Skip to content
  • OpenHardware.io
  • Categories
  • Recent
  • Tags
  • Popular
Skins
  • Light
  • Brite
  • Cerulean
  • Cosmo
  • Flatly
  • Journal
  • Litera
  • Lumen
  • Lux
  • Materia
  • Minty
  • Morph
  • Pulse
  • Sandstone
  • Simplex
  • Sketchy
  • Spacelab
  • United
  • Yeti
  • Zephyr
  • Dark
  • Cyborg
  • Darkly
  • Quartz
  • Slate
  • Solar
  • Superhero
  • Vapor

  • Default (No Skin)
  • No Skin
Collapse
Brand Logo
Matt PittsM

Matt Pitts

@Matt Pitts
  • Getting Started
  • Controller
  • Build
  • Hardware
  • Download/API
  • Forum
  • Store
About
Posts
38
Topics
10
Shares
0
Groups
0
Followers
0
Following
1

Posts

Recent Best Controversial

  • How To: Make a Simple/Cheap Scene Controller (with video)
    Matt PittsM Matt Pitts

    @rechin304 said:

    @Matt-Pitts on 3 is short press and in code is scene on and on long press is 7 scene off

    MyMessage scene(KEYPAD_CHILD_ID, V_SCENE_ON); //scene ON
    MyMessage scene2(KEYPAD_CHILD_ID, V_SCENE_OFF); //scene OFF
    
    
            send(scene2.set(keyInt));
          } else {
          send(scene.set(keyInt));```
    

    Hi Not sure if that helps me, I'm struggling to understand how this actually works? as I said the only button doing anything is 3, do I need to modify the sketch to get the other buttons working?

    My Project

  • How To: Make a Simple/Cheap Scene Controller (with video)
    Matt PittsM Matt Pitts

    Hi Guys,

    I'm so glad that have updated the sketch which i have now been able to compile and get running :-)

    But this is the message I get in the serial monitor and I only get these messages when I press button 3?? I am using a single row of four buttons as in the original sketch.

    Am I missing something here? I was assuming the message with either be a 1 for a short press and 0 for a long press? I would be really grateful if someone who knows more about this than me is able to help me figure out what's going on?

    TSP:MSG:SEND 11-11-0-0 s=95,c=1,t=19,pt=2,l=2,sg=0,ft=0,st=ok:3
    TSP:MSG:SEND 11-11-0-0 s=95,c=1,t=19,pt=2,l=2,sg=0,ft=0,st=ok:7
    TSP:MSG:SEND 11-11-0-0 s=95,c=1,t=19,pt=2,l=2,sg=0,ft=0,st=ok:7
    TSP:MSG:SEND 11-11-0-0 s=95,c=1,t=19,pt=2,l=2,sg=0,ft=0,st=ok:3
    TSP:MSG:SEND 11-11-0-0 s=95,c=1,t=19,pt=2,l=2,sg=0,ft=0,st=ok:7
    TSP:MSG:SEND 11-11-0-0 s=95,c=1,t=19,pt=2,l=2,sg=0,ft=0,st=ok:7
    TSP:MSG:SEND 11-11-0-0 s=95,c=1,t=19,pt=2,l=2,sg=0,ft=0,st=ok:7
    TSP:MSG:SEND 11-11-0-0 s=95,c=1,t=19,pt=2,l=2,sg=0,ft=0,st=ok:3
    TSP:MSG:SEND 11-11-0-0 s=95,c=1,t=19,pt=2,l=2,sg=0,ft=0,st=ok:3
    TSP:MSG:SEND 11-11-0-0 s=95,c=1,t=19,pt=2,l=2,sg=0,ft=0,st=ok:3
    TSP:MSG:SEND 11-11-0-0 s=95,c=1,t=19,pt=2,l=2,sg=0,ft=0,st=ok:7
    TSP:MSG:SEND 11-11-0-0 s=95,c=1,t=19,pt=2,l=2,sg=0,ft=0,st=ok:7
    TSP:MSG:SEND 11-11-0-0 s=95,c=1,t=19,pt=2,l=2,sg=0,ft=0,st=ok:7
    TSP:MSG:SEND 11-11-0-0 s=95,c=1,t=19,pt=2,l=2,sg=0,ft=0,st=ok:7
    TSP:MSG:SEND 11-11-0-0 s=95,c=1,t=19,pt=2,l=2,sg=0,ft=0,st=ok:3
    TSP:MSG:SEND 11-11-0-0 s=95,c=1,t=19,pt=2,l=2,sg=0,ft=0,st=ok:3
    TSP:MSG:SEND 11-11-0-0 s=95,c=1,t=19,pt=2,l=2,sg=0,ft=0,st=ok:3
    
    
    My Project

  • How To: Make a Simple/Cheap Scene Controller (with video)
    Matt PittsM Matt Pitts

    Hi Guys,

    I've been trying to compile this sketch without any success. I keep getting the following error when compiling

    #error No forward link or gateway feature activated. This means nowhere to send messages! Pretty pointless.
    

    Can anyone help? thanks

    My Project

  • LM393 Light Sensor Readings
    Matt PittsM Matt Pitts

    @mfalkvidd so what your saying is it's working correctly?

    Troubleshooting

  • LM393 Light Sensor Readings
    Matt PittsM Matt Pitts

    Hi There,

    I have just setup the mysensors LM393 Light Sensor in the hope I can use the readings it generates to control when my house light switch on and off.

    I'm a little unclear about the readings that the sensor is currently generating. I have setup exactly as described in the mysensors Light Sensor example.

    Initally I only got these reading in the serial monitor, then I shone a torch into the sensor and got the higher readings, It is my understanding that the sensor should read high in the dark and low in the light? is that correct? so I don't really understand why it read higher when I shone the torch on it, can someone explain, or is something wrong with my sensor?

    0
    0
    0
    96
    TSP:MSG:SEND 16-16-0-0 s=0,c=1,t=23,pt=2,l=2,sg=0,ft=0,st=ok:96
    96
    96
    96
    96
    43
    TSP:MSG:SEND 16-16-0-0 s=0,c=1,t=23,pt=2,l=2,sg=0,ft=0,st=ok:43
    96
    TSP:MSG:SEND 16-16-0-0 s=0,c=1,t=23,pt=2,l=2,sg=0,ft=0,st=ok:96
    0
    TSP:MSG:SEND 16-16-0-0 s=0,c=1,t=23,pt=2,l=2,sg=0,ft=0,st=ok:0
    
    Troubleshooting

  • IR Sensor How to Use Manual codes
    Matt PittsM Matt Pitts

    Thanks @blacey I'll give that a go tomorow and report back, really appreciate you pointing me in the right direction

    Troubleshooting

  • IR Sensor How to Use Manual codes
    Matt PittsM Matt Pitts

    OK I used the sketch directly from Github and got these values, but not sure what to do with them now? There seem to be little in the way of instructions for how to set this up?

    power on - UNKONWN C75375AC
    power off - UNKONWN 52E87F1D
    source up - UNKONWN 5E467F07
    source down - UNKONWN 5299205C
    vol up - UNKONWN 8086D9D7
    vol up - UNKONWN 8086D9D7

    Troubleshooting

  • IR Sensor How to Use Manual codes
    Matt PittsM Matt Pitts

    Hi I've just tried recording one button press IR value from my remote and this if what I get in the serial monitor, which does make much sense to me, can someone help out here??

    Decoded Unknown: Value:0 (0 bits)
    Raw samples(100): Gap:34750
    Head: m450 s3500
    0:m250 s3450 1:m250 s3450 2:m250 s3450 3:m200 s3500
    4:m200 s3500 5:m200 s3500 6:m150 s3500 7:m200 s3500
    8:m200 s3500 9:m200 s3500 10:m200 s3500 11:m200 s3500
    12:m200 s3450 13:m250 s3450 14:m250 s3450 15:m200 s3550

    16:m200 s3500 17:m200 s3500 18:m200 s3500 19:m250 s3500
    20:m200 s3500 21:m250 s3450 22:m250 s3500 23:m200 s3500
    24:m200 s3500 25:m250 s3500 26:m200 s3500 27:m250 s3450
    28:m250 s3500 29:m250 s3450 30:m250 s3450 31:m250 s3500

    32:m250 s3450 33:m250 s3450 34:m250 s3500 35:m200 s3500
    36:m250 s3450 37:m250 s3500 38:m250 s3450 39:m250 s3500
    40:m250 s3450 41:m250 s3500 42:m250 s3450 43:m250 s3500
    44:m200 s3500 45:m250 s3500 46:m250 s3450 47:m250 s3500

    48:m250
    Extent=182350
    Mark min:150 max:250
    Space min:3450 max:3550

    TSP:MSG:SEND 4-4-0-0 s=3,c=1,t=24,pt=0,l=8,sg=0,ft=0,st=ok:00000000
    Decoded Unknown: Value:0 (0 bits)
    Raw samples(2): Gap:5750
    Head: m300 s3500

    Extent=3800
    Mark min:32767 max:0
    Space min:32767 max:0

    TSP:MSG:SEND 4-4-0-0 s=3,c=1,t=24,pt=0,l=8,sg=0,ft=0,st=ok:00000000

    Troubleshooting

  • IR Sensor How to Use Manual codes
    Matt PittsM Matt Pitts

    Hi There,

    I'm planning to use the IR sketch to try and control my NAD Amp. I have found the the IR codes for the Amp on their website http://nadelectronics.com/download-agree/131121131849-D3020_remote_codes.pdf|D 3020 Remote Codes

    But I'm unclear how I translate this into the sketch, as they look somewhat different to the examples that are already in the IR Sensor sketch.

    If anyone is able to point me in the right direction that would be much appreciated, Thanks

    Troubleshooting

  • W5100 MQTT gateway fails to connect to broker
    Matt PittsM Matt Pitts

    It was a silly mistake, I have forgotten to uncomment the username and password, its working now :-)

    Troubleshooting

  • W5100 MQTT gateway fails to connect to broker
    Matt PittsM Matt Pitts

    I have always found everyone on this forum generally really helpful, so I'm hoping some will be able to help me solve my problem. I have recently been testing Home Assistant and I'm now trying to get mysenors up and running with it.

    I already have the latest verison of mosquitto up and running on my RPI without any problems and I've been able to publish and subcribe to topics, so I know its working OK.

    I have just compiled and uploaded the default W5100 MQTT gateway sketch and altered the various settings and when I restart the arduino I get the following in the serial monitor

    IP: 192.ting MQTT connection...
    IP: 192.168.0.87
    0;255;3;0;9;Attempting MQTT connection...
    0;255;3;0;9;Starting gateway (RNNGA-, 2.0.0)
    0;255;3;0;9;TSM:INIT
    0;255;3;0;9;TSM:RADIO:OK
    0;255;3;0;9;TSM:GW MODE
    0;255;3;0;9;TSM:READY
    IP: 192.168.0.87
    0;255;3;0;9;No registration required
    0;255;3;0;9;Init complete, id=0, parent=0, distance=0, registration=1
    IP: 192.168.0.87
    0;255;3;0;9;Attempting MQTT connection...
    IP: 192.168.0.87
    

    So the gateway is never able to connect to the MQTT broker. I have double checked everything and restarted, recomplied and still no luck. Am I missing something obvious, Any help would be very much appreciated

    Troubleshooting

  • Relay Help - Nothing Happens
    Matt PittsM Matt Pitts

    @martinhjelmare Thanks for your input, I have finally got the relay working based on your example :-)

    Thanks for your explanation of the topic structure? I'm still struggling to understand the mqtt topic structre is there somewhere I can read a good explanation?

    I can see how you work out the prefix node_id and child_id but how do I know or work out message type ack and message_subtype?

    I just want to understand this better for future reference.

    Switch mqttsw1               "Test Switch"   (Bedroom)    {mqtt=">[matt_broker:mygateway1-in/40/1/1/0/2:command:ON:1],>[matt_broker:mygateway1-in/40/1/1/0/2:command:OFF:0]"}
    
    Troubleshooting

  • Relay connection with MQTT?
    Matt PittsM Matt Pitts

    @George-Whitehouse I've just seen your post about getting the correct message from openhab, I'm also having the same problem getting the relay to switch from within openhab.

    Could you share the openhab item you actually got working? Thanks very much

    OpenHAB

  • Relay Help - Nothing Happens
    Matt PittsM Matt Pitts

    Hi @Boots33 This is starting to drive my a little crazy, I've managed to get lots of other mysenors working without this much trouble!! I feel like a bit of a failure at this point.

    Yes I tried @hek simple sketch which makes the relay switch on and off contiunously, so it must be wired up correctly.

    I'm not sure what the debug lines should look like?? The following appears in the serial monitor as soon as I switch on the nano

    send: 40-40-0-0 s=255,c=3,t=15,pt=2,l=2,sg=0,st=ok:0
    send: 40-40-0-0 s=255,c=0,t=18,pt=0,l=5,sg=0,st=fail:1.5.4
    send: 40-40-0-0 s=255,c=3,t=6,pt=1,l=1,sg=0,st=ok:0
    repeater started, id=40, parent=0, distance=1
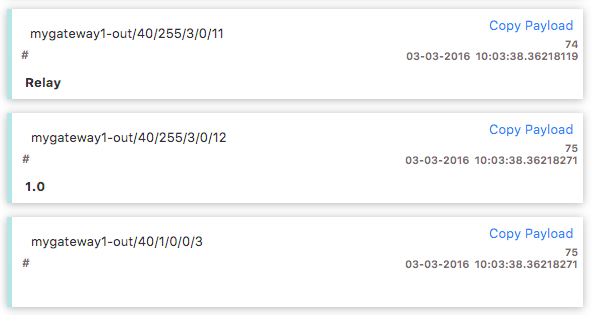
    send: 40-40-0-0 s=255,c=3,t=11,pt=0,l=5,sg=0,st=ok:Relay
    send: 40-40-0-0 s=255,c=3,t=12,pt=0,l=3,sg=0,st=ok:1.0
    send: 40-40-0-0 s=1,c=0,t=3,pt=0,l=0,sg=0,st=ok:
    

    I was expecting the last send to have a something after the ok: or is that normal?

    I'm not clear as to which topic I need to send the commands to, which I think is part of the problem?

    Here's the code I have been using in my openhab items file which defiantly sends the commands to the broker as I see them appear in MQTT fx,

    Switch Testlight               "Test switch"   (Bedroom)    {mqtt=">[matt_broker:mygateway1-in/40/1/0/0/3:command:ON:1],>[matt_broker:mygateway1-in/40/1/0/0/3:command:OFF:0]"} 
    

    but as to which topic they need to go to I'm still stuck. Although I have tried all the ones that appear in the broker and none of them will switch the relay. Am I missing something really obvious here!!

    Troubleshooting

  • Relay Help - Nothing Happens
    Matt PittsM Matt Pitts

    @hek sorry I don't really understand what you mean? I'm using openhab and my messages are being send to the topic from openhab via my mosquito broker.

    I have mqtt fx subscribed to all topics so I can see incoming and outgoing messages.

    The messages in my previous post came from the relay node when I powered it on.

    The question is which of those topics should I be sending my on off commands to? I also want to understand the messages.

    The 1st message from the node is just stating 'node' which I assume just confirms that node is there?

    The second message just states '1.0' I assume this is the sketch version?

    The third message is blank but I assume this should show the state of the relay ie either 0 or 1. Is that correct?

    So based in that logic I have been sending my commands to the last tooic, but I also tried all the others just in case. But none will switch the relay.

    Is this correct

    Troubleshooting

  • Relay Help - Nothing Happens
    Matt PittsM Matt Pitts

    I'm still struggling with my relay just thought i would share the serial monitor output

    YoU will see the last 4 messages are me sending on off commands

    send: 40-40-0-0 s=255,c=3,t=15,pt=2,l=2,sg=0,st=ok:0
    send: 40-40-0-0 s=255,c=0,t=18,pt=0,l=5,sg=0,st=fail:1.5.4
    send: 40-40-0-0 s=255,c=3,t=6,pt=1,l=1,sg=0,st=ok:0
    repeater started, id=40, parent=0, distance=1
    send: 40-40-0-0 s=255,c=3,t=11,pt=0,l=5,sg=0,st=ok:Relay
    send: 40-40-0-0 s=255,c=3,t=12,pt=0,l=3,sg=0,st=ok:1.0
    send: 40-40-0-0 s=1,c=0,t=3,pt=0,l=0,sg=0,st=ok:
    read: 0-0-40 s=1,c=0,t=3,pt=0,l=1,sg=0:1
    read: 0-0-40 s=1,c=0,t=3,pt=0,l=1,sg=0:0
    read: 0-0-40 s=1,c=0,t=3,pt=0,l=1,sg=0:1
    read: 0-0-40 s=1,c=0,t=3,pt=0,l=1,sg=0:0
    

    Also when I try the simple sketch from @hek the relay works, so I'm stuck

    Here are the messa0_1456999660383_Screen Shot 2016-03-03 at 10.06.30.png gaes I get when I first power up the nano
    Troubleshooting

  • Relay Help - Nothing Happens
    Matt PittsM Matt Pitts

    Thanks @Boots33 and @hek I will give all those things a try in the morning.

    Troubleshooting

  • Relay Help - Nothing Happens
    Matt PittsM Matt Pitts

    @Boots33 thanks, I'm using the sketch unaltered. When I check the serial monitor I can see the messages coming in 0 and 1 so I know the connection to the broker and therefore the radio must be working right? otherwise the messages wouldn't show up on the serial monitor right? also I see st:OK in the monitor which means messages are being delivered, is that right?

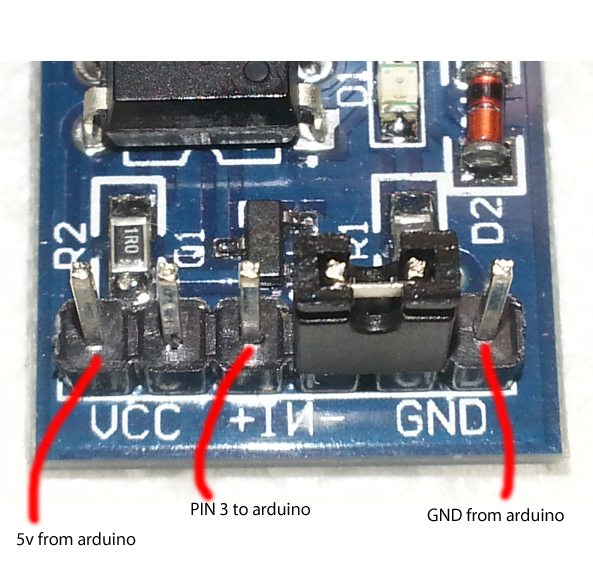
    Weirdly though I thought that once I connected 5v from the arduino to VCC and GND to GND the relay would power up, but this doesn't happen?? The relay only powers up when I connect the pin 3 to the relay. In fact it I connect the 5V from the arduino to the +IN that also powers the relay. Sorry I'm relatively new to all this and only have a very basic understanding so apologies for so many questions.

    I'm wondering if I need to alter the sketch in some way?? My current pin connections are show below in the photo. If I remove the jumper the relay doesn't work at all??

    0_1456917851573_relay-pins.jpg

    Troubleshooting

  • Relay Help - Nothing Happens
    Matt PittsM Matt Pitts

    @Boots33 Thanks for your input, its much appreciated. I have connected 5v from the nano to VCC GND to GND pin on the nano and my arduino digital pin 3 to +IN

    When I do the above the LED on the relay lights up to I know its getting power and I hear it click when I initially power the whole thing up. I have also tested plugging into the power outlet and the light is on, so I know that power is getting through.

    But when I send the on off command from within my openhab setup I see the messages being published on my broker but they do not switch the relay on or off

    Troubleshooting

  • Relay Help - Nothing Happens
    Matt PittsM Matt Pitts

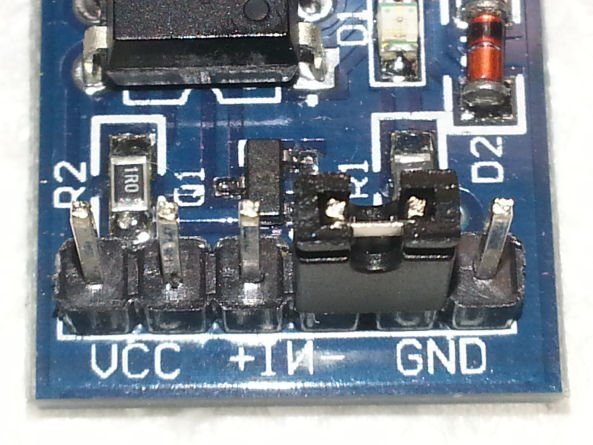
    Here are the pins on my relay, because there are multiple pins and the jumper i'm rather confused

    @Matt-Pitts 0_1456905894062_relay.jpg

    Troubleshooting
  • Login

  • Don't have an account? Register

  • Login or register to search.
  • First post
    Last post
0
  • OpenHardware.io
  • Categories
  • Recent
  • Tags
  • Popular