Can you share your code ?
Q
quocanhcgd
@quocanhcgd
Posts
-
Controlling speed of an AC 230v FAN. Help Needed[RESOLVED] -
AC Dimmer with OpenHabHere my code.
/*
AC Light Control
Uses up and down buttons to set levels
makes use of a timer interrupt to set the level of dimming
*/
#include <SPI.h>
#include <MySensor.h>
#include <TimerOne.h>
#include <Bounce2.h>
#define SN "AC Dimmer control"
#define SV "1.0"
#define NODE_ID 30  //change to a number to assign a specific ID
#define FADE_DELAY 100  // Delay in ms for each percentage fade up/down (10ms = 1s full-range dim)
#define FADE_PERCENTAGE 5 //The percentage the fade level will be changed when a button is pressed
volatile int i=0;               // Variable to use as a counter of dimming steps. It is volatile since it is passed between interrupts
volatile boolean zero_cross=0;  // Flag to indicate we have crossed zero
int AC_pin = 3;                 // Output to Opto Triac
int UP_BUTTON_PIN = 5;                 // Arduino Digital I/O pin number for the fade up button
int DOWN_BUTTON_PIN = 6;                 // Arduino Digital I/O pin number for the fade down button
int POWER_BUTTON_PIN = 7;                 // Arduino Digital I/O pin number for the power button

int freqStep = 75;              // This is the delay-per-brightness step in microseconds. It allows for 128 steps
                                // If using 60 Hz grid frequency set this to 65
MySensor gw;
//Tuy chinh lai
static int currentLevel = 128;  // Current dim level...
uint8_t fadeLevel = 128; //used to store the fade level when using the buttons
uint8_t upPreviousValue;
uint8_t downPreviousValue;
uint8_t powerPreviousValue;

Bounce upDebouncer = Bounce();
Bounce downDebouncer = Bounce();
Bounce powerDebouncer = Bounce();
MyMessage dimmerMsg(AC_pin, V_DIMMER);
MyMessage lightMsg(AC_pin, V_LIGHT);

unsigned long previousMillis = 0; // last time update
unsigned long upPreviousMillis = 0;
unsigned long downPreviousMillis = 0;
unsigned long buttonFadeDelay = 200;

// =Het tuy chinh lai


void setup() {  // Begin setup
  Serial.begin(115200);
  /// - Setup Mysensors
  Serial.println( SN );
  gw.begin( incomingMessage,  NODE_ID, true);
  // Register the LED Dimmable Light with the gateway
  gw.present( 3, S_DIMMER );

  gw.sendSketchInfo(SN, SV);
  // Pull the gateway's current dim level - restore light level upon sendor node power-up
  gw.request( 3, V_DIMMER );
  // - Het setup mysensors
  //Setup the button
  /*pinMode(buton1, INPUT);  // set buton1 pin as input
  pinMode(buton2, INPUT);  // set buton1 pin as input
  pinMode(buton3, INPUT);  // set buton1 pin as input*/
     // Setup the button
  pinMode(UP_BUTTON_PIN,INPUT);
  pinMode(DOWN_BUTTON_PIN,INPUT);
  pinMode(POWER_BUTTON_PIN,INPUT);

  // Activate internal pull-up
  digitalWrite(UP_BUTTON_PIN,LOW);
  digitalWrite(DOWN_BUTTON_PIN,LOW);
  digitalWrite(POWER_BUTTON_PIN,LOW);

  // After setting up the button, setup debouncer
  upDebouncer.attach(UP_BUTTON_PIN);
  downDebouncer.attach(DOWN_BUTTON_PIN);
  powerDebouncer.attach(POWER_BUTTON_PIN);
  upDebouncer.interval(5);
  downDebouncer.interval(5);
  powerDebouncer.interval(5);

  //Setup AC PIN
  pinMode(AC_pin, OUTPUT);                          // Set the Triac pin as output
  attachInterrupt(0, zero_cross_detect, RISING);    // Attach an Interupt to Pin 2 (interupt 0) for Zero Cross Detection
  Timer1.initialize(freqStep);                      // Initialize TimerOne library for the freq we need
  Timer1.attachInterrupt(dim_check, freqStep);      // Go to dim_check procedure every 75 uS (50Hz)  or 65 uS (60Hz)
  // Use the TimerOne Library to attach an interrupt

}

void zero_cross_detect() {
  zero_cross = true;               // set flag for dim_check function that a zero cross has occured
  i=0;                             // stepcounter to 0.... as we start a new cycle
  digitalWrite(AC_pin, LOW);
}

// Turn on the TRIAC at the appropriate time
// We arrive here every 75 (65) uS
// First check if a flag has been set
// Then check if the counter 'i' has reached the dimming level
// if so.... switch on the TRIAC and reset the counter
void dim_check() {
  if(zero_cross == true) {
    if(i>=fadeLevel) {
      digitalWrite(AC_pin, HIGH);  // turn on light
      i=0;  // reset time step counter
      zero_cross=false;    // reset zero cross detection flag
    }
    else {
      i++;  // increment time step counter
    }
  }
}

void loop() {
    gw.process();
    /*
There are 3 buttons attached to the mirror.  One is an on/off button and the other two will fade up/fade down.
The sensor will remember the last fade state and fade the lights to that level next time they are turned on.

If fade up or fade down button is pressed it should store that value into a variable and when the ON button is pressed
it will fade to that previous value.
 */
 //up button
  upDebouncer.update();
    // Get the update value
    uint8_t upValue = upDebouncer.read();

    unsigned long upCurrentMillis = millis();

    if(upCurrentMillis - upPreviousMillis > buttonFadeDelay){
      if ((upValue == HIGH) && (fadeLevel<128)) { //Because of the internal pullup resistors LOW = button is presssed
           fadeLevel = fadeLevel < 8 ? 0 : fadeLevel;
           if (fadeLevel > 8)
          { fadeLevel -= (FADE_PERCENTAGE * 1.28);
        } else {
          fadeLevel = 8;
        }
           fadeToLevel( fadeLevel );
           Serial.println(fadeLevel);
      }
      upPreviousMillis = upCurrentMillis;
    }

 // down button
 downDebouncer.update();
    // Get the update value
    uint8_t downValue = downDebouncer.read();

    unsigned long downCurrentMillis = millis();

    if(downCurrentMillis - downPreviousMillis > buttonFadeDelay){
      if ((downValue == HIGH) && (fadeLevel>0)) {
         fadeLevel += (FADE_PERCENTAGE * 1.28);
         fadeLevel = fadeLevel > 128 ? 121 : fadeLevel;
         fadeToLevel( fadeLevel );
         Serial.println(fadeLevel);
      }
      downPreviousMillis = downCurrentMillis;
    }
 // Power button
 powerDebouncer.update();
    // Get the update value
    uint8_t powerValue = powerDebouncer.read();

    if(powerValue != powerPreviousValue){
      if (powerValue == HIGH) {
      Serial.print("Power Button Pressed. fadeLevel is ");
      Serial.println(fadeLevel);

        if (currentLevel < 128) {

         fadeToLevel( 128 );
         fadeLevel = 128;
        }
        else{
          if (fadeLevel == 128) {
            fadeToLevel(64);
            fadeLevel = 64;
          }
          else{
            fadeToLevel(fadeLevel);
          }
        }
      }
      powerPreviousValue = powerValue;
    }

}
void incomingMessage(const MyMessage &message) {
  if (message.type == V_LIGHT || message.type == V_DIMMER) {

    //  Retrieve the power or dim level from the incoming request message
    int requestedLevel = atoi( message.data );

    // Adjust incoming level if this is a V_LIGHT variable update [0 == off, 1 == on]
    requestedLevel *= ( message.type == V_LIGHT ? 100 : 1 );

    // Clip incoming level to valid range of 0 to 100
    requestedLevel = requestedLevel > 100 ? 100 : requestedLevel;
    requestedLevel = requestedLevel < 0   ? 0   : requestedLevel;


    float percent_level;
    percent_level = 128 - (requestedLevel * 1.28);
    fadeToLevel( percent_level );
     Serial.print( "Changing level to " );
    Serial.print( requestedLevel );
    Serial.print( ", from " );
    Serial.println( currentLevel );
    // Inform the gateway of the current DimmableLED's SwitchPower1 and LoadLevelStatus value...
    gw.send(lightMsg.set(currentLevel > 0 ? 1 : 0));

    // hek comment: Is this really nessesary?
    gw.send( dimmerMsg.set(currentLevel) );


    }
}

/***
 *  This method provides a graceful fade up/down effect
 */
void fadeToLevel( int toLevel ) {
  Serial.print("toLevel Value: ");
 Serial.println(toLevel);


  int delta = ( currentLevel - toLevel ) < 0 ? 1 : -1;
  Serial.print("delta Value: ");
 Serial.println(delta);
  while ( currentLevel != toLevel ) {
    currentLevel += delta;
   // analogWrite( MIRROR_LED_PIN, (int)(currentLevel / 100. * 255) );
    delay( FADE_DELAY );

     fadeLevel = toLevel;
  }

   // Inform the gateway of the current DimmableLED's SwitchPower1 and LoadLevelStatus value...
// gw.send(lightMsg.set(currentLevel > 0 ? 1 : 0));  //used to send status of light (on/off) to Vera
  gw.send( dimmerMsg.set((int)currentLevel/100*128) );

}
OpenHab item
Dimmer Dimmed_Light "Dimmer Light [%d %%]" <slider> (all,node1) { mqtt=">[mymqtt:/MyMQTT/30/3/V_DIMMER:state:*:default]" }Openhab sitemap
Slider item=Dimmed_LightOpenhab Rules
/**
 * This is a demo rule which simulates a real dimmer by reacting to increase/decrease commands
 * and posting an updated state on the bus
 */
rule "Dimmed Light"
	when
		Item Dimmed_Light received command
	then
		var Number percent = 100
		if(Dimmed_Light.state instanceof DecimalType) percent = Dimmed_Light.state as DecimalType

		if(receivedCommand==INCREASE) percent = percent + 5
		if(receivedCommand==DECREASE) percent = percent - 5

		if(percent<0)   percent = 0
		if(percent>100) percent = 100

		postUpdate(Dimmed_Light, percent);
end
I have a problem:
When i use fade up or fade down , openhab don't receive a value. But i use the fade up and fade down from openhab to AC module , the light dimmer okie.
How can i fix it ?
Thanks -
Scene ControllerCan i use Arduino Uno to make scene controller? If okie, please teach me to do it? thanks
-
My Ideal sensor node PCB@Bandra said:
Just for completeness, my PCBs came in and I've had a chance to solder them up. The PCBs are really nice. iTead have done a great job. @Zeph, turns out that I didn't need to cut my PCBs because the friendly folk at iTead cut them for me.
Here's a photo of a few things soldered on:
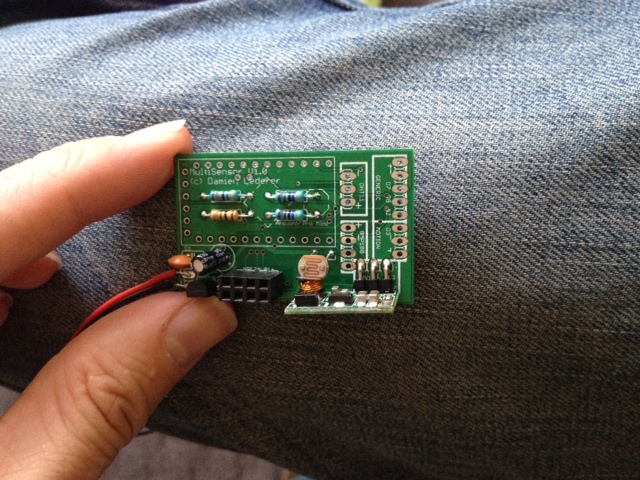
Underneath the APM I have a 1M and 470K resistors for the battery voltage check. There's also a 4.7K resistor for the Dallas DS18B20 temp sensor. Finally there's a 4.7K resistor for the LDR divider circuit.
You can also see the 4x2 header for the radio, the LDR itself, and the 3.3v step-up converter.
Here's the (almost) finished package:
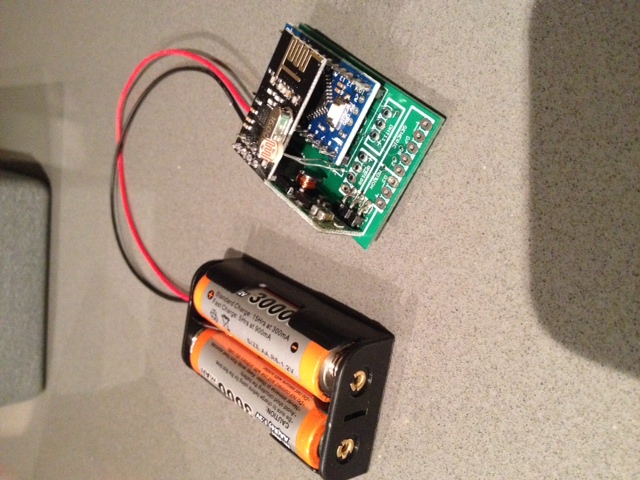
You can see all the exposed solder pads for my various sensor configurations (motion, humidity, baro pressure, door reed switch, distance and soil moisture).
The range on the nRF24 is fine. I put my gateway at one end of the apartment and it easily picked up my sensor at the other end of the apartment (about 10m away through two thick internal walls). So I'm not worried about the nRF24 being parallel to the GND plane.
I actually took off the 4.7uF cap. It's probably my PCB (don't think the auto-route did a great job of it) but it made the radio flaky. Works just fine without it.
Now to find a box to put it in...
Can you share your board to me,pls? Im newbie. Pls email to me quocanhcgd@gmail.com Thanks
-
Multi Button Relay switchI activated this line but no result. may be openhab work wrong? What the controller you use?
@jeylites said:You will need to activate this line
pinMode(Relays[i].relayPin, OUTPUT);It should work right after.
-
Multi Button Relay switchThanks for sharing.
I have a problem with this scripts. My relay auto start then off every gateway check node. How can i fix it?
Thanks -
6 Way wall touch switch@ferpando said:
LedControlMS
Can you share to me your project, pls?
How to cônnect 6 buttons with 6 leds?
sorry i newbie.
Thanks -
OpenHAB/MQTT Tips & HintsMy house have 4 floor, i have plan build one gateway for each floor. Each floor has 4-5 sensors (temp, hum, relay, light, door, RF light). Each sensors use NRF24 to connect with gateway. Gateway connect to RAS by ethernet.
My question:- Can i build 2 gateway mqtt connect to openhab?
if not, what my solution to solve ?
Thanks
- Can i build 2 gateway mqtt connect to openhab?