
Backlit Dimmable LED Mirror with Motion Sensor
-
Do you have the Fitzing and code for the 3 zone? I have several places to use this. Any "max wattage" info, per channel and total?
Thanks,
RichardSorry it has been too long since I made this video and I don't remember the reference. If you're talking about my Arduino that dims three separate lights it's basically just the same wiring except you use 3 different PWM pins to the 3 different MOSFETs. The max wattage is determined by the MOSFET you use.
If that's not what you're referring to, let me know.
-
Sorry it has been too long since I made this video and I don't remember the reference. If you're talking about my Arduino that dims three separate lights it's basically just the same wiring except you use 3 different PWM pins to the 3 different MOSFETs. The max wattage is determined by the MOSFET you use.
If that's not what you're referring to, let me know.
@petewill Yes that's what I'm talking about. Just wondering how the code was modified to discretely control the 3 zones.
-
@petewill Yes that's what I'm talking about. Just wondering how the code was modified to discretely control the 3 zones.
@csa02221862 said:
@petewill Yes that's what I'm talking about. Just wondering how the code was modified to discretely control the 3 zones.
you want with or without the buttons?
If with, how would the buttons work?
-
@petewill Yes that's what I'm talking about. Just wondering how the code was modified to discretely control the 3 zones.
@csa02221862 Sorry for the delayed reply. Busy day yesterday. Here is my code that I'm running in my 1.4.1/1.5 environment.
/*** * This program is free software; you can redistribute it and/or * modify it under the terms of the GNU General Public License * version 2 as published by the Free Software Foundation. * * DESCRIPTION * This sketch provides a Dimmable LED Light using PWM and based Henrik Ekblad * <henrik.ekblad@gmail.com> Vera Arduino Sensor project. * Developed by Bruce Lacey, inspired by Hek's MySensor's example sketches. * * The circuit uses a MOSFET for Pulse-Wave-Modulation to dim the attached LED or LED strip. * The MOSFET Gate pin is connected to Arduino pin 3 (LED_PIN), the MOSFET Drain pin is connected * to the LED negative terminal and the MOSFET Source pin is connected to ground. * * This sketch is extensible to support more than one MOSFET/PWM dimmer per circuit. * * REVISION HISTORY * Version 1.0 - February 15, 2014 - Bruce Lacey * Version 1.1 - August 13, 2014 - Converted to 1.4 (hek) * Version 1.2 - January 22, 2015 - Created a seperate control for the basement LEDs * Version 1.3 - March 7, 2015 - Added coat closet LED * ***/ #define SN "Basement LEDs" #define SV "1.3" #include <MySensor.h> #include <SPI.h> #define NODE_ID AUTO //Change to a number to manually assign a node ID #define MASTER_WINDOW_LED_CHILD 0 #define COAT_CLOSET_LED_CHILD 1 #define UPSTAIRS_RAIL_LED_CHILD 30 #define BASEMENT_DESK_LED_CHILD 40 #define MASTER_WINDOW_LED_PIN 3 // Arduino pin attached to MOSFET Gate pin #define UPSTAIRS_RAIL_LED_PIN 5 #define BASEMENT_DESK_LED_PIN 6 #define COAT_CLOSET_LED_PIN 9 #define FADE_DELAY 10 // Delay in ms for each percentage fade up/down (10ms = 1s full-range dim) //MySensor gw; MySensor gw(4, 10); //Change CE PIN to free up another PWM pin static int currentLevelUpstairsRail = 0; static int currentLevelBasementDesk = 0; static int currentLevelMasterWinLight = 0; static int currentLevelCoatCloset = 0; /*** * Dimmable LED initialization method */ void setup() { Serial.println( SN ); gw.begin( incomingMessage, NODE_ID); // Register the LED Dimmable Light with the gateway gw.present(UPSTAIRS_RAIL_LED_CHILD, S_DIMMER ); gw.present(BASEMENT_DESK_LED_CHILD, S_DIMMER ); gw.present(MASTER_WINDOW_LED_CHILD, S_DIMMER ); gw.present(COAT_CLOSET_LED_CHILD, S_DIMMER ); gw.sendSketchInfo(SN, SV); } /*** * Dimmable LED main processing loop */ void loop() { gw.process(); } void incomingMessage(const MyMessage &message) { if (message.type == V_LIGHT || message.type == V_DIMMER) { // Retrieve the power or dim level from the incoming request message int requestedLevel = atoi( message.data ); // Adjust incoming level if this is a V_LIGHT variable update [0 == off, 1 == on] requestedLevel *= ( message.type == V_LIGHT ? 100 : 1 ); // Clip incoming level to valid range of 0 to 100 requestedLevel = requestedLevel > 100 ? 100 : requestedLevel; requestedLevel = requestedLevel < 0 ? 0 : requestedLevel; // Serial.print( "Changing level to " ); // Serial.println( requestedLevel ); //fadeToLevel( requestedLevel );//old code fadeToLevel( message.sensor, requestedLevel ); } } void fadeToLevel(int ledChild, int toLevel ) { // Serial.print( "In the FadeToLevel method. ChildID: " ); // Serial.println( ledChild ); int currentLevel; int ledPin; if(ledChild == UPSTAIRS_RAIL_LED_CHILD){ currentLevel = currentLevelUpstairsRail; ledPin = UPSTAIRS_RAIL_LED_PIN; } else if(ledChild == MASTER_WINDOW_LED_CHILD){ currentLevel = currentLevelMasterWinLight; ledPin = MASTER_WINDOW_LED_PIN; } else if(ledChild == COAT_CLOSET_LED_CHILD){ currentLevel = currentLevelCoatCloset; ledPin = COAT_CLOSET_LED_PIN; } else{ currentLevel = currentLevelBasementDesk; ledPin = BASEMENT_DESK_LED_PIN; } int delta = ( toLevel - currentLevel ) < 0 ? -1 : 1; while ( currentLevel != toLevel ) { currentLevel += delta; analogWrite(ledPin, (int)(currentLevel / 100. * 255) ); delay( FADE_DELAY ); // Serial.println( ledPin ); } if(ledChild == UPSTAIRS_RAIL_LED_CHILD){ currentLevelUpstairsRail = toLevel; } else if(ledChild == MASTER_WINDOW_LED_CHILD){ currentLevelMasterWinLight = toLevel; } else if(ledChild == COAT_CLOSET_LED_CHILD){ currentLevelCoatCloset = toLevel; } else{ currentLevelBasementDesk = toLevel; } //gw.sendVariable( ledChild, V_LIGHT, currentLevel > 0 ? 1 : 0 ); //gw.sendVariable( ledChild, V_DIMMER, currentLevel ); MyMessage dimmerMsg(ledChild, V_DIMMER); gw.send(dimmerMsg.set(currentLevel)); }``` -
Pete, thanks.
This will work for most situations I need. Is there an option to add the buttons and motion to one or more of the led's?
Hate to bother you again.
Richard
-
Pete, thanks.
This will work for most situations I need. Is there an option to add the buttons and motion to one or more of the led's?
Hate to bother you again.
Richard
@csa02221862 It should be possible but I never added it. This is in my basement controlling various lights throughout my house so I don't need buttons very often (when I do I just use my phone). The motion sensors are run through a different node and all the logic happens through my controller.
-
@petewill Thanks for an awesome write up, I just recently ran across it! I am trying to get it working and downloaded the 1.4 library and tried uploading the sketch to my pro mini and got the following error:
Sketch uses 18,642 bytes (130%) of program storage space. Maximum is 14,336 bytes.
Global variables use 633 bytes (61%) of dynamic memory, leaving 391 bytes for local variables. Maximum is 1,024 bytes.
processing.app.debug.RunnerException: Sketch too big; see http://www.arduino.cc/en/Guide/Troubleshooting#size for tips on reducing it.
at cc.arduino.Compiler.size(Compiler.java:315)
at cc.arduino.Compiler.build(Compiler.java:156)
at processing.app.Sketch.build(Sketch.java:1111)
at processing.app.Sketch.exportApplet(Sketch.java:1146)
at processing.app.Sketch.exportApplet(Sketch.java:1132)
at processing.app.Editor$DefaultExportHandler.run(Editor.java:2409)
at java.lang.Thread.run(Thread.java:745)
Sketch too big; see http://www.arduino.cc/en/Guide/Troubleshooting#size for tips on reducing it.Any suggestions on what I might be doing wrong? I am pretty new so I might be overlooking something really simple..
-
@petewill Thanks for an awesome write up, I just recently ran across it! I am trying to get it working and downloaded the 1.4 library and tried uploading the sketch to my pro mini and got the following error:
Sketch uses 18,642 bytes (130%) of program storage space. Maximum is 14,336 bytes.
Global variables use 633 bytes (61%) of dynamic memory, leaving 391 bytes for local variables. Maximum is 1,024 bytes.
processing.app.debug.RunnerException: Sketch too big; see http://www.arduino.cc/en/Guide/Troubleshooting#size for tips on reducing it.
at cc.arduino.Compiler.size(Compiler.java:315)
at cc.arduino.Compiler.build(Compiler.java:156)
at processing.app.Sketch.build(Sketch.java:1111)
at processing.app.Sketch.exportApplet(Sketch.java:1146)
at processing.app.Sketch.exportApplet(Sketch.java:1132)
at processing.app.Editor$DefaultExportHandler.run(Editor.java:2409)
at java.lang.Thread.run(Thread.java:745)
Sketch too big; see http://www.arduino.cc/en/Guide/Troubleshooting#size for tips on reducing it.Any suggestions on what I might be doing wrong? I am pretty new so I might be overlooking something really simple..
-
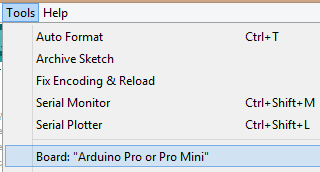
@loralg Are you sure you're choosing the Pro Mini from the Tools > Boards menu? It should have around 32,000 bytes not 14,336.
-
@petewill there are atmega168-based pro minis. Using them with MySensors is hard though, because of their small flash size.
-
@petewill @mfalkvidd After looking I have the 168.. I already have some more ordered that are the 328 though. I should have looked closer when I ordered the first batch. Thanks for the help! I figured it was probably something simple I had overlooked on my end.




Hello! It looks like you're interested in this conversation, but you don't have an account yet.
Getting fed up of having to scroll through the same posts each visit? When you register for an account, you'll always come back to exactly where you were before, and choose to be notified of new replies (either via email, or push notification). You'll also be able to save bookmarks and upvote posts to show your appreciation to other community members.
With your input, this post could be even better 💗
Register Login