ds18b20 on 2xAAA battery
-
i must admit you are lucky or your sensors dont care about voltage but at this stage after reading your comments i have tried 3 different sensors and all the same result
may be something is in my sketch ?
// _____ _ _ _ // | __ \ (_) | | | | // | |__) | _ | |__| | ___ _ __ ___ ___ // | ___/ | | | __ | / _ \ | |_ \_ \ / _ \ // | | | | | | | | | (_) | | | | | | | | __/ // |_| |_| |_| |_| \___/ |_| |_| |_| \___| // // S M A R T H E A T I N G C O N T R O L // ***************************************************************** // * Battery Powered OneWire DS18B20 Temperature Sensor * // * Version 0.31 Build Date 06/11/2017 * // * Last Modification Date 09/05/2019 * // * Have Fun - PiHome.eu * // ***************************************************************** // Enable debug prints to serial monitor //#define MY_DEBUG // Enable and select radio type attached #define MY_RADIO_RF24 //#define MY_RADIO_NRF5_ESB //#define MY_RADIO_RFM69 //#define MY_RADIO_RFM95 // Set LOW transmit power level as default, if you have an amplified NRF-module and // power your radio separately with a good regulator you can turn up PA level. // #define MY_RF24_PA_LEVEL RF24_PA_LOW // RF24_PA_MIN RF24_PA_LOW RF24_PA_HIGH RF24_PA_MAX RF24_PA_ERROR #define MY_RF24_PA_LEVEL RF24_PA_MIN //#define MY_DEBUG_VERBOSE_RF24 // RF channel for the sensor net, 0-127 Default is 76 #define MY_RF24_CHANNEL 76 //PiHome - Make Sure you change Node ID, for each temperature sensor. 21 for Ground Floor, 20 for First Floor, 30 for Domastic Hot Water. #define MY_NODE_ID 33 //RF24_250KBPS for 250kbs, RF24_1MBPS for 1Mbps, or RF24_2MBPS for 2Mbps #define RF24_DATARATE RF24_250KBPS // Set baud rate to same as optibot //#define MY_BAUD_RATE 9600 //set how long to wait for transport ready in milliseconds //#define MY_TRANSPORT_WAIT_READY_MS 3000 //#include <SPI.h> #include <MySensors.h> #include <DallasTemperature.h> #include <OneWire.h> #define ledpin 4 // LED for one Blink Power On, Solid LED for No sensors, 5 Blinks for no Radio (this settings is in MySensors.cpp) and three blinks for low battery // Define sensor node childs #define CHILD_ID_BATT 1 #define CHILD_ID_TEMP 0 #define COMPARE_TEMP 1 // Send temperature only if changed? 1 = Yes 0 = No #define COMPARE_BVOLT 1 // Send battery voltage only if changed? 1 = Yes 0 = No #define ONE_WIRE_BUS 3 // Pin where dallase sensor is connected #define MAX_ATTACHED_DS18B20 2 unsigned long SLEEP_TIME = 56000; // Sleep time between reads (in milliseconds) // Battery related init int BATTERY_SENSE_PIN = A0; // select the input pin for the battery sense point float oldBatteryV = 0; MyMessage msgBatt(CHILD_ID_BATT, V_VOLTAGE); // Dallas Temperature related init OneWire oneWire(ONE_WIRE_BUS); // Setup a oneWire instance to communicate with any OneWire devices (not just Maxim/Dallas temperature ICs) DallasTemperature sensors(&oneWire); // Pass the oneWire reference to Dallas Temperature. float lastTemperature[MAX_ATTACHED_DS18B20]; int numSensors=0; bool receivedConfig = false; bool metric = true; // Initialize temperature message MyMessage msg(CHILD_ID_TEMP, V_TEMP); void before(){ // Startup up the OneWire library sensors.begin(); } void setup(){ //This is LED pin set to output and turn it on for short while pinMode(ledpin, OUTPUT); digitalWrite(ledpin, HIGH); delay(60); digitalWrite(ledpin, LOW); // requestTemperatures() will not block current thread sensors.setWaitForConversion(false); // needed for battery soc // use the 1.1 V internal reference #if defined(__AVR_ATmega2560__) analogReference(INTERNAL1V1); #else analogReference(INTERNAL); #endif // disable ADC //ADCSRA = 0; //power_usart0_disable();// Serial (USART) //power_adc_disable(); // ADC converter //power_twi_enable(); // TWI (I2C) } void presentation() { // Send the sketch version information to the gateway and Controller sendSketchInfo("Temperature Sensor", "0.31"); // Fetch the number of attached temperature sensors numSensors = sensors.getDeviceCount(); //Blink LED as number of sensors attached blink_led(numSensors, ledpin); //check if attached sensors number is grater then 0 if no then put led on solid #if numSensors > 0 digitalWrite(ledpin, HIGH); #else digitalWrite(ledpin, LOW); #endif // Present all sensors to controller for (int i=0; i<numSensors && i<MAX_ATTACHED_DS18B20; i++) { present(i, S_TEMP); } } void loop(){ // get the battery Voltage //ref http://www.ohmslawcalculator.com/voltage-divider-calculator // Sense point is bypassed with 0.1 uF cap to reduce noise at that point // 1M, 100K divider across battery and using internal ADC ref of 1.1V // ((1e6+100e3)/100e3)*1.1 = Vmax = 12.1 Volts // 12.1/1023 = Volts per bit = 0.011828 //R1 820k, R2 220k //((820e3+220e3)/220e3)*1.1 = Vmax = 5.2 Volts //5.2/1023 = Volts per bit = 0.005083089 int battSensorValue = analogRead(BATTERY_SENSE_PIN); //float batteryV = battSensorValue * 0.005083089; //R1 820k, R2 220k divider across battery and using internal ADC ref of 1.1v float batteryV = battSensorValue * 0.011828; //R1 1M, R2 100K divider across battery and using internal ADC ref of 1.1v //int batteryPcnt = ( ( batteryV - 2.9 ) / ( ( 4.2 - 2.9 ) / 100 ) ); // for 18650 Battery Powred int batteryPcnt = ( ( batteryV - 2.1 ) / ( ( 3.0 - 2.1 ) / 100 ) ); // for AAA Battery Powered #ifdef MY_DEBUG Serial.print("Pin Reading: "); Serial.println(battSensorValue); Serial.print("Battery Voltage: "); Serial.print(batteryV); Serial.println(" v"); //Print Battery Percentage Serial.print("Battery percent: "); Serial.print(batteryPcnt); Serial.println(" %"); #endif #if COMPARE_BVOLT == 1 if (oldBatteryV != batteryV) { send(msgBatt.set(batteryV, 2)); sendBatteryLevel(batteryPcnt); oldBatteryV = batteryV; } #else send(msgBatt.set(batteryV, 2)); sendBatteryLevel(batteryPcnt); oldBatteryV = batteryV; #endif // Fetch temperatures from Dallas sensors sensors.requestTemperatures(); // query conversion time and sleep until conversion completed int16_t conversionTime = sensors.millisToWaitForConversion(sensors.getResolution()); //sleep() call can be replaced by wait() call if node need to process incoming messages (or if node is repeater) sleep(conversionTime); // Read temperatures and send them to controller for (int i=0; i<numSensors && i<MAX_ATTACHED_DS18B20; i++) { // Fetch and round temperature to one decimal float temperature = static_cast<float>(static_cast<int>((getControllerConfig().isMetric?sensors.getTempCByIndex(i):sensors.getTempFByIndex(i)) * 10.)) / 10.; // Only send data if temperature has changed and no error #if COMPARE_TEMP == 1 if (lastTemperature[i] != temperature && temperature != -127.00 && temperature != 85.00) { #else if (temperature != -127.00 && temperature != 85.00) { #endif // Send in the new temperature send(msg.setSensor(i).set(temperature,1)); // Save new temperatures for next compare lastTemperature[i]=temperature; } } //Condition to check battery levell is lower then minimum then blink led 3 times //if (batteryV < 2.9) { //for 18650 Battery Powered Sensor if (batteryV < 2.0) { //for AAA Battery Powered Sensor blink_led(3, ledpin); //Serial.print("Low Voltage"); } //go to sleep for while //smartSleep(SLEEP_TIME); sleep(SLEEP_TIME); } //Blink LED function, pass ping number and number of blinks usage: blink_led(variable or number of time blink, ledpin); void blink_led(int count, int pin){ for(int i=0;i<count;i++){ digitalWrite(pin, HIGH); delay(700); digitalWrite(pin, LOW); delay(700); } }@pihome Not sure why you are looking for a sketch problem if the issues don't arise >=3v?
That some folks have ds18b20 working below the specified minimum of 3v is pure luck, but even were you to source devices which could work down to say 2.8v, it still does not address their certain disfunction below it, particularly down to the 1.9v drop off voltage of your radio, which was your objective?
Your options are limited to swapping to a sensor (?) which works down to 1.9v, switch on/off a separate supply for the ds18b20, or run a full-time booster for the entire assembly to suck all life from your batteries. It is this latter scenario here, but designed and built by folks clever than I.
Very tempted after this to look at switching on/off the ds18b20 array's power and see how long it lasts on batteries aloe, perhaps a rainy day or winter project. -
@zboblamont,
yes you are right it is pure luck, i just wanted to check i m not doing anything stupid and said pair of eyes are always good. i have ordered the parts and i m going to work on two version: one with boost convert for sensor and second 3xAAA with voltage regulator and probably 3rd version (may be in future when i get some free time) with boost converter with shutdown, may be some one already have done this and my search string isnt very good to dig that out. -
further update:
while playing with 1mhz bootloader and feeding arduino to raw pin from 18650 battery, sensors is successfully sending battery voltage and battery percentage but no temperature sensor reading. to prove that something isnt right with 1mhz bootloader i burned 8mhz default bootloader i get battery voltage, battery percentage and temperature reading. can not think of something obvious :(Link to 1mhz bootloader
PiHome - Smart Heating Control
-
further update:
while playing with 1mhz bootloader and feeding arduino to raw pin from 18650 battery, sensors is successfully sending battery voltage and battery percentage but no temperature sensor reading. to prove that something isnt right with 1mhz bootloader i burned 8mhz default bootloader i get battery voltage, battery percentage and temperature reading. can not think of something obvious :(Link to 1mhz bootloader
-
@pihome No expert, but recall these one-wire devices have a digital communications protocol. As such they rely on accurate timing, hence your clock speed disrupts it?
@zboblamont might be on the right track. See https://github.com/arduino/Arduino/issues/7181 for a discussion on timing problems, especially at 1MHz
-
It appears that you during runtime can change prescale, so you should be able to change clock frequency to 8MHz when reading DS18B20 and after reading change clock back to 1MHz
-
@bjacobse
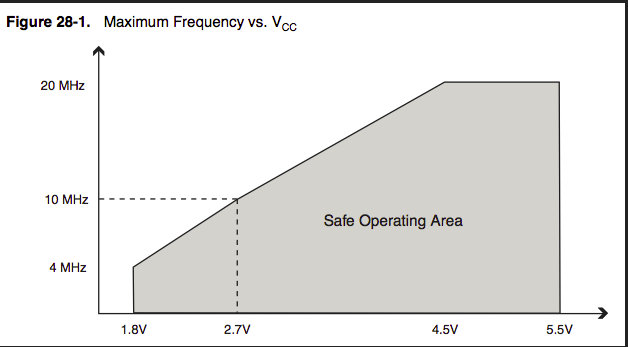
reason behind 1mhz mcu is to run it on lower voltage but switching between speed still need higher voltage. if i m not wrong!!! -
@bjacobse
reason behind 1mhz mcu is to run it on lower voltage but switching between speed still need higher voltage. if i m not wrong!!! -
Well then another approach is not to use DS18B20 :-)
Have you checked TMP117 price seems to be 2USD in higher qty, and supply range: 1.8 V to 5.5 Vhttp://www.ti.com/product/TMP117
And someone have made a lib to Arduino: https://github.com/NilsMinor/TMP117-Arduino
-
Hi, I'm on a somehow "comparable" (but very different scenario) project in terms of using same DS18B20 and arduino 3.3V, a mkr SAMD21 in my case, and trying to get the longer autonomy I can.
The best option I've seen so far seems to be to use the (best option) TPS61291 or (alternate option) TPS61221, as the first seems to be designed for this use cases, and the second has enable option to switch it off. All those seemed to me (newbie here) better than the TPS you indicate.
For my use case, the "low tech" option indicated by @mfalkvidd could fit very nicely, so I'll dig into that option.
-
just for reference, 4 out of 5 sensebender micros is still running strong, after 4 years on the same set of AA batteries, that they where deployed with.
The 5th sensebender is my outdoor sensor, that one eats a set of batteries within 48 hours.. But i suspect that it's the air humidity that has destroyed it.
I opted to use a Si7021 instead (there might be others that are better suited now), as it was better suited for low power operation, and runs down to 1.2V supply (if I remember right).