Rain Guage
-
Isn't it enough space in the foot for the electronics?
Or perhaps make foot a little bigger in v2.0 to fit it there ;)right!
While I want to keep the height low, I can modify the foot to include the whole of the electronica for sure. a radius of 4in provides a nice area for a lot of stuff.
plus, I was thinking about having the antenna at the bottom of the device...
good idea, thanks! It is better that we know that the tipping bucket will work (volumetrically) at this point.
time to get onto the rest of the physical design, I guess.
-
Thank you again!
- For the idea ( and when you think it is ready the files :)
- For the suggestion of 3dhubs.com I will certainly use it to make some money with my upcoming printer...
@marceltrapman said:
- For the suggestion of 3dhubs.com I will certainly use it to make some money with my upcoming printer...
Don't forget my "one free part referral" fee!!!
-
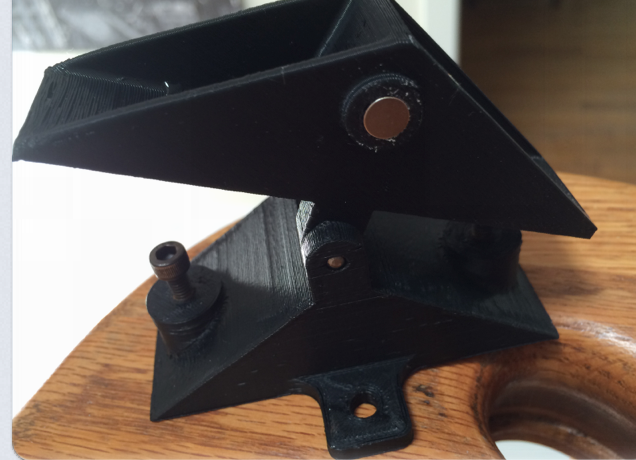
Neodymium magnet in and works fine. I had to clean out the countersink hole with a drill to get it in and used E6000 glue to hold it.
Now onto the hall effect sensor, wiring it up and of course the sketch.
The 123D Design file is also attached if anyone wants to make one, play with the design, make fun of it, etc. The .stl file is 13Mb, I can email that if you want.
If you want a print, let me know. I also have a few magnets and sensors, so I can send what you need for the project.
I think I'm going to design a housing for the electronics too. I'm not sure I can find the right project box for this (I really just want to print more parts :)
@BulldogLowell I have read about techniques to include the magnet while printing.
You can do that by designing a hole, stop the printer when the hole is about to be covered, insert the magnet and continue printing.I will think about you once the printer is there (a couple of months from now)...
Fulltime Servoy Developer
Parttime Moderator MySensors boardI use Domoticz as controller for Z-Wave and MySensors (previously Indigo and OpenHAB).
I have a FABtotum to print cases. -
@BulldogLowell I have read about techniques to include the magnet while printing.
You can do that by designing a hole, stop the printer when the hole is about to be covered, insert the magnet and continue printing.I will think about you once the printer is there (a couple of months from now)...
So, I managed to finish a sketch for the Rain Gauge.
It creates two devices:
- an information panel that displays last 24hours rain and the current rate of rain. along with 5 buckets of time so that you may see up to 5 days total rainfall.
It stores 24, 48, 72, 96 and 120 hrs rain in the Variable1-Variable5 respectively.
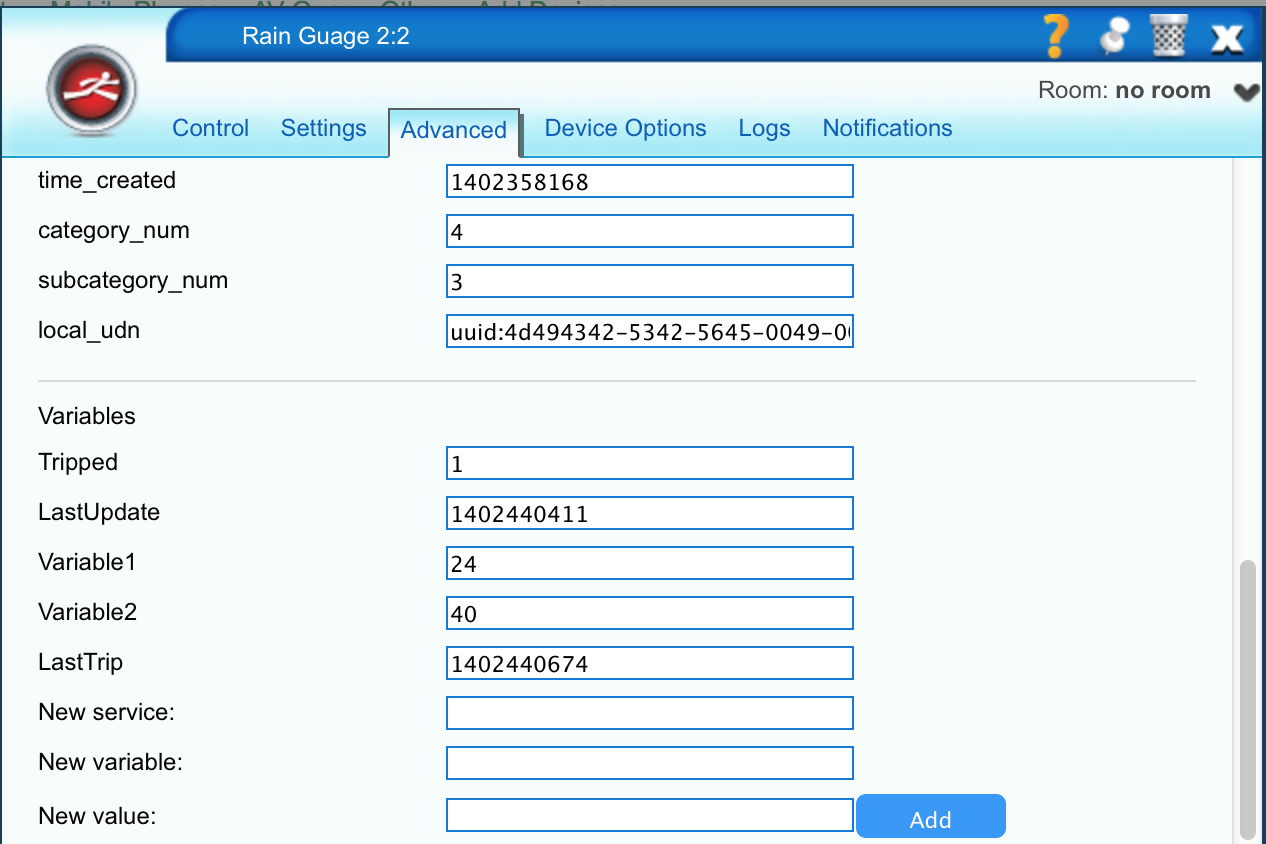
I customized the Rain Sensor to look more like a rain sensor and be more descriptive on the front panel, using the image from the moisture sensor, which I thought looked better. - a binary sensor that you can set. Put in the hours you wish to evaluate (1-120) and the rainfall you desire to trip the device. They are entered as Variable1 and Variable 2.
images attached, take a look and comments are appreciated.
I would like to do more with the presentation of the sensors on the vera UI... I'll do that after I get this all together, if I can.

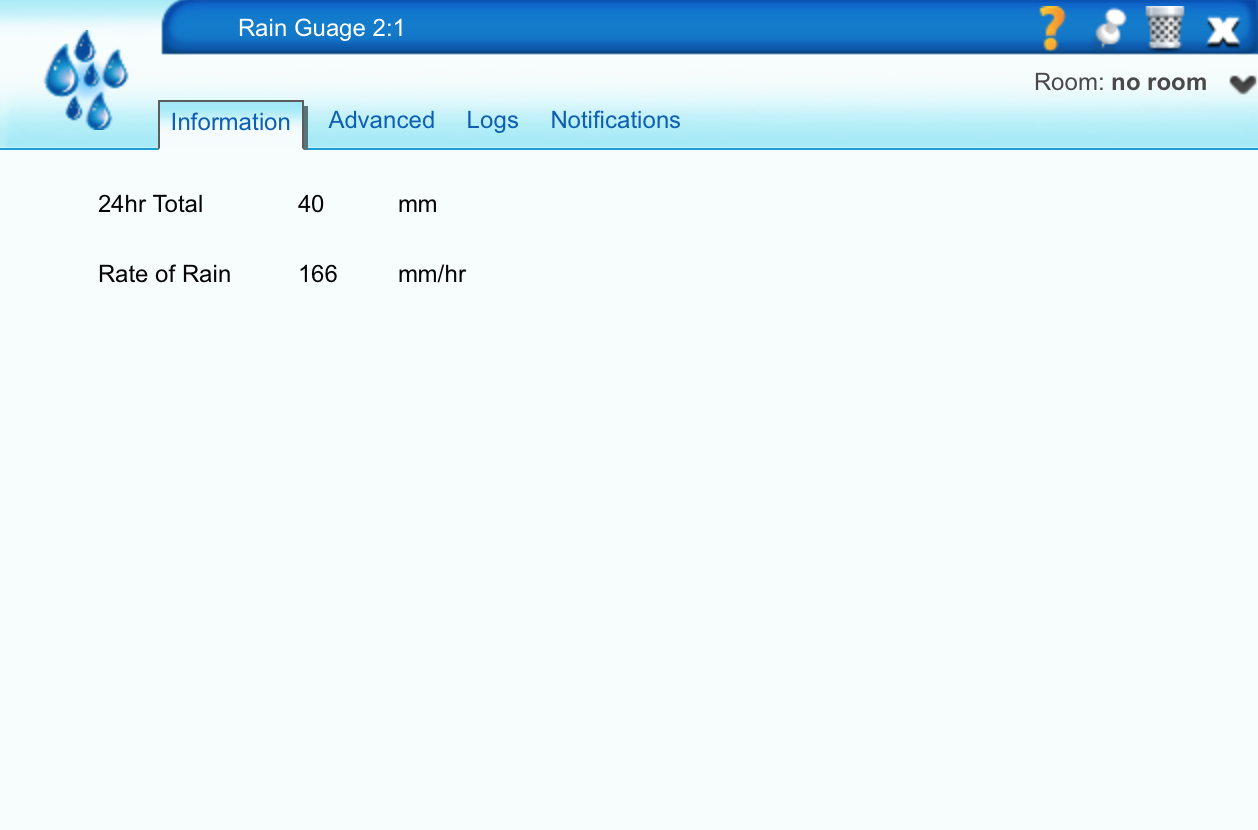
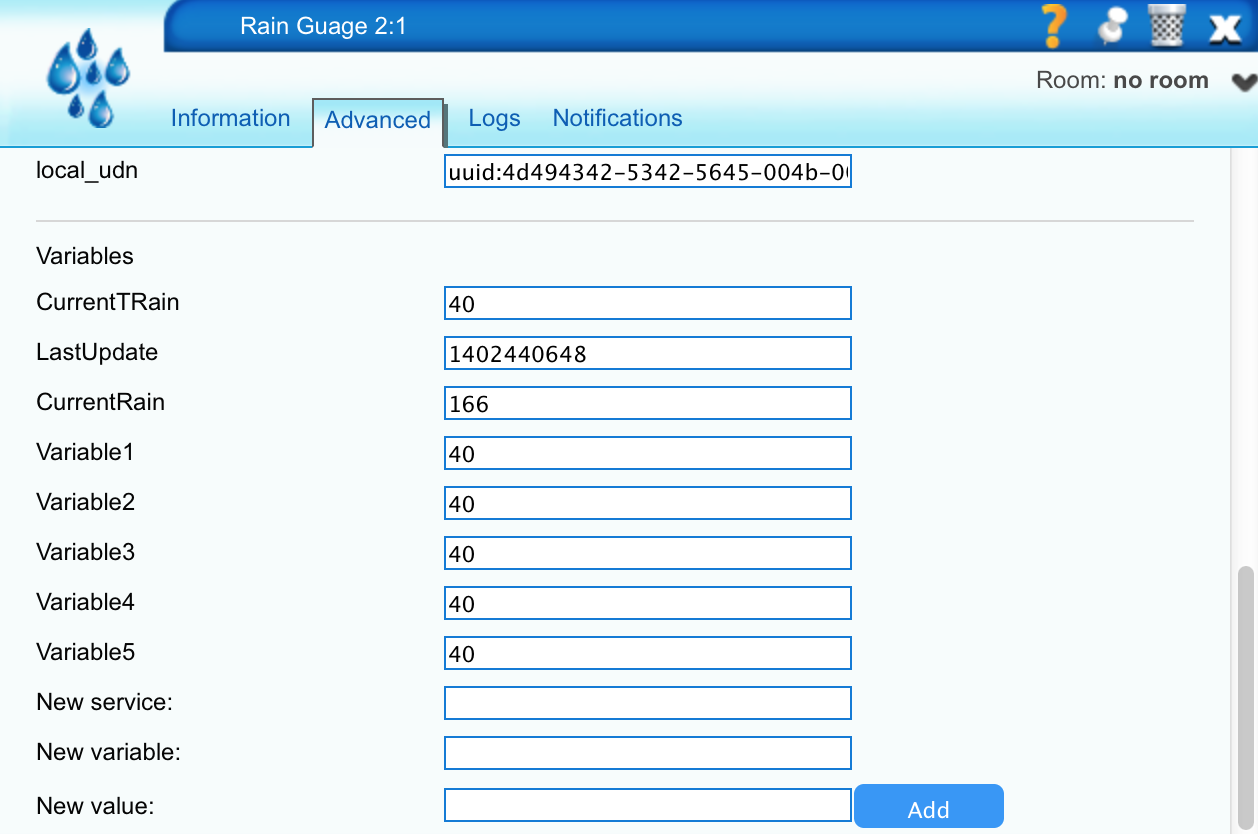
- an information panel that displays last 24hours rain and the current rate of rain. along with 5 buckets of time so that you may see up to 5 days total rainfall.
-
@BulldogLowell I also busy building an rain gauge. How is your one performing? Now did you set this up in the arduino? How did you do the calculation?
Regards
Francois
yes is working still, I mentioned how I did the math above...
-
@BulldogLowell do you mind sharing the sketch I not seeing in this forum or on the Build pages of MySensor.org
-
@BulldogLowell do you mind sharing the sketch I not seeing in this forum or on the Build pages of MySensor.org
Sure, but I have that running at my 'other' house and it is on older version of MySensors (haven't upgraded there yet ;)
I'll take a whack at updating if you like... it needs to get done anyway... here it is:
/* Arduino Tipping Bucket Rain Gauge June 15, 2014 Version 1.00b Arduino Tipping Bucket Rain Gauge Utilizing a tipping bucket sensor, your Vera home automation controller and the MySensors.org gateway you can measure and sense local rain. This sketch will create two devices on your Vera controller. One will display your total precipitation for the last 24, 48, 72, 96 and 120 hours. The other, a sensor that changes state if there is recent rain (up to last 120 hours) above a threshold. Both these settings are user definable. This sketch features the following: * Allows you to set the rain threshold in mm * Allows you to determine the interval window up to 120 hours. * Displays the last 24, 48, 72, 96 and 120 hours total rain in Variable1 through Variable5 of the Rain Sensor device * Configuration changes to Sensor device updated every 3 hours. * SHould run on any Arduino * Will retain Tripped/Not Tripped status and data in a power outage, saving small ammount of data to EEPROM (Circular Buffer to maximize life of EEBPROM * There is a unique setup requirement necessary in order to properly present the Vera device variables. The details are outlined in the sketch below. * LED status indicator by BulldogLowell@gmail.com for free public use */ #include <SPI.h> #include <EEPROM.h> #include <RF24.h> #include <Sensor.h> // #define STATE_LOCATION 513 // stay away from EEPROM used with Sensor.h #define EEPROM_BUFFER 514 // location of the EEPROM circular buffer #define BUFFER_LENGTH 121 // Sensor gw; boolean metric = false; // int eepromIndex; int tipSensorPin = 3; int ledPin = 5; //PWM capable required unsigned long dataMillis; unsigned long serialInterval = 10000UL; const unsigned long oneHour = 60000UL; unsigned long lastTipTime; unsigned long lastBucketInterval; unsigned long startMillis; int dayBuckets [5] [2] = { { V_VAR1, 24 }, { V_VAR2, 48 }, { V_VAR3, 72 }, { V_VAR4, 96 }, { V_VAR5, 120}, }; volatile byte rainBucket [120] ; // 5 days of data const unsigned long calibrateFactor = 1UL; //Calibration in milimeters of rain per single tip unsigned long rainRate = 0; float currentRain = 0; boolean wasTipped = false; boolean updateVera; int rainCount; volatile int tipBuffer = 0; byte rainWindow = 72;//default rain window in hours int rainSensorThreshold = 15;//default rain sensor sensitivity in mm byte hourCount = 24; byte state; byte oldState = -1; unsigned long ledPulseTime = 500UL; unsigned long pulseStart; // void setup() { Serial.begin(115200); gw.begin(); // pinMode(tipSensorPin, OUTPUT); attachInterrupt (1, sensorTipped, CHANGE); pinMode(ledPin, OUTPUT); digitalWrite(ledPin, HIGH); gw.sendSketchInfo("Rain Guage", "1.00b"); gw.sendSensorPresentation(1, S_RAIN); gw.sendSensorPresentation(2, S_MOTION); Serial.println(F("Sensor Presentation Complete")); pinMode(tipSensorPin, INPUT); // state = EEPROM.read(STATE_LOCATION); for (int i = 0; i < BUFFER_LENGTH; i++) { byte locator = EEPROM.read(EEPROM_BUFFER + i); if (locator == 0xFF) { eepromIndex = EEPROM_BUFFER + i; loadRainArray(eepromIndex); Serial.println(eepromIndex); break; } } // gw.sendVariable(2, V_TRIPPED, state); dataMillis = millis(); startMillis = millis(); lastTipTime = millis() - oneHour; // uncomment the following block the first time you include this device. The delays // are necessary in order to create the five Variable buckets in the correct order. // Once you create them, you can comment out these lines and re-upload to your arduino //------------------------------------------------------ /* for (int j = 0; j < 5; j++) { delay(2000); gw.sendVariable(1, dayBuckets[j] [0], 1); } delay(2000); gw.sendVariable(2,V_VAR1, 1); delay(2000); gw.sendVariable(2,V_VAR2, 1); */ //------------------------------------------------------ rainWindow = atoi(gw.getStatus(2, V_VAR1)); delay(2000); rainSensorThreshold = atoi(gw.getStatus(2, V_VAR2)); gw.sendVariable(1, V_RAINRATE, 0); Serial.print(F("Radio Done")); analogWrite(ledPin, 20); } // void loop() { unsigned long measure = 0; // Check to see if we need to show sensor tripped in this block for (int i = 0; i < rainWindow; i++) { measure = measure + rainBucket [i]; } measure >= rainSensorThreshold ? state = 1: state = 0; if (millis() - pulseStart < ledPulseTime) { analogWrite(ledPin, 255); } else { analogWrite(ledPin, 20); } if (state != oldState) { gw.sendVariable(2, V_TRIPPED, state); EEPROM.write(STATE_LOCATION, state); oldState = state; } // if (millis() - lastTipTime >= oneHour)// timeout for rain rate { if (rainRate != 0) { rainRate = 0; gw.sendVariable(1, V_RAINRATE, rainRate); } } if (updateVera) { gw.sendVariable(1, V_RAINRATE, rainRate); updateVera = false; } // if ( (millis() - dataMillis) >= serialInterval)//Comment back in this block to enable Serial prints { for (int i = 24; i <= 120; i=i+24) { updateSerialData(i); } dataMillis = millis(); } // if (tipBuffer > 0) { Serial.println(F("Sensor Tipped")); rainBucket [0] ++; pulseStart = millis(); if (rainBucket [0] > 253) rainBucket[0] = 253; // odd occurance but prevent overflow int dayTotal = 0; for (int i = 0; i < 24; i++) { dayTotal = dayTotal + rainBucket [i]; } gw.sendVariable(1, V_RAIN, dayTotal); unsigned long tipDelay = millis() - lastTipTime; if (tipDelay <= oneHour) { rainRate = ((oneHour) / tipDelay); gw.sendVariable(1, V_RAINRATE, rainRate); Serial.print(F("RainRate= ")); Serial.println(rainRate); } lastTipTime = millis(); updateVera = true; tipBuffer--; } if ( (millis()- startMillis) >= oneHour) { Serial.println("one hour elapsed"); //EEPROM write last value EEPROM.write(eepromIndex, rainBucket[0]); eepromIndex++; if (eepromIndex > EEPROM_BUFFER + BUFFER_LENGTH) eepromIndex = EEPROM_BUFFER; Serial.println(eepromIndex); EEPROM.write(eepromIndex, 0xFF); // for (int i = BUFFER_LENGTH - 1; i >= 0; i--)//cascade an hour of values { rainBucket [i + 1] = rainBucket [i]; } rainBucket[0] = 0; gw.sendVariable(1, V_RAIN, tipCounter(24));// send 24hr tips startMillis = millis(); for (int j = 0; j < 5; j++) { int total = 0; for (int i = 0; i < dayBuckets[j][1]; i++) { total = total + rainBucket [i]; } gw.sendVariable( 1, dayBuckets[j] [0], total); } hourCount++; if (hourCount >=3)//8 times daily update the Sensor variables { rainWindow = atoi(gw.getStatus(2, V_VAR1)); if (rainWindow < 6) { rainWindow = 6; gw.sendVariable( 2, V_VAR1, rainWindow); } if (rainWindow > 120) { rainWindow = 120; gw.sendVariable( 2, V_VAR2, rainWindow); } rainSensorThreshold = atoi(gw.getStatus(2, V_VAR2)); delay(2000); // if (rainSensorThreshold < 1) { rainSensorThreshold = 1; gw.sendVariable( 2, V_VAR2, rainSensorThreshold); } if (rainSensorThreshold > 1000) { rainSensorThreshold = 1000; gw.sendVariable( 2, V_VAR2, rainSensorThreshold); } // hourCount = 0; } } } // void sensorTipped() { static unsigned long last_interrupt_time = 0; unsigned long interrupt_time = millis(); if (interrupt_time - last_interrupt_time > 200) { tipBuffer++; } last_interrupt_time = interrupt_time; } // unsigned long tipCounter(int x) { int tipCount = 0; for ( int i = 0; i < x; i++) { tipCount = tipCount + rainBucket [i]; } return tipCount; } // void updateSerialData(int x) { Serial.print(F("Tips last ")); Serial.print(x); Serial.print(F("hours: ")); int tipCount = 0; for (int i = 0; i < x; i++) { tipCount = tipCount + rainBucket [i]; } Serial.println(tipCount); } void loadRainArray(int value) { for (int i = 0; i < BUFFER_LENGTH - 1; i++) { value--; Serial.println(value); if (value < EEPROM_BUFFER) { value = EEPROM_BUFFER + BUFFER_LENGTH; } byte rainValue = EEPROM.read(value); Serial.println(rainValue); if (rainValue < 255) { rainBucket[i] = rainValue; } else { rainBucket [i] = 0; } } } -
Hey Francois
Thanks for a nice projekt. I am thinking on building one myself. But is it possible to log the rain for everyday and writing the data to a csv file so I can use the data in Excel on Windows.
Hope that you can help my.
Tom
Tom,
Are you wishing to
- log to an SD card
- collect data controller side (e.g. Vera or other controller)
- transmit data directly to a server
- something else....?
-
@BulldogLowell said:
#define STATE_LOCATION 513 // stay away from EEPROM used with Sensor.h #define EEPROM_BUFFER 514 // location of the EEPROM circular buffer #define BUFFER_LENGTH 121are we still required to steer clear of MySensor's EEPROM in addresses 0-512?
-
@BulldogLowell said:
#define STATE_LOCATION 513 // stay away from EEPROM used with Sensor.h #define EEPROM_BUFFER 514 // location of the EEPROM circular buffer #define BUFFER_LENGTH 121are we still required to steer clear of MySensor's EEPROM in addresses 0-512?
-
Neodymium magnet in and works fine. I had to clean out the countersink hole with a drill to get it in and used E6000 glue to hold it.
Now onto the hall effect sensor, wiring it up and of course the sketch.
The 123D Design file is also attached if anyone wants to make one, play with the design, make fun of it, etc. The .stl file is 13Mb, I can email that if you want.
If you want a print, let me know. I also have a few magnets and sensors, so I can send what you need for the project.
I think I'm going to design a housing for the electronics too. I'm not sure I can find the right project box for this (I really just want to print more parts :)
Hi!!
I was searching for a long time in internet any place where someone offers a design of this mechanism of rain gauge. Finally I've found you!. I really interested in having one, but I don't have a 3D (not jet!). Could you provide me one print? Let me know how is the process to get one, please ! (I am in Spain!)
Thank you
-
Hi!!
I was searching for a long time in internet any place where someone offers a design of this mechanism of rain gauge. Finally I've found you!. I really interested in having one, but I don't have a 3D (not jet!). Could you provide me one print? Let me know how is the process to get one, please ! (I am in Spain!)
Thank you
I actually used www.3dhubs.com which I believe is a Dutch company. I looked, they have service in Spain!
the service connects you with owners of 3D printers who make money using their personal machines.
-
@nostradamux I had one printed using @BulldogLowell design and thru 3Dhubs.com the build was good and I used abs also for material. My cost in USA was approx. $17 usd and took a day to print and receive, looks good.
However I have not gotten far with project due to other issues unrealated just with I had more time and experience.But this group is most helpful for newbies!
Good luck -
@BulldogLowell could you convert your 123D file to STL so that the 3DHub could be used please ?
this is how to do it:
http://sitesupport.123dapp.com/entries/20540436-How-to-export-an-STL-file-for-3D-printing-in-123Dthanks,
;-)
z-wave - Vera -> Domoticz
rfx - Domoticz <- MyDomoAtHome <- Imperihome
mysensors -> mysensors-gw -> Domoticz -
@BulldogLowell could you convert your 123D file to STL so that the 3DHub could be used please ?
this is how to do it:
http://sitesupport.123dapp.com/entries/20540436-How-to-export-an-STL-file-for-3D-printing-in-123Dthanks,
;-)
exceeds max file size, so here is a link:
https://drive.google.com/file/d/0B3KGTJHUgpw1MVpaYnUyUDUwN0E/view?usp=sharing
-
@BulldogLowell Did you ever get around to updating the sketch to work with version 1.4.1? I'm finally getting around to making a rain gauge and I didn't want to recreate the wheel if you already made it and I missed it somewhere.
Thanks,
Pete
-
Sorry for the lag time, I've been on Easter vacation with the family!
Yes, I did update it, but I don't have my laptop with me here. I'll post it when I return home, early next week.