My Slim 2AA Battery Node
-
Does anybody has a idea why my nodes keep freezing ?
I build like 5 identical nodes with a PIR and after working fine for a couple of hours at least half of them freeze.
There is one particular node that is working for 4 days now straight, but all the others are frozen meanwhile.
I have no idea where to start troubleshooting, as they are all the same ( capacitory, resistors,radios,Atmega328p,batteries,solder,radio,sketch)
and are all basically within the same radius placed around the gateway. I have other "not battery Slim Nodes" and they never freeze, though running the same sketch.Please i need some tips
Regards
Komaandy
@Komaandy - did you try the hardware without the PIR?
-
Do you mean running the node without the PIR ?
I thought about, I guess i will test it.
You think the PIR freezes the node ?@Komaandy - Yes and Yes :)
Its a good way to debug, remove not crucial stuff to see if it works... one by one and you will figure it out.
The PIR (depending on which one and what kind of power you are using) might be the problem but hard to say without knowing your setup. -
@AWI said in My Slim 2AA Battery Node:
@Komaandy please don't double post. Please continue in the other thread
@Komaandy and @sundberg84 Once again; Please continue in the other thread! Especially since @Komaandy now confirmed that it is this far NOT a generic Slim Node issue. Also, I haven't got any feedback on my reply there, but I assume it didn't work?
-
Hi @Komaandy ,
unfortunately I must report that I made the same expiriences you made. I am running 5 "My SLim 2AA Battery Node" Sensors from which only 2 really work. The others keep freezing after an hour, a day, are sometimes after a few days. I have still no idea why this is happening, but because of this I stopped building more of the "My SLim 2AA Battery Node" sensors, which is very sad, because it´s an ingeniuous design.
I am using MQTT and therefore I installed NRF24L01 modules. Some of them are really weak, so I thought that´s the problem: The node does not freeze, it´s just the NRF24L01 that is not sending any info anymore. So I attached a LED to my node to see if it is still alive. Whenever I opened a window the LED must lid. So when I did not got any info from the node I checked if the node is still operational by opening a window and there I noticed when the LED did not lid, that the node was completely frozen. So It was not a wireless connection problem, but the NRF24L01 of course could still be the problem.
A lot of my investigastions was about figuring out what is happening when entering the sleep mode, because I thought (and still believe) the node is just not waking up from sleep anymore. Unluckily I still did not find a solution.
Anywhere you said that the none battery driven nodes are working flawlessly, that´s another point I was thinking about. I have one MQTT Arduino Nano device in the basement which is directly powered over USB and I never had problems with it, also the MQTT / NRF24L01 range is awesome.
But I have no oscillator or anything to check if it a power problem with the "My Slim 2AA Battery Node".
Maybe you´ll find a solution for your problems which could help me, too. I´m looking forward hearing from you.still learning...
-
Hi @Komaandy ,
unfortunately I must report that I made the same expiriences you made. I am running 5 "My SLim 2AA Battery Node" Sensors from which only 2 really work. The others keep freezing after an hour, a day, are sometimes after a few days. I have still no idea why this is happening, but because of this I stopped building more of the "My SLim 2AA Battery Node" sensors, which is very sad, because it´s an ingeniuous design.
I am using MQTT and therefore I installed NRF24L01 modules. Some of them are really weak, so I thought that´s the problem: The node does not freeze, it´s just the NRF24L01 that is not sending any info anymore. So I attached a LED to my node to see if it is still alive. Whenever I opened a window the LED must lid. So when I did not got any info from the node I checked if the node is still operational by opening a window and there I noticed when the LED did not lid, that the node was completely frozen. So It was not a wireless connection problem, but the NRF24L01 of course could still be the problem.
A lot of my investigastions was about figuring out what is happening when entering the sleep mode, because I thought (and still believe) the node is just not waking up from sleep anymore. Unluckily I still did not find a solution.
Anywhere you said that the none battery driven nodes are working flawlessly, that´s another point I was thinking about. I have one MQTT Arduino Nano device in the basement which is directly powered over USB and I never had problems with it, also the MQTT / NRF24L01 range is awesome.
But I have no oscillator or anything to check if it a power problem with the "My Slim 2AA Battery Node".
Maybe you´ll find a solution for your problems which could help me, too. I´m looking forward hearing from you.@siod Thanks for your report. Could you please share some more info. Hw/sw versions, nRF-batches, sensors, configs/settings, sketches etc. @Komaandy could only confirm issues with a PIR eqiupped node, but you have a door-switch so I guess it's a potential generic problem then. Let's hope for other reports as to help us narrow down the search.
I have not yet migrated to MySensors 2.x :flushed: , but it's hopefully coming soon. My Slim Nodes from the start of this thread (~ 10 pcs) are still in flawless production.
-
@siod Thanks for your report. Could you please share some more info. Hw/sw versions, nRF-batches, sensors, configs/settings, sketches etc. @Komaandy could only confirm issues with a PIR eqiupped node, but you have a door-switch so I guess it's a potential generic problem then. Let's hope for other reports as to help us narrow down the search.
I have not yet migrated to MySensors 2.x :flushed: , but it's hopefully coming soon. My Slim Nodes from the start of this thread (~ 10 pcs) are still in flawless production.
@m26872 - I made myself a slim node with a light sensor and a uv-sensor last weekend. Its running latest dev branch and has been working flawless atleast 1 week now.
-
@siod Thanks for your report. Could you please share some more info. Hw/sw versions, nRF-batches, sensors, configs/settings, sketches etc. @Komaandy could only confirm issues with a PIR eqiupped node, but you have a door-switch so I guess it's a potential generic problem then. Let's hope for other reports as to help us narrow down the search.
I have not yet migrated to MySensors 2.x :flushed: , but it's hopefully coming soon. My Slim Nodes from the start of this thread (~ 10 pcs) are still in flawless production.
@m26872 First of all: I already got so much help and I am very grateful for that, awesome community!
I don´t think I will ever find the problem with those sensors and because of the lack of time I have (familiy, work...) I think looking for the problem would take longer than just build a new sensor. And that´s what I will do next: I will just build another node, one step after the other and so I can validate if it maybe is a hardware problem or a code problem. BTW my whole sketch is just a few posts above this one...
So I will come back after I started over...
-
Hi there,
im still into troubleshooting, and what i did last was create a "mock up temperatursensor slim node " with this sketch
, so its really only the node and batteries. But it still freezes :(
Hardware i use is :-Atmega328p 1Mhz bootloader. // Burnt the bootloader with one Arduino UNO as master and another Arduino UNO on which I replaced the Atmega328p as slave // Arduino as ISP // with the latest Arduino IDE (1.8.2)
- after burning the bootloader on the bare ATMEGA´s i assemble them on the node and transfer the sketch via FTDI232
Furthermore i use
-generic Capacitors and restistors ( specs from your BOM)- Kuman nRF24L01 batches ( bought like 30 in a bulk once, but other "nonslimnodes" are working)
-fresh batteries
Any help is very aprreciated :) :)
/* * MockMySensors * * This skecth is intended to crate fake sensors which register and respond to the controller * *** * Barduino 2015, GizMoCuz 2015 */ // Enable debug prints to serial monitor #define MY_DEBUG // Enable and select radio type attached #define MY_RADIO_NRF24 //#define MY_RADIO_RFM69 #define MY_NODE_ID 123 #include <MySensors.h> #define RADIO_ERROR_LED_PIN 4 // Error led pin #define RADIO_RX_LED_PIN 6 // Receive led pin #define RADIO_TX_LED_PIN 13 // the PCB, on board LED // Wait times #define LONG_WAIT 500 #define SHORT_WAIT 50 #define SKETCH_NAME "MockMySensors " #define SKETCH_VERSION "v0.5" // Define Sensors ids /* S_DOOR, S_MOTION, S_SMOKE, S_LIGHT, S_DIMMER, S_COVER, S_TEMP, S_HUM, S_BARO, S_WIND, S_RAIN, S_UV, S_WEIGHT, S_POWER, S_HEATER, S_DISTANCE, S_LIGHT_LEVEL, S_ARDUINO_NODE, S_ARDUINO_REPEATER_NODE, S_LOCK, S_IR, S_WATER, S_AIR_QUALITY, S_CUSTOM, S_DUST, S_SCENE_CONTROLLER */ ////#define ID_S_ARDUINO_NODE //auto defined in initialization ////#define ID_S_ARDUINO_REPEATER_NODE //auto defined in initialization // Some of these ID's have not been updated for v1.5. Uncommenting too many of them // will make the sketch too large for a pro mini's memory so it's probably best to try // one at a time. //#define ID_S_ARMED 0 // dummy to controll armed stated for several sensors //#define ID_S_DOOR 1 //#define ID_S_MOTION 2 //#define ID_S_SMOKE 3 //#define ID_S_LIGHT 4 //#define ID_S_DIMMER 5 //#define ID_S_COVER 6 #define ID_S_TEMP 7 //#define ID_S_HUM 8 //#define ID_S_BARO 9 //#define ID_S_WIND 10 //#define ID_S_RAIN 11 //#define ID_S_UV 12 //#define ID_S_WEIGHT 13 //#define ID_S_POWER 14 //#define ID_S_HEATER 15 //#define ID_S_DISTANCE 16 //#define ID_S_LIGHT_LEVEL 17 //#define ID_S_LOCK 18 //#define ID_S_IR 19 //#define ID_S_WATER 20 //#define ID_S_AIR_QUALITY 21 //#define ID_S_DUST 22 //#define ID_S_SCENE_CONTROLLER 23 //// Lib 1.5 sensors //#define ID_S_RGB_LIGHT 24 //#define ID_S_RGBW_LIGHT 25 //#define ID_S_COLOR_SENSOR 26 //#define ID_S_HVAC 27 //#define ID_S_MULTIMETER 28 //#define ID_S_SPRINKLER 29 //#define ID_S_WATER_LEAK 30 //#define ID_S_SOUND 31 //#define ID_S_VIBRATION 32 //#define ID_S_MOISTURE 33 // //#define ID_S_CUSTOM 99 // Global Vars unsigned long SLEEP_TIME = 60000; // Sleep time between reads (in milliseconds) bool metric = true; long randNumber; //Instanciate Messages objects #ifdef ID_S_ARMED bool isArmed; #endif #ifdef ID_S_DOOR // V_TRIPPED, V_ARMED MyMessage msg_S_DOOR_T(ID_S_DOOR,V_TRIPPED); MyMessage msg_S_DOOR_A(ID_S_DOOR,V_ARMED); #endif #ifdef ID_S_MOTION // V_TRIPPED, V_ARMED MyMessage msg_S_MOTION_A(ID_S_MOTION,V_ARMED); MyMessage msg_S_MOTION_T(ID_S_MOTION,V_TRIPPED); #endif #ifdef ID_S_SMOKE // V_TRIPPED, V_ARMED MyMessage msg_S_SMOKE_T(ID_S_SMOKE,V_TRIPPED); MyMessage msg_S_SMOKE_A(ID_S_SMOKE,V_ARMED); #endif #ifdef ID_S_LIGHT MyMessage msg_S_LIGHT(ID_S_LIGHT,V_LIGHT); bool isLightOn=0; #endif #ifdef ID_S_DIMMER MyMessage msg_S_DIMMER(ID_S_DIMMER,V_DIMMER); int dimmerVal=100; #endif #ifdef ID_S_COVER MyMessage msg_S_COVER_U(ID_S_COVER,V_UP); MyMessage msg_S_COVER_D(ID_S_COVER,V_DOWN); MyMessage msg_S_COVER_S(ID_S_COVER,V_STOP); MyMessage msg_S_COVER_V(ID_S_COVER,V_VAR1); int coverState=0; //0=Stop; 1=up; -1=down #endif #ifdef ID_S_TEMP MyMessage msg_S_TEMP(ID_S_TEMP,V_TEMP); #endif #ifdef ID_S_HUM MyMessage msg_S_HUM(ID_S_HUM,V_HUM); #endif #ifdef ID_S_BARO MyMessage msg_S_BARO_P(ID_S_BARO,V_PRESSURE); MyMessage msg_S_BARO_F(ID_S_BARO,V_FORECAST); #endif #ifdef ID_S_WIND MyMessage msg_S_WIND_S(ID_S_WIND,V_WIND); MyMessage msg_S_WIND_G(ID_S_WIND,V_GUST); MyMessage msg_S_WIND_D(ID_S_WIND,V_DIRECTION); #endif #ifdef ID_S_RAIN MyMessage msg_S_RAIN_A(ID_S_RAIN,V_RAIN); MyMessage msg_S_RAIN_R(ID_S_RAIN,V_RAINRATE); #endif #ifdef ID_S_UV MyMessage msg_S_UV(ID_S_UV,V_UV); #endif #ifdef ID_S_WEIGHT MyMessage msg_S_WEIGHT(ID_S_WEIGHT,V_WEIGHT); #endif #ifdef ID_S_POWER MyMessage msg_S_POWER_W(ID_S_POWER,V_WATT); MyMessage msg_S_POWER_K(ID_S_POWER,V_KWH); #endif #ifdef ID_S_HEATER //////// REVIEW IMPLEMENTATION //////////// MyMessage msg_S_HEATER_SET_POINT(ID_S_HEATER, V_HVAC_SETPOINT_HEAT); // HVAC/Heater setpoint (Integer between 0-100). S_HEATER, S_HVAC MyMessage msg_S_HEATER_FLOW_STATE(ID_S_HEATER, V_HVAC_FLOW_STATE); // Mode of header. One of "Off", "HeatOn", "CoolOn", or "AutoChangeOver" // S_HVAC, S_HEATER //MyMessage msg_S_HEATER_STATUS(ID_S_HEATER,V_STATUS); //MyMessage msg_S_HEATER_TEMP(ID_S_HEATER,V_TEMP); float heater_setpoint=21.5; String heater_flow_state="Off"; // float heater_temp=23.5; // bool heater_status=false; // V_TEMP // Temperature // V_STATUS // Binary status. 0=off 1=on // V_HVAC_FLOW_STATE // Mode of header. One of "Off", "HeatOn", "CoolOn", or "AutoChangeOver" // V_HVAC_SPEED // HVAC/Heater fan speed ("Min", "Normal", "Max", "Auto") // V_HVAC_SETPOINT_HEAT // HVAC/Heater setpoint #endif #ifdef ID_S_DISTANCE MyMessage msg_S_DISTANCE(ID_S_DISTANCE,V_DISTANCE); #endif #ifdef ID_S_LIGHT_LEVEL MyMessage msg_S_LIGHT_LEVEL(ID_S_LIGHT_LEVEL,V_LIGHT_LEVEL); #endif #ifdef ID_S_LOCK MyMessage msg_S_LOCK(ID_S_LOCK,V_LOCK_STATUS); bool isLocked = 0; #endif #ifdef ID_S_IR MyMessage msg_S_IR_S(ID_S_IR,V_IR_SEND); MyMessage msg_S_IR_R(ID_S_IR,V_IR_RECEIVE); long irVal = 0; #endif #ifdef ID_S_WATER MyMessage msg_S_WATER_F(ID_S_WATER,V_FLOW); MyMessage msg_S_WATER_V(ID_S_WATER,V_VOLUME); #endif #ifdef ID_S_AIR_QUALITY MyMessage msg_S_AIR_QUALITY(ID_S_AIR_QUALITY,V_LEVEL); #endif #ifdef ID_S_DUST MyMessage msg_S_DUST(ID_S_DUST,V_LEVEL); #endif #ifdef ID_S_SCENE_CONTROLLER MyMessage msg_S_SCENE_CONTROLLER_ON(ID_S_SCENE_CONTROLLER,V_SCENE_ON); MyMessage msg_S_SCENE_CONTROLLER_OF(ID_S_SCENE_CONTROLLER,V_SCENE_OFF); // not sure if scene controller sends int or chars // betting on ints as Touch Display Scen by Hek // compiler warnings char *scenes[] = { (char *)"Good Morning", (char *)"Clean Up!", (char *)"All Lights Off", (char *)"Music On/Off" }; int sceneVal=0; int sceneValPrevious=0; #endif #ifdef ID_S_RGB_LIGHT MyMessage msg_S_RGB_LIGHT_V_RGB(ID_S_RGB_LIGHT,V_RGB); MyMessage msg_S_RGB_LIGHT_V_WATT(ID_S_RGB_LIGHT,V_WATT); String rgbState="000000"; //RGB light V_RGB, V_WATT //RGB value transmitted as ASCII hex string (I.e "ff0000" for red) #endif #ifdef ID_S_RGBW_LIGHT MyMessage msg_S_RGBW_LIGHT_V_RGBW(ID_S_RGBW_LIGHT,V_RGBW); MyMessage msg_S_RGBW_LIGHT_V_WATT(ID_S_RGBW_LIGHT,V_WATT); String rgbwState="00000000"; //RGBW light (with separate white component) V_RGBW, V_WATT //RGBW value transmitted as ASCII hex string (I.e "ff0000ff" for red + full white) S_RGBW_LIGHT #endif #ifdef ID_S_COLOR_SENSOR MyMessage msg_S_COLOR_SENSOR_V_RGB(ID_S_COLOR_SENSOR,V_RGB); //Color sensor V_RGB //RGB value transmitted as ASCII hex string (I.e "ff0000" for red) S_RGB_LIGHT, S_COLOR_SENSOR #endif #ifdef ID_S_HVAC MyMessage msg_S_HVAC_V_HVAC_SETPOINT_HEAT(ID_S_HVAC,V_HVAC_SETPOINT_HEAT); MyMessage msg_S_HVAC_V_HVAC_SETPOINT_COOL(ID_S_HVAC,V_HVAC_SETPOINT_COOL); MyMessage msg_S_HVAC_V_HVAC_FLOW_STATET(ID_S_HVAC,V_HVAC_FLOW_STATE); MyMessage msg_S_HVAC_V_HVAC_FLOW_MODE(ID_S_HVAC,V_HVAC_FLOW_MODE); MyMessage msg_S_HVAC_V_HVAC_SPEED(ID_S_HVAC,V_HVAC_SPEED); float hvac_SetPointHeat = 16.5; float hvac_SetPointCool = 25.5; String hvac_FlowState = "AutoChangeOver"; String hvac_FlowMode = "Auto"; String hvac_Speed = "Normal"; //Thermostat/HVAC device //V_HVAC_SETPOINT_HEAT, // HVAC/Heater setpoint //V_HVAC_SETPOINT_COOL, // HVAC cold setpoint //V_HVAC_FLOW_STATE, // Mode of header. One of "Off", "HeatOn", "CoolOn", or "AutoChangeOver" //V_HVAC_FLOW_MODE, // Flow mode for HVAC ("Auto", "ContinuousOn", "PeriodicOn") //V_HVAC_SPEED // HVAC/Heater fan speed ("Min", "Normal", "Max", "Auto") // NOT IMPLEMENTED YET //V_TEMP // Temperature //V_STATUS // Binary status. 0=off 1=on #endif #ifdef ID_S_MULTIMETER MyMessage msg_S_MULTIMETER_V_IMPEDANCE(ID_S_MULTIMETER,V_IMPEDANCE); MyMessage msg_S_MULTIMETER_V_VOLTAGE(ID_S_MULTIMETER,V_VOLTAGE); MyMessage msg_S_MULTIMETER_V_CURRENT(ID_S_MULTIMETER,V_CURRENT); // Multimeter device V_VOLTAGE, V_CURRENT, V_IMPEDANCE // V_IMPEDANCE 14 Impedance value // V_VOLTAGE 38 Voltage level // V_CURRENT 39 Current level #endif #ifdef ID_S_SPRINKLER // S_SPRINKLER 31 Sprinkler device V_STATUS (turn on/off), V_TRIPPED (if fire detecting device) // V_STATUS 2 Binary status. 0=off 1=on // V_ARMED 15 Armed status of a security sensor. 1=Armed, 0=Bypassed // V_TRIPPED 16 Tripped status of a security sensor. 1=Tripped, 0=Untripped #endif #ifdef ID_S_WATER_LEAK #endif #ifdef ID_S_SOUND #endif #ifdef ID_S_VIBRATION #endif #ifdef ID_S_MOISTURE #endif #ifdef ID_S_MOISTURE MyMessage msg_S_MOISTURE(ID_S_MOISTURE,V_LEVEL); #endif #ifdef ID_S_CUSTOM MyMessage msg_S_CUSTOM_1(ID_S_CUSTOM,V_VAR1); MyMessage msg_S_CUSTOM_2(ID_S_CUSTOM,V_VAR2); MyMessage msg_S_CUSTOM_3(ID_S_CUSTOM,V_VAR3); MyMessage msg_S_CUSTOM_4(ID_S_CUSTOM,V_VAR4); MyMessage msg_S_CUSTOM_5(ID_S_CUSTOM,V_VAR5); #endif void setup() { // Random SEED randomSeed(analogRead(0)); wait(LONG_WAIT); Serial.println("GW Started"); } void presentation() { // Send the Sketch Version Information to the Gateway Serial.print("Send Sketch Info: "); sendSketchInfo(SKETCH_NAME, SKETCH_VERSION); Serial.print(SKETCH_NAME); Serial.println(SKETCH_VERSION); wait(LONG_WAIT); // Get controller configuration Serial.print("Get Config: "); metric = getControllerConfig().isMetric; Serial.println(metric ? "Metric":"Imperial"); wait(LONG_WAIT); // Init Armed #ifdef ID_S_ARMED isArmed = true; #endif // Register all sensors to gw (they will be created as child devices) Serial.println("Presenting Nodes"); Serial.println("________________"); #ifdef ID_S_DOOR Serial.println(" S_DOOR"); present(ID_S_DOOR,S_DOOR,"Outside Door"); wait(SHORT_WAIT); #endif #ifdef ID_S_MOTION Serial.println(" S_MOTION"); present(ID_S_MOTION,S_MOTION,"Outside Motion"); wait(SHORT_WAIT); #endif #ifdef ID_S_SMOKE Serial.println(" S_SMOKE"); present(ID_S_SMOKE,S_SMOKE,"Kitchen Smoke"); wait(SHORT_WAIT); #endif #ifdef ID_S_LIGHT Serial.println(" S_LIGHT"); present(ID_S_LIGHT,S_LIGHT,"Hall Light"); wait(SHORT_WAIT); #endif #ifdef ID_S_DIMMER Serial.println(" S_DIMMER"); present(ID_S_DIMMER,S_DIMMER,"Living room dimmer"); wait(SHORT_WAIT); #endif #ifdef ID_S_COVER Serial.println(" S_COVER"); present(ID_S_COVER,S_COVER,"Window cover"); wait(SHORT_WAIT); #endif #ifdef ID_S_TEMP Serial.println(" S_TEMP"); present(ID_S_TEMP,S_TEMP,"House Temperarue"); wait(SHORT_WAIT); #endif #ifdef ID_S_HUM Serial.println(" S_HUM"); present(ID_S_HUM,S_HUM,"Current Humidity"); wait(SHORT_WAIT); #endif #ifdef ID_S_BARO Serial.println(" S_BARO"); present(ID_S_BARO,S_BARO," Air pressure"); wait(SHORT_WAIT); #endif #ifdef ID_S_WIND Serial.println(" S_WIND"); present(ID_S_WIND,S_WIND,"Wind Station"); wait(SHORT_WAIT); #endif #ifdef ID_S_RAIN Serial.println(" S_RAIN"); present(ID_S_RAIN,S_RAIN,"Rain Station"); wait(SHORT_WAIT); #endif #ifdef ID_S_UV Serial.println(" S_UV"); present(ID_S_UV,S_UV,"Ultra Violet"); wait(SHORT_WAIT); #endif #ifdef ID_S_WEIGHT Serial.println(" S_WEIGHT"); present(ID_S_WEIGHT,S_WEIGHT,"Outdoor Scale"); wait(SHORT_WAIT); #endif #ifdef ID_S_POWER Serial.println(" S_POWER"); present(ID_S_POWER,S_POWER,"Power Metric"); wait(SHORT_WAIT); #endif #ifdef ID_S_HEATER Serial.println(" S_HEATER"); present(ID_S_HEATER,S_HEATER,"Garage Heater"); wait(SHORT_WAIT); #endif #ifdef ID_S_DISTANCE Serial.println(" S_DISTANCE"); present(ID_S_DISTANCE,S_DISTANCE,"Distance Measure"); wait(SHORT_WAIT); #endif #ifdef ID_S_LIGHT_LEVEL Serial.println(" S_LIGHT_LEVEL"); present(ID_S_LIGHT_LEVEL,S_LIGHT_LEVEL,"Outside Light Level"); wait(SHORT_WAIT); #endif #ifdef ID_S_LOCK Serial.println(" S_LOCK"); present(ID_S_LOCK,S_LOCK,"Front Door Lock"); wait(SHORT_WAIT); #endif #ifdef ID_S_IR Serial.println(" S_IR"); present(ID_S_IR,S_IR,"Univeral Command"); wait(SHORT_WAIT); #endif #ifdef ID_S_WATER Serial.println(" S_WATER"); present(ID_S_WATER,S_WATER,"Water Level"); wait(SHORT_WAIT); #endif #ifdef ID_S_AIR_QUALITY Serial.println(" S_AIR_QUALITY"); present(ID_S_AIR_QUALITY,S_AIR_QUALITY,"Air Station"); wait(SHORT_WAIT); #endif #ifdef ID_S_DUST Serial.println(" S_DUST"); present(ID_S_DUST,S_DUST,"Dust Level"); wait(SHORT_WAIT); #endif #ifdef ID_S_SCENE_CONTROLLER Serial.println(" S_SCENE_CONTROLLER"); present(ID_S_SCENE_CONTROLLER,S_SCENE_CONTROLLER,"Scene Controller"); wait(SHORT_WAIT); #endif #ifdef ID_S_RGB_LIGHT Serial.println(" RGB_LIGHT"); present(ID_S_RGB_LIGHT,S_RGB_LIGHT,"Mood Light"); wait(SHORT_WAIT); #endif #ifdef ID_S_RGBW_LIGHT Serial.println(" RGBW_LIGHT"); present(ID_S_RGBW_LIGHT,S_RGBW_LIGHT,"Mood Light 2"); wait(SHORT_WAIT); #endif #ifdef ID_S_COLOR_SENSOR Serial.println(" COLOR_SENSOR"); present(ID_S_COLOR_SENSOR,S_COLOR_SENSOR,"Hall Painting"); wait(SHORT_WAIT); #endif #ifdef ID_S_HVAC Serial.println(" HVAC"); present(ID_S_HVAC,S_HVAC,"HVAC"); wait(SHORT_WAIT); #endif #ifdef ID_S_MULTIMETER Serial.println(" MULTIMETER"); present(ID_S_MULTIMETER,S_MULTIMETER,"Electric Staion"); wait(SHORT_WAIT); #endif #ifdef ID_S_SPRINKLER #endif #ifdef ID_S_WATER_LEAK #endif #ifdef ID_S_SOUND #endif #ifdef ID_S_VIBRATION #endif #ifdef ID_S_MOISTURE #endif #ifdef ID_S_MOISTURE Serial.println(" S_MOISTURE"); present(ID_S_MOISTURE,S_MOISTURE,"Basement Sensor"); wait(SHORT_WAIT); #endif #ifdef ID_S_CUSTOM Serial.println(" S_CUSTOM"); present(ID_S_CUSTOM,S_CUSTOM,"Other Stuff"); wait(SHORT_WAIT); #endif Serial.println("________________"); } void loop() { Serial.println(""); Serial.println(""); Serial.println(""); Serial.println("#########################"); randNumber=random(0,101); Serial.print("RandomNumber:"); Serial.println(randNumber); // Send fake battery level Serial.println("Send Battery Level"); sendBatteryLevel(randNumber); wait(LONG_WAIT); // Request time Serial.println("Request Time"); requestTime(); wait(LONG_WAIT); //Read Sensors #ifdef ID_S_DOOR door(); #endif #ifdef ID_S_MOTION motion(); #endif #ifdef ID_S_SMOKE smoke(); #endif #ifdef ID_S_LIGHT light(); #endif #ifdef ID_S_DIMMER dimmer(); #endif #ifdef ID_S_COVER cover(); #endif #ifdef ID_S_TEMP temp(); #endif #ifdef ID_S_HUM hum(); #endif #ifdef ID_S_BARO baro(); #endif #ifdef ID_S_WIND wind(); #endif #ifdef ID_S_RAIN rain(); #endif #ifdef ID_S_UV uv(); #endif #ifdef ID_S_WEIGHT weight(); #endif #ifdef ID_S_POWER power(); #endif #ifdef ID_S_HEATER heater(); #endif #ifdef ID_S_DISTANCE distance(); #endif #ifdef ID_S_LIGHT_LEVEL light_level(); #endif #ifdef ID_S_LOCK lock(); #endif #ifdef ID_S_IR ir(); #endif #ifdef ID_S_WATER water(); #endif #ifdef ID_S_AIR_QUALITY air(); #endif #ifdef ID_S_DUST dust(); #endif #ifdef ID_S_SCENE_CONTROLLER scene(); #endif #ifdef ID_S_RGB_LIGHT rgbLight(); #endif #ifdef ID_S_RGBW_LIGHT rgbwLight(); #endif #ifdef ID_S_COLOR_SENSOR color(); #endif #ifdef ID_S_HVAC hvac(); #endif #ifdef ID_S_MULTIMETER multimeter(); #endif #ifdef ID_S_SPRINKLER #endif #ifdef ID_S_WATER_LEAK #endif #ifdef ID_S_SOUND #endif #ifdef ID_S_VIBRATION #endif #ifdef ID_S_MOISTURE #endif #ifdef ID_S_MOISTURE moisture(); #endif #ifdef ID_S_CUSTOM custom(); #endif sendBatteryLevel(randNumber); wait(SHORT_WAIT); Serial.println("#########################"); wait(SLEEP_TIME); //sleep a bit } // This is called when a new time value was received void receiveTime(unsigned long controllerTime) { Serial.print("Time value received: "); Serial.println(controllerTime); } //void door(){} #ifdef ID_S_DOOR void door() { Serial.print("Door is: " ); if (randNumber <= 50) { Serial.println("Open"); send(msg_S_DOOR_T.set((int16_t)1)); } else { Serial.println("Closed"); send(msg_S_DOOR_T.set((int16_t)0)); } #ifdef ID_S_ARMED Serial.print("System is: " ); Serial.println((isArmed ? "Armed":"Disarmed")); send(msg_S_DOOR_A.set(isArmed)); #endif } #endif #ifdef ID_S_MOTION void motion() { Serial.print("Motion is: " ); if (randNumber <= 50) { Serial.println("Active"); send(msg_S_MOTION_T.set(1)); } else { Serial.println("Quiet"); send(msg_S_MOTION_T.set(0)); } #ifdef ID_S_ARMED Serial.print("System is: " ); Serial.println((isArmed ? "Armed":"Disarmed")); send(msg_S_MOTION_A.set(isArmed)); #endif } #endif #ifdef ID_S_SMOKE void smoke() { Serial.print("Smoke is: " ); if (randNumber <= 50) { Serial.println("Active"); send(msg_S_SMOKE_T.set(1)); } else { Serial.println("Quiet"); send(msg_S_SMOKE_T.set(0)); } #ifdef ID_S_ARMED Serial.print("System is: " ); Serial.println((isArmed ? "Armed":"Disarmed")); send(msg_S_SMOKE_A.set(isArmed)); #endif } #endif #ifdef ID_S_LIGHT void light() { Serial.print("Light is: " ); Serial.println((isLightOn ? "On":"Off")); send(msg_S_LIGHT.set(isLightOn)); } #endif #ifdef ID_S_DIMMER void dimmer() { Serial.print("Dimmer is set to: " ); Serial.println(dimmerVal); send(msg_S_DIMMER.set(dimmerVal)); } #endif #ifdef ID_S_COVER void cover() { Serial.print("Cover is : " ); if (coverState == 1) { Serial.println("Opening"); send(msg_S_COVER_U.set(1)); } else if (coverState == -1) { Serial.println("Closing"); send(msg_S_COVER_D.set(0)); } else { Serial.println("Idle"); send(msg_S_COVER_S.set(-1)); } send(msg_S_COVER_V.set(coverState)); } #endif #ifdef ID_S_TEMP void temp() { Serial.print("Temperature is: " ); Serial.println(map(randNumber,1,100,0,45)); send(msg_S_TEMP.set(map(randNumber,1,100,0,45))); } #endif #ifdef ID_S_HUM void hum() { Serial.print("Humitidty is: " ); Serial.println(randNumber); send(msg_S_HUM.set(randNumber)); } #endif #ifdef ID_S_BARO void baro() { const char *weather[] = {"stable","sunny","cloudy","unstable","thunderstorm","unknown"}; long pressure = map(randNumber,1,100,870,1086);// hPa? int forecast = map(randNumber,1,100,0,5); Serial.print("Atmosferic Pressure is: " ); Serial.println(pressure); send(msg_S_BARO_P.set(pressure)); Serial.print("Weather forecast: " ); Serial.println(weather[forecast]); send(msg_S_BARO_F.set(weather[forecast])); } #endif #ifdef ID_S_WIND void wind() { Serial.print("Wind Speed is: " ); Serial.println(randNumber); send(msg_S_WIND_S.set(randNumber)); Serial.print("Wind Gust is: " ); Serial.println(randNumber+10); send(msg_S_WIND_G.set(randNumber+10)); Serial.print("Wind Direction is: " ); Serial.println(map(randNumber,1,100,0,360)); send(msg_S_WIND_D.set(map(randNumber,1,100,0,360))); } #endif #ifdef ID_S_RAIN void rain() { Serial.print("Rain ammount is: " ); Serial.println(randNumber); send(msg_S_RAIN_A.set(randNumber)); Serial.print("Rain rate is: " ); Serial.println(randNumber/60); send(msg_S_RAIN_R.set(randNumber/60,1)); } #endif #ifdef ID_S_UV void uv() { Serial.print("Ultra Violet level is: " ); Serial.println(map(randNumber,1,100,0,15)); send(msg_S_UV.set(map(randNumber,1,100,0,15))); } #endif #ifdef ID_S_WEIGHT void weight() { Serial.print("Weight is: " ); Serial.println(map(randNumber,1,100,0,150)); send(msg_S_WEIGHT.set(map(randNumber,1,100,0,150))); } #endif #ifdef ID_S_POWER void power() { Serial.print("Watt is: " ); Serial.println(map(randNumber,1,100,0,150)); send(msg_S_POWER_W.set(map(randNumber,1,100,0,150))); Serial.print("KWH is: " ); Serial.println(map(randNumber,1,100,0,150)); send(msg_S_POWER_K.set(map(randNumber,1,100,0,150))); } #endif #ifdef ID_S_HEATER void heater() { // float heater_setpoint=21.5; // float heater_temp=23.5; // bool heater_status=false; // String heatState="Off"; Serial.print("Heater flow state is: " ); Serial.println(heater_flow_state); send(msg_S_HEATER_FLOW_STATE.set(heater_flow_state.c_str())); // Serial.print("Heater on/off is: " ); // Serial.println((heater_status==true)?"On":"Off"); // send(msg_S_HEATER_STATUS.set(heater_status)); // Serial.print("Heater Temperature is: " ); // Serial.println(heater_temp,1); // send(msg_S_HEATER_TEMP.set(heater_temp,1)); Serial.print("Heater Setpoint: " ); Serial.println(heater_setpoint,1); send(msg_S_HEATER_SET_POINT.set(heater_setpoint,1)); } #endif #ifdef ID_S_DISTANCE void distance() { Serial.print("Distance is: " ); Serial.println(map(randNumber,1,100,0,150)); send(msg_S_DISTANCE.set(map(randNumber,1,100,0,150))); } #endif #ifdef ID_S_LIGHT_LEVEL void light_level() { Serial.print("Light is: " ); Serial.println(map(randNumber,1,100,0,150)); send(msg_S_LIGHT_LEVEL.set(map(randNumber,1,100,0,150))); } #endif #ifdef ID_S_LOCK void lock() { Serial.print("Lock is: " ); Serial.println((isLocked ? "Locked":"Unlocked")); send(msg_S_LOCK.set(isLocked)); } #endif #ifdef ID_S_IR void ir() { Serial.print("Infrared is: " ); Serial.println(irVal); send(msg_S_IR_S.set(irVal)); send(msg_S_IR_R.set(irVal)); } #endif #ifdef ID_S_WATER void water() { Serial.print("Water flow is: " ); Serial.println(map(randNumber,1,100,0,150)); send(msg_S_WATER_F.set(map(randNumber,1,100,0,150))); Serial.print("Water volume is: " ); Serial.println(map(randNumber,1,100,0,150)); send(msg_S_WATER_V.set(map(randNumber,1,100,0,150))); } #endif #ifdef ID_S_AIR_QUALITY void air() { Serial.print("Air Quality is: " ); Serial.println(randNumber); send(msg_S_AIR_QUALITY.set(randNumber)); } #endif #ifdef ID_S_DUST void dust() { Serial.print("Dust level is: " ); Serial.println(randNumber); send(msg_S_DUST.set(randNumber)); } #endif #ifdef ID_S_SCENE_CONTROLLER void scene() { Serial.print("Scene is: " ); Serial.println(scenes[sceneVal]); if(sceneValPrevious != sceneVal) { send(msg_S_SCENE_CONTROLLER_OF.set(sceneValPrevious)); send(msg_S_SCENE_CONTROLLER_ON.set(sceneVal)); sceneValPrevious=sceneVal; } } #endif #ifdef ID_S_RGB_LIGHT void rgbLight() { Serial.print("RGB Light state is: " ); Serial.println(rgbState); send(msg_S_RGB_LIGHT_V_RGB.set(rgbState.c_str())); Serial.print("RGB Light Watt is: " ); Serial.println(map(randNumber,1,100,0,150)); send(msg_S_RGB_LIGHT_V_WATT.set(map(randNumber,1,100,0,150))); } #endif #ifdef ID_S_RGBW_LIGHT void rgbwLight() { Serial.print("RGBW Light state is: " ); Serial.println(rgbwState); send(msg_S_RGBW_LIGHT_V_RGBW.set(rgbwState.c_str())); Serial.print("RGBW Light Watt is: " ); Serial.println(map(randNumber,1,100,0,150)); send(msg_S_RGBW_LIGHT_V_WATT.set(map(randNumber,1,100,0,150))); } #endif #ifdef ID_S_COLOR_SENSOR void color() { String colorState; String red = String(random(0,256),HEX); String green = String(random(0,256),HEX); String blue = String(random(0,256),HEX); colorState=String(red + green + blue); Serial.print("Color state is: " ); Serial.println(colorState); send(msg_S_COLOR_SENSOR_V_RGB.set(colorState.c_str())); } #endif #ifdef ID_S_HVAC void hvac() { // float hvac_SetPointHeat = 16.5; // float hvac_SetPointCool = 25.5; // String hvac_FlowState = "AutoChangeOver"; // String hvac_FlowMode = "Auto"; // String hvac_Speed = "Normal"; Serial.print("HVAC Set Point Heat is: " ); Serial.println(hvac_SetPointHeat); send(msg_S_HVAC_V_HVAC_SETPOINT_HEAT.set(hvac_SetPointHeat,1)); Serial.print("HVAC Set Point Cool is: " ); Serial.println(hvac_SetPointCool); send(msg_S_HVAC_V_HVAC_SETPOINT_COOL.set(hvac_SetPointCool,1)); Serial.print("HVAC Flow State is: " ); Serial.println(hvac_FlowState); send(msg_S_HVAC_V_HVAC_FLOW_STATET.set(hvac_FlowState.c_str())); Serial.print("HVAC Flow Mode is: " ); Serial.println(hvac_FlowMode); send(msg_S_HVAC_V_HVAC_FLOW_MODE.set(hvac_FlowMode.c_str())); Serial.print("HVAC Speed is: " ); Serial.println(hvac_Speed); send(msg_S_HVAC_V_HVAC_SPEED.set(hvac_Speed.c_str())); } #endif #ifdef ID_S_MULTIMETER void multimeter() { int impedance=map(randNumber,1,100,0,15000); int volt=map(randNumber,1,100,0,380); int amps=map(randNumber,1,100,0,16); Serial.print("Impedance is: " ); Serial.println(impedance); send(msg_S_MULTIMETER_V_IMPEDANCE.set(impedance)); Serial.print("Voltage is: " ); Serial.println(volt); send(msg_S_MULTIMETER_V_VOLTAGE.set(volt)); Serial.print("Current is: " ); Serial.println(amps); send(msg_S_MULTIMETER_V_CURRENT.set(amps)); } #endif #ifdef ID_S_SPRINKLER #endif #ifdef ID_S_WATER_LEAK #endif #ifdef ID_S_SOUND #endif #ifdef ID_S_VIBRATION #endif #ifdef ID_S_MOISTURE #endif #ifdef ID_S_MOISTURE void moisture() { Serial.print("Moisture level is: " ); Serial.println(randNumber); send(msg_S_MOISTURE.set(randNumber)); } #endif #ifdef ID_S_CUSTOM void custom() { Serial.print("Custom value is: " ); Serial.println(randNumber); send(msg_S_CUSTOM_1.set(randNumber)); send(msg_S_CUSTOM_2.set(randNumber)); send(msg_S_CUSTOM_3.set(randNumber)); send(msg_S_CUSTOM_4.set(randNumber)); send(msg_S_CUSTOM_5.set(randNumber)); } #endif void receive(const MyMessage &message) { switch (message.type) { #ifdef ID_S_ARMED case V_ARMED: isArmed = message.getBool(); Serial.print("Incoming change for ID_S_ARMED:"); Serial.print(message.sensor); Serial.print(", New status: "); Serial.println((isArmed ? "Armed":"Disarmed" )); #ifdef ID_S_DOOR door();//temp ack for door #endif #ifdef ID_S_MOTION motion();//temp ack #endif #ifdef ID_S_SMOKE smoke();//temp ack #endif break; #endif case V_STATUS: // V_LIGHT: #ifdef ID_S_LIGHT if(message.sensor==ID_S_LIGHT) { isLightOn = message.getBool(); Serial.print("Incoming change for ID_S_LIGHT:"); Serial.print(message.sensor); Serial.print(", New status: "); Serial.println((isLightOn ? "On":"Off")); light(); // temp ack } #endif // #ifdef ID_S_HEATER // if(message.sensor == ID_S_HEATER){ // heater_status = message.getBool(); // Serial.print("Incoming change for ID_S_HEATER:"); // Serial.print(message.sensor); // Serial.print(", New status: "); // Serial.println(heater_status); // heater();//temp ack // } // #endif break; #ifdef ID_S_DIMMER case V_DIMMER: if ((message.getInt()<0)||(message.getInt()>100)) { Serial.println( "V_DIMMER data invalid (should be 0..100)" ); break; } dimmerVal= message.getInt(); Serial.print("Incoming change for ID_S_DIMMER:"); Serial.print(message.sensor); Serial.print(", New status: "); Serial.println(message.getInt()); dimmer();// temp ack break; #endif #ifdef ID_S_COVER case V_UP: coverState=1; Serial.print("Incoming change for ID_S_COVER:"); Serial.print(message.sensor); Serial.print(", New status: "); Serial.println("V_UP"); cover(); // temp ack break; case V_DOWN: coverState=-1; Serial.print("Incoming change for ID_S_COVER:"); Serial.print(message.sensor); Serial.print(", New status: "); Serial.println("V_DOWN"); cover(); //temp ack break; case V_STOP: coverState=0; Serial.print("Incoming change for ID_S_COVER:"); Serial.print(message.sensor); Serial.print(", New status: "); Serial.println("V_STOP"); cover(); //temp ack break; #endif case V_HVAC_SETPOINT_HEAT: #ifdef ID_S_HEATER if(message.sensor == ID_S_HEATER) { heater_setpoint=message.getFloat(); Serial.print("Incoming set point for ID_S_HEATER:"); Serial.print(message.sensor); Serial.print(", New status: "); Serial.println(heater_setpoint,1); heater();//temp ack } #endif #ifdef ID_S_HVAC if(message.sensor == ID_S_HVAC) { hvac_SetPointHeat=message.getFloat(); Serial.print("Incoming set point for ID_S_HVAC:"); Serial.print(message.sensor); Serial.print(", New status: "); Serial.println(hvac_SetPointHeat,1); hvac();//temp ack } #endif break; case V_HVAC_FLOW_STATE: #ifdef ID_S_HEATER if(message.sensor == ID_S_HEATER) { heater_flow_state=message.getString(); Serial.print("Incoming flow state change for ID_S_HEATER:"); Serial.print(message.sensor); Serial.print(", New status: "); Serial.println(heater_flow_state); heater();//temp ack } #endif #ifdef ID_S_HVAC if(message.sensor == ID_S_HVAC) { hvac_FlowState=message.getString(); Serial.print("Incoming set point for ID_S_HVAC:"); Serial.print(message.sensor); Serial.print(", New status: "); Serial.println(hvac_FlowState); hvac();//temp ack } #endif break; #ifdef ID_S_LOCK case V_LOCK_STATUS: isLocked = message.getBool(); Serial.print("Incoming change for ID_S_LOCK:"); Serial.print(message.sensor); Serial.print(", New status: "); Serial.println(message.getBool()?"Locked":"Unlocked"); lock(); //temp ack break; #endif #ifdef ID_S_IR case V_IR_SEND: irVal = message.getLong(); Serial.print("Incoming change for ID_S_IR:"); Serial.print(message.sensor); Serial.print(", New status: "); Serial.println(irVal); ir(); // temp ack break; case V_IR_RECEIVE: irVal = message.getLong(); Serial.print("Incoming change for ID_S_IR:"); Serial.print(message.sensor); Serial.print(", New status: "); Serial.println(irVal); ir(); // temp ack break; #endif #ifdef ID_S_SCENE_CONTROLLER case V_SCENE_ON: sceneVal = message.getInt(); Serial.print("Incoming change for ID_S_SCENE_CONTROLLER:"); Serial.print(message.sensor); Serial.print(", New status: "); Serial.print(scenes[sceneVal]); Serial.println(" On"); scene();// temp ack break; case V_SCENE_OFF: sceneVal = message.getInt(); Serial.print("Incoming change for ID_S_SCENE_CONTROLLER:"); Serial.print(message.sensor); Serial.print(", New status: "); Serial.print(scenes[sceneVal]); Serial.println(" Off"); scene();// temp ack break; #endif #ifdef ID_S_RGB_LIGHT case V_RGB: rgbState=message.getString(); Serial.print("Incoming flow state change for ID_S_RGB_LIGHT:"); Serial.print(message.sensor); Serial.print(", New status: "); Serial.println(rgbState); rgbLight(); // temp ack break; #endif #ifdef ID_S_RGBW_LIGHT case V_RGBW: rgbwState=message.getString(); Serial.print("Incoming flow state change for ID_S_RGBW_LIGHT:"); Serial.print(message.sensor); Serial.print(", New status: "); Serial.println(rgbwState); rgbwLight(); break; #endif #ifdef ID_S_HVAC // hvac_SetPointHeat // hvac_SetPointCool // hvac_FlowState // hvac_FlowMode // hvac_Speed case V_HVAC_SETPOINT_COOL: hvac_SetPointCool=message.getFloat(); Serial.print("Incoming set point for ID_S_HVAC:"); Serial.print(message.sensor); Serial.print(", New status: "); Serial.println(hvac_SetPointCool,1); hvac();//temp ack break; case V_HVAC_FLOW_MODE: hvac_Speed=message.getString(); Serial.print("Incoming set point for ID_S_HVAC:"); Serial.print(message.sensor); Serial.print(", New status: "); Serial.println(hvac_Speed); hvac();//temp ack break; case V_HVAC_SPEED: hvac_FlowMode=message.getString(); Serial.print("Incoming set point for ID_S_HVAC:"); Serial.print(message.sensor); Serial.print(", New status: "); Serial.println(hvac_FlowMode); hvac();//temp ack break; #endif default: Serial.print("Unknown/UnImplemented message type: "); Serial.println(message.type); } }``` -
can you try to add the watchdog timers and see what happens? Try using a different bootloader? Different power source or using a small booster or an additional AA battery and a LDO. I am just throwing ideas and see what you can do with the stuff you may have at home.
-
@gohan said in My Slim 2AA Battery Node:
LDO
@gohan
Hi, i added a WDT now into the MotionSensorSketch.
Well at least i guess i did. I just read about it , never used it before. Does the 1Mhz Optiboot boatloaders support this ?Unfortunalty I didnt recieve my 3,3V boosters yet and i dont have LDO´s around.
Concerning the bootloaders. Do you have a suggestion which one to use ? As I read that sticking to 1Mhz is important when using only 2AA batteries because of instability when voltage goes belowe certian values.
Obviously i could use more batteries, but then i cant supply the nRF2401 from the board right ?// Enable debug prints #define MY_DEBUG // Enable and select radio type attached #define MY_RADIO_NRF24 //#define MY_RADIO_RFM69 #define MY_NODE_ID 40 #include <MySensors.h> #include <avr/wdt.h> unsigned long SLEEP_TIME = 120000; // Sleep time between reports (in milliseconds) #define DIGITAL_INPUT_SENSOR 3 // The digital input you attached your motion sensor. (Only 2 and 3 generates interrupt!) #define CHILD_ID 1 // Id of the sensor child // Initialize motion message MyMessage msg(CHILD_ID, V_TRIPPED); void setup() { wdt_enable(WDTO_2S); pinMode(DIGITAL_INPUT_SENSOR, INPUT); // sets the motion sensor digital pin as input } void presentation() { // Send the sketch version information to the gateway and Controller sendSketchInfo("Motion Sensor", "AndyWasHere"); // Register all sensors to gw (they will be created as child devices) present(CHILD_ID, S_MOTION); } void loop() { // Read digital motion value bool tripped = digitalRead(DIGITAL_INPUT_SENSOR) == HIGH; Serial.println(tripped); send(msg.set(tripped?"1":"0")); // Send tripped value to gw // Sleep until interrupt comes in on motion sensor. Send update every two minute. sleep(digitalPinToInterrupt(DIGITAL_INPUT_SENSOR), CHANGE, SLEEP_TIME); wdt_reset(); }``` -
Actually you would have to put wdt_enable(WDTO_8S); right after Loop() and wdt_disable(); before calling the sleep (this is what I copied from another sketch). The wdt_reset you cold use in the middle of the loop in case you have a function that could take long time to execute and it may trigger the WD timer so you can reset the timer (you can play with the length of the timer according to your needs)
-
Actually you would have to put wdt_enable(WDTO_8S); right after Loop() and wdt_disable(); before calling the sleep (this is what I copied from another sketch). The wdt_reset you cold use in the middle of the loop in case you have a function that could take long time to execute and it may trigger the WD timer so you can reset the timer (you can play with the length of the timer according to your needs)
@gohan
maybe like this ?void loop() { wdt_enable(WDTO_8S); // Read digital motion value bool tripped = digitalRead(DIGITAL_INPUT_SENSOR) == HIGH; Serial.println(tripped); send(msg.set(tripped?"1":"0")); // Send tripped value to gw wdt_disable(); // Sleep until interrupt comes in on motion sensor. Send update every two minute. sleep(digitalPinToInterrupt(DIGITAL_INPUT_SENSOR), CHANGE, SLEEP_TIME); }``` -
Hi there,
im still into troubleshooting, and what i did last was create a "mock up temperatursensor slim node " with this sketch
, so its really only the node and batteries. But it still freezes :(
Hardware i use is :-Atmega328p 1Mhz bootloader. // Burnt the bootloader with one Arduino UNO as master and another Arduino UNO on which I replaced the Atmega328p as slave // Arduino as ISP // with the latest Arduino IDE (1.8.2)
- after burning the bootloader on the bare ATMEGA´s i assemble them on the node and transfer the sketch via FTDI232
Furthermore i use
-generic Capacitors and restistors ( specs from your BOM)- Kuman nRF24L01 batches ( bought like 30 in a bulk once, but other "nonslimnodes" are working)
-fresh batteries
Any help is very aprreciated :) :)
/* * MockMySensors * * This skecth is intended to crate fake sensors which register and respond to the controller * *** * Barduino 2015, GizMoCuz 2015 */ // Enable debug prints to serial monitor #define MY_DEBUG // Enable and select radio type attached #define MY_RADIO_NRF24 //#define MY_RADIO_RFM69 #define MY_NODE_ID 123 #include <MySensors.h> #define RADIO_ERROR_LED_PIN 4 // Error led pin #define RADIO_RX_LED_PIN 6 // Receive led pin #define RADIO_TX_LED_PIN 13 // the PCB, on board LED // Wait times #define LONG_WAIT 500 #define SHORT_WAIT 50 #define SKETCH_NAME "MockMySensors " #define SKETCH_VERSION "v0.5" // Define Sensors ids /* S_DOOR, S_MOTION, S_SMOKE, S_LIGHT, S_DIMMER, S_COVER, S_TEMP, S_HUM, S_BARO, S_WIND, S_RAIN, S_UV, S_WEIGHT, S_POWER, S_HEATER, S_DISTANCE, S_LIGHT_LEVEL, S_ARDUINO_NODE, S_ARDUINO_REPEATER_NODE, S_LOCK, S_IR, S_WATER, S_AIR_QUALITY, S_CUSTOM, S_DUST, S_SCENE_CONTROLLER */ ////#define ID_S_ARDUINO_NODE //auto defined in initialization ////#define ID_S_ARDUINO_REPEATER_NODE //auto defined in initialization // Some of these ID's have not been updated for v1.5. Uncommenting too many of them // will make the sketch too large for a pro mini's memory so it's probably best to try // one at a time. //#define ID_S_ARMED 0 // dummy to controll armed stated for several sensors //#define ID_S_DOOR 1 //#define ID_S_MOTION 2 //#define ID_S_SMOKE 3 //#define ID_S_LIGHT 4 //#define ID_S_DIMMER 5 //#define ID_S_COVER 6 #define ID_S_TEMP 7 //#define ID_S_HUM 8 //#define ID_S_BARO 9 //#define ID_S_WIND 10 //#define ID_S_RAIN 11 //#define ID_S_UV 12 //#define ID_S_WEIGHT 13 //#define ID_S_POWER 14 //#define ID_S_HEATER 15 //#define ID_S_DISTANCE 16 //#define ID_S_LIGHT_LEVEL 17 //#define ID_S_LOCK 18 //#define ID_S_IR 19 //#define ID_S_WATER 20 //#define ID_S_AIR_QUALITY 21 //#define ID_S_DUST 22 //#define ID_S_SCENE_CONTROLLER 23 //// Lib 1.5 sensors //#define ID_S_RGB_LIGHT 24 //#define ID_S_RGBW_LIGHT 25 //#define ID_S_COLOR_SENSOR 26 //#define ID_S_HVAC 27 //#define ID_S_MULTIMETER 28 //#define ID_S_SPRINKLER 29 //#define ID_S_WATER_LEAK 30 //#define ID_S_SOUND 31 //#define ID_S_VIBRATION 32 //#define ID_S_MOISTURE 33 // //#define ID_S_CUSTOM 99 // Global Vars unsigned long SLEEP_TIME = 60000; // Sleep time between reads (in milliseconds) bool metric = true; long randNumber; //Instanciate Messages objects #ifdef ID_S_ARMED bool isArmed; #endif #ifdef ID_S_DOOR // V_TRIPPED, V_ARMED MyMessage msg_S_DOOR_T(ID_S_DOOR,V_TRIPPED); MyMessage msg_S_DOOR_A(ID_S_DOOR,V_ARMED); #endif #ifdef ID_S_MOTION // V_TRIPPED, V_ARMED MyMessage msg_S_MOTION_A(ID_S_MOTION,V_ARMED); MyMessage msg_S_MOTION_T(ID_S_MOTION,V_TRIPPED); #endif #ifdef ID_S_SMOKE // V_TRIPPED, V_ARMED MyMessage msg_S_SMOKE_T(ID_S_SMOKE,V_TRIPPED); MyMessage msg_S_SMOKE_A(ID_S_SMOKE,V_ARMED); #endif #ifdef ID_S_LIGHT MyMessage msg_S_LIGHT(ID_S_LIGHT,V_LIGHT); bool isLightOn=0; #endif #ifdef ID_S_DIMMER MyMessage msg_S_DIMMER(ID_S_DIMMER,V_DIMMER); int dimmerVal=100; #endif #ifdef ID_S_COVER MyMessage msg_S_COVER_U(ID_S_COVER,V_UP); MyMessage msg_S_COVER_D(ID_S_COVER,V_DOWN); MyMessage msg_S_COVER_S(ID_S_COVER,V_STOP); MyMessage msg_S_COVER_V(ID_S_COVER,V_VAR1); int coverState=0; //0=Stop; 1=up; -1=down #endif #ifdef ID_S_TEMP MyMessage msg_S_TEMP(ID_S_TEMP,V_TEMP); #endif #ifdef ID_S_HUM MyMessage msg_S_HUM(ID_S_HUM,V_HUM); #endif #ifdef ID_S_BARO MyMessage msg_S_BARO_P(ID_S_BARO,V_PRESSURE); MyMessage msg_S_BARO_F(ID_S_BARO,V_FORECAST); #endif #ifdef ID_S_WIND MyMessage msg_S_WIND_S(ID_S_WIND,V_WIND); MyMessage msg_S_WIND_G(ID_S_WIND,V_GUST); MyMessage msg_S_WIND_D(ID_S_WIND,V_DIRECTION); #endif #ifdef ID_S_RAIN MyMessage msg_S_RAIN_A(ID_S_RAIN,V_RAIN); MyMessage msg_S_RAIN_R(ID_S_RAIN,V_RAINRATE); #endif #ifdef ID_S_UV MyMessage msg_S_UV(ID_S_UV,V_UV); #endif #ifdef ID_S_WEIGHT MyMessage msg_S_WEIGHT(ID_S_WEIGHT,V_WEIGHT); #endif #ifdef ID_S_POWER MyMessage msg_S_POWER_W(ID_S_POWER,V_WATT); MyMessage msg_S_POWER_K(ID_S_POWER,V_KWH); #endif #ifdef ID_S_HEATER //////// REVIEW IMPLEMENTATION //////////// MyMessage msg_S_HEATER_SET_POINT(ID_S_HEATER, V_HVAC_SETPOINT_HEAT); // HVAC/Heater setpoint (Integer between 0-100). S_HEATER, S_HVAC MyMessage msg_S_HEATER_FLOW_STATE(ID_S_HEATER, V_HVAC_FLOW_STATE); // Mode of header. One of "Off", "HeatOn", "CoolOn", or "AutoChangeOver" // S_HVAC, S_HEATER //MyMessage msg_S_HEATER_STATUS(ID_S_HEATER,V_STATUS); //MyMessage msg_S_HEATER_TEMP(ID_S_HEATER,V_TEMP); float heater_setpoint=21.5; String heater_flow_state="Off"; // float heater_temp=23.5; // bool heater_status=false; // V_TEMP // Temperature // V_STATUS // Binary status. 0=off 1=on // V_HVAC_FLOW_STATE // Mode of header. One of "Off", "HeatOn", "CoolOn", or "AutoChangeOver" // V_HVAC_SPEED // HVAC/Heater fan speed ("Min", "Normal", "Max", "Auto") // V_HVAC_SETPOINT_HEAT // HVAC/Heater setpoint #endif #ifdef ID_S_DISTANCE MyMessage msg_S_DISTANCE(ID_S_DISTANCE,V_DISTANCE); #endif #ifdef ID_S_LIGHT_LEVEL MyMessage msg_S_LIGHT_LEVEL(ID_S_LIGHT_LEVEL,V_LIGHT_LEVEL); #endif #ifdef ID_S_LOCK MyMessage msg_S_LOCK(ID_S_LOCK,V_LOCK_STATUS); bool isLocked = 0; #endif #ifdef ID_S_IR MyMessage msg_S_IR_S(ID_S_IR,V_IR_SEND); MyMessage msg_S_IR_R(ID_S_IR,V_IR_RECEIVE); long irVal = 0; #endif #ifdef ID_S_WATER MyMessage msg_S_WATER_F(ID_S_WATER,V_FLOW); MyMessage msg_S_WATER_V(ID_S_WATER,V_VOLUME); #endif #ifdef ID_S_AIR_QUALITY MyMessage msg_S_AIR_QUALITY(ID_S_AIR_QUALITY,V_LEVEL); #endif #ifdef ID_S_DUST MyMessage msg_S_DUST(ID_S_DUST,V_LEVEL); #endif #ifdef ID_S_SCENE_CONTROLLER MyMessage msg_S_SCENE_CONTROLLER_ON(ID_S_SCENE_CONTROLLER,V_SCENE_ON); MyMessage msg_S_SCENE_CONTROLLER_OF(ID_S_SCENE_CONTROLLER,V_SCENE_OFF); // not sure if scene controller sends int or chars // betting on ints as Touch Display Scen by Hek // compiler warnings char *scenes[] = { (char *)"Good Morning", (char *)"Clean Up!", (char *)"All Lights Off", (char *)"Music On/Off" }; int sceneVal=0; int sceneValPrevious=0; #endif #ifdef ID_S_RGB_LIGHT MyMessage msg_S_RGB_LIGHT_V_RGB(ID_S_RGB_LIGHT,V_RGB); MyMessage msg_S_RGB_LIGHT_V_WATT(ID_S_RGB_LIGHT,V_WATT); String rgbState="000000"; //RGB light V_RGB, V_WATT //RGB value transmitted as ASCII hex string (I.e "ff0000" for red) #endif #ifdef ID_S_RGBW_LIGHT MyMessage msg_S_RGBW_LIGHT_V_RGBW(ID_S_RGBW_LIGHT,V_RGBW); MyMessage msg_S_RGBW_LIGHT_V_WATT(ID_S_RGBW_LIGHT,V_WATT); String rgbwState="00000000"; //RGBW light (with separate white component) V_RGBW, V_WATT //RGBW value transmitted as ASCII hex string (I.e "ff0000ff" for red + full white) S_RGBW_LIGHT #endif #ifdef ID_S_COLOR_SENSOR MyMessage msg_S_COLOR_SENSOR_V_RGB(ID_S_COLOR_SENSOR,V_RGB); //Color sensor V_RGB //RGB value transmitted as ASCII hex string (I.e "ff0000" for red) S_RGB_LIGHT, S_COLOR_SENSOR #endif #ifdef ID_S_HVAC MyMessage msg_S_HVAC_V_HVAC_SETPOINT_HEAT(ID_S_HVAC,V_HVAC_SETPOINT_HEAT); MyMessage msg_S_HVAC_V_HVAC_SETPOINT_COOL(ID_S_HVAC,V_HVAC_SETPOINT_COOL); MyMessage msg_S_HVAC_V_HVAC_FLOW_STATET(ID_S_HVAC,V_HVAC_FLOW_STATE); MyMessage msg_S_HVAC_V_HVAC_FLOW_MODE(ID_S_HVAC,V_HVAC_FLOW_MODE); MyMessage msg_S_HVAC_V_HVAC_SPEED(ID_S_HVAC,V_HVAC_SPEED); float hvac_SetPointHeat = 16.5; float hvac_SetPointCool = 25.5; String hvac_FlowState = "AutoChangeOver"; String hvac_FlowMode = "Auto"; String hvac_Speed = "Normal"; //Thermostat/HVAC device //V_HVAC_SETPOINT_HEAT, // HVAC/Heater setpoint //V_HVAC_SETPOINT_COOL, // HVAC cold setpoint //V_HVAC_FLOW_STATE, // Mode of header. One of "Off", "HeatOn", "CoolOn", or "AutoChangeOver" //V_HVAC_FLOW_MODE, // Flow mode for HVAC ("Auto", "ContinuousOn", "PeriodicOn") //V_HVAC_SPEED // HVAC/Heater fan speed ("Min", "Normal", "Max", "Auto") // NOT IMPLEMENTED YET //V_TEMP // Temperature //V_STATUS // Binary status. 0=off 1=on #endif #ifdef ID_S_MULTIMETER MyMessage msg_S_MULTIMETER_V_IMPEDANCE(ID_S_MULTIMETER,V_IMPEDANCE); MyMessage msg_S_MULTIMETER_V_VOLTAGE(ID_S_MULTIMETER,V_VOLTAGE); MyMessage msg_S_MULTIMETER_V_CURRENT(ID_S_MULTIMETER,V_CURRENT); // Multimeter device V_VOLTAGE, V_CURRENT, V_IMPEDANCE // V_IMPEDANCE 14 Impedance value // V_VOLTAGE 38 Voltage level // V_CURRENT 39 Current level #endif #ifdef ID_S_SPRINKLER // S_SPRINKLER 31 Sprinkler device V_STATUS (turn on/off), V_TRIPPED (if fire detecting device) // V_STATUS 2 Binary status. 0=off 1=on // V_ARMED 15 Armed status of a security sensor. 1=Armed, 0=Bypassed // V_TRIPPED 16 Tripped status of a security sensor. 1=Tripped, 0=Untripped #endif #ifdef ID_S_WATER_LEAK #endif #ifdef ID_S_SOUND #endif #ifdef ID_S_VIBRATION #endif #ifdef ID_S_MOISTURE #endif #ifdef ID_S_MOISTURE MyMessage msg_S_MOISTURE(ID_S_MOISTURE,V_LEVEL); #endif #ifdef ID_S_CUSTOM MyMessage msg_S_CUSTOM_1(ID_S_CUSTOM,V_VAR1); MyMessage msg_S_CUSTOM_2(ID_S_CUSTOM,V_VAR2); MyMessage msg_S_CUSTOM_3(ID_S_CUSTOM,V_VAR3); MyMessage msg_S_CUSTOM_4(ID_S_CUSTOM,V_VAR4); MyMessage msg_S_CUSTOM_5(ID_S_CUSTOM,V_VAR5); #endif void setup() { // Random SEED randomSeed(analogRead(0)); wait(LONG_WAIT); Serial.println("GW Started"); } void presentation() { // Send the Sketch Version Information to the Gateway Serial.print("Send Sketch Info: "); sendSketchInfo(SKETCH_NAME, SKETCH_VERSION); Serial.print(SKETCH_NAME); Serial.println(SKETCH_VERSION); wait(LONG_WAIT); // Get controller configuration Serial.print("Get Config: "); metric = getControllerConfig().isMetric; Serial.println(metric ? "Metric":"Imperial"); wait(LONG_WAIT); // Init Armed #ifdef ID_S_ARMED isArmed = true; #endif // Register all sensors to gw (they will be created as child devices) Serial.println("Presenting Nodes"); Serial.println("________________"); #ifdef ID_S_DOOR Serial.println(" S_DOOR"); present(ID_S_DOOR,S_DOOR,"Outside Door"); wait(SHORT_WAIT); #endif #ifdef ID_S_MOTION Serial.println(" S_MOTION"); present(ID_S_MOTION,S_MOTION,"Outside Motion"); wait(SHORT_WAIT); #endif #ifdef ID_S_SMOKE Serial.println(" S_SMOKE"); present(ID_S_SMOKE,S_SMOKE,"Kitchen Smoke"); wait(SHORT_WAIT); #endif #ifdef ID_S_LIGHT Serial.println(" S_LIGHT"); present(ID_S_LIGHT,S_LIGHT,"Hall Light"); wait(SHORT_WAIT); #endif #ifdef ID_S_DIMMER Serial.println(" S_DIMMER"); present(ID_S_DIMMER,S_DIMMER,"Living room dimmer"); wait(SHORT_WAIT); #endif #ifdef ID_S_COVER Serial.println(" S_COVER"); present(ID_S_COVER,S_COVER,"Window cover"); wait(SHORT_WAIT); #endif #ifdef ID_S_TEMP Serial.println(" S_TEMP"); present(ID_S_TEMP,S_TEMP,"House Temperarue"); wait(SHORT_WAIT); #endif #ifdef ID_S_HUM Serial.println(" S_HUM"); present(ID_S_HUM,S_HUM,"Current Humidity"); wait(SHORT_WAIT); #endif #ifdef ID_S_BARO Serial.println(" S_BARO"); present(ID_S_BARO,S_BARO," Air pressure"); wait(SHORT_WAIT); #endif #ifdef ID_S_WIND Serial.println(" S_WIND"); present(ID_S_WIND,S_WIND,"Wind Station"); wait(SHORT_WAIT); #endif #ifdef ID_S_RAIN Serial.println(" S_RAIN"); present(ID_S_RAIN,S_RAIN,"Rain Station"); wait(SHORT_WAIT); #endif #ifdef ID_S_UV Serial.println(" S_UV"); present(ID_S_UV,S_UV,"Ultra Violet"); wait(SHORT_WAIT); #endif #ifdef ID_S_WEIGHT Serial.println(" S_WEIGHT"); present(ID_S_WEIGHT,S_WEIGHT,"Outdoor Scale"); wait(SHORT_WAIT); #endif #ifdef ID_S_POWER Serial.println(" S_POWER"); present(ID_S_POWER,S_POWER,"Power Metric"); wait(SHORT_WAIT); #endif #ifdef ID_S_HEATER Serial.println(" S_HEATER"); present(ID_S_HEATER,S_HEATER,"Garage Heater"); wait(SHORT_WAIT); #endif #ifdef ID_S_DISTANCE Serial.println(" S_DISTANCE"); present(ID_S_DISTANCE,S_DISTANCE,"Distance Measure"); wait(SHORT_WAIT); #endif #ifdef ID_S_LIGHT_LEVEL Serial.println(" S_LIGHT_LEVEL"); present(ID_S_LIGHT_LEVEL,S_LIGHT_LEVEL,"Outside Light Level"); wait(SHORT_WAIT); #endif #ifdef ID_S_LOCK Serial.println(" S_LOCK"); present(ID_S_LOCK,S_LOCK,"Front Door Lock"); wait(SHORT_WAIT); #endif #ifdef ID_S_IR Serial.println(" S_IR"); present(ID_S_IR,S_IR,"Univeral Command"); wait(SHORT_WAIT); #endif #ifdef ID_S_WATER Serial.println(" S_WATER"); present(ID_S_WATER,S_WATER,"Water Level"); wait(SHORT_WAIT); #endif #ifdef ID_S_AIR_QUALITY Serial.println(" S_AIR_QUALITY"); present(ID_S_AIR_QUALITY,S_AIR_QUALITY,"Air Station"); wait(SHORT_WAIT); #endif #ifdef ID_S_DUST Serial.println(" S_DUST"); present(ID_S_DUST,S_DUST,"Dust Level"); wait(SHORT_WAIT); #endif #ifdef ID_S_SCENE_CONTROLLER Serial.println(" S_SCENE_CONTROLLER"); present(ID_S_SCENE_CONTROLLER,S_SCENE_CONTROLLER,"Scene Controller"); wait(SHORT_WAIT); #endif #ifdef ID_S_RGB_LIGHT Serial.println(" RGB_LIGHT"); present(ID_S_RGB_LIGHT,S_RGB_LIGHT,"Mood Light"); wait(SHORT_WAIT); #endif #ifdef ID_S_RGBW_LIGHT Serial.println(" RGBW_LIGHT"); present(ID_S_RGBW_LIGHT,S_RGBW_LIGHT,"Mood Light 2"); wait(SHORT_WAIT); #endif #ifdef ID_S_COLOR_SENSOR Serial.println(" COLOR_SENSOR"); present(ID_S_COLOR_SENSOR,S_COLOR_SENSOR,"Hall Painting"); wait(SHORT_WAIT); #endif #ifdef ID_S_HVAC Serial.println(" HVAC"); present(ID_S_HVAC,S_HVAC,"HVAC"); wait(SHORT_WAIT); #endif #ifdef ID_S_MULTIMETER Serial.println(" MULTIMETER"); present(ID_S_MULTIMETER,S_MULTIMETER,"Electric Staion"); wait(SHORT_WAIT); #endif #ifdef ID_S_SPRINKLER #endif #ifdef ID_S_WATER_LEAK #endif #ifdef ID_S_SOUND #endif #ifdef ID_S_VIBRATION #endif #ifdef ID_S_MOISTURE #endif #ifdef ID_S_MOISTURE Serial.println(" S_MOISTURE"); present(ID_S_MOISTURE,S_MOISTURE,"Basement Sensor"); wait(SHORT_WAIT); #endif #ifdef ID_S_CUSTOM Serial.println(" S_CUSTOM"); present(ID_S_CUSTOM,S_CUSTOM,"Other Stuff"); wait(SHORT_WAIT); #endif Serial.println("________________"); } void loop() { Serial.println(""); Serial.println(""); Serial.println(""); Serial.println("#########################"); randNumber=random(0,101); Serial.print("RandomNumber:"); Serial.println(randNumber); // Send fake battery level Serial.println("Send Battery Level"); sendBatteryLevel(randNumber); wait(LONG_WAIT); // Request time Serial.println("Request Time"); requestTime(); wait(LONG_WAIT); //Read Sensors #ifdef ID_S_DOOR door(); #endif #ifdef ID_S_MOTION motion(); #endif #ifdef ID_S_SMOKE smoke(); #endif #ifdef ID_S_LIGHT light(); #endif #ifdef ID_S_DIMMER dimmer(); #endif #ifdef ID_S_COVER cover(); #endif #ifdef ID_S_TEMP temp(); #endif #ifdef ID_S_HUM hum(); #endif #ifdef ID_S_BARO baro(); #endif #ifdef ID_S_WIND wind(); #endif #ifdef ID_S_RAIN rain(); #endif #ifdef ID_S_UV uv(); #endif #ifdef ID_S_WEIGHT weight(); #endif #ifdef ID_S_POWER power(); #endif #ifdef ID_S_HEATER heater(); #endif #ifdef ID_S_DISTANCE distance(); #endif #ifdef ID_S_LIGHT_LEVEL light_level(); #endif #ifdef ID_S_LOCK lock(); #endif #ifdef ID_S_IR ir(); #endif #ifdef ID_S_WATER water(); #endif #ifdef ID_S_AIR_QUALITY air(); #endif #ifdef ID_S_DUST dust(); #endif #ifdef ID_S_SCENE_CONTROLLER scene(); #endif #ifdef ID_S_RGB_LIGHT rgbLight(); #endif #ifdef ID_S_RGBW_LIGHT rgbwLight(); #endif #ifdef ID_S_COLOR_SENSOR color(); #endif #ifdef ID_S_HVAC hvac(); #endif #ifdef ID_S_MULTIMETER multimeter(); #endif #ifdef ID_S_SPRINKLER #endif #ifdef ID_S_WATER_LEAK #endif #ifdef ID_S_SOUND #endif #ifdef ID_S_VIBRATION #endif #ifdef ID_S_MOISTURE #endif #ifdef ID_S_MOISTURE moisture(); #endif #ifdef ID_S_CUSTOM custom(); #endif sendBatteryLevel(randNumber); wait(SHORT_WAIT); Serial.println("#########################"); wait(SLEEP_TIME); //sleep a bit } // This is called when a new time value was received void receiveTime(unsigned long controllerTime) { Serial.print("Time value received: "); Serial.println(controllerTime); } //void door(){} #ifdef ID_S_DOOR void door() { Serial.print("Door is: " ); if (randNumber <= 50) { Serial.println("Open"); send(msg_S_DOOR_T.set((int16_t)1)); } else { Serial.println("Closed"); send(msg_S_DOOR_T.set((int16_t)0)); } #ifdef ID_S_ARMED Serial.print("System is: " ); Serial.println((isArmed ? "Armed":"Disarmed")); send(msg_S_DOOR_A.set(isArmed)); #endif } #endif #ifdef ID_S_MOTION void motion() { Serial.print("Motion is: " ); if (randNumber <= 50) { Serial.println("Active"); send(msg_S_MOTION_T.set(1)); } else { Serial.println("Quiet"); send(msg_S_MOTION_T.set(0)); } #ifdef ID_S_ARMED Serial.print("System is: " ); Serial.println((isArmed ? "Armed":"Disarmed")); send(msg_S_MOTION_A.set(isArmed)); #endif } #endif #ifdef ID_S_SMOKE void smoke() { Serial.print("Smoke is: " ); if (randNumber <= 50) { Serial.println("Active"); send(msg_S_SMOKE_T.set(1)); } else { Serial.println("Quiet"); send(msg_S_SMOKE_T.set(0)); } #ifdef ID_S_ARMED Serial.print("System is: " ); Serial.println((isArmed ? "Armed":"Disarmed")); send(msg_S_SMOKE_A.set(isArmed)); #endif } #endif #ifdef ID_S_LIGHT void light() { Serial.print("Light is: " ); Serial.println((isLightOn ? "On":"Off")); send(msg_S_LIGHT.set(isLightOn)); } #endif #ifdef ID_S_DIMMER void dimmer() { Serial.print("Dimmer is set to: " ); Serial.println(dimmerVal); send(msg_S_DIMMER.set(dimmerVal)); } #endif #ifdef ID_S_COVER void cover() { Serial.print("Cover is : " ); if (coverState == 1) { Serial.println("Opening"); send(msg_S_COVER_U.set(1)); } else if (coverState == -1) { Serial.println("Closing"); send(msg_S_COVER_D.set(0)); } else { Serial.println("Idle"); send(msg_S_COVER_S.set(-1)); } send(msg_S_COVER_V.set(coverState)); } #endif #ifdef ID_S_TEMP void temp() { Serial.print("Temperature is: " ); Serial.println(map(randNumber,1,100,0,45)); send(msg_S_TEMP.set(map(randNumber,1,100,0,45))); } #endif #ifdef ID_S_HUM void hum() { Serial.print("Humitidty is: " ); Serial.println(randNumber); send(msg_S_HUM.set(randNumber)); } #endif #ifdef ID_S_BARO void baro() { const char *weather[] = {"stable","sunny","cloudy","unstable","thunderstorm","unknown"}; long pressure = map(randNumber,1,100,870,1086);// hPa? int forecast = map(randNumber,1,100,0,5); Serial.print("Atmosferic Pressure is: " ); Serial.println(pressure); send(msg_S_BARO_P.set(pressure)); Serial.print("Weather forecast: " ); Serial.println(weather[forecast]); send(msg_S_BARO_F.set(weather[forecast])); } #endif #ifdef ID_S_WIND void wind() { Serial.print("Wind Speed is: " ); Serial.println(randNumber); send(msg_S_WIND_S.set(randNumber)); Serial.print("Wind Gust is: " ); Serial.println(randNumber+10); send(msg_S_WIND_G.set(randNumber+10)); Serial.print("Wind Direction is: " ); Serial.println(map(randNumber,1,100,0,360)); send(msg_S_WIND_D.set(map(randNumber,1,100,0,360))); } #endif #ifdef ID_S_RAIN void rain() { Serial.print("Rain ammount is: " ); Serial.println(randNumber); send(msg_S_RAIN_A.set(randNumber)); Serial.print("Rain rate is: " ); Serial.println(randNumber/60); send(msg_S_RAIN_R.set(randNumber/60,1)); } #endif #ifdef ID_S_UV void uv() { Serial.print("Ultra Violet level is: " ); Serial.println(map(randNumber,1,100,0,15)); send(msg_S_UV.set(map(randNumber,1,100,0,15))); } #endif #ifdef ID_S_WEIGHT void weight() { Serial.print("Weight is: " ); Serial.println(map(randNumber,1,100,0,150)); send(msg_S_WEIGHT.set(map(randNumber,1,100,0,150))); } #endif #ifdef ID_S_POWER void power() { Serial.print("Watt is: " ); Serial.println(map(randNumber,1,100,0,150)); send(msg_S_POWER_W.set(map(randNumber,1,100,0,150))); Serial.print("KWH is: " ); Serial.println(map(randNumber,1,100,0,150)); send(msg_S_POWER_K.set(map(randNumber,1,100,0,150))); } #endif #ifdef ID_S_HEATER void heater() { // float heater_setpoint=21.5; // float heater_temp=23.5; // bool heater_status=false; // String heatState="Off"; Serial.print("Heater flow state is: " ); Serial.println(heater_flow_state); send(msg_S_HEATER_FLOW_STATE.set(heater_flow_state.c_str())); // Serial.print("Heater on/off is: " ); // Serial.println((heater_status==true)?"On":"Off"); // send(msg_S_HEATER_STATUS.set(heater_status)); // Serial.print("Heater Temperature is: " ); // Serial.println(heater_temp,1); // send(msg_S_HEATER_TEMP.set(heater_temp,1)); Serial.print("Heater Setpoint: " ); Serial.println(heater_setpoint,1); send(msg_S_HEATER_SET_POINT.set(heater_setpoint,1)); } #endif #ifdef ID_S_DISTANCE void distance() { Serial.print("Distance is: " ); Serial.println(map(randNumber,1,100,0,150)); send(msg_S_DISTANCE.set(map(randNumber,1,100,0,150))); } #endif #ifdef ID_S_LIGHT_LEVEL void light_level() { Serial.print("Light is: " ); Serial.println(map(randNumber,1,100,0,150)); send(msg_S_LIGHT_LEVEL.set(map(randNumber,1,100,0,150))); } #endif #ifdef ID_S_LOCK void lock() { Serial.print("Lock is: " ); Serial.println((isLocked ? "Locked":"Unlocked")); send(msg_S_LOCK.set(isLocked)); } #endif #ifdef ID_S_IR void ir() { Serial.print("Infrared is: " ); Serial.println(irVal); send(msg_S_IR_S.set(irVal)); send(msg_S_IR_R.set(irVal)); } #endif #ifdef ID_S_WATER void water() { Serial.print("Water flow is: " ); Serial.println(map(randNumber,1,100,0,150)); send(msg_S_WATER_F.set(map(randNumber,1,100,0,150))); Serial.print("Water volume is: " ); Serial.println(map(randNumber,1,100,0,150)); send(msg_S_WATER_V.set(map(randNumber,1,100,0,150))); } #endif #ifdef ID_S_AIR_QUALITY void air() { Serial.print("Air Quality is: " ); Serial.println(randNumber); send(msg_S_AIR_QUALITY.set(randNumber)); } #endif #ifdef ID_S_DUST void dust() { Serial.print("Dust level is: " ); Serial.println(randNumber); send(msg_S_DUST.set(randNumber)); } #endif #ifdef ID_S_SCENE_CONTROLLER void scene() { Serial.print("Scene is: " ); Serial.println(scenes[sceneVal]); if(sceneValPrevious != sceneVal) { send(msg_S_SCENE_CONTROLLER_OF.set(sceneValPrevious)); send(msg_S_SCENE_CONTROLLER_ON.set(sceneVal)); sceneValPrevious=sceneVal; } } #endif #ifdef ID_S_RGB_LIGHT void rgbLight() { Serial.print("RGB Light state is: " ); Serial.println(rgbState); send(msg_S_RGB_LIGHT_V_RGB.set(rgbState.c_str())); Serial.print("RGB Light Watt is: " ); Serial.println(map(randNumber,1,100,0,150)); send(msg_S_RGB_LIGHT_V_WATT.set(map(randNumber,1,100,0,150))); } #endif #ifdef ID_S_RGBW_LIGHT void rgbwLight() { Serial.print("RGBW Light state is: " ); Serial.println(rgbwState); send(msg_S_RGBW_LIGHT_V_RGBW.set(rgbwState.c_str())); Serial.print("RGBW Light Watt is: " ); Serial.println(map(randNumber,1,100,0,150)); send(msg_S_RGBW_LIGHT_V_WATT.set(map(randNumber,1,100,0,150))); } #endif #ifdef ID_S_COLOR_SENSOR void color() { String colorState; String red = String(random(0,256),HEX); String green = String(random(0,256),HEX); String blue = String(random(0,256),HEX); colorState=String(red + green + blue); Serial.print("Color state is: " ); Serial.println(colorState); send(msg_S_COLOR_SENSOR_V_RGB.set(colorState.c_str())); } #endif #ifdef ID_S_HVAC void hvac() { // float hvac_SetPointHeat = 16.5; // float hvac_SetPointCool = 25.5; // String hvac_FlowState = "AutoChangeOver"; // String hvac_FlowMode = "Auto"; // String hvac_Speed = "Normal"; Serial.print("HVAC Set Point Heat is: " ); Serial.println(hvac_SetPointHeat); send(msg_S_HVAC_V_HVAC_SETPOINT_HEAT.set(hvac_SetPointHeat,1)); Serial.print("HVAC Set Point Cool is: " ); Serial.println(hvac_SetPointCool); send(msg_S_HVAC_V_HVAC_SETPOINT_COOL.set(hvac_SetPointCool,1)); Serial.print("HVAC Flow State is: " ); Serial.println(hvac_FlowState); send(msg_S_HVAC_V_HVAC_FLOW_STATET.set(hvac_FlowState.c_str())); Serial.print("HVAC Flow Mode is: " ); Serial.println(hvac_FlowMode); send(msg_S_HVAC_V_HVAC_FLOW_MODE.set(hvac_FlowMode.c_str())); Serial.print("HVAC Speed is: " ); Serial.println(hvac_Speed); send(msg_S_HVAC_V_HVAC_SPEED.set(hvac_Speed.c_str())); } #endif #ifdef ID_S_MULTIMETER void multimeter() { int impedance=map(randNumber,1,100,0,15000); int volt=map(randNumber,1,100,0,380); int amps=map(randNumber,1,100,0,16); Serial.print("Impedance is: " ); Serial.println(impedance); send(msg_S_MULTIMETER_V_IMPEDANCE.set(impedance)); Serial.print("Voltage is: " ); Serial.println(volt); send(msg_S_MULTIMETER_V_VOLTAGE.set(volt)); Serial.print("Current is: " ); Serial.println(amps); send(msg_S_MULTIMETER_V_CURRENT.set(amps)); } #endif #ifdef ID_S_SPRINKLER #endif #ifdef ID_S_WATER_LEAK #endif #ifdef ID_S_SOUND #endif #ifdef ID_S_VIBRATION #endif #ifdef ID_S_MOISTURE #endif #ifdef ID_S_MOISTURE void moisture() { Serial.print("Moisture level is: " ); Serial.println(randNumber); send(msg_S_MOISTURE.set(randNumber)); } #endif #ifdef ID_S_CUSTOM void custom() { Serial.print("Custom value is: " ); Serial.println(randNumber); send(msg_S_CUSTOM_1.set(randNumber)); send(msg_S_CUSTOM_2.set(randNumber)); send(msg_S_CUSTOM_3.set(randNumber)); send(msg_S_CUSTOM_4.set(randNumber)); send(msg_S_CUSTOM_5.set(randNumber)); } #endif void receive(const MyMessage &message) { switch (message.type) { #ifdef ID_S_ARMED case V_ARMED: isArmed = message.getBool(); Serial.print("Incoming change for ID_S_ARMED:"); Serial.print(message.sensor); Serial.print(", New status: "); Serial.println((isArmed ? "Armed":"Disarmed" )); #ifdef ID_S_DOOR door();//temp ack for door #endif #ifdef ID_S_MOTION motion();//temp ack #endif #ifdef ID_S_SMOKE smoke();//temp ack #endif break; #endif case V_STATUS: // V_LIGHT: #ifdef ID_S_LIGHT if(message.sensor==ID_S_LIGHT) { isLightOn = message.getBool(); Serial.print("Incoming change for ID_S_LIGHT:"); Serial.print(message.sensor); Serial.print(", New status: "); Serial.println((isLightOn ? "On":"Off")); light(); // temp ack } #endif // #ifdef ID_S_HEATER // if(message.sensor == ID_S_HEATER){ // heater_status = message.getBool(); // Serial.print("Incoming change for ID_S_HEATER:"); // Serial.print(message.sensor); // Serial.print(", New status: "); // Serial.println(heater_status); // heater();//temp ack // } // #endif break; #ifdef ID_S_DIMMER case V_DIMMER: if ((message.getInt()<0)||(message.getInt()>100)) { Serial.println( "V_DIMMER data invalid (should be 0..100)" ); break; } dimmerVal= message.getInt(); Serial.print("Incoming change for ID_S_DIMMER:"); Serial.print(message.sensor); Serial.print(", New status: "); Serial.println(message.getInt()); dimmer();// temp ack break; #endif #ifdef ID_S_COVER case V_UP: coverState=1; Serial.print("Incoming change for ID_S_COVER:"); Serial.print(message.sensor); Serial.print(", New status: "); Serial.println("V_UP"); cover(); // temp ack break; case V_DOWN: coverState=-1; Serial.print("Incoming change for ID_S_COVER:"); Serial.print(message.sensor); Serial.print(", New status: "); Serial.println("V_DOWN"); cover(); //temp ack break; case V_STOP: coverState=0; Serial.print("Incoming change for ID_S_COVER:"); Serial.print(message.sensor); Serial.print(", New status: "); Serial.println("V_STOP"); cover(); //temp ack break; #endif case V_HVAC_SETPOINT_HEAT: #ifdef ID_S_HEATER if(message.sensor == ID_S_HEATER) { heater_setpoint=message.getFloat(); Serial.print("Incoming set point for ID_S_HEATER:"); Serial.print(message.sensor); Serial.print(", New status: "); Serial.println(heater_setpoint,1); heater();//temp ack } #endif #ifdef ID_S_HVAC if(message.sensor == ID_S_HVAC) { hvac_SetPointHeat=message.getFloat(); Serial.print("Incoming set point for ID_S_HVAC:"); Serial.print(message.sensor); Serial.print(", New status: "); Serial.println(hvac_SetPointHeat,1); hvac();//temp ack } #endif break; case V_HVAC_FLOW_STATE: #ifdef ID_S_HEATER if(message.sensor == ID_S_HEATER) { heater_flow_state=message.getString(); Serial.print("Incoming flow state change for ID_S_HEATER:"); Serial.print(message.sensor); Serial.print(", New status: "); Serial.println(heater_flow_state); heater();//temp ack } #endif #ifdef ID_S_HVAC if(message.sensor == ID_S_HVAC) { hvac_FlowState=message.getString(); Serial.print("Incoming set point for ID_S_HVAC:"); Serial.print(message.sensor); Serial.print(", New status: "); Serial.println(hvac_FlowState); hvac();//temp ack } #endif break; #ifdef ID_S_LOCK case V_LOCK_STATUS: isLocked = message.getBool(); Serial.print("Incoming change for ID_S_LOCK:"); Serial.print(message.sensor); Serial.print(", New status: "); Serial.println(message.getBool()?"Locked":"Unlocked"); lock(); //temp ack break; #endif #ifdef ID_S_IR case V_IR_SEND: irVal = message.getLong(); Serial.print("Incoming change for ID_S_IR:"); Serial.print(message.sensor); Serial.print(", New status: "); Serial.println(irVal); ir(); // temp ack break; case V_IR_RECEIVE: irVal = message.getLong(); Serial.print("Incoming change for ID_S_IR:"); Serial.print(message.sensor); Serial.print(", New status: "); Serial.println(irVal); ir(); // temp ack break; #endif #ifdef ID_S_SCENE_CONTROLLER case V_SCENE_ON: sceneVal = message.getInt(); Serial.print("Incoming change for ID_S_SCENE_CONTROLLER:"); Serial.print(message.sensor); Serial.print(", New status: "); Serial.print(scenes[sceneVal]); Serial.println(" On"); scene();// temp ack break; case V_SCENE_OFF: sceneVal = message.getInt(); Serial.print("Incoming change for ID_S_SCENE_CONTROLLER:"); Serial.print(message.sensor); Serial.print(", New status: "); Serial.print(scenes[sceneVal]); Serial.println(" Off"); scene();// temp ack break; #endif #ifdef ID_S_RGB_LIGHT case V_RGB: rgbState=message.getString(); Serial.print("Incoming flow state change for ID_S_RGB_LIGHT:"); Serial.print(message.sensor); Serial.print(", New status: "); Serial.println(rgbState); rgbLight(); // temp ack break; #endif #ifdef ID_S_RGBW_LIGHT case V_RGBW: rgbwState=message.getString(); Serial.print("Incoming flow state change for ID_S_RGBW_LIGHT:"); Serial.print(message.sensor); Serial.print(", New status: "); Serial.println(rgbwState); rgbwLight(); break; #endif #ifdef ID_S_HVAC // hvac_SetPointHeat // hvac_SetPointCool // hvac_FlowState // hvac_FlowMode // hvac_Speed case V_HVAC_SETPOINT_COOL: hvac_SetPointCool=message.getFloat(); Serial.print("Incoming set point for ID_S_HVAC:"); Serial.print(message.sensor); Serial.print(", New status: "); Serial.println(hvac_SetPointCool,1); hvac();//temp ack break; case V_HVAC_FLOW_MODE: hvac_Speed=message.getString(); Serial.print("Incoming set point for ID_S_HVAC:"); Serial.print(message.sensor); Serial.print(", New status: "); Serial.println(hvac_Speed); hvac();//temp ack break; case V_HVAC_SPEED: hvac_FlowMode=message.getString(); Serial.print("Incoming set point for ID_S_HVAC:"); Serial.print(message.sensor); Serial.print(", New status: "); Serial.println(hvac_FlowMode); hvac();//temp ack break; #endif default: Serial.print("Unknown/UnImplemented message type: "); Serial.println(message.type); } }``` -
-
Has anyone used NRF24L01+ + PA + LNA on these modules ?
-
Any reason why it shouldnt work out of the box ( does AA batteries give enough power to drive them on LOW settings? )
-
What type of battery monitoring is recommended on these ones? The resistance or the library way?
I just got 90 PCBs, beautiful, fast shipping ( i think under 2 weeks to Norway ) and looks well made.
I'll drop one in each beehive I have ( 7 ) and see how long they last -
-
So, it seems i made some progress.
After changing to the @GertSanders bootloader ( https://www.openhardware.io/view/33/Various-bootloader-files-based-on-Optiboot-62) all the PIR nodes seem to be stable.
I´m using these settings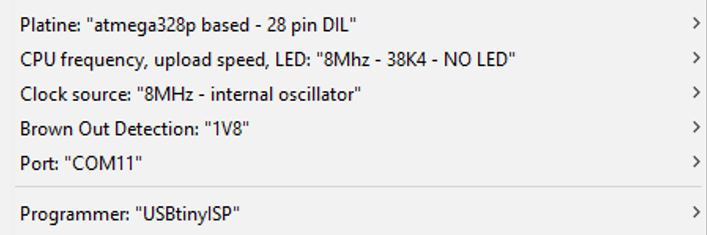
Wish me luck :)
-
So, it seems i made some progress.
After changing to the @GertSanders bootloader ( https://www.openhardware.io/view/33/Various-bootloader-files-based-on-Optiboot-62) all the PIR nodes seem to be stable.
I´m using these settingsWish me luck :)
@Komaandy Yes, using 8MHz instead of 1MHz is perhaps a good idea. Stable enough at room temperature, well proven and will e.g. solve a "Serial.print()" interrupt loop issue. Just remember that you'll lose ~25uA if you'll leave BOD enabled.
-
@Komaandy Yes, using 8MHz instead of 1MHz is perhaps a good idea. Stable enough at room temperature, well proven and will e.g. solve a "Serial.print()" interrupt loop issue. Just remember that you'll lose ~25uA if you'll leave BOD enabled.
@m26872 said in My Slim 2AA Battery Node:
Just remember that you'll lose ~25uA if you'll leave BOD enabled.
No, on ATMega328 MySensors disables BOD before going to sleep.
So extra consumption from BOD will only exist when node is active and in that case it's negligible. -
@m26872 said in My Slim 2AA Battery Node:
Just remember that you'll lose ~25uA if you'll leave BOD enabled.
No, on ATMega328 MySensors disables BOD before going to sleep.
So extra consumption from BOD will only exist when node is active and in that case it's negligible.