Video How To - Phoney TV
-
Hi Everyone,
Here is a how to video for building Jim's (@BulldogLowell) awesome PhoneyTV project. We thought it would be the most straight forward to start a new thread so everything can be compiled into the first post but make sure you check out Jim's original work here: http://forum.mysensors.org/topic/85/phoneytv-for-vera-is-here
You can see all the details of his build (including his cool enclosure) as well as the input from others there.Ok, here is the info you need to build this project:
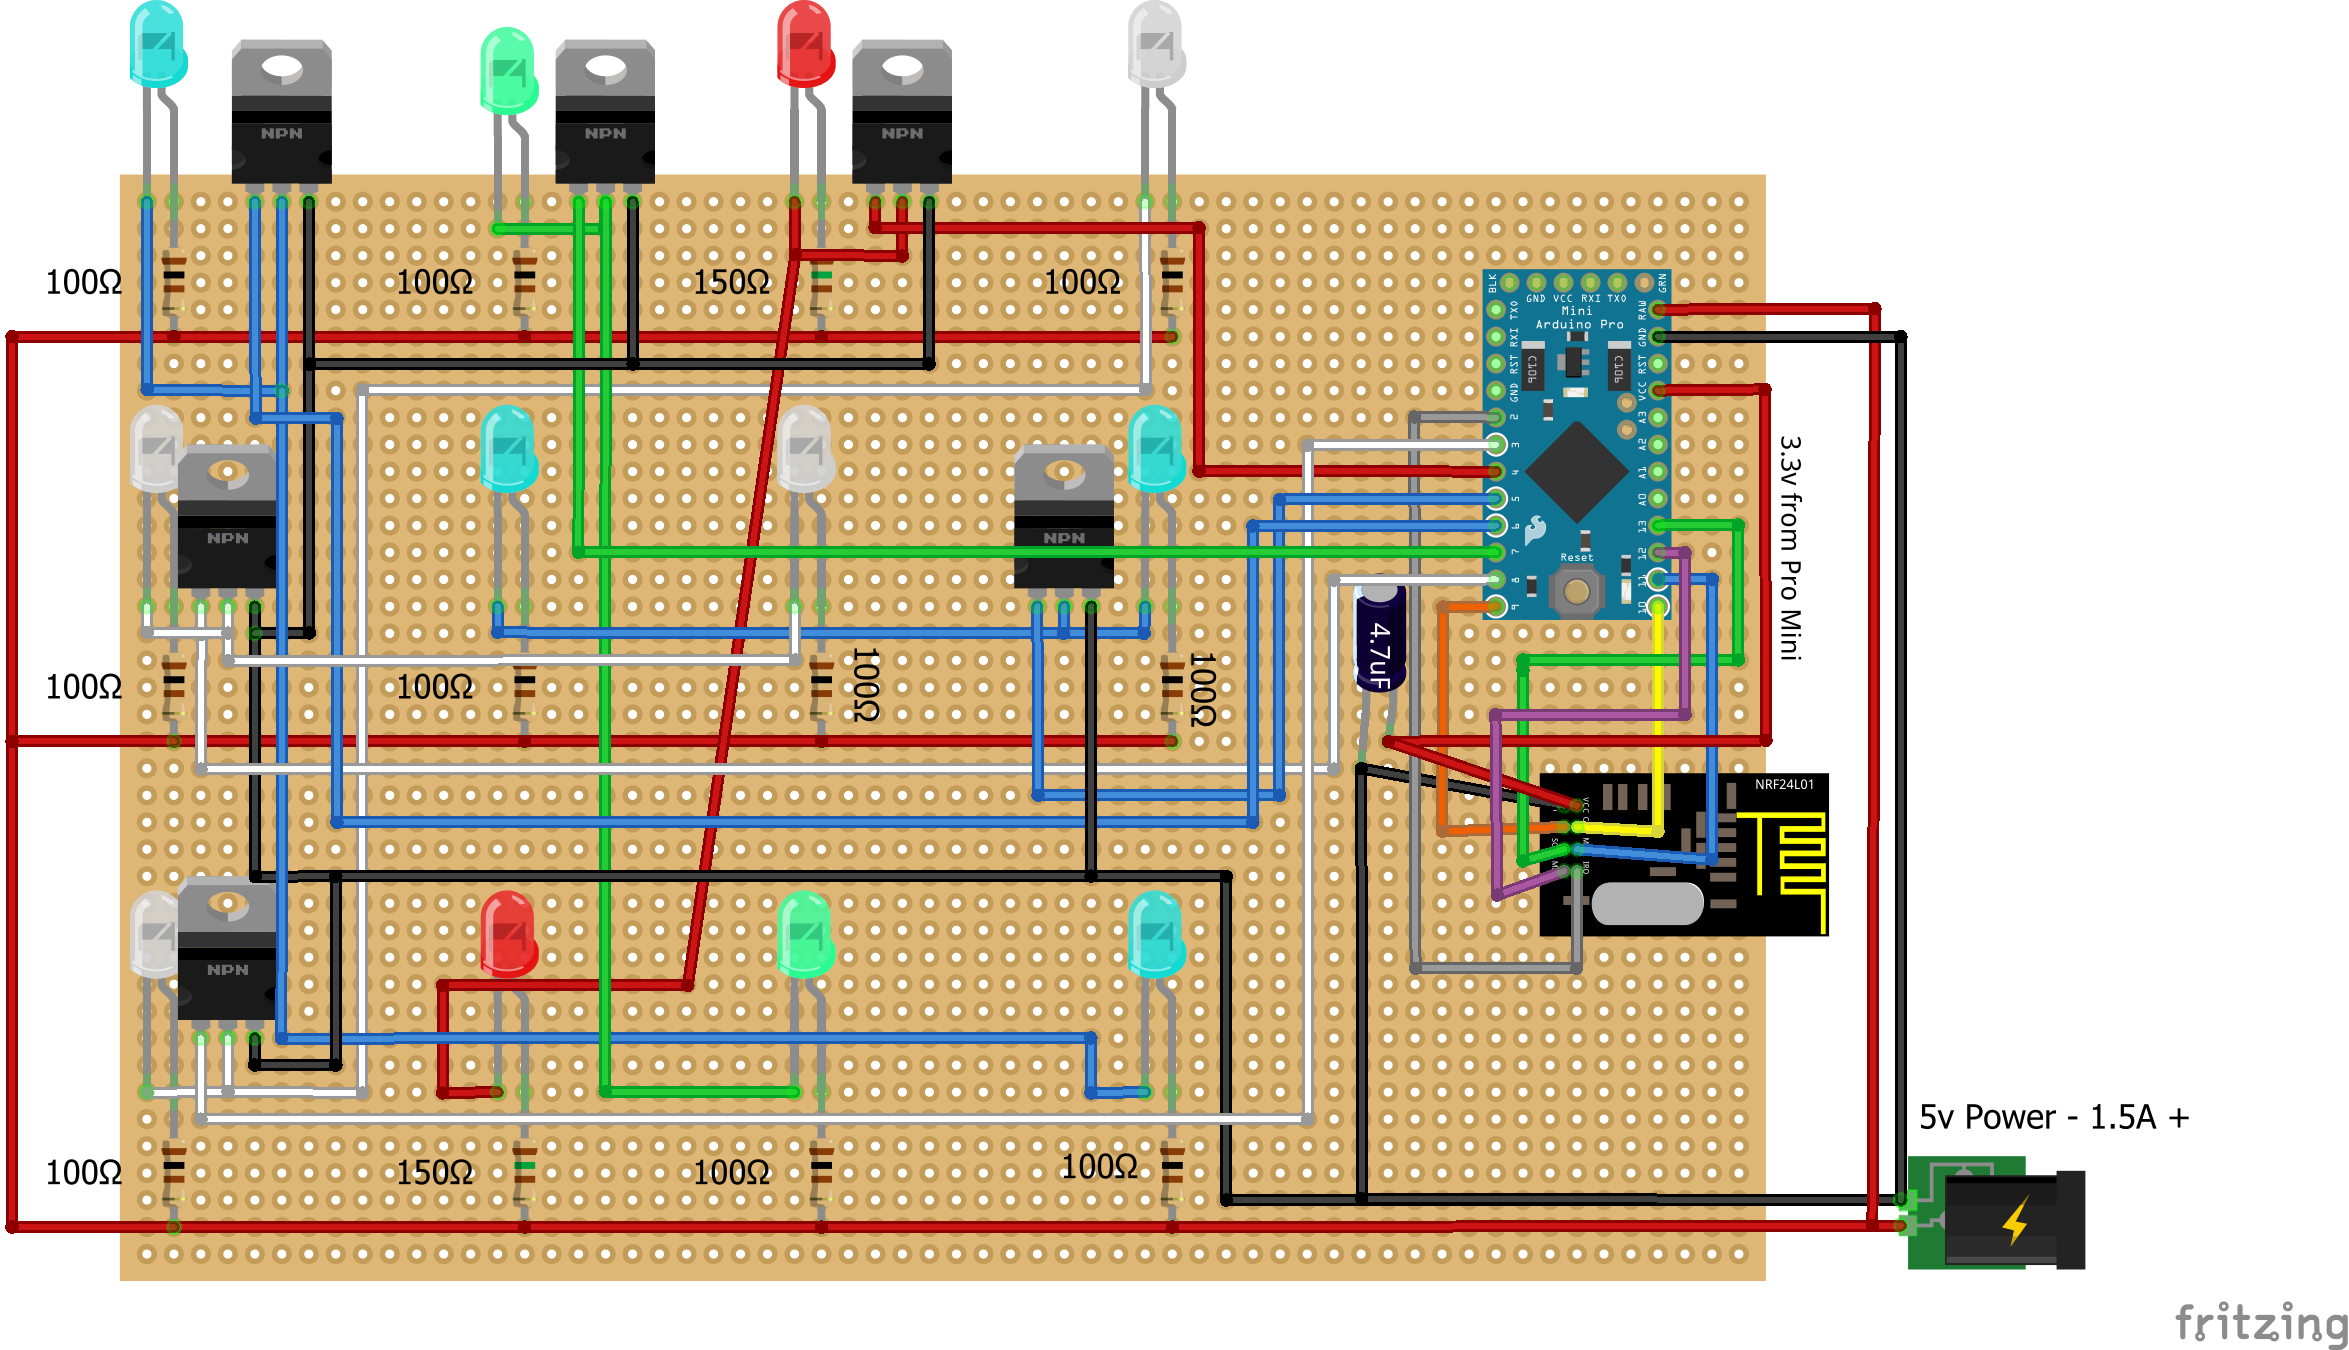
/*
 * PhoneyTV v3.1.1
 *
 * This Sketch illuminates 6 sets of LED's in a random fashion as to mimic the
 * light eminating from a television.  It is intended to make an empty home,
 * or an empty section of a home, appear to be occupied by someone watching
 * TV.  As an alternative to a real television left on, this uses less than 1%
 * of the electrical energy.
 *
 * With the use of the MySensors plugin and gateway, PhoneyTV is intended to
 * be used with a controller (e.g. Vera or Raspberry PI).
 *
 * Sketch does not use any delays to create the random blinking as a way to
 * assure that communication back to the gateway is as unaffected as possible.
 *
 * You can adjust the length of the blink interval and its "twitchyness" by
 * modifying the random number generators, if you prefer more/less 'motion' in
 * in your unit.  The lines are highlighted in the code, play around to create the
 * random effect you like.
 *
 * Sketch takes advantage of available PWM on pins 3, 5 & 6 using the white/blue LEDs
 * to allow fluctuations in the intensity of the light, enhancing the PhoneyTV's
 * realistic light effects.
 *
 * Created 12-APR-2014
 * Free for distrubution
 * Credit should be given to MySensors.org for their base code for relay control
 * and for the radio configuration.  Thanks Guys.
 *
 * 29-May-2014
 * Version 2:  Simplified the code, removing all redundant relay setup from original
 * code.  Added an on/off momentary pushputton option to be set up on pin 2.  Inproved
 * the dark dips for longer duration (can be configured) at intervals.
 *
 * 6-Jun-2015
 * Version 3.1
 * Updated for MySensors V1.4.1
 * Contributed by Jim (BulldogLowell@gmail.com) Inspired by Josh >> Deltanu1142@gmail.com
 *
 * How to video: https://youtu.be/p37qnl8Kjfc
 */
//
#include <MySensor.h>
#include <SPI.h>
#include <Bounce2.h>
//
#define SKETCH_NAME "PhoneyTV"
#define SKETCH_VERSION "3.1.1"
//
#define RADIO_RESET_DELAY_TIME 20
//
#define BUTTON_PIN  2  // Arduino Digital I/O pin number for button
#define CHILD_ID 1   //
#define RADIO_ID 5  //AUTO
//
#define DEBUG_ON
//
#ifdef DEBUG_ON
#define DEBUG_PRINT(x)   Serial.print(x)
#define DEBUG_PRINTLN(x) Serial.println(x)
#define SERIAL_START(x)  Serial.begin(x)
#else
#define DEBUG_PRINT(x)
#define DEBUG_PRINTLN(x)
#define SERIAL_START(x)
#endif
//
MySensor gw;
MyMessage msg(CHILD_ID, V_LIGHT);
//
byte ledPin3 =  3;      // White using PWM
byte ledPin4 =  4;      // Red
byte ledPin5 =  5;      // Blue using PWM
byte ledPin6 =  6;      // Blue using PWM
byte ledPin7 =  7;      // Green
byte ledPin8 =  8;      // White (No PWM)
//
Bounce debouncer = Bounce();
byte oldValue = 0;
boolean state = false;
boolean oldState = false;
int dipInterval = 10;
int darkTime = 250;
unsigned long currentDipTime;
unsigned long dipStartTime;
unsigned long currentMillis;
byte ledState = LOW;
unsigned long previousMillis = 0UL;
byte led = 5;
unsigned long interval = 2000UL;
int twitch = 50;
int dipCount = 0;
int analogLevel = 100;
boolean timeToDip = false;
boolean gotAck=false;
//
void setup()
{
  SERIAL_START(115200);
  pinMode(ledPin3, OUTPUT);
  pinMode(ledPin4, OUTPUT);
  pinMode(ledPin5, OUTPUT);
  pinMode(ledPin6, OUTPUT);
  pinMode(ledPin7, OUTPUT);
  pinMode(ledPin8, OUTPUT);
  pinMode(BUTTON_PIN, INPUT_PULLUP);
  //
  debouncer.attach(BUTTON_PIN);
  debouncer.interval(50);
  //
  gw.begin(incomingMessage, RADIO_ID, true, 0);  // configured as a repeating node!!
  gw.sendSketchInfo(SKETCH_NAME, SKETCH_VERSION);
  gw.wait(RADIO_RESET_DELAY_TIME);
  gw.present(CHILD_ID, S_LIGHT);
  gw.wait(RADIO_RESET_DELAY_TIME);
  while(!gw.send(msg.set(state), false))
  {
	gw.wait(RADIO_RESET_DELAY_TIME);
  }
  gw.wait(RADIO_RESET_DELAY_TIME);
  DEBUG_PRINTLN(F("Sensor Presentation Complete"));
}
//
void loop()
{
  gw.process();
  debouncer.update();
  byte value = debouncer.read();
  if (value != oldValue && value == 0)
  {
	state = !state;
	while(!gotAck)
	{
	  gw.send(msg.set(state), true);
	  gw.wait(RADIO_RESET_DELAY_TIME);
	}
	gotAck = false;
	DEBUG_PRINT(F("State Changed to:"));
	DEBUG_PRINTLN(state? F("PhoneyTV ON") : F("PhoneyTV OFF"));
  }
  oldValue = value;
  if (state)
  {
	if (timeToDip == false)
	{
	  currentMillis = millis();
	  if (currentMillis - previousMillis > interval)
	  {
		previousMillis = currentMillis;
		interval = random(750, 4001); //Adjusts the interval for more/less frequent random light changes
		twitch = random(40, 100); // Twitch provides motion effect but can be a bit much if too high
		dipCount = dipCount++;
	  }
	  if (currentMillis - previousMillis < twitch)
	  {
		led = random(3, 9);
		analogLevel = random(50, 255); // set the range of the 3 pwm leds
		ledState = !ledState;
		switch (led) //for the three PWM pins
		{
		  case 3:
			pwmWrite();
			break;
		  case 5:
			pwmWrite();
			break;
		  case 6:
			pwmWrite();
			break;
		  default:
			digitalWrite(led, ledState);
		}
		if (dipCount > dipInterval)
		{
		  timeToDip = true;
		  dipCount = 0;
		  dipStartTime = millis();
		  darkTime = random(50, 150);
		  dipInterval = random(5, 250); // cycles of flicker
		}
	  }
	}
	else
	{
	  DEBUG_PRINTLN(F("Dip Time"));
	  currentDipTime = millis();
	  if (currentDipTime - dipStartTime < darkTime)
	  {
		for (int i = 3; i < 9; i++)
		{
		  digitalWrite(i, LOW);
		}
	  }
	  else
	  {
		timeToDip = false;
	  }
	}
  }
  else
  {
	if (state != oldState)
	{
	  for (int i = 3; i < 9; i++)
	  {
		digitalWrite(i, LOW);
	  }
	}
  }
  oldState = state;
}
//
void incomingMessage(const MyMessage &message)
{
  if (message.isAck())
  {
	DEBUG_PRINTLN(F("This is an ack from gateway"));
	gotAck = true;
  }
  if (message.type == V_LIGHT)
  {
	state = message.getBool();
	DEBUG_PRINT(F("Incoming change for sensor... New State = "));
	DEBUG_PRINTLN(state? F("ON") : F("OFF"));
  }
}
//
void pwmWrite()
{
  if (ledState == HIGH)
  {
	analogWrite(led, analogLevel);
  }
  else
  {
	digitalWrite(led, LOW);
  }
}
Parts List
- 10 - 100 Ohm 1/2 watt Resistors - http://www.ebay.com/itm/20pcs-1-2W-0-5W-Watt-Metal-Film-Resistor-1-36-47-100-360-470-560-680-820-OHM-/361402983317?var=&hash=item54254be395:m:myWupCGR_EGHbEjk3g4ixZg
- 2 - 150 Ohm 1/2 watt Resistors - http://www.ebay.com/itm/20pcs-1-2W-0-5W-Watt-Metal-Film-Resistor-1-36-47-100-360-470-560-680-820-OHM-/361402983317?var=&hash=item54254be395:m:myWupCGR_EGHbEjk3g4ixZg
- 9cm x 15cm PCB Board - http://www.ebay.com/itm/1x-Double-Side-Protoboard-9cm-x15cm-PCB-Experiment-Matrix-Circuit-Board-WWU-/231693193879?hash=item35f1fd9297:g:cGEAAOSwKIpV~GH8
- 6 - MOSFET Transistors - http://www.digikey.com/product-detail/en/0/785-1568-5-ND
- 4 - 1/2 watt super-bright 10mm Red, Green, Blue & White LEDs -
http://www.ebay.com/itm/25pcs-10mm-0-5W-Red-Yellow-Blue-Green-White-40-Large-Chip-Water-Clear-LED-Leds-/321548049284?hash=item4addc1db84 - 4.7 uf Capacitor - Assorted Capacitors in the MySensors store http://www.mysensors.org/store/#components
- Pro Mini (3.3v) - http://www.mysensors.org/store/#arduinos
- NRF24L01+ Radio - http://www.mysensors.org/store/#radios
- Cat5/6 cable
- Old phone charger
- USB cord
My "How To" home automation video channel: https://www.youtube.com/channel/UCq_Evyh5PQALx4m4CQuxqkA
-
Hi Everyone,
Here is a how to video for building Jim's (@BulldogLowell) awesome PhoneyTV project. We thought it would be the most straight forward to start a new thread so everything can be compiled into the first post but make sure you check out Jim's original work here: http://forum.mysensors.org/topic/85/phoneytv-for-vera-is-here
You can see all the details of his build (including his cool enclosure) as well as the input from others there.Ok, here is the info you need to build this project:
/*
 * PhoneyTV v3.1.1
 *
 * This Sketch illuminates 6 sets of LED's in a random fashion as to mimic the
 * light eminating from a television.  It is intended to make an empty home,
 * or an empty section of a home, appear to be occupied by someone watching
 * TV.  As an alternative to a real television left on, this uses less than 1%
 * of the electrical energy.
 *
 * With the use of the MySensors plugin and gateway, PhoneyTV is intended to
 * be used with a controller (e.g. Vera or Raspberry PI).
 *
 * Sketch does not use any delays to create the random blinking as a way to
 * assure that communication back to the gateway is as unaffected as possible.
 *
 * You can adjust the length of the blink interval and its "twitchyness" by
 * modifying the random number generators, if you prefer more/less 'motion' in
 * in your unit.  The lines are highlighted in the code, play around to create the
 * random effect you like.
 *
 * Sketch takes advantage of available PWM on pins 3, 5 & 6 using the white/blue LEDs
 * to allow fluctuations in the intensity of the light, enhancing the PhoneyTV's
 * realistic light effects.
 *
 * Created 12-APR-2014
 * Free for distrubution
 * Credit should be given to MySensors.org for their base code for relay control
 * and for the radio configuration.  Thanks Guys.
 *
 * 29-May-2014
 * Version 2:  Simplified the code, removing all redundant relay setup from original
 * code.  Added an on/off momentary pushputton option to be set up on pin 2.  Inproved
 * the dark dips for longer duration (can be configured) at intervals.
 *
 * 6-Jun-2015
 * Version 3.1
 * Updated for MySensors V1.4.1
 * Contributed by Jim (BulldogLowell@gmail.com) Inspired by Josh >> Deltanu1142@gmail.com
 *
 * How to video: https://youtu.be/p37qnl8Kjfc
 */
//
#include <MySensor.h>
#include <SPI.h>
#include <Bounce2.h>
//
#define SKETCH_NAME "PhoneyTV"
#define SKETCH_VERSION "3.1.1"
//
#define RADIO_RESET_DELAY_TIME 20
//
#define BUTTON_PIN  2  // Arduino Digital I/O pin number for button
#define CHILD_ID 1   //
#define RADIO_ID 5  //AUTO
//
#define DEBUG_ON
//
#ifdef DEBUG_ON
#define DEBUG_PRINT(x)   Serial.print(x)
#define DEBUG_PRINTLN(x) Serial.println(x)
#define SERIAL_START(x)  Serial.begin(x)
#else
#define DEBUG_PRINT(x)
#define DEBUG_PRINTLN(x)
#define SERIAL_START(x)
#endif
//
MySensor gw;
MyMessage msg(CHILD_ID, V_LIGHT);
//
byte ledPin3 =  3;      // White using PWM
byte ledPin4 =  4;      // Red
byte ledPin5 =  5;      // Blue using PWM
byte ledPin6 =  6;      // Blue using PWM
byte ledPin7 =  7;      // Green
byte ledPin8 =  8;      // White (No PWM)
//
Bounce debouncer = Bounce();
byte oldValue = 0;
boolean state = false;
boolean oldState = false;
int dipInterval = 10;
int darkTime = 250;
unsigned long currentDipTime;
unsigned long dipStartTime;
unsigned long currentMillis;
byte ledState = LOW;
unsigned long previousMillis = 0UL;
byte led = 5;
unsigned long interval = 2000UL;
int twitch = 50;
int dipCount = 0;
int analogLevel = 100;
boolean timeToDip = false;
boolean gotAck=false;
//
void setup()
{
  SERIAL_START(115200);
  pinMode(ledPin3, OUTPUT);
  pinMode(ledPin4, OUTPUT);
  pinMode(ledPin5, OUTPUT);
  pinMode(ledPin6, OUTPUT);
  pinMode(ledPin7, OUTPUT);
  pinMode(ledPin8, OUTPUT);
  pinMode(BUTTON_PIN, INPUT_PULLUP);
  //
  debouncer.attach(BUTTON_PIN);
  debouncer.interval(50);
  //
  gw.begin(incomingMessage, RADIO_ID, true, 0);  // configured as a repeating node!!
  gw.sendSketchInfo(SKETCH_NAME, SKETCH_VERSION);
  gw.wait(RADIO_RESET_DELAY_TIME);
  gw.present(CHILD_ID, S_LIGHT);
  gw.wait(RADIO_RESET_DELAY_TIME);
  while(!gw.send(msg.set(state), false))
  {
	gw.wait(RADIO_RESET_DELAY_TIME);
  }
  gw.wait(RADIO_RESET_DELAY_TIME);
  DEBUG_PRINTLN(F("Sensor Presentation Complete"));
}
//
void loop()
{
  gw.process();
  debouncer.update();
  byte value = debouncer.read();
  if (value != oldValue && value == 0)
  {
	state = !state;
	while(!gotAck)
	{
	  gw.send(msg.set(state), true);
	  gw.wait(RADIO_RESET_DELAY_TIME);
	}
	gotAck = false;
	DEBUG_PRINT(F("State Changed to:"));
	DEBUG_PRINTLN(state? F("PhoneyTV ON") : F("PhoneyTV OFF"));
  }
  oldValue = value;
  if (state)
  {
	if (timeToDip == false)
	{
	  currentMillis = millis();
	  if (currentMillis - previousMillis > interval)
	  {
		previousMillis = currentMillis;
		interval = random(750, 4001); //Adjusts the interval for more/less frequent random light changes
		twitch = random(40, 100); // Twitch provides motion effect but can be a bit much if too high
		dipCount = dipCount++;
	  }
	  if (currentMillis - previousMillis < twitch)
	  {
		led = random(3, 9);
		analogLevel = random(50, 255); // set the range of the 3 pwm leds
		ledState = !ledState;
		switch (led) //for the three PWM pins
		{
		  case 3:
			pwmWrite();
			break;
		  case 5:
			pwmWrite();
			break;
		  case 6:
			pwmWrite();
			break;
		  default:
			digitalWrite(led, ledState);
		}
		if (dipCount > dipInterval)
		{
		  timeToDip = true;
		  dipCount = 0;
		  dipStartTime = millis();
		  darkTime = random(50, 150);
		  dipInterval = random(5, 250); // cycles of flicker
		}
	  }
	}
	else
	{
	  DEBUG_PRINTLN(F("Dip Time"));
	  currentDipTime = millis();
	  if (currentDipTime - dipStartTime < darkTime)
	  {
		for (int i = 3; i < 9; i++)
		{
		  digitalWrite(i, LOW);
		}
	  }
	  else
	  {
		timeToDip = false;
	  }
	}
  }
  else
  {
	if (state != oldState)
	{
	  for (int i = 3; i < 9; i++)
	  {
		digitalWrite(i, LOW);
	  }
	}
  }
  oldState = state;
}
//
void incomingMessage(const MyMessage &message)
{
  if (message.isAck())
  {
	DEBUG_PRINTLN(F("This is an ack from gateway"));
	gotAck = true;
  }
  if (message.type == V_LIGHT)
  {
	state = message.getBool();
	DEBUG_PRINT(F("Incoming change for sensor... New State = "));
	DEBUG_PRINTLN(state? F("ON") : F("OFF"));
  }
}
//
void pwmWrite()
{
  if (ledState == HIGH)
  {
	analogWrite(led, analogLevel);
  }
  else
  {
	digitalWrite(led, LOW);
  }
}
Parts List
- 10 - 100 Ohm 1/2 watt Resistors - http://www.ebay.com/itm/20pcs-1-2W-0-5W-Watt-Metal-Film-Resistor-1-36-47-100-360-470-560-680-820-OHM-/361402983317?var=&hash=item54254be395:m:myWupCGR_EGHbEjk3g4ixZg
- 2 - 150 Ohm 1/2 watt Resistors - http://www.ebay.com/itm/20pcs-1-2W-0-5W-Watt-Metal-Film-Resistor-1-36-47-100-360-470-560-680-820-OHM-/361402983317?var=&hash=item54254be395:m:myWupCGR_EGHbEjk3g4ixZg
- 9cm x 15cm PCB Board - http://www.ebay.com/itm/1x-Double-Side-Protoboard-9cm-x15cm-PCB-Experiment-Matrix-Circuit-Board-WWU-/231693193879?hash=item35f1fd9297:g:cGEAAOSwKIpV~GH8
- 6 - MOSFET Transistors - http://www.digikey.com/product-detail/en/0/785-1568-5-ND
- 4 - 1/2 watt super-bright 10mm Red, Green, Blue & White LEDs -
http://www.ebay.com/itm/25pcs-10mm-0-5W-Red-Yellow-Blue-Green-White-40-Large-Chip-Water-Clear-LED-Leds-/321548049284?hash=item4addc1db84 - 4.7 uf Capacitor - Assorted Capacitors in the MySensors store http://www.mysensors.org/store/#components
- Pro Mini (3.3v) - http://www.mysensors.org/store/#arduinos
- NRF24L01+ Radio - http://www.mysensors.org/store/#radios
- Cat5/6 cable
- Old phone charger
- USB cord
-
@petewill
You are getting quite good at this Youtube thing, Very enjoyable and inspirational. Thanks again. -
Agree with @DrJeff - its really good and easy to understand - great work!
-
BIG improvement to the old design using the picture frame, Pete!!!
-
@sundberg84 & @BulldogLowell Thanks! It was a fun project!
-
Maybe you should add audio as well? so a listening thief understand someone is home and "watching TV" Maybe you can add a squeezebox to play some audio-stream
-
you can also use LMS. Cheaper, open source ... :)
I like this project, thanks for sharing!
@Dave-Dan I have never heard of LMS. I tried to look it up but didn't find it. Do you have a website? I'm already invested in Sonos so I probably can't switch (wife loves it too much) but it's always great to have more knowledge and options. Thanks for sharing!
-
LMs is Logitech Media Server. It's the same as Sonos (more like 'hand made') based on a Server (LMS) and clients (as Sonos Speakers).
I was looking for a solution to stream music across the house having also the ability to sync specific speakers to sound same time / same music.
Tried some solutions, started to think on Sonos (too expensive for me) so I started to investigate LMS.
The current version is distributed for free here: http://www.mysqueezebox.com/download. You can install this in a Raspberry Pi (I have my server in a RPI 1 and goes pretty fast).
Then the Clients (Speakers) I use PiCorePlayer (https://sites.google.com/site/picoreplayer/home/news) with a HiFi HAT attached to each client (https://www.hifiberry.com/).
There's a plugin for Vera and works super cool with OpenHab.
Let me know if you have questions. I'll be happy to share specifics.
-
@Dave-Dan @petewill I use LMS as well, but mainly with the "official" hardware players. Still a large used market for those (search ebay for squeezebox). I have first gen Slim Devices players all the way to the latest ones released by Logitech. There's a great plugin for HomeSeer as well. We use them for automated alarm clocks (Squeezebox Radio's mainly), voice announcements, status displays and music of course :D.
Cheers
Al -
@petewill Have you, or anyone else for that matter, looked at upgrading this code to compile under MySensors ver 2.0? I've setup multiple versions of the library so I can get it compiled under 1.4, but would like to move all my sensors to 2.0, if possible. If not, I'll look at changing the code after I finish with the hardware build.
Thanks for your work on this, and thanks to @BulldogLowell for the great project, been wanting to do a faketv type setup for some time now.
P.S.) your fritzing layout is missing the ground connection on the Pro Mini.
Chief P
-
@petewill Have you, or anyone else for that matter, looked at upgrading this code to compile under MySensors ver 2.0? I've setup multiple versions of the library so I can get it compiled under 1.4, but would like to move all my sensors to 2.0, if possible. If not, I'll look at changing the code after I finish with the hardware build.
Thanks for your work on this, and thanks to @BulldogLowell for the great project, been wanting to do a faketv type setup for some time now.
P.S.) your fritzing layout is missing the ground connection on the Pro Mini.
Chief P
@chief I haven't upgraded to 2.0 yet. It's on the list but it will take me quite a while (I have a lot of sensors) so I need a good chunk of time to do it. I'll update the code then but if you get to it first please do share it :)
And, thanks for pointing out the missing ground! Good catch. I'll fix that now. -
@jimbolaya Something like this should work: http://www.digikey.com/products/en?keywords=IPP055N03LGXKSA1-ND.
-
Thx for the reply @Sparkman. The link you included brings me to a page that lists all their products. Could you please check and repost?
@jimbolaya Sorry, link is now fixed.