💬 Soil Moisture Sensor
-
Sure. At first, I'm very surprised that your resistive sensor in soil still not destroyed under corrosion especially when the current flows. All my experiments with such sensors have been stuck many years ago. May be a miss sometihing, just show me your sensors after three years in soil? And again, it's a basic phisical things, that the conductivity of the soil depends on the mineral composition. I have already said more than once that there is possible to get a "negative" conductivity of the soil, something like effect of the battery.
-
Hello,
I start with mysensors and I do not know much about programming. Is there a possibility to have 7 soil moisture sensor on one or two arduino mini pro.
Thank you -
My sketch handles 6. Feel free to use it. It uses analog capacitive sensors. They cost about 3 euro.
I would recommend getting an Arduino Nano with an Expansion board. Then you don't need to solder anything.
https://www.aliexpress.com/item/Free-shipping-Nano-328P-IO-wireless-sensor-expansion-board-for-XBEE-and-NRF24L01-Socket-for-arduino/32298692903.html/** * The MySensors Arduino library handles the wireless radio link and protocol * between your home built sensors/actuators and HA controller of choice. * The sensors forms a self healing radio network with optional repeaters. Each * repeater and gateway builds a routing tables in EEPROM which keeps track of the * network topology allowing messages to be routed to nodes. * * Created by Henrik Ekblad <henrik.ekblad@mysensors.org> * Copyright (C) 2013-2015 Sensnology AB * Full contributor list: https://github.com/mysensors/Arduino/graphs/contributors * * Documentation: http://www.mysensors.org * Support Forum: http://forum.mysensors.org * * This program is free software; you can redistribute it and/or * modify it under the terms of the GNU General Public License * version 2 as published by the Free Software Foundation. * ******************************* * * DESCRIPTION * * This node can measure the moisture of 6 different plants. It uses the cheap 'capacitive analog * moisture sensor' that you can get for about 3 dollars an Aliexpress or eBay. For example: * https://www.aliexpress.com/item/Analog-Capacitive-Soil-Moisture-Sensor-V1-2-Corrosion-Resistant-Z09-Drop-ship/32858273308.html * * Each plant' moisture value can also be responded to individually, either by turning on an LED (wire that to the plan, and you can see which one is thirsty) or, if you want, per-plant automated irrigation by connecting a little solenoid.. * * Todo: Allow the controller to set the threshold values for each plant individually. Unfortunately, Domoticz doesn't support this yet :-( * */ //#define MY_SIGNING_SIMPLE_PASSWD "changeme" #define MY_SPLASH_SCREEN_DISABLED // saves a little memory. //#define MY_DISABLE_RAM_ROUTING_TABLE_FEATURE // saves a little memory. #define MY_NODE_ID 60 // Optional. Sets fixed id with controller. #define MY_PARENT_NODE_ID 0 // Optional. Sets fixed id for controller. #define MY_PARENT_NODE_IS_STATIC // Optional. Sets fixed id for controller. #define MY_TRANSPORT_WAIT_READY_MS 5000 // try connecting for 5 seconds. Otherwise just continue. // Enable debug prints to serial monitor //#define MY_DEBUG // Enable and select radio type attached #define MY_RADIO_NRF24 //#define MY_RADIO_NRF5_ESB //#define MY_RADIO_RFM69 //#define MY_RADIO_RFM95 #define MY_RF24_PA_LEVEL RF24_PA_LOW // Low power radio setting works better with cheap Chinese radios. #include <MySensors.h> #define NUMBEROFSENSORS 6 // How many sensors are connected? #define DRYNESSTHRESHOLD 45 // minimum moisture level that is still ok. A lower value will trigger LED/irrigation. uint32_t SLEEPTIME = 60; // Sleep time between the sending of data (in SECONDS). Maximum is 254 seconds. Change "byte" to "int" further down in the code if you want more time between sending updates. unsigned long lastTimeChecked = 0; MyMessage msg(0, V_LEVEL); void before() { for (byte i = 3; i < NUMBEROFSENSORS + 3; i++){ // Set the LED (or irrigation vales) to their initial position. pinMode(i, OUTPUT); digitalWrite(i, LOW); } } void presentation() { // Send the sketch version information to the gateway and Controller sendSketchInfo(F("Plant Sensorium"), F("1.2")); // present the sensors for (byte i=0; i<NUMBEROFSENSORS ; i++) { present(i, S_MOISTURE, i); // the last i gives the controller a name, in this case the number of the sensor. } } void setup() { Serial.begin(115200); delay(1000); Serial.println(F("Hello world. Warming up the sensors (15 seconds).")); delay(15000); } void loop() { static byte measurementCounter = 0; // Counts the measurements that are done, once per second. uint32_t currentMillis = millis(); // The millisecond clock in the main loop. if (currentMillis - lastTimeChecked > 1000) { // Internally, the moisture values are checked every second. lastTimeChecked = currentMillis; Serial.println(F("__________")); for (int i=0; i<NUMBEROFSENSORS; i++) { // loop over all the sensors. byte shiftedDigitalPin = i + 3; int16_t moistureLevel = (1023-analogRead(i))/10.23; Serial.print(i); Serial.print(F(" mosture level: ")); Serial.println(moistureLevel); Serial.print(F("- output pin: ")); Serial.println(shiftedDigitalPin); Serial.print(F("- irrigation/LED state is ")); Serial.println(digitalRead(shiftedDigitalPin)); if(digitalRead(shiftedDigitalPin) == HIGH){ // outputs the LED/irrigation status via serial. This code can be removed. Serial.print(F("- currently watering until ")); Serial.println(DRYNESSTHRESHOLD + 10); } if (moistureLevel < DRYNESSTHRESHOLD){ // if the plant doesn' have enough water, turn on the LED/water. Serial.print(F("- moisture level is below ")); Serial.println(DRYNESSTHRESHOLD); digitalWrite(shiftedDigitalPin, HIGH); }else if (moistureLevel >= DRYNESSTHRESHOLD + 10){ // turn of the water/led if the plant is wet enough. digitalWrite(shiftedDigitalPin, LOW); } if(measurementCounter < NUMBEROFSENSORS){ // During the first 6 seconds the script will send updated data. if(measurementCounter == i){ // it sends sensor 0 at second 0. Sensor 1 at second 1, etc. This keeps the radio happy. Serial.println(F("- sending data.")); send(msg.setSensor(i).set(moistureLevel)); } } if(measurementCounter > SLEEPTIME){ // If enough time has passed, the counter is reset, and new data is sent. measurementCounter = 0; }else{ measurementCounter++; } } } } -
-
I command and I try. Thank you very much
@mathieu44444 My pleasure. Good luck.
-
@ul7aajr could you expand on why is it not a good idea? I've been using my sensors for almost 3 years without noticing any problem.
@mfalkvidd , maybe you are using your resistive sensors indoors in soil consisting of 100% mold. (blomjord). I guess it works great. However I'm just curious if your sensors are also working on soil from outdoors. I guess not very well.
-
@mfalkvidd , maybe you are using your resistive sensors indoors in soil consisting of 100% mold. (blomjord). I guess it works great. However I'm just curious if your sensors are also working on soil from outdoors. I guess not very well.
@รอเร-อ I have resistive sensors (YL-69 type) both indoors and outdoors. Both have been working correctly for months now. I'm using a direct-reverse polarization sketch to minimize corrosion and it seems to work well. What I found to be very important in outdoors sensors is the isolation of the connector between the probe and the cable; if rain water or watering stays into there, they tend to corrode and their resistance increases, therefore fooling the sensor into thinking that the soil is drier than it really is. I have a couple of capacitive sensors somewhere but haven't felt the need to try them since the resistive ones are working well.
-
I've ordered 5 capacitive sensors from Aliexpress now. I need to find a way to protect them so I can bury them into the soil in the garden at different depths.
What sketch are you using for capacitive sensors?
EDIT: I just saw your sketch posted above. I will try it out. Thanks!
-
@รอเร-อ I have resistive sensors (YL-69 type) both indoors and outdoors. Both have been working correctly for months now. I'm using a direct-reverse polarization sketch to minimize corrosion and it seems to work well. What I found to be very important in outdoors sensors is the isolation of the connector between the probe and the cable; if rain water or watering stays into there, they tend to corrode and their resistance increases, therefore fooling the sensor into thinking that the soil is drier than it really is. I have a couple of capacitive sensors somewhere but haven't felt the need to try them since the resistive ones are working well.
thanks
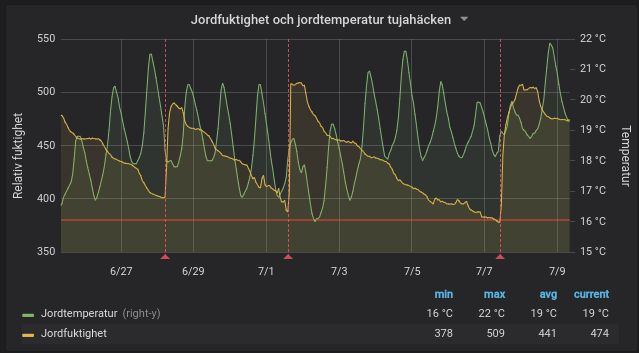
here with my soil, it's different. Even at very little moisture it shows 100%. Maybe I have a lot of iron in the soil.
-
My sketch handles 6. Feel free to use it. It uses analog capacitive sensors. They cost about 3 euro.
I would recommend getting an Arduino Nano with an Expansion board. Then you don't need to solder anything.
https://www.aliexpress.com/item/Free-shipping-Nano-328P-IO-wireless-sensor-expansion-board-for-XBEE-and-NRF24L01-Socket-for-arduino/32298692903.html/** * The MySensors Arduino library handles the wireless radio link and protocol * between your home built sensors/actuators and HA controller of choice. * The sensors forms a self healing radio network with optional repeaters. Each * repeater and gateway builds a routing tables in EEPROM which keeps track of the * network topology allowing messages to be routed to nodes. * * Created by Henrik Ekblad <henrik.ekblad@mysensors.org> * Copyright (C) 2013-2015 Sensnology AB * Full contributor list: https://github.com/mysensors/Arduino/graphs/contributors * * Documentation: http://www.mysensors.org * Support Forum: http://forum.mysensors.org * * This program is free software; you can redistribute it and/or * modify it under the terms of the GNU General Public License * version 2 as published by the Free Software Foundation. * ******************************* * * DESCRIPTION * * This node can measure the moisture of 6 different plants. It uses the cheap 'capacitive analog * moisture sensor' that you can get for about 3 dollars an Aliexpress or eBay. For example: * https://www.aliexpress.com/item/Analog-Capacitive-Soil-Moisture-Sensor-V1-2-Corrosion-Resistant-Z09-Drop-ship/32858273308.html * * Each plant' moisture value can also be responded to individually, either by turning on an LED (wire that to the plan, and you can see which one is thirsty) or, if you want, per-plant automated irrigation by connecting a little solenoid.. * * Todo: Allow the controller to set the threshold values for each plant individually. Unfortunately, Domoticz doesn't support this yet :-( * */ //#define MY_SIGNING_SIMPLE_PASSWD "changeme" #define MY_SPLASH_SCREEN_DISABLED // saves a little memory. //#define MY_DISABLE_RAM_ROUTING_TABLE_FEATURE // saves a little memory. #define MY_NODE_ID 60 // Optional. Sets fixed id with controller. #define MY_PARENT_NODE_ID 0 // Optional. Sets fixed id for controller. #define MY_PARENT_NODE_IS_STATIC // Optional. Sets fixed id for controller. #define MY_TRANSPORT_WAIT_READY_MS 5000 // try connecting for 5 seconds. Otherwise just continue. // Enable debug prints to serial monitor //#define MY_DEBUG // Enable and select radio type attached #define MY_RADIO_NRF24 //#define MY_RADIO_NRF5_ESB //#define MY_RADIO_RFM69 //#define MY_RADIO_RFM95 #define MY_RF24_PA_LEVEL RF24_PA_LOW // Low power radio setting works better with cheap Chinese radios. #include <MySensors.h> #define NUMBEROFSENSORS 6 // How many sensors are connected? #define DRYNESSTHRESHOLD 45 // minimum moisture level that is still ok. A lower value will trigger LED/irrigation. uint32_t SLEEPTIME = 60; // Sleep time between the sending of data (in SECONDS). Maximum is 254 seconds. Change "byte" to "int" further down in the code if you want more time between sending updates. unsigned long lastTimeChecked = 0; MyMessage msg(0, V_LEVEL); void before() { for (byte i = 3; i < NUMBEROFSENSORS + 3; i++){ // Set the LED (or irrigation vales) to their initial position. pinMode(i, OUTPUT); digitalWrite(i, LOW); } } void presentation() { // Send the sketch version information to the gateway and Controller sendSketchInfo(F("Plant Sensorium"), F("1.2")); // present the sensors for (byte i=0; i<NUMBEROFSENSORS ; i++) { present(i, S_MOISTURE, i); // the last i gives the controller a name, in this case the number of the sensor. } } void setup() { Serial.begin(115200); delay(1000); Serial.println(F("Hello world. Warming up the sensors (15 seconds).")); delay(15000); } void loop() { static byte measurementCounter = 0; // Counts the measurements that are done, once per second. uint32_t currentMillis = millis(); // The millisecond clock in the main loop. if (currentMillis - lastTimeChecked > 1000) { // Internally, the moisture values are checked every second. lastTimeChecked = currentMillis; Serial.println(F("__________")); for (int i=0; i<NUMBEROFSENSORS; i++) { // loop over all the sensors. byte shiftedDigitalPin = i + 3; int16_t moistureLevel = (1023-analogRead(i))/10.23; Serial.print(i); Serial.print(F(" mosture level: ")); Serial.println(moistureLevel); Serial.print(F("- output pin: ")); Serial.println(shiftedDigitalPin); Serial.print(F("- irrigation/LED state is ")); Serial.println(digitalRead(shiftedDigitalPin)); if(digitalRead(shiftedDigitalPin) == HIGH){ // outputs the LED/irrigation status via serial. This code can be removed. Serial.print(F("- currently watering until ")); Serial.println(DRYNESSTHRESHOLD + 10); } if (moistureLevel < DRYNESSTHRESHOLD){ // if the plant doesn' have enough water, turn on the LED/water. Serial.print(F("- moisture level is below ")); Serial.println(DRYNESSTHRESHOLD); digitalWrite(shiftedDigitalPin, HIGH); }else if (moistureLevel >= DRYNESSTHRESHOLD + 10){ // turn of the water/led if the plant is wet enough. digitalWrite(shiftedDigitalPin, LOW); } if(measurementCounter < NUMBEROFSENSORS){ // During the first 6 seconds the script will send updated data. if(measurementCounter == i){ // it sends sensor 0 at second 0. Sensor 1 at second 1, etc. This keeps the radio happy. Serial.println(F("- sending data.")); send(msg.setSensor(i).set(moistureLevel)); } } if(measurementCounter > SLEEPTIME){ // If enough time has passed, the counter is reset, and new data is sent. measurementCounter = 0; }else{ measurementCounter++; } } } } -
I use the expansion board I mentioned. You can just plug the sensors directly into it, all in a row from A0 to A5.
Then on the opposite side of the board I have LED's connected to digital pins 3 till 8, one for each plant.
I'm working on replacing the LED's with solenoids that will automatically water the plants. The code already supports this.
-
how did you wire you normal fork sensor, i get different reading when using a voltage divider if i switch the polarization.
i used this to connect it.
http://www.electronicwings.com/sensors-modules/soil-moisture-sensor
using pin digital 6 and 7 as alternating power, and pin A0 to readAnd how do other people protect there capacitive sensor electronics from water .. rain
-
o and i forget to ask if this product is a better option .
-
How would you guys protect one of these capacitive soil moisture sensors from moisture in case the probe shall be buried 20 cm deep in the soil outdoors.
The way they are made now, they may only be used in a indoor flower pot and even then there is a risk that the probes electronic components will be drowned in water while watering your flowers. Ideally, they should be water proof from the beginning, that's what I think.
Anyway, now I have a few of them and I intend to do a solar powered a multi depth soil moisture sensor using capacitive soil moisture sensors at various depths.
So, how to protect them?
I have an idea but I'm not sure it's working: Put it partly inside a plastic tube and cover the electronics with 2 component expoxy glue. ...
EDIT 1 : maybe silicone rubber would work...
EDIT 2 : Adding a photo of an untested prototype. Plastic housing filled with construction silicone rubber!
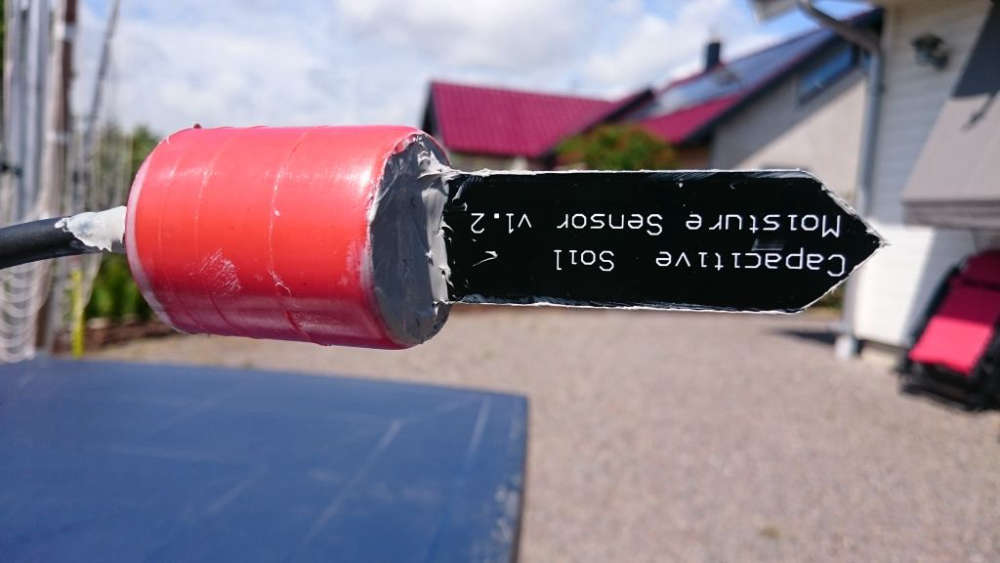
EDIT 3: Prototype sensor works great. (At least for the moment. I hope it will last several years.)
Cheers! -
How would you guys protect one of these capacitive soil moisture sensors from moisture in case the probe shall be buried 20 cm deep in the soil outdoors.
The way they are made now, they may only be used in a indoor flower pot and even then there is a risk that the probes electronic components will be drowned in water while watering your flowers. Ideally, they should be water proof from the beginning, that's what I think.
Anyway, now I have a few of them and I intend to do a solar powered a multi depth soil moisture sensor using capacitive soil moisture sensors at various depths.
So, how to protect them?
I have an idea but I'm not sure it's working: Put it partly inside a plastic tube and cover the electronics with 2 component expoxy glue. ...
EDIT 1 : maybe silicone rubber would work...
EDIT 2 : Adding a photo of an untested prototype. Plastic housing filled with construction silicone rubber!
EDIT 3: Prototype sensor works great. (At least for the moment. I hope it will last several years.)
Cheers! -
if you buy a capacitive sensor like this then it is extremely simple. Here are some sample sketches which work pretty good. Not sure why one should bother with corrosion and similar issues when you can buy a pretty cheap capacitive sensor. Are there any drawbacks I may have missed ? I just installed one in a pot and curious to see how it goes
Here's the code that I use
/*
 * The MySensors Arduino library handles the wireless radio link and protocol
 * between your home built sensors/actuators and HA controller of choice.
 * The sensors forms a self healing radio network with optional repeaters. Each
 * repeater and gateway builds a routing tables in EEPROM which keeps track of the
 * network topology allowing messages to be routed to nodes.
 *
 * Created by Henrik Ekblad <henrik.ekblad@mysensors.org>
 * Copyright (C) 2013-2015 Sensnology AB
 * Full contributor list: https://github.com/mysensors/Arduino/graphs/contributors
 *
 * Documentation: http://www.mysensors.org
 * Support Forum: http://forum.mysensors.org
 *
 * This program is free software; you can redistribute it and/or
 * modify it under the terms of the GNU General Public License
 * version 2 as published by the Free Software Foundation.
 *
 *******************************
 *
 * DESCRIPTION
 *
 * Arduino soil moisture based on gypsum sensor/resistive sensor to avoid electric catalyse in soil
 *  Required to interface the sensor: 2 * 4.7kOhm + 2 * 1N4148
 *
 * Gypsum sensor and calibration:
 *    DIY: See http://vanderleevineyard.com/1/category/vinduino/1.html
 *    Built: Davis / Watermark 200SS
 *        http://www.cooking-hacks.com/watermark-soil-moisture-sensor?_bksrc=item2item&_bkloc=product
 *        http://www.irrometer.com/pdf/supportmaterial/sensors/voltage-WM-chart.pdf
 *        cb (centibar) http://www.irrometer.com/basics.html
 *            0-10 Saturated Soil. Occurs for a day or two after irrigation
 *            10-20 Soil is adequately wet (except coarse sands which are drying out at this range)
 *            30-60 Usual range to irrigate or water (except heavy clay soils).
 *            60-100 Usual range to irrigate heavy clay soils
 *            100-200 Soil is becoming dangerously dry for maximum production. Proceed with caution.
 *
 * Connection:
 * D6, D7: alternative powering to avoid sensor degradation
 * A0, A1: alternative resistance measuring
 *
 *  Based on:
 *  "Vinduino" portable soil moisture sensor code V3.00
 *   Date December 31, 2012
 *   Reinier van der Lee and Theodore Kaskalis
 *   www.vanderleevineyard.com
 * Contributor: epierre
 */

// Copyright (C) 2015, Reinier van der Lee
// www.vanderleevineyard.com

// This program is free software: you can redistribute it and/or modify
// it under the terms of the GNU General Public License as published by
// the Free Software Foundation, either version 3 of the License, or
// any later version.

// This program is distributed in the hope that it will be useful,
// but WITHOUT ANY WARRANTY; without even the implied warranty of
// MERCHANTABILITY or FITNESS FOR A PARTICULAR PURPOSE.  See the
// GNU General Public License for more details.

#define MY_NODE_ID 6

// Enable debug prints to serial monitor
#define MY_DEBUG

// Enable and select radio type attached
//#define MY_RADIO_NRF24
//#define MY_RADIO_NRF5_ESB
#define MY_RADIO_RFM69
//#define MY_RADIO_RFM95
#define MY_RFM69_NEW_DRIVER


#include <math.h>       // Conversion equation from resistance to %
#include <MySensors.h>


#define CHILD_ID 0

MyMessage msg(CHILD_ID, V_LEVEL);
static const uint64_t UPDATE_INTERVAL = 43200000;

void setup()
{
 Serial.begin(115200); // open serial port, set the baud rate as 115200 bps
}

void presentation()
{
    sendSketchInfo("Soil Moisture Sensor", "1.0");
    present(CHILD_ID, S_MOISTURE);
}

void loop()
{
    int moisture;
    moisture = analogRead(0);
    //Serial.println(moisture); //print the value to serial port
    send(msg.set(moisture));
    sleep(UPDATE_INTERVAL);
}
Regards,
-
if you buy a capacitive sensor like this then it is extremely simple. Here are some sample sketches which work pretty good. Not sure why one should bother with corrosion and similar issues when you can buy a pretty cheap capacitive sensor. Are there any drawbacks I may have missed ? I just installed one in a pot and curious to see how it goes
Here's the code that I use
/*
 * The MySensors Arduino library handles the wireless radio link and protocol
 * between your home built sensors/actuators and HA controller of choice.
 * The sensors forms a self healing radio network with optional repeaters. Each
 * repeater and gateway builds a routing tables in EEPROM which keeps track of the
 * network topology allowing messages to be routed to nodes.
 *
 * Created by Henrik Ekblad <henrik.ekblad@mysensors.org>
 * Copyright (C) 2013-2015 Sensnology AB
 * Full contributor list: https://github.com/mysensors/Arduino/graphs/contributors
 *
 * Documentation: http://www.mysensors.org
 * Support Forum: http://forum.mysensors.org
 *
 * This program is free software; you can redistribute it and/or
 * modify it under the terms of the GNU General Public License
 * version 2 as published by the Free Software Foundation.
 *
 *******************************
 *
 * DESCRIPTION
 *
 * Arduino soil moisture based on gypsum sensor/resistive sensor to avoid electric catalyse in soil
 *  Required to interface the sensor: 2 * 4.7kOhm + 2 * 1N4148
 *
 * Gypsum sensor and calibration:
 *    DIY: See http://vanderleevineyard.com/1/category/vinduino/1.html
 *    Built: Davis / Watermark 200SS
 *        http://www.cooking-hacks.com/watermark-soil-moisture-sensor?_bksrc=item2item&_bkloc=product
 *        http://www.irrometer.com/pdf/supportmaterial/sensors/voltage-WM-chart.pdf
 *        cb (centibar) http://www.irrometer.com/basics.html
 *            0-10 Saturated Soil. Occurs for a day or two after irrigation
 *            10-20 Soil is adequately wet (except coarse sands which are drying out at this range)
 *            30-60 Usual range to irrigate or water (except heavy clay soils).
 *            60-100 Usual range to irrigate heavy clay soils
 *            100-200 Soil is becoming dangerously dry for maximum production. Proceed with caution.
 *
 * Connection:
 * D6, D7: alternative powering to avoid sensor degradation
 * A0, A1: alternative resistance measuring
 *
 *  Based on:
 *  "Vinduino" portable soil moisture sensor code V3.00
 *   Date December 31, 2012
 *   Reinier van der Lee and Theodore Kaskalis
 *   www.vanderleevineyard.com
 * Contributor: epierre
 */

// Copyright (C) 2015, Reinier van der Lee
// www.vanderleevineyard.com

// This program is free software: you can redistribute it and/or modify
// it under the terms of the GNU General Public License as published by
// the Free Software Foundation, either version 3 of the License, or
// any later version.

// This program is distributed in the hope that it will be useful,
// but WITHOUT ANY WARRANTY; without even the implied warranty of
// MERCHANTABILITY or FITNESS FOR A PARTICULAR PURPOSE.  See the
// GNU General Public License for more details.

#define MY_NODE_ID 6

// Enable debug prints to serial monitor
#define MY_DEBUG

// Enable and select radio type attached
//#define MY_RADIO_NRF24
//#define MY_RADIO_NRF5_ESB
#define MY_RADIO_RFM69
//#define MY_RADIO_RFM95
#define MY_RFM69_NEW_DRIVER


#include <math.h>       // Conversion equation from resistance to %
#include <MySensors.h>


#define CHILD_ID 0

MyMessage msg(CHILD_ID, V_LEVEL);
static const uint64_t UPDATE_INTERVAL = 43200000;

void setup()
{
 Serial.begin(115200); // open serial port, set the baud rate as 115200 bps
}

void presentation()
{
    sendSketchInfo("Soil Moisture Sensor", "1.0");
    present(CHILD_ID, S_MOISTURE);
}

void loop()
{
    int moisture;
    moisture = analogRead(0);
    //Serial.println(moisture); //print the value to serial port
    send(msg.set(moisture));
    sleep(UPDATE_INTERVAL);
}
Regards,
@cgeo the reasons I'm using the resistive sensor are:
- the cost for the resistive sensor is less than 10% of the cost of the capacitive sensor you linked
- after 3 years of use I don't experience corrosion issues except for the part that is above the dirt, which the capacitive sensor will have problems with as well
Hello! It looks like you're interested in this conversation, but you don't have an account yet.
Getting fed up of having to scroll through the same posts each visit? When you register for an account, you'll always come back to exactly where you were before, and choose to be notified of new replies (either via email, or push notification). You'll also be able to save bookmarks and upvote posts to show your appreciation to other community members.
With your input, this post could be even better 💗
Register Login