nRF5 action!
-
by default nrf52dk is RX(24) and TX(25).
for adafruit, i have not installed the board..but you can check in adafruit howto (or in their variant files).Peripherals are not fixed, that's a big advantage vs simple 8bits mcu. You define them when doing your design (sometimes it may need some checks in datasheet, depends on mcu).
So, for your ebyte module your options are:
- create a new board for the board manager (see variant files) regarding a specific design.
- or you don't care of this for the moment, and you can simply use nrf52dk board and use the same mapping.
- or, in the same order, use adafruit board and their mapping (or sparkfun board etc.., no matter, just check their board map pictures )
@scalz said in nRF5 Bluetooth action!:
nrf52dk is RX(24) and TX(25)
Hmm.. Where is that defined exactly? I just now tried hooking the Tx(25) of an actual nrf52DK to the Rx pin of a FTDI connector, and GND to GND, but I'm not seeing any output from the nrf52DK, even though I should be. I'm assuming that by 25 you're referring to PO.25 and not pin 25 on the chip?
-
I googled up this diagram:
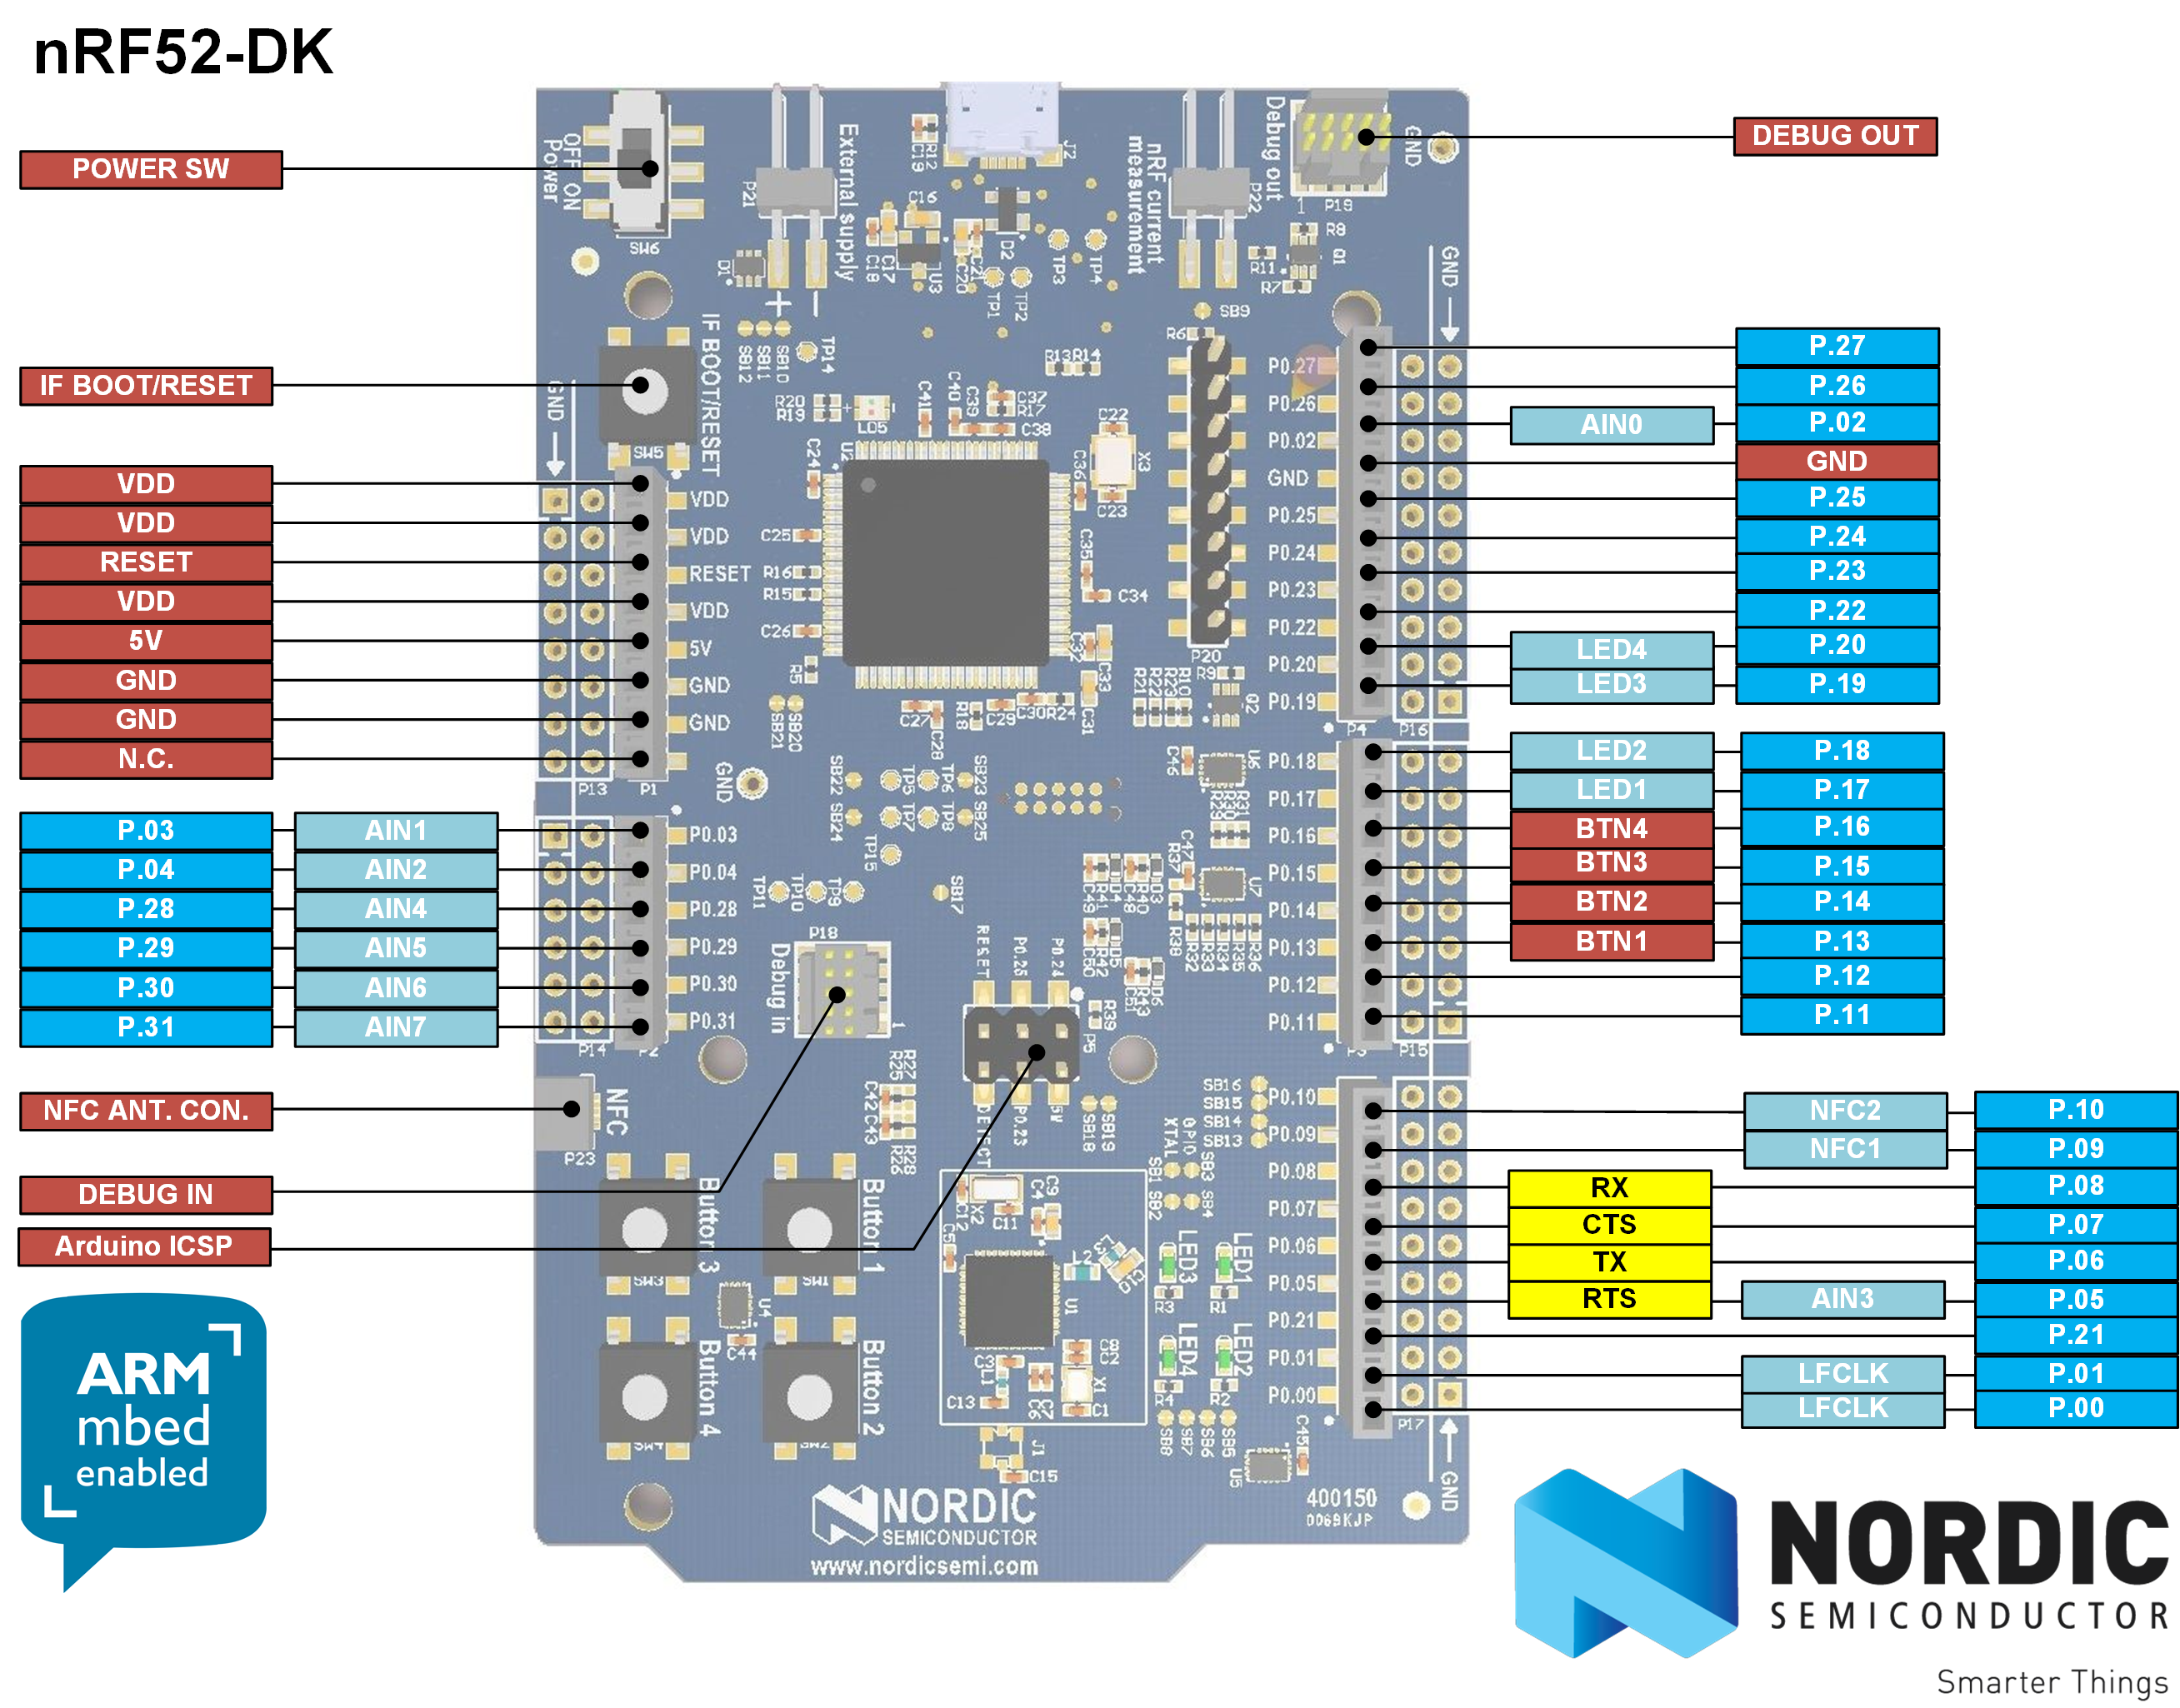
Looks as though TX is maybe P0.06. I'll try that.... -
Confirmed: Pin P0.06 works as Uarte TX on the nRF52 DK. :)
-
As final confirmation I did re-program the Ebyte module as an nRF52 DK, then connected its P0.06 to the FTDI RX, and, voilà , it worked as expected. @scalz Thanks for the idea! :)
One small caveat: On the Ebyte module, P0.06 doesn't appear on the silkscreen (there's a typo where it's shown as P0.07 instead, resulting in there being two P0.07's on the silkscreen), so just pick the most obvious pin based on the numerical progression (or else consult the datasheet), and it will work.
-
In lieu of my breakout board, which hasn't yet arrived, I've been attaching wires directly to the module so that I can do more than just sit and wait for the BoB delivery. I'm now doing it this way:
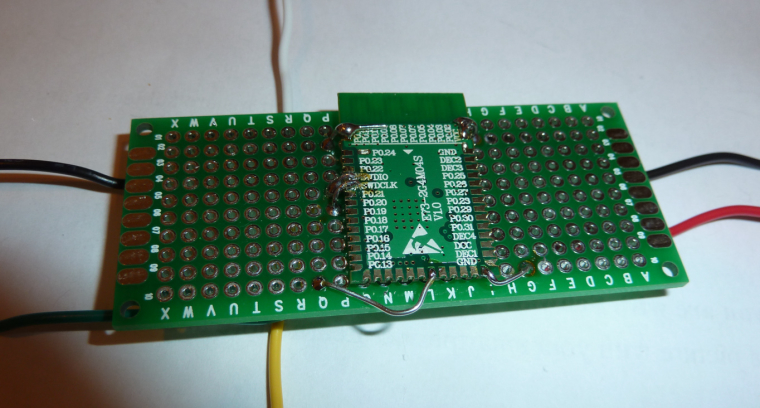
and although crude it's working much better than just soldering the wire to the module with no mechanical support. Doing it the way pictured, the connections stay connected and don't break loose. :) Ironically, by the time my breakout boards finally do arrive, I may have already learned everything I needed them for.I am curious: how are the rest of you handling this issue?
[Edit: One other alternative: once my 1.27mm pitch generic protoboards arrive, I expect they'll offer up cleaner connection possibilities. At the moment, I'm also waiting for them to arrive from Aliexpress....]
-
@scalz
Thanks for the explanation. I had been programming it as a "Generic nRF82832," and I don't know what that mapping is. However, I can just as easily pick one of the alternatives you listed, such as the D.K, to get a predictable pin mapping.@d00616
Your idea of having the pin mapping be selectable within the sketch sounds great! A+. I'm really looking forward to that and hope that you can do it soon. It sounds much easier for noobs like me than having to futz about with finding/changing/installing other files, and maybe also making it easier to share with and/or borrow from other makers.@NeverDie said in nRF5 Bluetooth action!:
Your idea of having the pin mapping be selectable within the sketch sounds great! A+. I'm really looking forward to that and hope that you can do it soon.
With merging this pull request the feature should be available: https://github.com/mysensors/ArduinoBoards/pull/13
Documentation can be found at https://github.com/mysensors/ArduinoHwNRF5
-
@NeverDie said in nRF5 Bluetooth action!:
Your idea of having the pin mapping be selectable within the sketch sounds great! A+. I'm really looking forward to that and hope that you can do it soon.
With merging this pull request the feature should be available: https://github.com/mysensors/ArduinoBoards/pull/13
Documentation can be found at https://github.com/mysensors/ArduinoHwNRF5
@d00616 said in nRF5 Bluetooth action!:
With merging this pull request the feature should be available: https://github.com/mysensors/ArduinoBoards/pull/13
Merged. Have fun with board definition in your sketch.
-
In lieu of my breakout board, which hasn't yet arrived, I've been attaching wires directly to the module so that I can do more than just sit and wait for the BoB delivery. I'm now doing it this way:
and although crude it's working much better than just soldering the wire to the module with no mechanical support. Doing it the way pictured, the connections stay connected and don't break loose. :) Ironically, by the time my breakout boards finally do arrive, I may have already learned everything I needed them for.I am curious: how are the rest of you handling this issue?
[Edit: One other alternative: once my 1.27mm pitch generic protoboards arrive, I expect they'll offer up cleaner connection possibilities. At the moment, I'm also waiting for them to arrive from Aliexpress....]
@NeverDie said in nRF5 Bluetooth action!:
I am curious: how are the rest of you handling this issue?
Not many solutions, I soldered wires directly to the modules too, I used thin&cheap wires from aliexpress. They are very convenient for this, easy to solder and very soft so not having any constraint on the solder joints when you manipulate them. Then I put module on the side of board with double sided tape and soldered other ends of the wires to a connector.
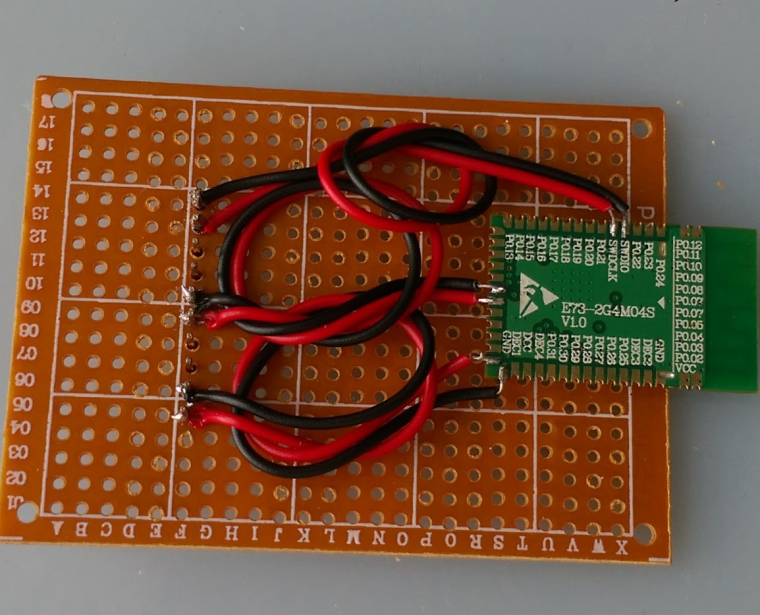
Then I flip everything and only look at the beautiful side of things :D
-
@d00616 said in nRF5 Bluetooth action!:
With merging this pull request the feature should be available: https://github.com/mysensors/ArduinoBoards/pull/13
Merged. Have fun with board definition in your sketch.
@d00616 said in nRF5 Bluetooth action!:
@d00616 said in nRF5 Bluetooth action!:
With merging this pull request the feature should be available: https://github.com/mysensors/ArduinoBoards/pull/13
Merged. Have fun with board definition in your sketch.
Thanks! By being "merged," does that mean it is now in the regular MySensors development release, and so I should reload a fresh copy of the MySensors development library?
Also, is this the way I should enable P0.21 as nReset (to enable hardware resets on P0.21), or should I instead be writing 0xFFFF directly to both the PSELRESET[0] and PSELRESET[1] registers to enable that?
-
@d00616 said in nRF5 Bluetooth action!:
@d00616 said in nRF5 Bluetooth action!:
With merging this pull request the feature should be available: https://github.com/mysensors/ArduinoBoards/pull/13
Merged. Have fun with board definition in your sketch.
Thanks! By being "merged," does that mean it is now in the regular MySensors development release, and so I should reload a fresh copy of the MySensors development library?
Also, is this the way I should enable P0.21 as nReset (to enable hardware resets on P0.21), or should I instead be writing 0xFFFF directly to both the PSELRESET[0] and PSELRESET[1] registers to enable that?
@NeverDie said in nRF5 Bluetooth action!:
Thanks! By being "merged," does that mean it is now in the regular MySensors development release, and so I should reload a fresh copy of the MySensors development library?
The Board definition is independed from MySensors core living at https://github.com/mysensors/ArduinoBoards You have to follow the instructions, then you can install the MySensors nRF5 Boards via Arduino Board Manager.
Also, is this the way I should enable P0.21 as nReset (to enable hardware resets on P0.21), or should I instead be writing 0xFFFF directly to both the PSELRESET[0] and PSELRESET[1] registers to enable that?
Look into the Tools menu. For nRF52 MCU is a "Reset" menu. Switch it to "Enable"
-
@NeverDie said in nRF5 Bluetooth action!:
Thanks! By being "merged," does that mean it is now in the regular MySensors development release, and so I should reload a fresh copy of the MySensors development library?
The Board definition is independed from MySensors core living at https://github.com/mysensors/ArduinoBoards You have to follow the instructions, then you can install the MySensors nRF5 Boards via Arduino Board Manager.
Also, is this the way I should enable P0.21 as nReset (to enable hardware resets on P0.21), or should I instead be writing 0xFFFF directly to both the PSELRESET[0] and PSELRESET[1] registers to enable that?
Look into the Tools menu. For nRF52 MCU is a "Reset" menu. Switch it to "Enable"
@d00616
I got the pin mapping to work, but setting reset enable through the tool menu seems to have no effect. I subsequently drive P0.21 low (all the way to GND even), but no reset happens. Am I doing it wrong? Anyone gotten it to work? -
@d00616
I got the pin mapping to work, but setting reset enable through the tool menu seems to have no effect. I subsequently drive P0.21 low (all the way to GND even), but no reset happens. Am I doing it wrong? Anyone gotten it to work?@NeverDie
I also tried adding a 10K pullup resistor, and no change.At the moment I'm unfamiliar with the nRF52 API. What would the code be to set both those reset registers to 0xFFFF? That by itself should enable the reset on P0.21. I could try inserting it into the demo script and see if reset then works.
-
I guess it wouldn't be that simple, because I just now read that it requires a system reset after writing to those registers: https://devzone.nordicsemi.com/question/157603/can-i-enable-and-disable-nrf52832-reset-pin-when-code-is-running/ for it to take effect.
-
By switching to a Windows 10 computer, I was able to get J-link working over USB from windows. Then I opened up J-Link Command, which mostly utiizes a command line interface. It turns out that for unlocking, the nRF52836 is not on the list of devices (see below), so I simply then issued a mass erase command, which looks as though it may have worked:
J-Link>unlock
Syntax: unlock <DeviceName>
---Supported devices---
  LM3Sxxx [<Auto>]
  Kinetis
  EFM32Gxxx
  LPC5460x
J-Link>erase
Erasing device (nRF52832_xxAA)...
J-Link: Flash download: Total time needed: 0.336s (Prepare: 0.064s, Compare: 0.000s, Erase: 0.263s, Program: 0.000s, Verify: 0.000s, Restore: 0.008s)
Erasing done.
J-Link>mem 0 100
00000000 = FF FF FF FF FF FF FF FF FF FF FF FF FF FF FF FF
00000010 = FF FF FF FF FF FF FF FF FF FF FF FF FF FF FF FF
00000020 = FF FF FF FF FF FF FF FF FF FF FF FF FF FF FF FF
00000030 = FF FF FF FF FF FF FF FF FF FF FF FF FF FF FF FF
00000040 = FF FF FF FF FF FF FF FF FF FF FF FF FF FF FF FF
00000050 = FF FF FF FF FF FF FF FF FF FF FF FF FF FF FF FF
00000060 = FF FF FF FF FF FF FF FF FF FF FF FF FF FF FF FF
00000070 = FF FF FF FF FF FF FF FF FF FF FF FF FF FF FF FF
00000080 = FF FF FF FF FF FF FF FF FF FF FF FF FF FF FF FF
00000090 = FF FF FF FF FF FF FF FF FF FF FF FF FF FF FF FF
000000A0 = FF FF FF FF FF FF FF FF FF FF FF FF FF FF FF FF
000000B0 = FF FF FF FF FF FF FF FF FF FF FF FF FF FF FF FF
000000C0 = FF FF FF FF FF FF FF FF FF FF FF FF FF FF FF FF
000000D0 = FF FF FF FF FF FF FF FF FF FF FF FF FF FF FF FF
000000E0 = FF FF FF FF FF FF FF FF FF FF FF FF FF FF FF FF
000000F0 = FF FF FF FF FF FF FF FF FF FF FF FF FF FF FF FF
J-Link>
:)
@NeverDie said in nRF5 Bluetooth action!:
By switching to a Windows 10 computer, I was able to get J-link working over USB from windows.
Can you explain the steps you used for that ?
Did you use a jlink clone or the version included in the DK ? -
@NeverDie said in nRF5 Bluetooth action!:
By switching to a Windows 10 computer, I was able to get J-link working over USB from windows.
Can you explain the steps you used for that ?
Did you use a jlink clone or the version included in the DK ?@Nca78 said in nRF5 Bluetooth action!:
@NeverDie said in nRF5 Bluetooth action!:
By switching to a Windows 10 computer, I was able to get J-link working over USB from windows.
Can you explain the steps you used for that ?
Did you use a jlink clone or the version included in the DK ?Well you can forget about my questions.
I tried to use the JLink tools to make the mass erase but it didn't want to connect to the module.
But then I have replaced the driver with Zadig and configured Arduino for NRF5 and it uploaded the LightSensor sketch, I can see it in the log of the controller. No mass erase needed, nor any unlock or related command.
Just plug and program for me :DI have some strange error messages but I guess they come from (very) dated firmware on my Segger clone
** Programming Started ** auto erase enabled Info : nRF51822-QFN48(build code: B00) 512kB Flash Warn : not enough working area available(requested 32) Warn : no working area available, falling back to slow memory writes wrote 28672 bytes from file C:\Users\Nicolas\AppData\Local\Temp\arduino_build_723618/LightSensor.ino.hex in 6.715397s (4.170 KiB/s) ** Programming Finished ** ** Verify Started ** Warn : not enough working area available(requested 52) verified 27432 bytes in 0.279278s (95.923 KiB/s) ** Verified OK ** ** Resetting Target ** shutdown command invoked -
@NeverDie said in nRF5 Bluetooth action!:
By switching to a Windows 10 computer, I was able to get J-link working over USB from windows.
Can you explain the steps you used for that ?
Did you use a jlink clone or the version included in the DK ?@Nca78 said in nRF5 Bluetooth action!:
Did you use a jlink clone or the version included in the DK ?
I used the j-link Segger clone to do the mass erase, and then I switched to the DK to do the programming. However, today I was able to do the programming from the Segger clone on the Windows 10 computer, and the setup is less arduous than for programming an external chip using the DK (because with the Segger I didn't have to power the target chip independently during the programming).
-
I guess it wouldn't be that simple, because I just now read that it requires a system reset after writing to those registers: https://devzone.nordicsemi.com/question/157603/can-i-enable-and-disable-nrf52832-reset-pin-when-code-is-running/ for it to take effect.
So, I guess the way the code would read is:
- First check if the reset registers are already properly set.
- If so, then just move on to whatever is next.
If not, then properly set the reset registers and invoke the system reset.
Apparently a system reset doesn't change the values in the reset registers.
Of course, none of this would be needed if the reset enable from the tools menu worked, so I'd still prefer to do it that way if at all possible.
As I indicated earlier, the pin mapping on Rx and Tx did work using @d00616 new technique, so hurray for that. That much was an important victory in itself that's worth celebrating. :)
-
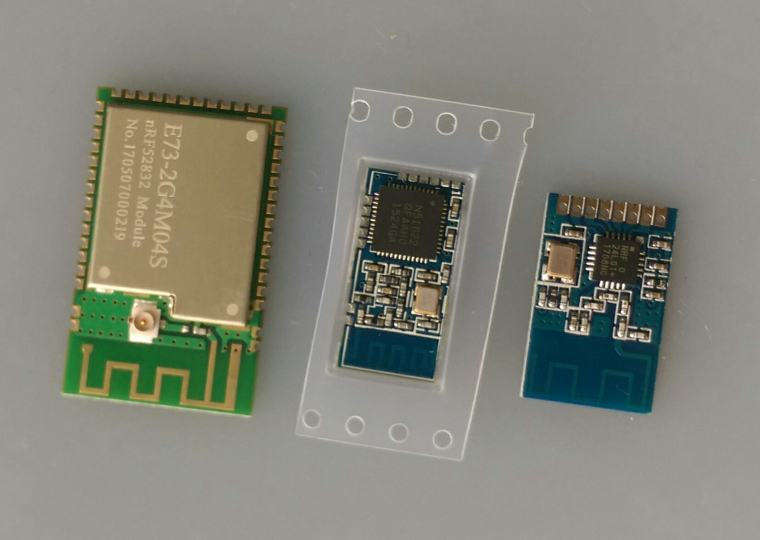
First nrf51822 module arrived already.
It's really small, here between an nrf24 SMD and the cdebyte 52832.
Soldering quality looks better than the pictures on AliExpress.
Hello! It looks like you're interested in this conversation, but you don't have an account yet.
Getting fed up of having to scroll through the same posts each visit? When you register for an account, you'll always come back to exactly where you were before, and choose to be notified of new replies (either via email, or push notification). You'll also be able to save bookmarks and upvote posts to show your appreciation to other community members.
With your input, this post could be even better 💗
Register Login