nRF5 action!
-
@d00616 said in nRF5 Bluetooth action!:
@d00616 said in nRF5 Bluetooth action!:
With merging this pull request the feature should be available: https://github.com/mysensors/ArduinoBoards/pull/13
Merged. Have fun with board definition in your sketch.
Thanks! By being "merged," does that mean it is now in the regular MySensors development release, and so I should reload a fresh copy of the MySensors development library?
Also, is this the way I should enable P0.21 as nReset (to enable hardware resets on P0.21), or should I instead be writing 0xFFFF directly to both the PSELRESET[0] and PSELRESET[1] registers to enable that?
@NeverDie said in nRF5 Bluetooth action!:
Thanks! By being "merged," does that mean it is now in the regular MySensors development release, and so I should reload a fresh copy of the MySensors development library?
The Board definition is independed from MySensors core living at https://github.com/mysensors/ArduinoBoards You have to follow the instructions, then you can install the MySensors nRF5 Boards via Arduino Board Manager.
Also, is this the way I should enable P0.21 as nReset (to enable hardware resets on P0.21), or should I instead be writing 0xFFFF directly to both the PSELRESET[0] and PSELRESET[1] registers to enable that?
Look into the Tools menu. For nRF52 MCU is a "Reset" menu. Switch it to "Enable"
-
@NeverDie said in nRF5 Bluetooth action!:
Thanks! By being "merged," does that mean it is now in the regular MySensors development release, and so I should reload a fresh copy of the MySensors development library?
The Board definition is independed from MySensors core living at https://github.com/mysensors/ArduinoBoards You have to follow the instructions, then you can install the MySensors nRF5 Boards via Arduino Board Manager.
Also, is this the way I should enable P0.21 as nReset (to enable hardware resets on P0.21), or should I instead be writing 0xFFFF directly to both the PSELRESET[0] and PSELRESET[1] registers to enable that?
Look into the Tools menu. For nRF52 MCU is a "Reset" menu. Switch it to "Enable"
@d00616
I got the pin mapping to work, but setting reset enable through the tool menu seems to have no effect. I subsequently drive P0.21 low (all the way to GND even), but no reset happens. Am I doing it wrong? Anyone gotten it to work? -
@d00616
I got the pin mapping to work, but setting reset enable through the tool menu seems to have no effect. I subsequently drive P0.21 low (all the way to GND even), but no reset happens. Am I doing it wrong? Anyone gotten it to work?@NeverDie
I also tried adding a 10K pullup resistor, and no change.At the moment I'm unfamiliar with the nRF52 API. What would the code be to set both those reset registers to 0xFFFF? That by itself should enable the reset on P0.21. I could try inserting it into the demo script and see if reset then works.
-
I guess it wouldn't be that simple, because I just now read that it requires a system reset after writing to those registers: https://devzone.nordicsemi.com/question/157603/can-i-enable-and-disable-nrf52832-reset-pin-when-code-is-running/ for it to take effect.
-
By switching to a Windows 10 computer, I was able to get J-link working over USB from windows. Then I opened up J-Link Command, which mostly utiizes a command line interface. It turns out that for unlocking, the nRF52836 is not on the list of devices (see below), so I simply then issued a mass erase command, which looks as though it may have worked:
J-Link>unlock
Syntax: unlock <DeviceName>
---Supported devices---
  LM3Sxxx [<Auto>]
  Kinetis
  EFM32Gxxx
  LPC5460x
J-Link>erase
Erasing device (nRF52832_xxAA)...
J-Link: Flash download: Total time needed: 0.336s (Prepare: 0.064s, Compare: 0.000s, Erase: 0.263s, Program: 0.000s, Verify: 0.000s, Restore: 0.008s)
Erasing done.
J-Link>mem 0 100
00000000 = FF FF FF FF FF FF FF FF FF FF FF FF FF FF FF FF
00000010 = FF FF FF FF FF FF FF FF FF FF FF FF FF FF FF FF
00000020 = FF FF FF FF FF FF FF FF FF FF FF FF FF FF FF FF
00000030 = FF FF FF FF FF FF FF FF FF FF FF FF FF FF FF FF
00000040 = FF FF FF FF FF FF FF FF FF FF FF FF FF FF FF FF
00000050 = FF FF FF FF FF FF FF FF FF FF FF FF FF FF FF FF
00000060 = FF FF FF FF FF FF FF FF FF FF FF FF FF FF FF FF
00000070 = FF FF FF FF FF FF FF FF FF FF FF FF FF FF FF FF
00000080 = FF FF FF FF FF FF FF FF FF FF FF FF FF FF FF FF
00000090 = FF FF FF FF FF FF FF FF FF FF FF FF FF FF FF FF
000000A0 = FF FF FF FF FF FF FF FF FF FF FF FF FF FF FF FF
000000B0 = FF FF FF FF FF FF FF FF FF FF FF FF FF FF FF FF
000000C0 = FF FF FF FF FF FF FF FF FF FF FF FF FF FF FF FF
000000D0 = FF FF FF FF FF FF FF FF FF FF FF FF FF FF FF FF
000000E0 = FF FF FF FF FF FF FF FF FF FF FF FF FF FF FF FF
000000F0 = FF FF FF FF FF FF FF FF FF FF FF FF FF FF FF FF
J-Link>
:)
@NeverDie said in nRF5 Bluetooth action!:
By switching to a Windows 10 computer, I was able to get J-link working over USB from windows.
Can you explain the steps you used for that ?
Did you use a jlink clone or the version included in the DK ? -
@NeverDie said in nRF5 Bluetooth action!:
By switching to a Windows 10 computer, I was able to get J-link working over USB from windows.
Can you explain the steps you used for that ?
Did you use a jlink clone or the version included in the DK ?@Nca78 said in nRF5 Bluetooth action!:
@NeverDie said in nRF5 Bluetooth action!:
By switching to a Windows 10 computer, I was able to get J-link working over USB from windows.
Can you explain the steps you used for that ?
Did you use a jlink clone or the version included in the DK ?Well you can forget about my questions.
I tried to use the JLink tools to make the mass erase but it didn't want to connect to the module.
But then I have replaced the driver with Zadig and configured Arduino for NRF5 and it uploaded the LightSensor sketch, I can see it in the log of the controller. No mass erase needed, nor any unlock or related command.
Just plug and program for me :DI have some strange error messages but I guess they come from (very) dated firmware on my Segger clone
** Programming Started ** auto erase enabled Info : nRF51822-QFN48(build code: B00) 512kB Flash Warn : not enough working area available(requested 32) Warn : no working area available, falling back to slow memory writes wrote 28672 bytes from file C:\Users\Nicolas\AppData\Local\Temp\arduino_build_723618/LightSensor.ino.hex in 6.715397s (4.170 KiB/s) ** Programming Finished ** ** Verify Started ** Warn : not enough working area available(requested 52) verified 27432 bytes in 0.279278s (95.923 KiB/s) ** Verified OK ** ** Resetting Target ** shutdown command invoked -
@NeverDie said in nRF5 Bluetooth action!:
By switching to a Windows 10 computer, I was able to get J-link working over USB from windows.
Can you explain the steps you used for that ?
Did you use a jlink clone or the version included in the DK ?@Nca78 said in nRF5 Bluetooth action!:
Did you use a jlink clone or the version included in the DK ?
I used the j-link Segger clone to do the mass erase, and then I switched to the DK to do the programming. However, today I was able to do the programming from the Segger clone on the Windows 10 computer, and the setup is less arduous than for programming an external chip using the DK (because with the Segger I didn't have to power the target chip independently during the programming).
-
I guess it wouldn't be that simple, because I just now read that it requires a system reset after writing to those registers: https://devzone.nordicsemi.com/question/157603/can-i-enable-and-disable-nrf52832-reset-pin-when-code-is-running/ for it to take effect.
So, I guess the way the code would read is:
- First check if the reset registers are already properly set.
- If so, then just move on to whatever is next.
If not, then properly set the reset registers and invoke the system reset.
Apparently a system reset doesn't change the values in the reset registers.
Of course, none of this would be needed if the reset enable from the tools menu worked, so I'd still prefer to do it that way if at all possible.
As I indicated earlier, the pin mapping on Rx and Tx did work using @d00616 new technique, so hurray for that. That much was an important victory in itself that's worth celebrating. :)
-
So, I guess the way the code would read is:
- First check if the reset registers are already properly set.
- If so, then just move on to whatever is next.
If not, then properly set the reset registers and invoke the system reset.
Apparently a system reset doesn't change the values in the reset registers.
Of course, none of this would be needed if the reset enable from the tools menu worked, so I'd still prefer to do it that way if at all possible.
As I indicated earlier, the pin mapping on Rx and Tx did work using @d00616 new technique, so hurray for that. That much was an important victory in itself that's worth celebrating. :)
@NeverDie said in nRF5 Bluetooth action!:
Apparently a system reset doesn't change the values in the reset registers.
The "Reset" menu was from my first approach creating user manageable boards for arduino-nrf5. I haven' tested it. With the reset menu I set the "-DCONFIG_GPIO_AS_PINRESET" option. This option should be processed in "cores/nRF5/SDK/components/toolchain/system_nrf52.c". If not the SystemInit() function is not processed in the startup code. This is a problem handling the chip errata. I have not time to check this at the moment.
Here is a PR which want to enable reset as default: https://github.com/sandeepmistry/arduino-nRF5/pull/91
-
Maybe the reset pin problem is hardware related? I say that because if I program the Ebyte module as a Nordic nRF52832 DK board, it still has the same issue. In contrast, the reset button on the actual nRF52832 DK board does work as expected.
-
I've confirmed that connecting P0.21 to GND and then removing it again on the Nordic nRF52832 DK does act as a reset. So, at the moment I have no idea why doing so on the Ebyte nRF52832 that's been programmed to think it's an Nordic nRF52832 DK doesn't do the same. There must be some hardware difference, right?
-
I've confirmed that on both the Ebyte Module and on the Nordic nRF52832 DK, there is continuity between the P0.21 pin on the chip and the P0.21 pin on the board pinout. So, there must be some other factor that accounts for the difference.
-
Making no headway on the reset topic, so for now I'm going to punt and move on to other things.
-
Success! I received some of these modules:
https://www.aliexpress.com/item/nRF52832-Bluetooth-4-1-BLE-Module-M4-Transparent-Transmission-SMA-512K-FLASH-64K-RAM-pass-through/32798522093.html?spm=2114.search0104.3.10.osbQHP&ws_ab_test=searchweb0_0,searchweb201602_5_10152_10065_10151_10068_10130_10084_10083_10119_10080_10307_10082_10081_10110_10178_10137_10111_10060_10112_10113_10155_10114_10154_10056_10055_10054_10310_10312_10059_100031_10099_10078_10079_10103_10073_10102_10120_10052_10053_10142_10107_10050_10051-10120,searchweb201603_2,ppcSwitch_5&btsid=b9a0c3cb-cc2a-4254-b24f-94136c73def6&algo_expid=2a71f70b-4929-43a5-887a-2f7263250568-1&algo_pvid=2a71f70b-4929-43a5-887a-2f7263250568
which I immediately programmed using the nRF52832 DK. This time, there was no need to first mass erase. Furthermore, this time P0.21 does indeed reset the module after it is pulled to ground and then released.So, from this I conclude there must be something peculiar to the Ebyte modules which prevents their resetting using P0.21.
It's nice to have different modules to compare amongst. :)
-
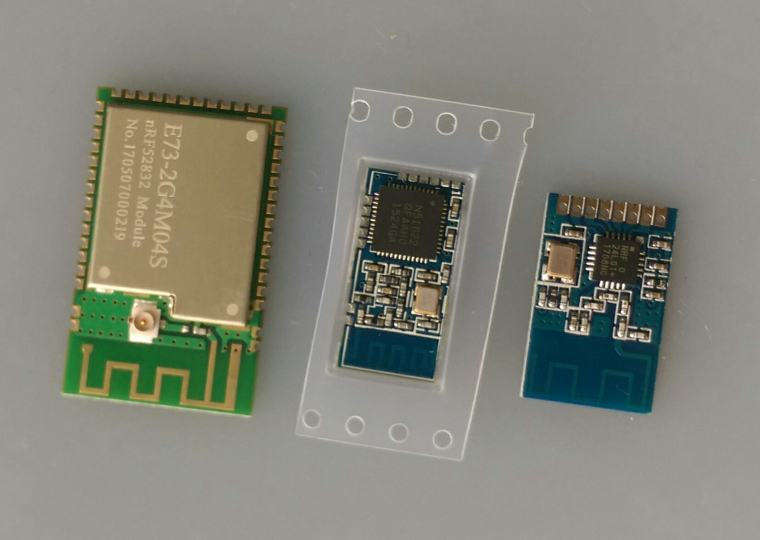
First nrf51822 module arrived already.
It's really small, here between an nrf24 SMD and the cdebyte 52832.
Soldering quality looks better than the pictures on AliExpress.
Note sure how this fits into the comparative size of things, but it looks interesting:
https://www.aliexpress.com/item/NRF52832-Module-Core-Board-Wireless-Bluetooth-Transceiver-Module-Transparent-Transmission-Code-NRF51822-Migration-Guide/32797905798.html?spm=a2g0s.13010208.99999999.280.9VhQow -
Anyone have a good sketch for measuring the battery supplied voltage on an nRF52? Some of the concepts from the old atmega328p may apply, but the specifics are going to be different, I'm sure.