What did you build today (Pictures) ?

-
@nca78 I would assume that pads 1 and 2 are capacitive touch surfaces, correct? very nice design.
@dbemowsk said in What did you build today (Pictures) ?:
@nca78 I would assume that pads 1 and 2 are capacitive touch surfaces, correct? very nice design.
Thank you !
Yes using dirt cheap TTP223 breakouts at the back so no SMD soldering needed. -
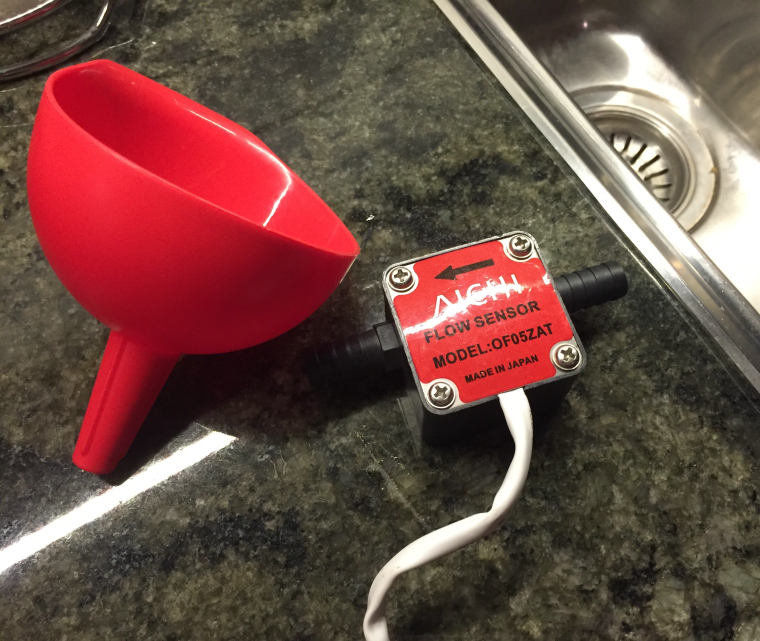
I received the next version of the leak detector PCB today. Putting it together, it checks out: thanks to a change in layout, it has the same board size as before, but now no clearance issues. i.e. No need for Kapton tape!
If I had had my own PCB CNC etcher, it would have saved me the time I lost waiting for the earlier version from the fab, only to find out that the clearances were too tight and that I would have to re-do it. Looking forward to not having such delays ever again. -
Christmas wreathe for the techie in all of us.
pretty colors
flashing
wire wrappingUses a pro mini and a lot of wire-wrapping. Other components on the circuit boards are just there for show.
(ugh, google photos links not showing up so converted to links)
-
Christmas wreathe for the techie in all of us.
pretty colors
flashing
wire wrappingUses a pro mini and a lot of wire-wrapping. Other components on the circuit boards are just there for show.
(ugh, google photos links not showing up so converted to links)
-
Finally got the PCBs from AllPCB.com (cost 5 Euros and took a total of 7 days from order submission to free DHL delivery to Europe!!!) for my own MySensors Arduino Pro Mini prototyping board. Unfortunately the soldering iron broke during my assembly, so it's not fully finished and I couldn't test it yet, either...

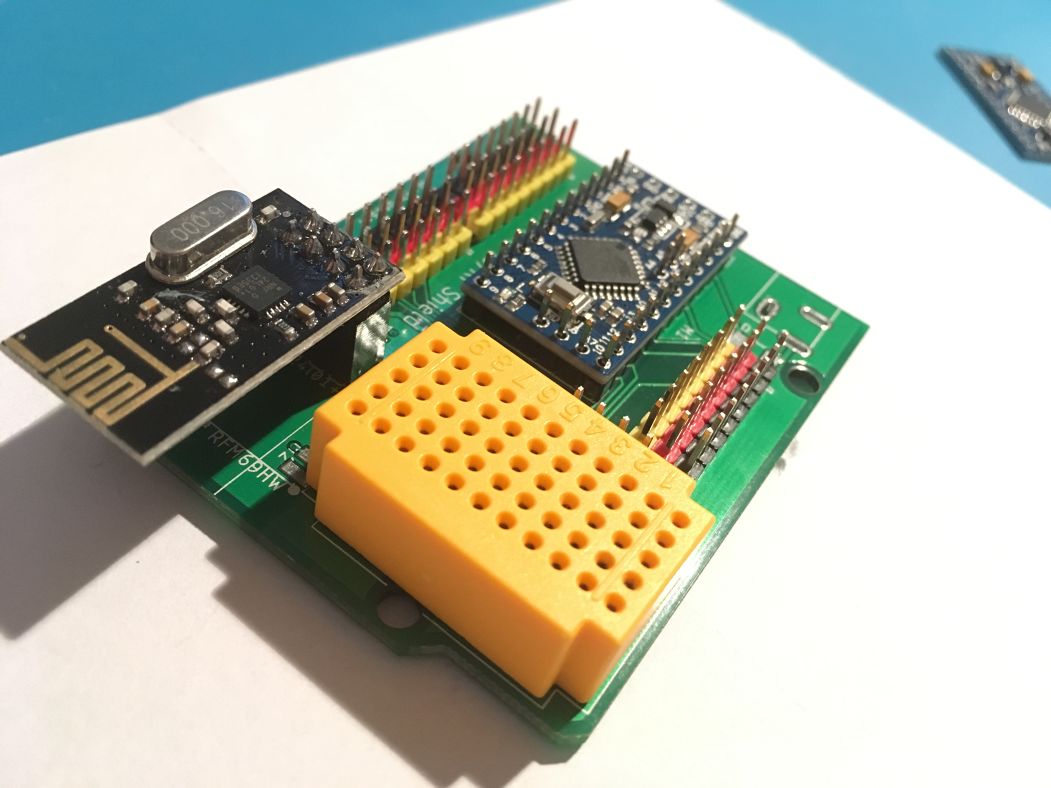
This board is inspired by the Nano IO shields that are offered on AliExpress and improves it further for my needs (and switched to the Pro Mini instead of the Nano).
- Each analog and digital pin of the Pro Mini has its own VCC and GND pins,
- the board also provides its own voltage regulator, solder pins for by NRF24L01+ and RFM69H are provided (plus the 5V->3.3V XC6206 regulator),
- either a tiny 55-pin breadboard or three I²C connectors can be placed on the board.
- One can also use PogoPins instead of soldering the Pro Mini (or headers for it) to burn the bootloader or change fuses on the Pro Mini via the ICSP connector.
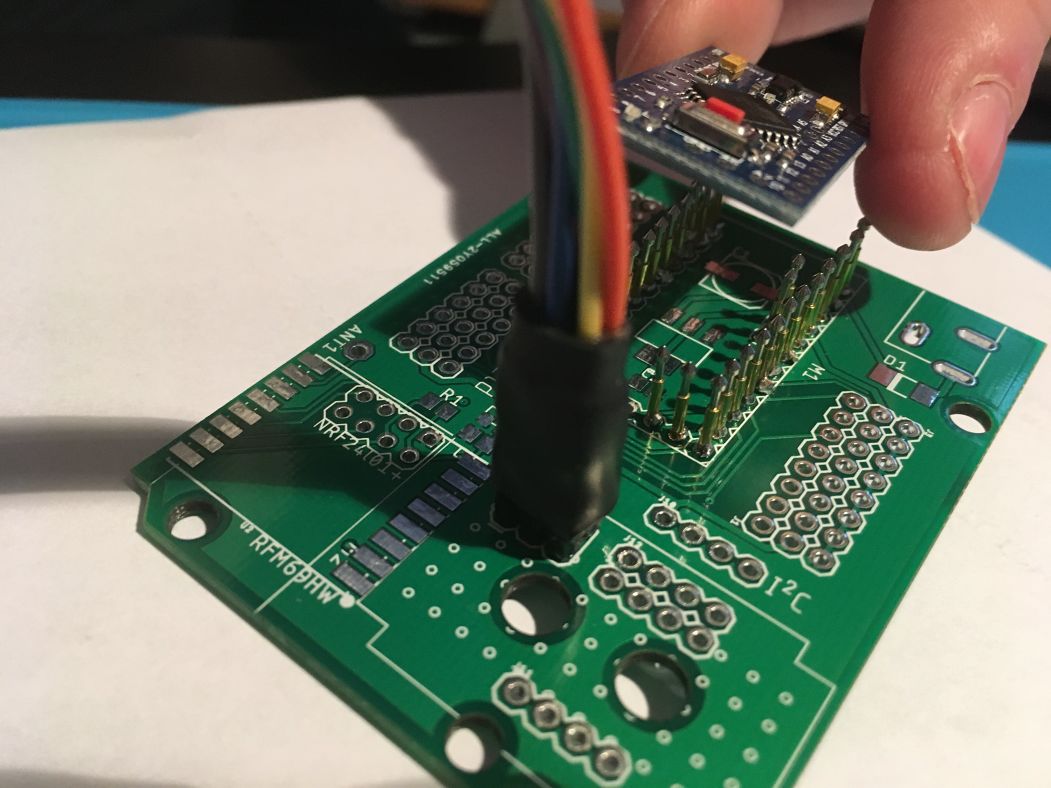
All design files are available on GitHub: https://www.openhardware.io/view/538/Arduino-Pro-Mini-IO-Shield
-
Finally got the PCBs from AllPCB.com (cost 5 Euros and took a total of 7 days from order submission to free DHL delivery to Europe!!!) for my own MySensors Arduino Pro Mini prototyping board. Unfortunately the soldering iron broke during my assembly, so it's not fully finished and I couldn't test it yet, either...
This board is inspired by the Nano IO shields that are offered on AliExpress and improves it further for my needs (and switched to the Pro Mini instead of the Nano).
- Each analog and digital pin of the Pro Mini has its own VCC and GND pins,
- the board also provides its own voltage regulator, solder pins for by NRF24L01+ and RFM69H are provided (plus the 5V->3.3V XC6206 regulator),
- either a tiny 55-pin breadboard or three I²C connectors can be placed on the board.
- One can also use PogoPins instead of soldering the Pro Mini (or headers for it) to burn the bootloader or change fuses on the Pro Mini via the ICSP connector.
All design files are available on GitHub: https://www.openhardware.io/view/538/Arduino-Pro-Mini-IO-Shield
-
A temperature controlled PWM fan controller for my DPS5005 power supply!
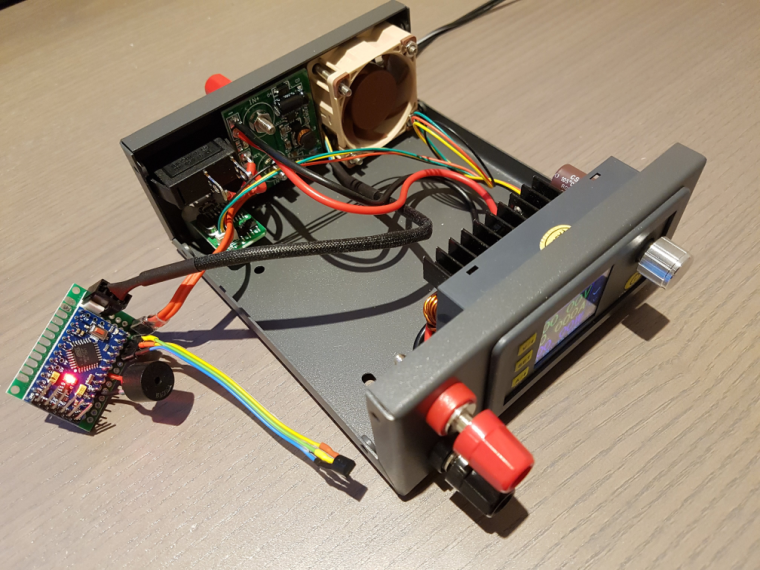
The original 2-wire fan that came with the power supply casing made an incredible amount of noise.
Using PWM to reduce its velocity made it even more noisy :imp:So, I made a fresh start and ordered a quality fan (almost as expensive as the whole casing...)
Using nothing more than a 5V pro mini, piezo speaker, DS18B20 temperature sensor and a resistor I made a full fledged fan controller ;-)
It takes the current temp from the DS18B20 (which will be mounted on the heatsink) and ramps up the fan linearly in the 30..60 C range. Below 30 C, the fan is off.
If RPM readback indicates a stalled fan, or DS18B20 returns wrong values the buzzer will force me to invest what's wrong :muscle:http://yveaux.blogspot.nl
-
A temperature controlled PWM fan controller for my DPS5005 power supply!
The original 2-wire fan that came with the power supply casing made an incredible amount of noise.
Using PWM to reduce its velocity made it even more noisy :imp:So, I made a fresh start and ordered a quality fan (almost as expensive as the whole casing...)
Using nothing more than a 5V pro mini, piezo speaker, DS18B20 temperature sensor and a resistor I made a full fledged fan controller ;-)
It takes the current temp from the DS18B20 (which will be mounted on the heatsink) and ramps up the fan linearly in the 30..60 C range. Below 30 C, the fan is off.
If RPM readback indicates a stalled fan, or DS18B20 returns wrong values the buzzer will force me to invest what's wrong :muscle: -
@mfalkvidd don't tempt me...
-
A temperature controlled PWM fan controller for my DPS5005 power supply!
The original 2-wire fan that came with the power supply casing made an incredible amount of noise.
Using PWM to reduce its velocity made it even more noisy :imp:So, I made a fresh start and ordered a quality fan (almost as expensive as the whole casing...)
Using nothing more than a 5V pro mini, piezo speaker, DS18B20 temperature sensor and a resistor I made a full fledged fan controller ;-)
It takes the current temp from the DS18B20 (which will be mounted on the heatsink) and ramps up the fan linearly in the 30..60 C range. Below 30 C, the fan is off.
If RPM readback indicates a stalled fan, or DS18B20 returns wrong values the buzzer will force me to invest what's wrong :muscle:@yveaux said in What did you build today (Pictures) ?:
The original 2-wire fan that came with the power supply casing made an incredible amount of noise.
Using PWM to reduce its velocity made it even more noisy :imp:Less funny that way but did you try to lower the PWM frequency of the atmega to it's minimum ? I had the same problem with the fan I put in my fridge cabinet and low PWM frequency solved it.
-
@yveaux said in What did you build today (Pictures) ?:
The original 2-wire fan that came with the power supply casing made an incredible amount of noise.
Using PWM to reduce its velocity made it even more noisy :imp:Less funny that way but did you try to lower the PWM frequency of the atmega to it's minimum ? I had the same problem with the fan I put in my fridge cabinet and low PWM frequency solved it.
-
An RC filter could probably also make wonders for the fan. I had to add one for the parts fan on my 3D printer. Couldn't control the speed with PWM without the RC filter..
Btw. probably a bit over the top of using an arduino as fan control? Unless you plan on adding a NRF radio, and report the temperature + PWM duty cycle to your mysensors system, and store the values in influxdb? ;)
@tbowmo said in What did you build today (Pictures) ?:
Btw. probably a bit over the top of using an arduino as fan control?
Really? How so? Seems like the end result will be as quiet as possible, yet avoids stalling.
-
@tbowmo said in What did you build today (Pictures) ?:
Btw. probably a bit over the top of using an arduino as fan control?
Really? How so? Seems like the end result will be as quiet as possible, yet avoids stalling.
@neverdie said in What did you build today (Pictures) ?:
@tbowmo said in What did you build today (Pictures) ?:
Btw. probably a bit over the top of using an arduino as fan control?
Really? How so? Seems like the end result will be as quiet as possible, yet avoids stalling.
Indeed! I thought of going the analog way, but the final solution would be more expensive, I didn't have the parts at hand, it wouldn't have as many features and it would have cost me a lot more time...
-
An RC filter could probably also make wonders for the fan. I had to add one for the parts fan on my 3D printer. Couldn't control the speed with PWM without the RC filter..
Btw. probably a bit over the top of using an arduino as fan control? Unless you plan on adding a NRF radio, and report the temperature + PWM duty cycle to your mysensors system, and store the values in influxdb? ;)
-
a 555 and a couple of resistors / capacitors.. ;)
https://electronics.stackexchange.com/questions/91102/555-temperature-controlled-pwm
But then again, I recon that most of us might have more atmega328 based boards, than 555's in the parts bin :)
about the RC for PWM, it was meant as a hint for others that might fight problems with a fan that they couldn't control properly with PWM..
@tbowmo said in What did you build today (Pictures) ?:
a 555 and a couple of resistors / capacitors..
https://electronics.stackexchange.com/questions/91102/555-temperature-controlled-pwmStill, no tacho readback to detect stalled fans, no temperature sensor verification or overtemperature warning, no initial fan spinup and little control over how the fans reacts to temperature changes....