Navigation

    • Register
    • Login
    • OpenHardware.io
    • Categories
    • Recent
    • Tags
    • Popular
    1. Home
    2. 4994james
    3. Posts
    • Profile
    • Following
    • Followers
    • Topics
    • Posts
    • Best
    • Groups

    Posts made by 4994james

    • RE: Use of BH1750 light sensor in low power node

      @gerritv

      I am using v1.3.0 of the BH1750 library which I think is the most recent version on github (updated Jan 22).

      I had the same issue when using ONE_TIME_HIGH_RES_MODE in that the sensor would return an accurate light level on first power up but then each subsequent read would return the same value regardless of the light level.

      Reading through the source code (I think) the measureReady statement is still missing a configure statement to re-power up the module.

      So I put a configure statement in the main loop of the sketch which (I think) powers up the module and then a wait for 200ms to allow enough time before reading.

      void loop(){
          if (!lightSensor.configure(BH1750::ONE_TIME_HIGH_RES_MODE)){ 
          Serial.println("Could not power up light sensor");
          }
          wait (200);
          if (lightSensor.measurementReady()) {
          uint16_t lux = lightSensor.readLightLevel();// Get Lux value
          #ifdef MY_DEBUG
          Serial.println(lux);
          #endif
          send(msgLight.set(lux, 1));
          }
      etc...
      

      My device is a combination temp/hum sensor using a HTU21 and light sensor using BH1750.

      I now get accurate light levels each read cycle.

      In BH1750 continuous mode the current draw was about 0.15mA between reads. In one time mode it is now reading 0.01mA on my ammeter, i.e. almost too small to read.

      posted in Development
      4994james
      4994james
    • RE: Testing battery level with regulator removed

      Hi. I have used the divider recommended in https://www.mysensors.org/build/battery and with a 0.1uF electrolytic cap. There is still a ripple on this when i attach the scope. Maybe that's the issue but I get the same value (325 as it happens) from A0 even if I vary the supply voltage.

      Just to confirm you have had this working after the pro mini onboard regulator is removed?

      posted in Hardware
      4994james
      4994james
    • Testing battery level with regulator removed

      Hi
      Using a clone pro mini + NRF24L01 and HTU21DF sensor.
      I have built a battery powered sensor with the regulator removed to reduce power consumption. When I test the level using the analog read method (split resistors) I always get the same value no matter what supply voltage i use (between 2.8v and 3,2v). Is this because analog read is no longer able to get a fixed reference point? I have also tried using the internal cpu voltage method and I get unpredictable results as well.

      posted in Hardware
      4994james
      4994james
    • RE: [SOLVED] s17021 vs HTU21

      @4994james
      Hi. I have been reading https://forum.mysensors.org/topic/476/htu21d-humidity-temperature-sensor/8 and have now got this working using the adafruit htu21d library. Not sure what the difference is but there obviously is something. I also confirm that the board works without external pull up resistors. Thanks for you help.

      This is my new (working) code:

      /**
       * The MySensors Arduino library handles the wireless radio link and protocol
       * between your home built sensors/actuators and HA controller of choice.
       * The sensors forms a self healing radio network with optional repeaters. Each
       * repeater and gateway builds a routing tables in EEPROM which keeps track of the
       * network topology allowing messages to be routed to nodes.
       *
       * Created by Henrik Ekblad <henrik.ekblad@mysensors.org>
       * Copyright (C) 2013-2015 Sensnology AB
       * Full contributor list: https://github.com/mysensors/Arduino/graphs/contributors
       *
       * Documentation: http://www.mysensors.org
       * Support Forum: http://forum.mysensors.org
       *
       * This program is free software; you can redistribute it and/or
       * modify it under the terms of the GNU General Public License
       * version 2 as published by the Free Software Foundation.
       *
       *******************************
       *
       * REVISION HISTORY
       * Version 1.0: Andrew Sutcliffe
       *  
       * DESCRIPTION
       * This sketch provides an example of how to implement a humidity/temperature
       * sensor using a HTU21DF Sensor.
       *  
       * For more information, please visit:
       * http://www.mysensors.org/build/humidity
       * 
       * Connect Vin to 3-5VDC
       * Connect GND to ground
       * Connect SCL to I2C clock pin (A5 on UNO)
       * Connect SDA to I2C data pin (A4 on UNO)
       * 
       */
      
      // Enable debug prints
      #define MY_DEBUG
      
      // Enable and select radio type attached 
      //#define MY_RADIO_NRF24
      //#define MY_RADIO_RFM69
      #define MY_RS485
      
      // Define this to enables DE-pin management on defined pin
      #define MY_RS485_DE_PIN 2
      
      // Set RS485 baud rate to use
      #define MY_RS485_BAUD_RATE 9600
      
      #include <MySensors.h>  
      #include <Wire.h>
      #include "Adafruit_HTU21DF.h"
      
      Adafruit_HTU21DF htu = Adafruit_HTU21DF();
      
      // Set this offset if the sensor has a permanent small offset to the real temperatures
      #define SENSOR_TEMP_OFFSET 0
      
      // Sleep time between sensor updates (in milliseconds)
      
      static const uint64_t UPDATE_INTERVAL = 60000;
      
      // Force sending an update of the temperature after n sensor reads, so a controller showing the
      // timestamp of the last update doesn't show something like 3 hours in the unlikely case, that
      // the value didn't change since;
      // i.e. the sensor would force sending an update every UPDATE_INTERVAL*FORCE_UPDATE_N_READS [ms]
      static const uint8_t FORCE_UPDATE_N_READS = 10;
      
      #define CHILD_ID_HUM 0
      #define CHILD_ID_TEMP 1
      
      #define MY_NODE_ID 104
      
      float lastTemp;
      float lastHum;
      uint8_t nNoUpdatesTemp;
      uint8_t nNoUpdatesHum;
      bool metric = true;
      
      MyMessage msgHum(CHILD_ID_HUM, V_HUM);
      MyMessage msgTemp(CHILD_ID_TEMP, V_TEMP);
      
      void presentation()  
      { 
        // Send the sketch version information to the gateway
        sendSketchInfo("HTU21DF-TemperatureAndHumidity", "1.0");
      
        // Register all sensors to gw (they will be created as child devices)
        present(CHILD_ID_HUM, S_HUM);
        present(CHILD_ID_TEMP, S_TEMP);
      }
      
      void setup()
      {
        Serial.begin(115200);
        Serial.println("HTU21D-F test");
      
        if (!htu.begin()) {
          Serial.println("Couldn't find sensor!");
          while (1);
          }
      }
      
      void loop(){
        // Get temperature from HTU21DF library
        float temperature = (htu.readTemperature());
       if (temperature != lastTemp || nNoUpdatesTemp == FORCE_UPDATE_N_READS) {
          // Only send temperature if it changed since the last measurement or if we didn't send an update for n times
          lastTemp = temperature;
          
          // Reset no updates counter
          nNoUpdatesTemp = 0;
          temperature += SENSOR_TEMP_OFFSET;
          send(msgTemp.set(temperature, 1));
      
          #ifdef MY_DEBUG
          Serial.print("T: ");
          Serial.println(temperature);
          #endif
        } 
        else {
          // Increase no update counter if the temperature stayed the same
          nNoUpdatesTemp++;
        }
      
        // Get humidity from HTU21DF library
        float humidity = (htu.readHumidity());
        if (humidity != lastHum || nNoUpdatesHum == FORCE_UPDATE_N_READS) {
          // Only send humidity if it changed since the last measurement or if we didn't send an update for n times
          lastHum = humidity;
          // Reset no updates counter
          nNoUpdatesHum = 0;
          send(msgHum.set(humidity, 1));
      
          #ifdef MY_DEBUG
          Serial.print("H: ");
          Serial.println(humidity);
          #endif
      }
        else {
          // Increase no update counter if the humidity stayed the same
          nNoUpdatesHum++;
        }
      
        // Sleep for a while to save energy
        sleep(UPDATE_INTERVAL); 
      }
      
      posted in Hardware
      4994james
      4994james
    • RE: [SOLVED] s17021 vs HTU21

      @Yveaux
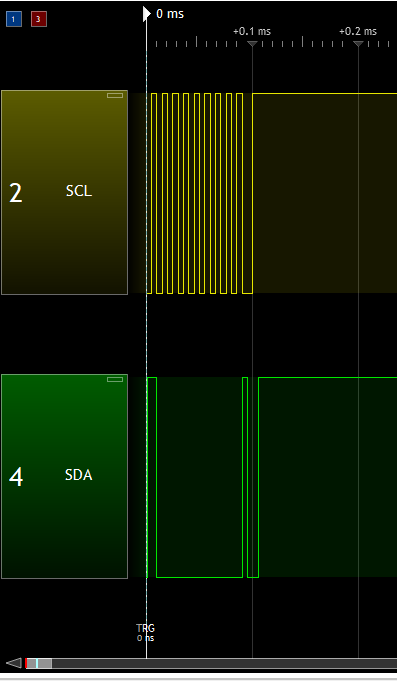
      This is what I see on trigger. this is identical when HTU21 and Si7021 boards are connected.
      97c3c3a0-5146-4e00-a868-f60a571b7185-image.png

      posted in Hardware
      4994james
      4994james
    • RE: [SOLVED] s17021 vs HTU21

      @Yveaux
      Many thanks for your response.
      I think the board has onboard pull up resistors, But to eliminate doubt I added 2 1k pull ups to sda and scl. This is the debug output when i use a sparkfun si7021 board (also with same pull ups - though not needed for this board for sure):

      setup!10446 MCO:BGN:INIT OK,TSP=1
      Temp 18.83C	Hum 50.94
      

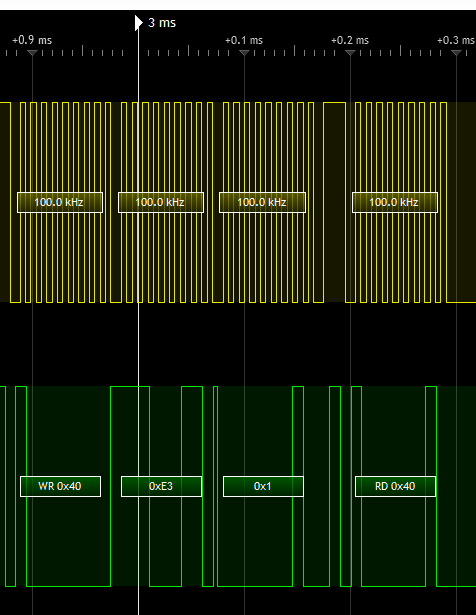
      and this is a screenshot of the trace on sda and scl:
      5c5812d9-a6fe-4b15-8026-3cf5def7d828-image.png

      E3 is temp command.

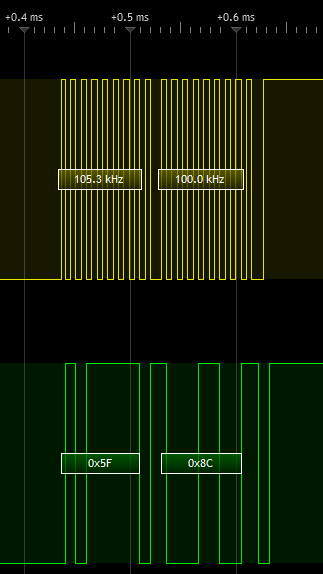
      followed by
      71c0c256-9b3c-470a-aeb0-98f7e2dac52e-image.png

      Temp reading and another (not shown) set of commands and humidity reading.

      However with the HTU21D the sketch hangs here:

      setup!10397 MCO:BGN:INIT OK,TSP=1
      

      i get the same first command trace as you would expect (same library) but no response from the board.

      posted in Hardware
      4994james
      4994james
    • RE: [SOLVED] s17021 vs HTU21

      @mfalkvidd Hi. Thank you. Most useful. Just tried and it reports:

      I2C Scanner
      Scanning...
      I2C device found at address 0x40 !
      done

      So seems to be the same as si7021 and correct. Will respond to @Yveaux with more details as still not working with si7021 library.

      posted in Hardware
      4994james
      4994james
    • [SOLVED] s17021 vs HTU21

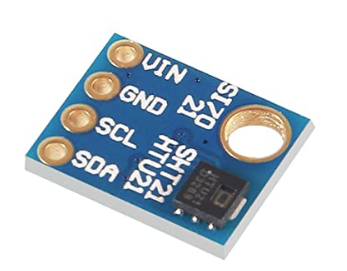
      I have had plenty of success with s17021 sensors and the mysensors library in the past however I have recently purchased some more boards for what I thought was a reasonable deal from Amazon. This is exactly what I have.
      0394aaa5-5ce0-493f-b787-a59fed5bc57b-image.png
      The issue I have is that none of them work. When it gets to Begin() it just stops. It doesn't return at all so doesn't issue a "sensor not detected" which is what I would expect if not connected. I hooked up my logic analyser trace and can see the initial command but nothing comes back.
      I can see the basic chip is different to the ones to the boards I have used previously so assume there is some software incompatibility. However I have looked at the data sheet and it is a I2C component and seems to have identical addresses and commands as the si7021. Have I just got a load of defective items or should I be using different software?

      posted in Hardware
      4994james
      4994james
    • RE: Handling NACKs in the gateway

      I have now "seen the light" about how this has been designed, amended the outbound mqtt message from the controller to request ACK:
      and this is working and sending back an echo message:

      mygateway1-in/100/2/1/1/3 100
      mygateway1-out/100/2/1/1/3 100
      

      So I can now build a rule round this in openhab to handle errors. I suppose I should have thought this through before pestering the forum but then again that is what it's for! Thanks again.

      posted in Development
      4994james
      4994james
    • RE: Handling NACKs

      @electrik hi. The is fine for a node where the code is part of the node sketch. However, because the gateway code is built into the libraries, it makes it difficult to implement in the gateway. As on the other thread one answer may be to change the controller code to request a confirmation from the gateway of delivery. In my case, I am using generic mqtt thing in openhab so not sure how to to be honest but will have a think.

      posted in Development
      4994james
      4994james
    • RE: Handling NACKs in the gateway

      @electrik thanks. Good thought. Will report back once I have looked at this.

      posted in Development
      4994james
      4994james
    • RE: Handling NACKs in the gateway

      Hi
      I have read around this a little bit and also investigated my hardware.

      1. I did find an issue in the node (receiving) hardware that was causing the NACKs at the gateway. This is now fixed and consequently I now have far less occurrences which is good but...
      2. I still do occasionally get NACKs. Here is an example of the debug output from the gateway of an apparently successful message:
      TSF:MSG:SEND,0-0-100-100,s=2,c=1,t=3,pt=0,l=3,sg=0,ft=0,st=OK:220
      

      and one where there has been a NACK:

      !TSF:MSG:SEND,0-0-100-100,s=2,c=1,t=3,pt=0,l=3,sg=0,ft=0,st=NACK:220
      

      So I am assuming that the NACK at the end of this debug message is telling me that this is a software handled NACK. I am assuming (and the problem is I haven't easily found a documented explanation for this) that what has happened is that the radio hardware ACK has failed for all of its 15 attempts and the gateway did not receive a requested ACK message.

      What appears to be not possible is to handle that lack of an ACK in the code in the gateway sketch.

      Regardless of the fact I have made the problem less of an issue by fixing my hardware problem it seems to me that the ability to handle this is a must if I want to use the platform to reliably control actuators. The most logical thing would be to amend the code so that the occurrence of a NACK is reported to the controller. I think that would have to be done by either:

      1. amending the library code: I could have a go at doing that but will take some getting my head round the cpp code and i am sure i would end up doing this in a non-re-usable way (I am using the mqtt version of the gateway transport).
      2. somehow detecting the debug message in the sketch.

      Am I on the right track?

      posted in Development
      4994james
      4994james
    • RE: Handling NACKs in the gateway

      @mfalkvidd thank you for this helpful response. I will respond once I get a chance to have a look at this properly again.

      posted in Development
      4994james
      4994james
    • Handling NACKs in the gateway

      I have set up a 2 way channel from an MQTT gateway (into openhab as controller as it happens but not really relevant) and a wireless sensor / actuator. The sensor detects humidity and sends to the gateway, openhab logic picks up the MQTT message and applies some calculations and sends back a fan speed. Most of the time this works fine however I have noticed that sometimes there are NACKs. In particular there are NACKs on the controller to node direction so that the node doesn't get the new fan speed. My question is: how can I handle these NACKs in the gateway? I haven't actually written any code as it all just done for me in the libraries. Here is the gateway code:

      // Enable debug prints to serial monitor
      #define MY_DEBUG
      
      // Enables and select radio type (if attached)
      #define MY_RADIO_RF24
      //#define MY_RADIO_RFM69
      //#define MY_RADIO_RFM95
      
      #define MY_GATEWAY_MQTT_CLIENT
      
      // Set this node's subscribe and publish topic prefix
      #define MY_MQTT_PUBLISH_TOPIC_PREFIX "mygateway1-out"
      #define MY_MQTT_SUBSCRIBE_TOPIC_PREFIX "mygateway1-in"
      
      // Set MQTT client id
      #define MY_MQTT_CLIENT_ID "mysensors-1"
      
      // W5100 Ethernet module SPI enable (optional if using a shield/module that manages SPI_EN signal)
      //#define MY_W5100_SPI_EN 4
      
      // Enable Soft SPI for NRF radio (note different radio wiring is required)
      // The W5100 ethernet module seems to have a hard time co-operate with
      // radio on the same spi bus.
      #if !defined(MY_W5100_SPI_EN) && !defined(ARDUINO_ARCH_SAMD)
      #define MY_SOFTSPI
      #define MY_SOFT_SPI_SCK_PIN 14
      #define MY_SOFT_SPI_MISO_PIN 16
      #define MY_SOFT_SPI_MOSI_PIN 15
      #endif
      
      // When W5100 is connected we have to move CE/CSN pins for NRF radio
      #ifndef MY_RF24_CE_PIN
      #define MY_RF24_CE_PIN 5
      #endif
      #ifndef MY_RF24_CS_PIN
      #define MY_RF24_CS_PIN 6
      #endif
      
      // Enable these if your MQTT broker requires username/password
      #define MY_MQTT_USER "openhabian"
      #define MY_MQTT_PASSWORD "X17572gM"
      
      // Enable MY_IP_ADDRESS here if you want a static ip address (no DHCP)
      #define MY_IP_ADDRESS 192,168,1,20
      
      // MQTT broker ip address or url. Define one or the other.
      //#define MY_CONTROLLER_URL_ADDRESS "m20.cloudmqtt.com"
      #define MY_CONTROLLER_IP_ADDRESS 192, 168, 1, 13
      
      // The MQTT broker port to to open
      #define MY_PORT 1883
      
      #define MY_MAC_ADDRESS 0xDE, 0xAD, 0xBE, 0xEF, 0xFE, 0xE1
      
      #include <Ethernet.h>
      #include <MySensors.h>
      
      void setup()
      {
          // Setup locally attached sensors
      }
      
      void presentation()
      {
          // Present locally attached sensors here
      }
      
      void loop()
      {
          // Send locally attached sensors data here
      }
      

      and here is the node:

      // Enable and select radio type attached 
      #define MY_RADIO_RF24
      //#define MY_RADIO_RFM69
      //#define MY_RS485
      
      #define CHILD_ID_HUM  0
      #define CHILD_ID_TEMP 1
      #define CHILD_ID_FAN_SPEED 2
      
      // Define pwm pin
      int PWMpin = 6;
      
      //for RS485 connection or if using MQTT gateway  then you must manually define the node id before including mysensors.h 
      #define MY_NODE_ID 100
      
      static bool metric = true;
      
      #include <MySensors.h>  
      
      // test every 10s
      static const uint64_t UPDATE_INTERVAL = 10000;
      
      //temp humidity module library
      #include <SI7021.h>
      static SI7021 sensor;
      
      int fan_speed = 0, humidity = 0, humidity_last = 0;
      float temperature = 0, temperature_last = 0;
      
      void presentation()  
      { 
      Serial.println(F("presentation!"));
        // Send the sketch info to the gateway
        sendSketchInfo("PWM humidity controlled fan", "1.0");
      
        // Present sensors as children to gateway
        present(CHILD_ID_HUM, S_HUM,   "Humidity");
        present(CHILD_ID_TEMP, S_TEMP, "Temperature");
        present(CHILD_ID_FAN_SPEED, S_COVER, "Fan speed");
      }
      
      void setup()
      {
        Serial.println(F("setup!"));
        pinMode(PWMpin, OUTPUT);
        //TCCR2B = TCCR2B & B11111000 | B00000001; // for PWM frequency of 31372.55 Hz
        //TCCR2B = TCCR2B & B11111000 | B00000010; // for PWM frequency of 3921.16 Hz
        //TCCR2B = TCCR2B & B11111000 | B00000111; // for PWM frequency of 30.64 Hz
        TCCR0B = TCCR0B & B11111000 | B00000010; // for PWM frequency of 7812.50 Hz
        analogWrite(PWMpin, fan_speed);
        
        while (not sensor.begin())
        {
          Serial.println(F("Sensor not detected!"));
          delay(1000);
        }
        delay(1000);
      }
      
      
      void loop()      
      {  
        // Read temperature & humidity from sensor.
        temperature = float( sensor.getCelsiusHundredths() ) / 100.0;
        humidity    = float( sensor.getHumidityBasisPoints() ) / 100.0;
        
        #ifdef MY_DEBUG
          Serial.print(F("Temp "));
          Serial.print(temperature);
          Serial.print('C');
          Serial.print(F("\tHum "));
          Serial.print(humidity);
          Serial.print(F("\tSpeed "));
          Serial.println(fan_speed);
        #endif
      
        //if humidity has changed significantly since last report then send to controller
        if ((abs(humidity - humidity_last) > 5 ) or (abs(temperature - temperature_last) > 0.5))
        {
          static MyMessage msgHum(CHILD_ID_HUM,  V_HUM );
          send(msgHum.set(humidity, 2)); 
          static MyMessage msgTemp(CHILD_ID_TEMP, V_TEMP);
          send(msgTemp.set(temperature, 2));
          static MyMessage msgSpeed(CHILD_ID_FAN_SPEED, V_PERCENTAGE);
          send(msgSpeed.set(fan_speed, 2));
          humidity_last = humidity;
          temperature_last = temperature;
        }
      
        // wait until next update
        wait(UPDATE_INTERVAL);
      }
      
      // handle inbound new fan speed message from controller
      void receive(const MyMessage &message)
      {
        String PayLoad = message.getString();
        #ifdef MY_DEBUG
          Serial.print("Value received: ");
          Serial.println(PayLoad);
        #endif
        fan_speed = PayLoad.toInt();
        analogWrite(PWMpin, fan_speed);
        #ifdef MY_DEBUG
          Serial.print(F("\tSpeed "));
          Serial.println(fan_speed);
        #endif
        //report back fan speed when changed
        static MyMessage msgSpeed(CHILD_ID_FAN_SPEED, V_PERCENTAGE);
        send(msgSpeed.set(fan_speed, 2));
      }
      

      So my thinking is that the node has periods where it is doing something else like reading the sensor and when it is executing that code it will be deaf to inbound traffic and hence the NACKs.

      Any help on how to program the logic IN THE GATEWAY to handle this would be gratefully received. I could, of course handle this in openhab but this seems should be something that is handled at the transport layer I think.

      Thank you

      posted in Development
      4994james
      4994james
    • RE: General questions on first GW and sensor setup

      Hi. I know this is an old post and you are probably ok now however one thing I have found from experience is that mysensors data doesn't always appear in sitemaps unless the data is formatted correctly. However you should still be seeing the channel being updated in the openhab log. These are examples of formatting that have worked for me:

       Frame label="Sensor 1"
          {
          Text item=MySensorsDevice10_Humidity label="Hum [%.1f %%]"
          Text item=MySensorsDevice10_LastUpdate label="Last seen [%1$tA, %1$td/%1$tm/%1$tY %1$tH:%1$tM]" icon="network"
          Text item=MySensorsDevice11_Temperature label="Temp [%.2f °C]"
          Text item=MySensorsDevice10_BatteryLevel label="Batt [%.1f %%]"
          }
      
      posted in OpenHAB
      4994james
      4994james
    • RE: Why are my nodes either all Online or all Offline?

      I have now found I can replicate this behaviour by simply restarting the serial monitor in arduino ide (i.e. forcing the bridge to restart). Once done the bridge thing and node things all show as online but no updates are made until the things are edited in some way.

      posted in OpenHAB
      4994james
      4994james
    • RE: Why are my nodes either all Online or all Offline?

      Hi
      I think I am seeing something quite similar. I am not sure what I have done. I have been running 3 temp / humidity boards for months without issue. Recently I decided to play about with the set up and now I am getting this odd behaviour:

      • delete all the old sensors and ethernet things.
      • re-add the ethernet bridge thing, set it up keep all settings off
      • manually re-add the sensor things, come online, relink items. everything apparently fine....updating in log and reporting values in sitemap
      • then, at some point, for no reason i can yet find, both sensors stop updating after a few hours as the same time: no new openhab log items, items stop updating.
      • all things still showing online in paper ui
      • check the debug log on the bridge in arduino ide and can see the messages from sensors coming down correctly
      • now if go into the ethernet bridge thing in paper ui, if i edit any of the settings, e.g. "send heartbeat..." then all the sensor things will switch to "OFFLINE - BRIDGE_OFFLINE"
      • to get the sensor things to come back to online i have to perform a similar edit in the sensor thing and save down. doesn't seem to matter what i change. just changing a setting seems to force it back online in paper ui and then the sensor starts feeding through openhab log messages and updates the items correctly again.

      Has anyone got any ideas? I feel as though I am not setting these settings correctly but I can find no documentation on how they are supposed to work.

      By the way I was running the openhab binding 2.2 and upgraded to 2.4 but get the same behaviour.

      Thanks

      posted in OpenHAB
      4994james
      4994james
    • RE: 💬 Easy/Newbie PCB for MySensors

      Hi A question about powering using the step booster. When I connect the BAT jumper it would seem from the schematic that the output of the booster will be delivered to vcc (i.e. the arduino) but the supply to the radio module will be the battery supply. Is that what was intended?

      posted in OpenHardware.io
      4994james
      4994james