Navigation

    • Register
    • Login
    • OpenHardware.io
    • Categories
    • Recent
    • Tags
    • Popular
    1. Home
    2. Heinz
    3. Best
    • Profile
    • Following
    • Followers
    • Topics
    • Posts
    • Best
    • Groups

    Best posts made by Heinz

    • Data stored in the EEPROM

      Chatting about storing data into the EEPROM with @paqor I got a little bit curious what the mysensors library stores into that EEPROM so I wrote a little function for dumping that data. I tested it with the 1.4 version of the library:

      
      void DumpMySensorsEepromData()
      {
      	Serial.println("Dumping MySensors EEPROM:");
      	Serial.println("");
      
      	Serial.print("Node id: ");
      	Serial.println(EEPROM.read(EEPROM_NODE_ID_ADDRESS));
      	Serial.print("Parent node id: ");
      	Serial.println(EEPROM.read(EEPROM_PARENT_NODE_ID_ADDRESS));
      	Serial.print("Distance: ");
      	Serial.println(EEPROM.read(EEPROM_DISTANCE_ADDRESS));
      	Serial.println("");
      
      	// child --> route
      	Serial.println("Routing information: ");
      	for (int route = EEPROM_ROUTES_ADDRESS; route < EEPROM_CONTROLLER_CONFIG_ADDRESS; route++)
      	{
      		int child = route - EEPROM_ROUTES_ADDRESS;
      		uint8_t destination = EEPROM.read(route);
      
      		if (destination != 0xff)
      		{
      			Serial.print(child);
      			Serial.print(" --> ");
      			Serial.print(destination);
      			Serial.println("");
      		}
      	}
      	Serial.println("");
      
      	// metric imperial
      	Serial.println("Controller config: ");
      	uint8_t isMetric = EEPROM.read(EEPROM_CONTROLLER_CONFIG_ADDRESS);
      	if (isMetric == 0xFF)
      	{
      		Serial.println("is metric");
      	}
      	else
      	{
      		Serial.println("is imperial");
      	}
      	Serial.println("");
      
      	Serial.println("Controller config raw data: ");
      	for (int config = EEPROM_CONTROLLER_CONFIG_ADDRESS; config < EEPROM_FIRMWARE_TYPE_ADDRESS; config++)
      	{
      		Serial.print(EEPROM.read(config));
      		Serial.print(", ");
      		if ((config - EEPROM_CONTROLLER_CONFIG_ADDRESS + 1) % 8 == 0)
      		{
      			Serial.println("");
      		}
      	}
      	Serial.println("");
      
      	Serial.print("Firmware Type: ");
      	Serial.print(EEPROM.read(EEPROM_FIRMWARE_TYPE_ADDRESS + 0));
      	Serial.print(", ");
      	Serial.println(EEPROM.read(EEPROM_FIRMWARE_TYPE_ADDRESS + 1));
      	
      	Serial.print("Firmware Version: ");
      	Serial.print(EEPROM.read(EEPROM_FIRMWARE_BLOCKS_ADDRESS + 0));
      	Serial.print(", ");
      	Serial.println(EEPROM.read(EEPROM_FIRMWARE_BLOCKS_ADDRESS + 1));
      	
      	Serial.print("Firmware Blocks: ");
      	Serial.print(EEPROM.read(EEPROM_FIRMWARE_VERSION_ADDRESS + 0));
      	Serial.print(", ");
      	Serial.println(EEPROM.read(EEPROM_FIRMWARE_VERSION_ADDRESS + 1));
      	
      	Serial.print("Firmware CRC: ");
      	Serial.print(EEPROM.read(EEPROM_FIRMWARE_CRC_ADDRESS + 0));
      	Serial.print(", ");
      	Serial.println(EEPROM.read(EEPROM_FIRMWARE_CRC_ADDRESS + 1));
      	Serial.println("");
      
      	Serial.print("Start of local user config is at address: ");
      	Serial.println(EEPROM_LOCAL_CONFIG_ADDRESS);
      	Serial.println("");
      
      	Serial.println("Local user data: ");
      	for (int localConfig = EEPROM_LOCAL_CONFIG_ADDRESS; localConfig < EEPROM_LOCAL_CONFIG_ADDRESS + 255; localConfig++)
      	{
      		Serial.print(EEPROM.read(localConfig));
      		Serial.print(", ");
      		if ((localConfig - EEPROM_LOCAL_CONFIG_ADDRESS + 1) % 8 == 0)
      		{
      			Serial.println("");
      		}
      	}
      	Serial.println("");
      }
      

      The output looks as follows:

      Dumping MySensors EEPROM:

      Node id: 1
      Parent node id: 0
      Distance: 1

      Routing information:
      0 --> 0
      1 --> 1
      2 --> 100
      5 --> 101
      65 --> 101
      100 --> 100
      101 --> 101
      102 --> 102
      104 --> 100
      105 --> 105
      106 --> 106
      107 --> 107
      108 --> 108
      109 --> 109
      110 --> 110
      111 --> 111
      112 --> 112
      129 --> 101
      243 --> 243

      Controller config:
      is imperial

      Controller config raw data:
      1, 255, 255, 255, 255, 255, 255, 255,
      255, 255, 255, 255, 255, 255, 255, 255,
      255, 255, 255, 255, 255, 255, 255, 255,

      Firmware Type: 255, 255
      Firmware Version: 255, 255
      Firmware Blocks: 255, 255
      Firmware CRC: 255, 255

      Start of local user config is at address: 291

      Local user data:
      255, 0, 0, 0, 255, 255, 255, 255,
      255, 255, 255, 255, 255, 255, 255, 255,
      255, 255, 255, 255, 255, 255, 255, 255,
      255, 255, 255, 255, 255, 255, 255, 255,
      255, 1, 1, 1, 255, 255, 255, 255,
      255, 255, 255, 255, 255, 255, 255, 255,
      255, 255, 255, 255, 255, 255, 255, 255,
      255, 255, 255, 255, 255, 255, 255, 255,
      255, 255, 255, 255, 255, 255, 255, 255,
      ...

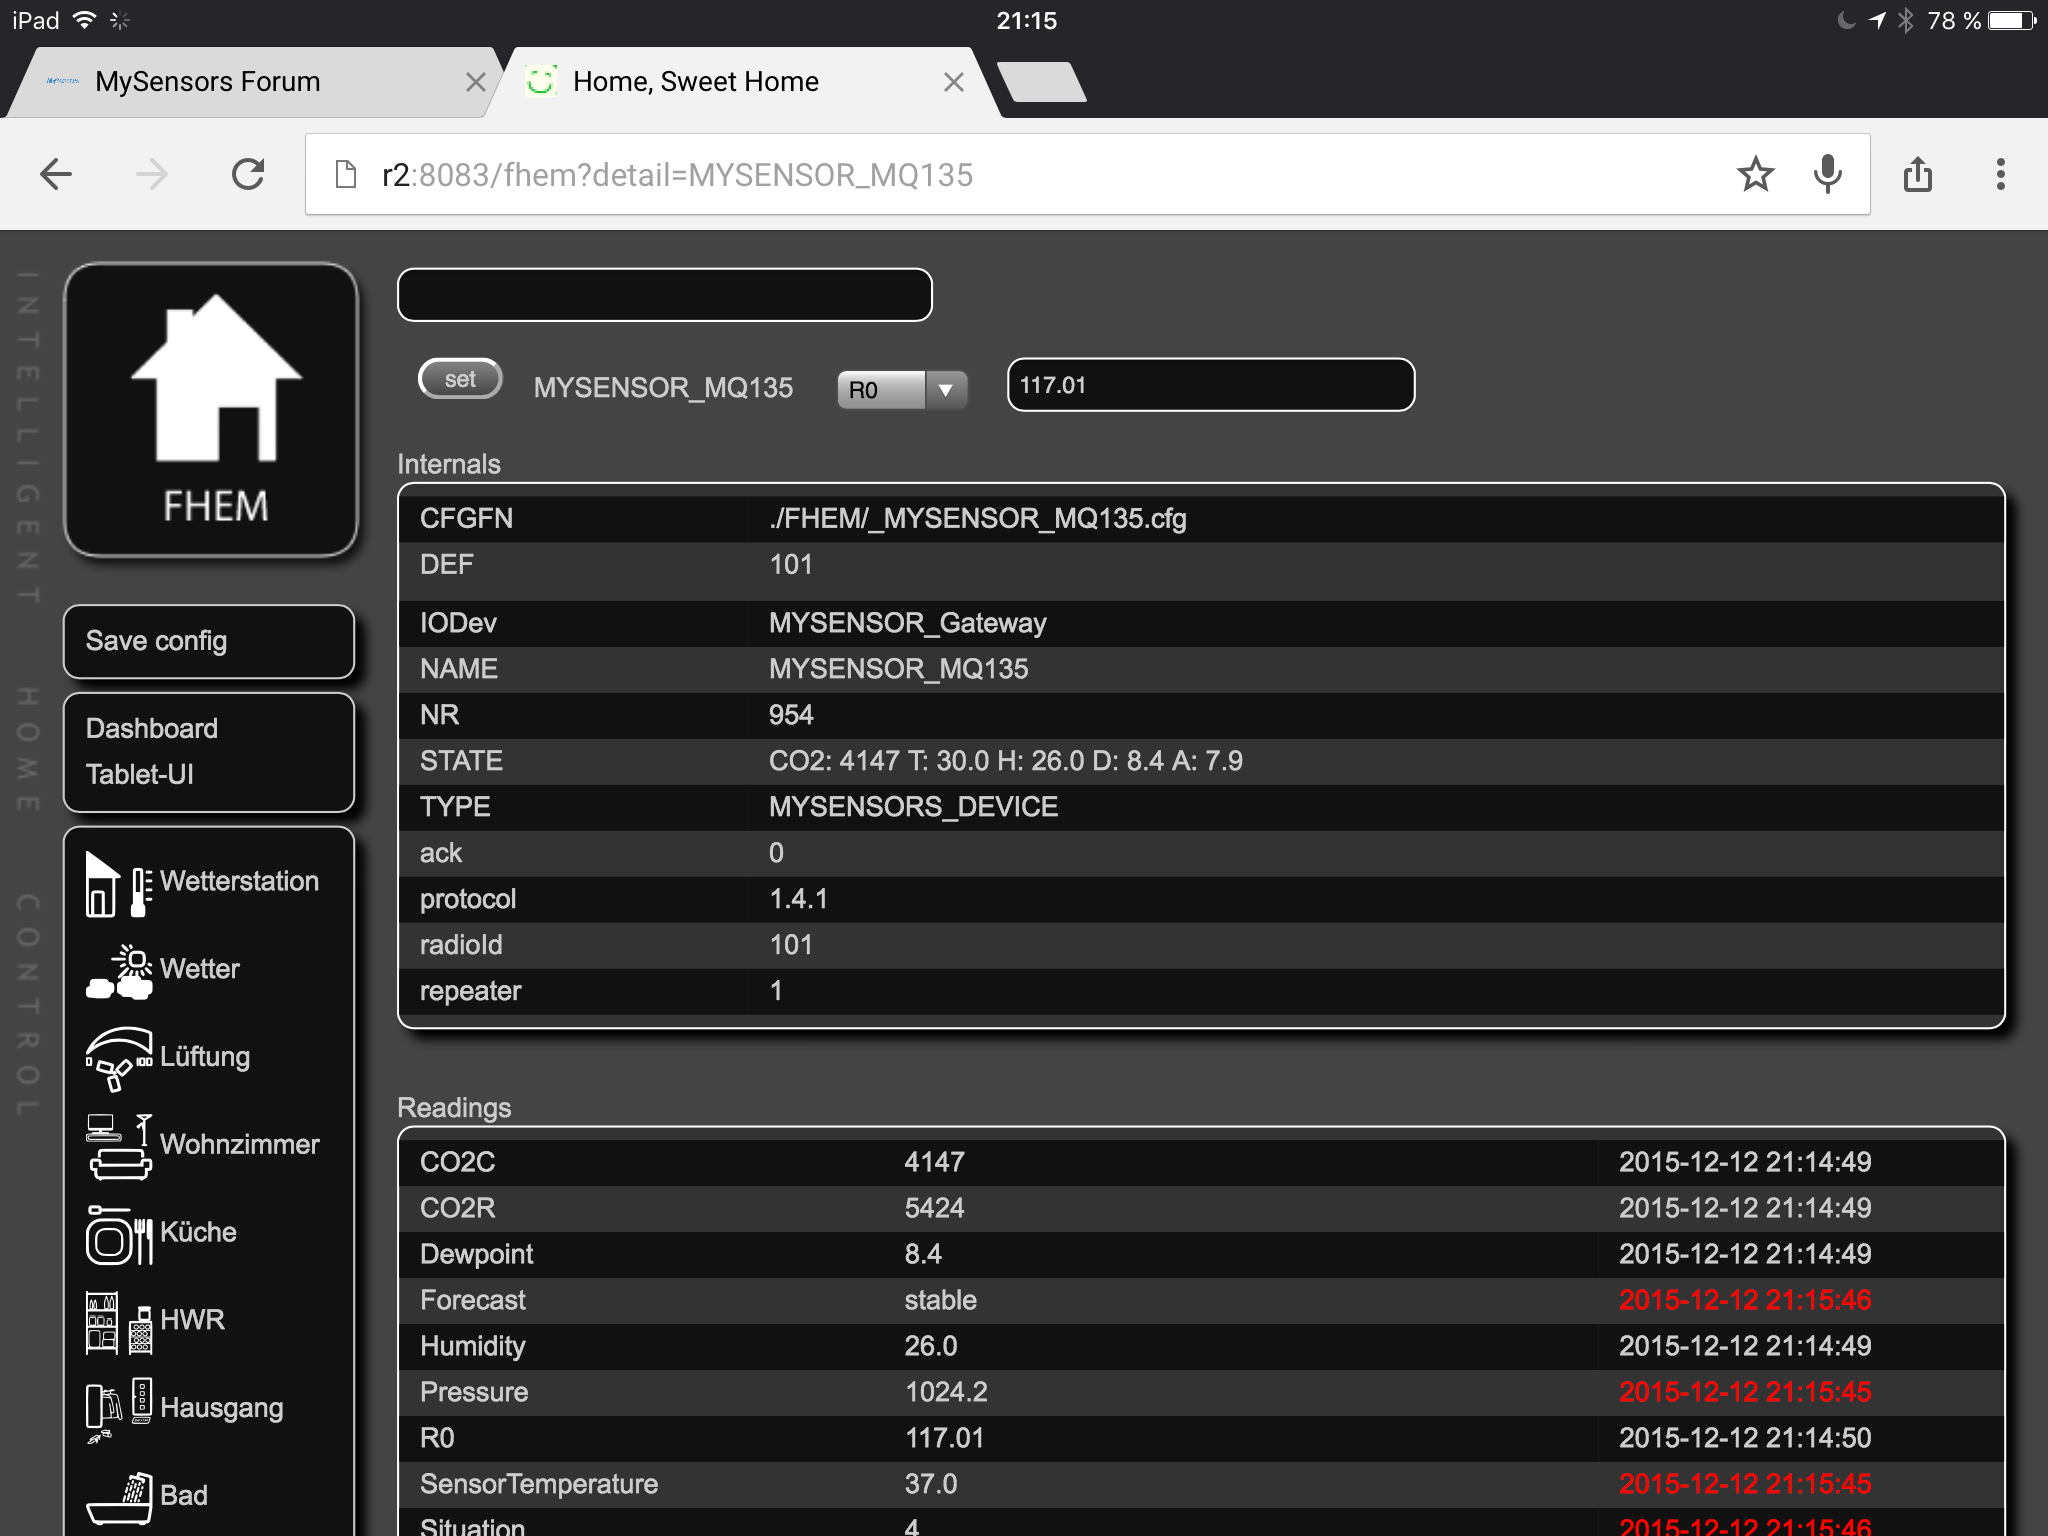
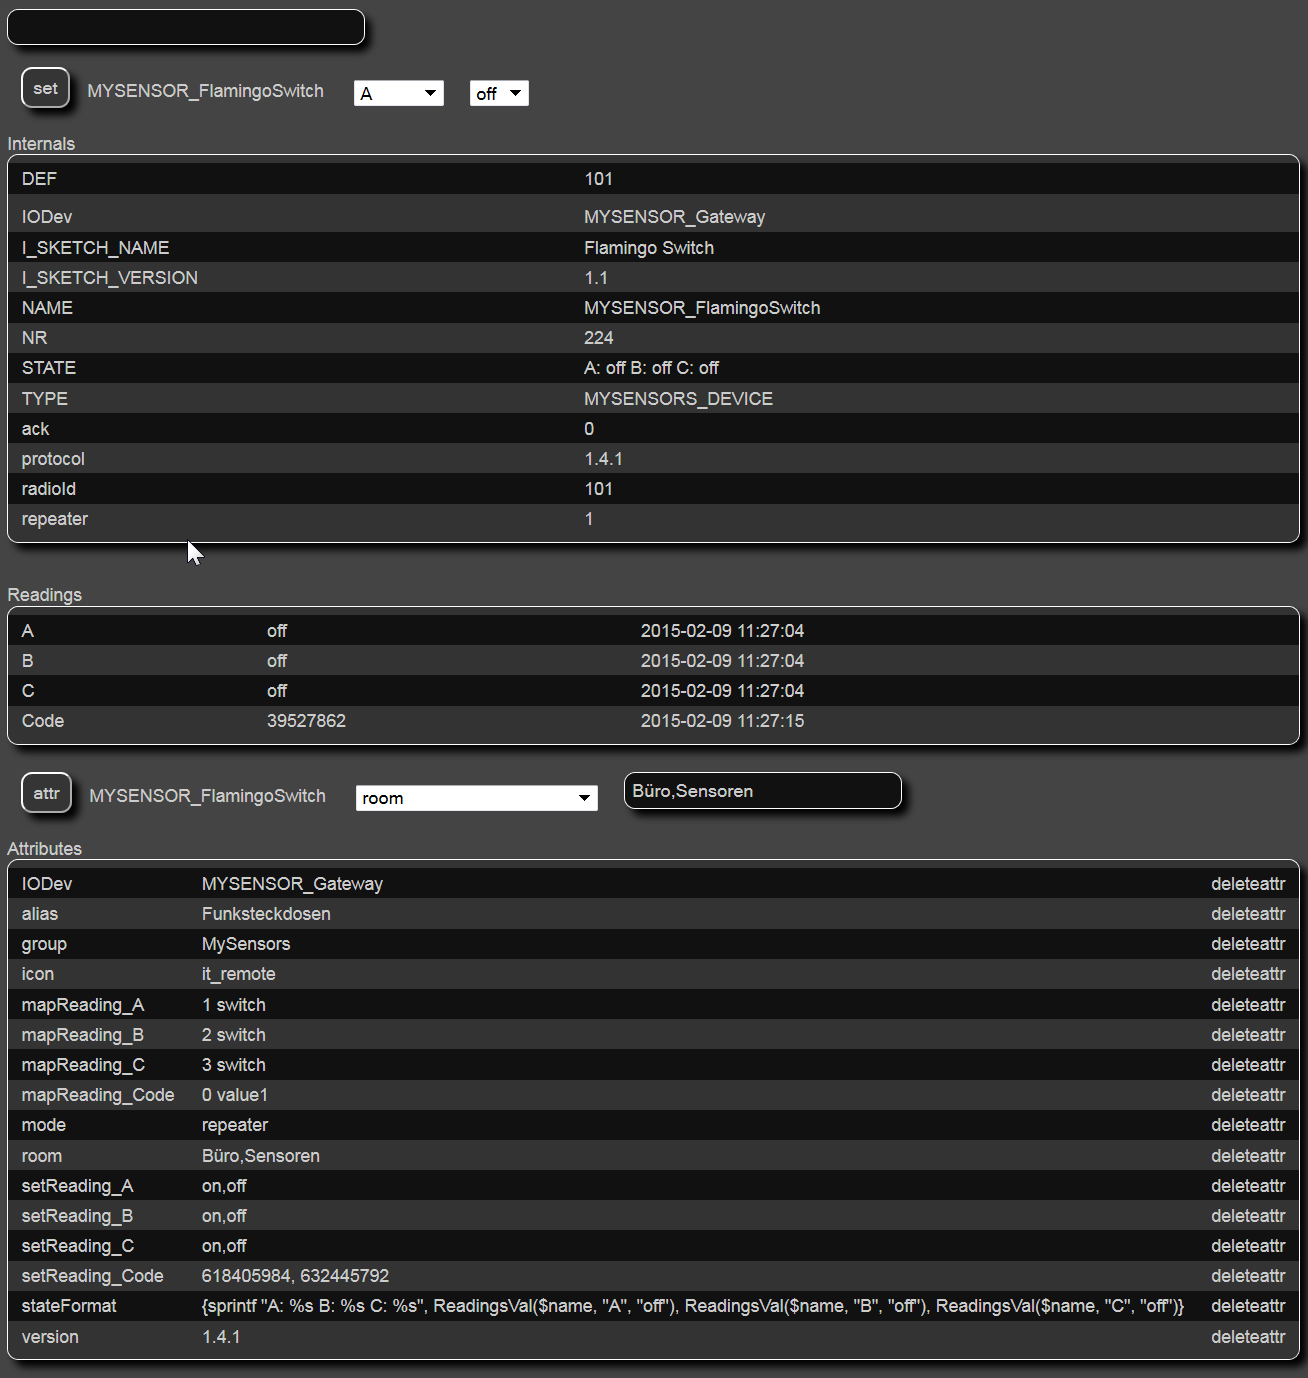
      The data is from a repeater. Note that the layout may change in upcoming mysensors versions.
      Your local data is for example stored at offset 291, so be careful when using the native EEPROM functions where you have to provide an offset!

      posted in Development
      Heinz
      Heinz
    • RE: Node-Red as Controller

      @vikasjee
      Everything is straight forward:

      • install FHEM on a rapsberry
      • add the MYSENSORS gateway to fhem.cfg
      define MYSENSOR_Gateway MYSENSORS 192.168.178.20:5003
      attr MYSENSOR_Gateway autocreate 1
      attr MYSENSOR_Gateway requestAck 1
      attr MYSENSOR_Gateway stateFormat connection
      
      • install mosquitto on the raspberry
      • add the MQTT device to fhem.cfg (point to local MQTT broker)
      define mqtt MQTT 127.0.0.1:1883
      
      • publish sensor data (e.g. MQTT_CO2) from FHEM to MQTT
      define MQTT_CO2 MQTT_BRIDGE MYSENSOR_MQ135_CO2
      attr MQTT_CO2 IODev mqtt
      attr MQTT_CO2 publishState fhem/CO2
      attr MQTT_CO2 stateFormat transmission-state
      

      Whenever the CO2 value changes it is forwarded to the local mosquitto broker via topic fehm/CO2
      Now you any client in the world that has access to the raspberry my subscribe this topic. You simply have to
      know the IP address of the MQTT broker.

      • install Node-Red on the raspberry
      • open the Node-Red window of the raspberry <IP>:1883
      • drag the MQTT input node to the sheet
      • configure the MQTT input node so that it uses the local broker and the topic from above
      • drag a debug output node to the sheet
      • connect both
      • Deploy

      2015-04-05 23_25_01-Node-RED _ fhem.png

      --> The CO2 values are printed in the debug window.

      The same can be done from within bluemix with the difference that node-red runs in the cloud accessing your local broker in the raspberry.

      posted in Node-RED
      Heinz
      Heinz
    • RE: [Solved] Help: gateway is sometimes receiving wrong values

      Ok, it seems that I found the cause of the problem: after changing the radio everything works as expected:

      Here the green line with sporadic wrong values:
      0_1509743234795_BME680.png

      And here the result with a new radio:
      0_1509743267882_BME680-2.png

      --> SOLVED

      posted in Bug Reports
      Heinz
      Heinz
    • RE: Sensor for Vallox DigitSE RS485 ventilation system with integration into FHEM.

      Some people asked if the library is able to control other parameters than the fan speed. The answer is yes. The following screenshot shows my sliders and buttons in FHEM:

      ValloxControls.png

      Sorry for the german labels again:
      The first group shows the power state (ON/OFF), the heating-state (winter season=ON, summer season=OFF) and the HRC damper position (inactive=OFF). See last post.

      The second group shows some alerts (none at the moment)
      the third group shows a button to switch between summer and winter season. The sliders control some temperature thresholds and other parameters.

      If you want to have a look at the bus data yourself you can download my sniffer tool which is a .Net port of the serial library described above under valloxserial.net

      posted in My Project
      Heinz
      Heinz
    • RE: NodeId position on the eprom

      see also http://forum.mysensors.org/topic/2680/data-stored-in-the-eeprom

      posted in Development
      Heinz
      Heinz
    • RE: Sensor to control remote controlled switches from Flamingo.eu e.g. mumbi m-FS300

      This is a picture of the outlets and the remote control. You can see that the remote control does not have any DIP switches anymore:
      IMG_0086.JPG

      The hardware setup is straight forward: the sender on the left is connected to PIN 4 and the receiver on the right is connected to PIN 3 of the arduino:
      IMG_0085.JPG

      I analyzed the codes of the remote control using the "poor-man's oszilliscope" and audacitiy. Further details can be found here:
      http://forum.arduino.cc/index.php?topic=201771.0

      Finally I developed a library that is very similar to the rcswitch one to be able to read the codes from the remote-control.
      The sketch contains receiver and sender functionality at the same time to make experimenting easier. In future there will be at least one sender sensor and one receiver in my sensor network. The receiver will be probably in my living room while the sender node will be at the other end of my mysensors network. The codes of the remotecontrol will be routed through the 2.4GHz network to the 433Mhz sender.

      0. Initialisation:

      FlamingoSwitch Switch; 
      Switch.enableReceive(IRQ_PIN);
      Switch.enableTransmit(TX_PIN);
      

      1. Receiving codes from the remote control:

      if (Switch.available())
      {
          unsigned long code = Switch.getReceivedValue();
          uint32_t state = code << 4; // 28Bit --> 32Bit
          Serial.print("Detected code:");
          Serial.print(state, HEX);
          Serial.println("");
          Switch.resetAvailable();
      }
      

      As the code is 28Bit long the rest of the 32Bit number is filled up with 0.

      2. Sending codes to the outlets:

      Switch.send(code);
      

      The sketch demonstrates two different possibilities of how to use the library.

      1. Controller stores codes of outlets:
      The sketch registers sensor 0 as custom device: gw.present(0, S_CUSTOM);
      This sensor 0 is used to sniff for codes received from the remote control. It will send the detected code to the mysensors network controller. The controller can send these codes back to sensor 0 to switch the outlets. In this mode the controller needs to store the codes for the different outlets in its configuration.

      2. Codes are stored in sketch:
      The sketch registers sensor 1-4 as light sensor: gw.present(sensorId, S_LIGHT);
      The sensor can be switched on/off from the controller. As the remote control sends 4 different codes for each button I included all of them in the sample sketch though only one of the four codes is neccessary to control the outlet.

      .... to be continued

      posted in My Project
      Heinz
      Heinz
    • RE: BMP085 + DHT22

      https://github.com/mysensors/MySensorsArduinoExamples/tree/master/examples/WeatherStationSensor
      or
      https://github.com/windkh/mysensors/tree/master/WeatherStationSensor

      I will port it to mysensors 2.0 soon.

      posted in Development
      Heinz
      Heinz
    • RE: Sensor for Vallox DigitSE RS485 ventilation system with integration into FHEM.

      This is the original controller of the ventilation system. It displays the fan speed as well as the 4 temperatures: incomming air, exhaust air, inside temp, outside temp. You can control the fan speed level 1-8 by pressing the up and down buttons.

      IMG_0089.JPG

      The controller communicates with the main device via a RS485 bus. To read the data sent between both parties I used an arduino mega as it has more than one hardware serial lines. This leads to less corrupt telegrams when communicating via RS485. You need at least one RS485 to TTL converter. As I had two of em I used one for sending and one for receiving telegrams:
      IMG_0087.JPG

      ValloxSensor_Steckplatine.png

      I had to develop a serial library that is able to interpret the vallox protocol. The protocol description can be found here:
      http://knx-user-forum.de/gebaeudetechnik-ohne-knx-eib/18274-vallox-rs485-schnittstellenbeschreibung.html

      The library is used by the vallox-sensor-sketch to retrieve the data from the RS485 bus. The variables are send to the mysensors controller as different sensor values (41 different variables!).

      integration into FHEM was very easy. The following picture shows the most important variables and their readings. I did not import the other ones as I do not have any original CO2 Sensor nor humidty sensors attached.
      2015-02-09 14_22_20-Home, Sweet Home.png

      I also added some buttons to FHEM to make controlling of the vallox device easier:
      2015-02-09 14_25_54-Home, Sweet Home.png

      Inspired by samppa I added some calculations for efficiency of the heat exchanger see also
      http://forum.mysensors.org/topic/38/measuring-efficiency-of-home-air-ventilation-heat-exchanger-unit/3

      The fan speed can be controlled by any tablet or phone in my house now. If somebody accidentally pushes the boost switch in the shower in the night it does not bother me any longer. I can easily turn it off using my iPhone 😉

      posted in My Project
      Heinz
      Heinz
    • RE: Sensor for Vallox DigitSE RS485 ventilation system with integration into FHEM.

      After some months of testing a little update:
      I received some e-mails questioning the so called "heat recovery cell bypass" mode. There is a damper inside the device that can
      is switched automatically by the vallox-controller to bypass the heat recovery cell (HRC) to avoid heating up the house during the
      summer months. Well, when you open the device on a hot summer day you will probably see the damper in an obvious wrong position:
      the air does not bypass the HRC! Huh! whats wrong here?

      Explanation:
      The device tries to cool down the incoming air by leading it through the HRC which is still colder than the temperature outside. If the temperature outside is colder than the air inside the house the damper is switched to the expected position. There are two things to you have to do to make all that work correctly:

      • turn off heating mode (the LED of the left most button on your control device must be off)
      • the HRC bypass temperature must be set to a value below the outside temperature (e.g. 14 degrees)

      To illustrate that effect I logged the temperatures in FHEM:

      ValloxBypass.png

      Sorry for the german labels.
      The first plot shows the damper position: blue background: HRC bypass is active.
      The second plot shows the temperature outside the house (blue) and the temperature inside the house (red)

      As soon as the temperature outside is greater than the temperature inside the HRC bypass is deactivated to cool the incoming air by leading the air through the "colder" HRC.

      The fourth diagram shows the temperature of the air that is entering the rooms (purple) and the temperature outside the house (blue).
      You can see that the fresh air entering the rooms is lower than the temperature outside: the cooling effect works (even if it is only few degrees)

      To all guys thinking about how to control the damper on their own logic from a raspi or arduino. This is not neccessary as the vallox logic works very well.

      posted in My Project
      Heinz
      Heinz
    • RE: Sensor for Vallox DigitSE RS485 ventilation system with integration into FHEM.

      For those who want to have the FHEM files here they are:
      _MYSENSOR_Vallox.cfg
      simply place the file in FHEM's subfolder FHEM and include it your fhem.cfg:

      include ./FHEM/_MYSENSOR_Vallox.cfg
      

      And here are the plot files which have to be placed in the subfolder www\gplot
      SVG_FileLog_Vallox_6.gplot
      SVG_FileLog_Vallox_5.gplot
      SVG_FileLog_Vallox_4.gplot
      SVG_FileLog_Vallox_3.gplot
      SVG_FileLog_Vallox_2.gplot
      SVG_FileLog_Vallox_1.gplot

      You will likely have to adapt the room and group names, and of course the german names, sorry for that.

      posted in My Project
      Heinz
      Heinz
    • Bosch BME680 Sensor

      I just created a sketch for controlling a BME680 sensor via I2C.
      For the ones who are interested in it, the sketch can be downloaded at:
      https://github.com/windkh/mysensors/tree/master/BME680Sensor

      Right now only the gas resistance value is transmitted as the air quality value (IAQ) can only be calculated when you make use of the closed source library from Bosch (which is by the way only available for ARM, X86, ...)

      The pressure is, like on the BME280 ,an absolute value. The sketch calculates the sealevel pressure from it.

      I am using the breakout board from watterott which can be found here:
      https://github.com/watterott/BME680-Breakout

      Right now you have to download this library in order to be able to compiile the sketch:
      https://github.com/windkh/BME680_Breakout
      This fork replaces the original I2C read and write routines from https://github.com/vicatcu/BME680_Breakout.

      Wiring:
      I am using a standard Arduino Uno with Radio attached to the standard pins with the mysensors 2.0 lib.
      To connect the breakout-board you need 4 wires:

      Breakout --> Arduino
      GND - GND
      NC
      VCC - 3.3V
      SCL - A5
      SDA - A4
      SDO
      CS

      The chip supports SPI and I2C. I used SCL and SDA for I2C and left SDO and CS disconnected.

      The next steps will be making the air quality values useful by finding an appropriate algorithm... stay tuned.

      posted in My Project
      Heinz
      Heinz
    • RE: Bosch BME680 Sensor

      I like the BME680 sensor as it has a very low power consumption. But it has also some disadvantages that have impact on the application and the environment it should be used.
      As far as I know the sensor was developed to be used in mobile phones or smart watches. Those devices are exposed to "fresh air" almost every day which makes it possible to estimate the air quality from the resistante of the sensor. The resistance of the sensor increases over the weeks and months as the internal chemical layer is exhausted or used up depending on the environment it is exposed to. The fading of the resistance can be compensated through smart algorithms that work on historical data (see post above). When the sensor is exposed to "fresh air" once a day, the algorithm can use this value as a kind of reference value to estimate the air quality index.
      But if you want to use this sensor for indoor applications, where the environment is very constant or changing very slowly, then I doubt that the algorithm is able to calculate an exact value for the air quality index.
      Knowing this means that you can use the sensor resistance also without the BSEC library and with your own simplified algorithm when "recalibration with fresh air" is done sometimes on your own. Another useful application could also be an outdoor weather station where the sensor is exposed to fresh air most of the time.
      All in all it is a cool product as it offers other measurements, too which spares hardware and minimizes the costs. In addition to that you can change the meaurement parameters of the sensor on your own as a good user manual of the sensor is also available.

      I am using the sensor in my kitchen to detect when someone is cooking. In this case I am not interested in the absolute resistance, but in the change over time. If the air quality gets worse in a very short time (resistance change per minute), then I can activate the ventilation system. The same could be done on the toilet 🙂

      best regards Heinz

      posted in My Project
      Heinz
      Heinz
    • RE: Node-Red as Controller

      I managed to get the following configuration to run:

      MySensors --> MySensorsEthernetGateway --> FHEM --> FHEM/MQTTDevice --> Mosquitto--> Node-Red
      FHEM and Mosquitto are running an a raspberry.
      Running Node-Red on IBM Bluemix in the cloud also succeeded to connect to my local mosquitto broker.

      posted in Node-RED
      Heinz
      Heinz
    • RE: German speaking members

      Auf gehts!

      posted in General Discussion
      Heinz
      Heinz
    • Sensor to control remote controlled switches from Flamingo.eu e.g. mumbi m-FS300

      Some days ago I bought some mumbi switches. The switches have to be teached using the remote control during the first few seconds after power on. So there are no DIP switches nor any other predefined codes I can use. But the switches are cheap and that was the reason I wantet have them in my homeautomation.

      The mission was to find out the protocol as well as the codes the remote control is sending to its switches. Then I wanted to turn on/off the switches using my homeautomation controller (fhem). To expand the range I wanted to have a mysensors device which can be placed everywhere around my house:
      I will add some more details and photos the upcomming days. But to cut it short: I uploaded the library together with a mysensors sketch to:
      https://github.com/windkh/flamingoswitch.git

      The device has 5 child sensors:
      Sensor 0 is used to sniff for codes on the air. It can also be used to send codes directly to the air.
      Sensor 1-4 are used with sniffed codes from my remote control. You will have to replace the codes in the sketch with the ones your remote control is sending.

      The receiver and sender hardware can be bought anywhere on the net like e.g.: http://www.amazon.de/Empfänger-Superregeneration-Raspberry-Wireless-Transmitter-433-MHz-Funk-Sende-Modul-für-Arduino/dp/B00M0XTP4W

      ... to be continued

      posted in My Project
      Heinz
      Heinz
    • RE: Node-Red as Controller

      if anybody wants to try it on his own here is the source which can be imported into node-red.

      [{"id":"e2627000.52f61","type":"serial-port","serialport":"COM13","serialbaud":"115200","databits":"8","parity":"none","stopbits":"1","newline":"10","bin":"false","out":"time","addchar":true},{"id":"ae116278.ceadf","type":"serial in","name":"SerialGateway","serial":"e2627000.52f61","x":75.5,"y":170.3333511352539,"z":"6e87bdcb.1ab8d4","wires":[["421469f9.a974f8"]]},{"id":"421469f9.a974f8","type":"function","name":"split message","func":"var message = msg.payload;\nsplitMessage = message.split(\" \");\nif(splitMessage[0] == \"0;0;3;0;9;read:\")\n{\n    msg.route = splitMessage[1].split(\"-\");\n    \n    var splitData = splitMessage[2].split(\"\\n\");\n    var tokens = splitData[1].split(\";\")\n    \n    msg.rawData = tokens;\n    if(tokens.length == 6)\n    {\n        msg.nodeId = tokens[0];\n        msg.childSensorId = tokens[1];\n        msg.messageType = tokens[2];\n        msg.ack = tokens[3];\n        msg.subType = tokens[4];\n        msg.payload = tokens[5];\n    }\n}\nelse\n{\n    \n}\nreturn msg;","outputs":1,"valid":true,"x":260.5,"y":170.3333511352539,"z":"6e87bdcb.1ab8d4","wires":[["ea996599.33b75"]]},{"id":"ea996599.33b75","type":"switch","name":"switch message type","property":"messageType","rules":[{"t":"eq","v":"0"},{"t":"eq","v":"1"},{"t":"eq","v":"2"},{"t":"eq","v":"3"},{"t":"eq","v":"4"}],"checkall":"true","outputs":5,"x":461.49998474121094,"y":170.3333511352539,"z":"6e87bdcb.1ab8d4","wires":[["4bca8505.d463e4"],["cfb87963.3e2a8"],["7cd01fb.f71436"],["e722ad62.22ebd"],["9f4ff922.f54838"]]},{"id":"4bca8505.d463e4","type":"function","name":"presentation","func":"msg.topic = \"presentation\";\nreturn msg;","outputs":1,"valid":true,"x":681.5,"y":37.333335876464844,"z":"6e87bdcb.1ab8d4","wires":[[]]},{"id":"7cd01fb.f71436","type":"function","name":"req","func":"msg.topic = \"req\";\nreturn msg;","outputs":1,"valid":true,"x":698.3333129882812,"y":152.33334350585938,"z":"6e87bdcb.1ab8d4","wires":[[]]},{"id":"e722ad62.22ebd","type":"function","name":"internal","func":"msg.topic = \"internal\";\nreturn msg;","outputs":1,"valid":true,"x":693.3333129882812,"y":203.33334350585938,"z":"6e87bdcb.1ab8d4","wires":[[]]},{"id":"9f4ff922.f54838","type":"function","name":"stream","func":"msg.topic = \"stream\";\nreturn msg;","outputs":1,"valid":true,"x":692.3333129882812,"y":261.3333435058594,"z":"6e87bdcb.1ab8d4","wires":[[]]},{"id":"137f8a82.b7ce45","type":"debug","name":"debug","active":true,"console":"false","complete":"true","x":897.3333129882812,"y":101.33333587646484,"z":"6e87bdcb.1ab8d4","wires":[]},{"id":"ff056cd7.417e98","type":"http response","name":"http out","x":744,"y":444.3333740234375,"z":"6e87bdcb.1ab8d4","wires":[]},{"id":"74b70760.4f808","type":"http in","name":"","url":"/mysensorsdata","method":"get","x":151.00001525878906,"y":444.3333740234375,"z":"6e87bdcb.1ab8d4","wires":[["68713a54.5c30ec"]]},{"id":"e26e1fbf.606c8","type":"template","name":"html template","field":"","format":"html","template":"\nGateway <br />\nreceived at:    {{data.timestamp}}<br />\nnode-id:        {{data.nodeId}}<br />\nchild-SensorId: {{data.childSensorId}}<br />\nmessageType:    {{data.messageType}}<br />\nsubType:        {{data.subType}}<br />\npayload:        {{data.payload}}\n","x":560.0000152587891,"y":445.33336663246155,"z":"6e87bdcb.1ab8d4","wires":[["ff056cd7.417e98"]]},{"id":"68713a54.5c30ec","type":"function","name":"message buffer","func":"context.data = context.data || new Object();\n\nswitch (msg.topic) {\n    case \"set\":\n        context.data.timestamp = new Date().toLocaleString();\n        context.data.nodeId = msg.nodeId;\n        context.data.childSensorId = msg.childSensorId;\n        context.data.messageType = msg.messageType;\n        context.data.subType = msg.subType;\n        context.data.payload = msg.payload;\n        msg = null;\n        break;\n    default:\n    \tmsg.data = context.data;\n}\n\nreturn msg;","outputs":1,"valid":true,"x":393.00001525878906,"y":445.3333435058594,"z":"6e87bdcb.1ab8d4","wires":[["e26e1fbf.606c8"]]},{"id":"8f3083f8.2dc96","type":"http in","name":"","url":"/mysensors","method":"get","x":135.00001525878906,"y":507.3333740234375,"z":"6e87bdcb.1ab8d4","wires":[["92f9be8f.e42c68"]]},{"id":"92f9be8f.e42c68","type":"template","name":"Auto Update Script","field":"","template":"<script>\n    setInterval(function(){\t\n\t    var theUrl = \"http://localhost:1880/mysensorsdata\";\n\t    var xmlHttp = new XMLHttpRequest();\n\t    xmlHttp.open( \"GET\", theUrl, false );\n\t    xmlHttp.send( null );\n\t    document. getElementById('mysensorsdata')\n\t    \t.innerHTML = xmlHttp.responseText;\n    },1000);\n</script>\n<div id = 'mysensorsdata'>\n ... Loading ...\n</div>\n","x":410,"y":507.3333740234375,"z":"6e87bdcb.1ab8d4","wires":[["ff056cd7.417e98"]]},{"id":"cfb87963.3e2a8","type":"function","name":"set","func":"msg.topic = \"set\";\nreturn msg;","outputs":1,"valid":true,"x":696.5,"y":101.33333587646484,"z":"6e87bdcb.1ab8d4","wires":[["137f8a82.b7ce45","68713a54.5c30ec"]]}]
      
      posted in Node-RED
      Heinz
      Heinz
    • RE: Air Quality Sensor

      Adjusting my mq-135 sensor took several atempts as the CO2 value of the atmosphere is not a constant value of 399ppm.
      This value is measured in Hawaii ( see http://co2now.org/ ) and is probably significantly lower than at your home. In germany for example you should calibrate your sensor when the wind comes from west over the atlantic which brings fresh air along. See http://www.donnerwetter.de/deutschland/co2.htm

      Everytime my sensor passed values below 400 I adjusted the R0 value. In the end I modified the sketch to be able to send this R0 value from FHEM to the sensor to avoid recompiling the sketch everytime.
      See
      https://github.com/windkh/mysensors/tree/master/CO2Sensor/CO2sensor.ino Line 440ff

      image.png

      posted in Hardware
      Heinz
      Heinz
    • Pressure example BMP085

      I had a closer look at the code for the pressure example (http://www.mysensors.org/build/pressure) and was a little bit
      confused about the weather forecast algorithm. It should follow the algorithm proposed here:
      http://www.freescale.com/files/sensors/doc/app_note/AN3914.pdf

      The sketch takes the pressure every minute and stores the value in a global array. The array has room for 180 sample which makes 3 hours.
      Every 30 minutes the average of the last 5 minutes is taken and compared to the average values in the past to find if the pressure is raising or not. Well that seems to be an easy job, but the code looks really ugly and consumes too much memory.

      First of all I would only store the last 5 samples instead of all 180, as the other samples are not used anyway in the whole sketch.
      Then I think there is an error when minute 180 is reached. The sketch stores the average5 into average0 (Line 169) and sets the minute counter to 5 (Line 99) which immediately triggers the calculation of average0 agaein (line 105) which is based on old data (minutes 0-4).
      I think the minute counter should be set to 6 here.

      I reached the memory limit of my arduino nano when merging the code for several sensors together. So I had a deeper look at the code and changed it like below:

      globals:

      const char *weather[] = { "stable", "sunny", "cloudy", "unstable", "thunderstorm", "unknown" };
      enum FORECAST
      {
      STABLE = 0,			// Stable weather
      SUNNY = 1,			// Slowly rising HP stable good weather
      CLOUDY = 2,			// Slowly falling Low Pressure System, stable rainy weather
      UNSTABLE = 3,		// Quickly rising HP, not stable weather
      THUNDERSTORM = 4,	// Quickly falling LP, Thunderstorm, not stable
      UNKNOWN = 5			// Unknown, more time needed
      };
      
      const int LAST_SAMPLES_COUNT = 5;
      float lastPressureSamples[LAST_SAMPLES_COUNT];
      #define MULTIPLIER (65.0/1023.0)
      
      int minuteCount = 0;
      bool firstRound = true;
      float pressureAvg[7];
      float dP_dt;
      

      algorithm

      float getLastPressureSamplesAverage()
      {
      float lastPressureSamplesAverage = 0;
      for (int i = 0; i < LAST_SAMPLES_COUNT; i++)
      {
      	lastPressureSamplesAverage += lastPressureSamples[i];
      }
      lastPressureSamplesAverage /= LAST_SAMPLES_COUNT;
      
          return lastPressureSamplesAverage ;
      }
      
      // Algorithm found here
      // http://www.freescale.com/files/sensors/doc/app_note/AN3914.pdf
      int sample(float pressure) {
      
      // Calculate the average of the last n minutes.
      int index = minuteCount % LAST_SAMPLES_COUNT;
      lastPressureSamples[index] = pressure;
      
      minuteCount++;
      if (minuteCount > 185)
      	minuteCount = 6;
      
      if (minuteCount == 5) {
      	pressureAvg[0] = getLastPressureSamplesAverage();
      }
      else if (minuteCount == 35) {
      	pressureAvg[1] = getLastPressureSamplesAverage();
      	float change = (pressureAvg[1] - pressureAvg[0]);
      	if (firstRound) // first time initial 3 hour
      		dP_dt = (MULTIPLIER * 2 * change); // note this is for t = 0.5hour
      	else
      		dP_dt = ((MULTIPLIER * change) / 1.5); // divide by 1.5 as this is the difference in time from 0 value.
      }
      else if (minuteCount == 65) {
      	pressureAvg[2] = getLastPressureSamplesAverage();
      	float change = (pressureAvg[2] - pressureAvg[0]);
      	if (firstRound) //first time initial 3 hour
      		dP_dt = (MULTIPLIER * change); //note this is for t = 1 hour
      	else
      		dP_dt = ((MULTIPLIER * change) / 2); //divide by 2 as this is the difference in time from 0 value
      }
      else if (minuteCount == 95) {
      	pressureAvg[3] = getLastPressureSamplesAverage();
      	float change = (pressureAvg[3] - pressureAvg[0]);
      	if (firstRound) // first time initial 3 hour
      		dP_dt = ((MULTIPLIER * change) / 1.5); // note this is for t = 1.5 hour
      	else
      		dP_dt = ((MULTIPLIER * change) / 2.5); // divide by 2.5 as this is the difference in time from 0 value
      }
      else if (minuteCount == 125) {
      	pressureAvg[4] = getLastPressureSamplesAverage();
      	float change = (pressureAvg[4] - pressureAvg[0]);
      	if (firstRound) // first time initial 3 hour
      		dP_dt = ((MULTIPLIER * change) / 2); // note this is for t = 2 hour
      	else
      		dP_dt = ((MULTIPLIER * change) / 3); // divide by 3 as this is the difference in time from 0 value
      }
      else if (minuteCount == 155) {
      	pressureAvg[5] = getLastPressureSamplesAverage();
      	float change = (pressureAvg[5] - pressureAvg[0]);
      	if (firstRound) // first time initial 3 hour
      		dP_dt = ((MULTIPLIER * change) / 2.5); // note this is for t = 2.5 hour
      	else
      		dP_dt = ((MULTIPLIER * change) / 3.5); // divide by 3.5 as this is the difference in time from 0 value
      }
      else if (minuteCount == 185) {
      	pressureAvg[6] = getLastPressureSamplesAverage();
      	float change = (pressureAvg[6] - pressureAvg[0]);
      	if (firstRound) // first time initial 3 hour
      		dP_dt = ((MULTIPLIER * change) / 3); // note this is for t = 3 hour
      	else
      		dP_dt = ((MULTIPLIER * change) / 4); // divide by 4 as this is the difference in time from 0 value
      
      	pressureAvg[0] = pressureAvg[5]; // Equating the pressure at 0 to the pressure at 2 hour after 3 hours have past.
      	firstRound = false; // flag to let you know that this is on the past 3 hour mark. Initialized to 0 outside main loop.
      }
      
      int forecast = UNKNOWN;
      if (minuteCount < 35 && firstRound) //if time is less than 35 min on the first 3 hour interval.
      	forecast = UNKNOWN;
      else if (dP_dt < (-0.25))
      	forecast = THUNDERSTORM;
      else if (dP_dt > 0.25)
      	forecast = UNSTABLE;
      else if ((dP_dt > (-0.25)) && (dP_dt < (-0.05)))
      	forecast = CLOUDY;
      else if ((dP_dt > 0.05) && (dP_dt < 0.25))
      	forecast = SUNNY;
      else if ((dP_dt >(-0.05)) && (dP_dt < 0.05))
      	forecast = STABLE;
      else
      	forecast = UNKNOWN; // Unknown
      
      return forecast;
      

      }

      Could anyone verify this as I could easily be wrong.

      posted in Bug Reports
      Heinz
      Heinz
    • RE: Sensor to control remote controlled switches from Flamingo.eu e.g. mumbi m-FS300

      Integration into FHEM:

      The integration of the sensor in FHEM is easy:
      2015-02-09 11_27_38-Home, Sweet Home.png

      You can see the Readings for the sniffer called "Code" and the outlets A, B, C with their state (all turned off). You can control
      the outlets using the combo-boxes and the set button on the top. If you press a button on the remote control the code is displayed in the "Code" Reading. The user may write it down for later usage. If FHEM writes a code to this variable then the value is transmitted back to the sensor 0 and thus on the 433Mhz radio.

      The FHEM code looks like:

      define MYSENSOR_FlamingoSwitch MYSENSORS_DEVICE 101
      attr MYSENSOR_FlamingoSwitch IODev MYSENSOR_Gateway    
      attr MYSENSOR_FlamingoSwitch alias Funksteckdosen
      attr MYSENSOR_FlamingoSwitch group MySensors
      attr MYSENSOR_FlamingoSwitch icon it_remote
      attr MYSENSOR_FlamingoSwitch mapReading_Code 0 value1
      attr MYSENSOR_FlamingoSwitch mapReading_A 1 switch
      attr MYSENSOR_FlamingoSwitch mapReading_B 2 switch
      attr MYSENSOR_FlamingoSwitch mapReading_C 3 switch
      attr MYSENSOR_FlamingoSwitch mode repeater
      attr MYSENSOR_FlamingoSwitch room Büro,Sensoren
      attr MYSENSOR_FlamingoSwitch setReading_Code 618405984, 632445792
      attr MYSENSOR_FlamingoSwitch setReading_A on,off
      attr MYSENSOR_FlamingoSwitch setReading_B on,off
      attr MYSENSOR_FlamingoSwitch setReading_C on,off
      attr MYSENSOR_FlamingoSwitch stateFormat {sprintf "A: %s B: %s C: %s", ReadingsVal($name, "A", "off"), ReadingsVal($name, "B", "off"),     ReadingsVal($name, "C", "off")}
      attr MYSENSOR_FlamingoSwitch version 1.4.1
      

      You can see that A, B, C do not need any codes in this configuration while the setReading_Code instruction has two. This demonstrates the two different possibilities of where to store the codes (on the controller or on the sensor node).

      The next picture shows the visualisation of the outlets A, B, C and the "Code" outlet:
      2015-02-09 11_17_32-Home, Sweet Home.png

      The FHEM code for A looks like:

      define MYSENSOR_FlamingoSwitch_A dummy
      attr MYSENSOR_FlamingoSwitch_A alias Steckdose A
      attr MYSENSOR_FlamingoSwitch_A devStateIcon off:black_Steckdose.off on:black_Steckdose.on
      attr MYSENSOR_FlamingoSwitch_A group Funksteckdosen
      attr MYSENSOR_FlamingoSwitch_A room Büro
      attr MYSENSOR_FlamingoSwitch_A setList on off
      attr MYSENSOR_FlamingoSwitch_A webCmd on:off
      define MYSENSOR_FlamingoSwitch_A_Notify notify MYSENSOR_FlamingoSwitch_A set MYSENSOR_FlamingoSwitch A %
      define MYSENSOR_FlamingoSwitch_A_Notify2 notify MYSENSOR_FlamingoSwitch:A set MYSENSOR_FlamingoSwitch_A %
      

      while the code for the "Code" outlet looks like:

      define MYSENSOR_FlamingoSwitch_Code dummy
      attr MYSENSOR_FlamingoSwitch_Code alias Steckdose Code
      attr MYSENSOR_FlamingoSwitch_Code devStateIcon 618405984:black_Steckdose.off 632445792:black_Steckdose.on
      attr MYSENSOR_FlamingoSwitch_Code eventMap aus:618405984 an:632445792
      attr MYSENSOR_FlamingoSwitch_Code group Funksteckdosen
      attr MYSENSOR_FlamingoSwitch_Code room Büro
      attr MYSENSOR_FlamingoSwitch_Code setList state:aus,an
      attr MYSENSOR_FlamingoSwitch_Code webCmd state
      define MYSENSOR_FlamingoSwitch_Code_Notify notify MYSENSOR_FlamingoSwitch_Code set MYSENSOR_FlamingoSwitch Code %
      

      best regards windkh

      posted in My Project
      Heinz
      Heinz
    • RE: Air Quality Sensor

      The sensor is in my kitchen. The value in the screenshot is very high as I made some french fries 2 hours ago.
      image.png

      posted in Hardware
      Heinz
      Heinz
    • RE: Simple enhancement for PressureSensor example (Weatherstation)

      Ok, no problem, I will create a pull request this weekend.
      rgrds Heinz

      posted in My Project
      Heinz
      Heinz
    • RE: Simple enhancement for PressureSensor example (Weatherstation)

      Pull request done.

      posted in My Project
      Heinz
      Heinz
    • RE: Bosch BME680 Sensor

      @alexsh1
      No I am not using the BSEC library. I read the raw values of the resistance and calculate the first derivative for triggering the ventilation system. The ventilation system is turned on, when
      (delta resistance)/minute > threshold

      Sometimes the ventilation is also triggered when I open my fridge. Then the smell of food coming out of the fridge also fires the trigger.

      It is said that the sensor is very sensitive to any kind of silicone which is basically everywhere in the air when you have dishes created from silicone in your kitchen. Silicone poisens/blinds the sensor immediately for several hours.
      So be careful when making experiments with it.

      posted in My Project
      Heinz
      Heinz