Note that you can make use of any MAX485 module that is suitable for the arduino (5V). Basically they are all the same except for a few minor tweaks like LEDs or other non relevant stuff.
Heinz
@Heinz
Posts
-
Sensor for Vallox DigitSE RS485 ventilation system with integration into FHEM. -
Sensor for Vallox DigitSE RS485 ventilation system with integration into FHEM.Well basically the part list is very simple
1x Arduino Mega 2560
1x NRF24L01+
1x Pushbutton
2x MAX485 Module TTL Switch Module (one for sender, one for receiver)
(e.g. https://protosupplies.com/product/max485-ttl-to-rs-485-interface-module/)The 1x Resistor 120Ohms is only neccessary if not already mounted on the MAX485 Module. It depends on what module
you bought. So have a look at the layout and check if there is a 120Ohms resistor mounted between pins A and B.
The module (https://protosupplies.com/product/max485-ttl-to-rs-485-interface-module/) already contains that resistor.Optionally you can add a capacitor between + and - to stabilize the voltage level if your power supply is a weak one.
Anyone will do like 10uF, 100uF... -
Sensor for Vallox DigitSE RS485 ventilation system with integration into FHEM. -
Sensor for Vallox DigitSE RS485 ventilation system with integration into FHEM.Hi @captaindork
sorry for delay,.... the position of the damper (which is the bypass) is indicated through a single bit of the multi purpose IO-Port 2. The library defines that as property 38 DamperMotorPositionProperty.
In the mysensors example it is published as
const uint8_t DAMPER_MOTOR_POSITION = 42;
The value is either 1 or 0.I mapped it in FHEM as follows
attr MYSENSOR_Vallox mapReading_DamperMotorPosition 42 value1define MYSENSOR_Vallox_DamperMotorPosition dummy attr MYSENSOR_Vallox_DamperMotorPosition alias WRG-Bypass attr MYSENSOR_Vallox_DamperMotorPosition devStateIcon 1:rc_GREEN 0:rc_BLANK attr MYSENSOR_Vallox_DamperMotorPosition event-on-update-reading state attr MYSENSOR_Vallox_DamperMotorPosition group Status attr MYSENSOR_Vallox_DamperMotorPosition icon vent_bypass attr MYSENSOR_Vallox_DamperMotorPosition room Lüftung attr MYSENSOR_Vallox_DamperMotorPosition sortby 3 define MYSENSOR_Vallox_DamperMotorPosition_Notify notify MYSENSOR_Vallox:DamperMotorPosition:.* { my $d = sprintf ("%.0f", ReadingsVal("MYSENSOR_Vallox","DamperMotorPosition", 0));; fhem("set MYSENSOR_Vallox_DamperMotorPosition $d");;} define MYSENSOR_Vallox_DamperMotorPosition_Notify2 at +*00:01:00 { my $d = sprintf "%.0f", ReadingsVal("MYSENSOR_Vallox","DamperMotorPosition", 0);; fhem("set MYSENSOR_Vallox_DamperMotorPosition $d");;} -
Bosch BME680 Sensor@sm_ali
You can have a look at this lib here
https://raw.githubusercontent.com/DFRobot/DFRobot_BME680/master/bme680.cthere is code that handles the calib thing
-
Air quality node -
Air quality node@neverdie same with me. I gave up using the BME680 for the same reasons you have. It is cheap and offers 4 readings in one chip but can not be really used with a small microcontroller like arduino nano or the sensebender micro as Bosch does all the drift compensation using software that requires large memory.
I believe theis chip was meant to be used in smartphones instead of homeautomation sensors.
I will order a SGP30 today. Thanks for pointing into that direction...
Gr Heinz -
Bosch BME680 Sensor@alexsh1
No I am not using the BSEC library. I read the raw values of the resistance and calculate the first derivative for triggering the ventilation system. The ventilation system is turned on, when
(delta resistance)/minute > thresholdSometimes the ventilation is also triggered when I open my fridge. Then the smell of food coming out of the fridge also fires the trigger.
It is said that the sensor is very sensitive to any kind of silicone which is basically everywhere in the air when you have dishes created from silicone in your kitchen. Silicone poisens/blinds the sensor immediately for several hours.
So be careful when making experiments with it. -
Bosch BME680 SensorI like the BME680 sensor as it has a very low power consumption. But it has also some disadvantages that have impact on the application and the environment it should be used.
As far as I know the sensor was developed to be used in mobile phones or smart watches. Those devices are exposed to "fresh air" almost every day which makes it possible to estimate the air quality from the resistante of the sensor. The resistance of the sensor increases over the weeks and months as the internal chemical layer is exhausted or used up depending on the environment it is exposed to. The fading of the resistance can be compensated through smart algorithms that work on historical data (see post above). When the sensor is exposed to "fresh air" once a day, the algorithm can use this value as a kind of reference value to estimate the air quality index.
But if you want to use this sensor for indoor applications, where the environment is very constant or changing very slowly, then I doubt that the algorithm is able to calculate an exact value for the air quality index.
Knowing this means that you can use the sensor resistance also without the BSEC library and with your own simplified algorithm when "recalibration with fresh air" is done sometimes on your own. Another useful application could also be an outdoor weather station where the sensor is exposed to fresh air most of the time.
All in all it is a cool product as it offers other measurements, too which spares hardware and minimizes the costs. In addition to that you can change the meaurement parameters of the sensor on your own as a good user manual of the sensor is also available.I am using the sensor in my kitchen to detect when someone is cooking. In this case I am not interested in the absolute resistance, but in the change over time. If the air quality gets worse in a very short time (resistance change per minute), then I can activate the ventilation system. The same could be done on the toilet :)
best regards Heinz
-
[Solved] Help: gateway is sometimes receiving wrong valuesStudying the log files of the night I found one damaged value
2017-11-04_23:02:43 MYSENSOR_BME680_R 33597 Ohm
2017-11-04_23:02:53 MYSENSOR_BME680_R 33760 Ohm
2017-11-04_23:03:04 MYSENSOR_BME680_R 33814 Ohm
2017-11-04_23:03:25 MYSENSOR_BME680_R 33705 Ohm
2017-11-04_23:03:25 MYSENSOR_BME680_R 2164818857 Ohm
2017-11-04_23:03:36 MYSENSOR_BME680_R 33814 Ohm
2017-11-04_23:03:46 MYSENSOR_BME680_R 33869 Ohm
2017-11-04_23:04:07 MYSENSOR_BME680_R 33624 Ohm
2017-11-04_23:04:49 MYSENSOR_BME680_R 33924 OhmWell, exchanging the radio improved the situation significantly, but unfortunately the problem might be still there....
-
[Solved] Help: gateway is sometimes receiving wrong valuesOk, it seems that I found the cause of the problem: after changing the radio everything works as expected:
Here the green line with sporadic wrong values:
And here the result with a new radio:
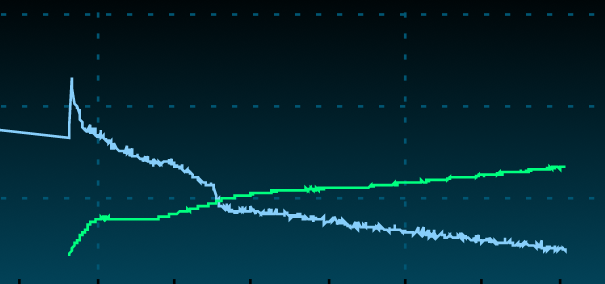
--> SOLVED
-
[Solved] Help: gateway is sometimes receiving wrong values -
[Solved] Help: gateway is sometimes receiving wrong valuesArduino uno with Ethernet
https://forum.mysensors.org/uploads/upload-2ceff83a-1538-4fd4-816d-d3cfef6e0c06.JPGmysensors 2.0
-
[Solved] Help: gateway is sometimes receiving wrong values -
[Solved] Help: gateway is sometimes receiving wrong valuesYes the left one is printed directly from the sensor node.
Why does it look corrupted from the start???The value to be transmitted is an uint32_t which represents a resistance in Ohm.
On the left side the values are ok, but the value received from the gateway is sometimes a very large one.
This occurs sporadically 1-3 times per hour. The value should be transfered every 10 seconds.All other nodes here in my home work very well. Only this one makes problems.
Adruino Uno, NRF, BME680 breakoutboard from watterott (http://www.watterott.com/de/BME680-Breakout) via I2C.The strange thing is that not only the value is damaged, but also the type.
Sketch can be found here:
https://github.com/windkh/mysensors/tree/master/BME680Sensor -
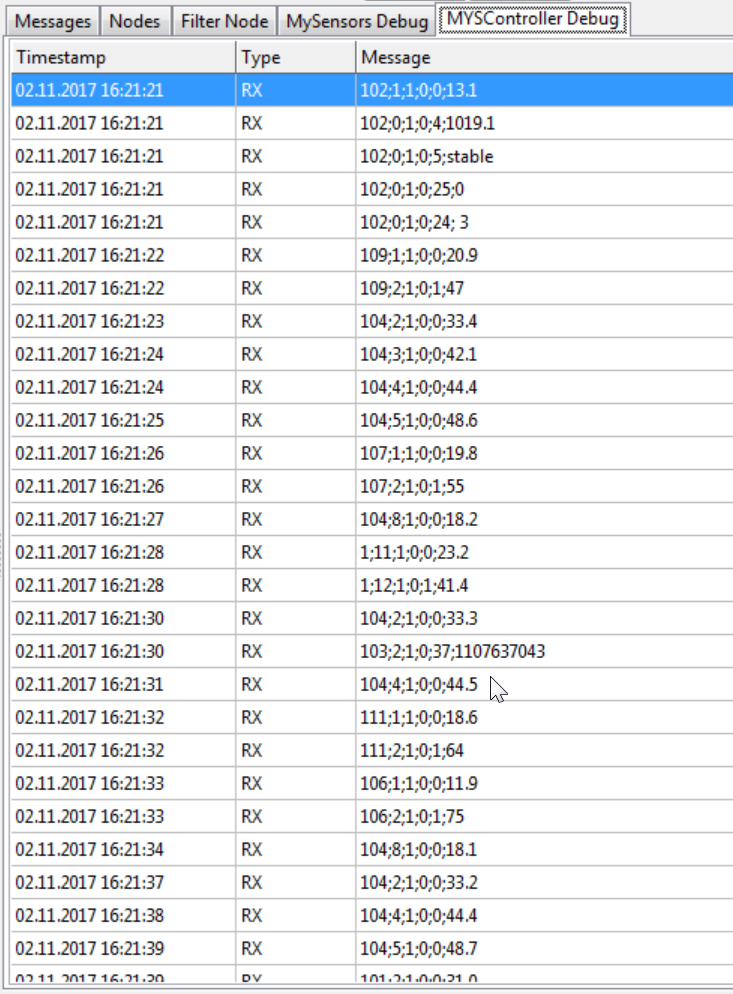
[Solved] Help: gateway is sometimes receiving wrong valuesNobody who can explain the jammed data on 16:21:30?
What happens if two sensors send data at the same time? -
[Solved] Help: gateway is sometimes receiving wrong valuesHi maybe someone can help me with a strange problem.
I noticed that one of my sensors sent wrong values (very high ones).
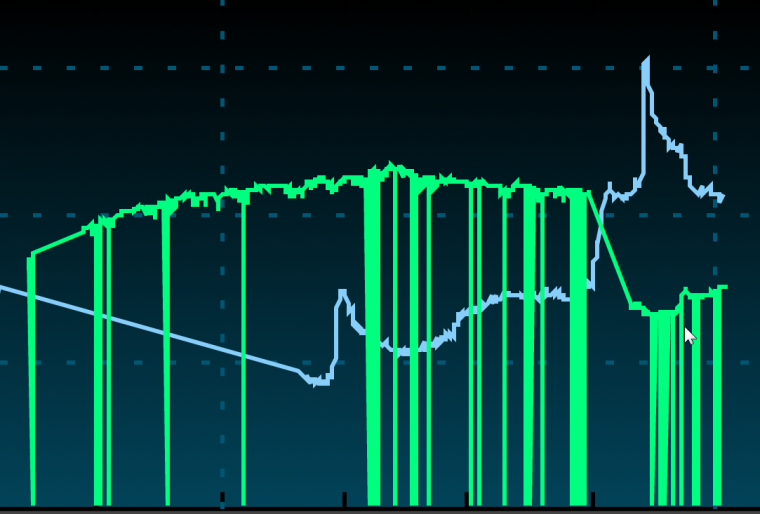
So I added some serial prints in the sketch and connected the MysController to log the values received from the gateway.Here is a picture where you can see the comparision between the output of the sensor 103 and the received values:

The red rectangles show the inconsistent values, while the blue value can not be found at all.
The green rectangle seems to be an unexpected type: S_TEMP was received, but S_AIR_QUALITY was expected.The following screenshot is the raw data from the sam scenario:
The value I am sending is of type uint32_t:
MyMessage resistanceMsg(CHILD_ID_RESISTANCE, V_LEVEL);
present(CHILD_ID_RESISTANCE, S_AIR_QUALITY);
send(resistanceMsg.set(lastResistance)Any suggestions what went wrong here???
-
Bosch BME680 SensorI just created a sketch for controlling a BME680 sensor via I2C.
For the ones who are interested in it, the sketch can be downloaded at:
https://github.com/windkh/mysensors/tree/master/BME680SensorRight now only the gas resistance value is transmitted as the air quality value (IAQ) can only be calculated when you make use of the closed source library from Bosch (which is by the way only available for ARM, X86, ...)
The pressure is, like on the BME280 ,an absolute value. The sketch calculates the sealevel pressure from it.
I am using the breakout board from watterott which can be found here:
https://github.com/watterott/BME680-BreakoutRight now you have to download this library in order to be able to compiile the sketch:
https://github.com/windkh/BME680_Breakout
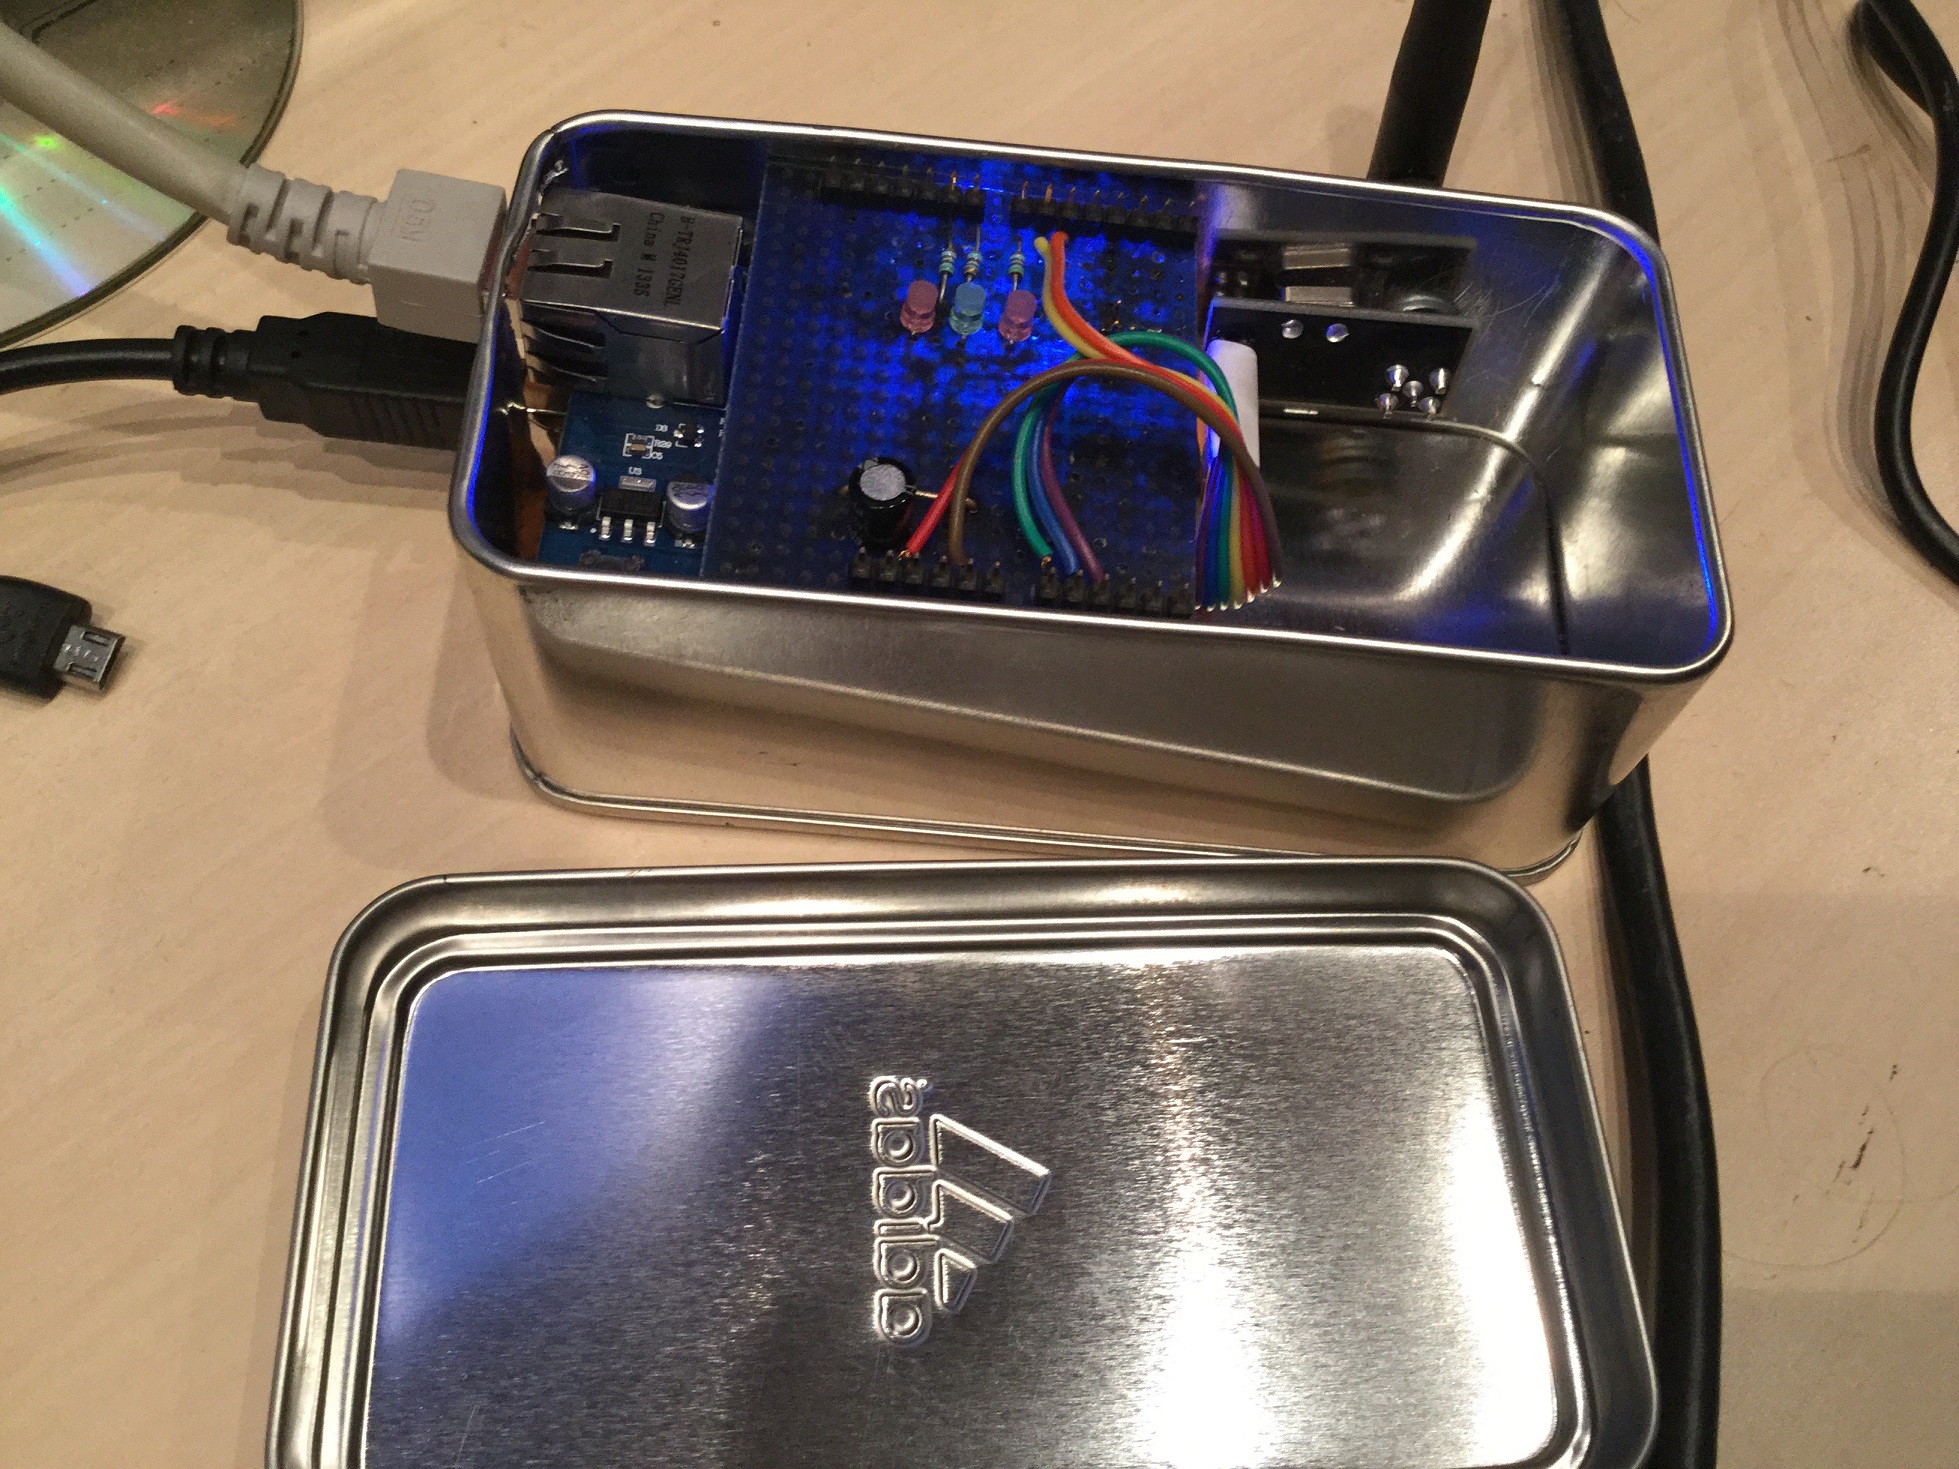
This fork replaces the original I2C read and write routines from https://github.com/vicatcu/BME680_Breakout.Wiring:
I am using a standard Arduino Uno with Radio attached to the standard pins with the mysensors 2.0 lib.
To connect the breakout-board you need 4 wires:Breakout --> Arduino
GND - GND
NC
VCC - 3.3V
SCL - A5
SDA - A4
SDO
CSThe chip supports SPI and I2C. I used SCL and SDA for I2C and left SDO and CS disconnected.
The next steps will be making the air quality values useful by finding an appropriate algorithm... stay tuned.
-
💬 Atmospheric Pressure SensorWhich altitude did you enter, or at which sealevel do you live (in meters)?
const float ALTITUDE = 688; // <-- adapt this value to your own location's altitude.The pressure of 728 hPa is a bit strange as it should be around 1000 hPa. In my eyes you threw out the code to correct the pressure depending on the sealevel of your home. See the code from my sketch:
float pressure = bmp.seaLevelForAltitude(SEALEVEL, absolutePressure);Here you can download the sketch I am using:
https://github.com/windkh/mysensors/blob/master/WeatherStationSensor/WeatherStationSensor.inoThe forecast will be unknown for at least 30minutes, because the sensor needs that time to detect a weather trend.
-
Sensor for Vallox DigitSE RS485 ventilation system with integration into FHEM.The "no reply" message is from the mysensors library, but I don't know what it means.
The line "started cyclic update timer" indicates that the sensor initialized successfully, but it is missing in your output.My latest code is online at
https://github.com/windkh/valloxserial/blob/master/examples/mysensors/ValloxSensor.ino