Navigation

    • Register
    • Login
    • OpenHardware.io
    • Categories
    • Recent
    • Tags
    • Popular
    1. Home
    2. nizoo91
    3. Posts
    • Profile
    • Following
    • Followers
    • Topics
    • Posts
    • Best
    • Groups

    Posts made by nizoo91

    • RE: Sending custom value to move DC motor a specific # of degrees

      @nagelc said in Sending custom value to move DC motor a specific # of degrees:

      Yes. This looks good. Dropped it in the parser here: https://www.mysensors.org/build/parser
      Looks like V_VAR1 is being sent with value 55.
      I think the code I posted above should get it from the incoming message and assign to target. If not, then I am not sure what is the problem. Perhaps someone that has worked more with V_VAR can respond?

      Actually I finally got it to work! and yes indeed, it was using your code!!! 🙂
      I don't know what I was doing before, but I tried your code previously but didn't work, and the only way to read the value was using : target = message.getString(); for some reason..

      But I changed quite a few things in the code, and now when I tried your code again, it actually worked!

      Dude thank you, you are a hero! I will post the final version once I polish up the code in case anyone else needs to do a similar thing!

      posted in Development
      nizoo91
      nizoo91
    • RE: Sending custom value to move DC motor a specific # of degrees

      @nizoo91 said in Sending custom value to move DC motor a specific # of degrees:

      Yah tried to find examples on the forums with no luck unfortunately 😕

      I am able to receive & send the last value from/to OpenHAB
      However I am unable to convert the payload to = target... that is the only missing piece I think..

      this is from my debug log

      183728 TSF:MSG:READ,0-0-1,s=6,c=1,t=24,pt=0,l=2,sg=0:55
      183735 TSF:MSG:SEND,1-1-0-0,s=6,c=2,t=24,pt=0,l=0,sg=0,ft=0,st=OK:
      
      posted in Development
      nizoo91
      nizoo91
    • RE: Sending custom value to move DC motor a specific # of degrees

      Yah tried to find examples on the forums with no luck unfortunately 😕

      I am able to receive & send the last value from/to OpenHAB, however I am unable to convert the payload to = target... that is the only missing piece I think..

      this is from my debug log

      183728 TSF:MSG:READ,0-0-1,s=6,c=1,t=24,pt=0,l=2,sg=0:55
      183735 TSF:MSG:SEND,1-1-0-0,s=6,c=2,t=24,pt=0,l=0,sg=0,ft=0,st=OK:
      
      posted in Development
      nizoo91
      nizoo91
    • RE: Sending custom value to move DC motor a specific # of degrees

      Any idea on how I can do this guys? 🙂

      I basically need whatever value I receive from V_VAR1 to = target

      I am receiving the values I send from OpenHAB, but at the moment it does nothing because I don't know how to define this 😕

      Please correct me if I am wrong but it should look something like this in the void loop() no?
      if V_VAR1 value is updated
      then V_VAR1 value = target
      then run loop..

      Just don't know how to do it in programming language 🙂 any help would be appreciated 🙂

      posted in Development
      nizoo91
      nizoo91
    • Sending custom value to move DC motor a specific # of degrees

      Hello everyone,

      On to a new project, I have a DC motor with an encoder that I would like to control from OpenHAB, would appreciate some help in directing me to the right place, as I have not been able to find any solutions on my own yet 😕

      Basically I need to send a custom degree value from OpenHAB to the Node, and the motor should move that many degrees, store the value and display "current" position in degrees would be ideal. (the value I sent last)

      I was able to move the motor using the code below, if placed within void receive(const MyMessage &message) however it would not stop the motor at the right degree... so clearly I was doing something wrong 😕

      Right now the bellow code will move the motor to "target" which is set at 360 on the sketch

      // Enable debug prints to serial monitor
      #define MY_DEBUG 
      
      // Enable and select radio type attached
      #define MY_RADIO_NRF24
      //#define MY_RADIO_RFM69
      
      // Enable repeater functionality for this node
      //#define MY_REPEATER_FEATURE
      
      #include <SPI.h>
      #include <MySensors.h>
      #define CHILD_ID 6
      
      
      MyMessage message(CHILD_ID, S_CUSTOM);
      
      #define total 7560                     //x4 pulses per rotation.
      #define target 360
      #define motorSpeed 125                 //Change speed of the motor. 125 to 135 is optimal speed for perfect stops
      long degree;
      long pulses;                              //Output pulses.
      int encoderA = 3;
      int encoderB = 2;
      const int pwm = 5;                      //Power of motor.
      const int dir = 6;
      const int dir2 = 7;                      //Direction of the motor.
      int pulsesChanged = 5;
      #define degree pulses/21                   // total / 360 = total ticks per degree of shaft rotation
      
      void setup() 
      {
        Serial.begin(115200);
        pinMode(pwm, OUTPUT);
        pinMode(dir, OUTPUT);
        pinMode(dir2, OUTPUT);
        analogWrite(pwm, 0);                     //Make sure the motor in reset mode.
        digitalWrite(dir, HIGH);
        digitalWrite(dir2, HIGH);
        pinMode(encoderA, INPUT);
        pinMode(encoderB, INPUT);
        delay(50);
        attachInterrupt(0, A_CHANGE, CHANGE);
        attachInterrupt(1, B_CHANGE, CHANGE);
      }
      
      void presentation()  
      { 
        sendSketchInfo("Program", "1.0");
        present(CHILD_ID, S_CUSTOM);
      }
      
      void loop() 
      {
          if(degree==target){
          analogWrite(pwm,0);
          digitalWrite(dir,HIGH);
          digitalWrite(dir2,HIGH);
          delay(500);
          //saveState(message.sensor, message.getBool());
          //request(CHILD_ID, V_VAR1);
          return;
          
        }
        else{
          if (degree>target){
            analogWrite(pwm,motorSpeed);
            digitalWrite(dir,LOW);
            digitalWrite(dir2,HIGH);
            //saveState(message.sensor, message.getBool());
            //request(CHILD_ID, V_VAR1);
      
            
          }
          else if(degree<target){
            analogWrite(pwm,motorSpeed);
            digitalWrite(dir,HIGH);
            digitalWrite(dir2,LOW);
            //saveState(message.sensor, message.getBool());
            //request(CHILD_ID, V_VAR1);
          }
        }
        if (pulsesChanged != 0) {
          pulsesChanged = 0;
          Serial.println(degree);
        }
      }
      
      void receive(const MyMessage &message) {
            saveState(message.sensor, message.getBool());
            request(CHILD_ID, V_VAR1);
      
      }
      
      void A_CHANGE(){
        if( digitalRead(encoderB) == 0 ) {
          if ( digitalRead(encoderA) == 0 ) {
            // A fell, B is low
            pulses--; // moving reverse
          } else {
            // A rose, B is low
            pulses++; // moving forward
          }
        }else {
          if ( digitalRead(encoderA) == 0 ) {
            // B fell, A is high
            pulses++; // moving reverse
          } else {
            // B rose, A is high
            pulses--; // moving forward
          }
        }
        pulsesChanged = 1;
      }
      
      void B_CHANGE(){
        if ( digitalRead(encoderA) == 0 ) {
          if ( digitalRead(encoderB) == 0 ) {
            // B fell, A is low
            pulses++; // moving forward
          } else {
            // B rose, A is low
            pulses--; // moving reverse
          }
       } else {
          if ( digitalRead(encoderB) == 0 ) {
            // B fell, A is high
            pulses--; // moving reverse
          } else {
            // B rose, A is high
            pulses++; // moving forward
          }
        }
        pulsesChanged = 1;
      }```
      posted in Development
      nizoo91
      nizoo91
    • RE: NRF24L01+ on SPI1, TFT on SPI0

      @monte said in NRF24L01+ on SPI1, TFT on SPI0:

      @nizoo91 that's nice, but i didn't found this method. Thanks for the tip! It is definitely easier to do this way 🙂
      But my main point was to help someone who will try to compile mysgw for SPI1 and it won't work, because picture he refered to was wrong... I may be stupid, but i spent whole day figuring that out 🙂

      For sure 🙂 trust me I have been there and done that, spent days trying to figure something out and to find out it was the simplest thing to solve hahah

      Anyhow, checkout this site for any pin reference you need. I found it to be very accurate 😉

      https://pinout.xyz/pinout/spi

      posted in Hardware
      nizoo91
      nizoo91
    • RE: NRF24L01+ on SPI1, TFT on SPI0

      @monte said in NRF24L01+ on SPI1, TFT on SPI0:

      he pins are: SPI1 CS0

      While the link you have provided is true and it may work, (I have not tested that method) you can simply do the following which is much easier:

      //cs0_pin=5 is GPIO pin, which is PIN 29

      dtoverlay=spi1-1cs,cs0_pin=5
      

      you can basically pick whichever pin you want as long as you tell MySensors which pin you are using when you run the ./configure using:

      --my-rf24-cs-pin=29
      
      posted in Hardware
      nizoo91
      nizoo91
    • RE: NRF24L01+ on SPI1, TFT on SPI0

      For anyone interested in something similar, you have to specify the following when using ./configre..

      --spi-driver=SPIDEV
      

      I added the above and it worked like a charm!

      For some reason, my TFT disables both SPI0 & SPI1, which took me sometime to figure out on how re-enable it! once that was done, it was a piece of cake!

      complete command:

      sudo ./configure --my-gateway=serial --my-debug=enable --my-serial-is-pty --my-serial-groupname=tty --my-transport=rf24 --my-rf24-channel=76 --my-rf24-ce-pin=37 --my-rf24-cs-pin=29 --spi-spidev-device=/dev/spidev1.0 --spi-driver=SPIDEV
      
      posted in Hardware
      nizoo91
      nizoo91
    • RE: NRF24L01+ on SPI1, TFT on SPI0

      @mfalkvidd Thank you for that, however I am still having issues trying to run the NRF24 from SPI1, I tried replacing the NRF24 as well but still didn't work 😕

      Ls /dev/ shows: spidev1.0

      This is what I added to /boot/config.txt
      Because the default is GPIO 18 (Pin12) which is being used by the TFT.

      # Enable audio (loads snd_bcm2835) (the below is added by the TFT setup)
      dtparam=audio=on
      dtoverlay=mhs35
      hdmi_force_hotplug=1
      hdmi_group=2
      hdmi_mode=1
      hdmi_mode=87
      hdmi_cvt 480 320 60 6 0 0 0
      hdmi_drive=2
      
      
      #below are things I added: 
      #disable bluetooth, not sure why I did this.. 
      dtoverlay=pi3-disable-bt
      
      #enabled spi1 with 1cs pin (default is BCM18, therefor I moved it to BCM 5 / PIN 29)
      dtoverlay=spi1-1cs,cs0_pin=5
      

      This is the line I am using now:

      sudo ./configure --my-gateway=serial --my-debug=enable --my-serial-is-pty --my-serial-groupname=tty --my-transport=rf24 --my-rf24-channel=76 --my-rf24-ce-pin=37 --my-rf24-cs-pin=29 --spi-spidev-device=/dev/spidev1.0
      
      [SECTION] Detecting target machine.
        [OK] machine detected: SoC=BCM2837, Type=rpi3, CPU=armv7l.
      [SECTION] Detecting SPI driver.
        [OK] SPI driver detected:BCM.
      [SECTION] Gateway configuration.
        [OK] Type: serial.
        [OK] Transport: rf24.
        [OK] Signing: Disabled.
        [OK] Encryption: Disabled.
        [OK] CPPFLAGS: -DMY_RADIO_RF24 -DMY_GATEWAY_SERIAL -DMY_DEBUG -DLINUX_SPI_BCM -DLINUX_ARCH_RASPBERRYPI -DSPI_SPIDEV_DEVICE="/dev/spidev1.0" -DMY_RF24_CS_PIN=29 -DMY_RF24_CE_PIN=37 -DMY_RF24_CHANNEL=76 -DMY_LINUX_SERIAL_GROUPNAME="tty" -DMY_LINUX_SERIAL_IS_PTY
      [SECTION] Detecting init system.
        [OK] Init system detected: systemd.
      [SECTION] Saving configuration.
        [OK] Saved.
      [SECTION] Cleaning previous builds.
        [OK] Finished.
      
      • Getting the following after installing:
      pi@raspberrypi:~/MySensors $ sudo ./bin/mysgw
      Mar 11 04:11:02 INFO  Starting gateway...
      Mar 11 04:11:02 INFO  Protocol version - 2.3.1
      Mar 11 04:11:02 DEBUG Serial port /dev/ttyUSB0 (115200 baud) created
      Mar 11 04:11:02 DEBUG MCO:BGN:INIT GW,CP=RNNGL---,REL=255,VER=2.3.1
      Mar 11 04:11:02 DEBUG TSF:LRT:OK
      Mar 11 04:11:02 DEBUG TSM:INIT
      Mar 11 04:11:02 DEBUG TSF:WUR:MS=0
      Mar 11 04:11:02 DEBUG !TSM:INIT:TSP FAIL
      Mar 11 04:11:02 DEBUG TSM:FAIL:CNT=1
      Mar 11 04:11:02 DEBUG TSM:FAIL:DIS
      Mar 11 04:11:02 DEBUG TSF:TDI:TSL
      Mar 11 04:11:12 DEBUG TSM:FAIL:RE-INIT
      Mar 11 04:11:12 DEBUG TSM:INIT
      Mar 11 04:11:12 DEBUG !TSM:INIT:TSP FAIL
      Mar 11 04:11:12 DEBUG TSM:FAIL:CNT=2
      Mar 11 04:11:12 DEBUG TSM:FAIL:DIS
      Mar 11 04:11:12 DEBUG TSF:TDI:TSL
      

      any additional suggestions?

      posted in Hardware
      nizoo91
      nizoo91
    • NRF24L01+ on SPI1, TFT on SPI0

      Hello guys,

      MySensors + Openhab + Serial = DONE and I can almost do it with my eyes closed now hahaha thanks to the forums!

      however I need to use the SPI1 for the NRF24L01 and leave the main SPI for a Touch Display (MHS Series 3.5" from KUMAN>Amazon)

      I have got it to work, after battling it a little bit, and for some reason it disables SPI when you load the damn thing 😕

      https://github.com/goodtft/LCD-show.git

      sudo ./MHS35-show
      

      but I was able to re-enable the SPI by de-compiling the overlay file "mhs35.dtbo" enable SPI then compile again..

      ls /dev/ gives me the following

      autofs           fuse       loop1             mqueue              ram14    serial1    tty14  tty27  tty4   tty52  tty8       vcs2   vcsm
      block            gpiochip0  loop2             net                 ram15    shm        tty15  tty28  tty40  tty53  tty9       vcs3   vhci
      btrfs-control    gpiochip1  loop3             network_latency     ram2     snd        tty16  tty29  tty41  tty54  ttyAMA0    vcs4   watchdog
      bus              gpiochip2  loop4             network_throughput  ram3     spidev1.0  tty17  tty3   tty42  tty55  ttyprintk  vcs5   watchdog0
      cachefiles       gpiomem    loop5             null                ram4     stderr     tty18  tty30  tty43  tty56  ttyS0      vcs6   zero
      char             hidraw0    loop6             ppp                 ram5     stdin      tty19  tty31  tty44  tty57  uhid       vcs7
      console          hidraw1    loop7             ptmx                ram6     stdout     tty2   tty32  tty45  tty58  uinput     vcsa
      cpu_dma_latency  hwrng      loop-control      pts                 ram7     tty        tty20  tty33  tty46  tty59  urandom    vcsa1
      cuse             i2c-1      mapper            ram0                ram8     tty0       tty21  tty34  tty47  tty6   usb        vcsa2
      disk             initctl    mem               ram1                ram9     tty1       tty22  tty35  tty48  tty60  vchiq      vcsa3
      fb0              input      memory_bandwidth  ram10               random   tty10      tty23  tty36  tty49  tty61  vcio       vcsa4
      fb1              kmsg       mmcblk0           ram11               raw      tty11      tty24  tty37  tty5   tty62  vc-mem     vcsa5
      fd               log        mmcblk0p1         ram12               rfkill   tty12      tty25  tty38  tty50  tty63  vcs        vcsa6
      full             loop0      mmcblk0p2         ram13               serial0  tty13      tty26  tty39  tty51  tty7   vcs1       vcsa7
      

      I do see "spidev1.0" which is a good thing, however I don't see "tty/USB0" like I used to when installing MySensors 😕

      Tutorials I followed :
      Double SPI Radio Raspberry Pi
      OpenHAB 2.4 MySensors Serial Gateway - How to install (only did MySensors portion)

      with the following "edited" ./configure line

      sudo ./configure --my-gateway=serial --my-debug=enable --my-signing-debug --my-serial-is-pty --my-serial-groupname=tty --my-transport=rf24 --my-rf24-channel=76 --my-rf24-ce-pin=37 --my-rf24-cs-pin=36
      
      • Getting the following from MySensors...
      pi@raspberrypi:~/MySensors $ sudo ./bin/mysgw
      Mar 10 10:51:16 INFO  Starting gateway...
      Mar 10 10:51:16 INFO  Protocol version - 2.3.1
      Mar 10 10:51:16 DEBUG Serial port /dev/ttyUSB0 (115200 baud) created
      Mar 10 10:51:16 DEBUG MCO:BGN:INIT GW,CP=RNNGL---,REL=255,VER=2.3.1
      Mar 10 10:51:16 DEBUG TSF:LRT:OK
      Mar 10 10:51:16 DEBUG TSM:INIT
      Mar 10 10:51:16 DEBUG TSF:WUR:MS=0
      Mar 10 10:51:16 DEBUG !TSM:INIT:TSP FAIL
      Mar 10 10:51:16 DEBUG TSM:FAIL:CNT=1
      Mar 10 10:51:16 DEBUG TSM:FAIL:DIS
      Mar 10 10:51:16 DEBUG TSF:TDI:TSL
      
      • mini-display stopped booting to desktop and the last line is:

      [ ]Starting Load/Save RF Kill Switch Status

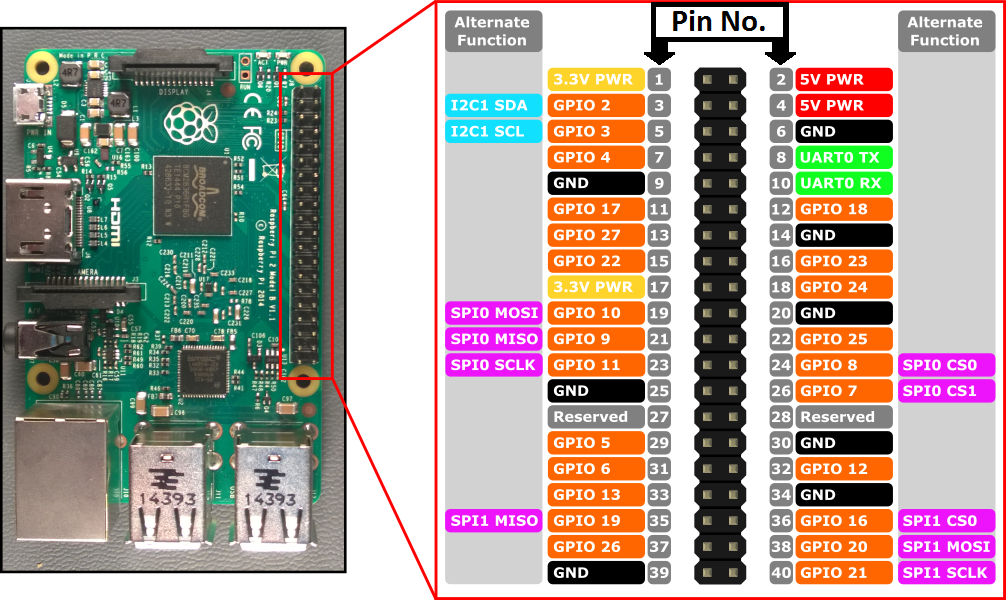
      Any suggestions to where I can start? don't I need to define which pins are used for MISO, MOSI & CLK? I am using the "alternate" pins described as per the picture on MySensors:
      alt text

      posted in Hardware
      nizoo91
      nizoo91
    • RE: OpenHAB 2.5 MySensors Serial Gateway - How to install

      @flipflap3 said in OpenHAB 2.4 MySensors Serial Gateway - How to install:

      feature:install openhab-transport-serial

      can you please add

      "feature:install esh-io-transport-mqtt"
      

      to the tutorial it is required to get it to work even in Serial 🙂

      posted in OpenHAB
      nizoo91
      nizoo91
    • RE: OpenHAB & MySensors Child_ID 255 problem

      @yveaux I never specified the child_ID in the sketches...

      I have two sensors which initialize on their own..

      Basically this code here and the only thing I added was defining the node_ID

      Can I specifically assign a child ID to each sensor? If so how?

      Regards,

      posted in Troubleshooting
      nizoo91
      nizoo91
    • OpenHAB & MySensors Child_ID 255 problem

      Hello,

      I was successfully able to run OpenHAB & MySensors via Serial Gateway using the nRF24L01+ everything was fine and I starting playing with HABPanel, and got a lot of things ready in there, however when added a "10 Minute Delay" on sending an email alert, something strange happened...you can check my OpenHAB post here for more info..

      this is my output from OpenHAB frontail

      2019-02-25 02:27:25.843 [DEBUG] [rsAbstractConnection$MySensorsReader] - Message from gateway received: 30;255;0;0;17;2.3.1
      
      2019-02-25 02:27:25.848 [DEBUG] [rs.internal.gateway.MySensorsGateway] - Presentation Message received
      
      2019-02-25 02:27:25.853 [WARN ] [rs.internal.gateway.MySensorsGateway] - Presented child is alredy present in gateway
      
      2019-02-25 02:27:25.858 [DEBUG] [rsAbstractConnection$MySensorsReader] - Message from gateway received: 30;255;3;0;6;0
      
      2019-02-25 02:27:25.862 [DEBUG] [rs.internal.gateway.MySensorsGateway] - I_CONFIG request received from M, answering: (is imperial?)false
      
      2019-02-25 02:27:25.867 [DEBUG] [rsAbstractConnection$MySensorsWriter] - Sending to MySensors: 30;255;3;0;6;M
      
      2019-02-25 02:27:25.903 [DEBUG] [rsAbstractConnection$MySensorsReader] - Message from gateway received: 30;255;3;0;11;Temperature Sensor
      
      2019-02-25 02:27:25.907 [DEBUG] [rsAbstractConnection$MySensorsReader] - Message from gateway received: 30;255;3;0;12;1.1```
      posted in Troubleshooting
      nizoo91
      nizoo91
    • RE: Temp-Monitoring using OpenHab, MQTT, Pi 3 & Uno

      Wohoo got it to finally work 🙂

      not using MQTT but via serial gateway which is good enough for now 🙂

      posted in Troubleshooting
      nizoo91
      nizoo91
    • RE: OpenHAB 2.5 MySensors Serial Gateway - How to install

      My god, had everything almost working and now my PaperUI disappeared on me for the 2nd time.....

      I was trying to remove and reinstall MySensors but this is the second time this happens to me 😕 I don't want to re-install everything again! Any ideas on how I can get the paperUI back?

      I tried removing my "addons.config" from "/var/lib/openhab2/config/org/openhab"
      didn't help, also opened it and it didn't have the paperui option, manually added it and still didn't work 😞

      I am about to give up on OpenHab lol, is there any easier controller to setup? I heard good things about Domoticz but I JUST got OH to kinda work! I was just receiving the wrong values and thought it could of been because of some errors, so decided to re-compile MySensors and install it again.. and then poooof, the whole UI isn't there anymore 🤦 🤦 🤦 🤦 🤦 🤦 🤦 🤦 🤦 🤦 🤦 🤦 🤦 🤦 🤦 🤦 🤦 🤦 🤦

      EDIT: oh great, even more stuff disappeared, now I only have HOMEBUILDER left! 🤦‍♂️

      posted in OpenHAB
      nizoo91
      nizoo91
    • RE: Temp-Monitoring using OpenHab, MQTT, Pi 3 & Uno

      @waspie said in Temp-Monitoring using OpenHab, MQTT, Pi 3 & Uno:

      @nizoo91 right, well then there's no need to be setting IPs and such in the arduino...

      Okay I am going to start from the beginning again then, because I just found another post that confused me even more!
      @gohan said in Sending data from Arduino to Raspberry Pi via NRF24L01+:

      "he serial gateway is supposed to be connected via USB and it is sending data over the usb serial port, so for your project you would need an extra Arduino as a sensor node where you will connect the 2 sensors (look at the MySensors library examples) with a NRF24 module that will be sending data to the other Arduino with the other NRF24 configured as serial gateway and connected to the RPI3 via USB. MySensors library allows you to setup your gateway also as Ethernet (with a W5100 shield) or Ethernet with MQTT client (also need the W5100 shield)."

      Attached is a picture of what I want to achieve, preferably without an Ethernet shield. alt text

      Any advice would be appropriated 😕

      posted in Troubleshooting
      nizoo91
      nizoo91
    • RE: Temp-Monitoring using OpenHab, MQTT, Pi 3 & Uno

      @waspie

      No I am not, I think I spent too much time yesterday on it, and made a mess again 😕

      I am going to give it an another shot now and see what I can do 🙂

      posted in Troubleshooting
      nizoo91
      nizoo91
    • RE: Temp-Monitoring using OpenHab, MQTT, Pi 3 & Uno

      Not sure if you are able to help me out here, but here is what I got so far,

      my MQTT1 Broker is running with following config:

      mosquitto.url=tcp://localhost:1883
      mosquitto.qos=1
      mosquitto.retain=true
      mosquitto.async=false
      mosquitto.user=openhabian
      mosquitto.pwd="" 
      
      • no pwd for mosquitto.

      I used the following commmand when installing the MySensors:

      ./configure --my-gateway=mqtt --my-controller-ip-address=127.0.0.1 --my-mqtt-publish-topic-prefix=mygateway1-out --my-mqtt-subscribe-topic-prefix=mygateway1-in --my-mqtt-client-id=mysensors-1 --my-mqtt-user=openhabian --my-mqtt-password=
      
      • Again no password
      • I am assuming 127.0.0.1 is localhost as usual, so I left it as 127.0.0.1
        Below is the result of : sudo ./bin/mysgw
        alt text

      .
      Arduino code to test connection:

      // Enable debug prints to serial monitor
      #define MY_DEBUG
      
      // Enables and select radio type (if attached)
      #define MY_RADIO_RF24
      //#define MY_RADIO_RFM69
      //#define MY_RADIO_RFM95
      
      #define MY_GATEWAY_MQTT_CLIENT
      #define MY_NODE_ID 1
      
      // Set this node's subscribe and publish topic prefix
      #define MY_MQTT_PUBLISH_TOPIC_PREFIX "mygateway1-out"
      #define MY_MQTT_SUBSCRIBE_TOPIC_PREFIX "mygateway1-in"
      
      // Set MQTT client id
      #define MY_MQTT_CLIENT_ID "mysensors-1"
      
      // Enable these if your MQTT broker requires username/password
      #define MY_MQTT_USER "openhabian"
      #define MY_MQTT_PASSWORD ""
      
      // Enable MY_IP_ADDRESS here if you want a static ip address (no DHCP)
      //#define MY_IP_ADDRESS 192, 168, 0, 19
      
      // If using static ip you can define Gateway and Subnet address as well
      //#define MY_IP_GATEWAY_ADDRESS 192, 168, 0, 19
      //#define MY_IP_SUBNET_ADDRESS 255,255,255,0
      
      // MQTT broker ip address or url. Define one or the other.
      //#define MY_CONTROLLER_URL_ADDRESS 192, 168, 0, 19
      #define MY_CONTROLLER_IP_ADDRESS 192, 168, 0, 19
      
      // The MQTT broker port to to open
      #define MY_PORT 1883
      
      #include <Ethernet.h>
      #include <MySensors.h>
      
      void setup()
      {
          // Setup locally attached sensors
      }
      
      void presentation()
      {
          // Present locally attached sensors here
      }
      
      void loop()
      {
          // Send locally attached sensors data here
      }
      

      • Result:
      0 MCO:BGN:INIT GW,CP=RNNGA---,REL=255,VER=2.3.1
      4 TSM:INIT
      5 TSF:WUR:MS=0
      11 TSM:INIT:TSP OK
      13 TSM:INIT:GW MODE
      15 TSM:READY:ID=0,PAR=0,DIS=0
      17 MCO:REG:NOT NEEDED
      641 !GWT:TPC:DHCP FAIL
      643 MCO:BGN:STP
      645 MCO:BGN:INIT OK,TSP=1
      1268 !GWT:TPC:DHCP FAIL
      1271 TSM:READY:NWD REQ
      1308 TSF:MSG:SEND,0-0-255-255,s=255,c=3,t=20,pt=0,l=0,sg=0,ft=0,st=OK:
      1937 !GWT:TPC:DHCP FAIL
      2561 !GWT:TPC:DHCP FAIL
      3184 !GWT:TPC:DHCP FAIL
      3809 !GWT:TPC:DHCP FAIL
      4432 !GWT:TPC:DHCP FAIL    
      

      Please let me know what stupid thing I have done now 😞

      posted in Troubleshooting
      nizoo91
      nizoo91
    • RE: Temp-Monitoring using OpenHab, MQTT, Pi 3 & Uno

      Thank you @waspie, for the follow-up

      I have actually made a big mess of everything trying to use different tutorials, OH documentation, ect...

      I am a little more familiar with OpenHab now, especial thanks to @bgunnarb 's comment, it helped me understand the "sequence" and breakdown each step separately.

      I decided to start with a fresh OpenHabian install and go at it again.

      I am curious about MQTT Broker version to use, in the tutorial it says:
      "There are compatibility issues on the latest release of openHAB (2.4). I will review this i more depth but for the moment you can add the compatibility with legacy bindings and install MQTT1 instead of the new binding."

      is the above statement still valid? does MQTT1 actually still work? should I absolutely not use the new MQTT Broker? because I have read other posts that got the new broker working...

      Thank you

      posted in Troubleshooting
      nizoo91
      nizoo91
    • RE: Temp-Monitoring using OpenHab, MQTT, Pi 3 & Uno

      @mfalkvidd, @bgunnarb & @waspie

      Thank you for the help guys, to be honest I felt fairly out dated because I wasn't able to get it working first try! as usually I am a tech guru, and I am able to just get things working the way I want fairly easily!

      Anyhow, I will keep digging and see what I can do! I definitely need to get my head around it, but also need to get this up and running for my school project, as this will be my project for end of the semester! and will be using it in our family Restaurant after 🙂 and yes, free food for everyone that helps me out haha 😉

      Will report back with any questions 🙂

      @waspie I would love to make it as simple as possible for the school project purposes, so I can get it done and take my time tinkering later on with MQTT and everything else, but I absolutely need a working device to present within 2 months 🙂

      Cheers

      posted in Troubleshooting
      nizoo91
      nizoo91
    • Temp-Monitoring using OpenHab, MQTT, Pi 3 & Uno

      Hello guys,

      I am trying to build a temperature monitoring system for a fridge, which tracks data and in-case it goes above a certain temperature, it would send an email alert. Would be nice if I am able to display data logs on a touch screen.

      I have the following setup:
      Raspberri Pi 3 with OpenHabian installed
      Arduino Uno hooked up to 2 DS18B20 (One Wire temp sensors)
      2x nRFl01+ (one for the Pi & one on the Uno)

      Things I have done previously:
      I tested the nRF24 connections and was able to send/receive simple "hello world" from Arduino to Rp3
      I have been able to read temperature data on the Arduino via serial monitor

      I have followed This Guide, however I am stuck in STEP 3, to be more specific, I don't know how to transfer data from Uno to Rp and check if it is working or not via MQTT,

      additionally, OpenHab is brand new to me, and I wasn't able to find any examples on how to configure it, I would really appreciate it if someone can link a few videos/tutorials that can get me going, as the amount of information my brain has consumed over the few days is vast, and I am about to lose my mind!

      Also I tried following the instructions on MySensors.org trying to just use serial communication, but that didn't really work and I was stuck around the same stage.

      Need clarification:

      1. Can I transmit and receive data using the MySensors libraries without installing MySensors in OpenHab? (because I don't have it, according to the tutorial it wasn't installed)

      2. Where the hell do I define my Node IDs ? (Do I simply place "#define MY_NODE_ID 1" ontop of my Uno Code?)?

      3. For the MQTT Broker on PaperUI, I was only able to get it online by using "LocalHost" is that right?

      I have a lot of questions, but will start with these, I will keep reading/watching videos in the meantime 🤔

      posted in Troubleshooting
      nizoo91
      nizoo91