Navigation

    • Register
    • Login
    • OpenHardware.io
    • Categories
    • Recent
    • Tags
    • Popular
    1. Home
    2. Rolo6442u
    3. Posts
    • Profile
    • Following
    • Followers
    • Topics
    • Posts
    • Best
    • Groups

    Posts made by Rolo6442u

    • RE: [SOLVED] Need help with ESP8266 MQTT Gateway (RFM69HW radio)

      For comparison, I have a MQTT Gateway running on a Wemos D1 for 2 months now, with a RFM69W. Works perfect. Here is my hardware setup and code, maybe it is of any help to you. Change the networkid, MQTT broker and wifi credentials to your own setup. I use static ID's on my nodes.

      // Enable debug prints to serial monitor
      #define MY_DEBUG
      
      // Use a bit lower baudrate for serial prints on ESP8266 than default in MyConfig.h
      #define MY_BAUD_RATE 9600
      
      // Enables and select radio type (if attached)
      #define MY_RADIO_RFM69
      //#define MY_IS_RFM69HW
      #define MY_RFM69_NETWORKID 83   // Own network ID, mysensors default is 100
      
      
      #define MY_GATEWAY_MQTT_CLIENT
      #define MY_GATEWAY_ESP8266
      
      // Set this node's subscribe and publish topic prefix
      #define MY_MQTT_PUBLISH_TOPIC_PREFIX "mygateway1-out"
      #define MY_MQTT_SUBSCRIBE_TOPIC_PREFIX "mygateway1-in"
      
      // Set MQTT client id
      #define MY_MQTT_CLIENT_ID "mysensors-1"
      
      // Enable these if your MQTT broker requires username/password
      //#define MY_MQTT_USER "username"
      //#define MY_MQTT_PASSWORD "password"
      
      // Set WIFI SSID and password
      #define MY_WIFI_SSID "xxxxxxx"
      #define MY_WIFI_PASSWORD "xxxxxxxx"
      
      // Set the hostname for the WiFi Client. This is the hostname
      // passed to the DHCP server if not static.
      #define MY_HOSTNAME "ESP8266_MQTT_GW"
      
      // Enable MY_IP_ADDRESS here if you want a static ip address (no DHCP)
      //#define MY_IP_ADDRESS 192,168,178,87
      
      // If using static ip you can define Gateway and Subnet address as well
      //#define MY_IP_GATEWAY_ADDRESS 192,168,178,1
      //#define MY_IP_SUBNET_ADDRESS 255,255,255,0
      
      // MQTT broker ip address.
      #define MY_CONTROLLER_IP_ADDRESS 10, 0, 0, 47
      
      //MQTT broker if using URL instead of ip address.
      // #define MY_CONTROLLER_URL_ADDRESS "test.mosquitto.org"
      
      // The MQTT broker port to to open
      #define MY_PORT 1883
      
      // Enable inclusion mode
      //#define MY_INCLUSION_MODE_FEATURE
      // Enable Inclusion mode button on gateway
      //#define MY_INCLUSION_BUTTON_FEATURE
      // Set inclusion mode duration (in seconds)
      //#define MY_INCLUSION_MODE_DURATION 60
      // Digital pin used for inclusion mode button
      //#define MY_INCLUSION_MODE_BUTTON_PIN D1
      
      // Set blinking period
      #define MY_DEFAULT_LED_BLINK_PERIOD 300
      
      // Flash leds on rx/tx/err
      #define MY_DEFAULT_ERR_LED_PIN D4   // Red
      #define MY_DEFAULT_TX_LED_PIN D3    // Yellow
      #define MY_DEFAULT_RX_LED_PIN D2    // Green
      
      
      #include <MySensors.h>
      
      void setup()
      {
      	// Setup locally attached sensors
      }
      
      void presentation()
      {
      	// Present locally attached sensors here
      }
      
      void loop()
      {
      	// Send locally attached sensors data here
      }


      2020-03-15 07_13_27-sPlan 7.0 - [Z__mysensors_GatewayESP8266MQTTClient_GatewayESP8266MQTT.spl7].jpg

      mqttgateway.jpg

      posted in Troubleshooting
      Rolo6442u
      Rolo6442u
    • RE: 💬 Building a Raspberry Pi Gateway

      @mfalkvidd
      Thanks, will take a look at that.

      posted in Announcements
      Rolo6442u
      Rolo6442u
    • RE: 💬 Building a Raspberry Pi Gateway

      @mfalkvidd
      I did not found it, I kind of made it up, following the syntax of other options.
      Looks like there is no way of changing the ID at this moment for the PI gateway.

      posted in Announcements
      Rolo6442u
      Rolo6442u
    • RE: 💬 Building a Raspberry Pi Gateway

      I want to run this gateway with another networkid (RFM69) but can't find how to do this. The option --my-rfm69-networkid=105 in the config line is ignored. So maybe it should go in the mysensnsors.conf file, but what is the syntax of this option?
      Thanks.

      posted in Announcements
      Rolo6442u
      Rolo6442u
    • RE: 💬 Various bootloader files based on Optiboot 6.2

      Found these bootloaders and using the 1MHz for some low power experiments. I did get this error message when burning the bootloader (using USBASP programmer) :
      "avrdude: WARNING: invalid value for unused bits in fuse "efuse", should be set to 1 according to datasheet
      This behaviour is deprecated and will result in an error in future version
      You probably want to use 0xfd instead of 0x05 (double check with your datasheet first)."

      The bootloader woas succesfully burned so the message was informational. I did look into this and made the following changes in boards.txt :
      I changed all the lines containing "......bootloader.extended_fuses="
      There are multiples sections in the file that have these lines.

      old value -> new value
      0x04 0xFC
      0x05 0xFD
      0x06 0xFE
      0x07 0xFF

      I used this site link text
      for calculating the new values for the extended fuse.
      Now the error message is gone. Maybe this is of any help when using these bootloaders.

      posted in OpenHardware.io
      Rolo6442u
      Rolo6442u
    • RE: 💬 Building a Raspberry Pi Gateway

      Did some tests and I do see the TX power climbing to 100% after a few transmits :

      -42 :transportGetReceivingRSSI()
      127 :transportGetSendingRSSI()
      -256 :transportGetReceivingSNR()
      -256 :transportGetSendingSNR()
      6 :transportGetTxPowerLevel()
      77 :transportGetTxPowerPercent()
      0 :transportInternalToRSSI(_transportSM.uplinkQualityRSSI)
      
      -46 :transportGetReceivingRSSI()
      -102 :transportGetSendingRSSI()
      -256 :transportGetReceivingSNR()
      -256 :transportGetSendingSNR()
      7 :transportGetTxPowerLevel()
      80 :transportGetTxPowerPercent()
      0 :transportInternalToRSSI(_transportSM.uplinkQualityRSSI)
      
      -47 :transportGetReceivingRSSI()
      -102 :transportGetSendingRSSI()
      -256 :transportGetReceivingSNR()
      -256 :transportGetSendingSNR()
      10 :transportGetTxPowerLevel()
      90 :transportGetTxPowerPercent()
      0 :transportInternalToRSSI(_transportSM.uplinkQualityRSSI)
      
      -47 :transportGetReceivingRSSI()
      -105 :transportGetSendingRSSI()
      -256 :transportGetReceivingSNR()
      -256 :transportGetSendingSNR()
      11 :transportGetTxPowerLevel()
      93 :transportGetTxPowerPercent()
      0 :transportInternalToRSSI(_transportSM.uplinkQualityRSSI)
      
      -47 :transportGetReceivingRSSI()
      -103 :transportGetSendingRSSI()
      -256 :transportGetReceivingSNR()
      -256 :transportGetSendingSNR()
      13 :transportGetTxPowerLevel()
      100 :transportGetTxPowerPercent()
      0 :transportInternalToRSSI(_transportSM.uplinkQualityRSSI)
      
      -47 :transportGetReceivingRSSI()
      -106 :transportGetSendingRSSI()
      -256 :transportGetReceivingSNR()
      -256 :transportGetSendingSNR()
      13 :transportGetTxPowerLevel()
      100 :transportGetTxPowerPercent()
      0 :transportInternalToRSSI(_transportSM.uplinkQualityRSSI)


      Not sure if this has a great impact on battery life, depends on how often the node sends a message. Al my nodes have an interval of about 10 minutes. I leave the gateway running for now. Having it running on this PI is a great advantage for me. Will try to do some current measurement on this node and calculate what the impact is on battery life.

      posted in Announcements
      Rolo6442u
      Rolo6442u
    • RE: 💬 Building a Raspberry Pi Gateway

      @kted I wil do some tests to check if I see this behavior. Just build a simple test node with a pushbutton, on 2 AA batteries. This node has the low power W radio module. How did you discover/measure that the max TX power was used?

      posted in Announcements
      Rolo6442u
      Rolo6442u
    • RE: 💬 Building a Raspberry Pi Gateway

      @kted Can you give me a pointer to the details of this issue? I'm willing to do some tests and report back my findings. Some info about my configuration, I have 5 nodes at this moment, all battery feeded, they are sending only nodes. They all work but they have a interval of several minutes between sending. The gateway is connected to Domoticz running on another Raspberry PI.

      posted in Announcements
      Rolo6442u
      Rolo6442u
    • RE: 💬 Building a Raspberry Pi Gateway

      Hi, just build an Ethernet gateway on a raspberry pi B+ following the instructions on this site. And it works! I'm running raspbian stretch lite and used the master branch. No issues. I use the RFM69 radio and this gateway has the HW model. I did have to update al my nodes to use the new RFM69 drivers but that was clearly mentioned in the article.
      I have two questions:

      1. In this section :
      log_pipe=0
      log_pipe_file=/tmp/mysgw.pipe
      

      Is this correct, I think there should be a 1 to enable this type of logging.

      1. When a new version of mysensors is released, how do I update the gateway version on the raspberry pi?

      And here is a picture of my work:
      alt text

      Thanks for the effort you put into this project!

      posted in Announcements
      Rolo6442u
      Rolo6442u
    • RE: Rfm69 and that pesky antenna

      I also use the RFM69 and have good results with a 82 mm wire loosly curled in the housing. Shown here in my lux sensor. On the gateway I use a vertical wire in combination with the RFM69HW radio.

      alt text

      posted in My Project
      Rolo6442u
      Rolo6442u
    • RE: Converting a sketch from 1.5.x to 2.0.x

      @Anticimex
      @scalz
      Thanks, I got it working. By setting it to "soft" this sketch writes all key's to eeprom and will not look for a hardware siging module. The RFM69 uses the EAS key for encryption. I defined my own key again in the sketch.
      Nice solution !

      posted in Announcements
      Rolo6442u
      Rolo6442u
    • RE: Converting a sketch from 1.5.x to 2.0.x

      Great work ! This version looks a lot cleaner and the support for the RFM69 is more integrated. Thanks for that. One thing I'm missing and that's the specification of the encryption key for the RFM69. This was done in version 1.5.x by a user defined 16 bytes string. Now i see only a #define MY_RFM69_ENABLE_ENCRYPTION.
      How and where is the key specified ? How does this make my setup unique ?

      Thanks.

      posted in Announcements
      Rolo6442u
      Rolo6442u
    • Battery operated Lux Sensor

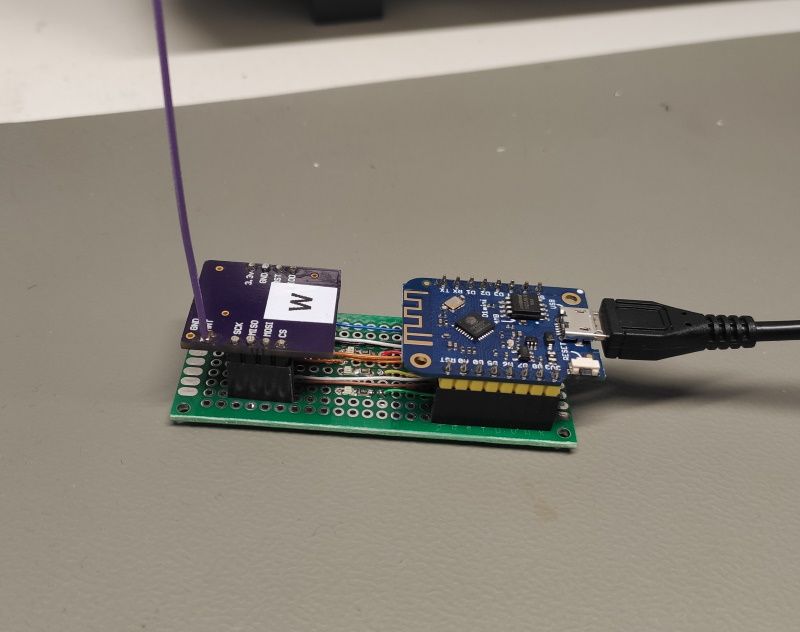
      Would like to show my first prototype of a battery operated Lux sensor. I have choosen to use a step up convertor to have a stable Vcc of 3.3V for the Pro Mini and the RFM69 radio. Using the battery power direct has drawbacks, the logic levels are fluctuating, the BOD detection of the Pro Mini is set to 2.7 V so I can not go to the minimum of 1V per cell. Using the step-up also has a drawback, it consumes a bit of power for itself. But it makes it possible to go down to the 1V per cell.

      Doing the measurements and calculations it should work for about 17 months (still theoretical !) on two AA alkaline batteries. The sensor sends in a lux value every 5 minutes, only when the value has changed. It also send the battery level, 0% is 2.0V, 100% is 3.0V. The prototype also sends the actual battery voltage but this is only for testing. This setup is running for a week now.

      It's still "under construction".

      alt text

      // Change baudrate to 9600 in c:\Users\Roland\Documents\Arduino\libraries\MySensors\MyConfig.h
      
      #include <MySigningNone.h>
      #include <MyTransportRFM69.h>
      #include <MyHwATMega328.h>
      #include <MySigningAtsha204Soft.h>
      #include <MySigningAtsha204.h>
      
      #include <MySensor.h>
      #include <SPI.h>
      #include <Wire.h> 
      #include <SFE_TSL2561.h>
      
      #define MY_DEBUG
      #define Led 3
      #define MeasurePoint1 4
      #define MeasurePoint2 5
      
      
      int BATTERY_SENSE_PIN = A0;  // select the input pin for the battery sense point
      
      // Create an SFE_TSL2561 object, here called "light":
      SFE_TSL2561 light;
      
      boolean gain;        // Gain setting, 0 = X1, 1 = X16;
      unsigned int ms;     // Integration ("shutter") time in milliseconds
      
      float Vref = 3.324;  // Vref in mV
      int VMIN = 2000;     //  Battery monitor low level in mV
      int VMAX = 3000;     //  Battery monitor high level in mV 
      int batteryPcnt;
      int LastbatteryPcnt = 0;
      int batterymV;
      float batteryV;
      int MeasureCount = 50; 
      
      // Define the child ID's 
      #define CHILD_ID_LIGHT 0
      #define CHILD_ID_VOLTMETER 1
      #define CHILD_ID_STATUS 2
      
      
      #ifdef MY_DEBUG
      unsigned long SLEEP_TIME = 60000; // Sleep time between reads (in milliseconds) 1 minute for testing
      #else
      unsigned long SLEEP_TIME = 300000; // Sleep time between reads (in milliseconds) 5 minutes
      #endif
      
      MyTransportRFM69 transport;
      
      // Hardware profile
      MyHwATMega328 hw;
      
      // Construct MySensors library (signer needed if MY_SIGNING_FEATURE is turned on in MyConfig.h)
      // To use LEDs blinking, uncomment WITH_LEDS_BLINKING in MyConfig.h
      #ifdef WITH_LEDS_BLINKING
      MySensor gw(transport, hw /*, signer*/, RADIO_RX_LED_PIN, RADIO_TX_LED_PIN, RADIO_ERROR_LED_PIN);
      #else
      MySensor gw(transport, hw /*, signer*/);
      #endif
      
      
      // V_LIGHT_LEVEL should only be used for uncalibrated light level 0-100%.
      // If your controller supports the new V_LEVEL variable, use this instead for
      // transmitting LUX light level.
      // MyMessage luxmsg(CHILD_ID_LIGHT, V_LIGHT_LEVEL);
       MyMessage luxmsg(CHILD_ID_LIGHT, V_LEVEL);  
       MyMessage voltmsg(CHILD_ID_VOLTMETER, V_VOLTAGE);
       MyMessage statusmsg(CHILD_ID_STATUS, V_STATUS);
        
      uint16_t lastlux;
      uint16_t mlux;
      
      double lux;    // Resulting lux value
      boolean good;  // True if neither sensor is saturated
      
      void setup()  
      { 
        #ifdef MY_DEBUG
        pinMode(MeasurePoint1, OUTPUT);
        pinMode(MeasurePoint2, OUTPUT);
        pinMode(Led, OUTPUT);
        digitalWrite(MeasurePoint1,LOW);
        digitalWrite(MeasurePoint2,LOW);
        digitalWrite(Led,LOW);
        #endif  
        
        analogReference(DEFAULT);   
        
        gw.begin();
        // Send the sketch version information to the gateway and Controller
        gw.sendSketchInfo("BattLuxSensor", "1.4");
        // Register all sensors to gateway (they will be created as child devices)
        gw.present(CHILD_ID_LIGHT, S_LIGHT_LEVEL);
        gw.present(CHILD_ID_VOLTMETER, S_MULTIMETER);
        gw.present(CHILD_ID_STATUS, S_BINARY);
        
        // Initialize the SFE_TSL2561 library
        // You can pass nothing to light.begin() for the default I2C address (0x39),
        // or use one of the following presets if you have changed
        // the ADDR jumper on the board:
        
        // TSL2561_ADDR_0 address with '0' shorted on board (0x29)
        // TSL2561_ADDR   default address (0x39)
        // TSL2561_ADDR_1 address with '1' shorted on board (0x49)
      
         light.begin();
        
        // Get factory ID from sensor:
        // (Just for debug, you don't need to do this to operate the sensor)
      
        unsigned char ID;
      
      #ifdef MY_DEBUG
        if (light.getID(ID))
        {
          Serial.print("Found TSL2561 light sensor at ID: 0X");
          Serial.println(ID,HEX);
        }
        // Most library commands will return true if communications was successful,
        // and false if there was a problem. You can ignore this returned value,
        // or check whether a command worked correctly and retrieve an error code:
        else
        {
          byte error = light.getError();
          Serial.println("TSL2561 light sensor not found");
          printError(error);
         }
      #endif
      
        // The light sensor has a default integration time of 402ms,
        // and a default gain of low (1X).
        
        // If you would like to change either of these, you can
        // do so using the setTiming() command.
        
        // If gain = false (0), device is set to low gain (1X)
        // If gain = high (1), device is set to high gain (16X)
      
        gain = 0;
      
        // If time = 0, integration will be 13.7ms
        // If time = 1, integration will be 101ms
        // If time = 2, integration will be 402ms
        // If time = 3, use manual start / stop to perform your own integration
      
        unsigned char time = 1;
      
        // setTiming() will set the third parameter (ms) to the
        // requested integration time in ms (this will be useful later):
        
        #ifdef MY_DEBUG
        Serial.println("Set timing and gain TSL2561");
        #endif
        light.setTiming(gain,time,ms);
      
      }
      
      void loop()      
      {     
        #ifdef MY_DEBUG
        digitalWrite(MeasurePoint1,HIGH);
        #endif
      
        // To start taking measurements, power up the sensor:
      
        #ifdef MY_DEBUG
        Serial.println("Powerup TSL2561");
        #endif
        
        light.setPowerUp();  
      
        //light.manualStart();     // Do manual start
        delay(410);                // Wait integration time
        //light.manualStop();      // Do manual stop
        
        // Once integration is complete, we'll retrieve the data.
        // There are two light sensors on the device, one for visible light
        // and one for infrared. Both sensors are needed for lux calculations.
        // Retrieve the data from the device:
        unsigned int data0, data1;
        
        if (light.getData(data0,data1))
        {
          // getData() returned true, communication was successful
       
          // To calculate lux, pass all your settings and readings
          // to the getLux() function.
          
          // The getLux() function will return 1 if the calculation
          // was successful, or 0 if one or both of the sensors was
          // saturated (too much light). If this happens, you can
          // reduce the integration time and/or gain.
          // For more information see the hookup guide at: https://learn.sparkfun.com/tutorials/getting-started-with-the-tsl2561-luminosity-sensor
        
          // Perform lux calculation:
      
          good = light.getLux(gain,ms,data0,data1,lux);
        }
        else
        {
          // getData() returned false because of an I2C error, inform the user.
      
          byte error = light.getError();
          #ifdef MY_DEBUG
          printError(error);
          #endif
        }
      
        #ifdef MY_DEBUG
        Serial.print("LUX Measurement return flag : ");
          if (good) 
          {
           Serial.println("Good");
          }
           else
          {
           Serial.println("Bad");
          }
        #endif
      
        // Convert lux to an integer
        mlux = int(lux); // Set Lux value to integer
      
        #ifdef MY_DEBUG
        Serial.print("Measured LUX value: ");
        Serial.println(mlux);
        Serial.println("Powerdown TSL2561");
        #endif
      
        light.setPowerDown();    // Power down the sensor       
        
        // Get the battery Voltage
        // Do 50 measurements and average the result
        
        long Average = 0;      
          for(int i = 0; i < MeasureCount; i++) {
            Average = Average + analogRead(BATTERY_SENSE_PIN);
          }
        int sensorValue = Average / MeasureCount;
        
        
        batteryV = sensorValue * (Vref / 1024.0);
        batterymV = int (1000 * batteryV);
        if (batterymV > 3000) batterymV = 3000;
        if (batterymV < 2000) batterymV = 2000;
        batteryPcnt = map(batterymV, VMIN, VMAX, 0, 100);  
        
        #ifdef MY_DEBUG
        Serial.print("ADC value: ");
        Serial.println(sensorValue);
        
        Serial.print("Battery Voltage: ");
        Serial.print(batteryV,2);
        Serial.println(" V");
      
        Serial.print("Battery percent: ");
        Serial.print(batteryPcnt);
        Serial.println(" %");
        #endif
        
        
        if ((batteryPcnt != LastbatteryPcnt) || (mlux != lastlux)) { 
          #ifdef MY_DEBUG
          digitalWrite(MeasurePoint2,HIGH);
          digitalWrite(Led,HIGH);
          #endif
      
          // Send in status (good or bad)
          gw.send(statusmsg.set(good));
          // Send in the Lux value
          gw.send(luxmsg.set(mlux));
          // Send in the battery level percentage
          gw.sendBatteryLevel(batteryPcnt);
          // Send in the battery voltage
          gw.send(voltmsg.set(batteryV, 2)); // Set wants volts and how many decimals (2 in our case)
          LastbatteryPcnt = batteryPcnt;
          
          
          lastlux = mlux;
        
        #ifdef MY_DEBUG
          digitalWrite(MeasurePoint2,LOW);
          digitalWrite(Led,LOW);
          #endif
        }
      
        #ifdef MY_DEBUG
        digitalWrite(MeasurePoint1,LOW);
        #endif
         
      
        gw.sleep(SLEEP_TIME);
      }


      // ===========================================================
      #ifdef MY_DEBUG
      void printError(byte error)
        // If there's an I2C error, this function will
        // print out an explanation.
      {
      
        Serial.print("I2C error: ");
        Serial.print(error,DEC);
        Serial.print(", ");
        
        switch(error)
        {
          case 0:
            Serial.println("success");
            break;
          case 1:
            Serial.println("data too long for transmit buffer");
            break;
          case 2:
            Serial.println("received NACK on address (disconnected?)");
            break;
          case 3:
            Serial.println("received NACK on data");
            break;
          case 4:
            Serial.println("other error");
            break;
          default:
            Serial.println("unknown error");
        }
      
      }
        #endif


      alt text

      posted in My Project
      Rolo6442u
      Rolo6442u
    • RE: Start with RFM69 radio module and Arduino Pro Micro as gateway

      Ok, I think the project using the Pro Micro ends here. I did some testing (with NRF024 radio module) and I got it working. But the switching of USB ports (bootloader/serial port) is to much hassle. Very tricky to read the serial debug data because after each reset the serial port is unloaded and loads again, giving my serial program a "port not found ", the classis chicken-egg situation. I will switch over to the RFM69 radio module, but no Pro Micro.

      posted in My Project
      Rolo6442u
      Rolo6442u
    • RE: Start with RFM69 radio module and Arduino Pro Micro as gateway

      Yes, a Nano would do but then I would need level shifting, the RFM69 is not 5V tolerant. And the 3.3V output on the Nano comes from the usb-serial chip (the CH340) and is not a good powersupply, so an extra 3.3V low drop regulater is needed. With the Pro Micro I would need less parts, has full 3.3V design and the unit will be smaller, although size is not really an issue. And it's fun to see if I can get it working.

      posted in My Project
      Rolo6442u
      Rolo6442u
    • Start with RFM69 radio module and Arduino Pro Micro as gateway

      Today ordered some parts for this project. I'm now using the NRF024 radio modules but have range issues. There are a lot of dead spots in my house, could be because I have concrete floors and walls. Also there are a lot of fake NRF modules arround,so changes are I have them also. The RFM69 does look better using the 868 Mhz band and not being copied so much.
      My plan is to use a 3.3V/8Mhz Arduino Pro Micro as USB gateway on my Domoticz system, this module has the USB port build in and works on 3.3V so no level shifting is needed. Did read that it might be a challenge to get this module working, it has the mega32U4 micocontroller. Maybe there are others who also want to use the Pro Micro so I will post updates in this topic. Waiting for the parts now.

      posted in My Project
      Rolo6442u
      Rolo6442u
    • Where does the fail in the debug output come from ?

      Recently started with mysensors with Domoticz as controller. It's great stuf, I use a serial gateway connected to a USB port on the raspberry pi running domotics. It works, the gateway is registered in domotics, i have build a simple input sensor on an Arduino UNO that toggles every 5 seconds. Status is shown correctly in domoticz so all looks good. Until I look at the the serial debug output on the sensor, I see frequent fails, like this -
      send: 10-10-0-0 s=1,c=1,t=2,pt=2,l=2,sg=0,st=fail:1
      send: 10-10-0-0 s=1,c=1,t=2,pt=2,l=2,sg=0,st=ok:0
      send: 10-10-0-0 s=1,c=1,t=2,pt=2,l=2,sg=0,st=ok:1
      send: 10-10-0-0 s=1,c=1,t=2,pt=2,l=2,sg=0,st=ok:0
      send: 10-10-0-0 s=1,c=1,t=2,pt=2,l=2,sg=0,st=ok:1
      send: 10-10-0-0 s=1,c=1,t=2,pt=2,l=2,sg=0,st=ok:0
      send: 10-10-0-0 s=1,c=1,t=2,pt=2,l=2,sg=0,st=ok:1
      send: 10-10-0-0 s=1,c=1,t=2,pt=2,l=2,sg=0,st=fail:0
      send: 10-10-0-0 s=1,c=1,t=2,pt=2,l=2,sg=0,st=ok:1

      My question is where does this fail come from ? Is it from the controller ? the gateway ? or the sensor itself ?
      I have caps on the radio, tried getting closer to the gateway but no change.

      Thanks !

      posted in General Discussion
      Rolo6442u
      Rolo6442u
    • RE: Can't get controller to see contact switch status changes "binaryswitchsensor"

      Today I had the same experiance with the ESP8266 gateway. Relay sensor and temp sensor working ok but the binary switch sensor did not work. It was correctly added in Domoticz but no status changes. When searching I found this post and build a quick and dirty USB gateway using an arduino Nano, plugged it in my Raspberry PI that runs Domoticz and bingo, it works ! So thanks for your post.

      One thing I did see in the telnet session to the ESP gateway, there were long numbers (6 digits I believe) at the end of the message were there should be a 0 or 1, indicating the status of the input. The gateway did not crash.
      Looks like a bug in the ESP gateway.

      posted in Domoticz
      Rolo6442u
      Rolo6442u