💬 Battery Powered Sensors
-
Sorry, where do you measure the power when it is in sleep mode? ie, where do you put your multimeter probes.
-
Sorry, where do you measure the power when it is in sleep mode? ie, where do you put your multimeter probes.
-
@Nicklas-Starkel you put them in serial. So:
battery+ to multimeter- (set to uA mode)
Multimeter+ to vcc
Battery- to gndYou need a very sensitive multimeter though. Most multimeters won't be able to measure low current reliably.
@mfalkvidd that's what I thought! I see that I'm getting 3.4V in the multimeter but my pro mini nor nano will start up (I have not removed the LEDs so they should light up).
If I use more V (6.8V) I put in via RAW on the PRO mini, and I can see teh voltage, but the same thing, it's not starting up, hmmm I wonder what rookie mistake I'm doing! -
@mfalkvidd that's what I thought! I see that I'm getting 3.4V in the multimeter but my pro mini nor nano will start up (I have not removed the LEDs so they should light up).
If I use more V (6.8V) I put in via RAW on the PRO mini, and I can see teh voltage, but the same thing, it's not starting up, hmmm I wonder what rookie mistake I'm doing!@Nicklas-Starkel sounds like you have the multimeter set to measure voltage instead of current. Which multimeter model are you using? Could you post a photo? There is usually a dial that can be turned to switch mode. Many multimeters also require moving one of the probes to a different connector (on the multimeter itself).
-
@Nicklas-Starkel sounds like you have the multimeter set to measure voltage instead of current. Which multimeter model are you using? Could you post a photo? There is usually a dial that can be turned to switch mode. Many multimeters also require moving one of the probes to a different connector (on the multimeter itself).
@mfalkvidd , it was too late at night for me.
I had it at current but it didn't show anything. So without thinking I put it at voltage.
And the problem with not showing anything when I had it at current was I had blown the internal multimeter fuse some days ago.
Ehrmm.. yes. move along, nothing to see here :) -
Hello,
Did you put this command in the setup sketch ?
analogReference(INTERNAL); -
@tonnerre33, yes I've analogReference(INTERNAL); in setup()
-
It's normal to have 1.1V on A0 when you have 3.3V on your batteries.
Where did you get the 1.11V value ? In the serial print or with your multimeter ?
If you read the value with the serial print, which variable is it (sensorValue or batteryV) ? -
@tonnerre33 in the serial print and MySensor MQTT gateway
-
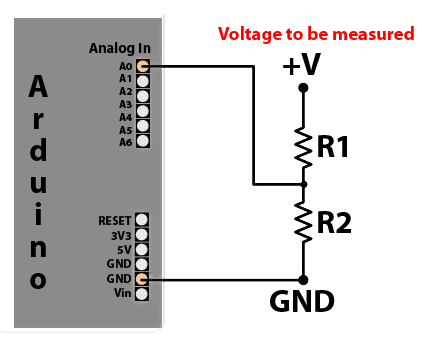
@tonnerre33, I'm trying to build arduio that can run on 2 AA batteries. I'm using MySensors for library and building arduino circuit based on this https://openhomeautomation.net/arduino-battery/
-
Can you post the logs of your node and the skech used ?
-
@tonnerre33, I'm trying to build arduio that can run on 2 AA batteries. I'm using MySensors for library and building arduino circuit based on this https://openhomeautomation.net/arduino-battery/
@bjacobt https://www.mysensors.org/build/battery#measuring-and-reporting-battery-level describes how the battery voltage is calculated and the example sketch has code for doing the calculation. Looks like you've missed reading this part:
// 1M, 470K divider across battery and using internal ADC ref of 1.1V // Sense point is bypassed with 0.1 uF cap to reduce noise at that point // ((1e6+470e3)/470e3)*1.1 = Vmax = 3.44 Volts // 3.44/1023 = Volts per bit = 0.003363075 ... float batteryV = sensorValue * 0.003363075; -
Can you post the logs of your node and the skech used ?
@tonnerre33
Here are the logs from Arduino Serial consoleStarting sensor (RNNNA-, 2.0.0) TSM:INIT TSM:RADIO:OK TSP:ASSIGNID:OK (ID=101) TSM:FPAR TSP:MSG:SEND 101-101-255-255 s=255,c=3,t=7,pt=0,l=0,sg=0,ft=0,st=bc: TSP:MSG:READ 0-0-101 s=255,c=3,t=8,pt=1,l=1,sg=0:0 TSP:MSG:FPAR RES (ID=0, dist=0) TSP:MSG:PAR OK (ID=0, dist=1) TSM:FPAR:OK TSM:ID TSM:CHKID:OK (ID=101) TSM:UPL TSP:PING:SEND (dest=0) TSP:MSG:SEND 101-101-0-0 s=255,c=3,t=24,pt=1,l=1,sg=0,ft=0,st=ok:1 TSP:MSG:READ 0-0-101 s=255,c=3,t=25,pt=1,l=1,sg=0:1 TSP:MSG:PONG RECV (hops=1) TSP:CHKUPL:OK TSM:UPL:OK TSM:READY TSP:MSG:SEND 101-101-0-0 s=255,c=3,t=15,pt=6,l=2,sg=0,ft=0,st=ok:0100 !TSP:MSG:SEND 101-101-0-0 s=255,c=0,t=17,pt=0,l=5,sg=0,ft=0,st=fail:2.0.0 TSP:MSG:SEND 101-101-0-0 s=255,c=3,t=6,pt=1,l=1,sg=0,ft=1,st=ok:0 TSP:MSG:READ 0-0-101 s=255,c=3,t=15,pt=6,l=2,sg=0:0100 TSP:MSG:SEND 101-101-0-0 s=255,c=3,t=11,pt=0,l=13,sg=0,ft=0,st=ok:Battery Meter TSP:MSG:SEND 101-101-0-0 s=255,c=3,t=12,pt=0,l=3,sg=0,ft=0,st=ok:1.0 Request registration... TSP:MSG:SEND 101-101-0-0 s=255,c=3,t=26,pt=1,l=1,sg=0,ft=0,st=ok:2 TSP:MSG:READ 0-0-101 s=255,c=3,t=27,pt=1,l=1,sg=0:1 Node registration=1 Init complete, id=101, parent=0, distance=1, registration=1 330 Battery Voltage: 1.11 V Battery percent: 33 % TSP:MSG:SEND 101-101-0-0 s=255,c=3,t=0,pt=1,l=1,sg=0,ft=0,st=ok:33The sketch used is this:
/**
 * The MySensors Arduino library handles the wireless radio link and protocol
 * between your home built sensors/actuators and HA controller of choice.
 * The sensors forms a self healing radio network with optional repeaters. Each
 * repeater and gateway builds a routing tables in EEPROM which keeps track of the
 * network topology allowing messages to be routed to nodes.
 *
 * Created by Henrik Ekblad <henrik.ekblad@mysensors.org>
 * Copyright (C) 2013-2015 Sensnology AB
 * Full contributor list: https://github.com/mysensors/Arduino/graphs/contributors
 *
 * Documentation: http://www.mysensors.org
 * Support Forum: http://forum.mysensors.org
 *
 * This program is free software; you can redistribute it and/or
 * modify it under the terms of the GNU General Public License
 * version 2 as published by the Free Software Foundation.
 *
 *******************************
 *
 * DESCRIPTION
 *
 * This is an example that demonstrates how to report the battery level for a sensor
 * Instructions for measuring battery capacity on A0 are available here:
 * http://www.mysensors.org/build/battery
 *
 */


#define MY_NODE_ID  101

// Enable debug prints to serial monitor
#define MY_DEBUG

// Enable and select radio type attached
#define MY_RADIO_NRF24
//#define MY_RADIO_RFM69

#include <MySensors.h>


int BATTERY_SENSE_PIN = A0;  // select the input pin for the battery sense point

unsigned long SLEEP_TIME = 100000;  // sleep time between reads (seconds * 1000 milliseconds)
int oldBatteryPcnt = 0;

void setup()
{
   // use the 1.1 V internal reference
#if defined(__AVR_ATmega2560__)
   analogReference(INTERNAL1V1);
#else
   analogReference(INTERNAL);
#endif
}

void presentation() {
   // Send the sketch version information to the gateway and Controller
   sendSketchInfo("Battery Meter", "1.0");
}

void loop()
{
   // get the battery Voltage
   int sensorValue = analogRead(BATTERY_SENSE_PIN);
   #ifdef MY_DEBUG
   Serial.println(sensorValue);
   #endif

   // 1M, 470K divider across battery and using internal ADC ref of 1.1V
   // Sense point is bypassed with 0.1 uF cap to reduce noise at that point
   // ((1e6+470e3)/470e3)*1.1 = Vmax = 3.44 Volts
   // 3.44/1023 = Volts per bit = 0.003363075

   int batteryPcnt = sensorValue / 10;

   #ifdef MY_DEBUG
   float batteryV  = sensorValue * 0.003363075;
   Serial.print("Battery Voltage: ");
   Serial.print(batteryV);
   Serial.println(" V");

   Serial.print("Battery percent: ");
   Serial.print(batteryPcnt);
   Serial.println(" %");
   #endif

   if (oldBatteryPcnt != batteryPcnt) {
     // Power up radio after sleep
     sendBatteryLevel(batteryPcnt);
     oldBatteryPcnt = batteryPcnt;
   }
   sleep(SLEEP_TIME);
}```

What I see on the gateway is:
mysGateway: TSF:MSG:READ,101-101-255,s=255,c=3,t=7,pt=0,l=0,sg=0:
mysGateway: TSF:MSG:BC
mysGateway: TSF:MSG:FPAR REQ,ID=101
mysGateway: TSF:PNG:SEND,TO=0
mysGateway: TSF:CKU:OK
mysGateway: TSF:MSG:GWL OK
mysGateway: TSF:MSG:SEND,0-0-101-101,s=255,c=3,t=8,pt=1,l=1,sg=0,ft=0,st=OK:0
mysGateway: TSF:MSG:READ,101-101-0,s=255,c=3,t=24,pt=1,l=1,sg=0:1
mysGateway: TSF:MSG:PINGED,ID=101,HP=1
mysGateway: TSF:MSG:SEND,0-0-101-101,s=255,c=3,t=25,pt=1,l=1,sg=0,ft=0,st=OK:1
mysGateway: TSF:MSG:READ,101-101-0,s=255,c=3,t=15,pt=6,l=2,sg=0:0100
mysGateway: !TSF:MSG:SEND,0-0-101-101,s=255,c=3,t=15,pt=6,l=2,sg=0,ft=0,st=NACK:0100
mysGateway: TSF:MSG:READ,101-101-0,s=255,c=3,t=6,pt=1,l=1,sg=0:0
mysGateway: Sending message on topic: mysensors-out/101/255/3/0/6
mysGateway: TSF:MSG:READ,101-101-255,s=255,c=3,t=7,pt=0,l=0,sg=0:
mysGateway: TSF:MSG:BC
mysGateway: TSF:MSG:FPAR REQ,ID=101
mysGateway: TSF:CKU:OK,FCTRL
mysGateway: TSF:MSG:GWL OK
mysGateway: TSF:MSG:SEND,0-0-101-101,s=255,c=3,t=8,pt=1,l=1,sg=0,ft=0,st=OK:0
mysGateway: TSF:MSG:READ,101-101-0,s=255,c=3,t=24,pt=1,l=1,sg=0:1
mysGateway: TSF:MSG:PINGED,ID=101,HP=1
mysGateway: TSF:MSG:SEND,0-0-101-101,s=255,c=3,t=25,pt=1,l=1,sg=0,ft=0,st=OK:1
mysGateway: TSF:MSG:READ,101-101-0,s=255,c=3,t=15,pt=6,l=2,sg=0:0100
mysGateway: !TSF:MSG:SEND,0-0-101-101,s=255,c=3,t=15,pt=6,l=2,sg=0,ft=0,st=NACK:0100
mysGateway: TSF:MSG:READ,101-101-0,s=255,c=3,t=6,pt=1,l=1,sg=0:0
mysGateway: Sending message on topic: mysensors-out/101/255/3/0/6
mysGateway: TSF:MSG:READ,101-101-0,s=255,c=3,t=11,pt=0,l=13,sg=0:Battery Meter
mysGateway: Sending message on topic: mysensors-out/101/255/3/0/11
mysGateway: TSF:MSG:READ,101-101-0,s=255,c=3,t=12,pt=0,l=3,sg=0:1.0
mysGateway: Sending message on topic: mysensors-out/101/255/3/0/12
mysGateway: TSF:MSG:READ,101-101-0,s=255,c=3,t=26,pt=1,l=1,sg=0:2
mysGateway: TSF:MSG:SEND,0-0-101-101,s=255,c=3,t=27,pt=1,l=1,sg=0,ft=0,st=OK:1
mysGateway: TSF:MSG:READ,101-101-0,s=255,c=3,t=0,pt=1,l=1,sg=0:33
mysGateway: Sending message on topic: mysensors-out/101/255/3/0/0```Thank for your help!
Jacob -
@bjacobt https://www.mysensors.org/build/battery#measuring-and-reporting-battery-level describes how the battery voltage is calculated and the example sketch has code for doing the calculation. Looks like you've missed reading this part:
// 1M, 470K divider across battery and using internal ADC ref of 1.1V // Sense point is bypassed with 0.1 uF cap to reduce noise at that point // ((1e6+470e3)/470e3)*1.1 = Vmax = 3.44 Volts // 3.44/1023 = Volts per bit = 0.003363075 ... float batteryV = sensorValue * 0.003363075; -
hi @mfalkvidd,
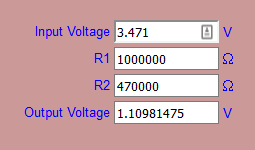
Do you mind clarifying a bit, I've done sensorValue * 0.003363075
analogRead(BATTERY_SENSE_PIN);Gives me 330, so
330 * 0.003363075 = 1.10981475 voltsThank You!
Jacob -
analogRead(BATTERY_SENSE_PIN);must give you 1023 and not 330.
For me it's a problem of value resistance or analogReference.Try to add this
analogReference(INTERNAL);
sensorValue = analogRead(BATTERY_SENSE_PIN);
  #ifdef MY_DEBUG
 Serial.print("Value A0 before force reference: ");
 Serial.print(sensorValue);
#endif
delay(10000);
sensorValue = analogRead(BATTERY_SENSE_PIN);
  #ifdef MY_DEBUG
 Serial.print("Value A0 after force reference: ");
 Serial.print(sensorValue);
#endif
Just after this existing code :
   #ifdef MY_DEBUG
   Serial.println(sensorValue);
   #endif
And plz send me the logs of the node ;)
-
analogRead(BATTERY_SENSE_PIN);must give you 1023 and not 330.
For me it's a problem of value resistance or analogReference.Try to add this
analogReference(INTERNAL);
sensorValue = analogRead(BATTERY_SENSE_PIN);
  #ifdef MY_DEBUG
 Serial.print("Value A0 before force reference: ");
 Serial.print(sensorValue);
#endif
delay(10000);
sensorValue = analogRead(BATTERY_SENSE_PIN);
  #ifdef MY_DEBUG
 Serial.print("Value A0 after force reference: ");
 Serial.print(sensorValue);
#endif
Just after this existing code :
   #ifdef MY_DEBUG
   Serial.println(sensorValue);
   #endif
And plz send me the logs of the node ;)
@tonnerre33 Its still the same
Starting sensor (RNNNA-, 2.0.0)
TSM:INIT
TSM:RADIO:OK
TSP:ASSIGNID:OK (ID=101)
TSM:FPAR
TSP:MSG:SEND 101-101-255-255 s=255,c=3,t=7,pt=0,l=0,sg=0,ft=0,st=bc:
TSP:MSG:READ 0-0-101 s=255,c=3,t=8,pt=1,l=1,sg=0:0
TSP:MSG:FPAR RES (ID=0, dist=0)
TSP:MSG:PAR OK (ID=0, dist=1)
TSM:FPAR:OK
TSM:ID
TSM:CHKID:OK (ID=101)
TSM:UPL
TSP:PING:SEND (dest=0)
TSP:MSG:SEND 101-101-0-0 s=255,c=3,t=24,pt=1,l=1,sg=0,ft=0,st=ok:1
TSP:MSG:READ 0-0-101 s=255,c=3,t=25,pt=1,l=1,sg=0:1
TSP:MSG:PONG RECV (hops=1)
TSP:CHKUPL:OK
TSM:UPL:OK
TSM:READY
TSP:MSG:SEND 101-101-0-0 s=255,c=3,t=15,pt=6,l=2,sg=0,ft=0,st=ok:0100
TSP:MSG:SEND 101-101-0-0 s=255,c=0,t=17,pt=0,l=5,sg=0,ft=0,st=ok:2.0.0
TSP:MSG:SEND 101-101-0-0 s=255,c=3,t=6,pt=1,l=1,sg=0,ft=0,st=ok:0
TSP:MSG:READ 0-0-101 s=255,c=3,t=15,pt=6,l=2,sg=0:0100
TSP:MSG:SEND 101-101-0-0 s=255,c=3,t=11,pt=0,l=13,sg=0,ft=0,st=ok:Battery Meter
TSP:MSG:SEND 101-101-0-0 s=255,c=3,t=12,pt=0,l=3,sg=0,ft=0,st=ok:1.0
Request registration...
TSP:MSG:SEND 101-101-0-0 s=255,c=3,t=26,pt=1,l=1,sg=0,ft=0,st=ok:2
TSP:MSG:READ 0-0-101 s=255,c=3,t=27,pt=1,l=1,sg=0:1
Node registration=1
Init complete, id=101, parent=0, distance=1, registration=1
330
Value A0 before force reference: 327
Value A0 after force reference: 329
Battery Voltage: 1.11 V
Battery percent: 32 %
TSP:MSG:SEND 101-101-0-0 s=255,c=3,t=0,pt=1,l=1,sg=0,ft=0,st=ok:32/** * The MySensors Arduino library handles the wireless radio link and protocol * between your home built sensors/actuators and HA controller of choice. * The sensors forms a self healing radio network with optional repeaters. Each * repeater and gateway builds a routing tables in EEPROM which keeps track of the * network topology allowing messages to be routed to nodes. * * Created by Henrik Ekblad <henrik.ekblad@mysensors.org> * Copyright (C) 2013-2015 Sensnology AB * Full contributor list: https://github.com/mysensors/Arduino/graphs/contributors * * Documentation: http://www.mysensors.org * Support Forum: http://forum.mysensors.org * * This program is free software; you can redistribute it and/or * modify it under the terms of the GNU General Public License * version 2 as published by the Free Software Foundation. * ******************************* * * DESCRIPTION * * This is an example that demonstrates how to report the battery level for a sensor * Instructions for measuring battery capacity on A0 are available here: * http://www.mysensors.org/build/battery * */ #define MY_NODE_ID 101 // Enable debug prints to serial monitor #define MY_DEBUG // Enable and select radio type attached #define MY_RADIO_NRF24 //#define MY_RADIO_RFM69 #include <MySensors.h> int BATTERY_SENSE_PIN = A0; // select the input pin for the battery sense point unsigned long SLEEP_TIME = 100000; // sleep time between reads (seconds * 1000 milliseconds) int oldBatteryPcnt = 0; void setup() { // use the 1.1 V internal reference #if defined(__AVR_ATmega2560__) analogReference(INTERNAL1V1); #else analogReference(INTERNAL); #endif } void presentation() { // Send the sketch version information to the gateway and Controller sendSketchInfo("Battery Meter", "1.0"); } void loop() { // get the battery Voltage int sensorValue = analogRead(BATTERY_SENSE_PIN); #ifdef MY_DEBUG Serial.println(sensorValue); #endif analogReference(INTERNAL); sensorValue = analogRead(BATTERY_SENSE_PIN); #ifdef MY_DEBUG Serial.print("Value A0 before force reference: "); Serial.println(sensorValue); #endif delay(10000); sensorValue = analogRead(BATTERY_SENSE_PIN); #ifdef MY_DEBUG Serial.print("Value A0 after force reference: "); Serial.println(sensorValue); #endif // 1M, 470K divider across battery and using internal ADC ref of 1.1V // Sense point is bypassed with 0.1 uF cap to reduce noise at that point // ((1e6+470e3)/470e3)*1.1 = Vmax = 3.44 Volts // 3.44/1023 = Volts per bit = 0.003363075 int batteryPcnt = sensorValue / 10; #ifdef MY_DEBUG float batteryV = sensorValue * 0.003363075; Serial.print("Battery Voltage: "); Serial.print(batteryV); Serial.println(" V"); Serial.print("Battery percent: "); Serial.print(batteryPcnt); Serial.println(" %"); #endif if (oldBatteryPcnt != batteryPcnt) { // Power up radio after sleep sendBatteryLevel(batteryPcnt); oldBatteryPcnt = batteryPcnt; } sleep(SLEEP_TIME); }``` -
Ok it's not a problem with the analogReference, you can delete this part of code.
Did you control your resistance value and did you do this schema ?
Hello! It looks like you're interested in this conversation, but you don't have an account yet.
Getting fed up of having to scroll through the same posts each visit? When you register for an account, you'll always come back to exactly where you were before, and choose to be notified of new replies (either via email, or push notification). You'll also be able to save bookmarks and upvote posts to show your appreciation to other community members.
With your input, this post could be even better 💗
Register Login