Test your home made controller with MockMySensors (w/ tutorial)
-
A "new" version of a stress test or "Fake sensor". As mentioned in a previous post it will never be complete. But I gave it an update to make it easier to work with.
This version (MySensors 1.5) will take an array of test values ; present them to the gateway/controller and spit out a range of values for each sensor in the testArray.
Version below is fixed node 50, 9 sensors and sends data every 0.1 sec.
/* PROJECT: MySensors PROGRAMMER: AWI DATE: 10 august 2015, update 4 september 2015 FILE: AWI_Universal_Test_50.ino LICENSE: Public domain -in conjunction with MySensors STATUS: never finished, MySensors 1.5 KNOWN ISSUES: no text message yet SUMMARY: multisensor for controller stress test 1. Presents sensors to controller 2. Sends (per sensor) values in defined range repeat Setup: sends values for al sensor specified in setup array Update: 20150904: Changed structure and type definitions (makes is easier to read) */ #include <MySensor.h> #include <SPI.h> const int NODE_ID = 50; // fixed MySensors node ID const bool testAck = false ; // set to true if you want all tests to be acknowledged // reference: typedef enum {P_STRING, P_BYTE, P_INT16, P_UINT16, P_LONG32, P_ULONG32, P_CUSTOM, P_FLOAT32 } mysensor_payload ; // MySensor types typedef union { // MySensor Payload types (only p_String used in this sketch) char p_String[10] ; // reduce characters to limit RAM size int16_t p_Int16 ; uint16_t p_Uint16 ; int32_t p_Int32 ; uint32_t p_Uint32 ; byte p_Byte ; float p_Float32 ; } payLoadType ; // data type for tests typedef struct { int s_type ; // S_ type of the sensor number (only for init) char s_name[10] ; // sensor name (max 9 char) int v_type ; // data V_ type to be sent mysensor_payload dataType ; // data type identifier (uses MySensors MyTypes definition) payLoadType testStartValue ; // start value for test payLoadType testEndValue ; // end value for test float testIncrement; // test increment (different behaviour for each datatype) } testDataType ; // TESTDATA: testdata & initialization, change to adapt to your needs const int noSensors = 9 ; // number of active sensors in node const int noTests = noSensors ; // noTests == noSensors for now // testData index determines child_no testDataType testData[noSensors] = { // size determined by noSensors constant {S_MOISTURE, "Moist1" , V_LEVEL, P_BYTE, "40", "50", 1 }, // start & end values in text for convenience, are converted later {S_MOISTURE, "Moist2" , V_LEVEL, P_BYTE, "60", "70", 1 }, {S_MOISTURE, "Moist3" , V_LEVEL, P_BYTE, "80", "90", 1 }, {S_MULTIMETER, "Multi1", V_VOLTAGE, P_FLOAT32, "30.2", "50.0", 2}, // MULTIMETER {S_MULTIMETER, "Multi2", V_CURRENT, P_FLOAT32, "1.3", "5.6", 1}, {S_MULTIMETER, "Multi3", V_IMPEDANCE, P_FLOAT32, "300", "900", 50}, {S_TEMP, "Temp1", V_TEMP, P_FLOAT32, "1.1", "20.3", 2}, // Temperature {S_TEMP, "Temp2", V_TEMP, P_FLOAT32, "10.3", "50.6", 3}, {S_TEMP, "Temp3", V_TEMP, P_FLOAT32, "300", "900", 50} }; // END TESTDATA // initialize MySensors MyTransportNRF24 transport(9, 10); // Ceech board, 3.3v (7,8) (pin default 9,10) MySensor gw(transport); // Initialize messages (only generic message here) MyMessage Msg; // instantiate message to fill "on the fly unsigned long SLEEP_PERIOD = 100 ; // Period between individual tests in ms unsigned long loopDelay = 1000 ; // Sleep period in ms) void setup() { Serial.println("\n Stress test for Mysensors network (20150904).\n"); gw.begin(incomingMessage, NODE_ID); // start MySensors, fixed node ID // Send the sketch version information to the gateway and Controller gw.sendSketchInfo("AWI Universal test 50", "1.1"); for (int i = 0; i < noSensors ; i++) { // Register al sensors (they will be created as child devices) gw.present(i , testData[i].s_type, testData[i].s_name ); // present all sensors in list (sensor_no, sensor_type, sensor_name) gw.wait(loopDelay); } } void loop() { gw.process(); // check if message from controller for (int i = 0; i < noTests ; i++) { Msg.setSensor(i); // set the sensor number, byte 0 Msg.setType(testData[i].v_type); // set the sensor type, byte 1 switch (testData[i].dataType) { // data type determines test format case P_BYTE: for (byte j = atoi(testData[i].testStartValue.p_String) ; j < atoi(testData[i].testEndValue.p_String) ; j += testData[i].testIncrement) { gw.send(Msg.set(j), testAck); gw.wait(SLEEP_PERIOD); } break; case P_INT16: for (int j = atoi(testData[i].testStartValue.p_String) ; j < atoi(testData[i].testEndValue.p_String) ; j += testData[i].testIncrement) { gw.send(Msg.set(j), testAck); gw.wait(SLEEP_PERIOD); } break; case P_UINT16: for (unsigned int j = atoi(testData[i].testStartValue.p_String) ; j < atoi(testData[i].testEndValue.p_String) ; j += testData[i].testIncrement) { gw.send(Msg.set(j), testAck); gw.wait(SLEEP_PERIOD); } break; case P_ULONG32: for (unsigned long j = atol(testData[i].testStartValue.p_String) ; j < atol(testData[i].testEndValue.p_String) ; j += testData[i].testIncrement) { gw.send(Msg.set(j), testAck); gw.wait(SLEEP_PERIOD); } break; case P_FLOAT32: for (float j = atof(testData[i].testStartValue.p_String) ; j < atof(testData[i].testEndValue.p_String) ; j += testData[i].testIncrement) { gw.send(Msg.set(j,3), testAck ); gw.wait(SLEEP_PERIOD); } break; default: // do nothing gw.wait(loopDelay); } } } void incomingMessage(const MyMessage &message) { Serial.print("Incoming Message"); Serial.print("Incoming change for sensor:"); Serial.print(message.sensor); Serial.print(" (type : "); Serial.print(message.type); Serial.print(")"); Serial.print(", status: "); Serial.println(message.getInt()); //} } /* IGNORE: For reference only S_DOOR, // Door sensor, V_TRIPPED, V_ARMED S_MOTION, // Motion sensor, V_TRIPPED, V_ARMED S_SMOKE, // Smoke sensor, V_TRIPPED, V_ARMED S_BINARY, // Binary light or relay, V_STATUS (or V_LIGHT), V_WATT (same as S_LIGHT) S_DIMMER, // Dimmable light or fan device, V_STATUS (on/off), V_DIMMER (dimmer level 0-100), V_WATT S_COVER, // Blinds or window cover, V_UP, V_DOWN, V_STOP, V_DIMMER (open/close to a percentage) S_TEMP, // Temperature sensor, V_TEMP S_HUM, // Humidity sensor, V_HUM S_BARO, // Barometer sensor, V_PRESSURE, V_FORECAST S_WIND, // Wind sensor, V_WIND, V_GUST S_RAIN, // Rain sensor, V_RAIN, V_RAINRATE S_UV, // Uv sensor, V_UV S_WEIGHT, // Personal scale sensor, V_WEIGHT, V_IMPEDANCE S_POWER, // Power meter, V_WATT, V_KWH S_HEATER, // Header device, V_HVAC_SETPOINT_HEAT, V_HVAC_FLOW_STATE S_DISTANCE, // Distance sensor, V_DISTANCE S_LIGHT_LEVEL, // Light level sensor, V_LIGHT_LEVEL (uncalibrated in percentage), V_LEVEL (light level in lux) S_ARDUINO_NODE, // Used (internally) for presenting a non-repeating Arduino node S_ARDUINO_REPEATER_NODE, // Used (internally) for presenting a repeating Arduino node S_LOCK, // Lock device, V_LOCK_STATUS S_IR, // Ir device, V_IR_SEND, V_IR_RECEIVE S_WATER, // Water meter, V_FLOW, V_VOLUME S_AIR_QUALITY, // Air quality sensor, V_LEVEL S_CUSTOM, // Custom sensor S_DUST, // Dust sensor, V_LEVEL S_SCENE_CONTROLLER, // Scene controller device, V_SCENE_ON, V_SCENE_OFF. S_RGB_LIGHT, // RGB light. Send color component data using V_RGB. Also supports V_WATT S_RGBW_LIGHT, // RGB light with an additional White component. Send data using V_RGBW. Also supports V_WATT S_COLOR_SENSOR, // Color sensor, send color information using V_RGB S_HVAC, // Thermostat/HVAC device. V_HVAC_SETPOINT_HEAT, V_HVAC_SETPOINT_COLD, V_HVAC_FLOW_STATE, V_HVAC_FLOW_MODE S_MULTIMETER, // Multimeter device, V_VOLTAGE, V_CURRENT, V_IMPEDANCE S_SPRINKLER, // Sprinkler, V_STATUS (turn on/off), V_TRIPPED (if fire detecting device) S_WATER_LEAK, // Water leak sensor, V_TRIPPED, V_ARMED S_SOUND, // Sound sensor, V_TRIPPED, V_ARMED, V_LEVEL (sound level in dB) S_VIBRATION, // Vibration sensor, V_TRIPPED, V_ARMED, V_LEVEL (vibration in Hz) S_MOISTURE, // Moisture sensor, V_TRIPPED, V_ARMED, V_LEVEL (water content or moisture in percentage?) }; // sensor data types // typedef enum {P_STRING, P_BYTE, P_INT16, P_UINT16, P_LONG32, P_ULONG32, P_CUSTOM, P_FLOAT32 } MyTypes ; sTypes[V_TEMP] = P_FLOAT32; // S_TEMP sTypes[V_HUM] =P_FLOAT32; // S_HUM sTypes[V_STATUS] = P_UINT16; // S_LIGHT, S_DIMMER, S_SPRINKLER, S_HVAC, S_HEATER. Used for setting binary (on/off) status. 1=on, 0=off sTypes[V_LIGHT] = P_UINT16; // Same as V_STATUS sTypes[V_PERCENTAGE] = P_UINT16; // S_DIMMER. Used for sending a percentage value (0-100). sTypes[V_DIMMER] = P_UINT16; // S_DIMMER. Same as V_PERCENTAGE. sTypes[V_PRESSURE] = P_FLOAT32; // S_BARO sTypes[V_FORECAST] = P_FLOAT32; // S_BARO sTypes[V_RAIN] = P_FLOAT32; // S_RAIN sTypes[V_RAINRATE] = P_FLOAT32; // S_RAIN sTypes[V_WIND] = P_FLOAT32; // S_WIND sTypes[V_GUST] = P_FLOAT32; // S_WIND sTypes[V_DIRECTION] = P_FLOAT32; // S_WIND sTypes[V_UV] = P_FLOAT32; // S_UV sTypes[V_WEIGHT] = P_FLOAT32; // S_WEIGHT sTypes[V_DISTANCE] = P_FLOAT32; // S_DISTANCE sTypes[V_IMPEDANCE] = P_FLOAT32; // S_MULTIMETER, S_WEIGHT sTypes[V_ARMED]= P_FLOAT32; // S_DOOR, S_MOTION, S_SMOKE, S_SPRINKLER sTypes[V_TRIPPED]= P_FLOAT32; // S_DOOR, S_MOTION, S_SMOKE, S_SPRINKLER (for sprinklers with fire detection) sTypes[V_WATT]= P_FLOAT32; // S_POWER, S_LIGHT, S_DIMMER sTypes[V_KWH]= P_FLOAT32; // S_POWER sTypes[V_SCENE_ON]= P_FLOAT32; // S_SCENE_CONTROLLER sTypes[V_SCENE_OFF]= P_FLOAT32; // S_SCENE_CONTROLLER sTypes[V_HEATER]= P_FLOAT32; // Deprecated. Use V_HVAC_FLOW_STATE instead. sTypes[V_HVAC_FLOW_STATE] = P_UINT16; // HVAC flow state ("Off", "HeatOn", "CoolOn", or "AutoChangeOver"). S_HEATER, S_HVAC sTypes[V_HVAC_SPEED]= P_FLOAT32; // HVAC/Heater fan speed ("Min", "Normal", "Max", "Auto") sTypes[V_LIGHT_LEVEL]= P_UINT16; // Used for sending light level in uncalibrated percentage. See also V_LEVEL (light level in lux). S_LIGHT_LEVEL sTypes[V_VAR1] = P_FLOAT32; sTypes[V_VAR2] = P_FLOAT32; sTypes[V_VAR3] = P_FLOAT32; sTypes[V_VAR4] = P_FLOAT32; sTypes[V_VAR5] = P_FLOAT32; sTypes[V_UP] = P_FLOAT32; // S_COVER sTypes[V_DOWN] = P_FLOAT32; // S_COVER sTypes[V_STOP] = P_FLOAT32; // S_COVER sTypes[V_IR_SEND] = P_FLOAT32; // S_IR sTypes[V_IR_RECEIVE] = P_FLOAT32; // S_IR sTypes[V_FLOW] = P_FLOAT32; // S_WATER sTypes[V_VOLUME] = P_FLOAT32; // S_WATER sTypes[V_LOCK_STATUS] = P_FLOAT32; // S_LOCK sTypes[V_LEVEL] = P_UINT16; // S_DUST, S_AIR_QUALITY, S_SOUND (dB), S_VIBRATION (hz), S_LIGHT_LEVEL (lux) sTypes[V_VOLTAGE] = P_FLOAT32; // S_MULTIMETER sTypes[V_CURRENT] = P_FLOAT32; // S_MULTIMETER sTypes[V_RGB] = P_ULONG32; // S_RGB_LIGHT, S_COLOR_SENSOR. // Used for sending color information for multi color LED lighting or color sensors. // Sent as ASCII hex: RRGGBB (RR=red, GG=green, BB=blue component) sTypes[V_RGBW] = P_ULONG32; // S_RGBW_LIGHT // Used for sending color information to multi color LED lighting. // Sent as ASCII hex: RRGGBBWW (WW=while component) sTypes[V_ID] = P_FLOAT32; // S_TEMP // Used for sending in sensors hardware ids (i.e. OneWire DS1820b). sTypes[V_UNIT_PREFIX] = P_STRING; // Allows sensors to send in a string representing the // unit prefix to be displayed in GUI, not parsed by controller! E.g. cm, m, km, inch. // Can be used for S_DISTANCE or gas concentration (S_DUST, S_AIR_QUALITY) sTypes[V_HVAC_SETPOINT_COOL] = P_UINT16; // HVAC cool setpoint (Integer between 0-100). S_HVAC sTypes[V_HVAC_SETPOINT_HEAT] = P_UINT16; // HVAC/Heater setpoint (Integer between 0-100). S_HEATER, S_HVAC sTypes[V_HVAC_FLOW_MODE] = P_UINT16; // Flow mode for HVAC ("Auto", "ContinuousOn", "PeriodicOn"). S_HVAC */ -
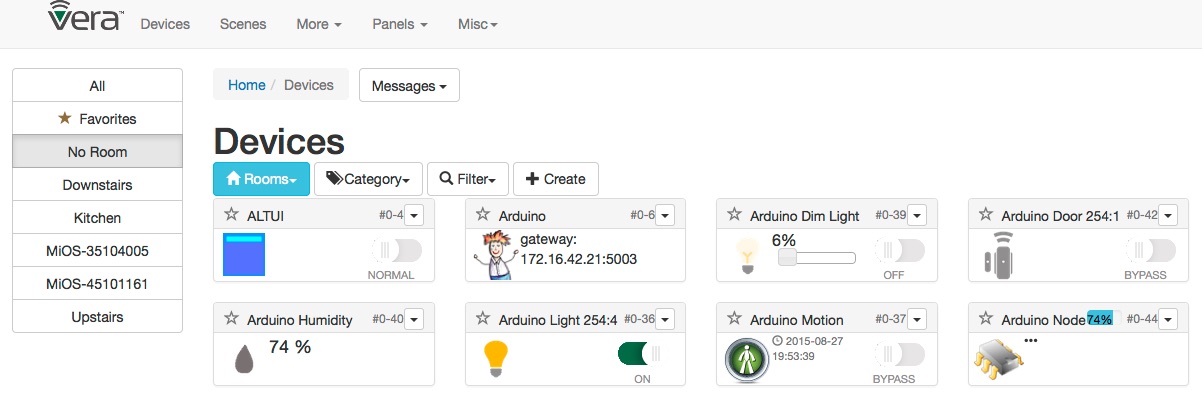
I'm most grateful for your work on this sketch - I've used it to exercise my gateway as I developed and debugged my Vera emulation environment called 'openLuup'. I now have a controller for MySensors running on Vera, BeagleBone Black, and an Arduino Yun, all running the ALTUI interface, so it looks like the attached.
Many thanks for the code and the initial explanations.
-
@akbooer , just curious to know, what version of AltUI do you have? Did you adjust anything into the mySensors plugin json?
I'm asking that because, my plugin display a bit different:
Yes, I made a mod to the Arduino plugin. The changes are on GitHub:
https://github.com/akbooer/Vera/blob/features-for-altui/L_Arduino.lua
I'm hoping to get this merged with the master branch in due course, but I've not finished.
-
Yes, I made a mod to the Arduino plugin. The changes are on GitHub:
https://github.com/akbooer/Vera/blob/features-for-altui/L_Arduino.lua
I'm hoping to get this merged with the master branch in due course, but I've not finished.
-
Hi Folks,
@GizMoCuz just commited a new version of MockMySensors and I'm about to commit another (MockMySensors.ino) (need to merge with his changes).
This will complete the 1.4 lib sensors and Giz has already started adding more.
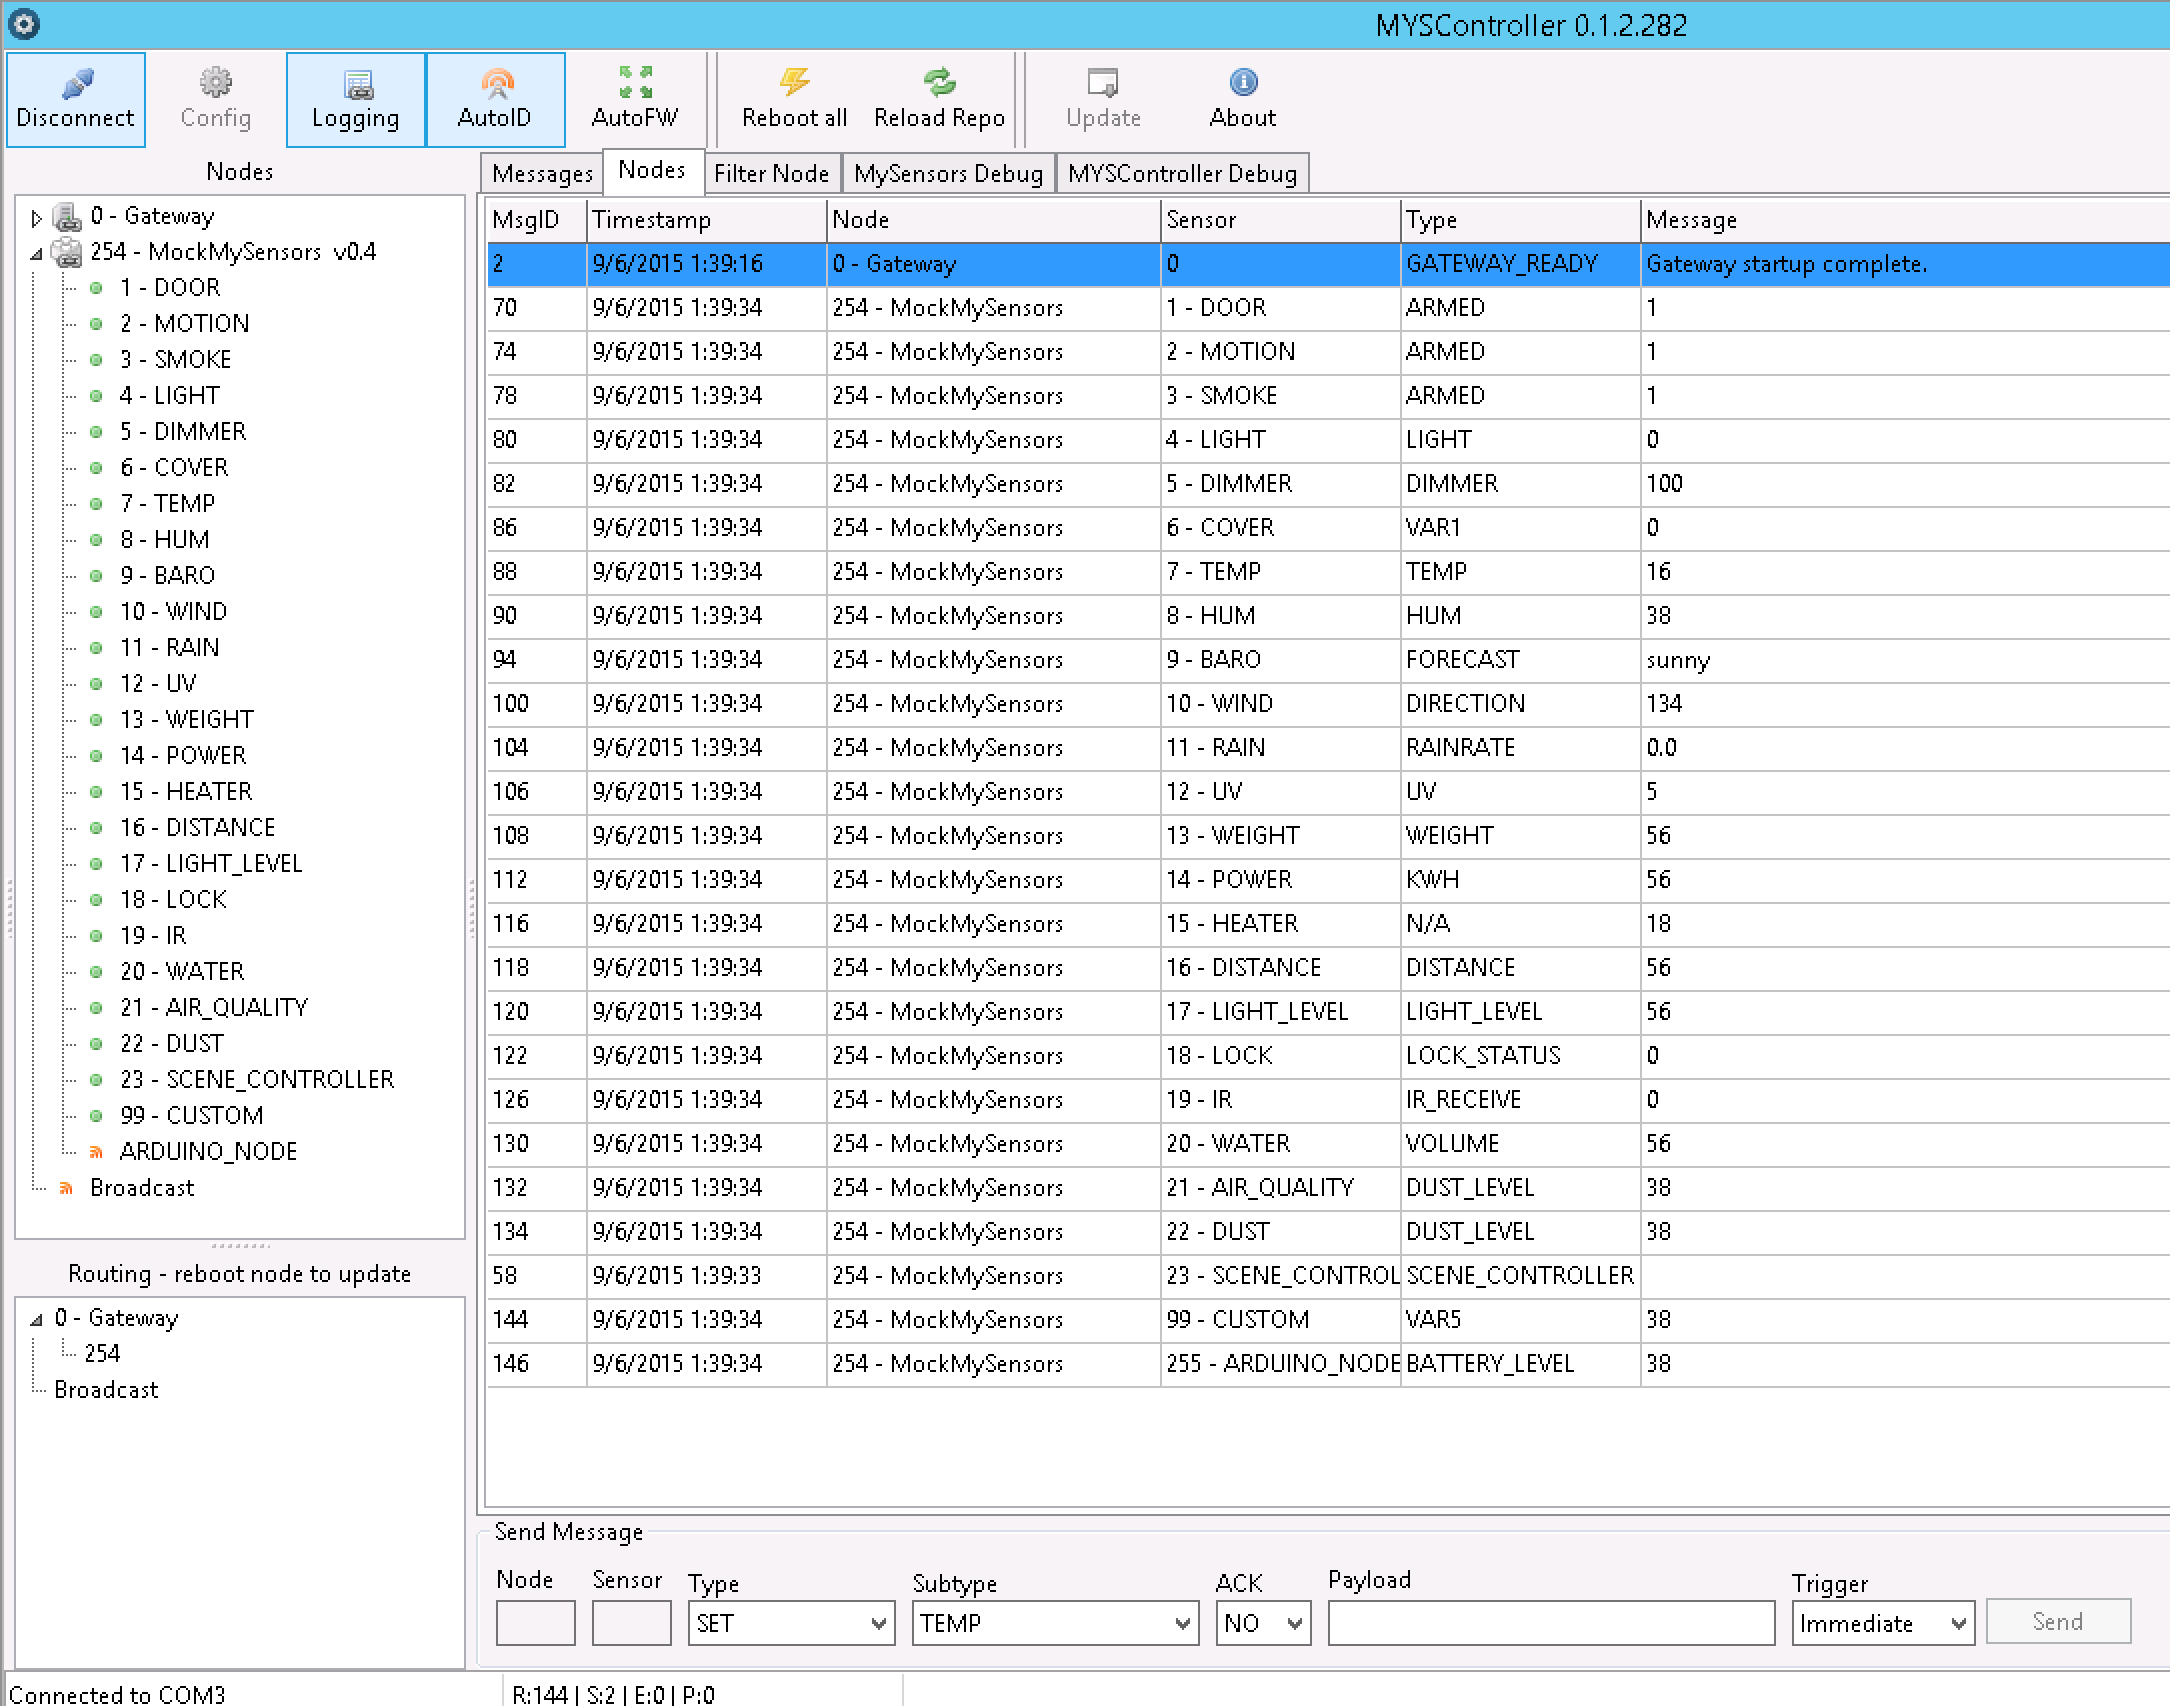
In the mean time here is a picture of MockMySensors running on the MYSController
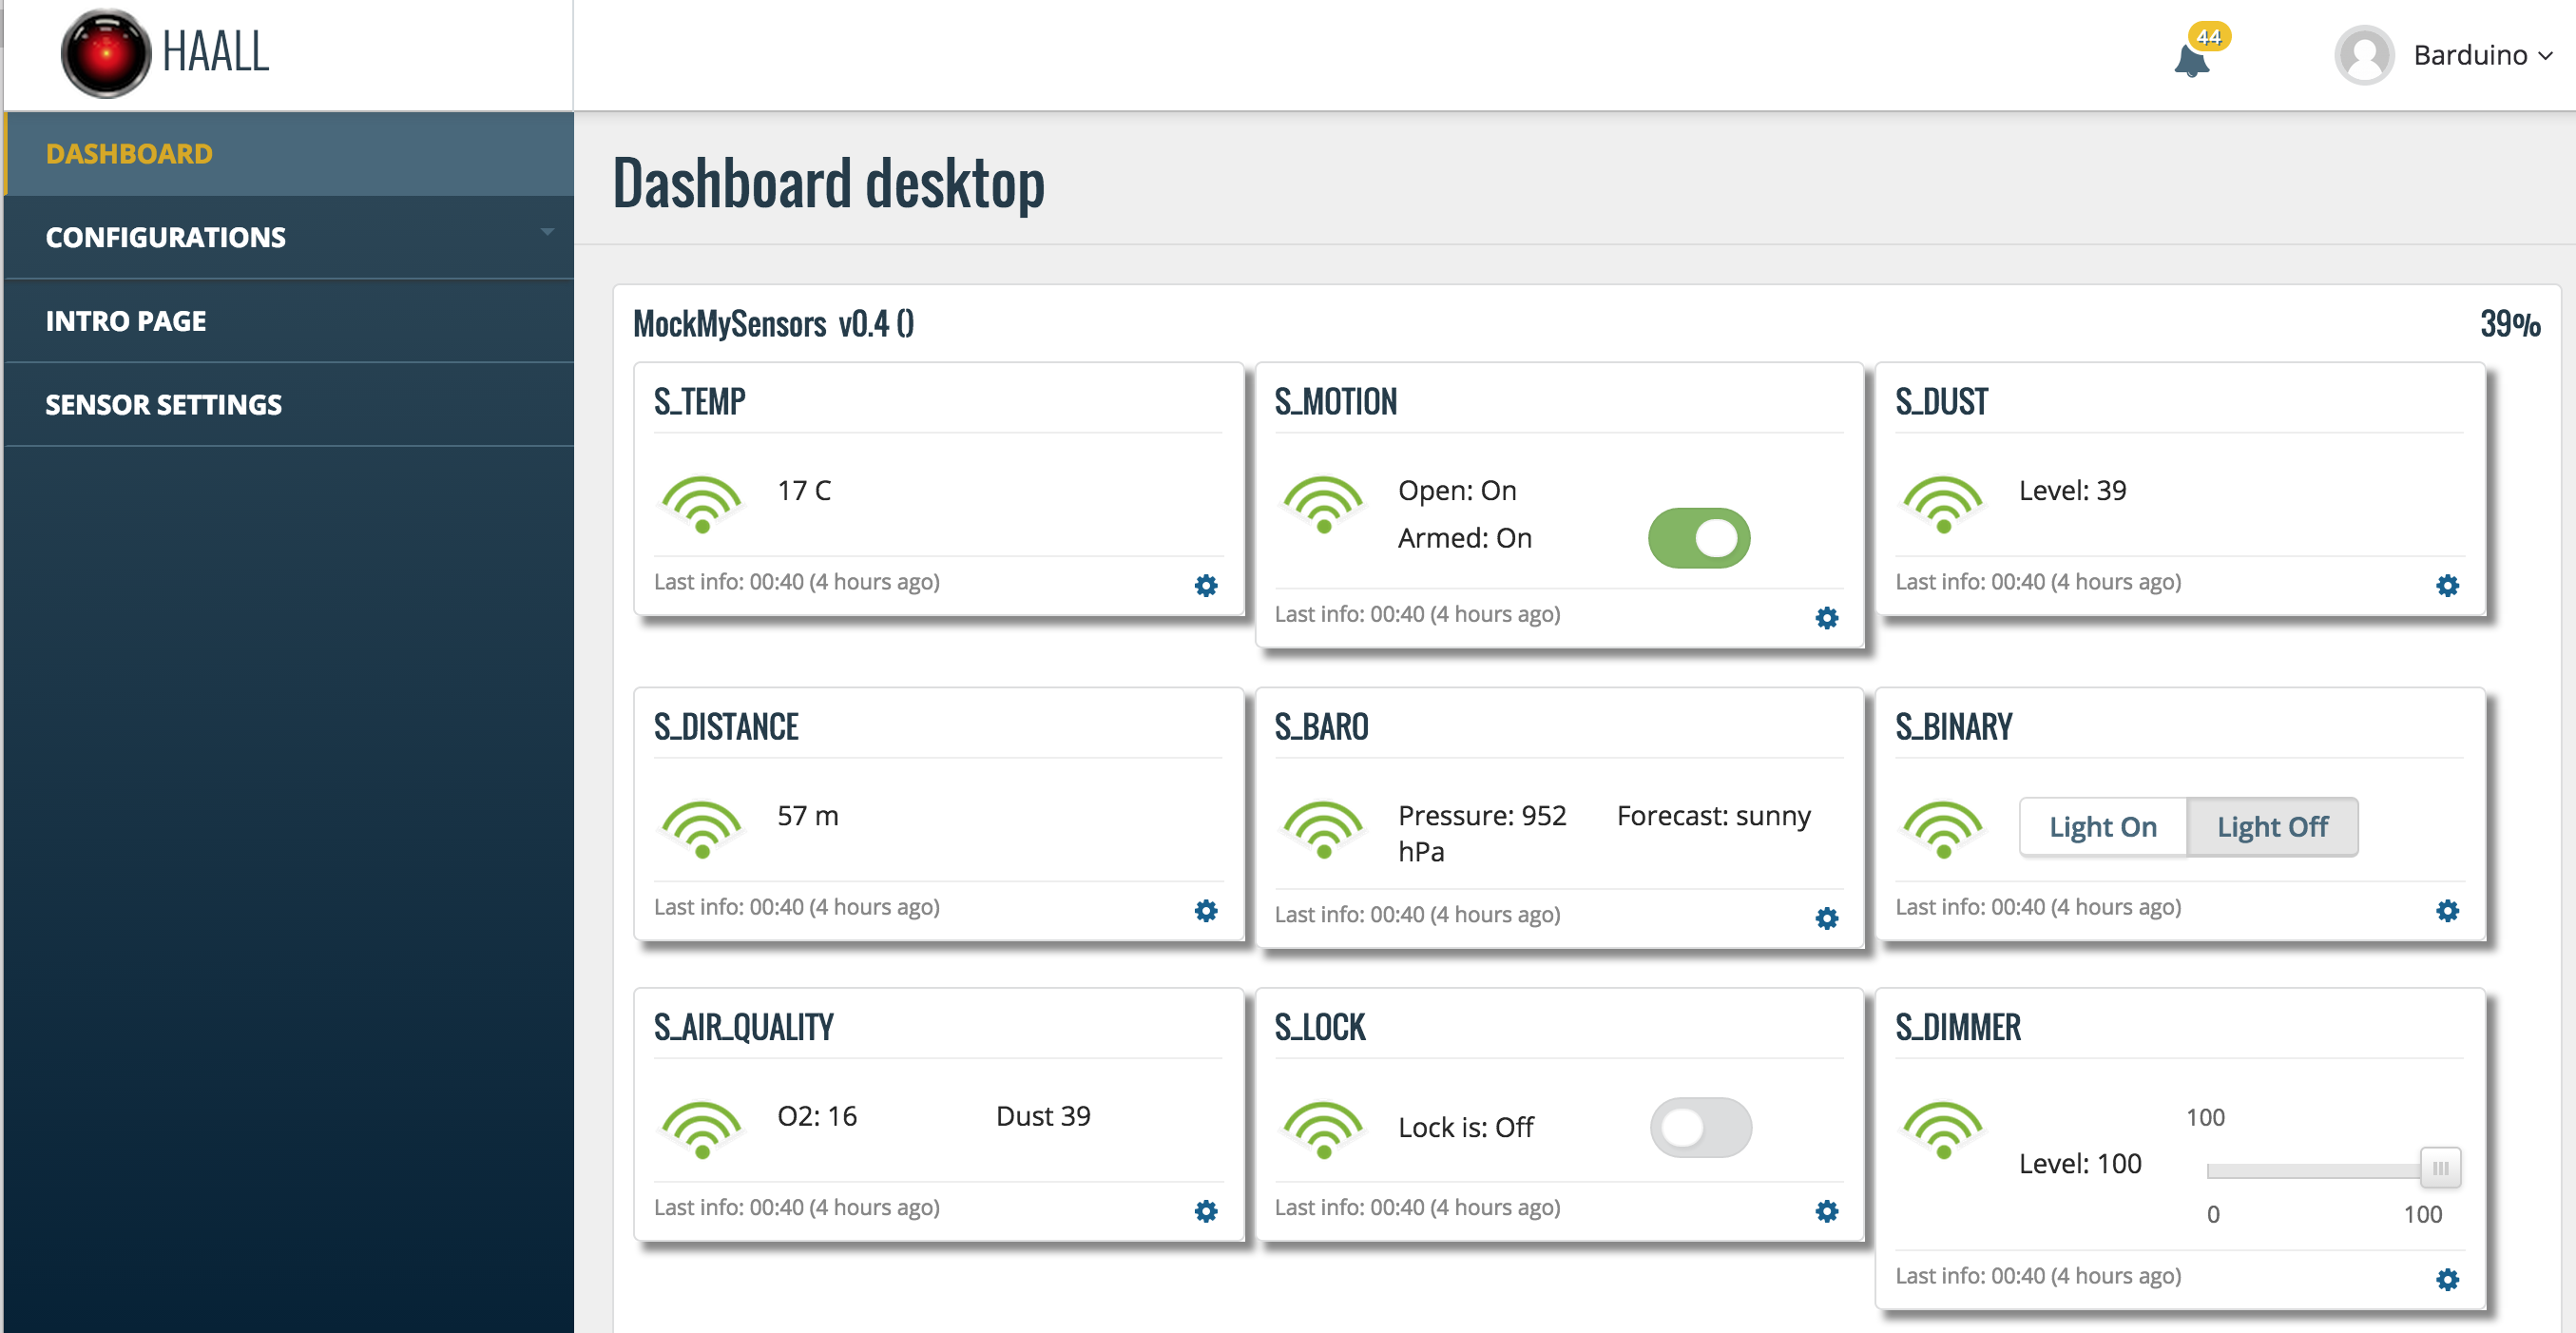
And here is how it look on the HAALL controller
If you have used this skecth in other controller would you mind posting screen shots of it here?
Cheers
-
Hello, is it possible to MockMySensors without physical radio on the gateway?
I ordered/received wrong radios and I am now waiting (most likely a month) for the new ones, but I would like to setup the controller without actual sensors. How can I mock them, or somehow simulate sensors without the radio?
Thanks -
Depending on what you want to run your controller on, and your own experience level with hacking stuff, you can use node-red to simulate sensors, and inject fake sensors into the controller of your choice. (Not all controllers support this though)
head over to http://forum.mysensors.org/topic/1965/nodered-injected-between-domoticz-and-mysensors for more info on setup..
-
Hello, is it possible to MockMySensors without physical radio on the gateway?
I ordered/received wrong radios and I am now waiting (most likely a month) for the new ones, but I would like to setup the controller without actual sensors. How can I mock them, or somehow simulate sensors without the radio?
ThanksI use nodeJS to read from the serial gatweay and send the information to my my controller HAALL, similar to what @tbowmo is suggesting.
Now depending on how your controller accepts information you might pull this off with some hacking. (In HAALL case it accepts via REST service). I've attached my nodeJS example for convenience.
Cheers
-
Thank you. I installed MajorDoMo controller on a old laptop, just because it is written in php - which I do professionally so that I could optimize or debug it. And it looks decent too :)
I just started with the MySensors and Arduino so I guess it will take me some time to get familiar with how everything works.My initial idea was to just use mockMySensors without radio and other sensors, but when I try initiate MySensors lib on the arduino I get "radio init fail" which is expected as I do not have the radio attached (it will arrive soon).
I messed a bit inside MySensors library, trying to comment out the part that initializes the radio but then I get some other messages. I guess it is never needed in practice to turn off radio portion of MySensors.Maybe my question is more related to Network Stress test thread http://forum.mysensors.org/topic/2000/mysensors-network-stress-test on which I also get the same "radio init fail" message, as again radio is missing.
If I find the time I will try to make some software emulation for sensors, based on your NodeJS example. That could be useful for prepping the Controller before even making new sensors, also for simulating scenarios and test how would controller react in certain situations (how different scenes work etc).
-
The mock example is written to use radio communications. Can be pretty hairy to fix it. Suggest you run the development branch which allows sensors to be attached to gateway. It should run twith the mock example if you configure it as a serial gateway (radio disabled).. See Serial Gateway example for how to activate gateway.
Here is a couple of nodejs modules that might be helpful:
http://forum.mysensors.org/topic/2208/node-js-modules-for-mysensors -
Hi Folks,
The guys at MySensors were kind to convert this to 1.6 lib.
So being back in Europe for the holidays I decided to create a post with some explanations/tutorial about the code.
This example MockMySensors from the MySensors examples actually combines 30 sensors in a single node.
It may have a poor architecture but it will give you an idea of how to combine sensors and with some feedback we can always improve on the architecture.
It has been designed for you to customize it for the sensor you want to test by uncomment the initial lines.
This line defines your NODE ID, you can always change it to AUTO or to your specification
#define MY_NODE_ID 254This part of the code defines the sensors you want to work with and their ids
#define ID_S_ARMED             0  // dummy to controll armed stated for several sensors
#define ID_S_DOOR              1
//#define ID_S_MOTION            2
//#define ID_S_SMOKE             3
//#define ID_S_LIGHT             4
//#define ID_S_DIMMER            5
//#define ID_S_COVER             6
//#define ID_S_TEMP              7
//#define ID_S_HUM               8
//#define ID_S_BARO              9
... code lines snipped ...
//#define ID_S_MOISTURE          33
//
//#define ID_S_CUSTOM            99
This part of the code defines the messages you want to instantiate to work with your sensors
#ifdef ID_S_DOOR // V_TRIPPED, V_ARMED
  MyMessage msg_S_DOOR_T(ID_S_DOOR,V_TRIPPED);
  MyMessage msg_S_DOOR_A(ID_S_DOOR,V_ARMED);
#endif

#ifdef ID_S_MOTION // V_TRIPPED, V_ARMED
  MyMessage msg_S_MOTION_A(ID_S_MOTION,V_ARMED);
  MyMessage msg_S_MOTION_T(ID_S_MOTION,V_TRIPPED);
#endif

#ifdef ID_S_SMOKE  // V_TRIPPED, V_ARMED
  MyMessage msg_S_SMOKE_T(ID_S_SMOKE,V_TRIPPED);
  MyMessage msg_S_SMOKE_A(ID_S_SMOKE,V_ARMED);
#endif

#ifdef ID_S_LIGHT
  MyMessage msg_S_LIGHT(ID_S_LIGHT,V_LIGHT);
  bool isLightOn=0;
#endif
... code lines snipped ...
#ifdef ID_S_MOISTURE
// To be implemented
#endif
On the presentation section, you have all the sensors being presented, along with some debugging
void presentation()  {
#ifdef ID_S_DOOR
    Serial.println("  S_DOOR");
    present(ID_S_DOOR,S_DOOR,"Outside Door");
    wait(SHORT_WAIT);
  #endif

  #ifdef ID_S_MOTION
    Serial.println("  S_MOTION");
    present(ID_S_MOTION,S_MOTION,"Outside Motion");
    wait(SHORT_WAIT);
  #endif

  #ifdef ID_S_SMOKE
    Serial.println("  S_SMOKE");
    present(ID_S_SMOKE,S_SMOKE,"Kitchen Smoke");
    wait(SHORT_WAIT);
  #endif
  ... code lines snipped ...
  #ifdef ID_S_CUSTOM
    Serial.println("  S_CUSTOM");
    present(ID_S_CUSTOM,S_CUSTOM,"Other Stuff");
    wait(SHORT_WAIT);
  #endif
On the loop section you have methods which will trigger each sensor to report. This will happen periodically on the SLEEP_TIME, 15 minutes by default
void loop()[
  //Read Sensors
  #ifdef ID_S_DOOR
    door();
  #endif

  #ifdef ID_S_MOTION
    motion();
  #endif

  #ifdef ID_S_SMOKE
    smoke();
  #endif

  ... code lines snipped ...

  #ifdef ID_S_CUSTOM
    custom();
  #endif
Lets take a look at one of them, the dimmer. As you can see its just reporting the dimmerVal which was declared as a global variable.
Sometimes these values are saved in the EPROM, for this example I wanted to avoid that.#ifdef ID_S_DIMMER void dimmer(){ Serial.print("Dimmer is set to: " ); Serial.println(dimmerVal); send(msg_S_DIMMER.set(dimmerVal)); } #endifFinally the incoming message section.
void receive(const MyMessage &message) {
... code lines snipped ...
	#ifdef ID_S_DIMMER
    case V_DIMMER:
          if ((message.getInt()<0)||(message.getInt()>100)) {
            Serial.println( "V_DIMMER data invalid (should be 0..100)" );
            break;
          }
          dimmerVal= message.getInt();
          Serial.print("Incoming change for ID_S_DIMMER:");
          Serial.print(message.sensor);
          Serial.print(", New status: ");
          Serial.println(message.getInt());
          dimmer();// temp ack
    break;
    #endif
... code lines snipped ...
The temp ack mean I'm just forcing the sensor to report back the new value to the controller.
And this is basically what it takes to combine sensors in the MySensors library.
One node can have many sensors and each sensor can receive any number or combinations of messages.
So for the dimmer example
#define ID_S_DIMMER            5
... code lines snipped ...
#ifdef ID_S_DIMMER
  MyMessage msg_S_DIMMER(ID_S_DIMMER,V_DIMMER);
  int dimmerVal=100;
#endif
... code lines snipped ...

void presentation()  {
... code lines snipped ...
#ifdef ID_S_DIMMER
	Serial.println("  S_DIMMER");
    present(ID_S_DIMMER,S_DIMMER,"Living room dimmer");
    wait(SHORT_WAIT);
#endif
... code lines snipped ...
There is nothing stoping me to add another message type to the dimmer. So for example if the dimmer does have an on/off button I could add
MyMessage msg_S_DIMMER_BUTTON(ID_S_DIMMER,V_STATUS)Note that your controller might not be expecting all this freedom of combinations of messages.
So although I could report a temperature on a dimmer sensor using
MyMessage msg_S_DIMMER_BUTTON(ID_S_DIMMER,V_TEMP)Your controller might not like it.
As always feddback is welcome
Cheers