Skip to content
  • MySensors
  • OpenHardware.io
  • Categories
  • Recent
  • Tags
  • Popular
Skins
  • Light
  • Brite
  • Cerulean
  • Cosmo
  • Flatly
  • Journal
  • Litera
  • Lumen
  • Lux
  • Materia
  • Minty
  • Morph
  • Pulse
  • Sandstone
  • Simplex
  • Sketchy
  • Spacelab
  • United
  • Yeti
  • Zephyr
  • Dark
  • Cyborg
  • Darkly
  • Quartz
  • Slate
  • Solar
  • Superhero
  • Vapor

  • Default (No Skin)
  • No Skin
Collapse
Brand Logo
  1. Home
  2. OpenHardware.io
  3. 💬 Easy/Newbie PCB for MySensors

💬 Easy/Newbie PCB for MySensors

Scheduled Pinned Locked Moved OpenHardware.io
mysensorsbatteryeasynewbiepcbmysx
716 Posts 111 Posters 305.9k Views 93 Watching
  • Oldest to Newest
  • Newest to Oldest
  • Most Votes
Reply
  • Reply as topic
Log in to reply
This topic has been deleted. Only users with topic management privileges can see it.
  • hekH Offline
    hekH Offline
    hek
    Admin
    wrote on last edited by
    #620

    The documentation at the time of the created revision is actually included in the zip as README.md (markdown).
    You should be able to view the file properly formatted in an md-editor or online using I.e.. https://dillinger.io/

    Uploaded images was never included in the revision dumps unfortunately.

    1 Reply Last reply
    1
    • D Offline
      D Offline
      dakipro
      wrote on last edited by
      #621

      Ooops, my bad then :( I was pretty sure I checked readme.md file, but apparently I got confused.
      Thanks a million!

      C: OpenHAB2 with node-red on linux laptop
      GW: Arduino Nano - W5100 Ethernet, Nrf24l01+ 2,4Ghz mqtt
      GW: Arduino Mega, RFLink 433Mhz

      1 Reply Last reply
      0
      • A Offline
        A Offline
        APL2017
        wrote on last edited by
        #622

        I am also looking for documentation for Rev. 9 that I purchased. The link with revisions that was provided: https://www.openhardware.io/view/4/EasyNewbie-PCB-for-MySensors#tabs-revisions
        lists revisions 1-7, but not 9. All I need is readable schematic and PCB layout in PDF. Thanks.

        mfalkviddM 1 Reply Last reply
        0
        • A APL2017

          I am also looking for documentation for Rev. 9 that I purchased. The link with revisions that was provided: https://www.openhardware.io/view/4/EasyNewbie-PCB-for-MySensors#tabs-revisions
          lists revisions 1-7, but not 9. All I need is readable schematic and PCB layout in PDF. Thanks.

          mfalkviddM Online
          mfalkviddM Online
          mfalkvidd
          Mod
          wrote on last edited by
          #623

          @apl2017 I don't know where the revision numbering comes from, but I believe the rev9 you are talking about is called rev5 on the revisions tab.

          Rev 10 was created 2018-06-04. That date matches with rev6 on the revisions tab.

          Perhaps @sundberg84 knows why there are two sets of revision numbers?

          1 Reply Last reply
          0
          • A Offline
            A Offline
            APL2017
            wrote on last edited by
            #624

            What software was used to develop this board? My latest KiCad does not read schematic from Rev. 5 ZIP file. All I need is a simple PDF...

            sundberg84S 1 Reply Last reply
            0
            • A APL2017

              What software was used to develop this board? My latest KiCad does not read schematic from Rev. 5 ZIP file. All I need is a simple PDF...

              sundberg84S Offline
              sundberg84S Offline
              sundberg84
              Hardware Contributor
              wrote on last edited by sundberg84
              #625

              @apl2017 - Rev 10 = Kicad, but all below is Eagles.

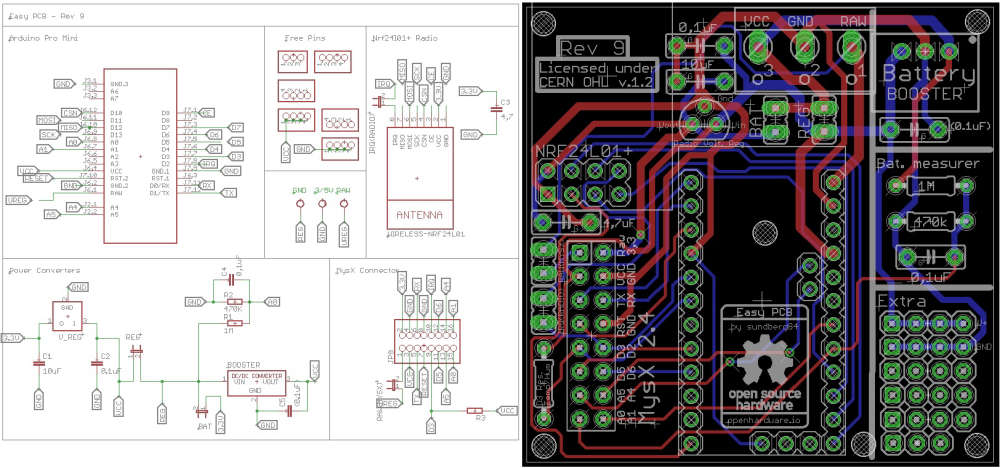
              This is Rev 9, Nrf24l01+

              0_1546847202029_Rev9 Schem.jpg

              @mfalkvidd - the rev tab in openhardware is the revision for the manufacturer. This doesnt match, because it starts at 0 and ticks up. If you have a board with rev 1 but make a small change without updating the revision number but still wants to upgrade it to the pcb manufacturer you need a new revision for them... so thats causes the confusion. But i think @hek named it M.Rev (Manufacturer revision) to try to keep them apart.

              Controller: Proxmox VM - Home Assistant
              MySensors GW: Arduino Uno - W5100 Ethernet, Gw Shield Nrf24l01+ 2,4Ghz
              MySensors GW: Arduino Uno - Gw Shield RFM69, 433mhz
              RFLink GW - Arduino Mega + RFLink Shield, 433mhz

              1 Reply Last reply
              1
              • A Offline
                A Offline
                APL2017
                wrote on last edited by
                #626

                Sorry to bother you again (3rd time), still waiting for readable PDF of Rev. 9 schematic and board layout. Thank you

                sundberg84S 1 Reply Last reply
                0
                • A APL2017

                  Sorry to bother you again (3rd time), still waiting for readable PDF of Rev. 9 schematic and board layout. Thank you

                  sundberg84S Offline
                  sundberg84S Offline
                  sundberg84
                  Hardware Contributor
                  wrote on last edited by sundberg84
                  #627

                  @apl2017 - why pdf? The image above is just as good? It wont present any other info?
                  The reason why I ask is that I dont have eagles installed anymore... so its a bit of hassle for me.

                  Controller: Proxmox VM - Home Assistant
                  MySensors GW: Arduino Uno - W5100 Ethernet, Gw Shield Nrf24l01+ 2,4Ghz
                  MySensors GW: Arduino Uno - Gw Shield RFM69, 433mhz
                  RFLink GW - Arduino Mega + RFLink Shield, 433mhz

                  1 Reply Last reply
                  1
                  • A Offline
                    A Offline
                    APL2017
                    wrote on last edited by
                    #628

                    sundberg84 Don't bother, I went through the hassle, downloaded Eagle and created readable PDF

                    D 1 Reply Last reply
                    2
                    • A APL2017

                      sundberg84 Don't bother, I went through the hassle, downloaded Eagle and created readable PDF

                      D Offline
                      D Offline
                      dakipro
                      wrote on last edited by
                      #629

                      @apl2017 care to share? :)

                      C: OpenHAB2 with node-red on linux laptop
                      GW: Arduino Nano - W5100 Ethernet, Nrf24l01+ 2,4Ghz mqtt
                      GW: Arduino Mega, RFLink 433Mhz

                      1 Reply Last reply
                      0
                      • E Offline
                        E Offline
                        ElCheekytico
                        wrote on last edited by
                        #630

                        Hey, @sundberg84 , I am trying to order the rfm69 version from ITEAD and their M.Rev1 file I downloaded looks to be your v9. Can you upload the v10 to them so I may place an order?

                        sundberg84S 1 Reply Last reply
                        0
                        • P Offline
                          P Offline
                          Pierre1410
                          wrote on last edited by
                          #631

                          Hello, i have built my first sensor based on your PCB. I am of course in learning mode so it refuses to work so far. it is motion detector. I suspect a problem on the radio nrf24 but does not know how to monitor the node with Arduino IDE serial monitor. If i connect the board to the USB the radio is not powered (built the node on battery). and if i connect the battery i have no access to serial monitor. I am afraid to connect both the USB and the batteries and burn the all thing...
                          so far i know radio receives power/ PIR receives 3.3 Volts (have configured the PIR to 3.3)/ arduino mini pro led comes on with battery connected.
                          Any advice would be really welcome.

                          1 Reply Last reply
                          0
                          • S Offline
                            S Offline
                            Stephen205
                            wrote on last edited by Stephen205
                            #632

                            The radio is only powered by the battery, the battery must be connected to test. Connect both the usb (set to 3.3v) and the battery, no damage will be caused by this.

                            1 Reply Last reply
                            1
                            • P Offline
                              P Offline
                              Pierre1410
                              wrote on last edited by
                              #633

                              Thanks Stephen. connected both and i can now see what is going on :-)

                              sundberg84S 1 Reply Last reply
                              1
                              • E ElCheekytico

                                Hey, @sundberg84 , I am trying to order the rfm69 version from ITEAD and their M.Rev1 file I downloaded looks to be your v9. Can you upload the v10 to them so I may place an order?

                                sundberg84S Offline
                                sundberg84S Offline
                                sundberg84
                                Hardware Contributor
                                wrote on last edited by
                                #634

                                @ElCheekytico - I dont know why they wont update to rev 10. I have uploaded the new revision to openhardware... nothing else I can do, sorry.

                                Controller: Proxmox VM - Home Assistant
                                MySensors GW: Arduino Uno - W5100 Ethernet, Gw Shield Nrf24l01+ 2,4Ghz
                                MySensors GW: Arduino Uno - Gw Shield RFM69, 433mhz
                                RFLink GW - Arduino Mega + RFLink Shield, 433mhz

                                1 Reply Last reply
                                0
                                • P Pierre1410

                                  Thanks Stephen. connected both and i can now see what is going on :-)

                                  sundberg84S Offline
                                  sundberg84S Offline
                                  sundberg84
                                  Hardware Contributor
                                  wrote on last edited by
                                  #635

                                  @pierre1410 - I would suggest you connect the battery, and then the usb/ftdi cable, but only GND, TX and RX fro the usb connection. This will have the node running on the batteries VCC and get you closer to the real deal. Using VCC from the usb adapter might be higher VCC than the batteries, and in worst case scenario it works great with that connected but not when you deploy and only use battery power.

                                  Controller: Proxmox VM - Home Assistant
                                  MySensors GW: Arduino Uno - W5100 Ethernet, Gw Shield Nrf24l01+ 2,4Ghz
                                  MySensors GW: Arduino Uno - Gw Shield RFM69, 433mhz
                                  RFLink GW - Arduino Mega + RFLink Shield, 433mhz

                                  P 1 Reply Last reply
                                  1
                                  • sundberg84S sundberg84

                                    @pierre1410 - I would suggest you connect the battery, and then the usb/ftdi cable, but only GND, TX and RX fro the usb connection. This will have the node running on the batteries VCC and get you closer to the real deal. Using VCC from the usb adapter might be higher VCC than the batteries, and in worst case scenario it works great with that connected but not when you deploy and only use battery power.

                                    P Offline
                                    P Offline
                                    Pierre1410
                                    wrote on last edited by
                                    #636

                                    @sundberg84 that is exactly what i experienced. thanks for the tip. struggling in fact to have my PIR sensor running on 3.3V. when i connect to the pin on the right of the board (3rd from top).. Arduino IDE serial terminal does not outcome any coherent information.

                                    sundberg84S 1 Reply Last reply
                                    0
                                    • P Pierre1410

                                      @sundberg84 that is exactly what i experienced. thanks for the tip. struggling in fact to have my PIR sensor running on 3.3V. when i connect to the pin on the right of the board (3rd from top).. Arduino IDE serial terminal does not outcome any coherent information.

                                      sundberg84S Offline
                                      sundberg84S Offline
                                      sundberg84
                                      Hardware Contributor
                                      wrote on last edited by
                                      #637

                                      @pierre1410 ok - well not to get your hopes down but a motion detector on batteries are one of the harder builds. If you are using a booster with the batteries it's harder due to false triggers from the booster noice. Also I believe the quality of your motion detector module determine if it's possible..I've had detectors running fine on 3.3v but several which didn't.

                                      Controller: Proxmox VM - Home Assistant
                                      MySensors GW: Arduino Uno - W5100 Ethernet, Gw Shield Nrf24l01+ 2,4Ghz
                                      MySensors GW: Arduino Uno - Gw Shield RFM69, 433mhz
                                      RFLink GW - Arduino Mega + RFLink Shield, 433mhz

                                      1 Reply Last reply
                                      0
                                      • P Offline
                                        P Offline
                                        Pierre1410
                                        wrote on last edited by
                                        #638

                                        Hello, Is there a way to solder a DC-DC booster 3.3V to 5V directly onto the Easy PCB or should it be connected separately to power a PIR for instance? and would that really prevent using 2xAA batteries to power the all thing? have tried to step down the PIR to work at 3.3V but it was not conclusive. Thanks a lot.

                                        sundberg84S 1 Reply Last reply
                                        0
                                        • P Pierre1410

                                          Hello, Is there a way to solder a DC-DC booster 3.3V to 5V directly onto the Easy PCB or should it be connected separately to power a PIR for instance? and would that really prevent using 2xAA batteries to power the all thing? have tried to step down the PIR to work at 3.3V but it was not conclusive. Thanks a lot.

                                          sundberg84S Offline
                                          sundberg84S Offline
                                          sundberg84
                                          Hardware Contributor
                                          wrote on last edited by
                                          #639

                                          @pierre1410 - you can always use the prototyping area for a 3.3 to 5v booster but... booster + PIR might cause false triggers, so choose your booster wisely.

                                          Controller: Proxmox VM - Home Assistant
                                          MySensors GW: Arduino Uno - W5100 Ethernet, Gw Shield Nrf24l01+ 2,4Ghz
                                          MySensors GW: Arduino Uno - Gw Shield RFM69, 433mhz
                                          RFLink GW - Arduino Mega + RFLink Shield, 433mhz

                                          1 Reply Last reply
                                          0
                                          Reply
                                          • Reply as topic
                                          Log in to reply
                                          • Oldest to Newest
                                          • Newest to Oldest
                                          • Most Votes


                                          10

                                          Online

                                          11.7k

                                          Users

                                          11.2k

                                          Topics

                                          113.0k

                                          Posts


                                          Copyright 2019 TBD   |   Forum Guidelines   |   Privacy Policy   |   Terms of Service
                                          • Login

                                          • Don't have an account? Register

                                          • Login or register to search.
                                          • First post
                                            Last post
                                          0
                                          • MySensors
                                          • OpenHardware.io
                                          • Categories
                                          • Recent
                                          • Tags
                                          • Popular