My 2AA battery sensor
-
Don't know if it's too obviuos but I haven't seen many basic designs so I thought I'd share mine. I have 10+ of these with runtime 6-8 months with very good results.
Worth to note is that this "basic" design is based on a normal 3.3V 8MHz Arduino Pro Mini with just the voltage regulator and power led removed. The other common low-power tweak with new bootloader, decreased clock speed and disabled brown out voltage detection is very nice but not a part of this design because I think it is one step beyond "basic". So keep it simple for now... (Or look here.)
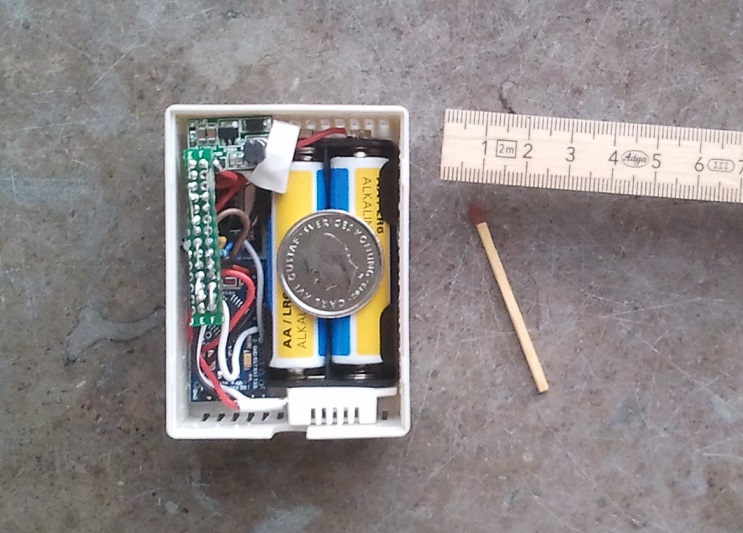
It's a normal battery powered slim one piece unit with battery monitoring and room for small sensors inside. In the picture a DHT22 has been squeezed but with better preparations there'll be more useable space.
Some benefits I noticed with this design is:- Easy access to the pro mini serial pins, the reset button and to view the pin 13 led.
- Easy remove/replace batteries.
- Easy in/out of components since the just attached in place with their firm-flexible wires.
- The "keyhole" in the cap is still available so the unit easily can hang on the wall.
- The radio is located far from the wall-side and with reasonable small risk of getting in the shadow behind the batteries.
- Small but still good battery life using (the most?) common standard batteries.
- (I'd thought I'd put good waf here but she said the box color was "too gray" )
The cost with building this sensor is that it requires some soldering and small/short wires work. (I prefer small/medium size "bread board type" wires to this.). I unsoldered the radio module pin headers and trimmed the ones on the step-up. After building 10 of these in 3 batches I've focused on productivity and less on the product. So I'm aware of improvements and maybe I'll introduce some in my next ongoing batch of 10.
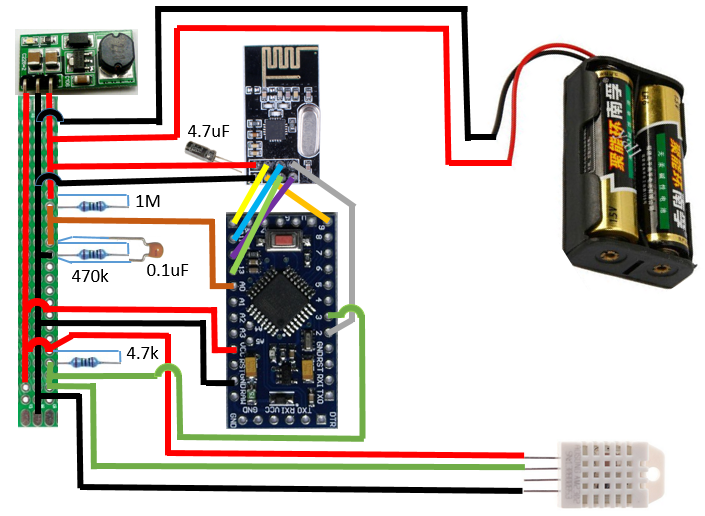
The 3.3V stepup-supply feeds the arduino and sensors that requires 3.3V to work. The radio is powered straight from the batteries because it's high qauality demand on its supply and that it's good with a voltage all the way down to 1.9V. I still use the 4,7uF capacitor on radio as precaution.
Since its battery and low power is wanted, I always remove the voltage regulator and power led from the Arduino pro mini and the power led from the step-up regulator (or the series resistor).
I set my power monitoring to report linear with 1.9V as 0% (Vmin_radio) and 3.3V as 100% (instead of 3.44 just to increase resolution). Power consumption looks very good. I usually use normal or high frequency update in my nodes (30s - 3min) and I've tried with really poor used batteries but all my batterylevels in datamine (Vera-plugin) are looking good. I've measured ~1mAac/0.1mAdc current draw in sleep mode. Considering the results from reality with my nodes with longer sleep durations, the mAdc value is closest to the truth.
More photos of a complete node to be found here below.
Main material (note that some links are for >1pcs). All except battery holder are from MySensors store.
- 27x54x75mm Case
- 2AA Battery holder (don't mind it's actually another on this particular image.)
- Arduino Pro Mini 3.3V 8Mhz
- Radio NRF24L01+
- 3.3V stepup regulator (remove power led and DO NOT FEED THE RADIO WITH THIS, just arduino and sensors.
- Prototype PCB (sliced by 2 row pieces, but I suggest to make 3 rows instead to better fit with step up and more space is easier to work with when soldering..)
- Sensors eg DHT, DS18B20s etc
- Wires. I used these, but I'm sure any wire good for breadboarding will do.
Edit:
I forgot to list the 2 resistors and 1 capacitor for battery monitoring as well as the sensor dependent 4k7 pullup resistor (if used). The battery monitoring circuit is under the 2-row proto-pcb and the pullup under the arduino. See the build site and store for more info. With a 3-row proto-pcb I'd place the pullup here as well.
The 4.7uF cap for radio is of course straight on top between vcc and gnd, but a little above so wires can be soldered here too.
I can also mention that I find a good order for making these are:- Glue the battery holder to the case "bottom".
- a. Pre-assemble arduino with radio soldering as short wires as possible. And attach all (~30mm) wires leaving these two.
b. Pre-a. the proto-pcb with all its components and with the step-up regulator.
c. Pre-a. sensor(s) that will be used. - Connect all things made in the previous step.
- Connect battery when needed but don't put it all in to case until software has been loaded and first tests been done.
As always; if unsure or in trouble; test individual parts before putting them together.
Edit 2:
Here's the layout with connections. Since the schematic is simple and covered elsewhere at the Build site I found it more informative to show the design as a layout with wiring.
Edit 3:
Some example sketches are found further below in this thread. E.g.
http://forum.mysensors.org/topic/486/my-2aa-battery-sensor/37Then the usual ads linked from the Bom above:
-
@Tibus Tests and forum experience shows that the radio is too noise or ripple sensitive and will work with very poor performance. Relatively large low-ESR (expensive) capacitor can compensate for this, but I prefer to simply bypass the stepup to the radio. If you're not aware of this issue you'll look forward to a lot of frustration with your setup. Look here for some more info.
-
I updated the first post regarding sleep mode power consumption. Current draw <0.1mA was too optimistic. My Fluke 87 detected mostly AC current. Beginners mistake and really embarrassing. I excuse me with that I do this hobby between 1 an 2 am.
Edit: This post should have been more elaborate. Please read further below for more info. To sum up - it's pretty good after all.
-
Hi @m26872
The radio is powered straight from the batteries because it's high qauality demand on its supply and that it's good with a voltage all the way down to 1.9V. I still use the 4,7uF capacitor on radio as precaution.
So straigh the setup look like this ? battery > stablize regulator > radio ?
Since its battery and low power is wanted, I always remove the voltage regulator and power led from the Arduino pro mini and the power led from the step-up regulator (or the series resistor).
Do you mind to share the how to?
I set my power monitoring to report linear with 1.9V as 0% (Vmin_radio) and 3.3V as 100% (instead of 3.44 just to increase resolution). Power consumption looks good.
Which method do you use? voltage divider or the using internal vRef ?
Thanks
@funky81 said:
Hi @m26872
The radio is powered straight from the batteries because it's high qauality demand on its supply and that it's good with a voltage all the way down to 1.9V. I still use the 4,7uF capacitor on radio as precaution.
So straigh the setup look like this ? battery > stablize regulator > radio ?
No. There are two parallell supplies from the same battery. One is simple battery->radio and the other one battery->step-up-regulator->arduino (and sensors).
Since its battery and low power is wanted, I always remove the voltage regulator and power led from the Arduino pro mini and the power led from the step-up regulator (or the series resistor).
Do you mind to share the how to?
There are descriptions on the build site. Instead of cutting the traces I just unsolder the regulator (the black piece with 5 legs) and the red power led (usually right next to it). If you're planning to reuse any, it's probably better to cut traces or unsolder series resistors. For the step-up in particular it's easy to see which resistor the led connects to.
I set my power monitoring to report linear with 1.9V as 0% (Vmin_radio) and 3.3V as 100% (instead of 3.44 just to increase resolution). Power consumption looks good.
Which method do you use? voltage divider or the using internal vRef ?
Because of the step-up regulator the internal vRef-method isn't possible. I use voltage divider from build site and the code I posted earlier here. But for 2AAs use VMIN=1.9, VMAX= 3.3V and Volts-per-bit = 0.003363075; Vmin and Vmax you can adjust if you want.
Thanks
You're welcome.
Edit: Logical level difference between radio and arduino is outside specification when radion operates at 1.9V and arduino at 3.3V, but from my own tests and experiemce 1.9 is working ok as a very low limit. A battery alarm should of course be set above 0% anyhow.
-
As a general comment I'd like to complete the cross reference to this thread. It says why you should avoid the china step-up converter due to its high quiescent power draw (~ 1mA). If space is available e.g. a 4AA-supply via APM inbuilt regulator can give <25% sleep mode power consumption.
Edit: After a few months testing, I'm reassessing the efficiency of the China step-up. See below in this thread.
-
@m26872 said:
runtime 1-4 weeks
So this gives a runtime of 1-4 weeks? I am just starting out and wanted to confirm this. There are other posts claiming 6 months but I suspect that is in theory and the reality is 1-4 as you have experienced. Also, are any of your sensors interrupt driven that only wake up on outside feedback such as door switch? - I wonder if that will have more battery life.
VeraLite UI5
Arduino UNO as Gateway (ENC28J60 Ethernet)
Arduino Mini Pro as sensors -
@m26872 said:
runtime 1-4 weeks
So this gives a runtime of 1-4 weeks? I am just starting out and wanted to confirm this. There are other posts claiming 6 months but I suspect that is in theory and the reality is 1-4 as you have experienced. Also, are any of your sensors interrupt driven that only wake up on outside feedback such as door switch? - I wonder if that will have more battery life.
@MatrixIII No no, that was for how long I have had my system running when I wrote the first post in this thread. The battery time in practice highly depends on how much the node sleeps. Always on and always asleep will give you the extreme. I'd say 6 months is very reasonable. I'll see if I can show some examples....
-
Ok here are some of my logged battery levels. Note that some nodes had been running before logging was turned on and that I also like to drain already used batteries. I'll leave to the reader to extrapolate the trends and estimate life time, but I suspect that the last 20% shouldn't be taken into account. First exampel shows briefly why;
First one odd but illustrating example where I used two rechargeable 700mAh AAAs with one DS18B20, varying (very) temp and only 30s sleep. Any nodes transmission activity will temporary produce a lower voltage reading and make the curve look noisy. This band grows thick near the end of life and these low spikes are the ones to keep an eye on. Apart from that we see the typical "tilted S"-shaped battery discharge curve.
-
Next one is a rather nervous DHT22 with 30s sleep and supplied by two (initially fresh) normal alkaline AAs.
-
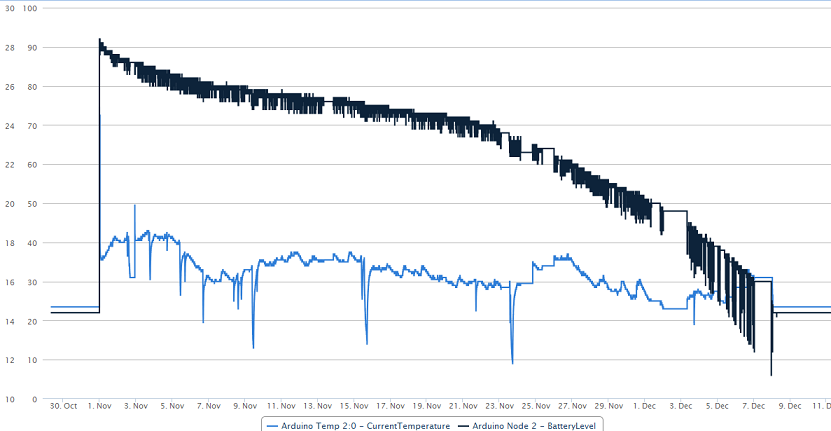
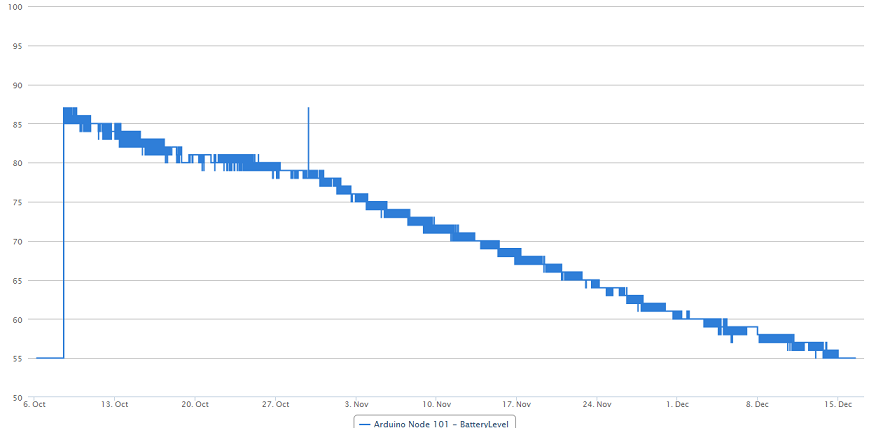
This one has two DS18B20s, 30s sleep. The sensors are attached to a central heating pipe. The heating system was turned on 1 Nov which is visible as new more battery consuming trend.
-
Here is the interrupt-driven (front) door switch sensor as requested. Unfortunately not with fresh AAs. Since it's almost always sleeping I think the power draw is surprisingly high. Explanation is of course the 1mA to the china step-up.
-
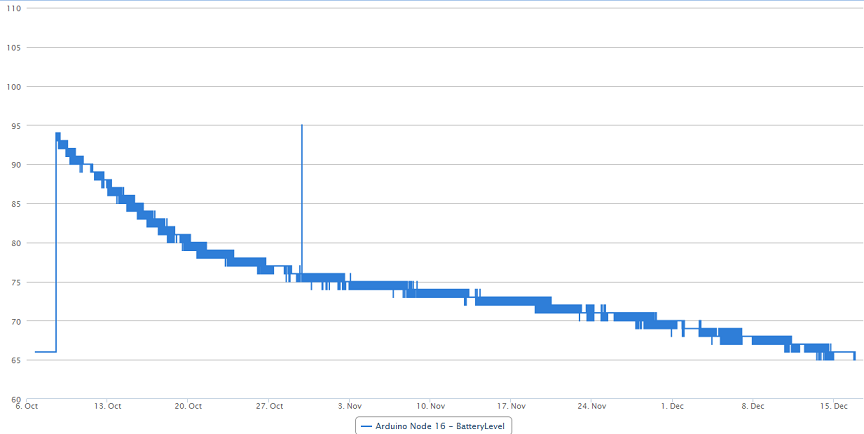
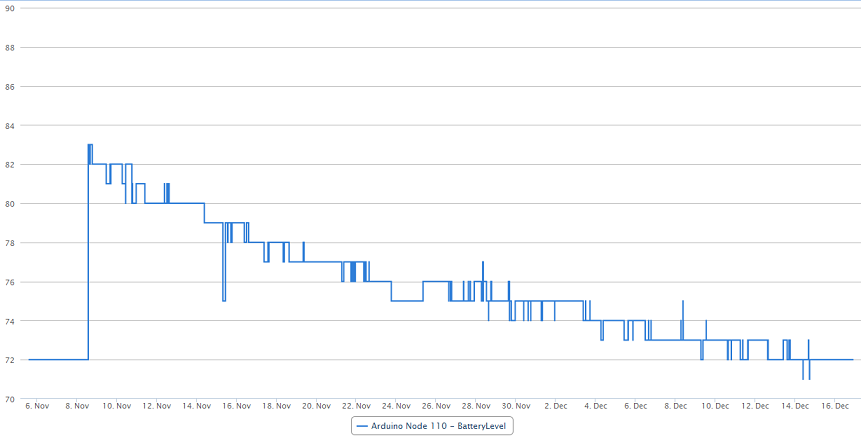
Finally are there two nodes started up at the same time, equally equipped with one BMP180 and one DHT22 each. Sleep time are more normal 15+5min. (15+5 because I now have learned to filter the DHT-readings and I do this here by measure a value 5 min before the real processing for avaraging purpose and to reduce risk of invalid readings.)
I'm confident this will survive 6 months since the decrease rate is 5% per month and it's still in the beginning of the "tilted S". The upper curve is with fresh batteries, the lower with used.

-
Very good analysis. I have just bought two lipo cells and a charger and a bunch of 9V battery cables. Sometime next year I hope to get the time to evaluate their use for power source to the sensors. Then I will also test my slightly more conservative battery level circuit described here.
-
Thanks.
I thought someone would ask why I expect a 3000mAh battery to supply 1mA for 6 months ?
-
Thanks.
I thought someone would ask why I expect a 3000mAh battery to supply 1mA for 6 months ?
@m26872 said:
Thanks.
I thought someone would ask why I expect a 3000mAh battery to supply 1mA for 6 months ?
Nice Work!! Oh and with the mods you have in place, I don't think you should have much problem getting to 6 months.. :-)
-
Thanks.
I thought someone would ask why I expect a 3000mAh battery to supply 1mA for 6 months ?
-
@m26872 said:
I thought someone would ask why I expect a 3000mAh battery to supply 1mA for 6 months ?
Ok, I'll be the straight man here: why do you expect a 3000mAh battery to supply 1mA for around 4400 hours?
@Zeph Thank you.
Because it's 90% mAac (from dc source) and I think the china step-up isn't really that crappy after all. Energizing-deenergizing a a coil with no load will look like this without any real power produced. Of course there are loss power and wear on battery etc, but not compareable to 1mAdc. Deeper investigation to this should be the subject of a new thread.