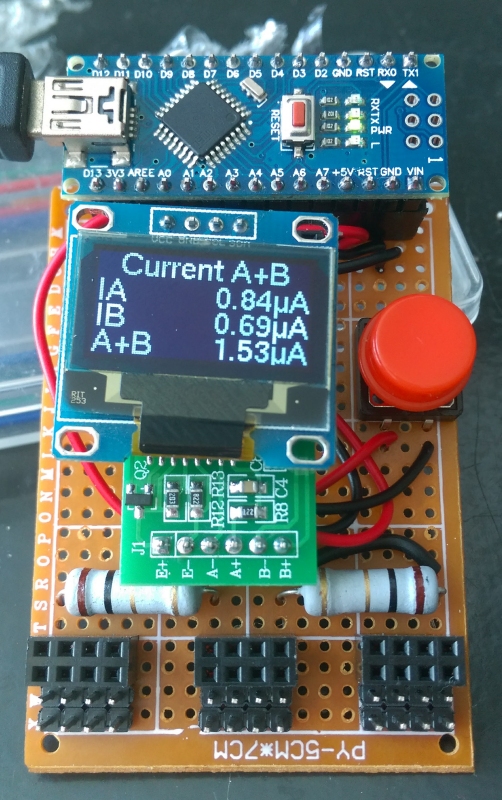
💬 Micro (nano) ampere meter (double)
-
Hello @AWI,
I made one, but I have a problem with the refresh rate.
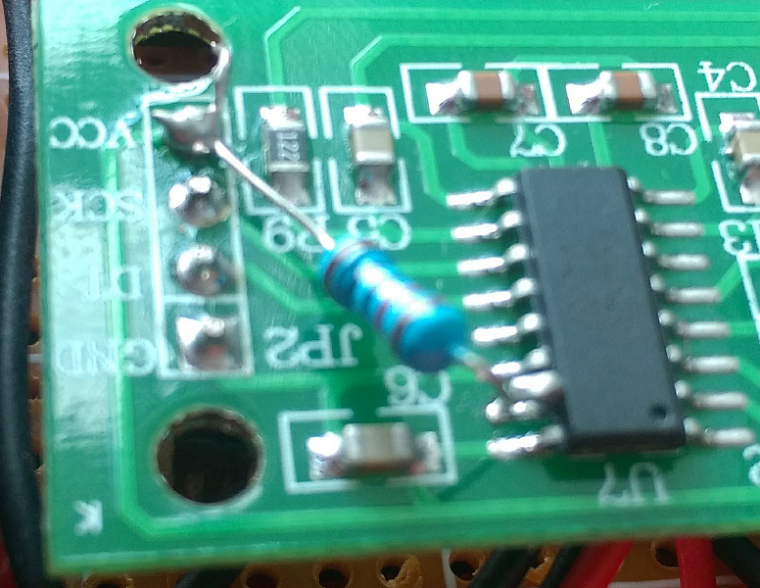
As I have no jumper at the back to set refresh rate like on HX711 breakout board, I lifted the pin 15 (RATE) on my breakout board to connect to VCC using a 10k resistor.
So now it's sampling at 80Hz, but the refresh rate is still a bit slow and the reactivity of the button is really bad. Despite setting only 2s to switch to next channel I have to keep the button pressed for several seconds more for the screen to change. And I need something like 2s press to trigger the offset setting.
Do you have the same behavior or do I have to fix some settings in the code (didn't look into the details at the moment...) ?Thank you for sharing this great little project !
@Nca78 Looks good, Hard to say why the response is slow. There is quite some averaging in taking readings from the ADC and I tried to find a right balance between accuracy and response time/ button behaviour. For me it is not spot on but very usable.
You could try to remove some of the averaging to get a better refresh rate. (i.e. the "32" to "8") -
Wow, those HX711 modules really are inexpensive. As little as 48 cents each on Aliexpress.
http://www.aliexpress.com/store/product/HX711-Module-Weighing-Sensor-Dedicated-AD-Module-For-Arduino-Free-Shipping-50PCS-LOT/716258_32228651474.html?spm=2114.12010615.0.0.MWbQV9
I just ordered some from Amazon for about triple that price, but, meh, they'll be here this Sunday, not a month or two from now, so I'm cool with that. I'd like to use them to measure the rate of charge on some solar nodes that I'm in the process of figuring out how to make. Not sure, but at a mere 48 cents each, I might even bake them into the final design instead of being forced into a much longer measurement interval that the 10 bits of ADC on the ATmega328P would require.So, thanks for this great project write-up! It tipped me off to go look into it. And while I'm at it, I may as well make this project too. :)
[Oops. I cancelled my Amazon order, as I just noticed that I should have ordered the shielded version, which Amazon doesn't appear to have. ]
-
@Nca78 Looks good, Hard to say why the response is slow. There is quite some averaging in taking readings from the ADC and I tried to find a right balance between accuracy and response time/ button behaviour. For me it is not spot on but very usable.
You could try to remove some of the averaging to get a better refresh rate. (i.e. the "32" to "8")@AWI said in 💬 Micro (nano) ampere meter (double):
@Nca78 Looks good, Hard to say why the response is slow. There is quite some averaging in taking readings from the ADC and I tried to find a right balance between accuracy and response time/ button behaviour. For me it is not spot on but very usable.
You could try to remove some of the averaging to get a better refresh rate. (i.e. the "32" to "8")Missed your answer when you posted it. Thank you for the suggestion, I will try to reduce the number of samples and hopefully I will find a good balance between reactivity and precision.
Else I will use 2 touch buttons in toggle mode so it will never miss a command. -
OK, I will give the answer by myself ;-) The common side of the shunt's should be connected to A+ / B+ that means together with the common side of the voltage divider for the offset.
Next question, is the any way to measure the voltage of the connected note ?- I know that there shoud be not a common GND - possibe do use Diodes? -
Hello @AWI,
I made one, but I have a problem with the refresh rate.
As I have no jumper at the back to set refresh rate like on HX711 breakout board, I lifted the pin 15 (RATE) on my breakout board to connect to VCC using a 10k resistor.
So now it's sampling at 80Hz, but the refresh rate is still a bit slow and the reactivity of the button is really bad. Despite setting only 2s to switch to next channel I have to keep the button pressed for several seconds more for the screen to change. And I need something like 2s press to trigger the offset setting.
Do you have the same behavior or do I have to fix some settings in the code (didn't look into the details at the moment...) ?Thank you for sharing this great little project !
@Nca78 , my HX711 board looks like yours. I'm a bit confused on how to connect the J1 pins to the load / power. Can you share how did you connected it? Thx!
Home Assistant / Vera Plus UI7
ESP8266 GW + mySensors 2.3.2
Alexa / Google Home -
@Nca78 , my HX711 board looks like yours. I'm a bit confused on how to connect the J1 pins to the load / power. Can you share how did you connected it? Thx!
@rvendrame sure, I'll do it tomorrow morning as I cannot do it right now. In case I forget, don't hesitate to ring me ;)
-
@Nca78 , my HX711 board looks like yours. I'm a bit confused on how to connect the J1 pins to the load / power. Can you share how did you connected it? Thx!
@rvendrame said in 💬 Micro (nano) ampere meter (double):
@Nca78 , my HX711 board looks like yours. I'm a bit confused on how to connect the J1 pins to the load / power. Can you share how did you connected it? Thx!
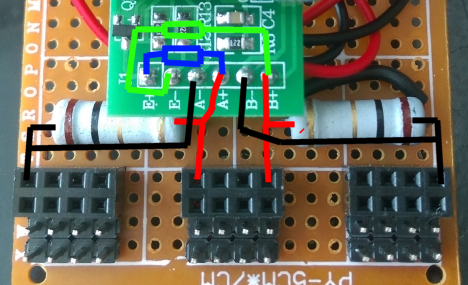
Soldering is a bit messy and not helping much to understand, so I did a (gorgeous) drawing. I think I'll frame that in my living room :D
And in case you want to increase the data rate
-
@rvendrame said in 💬 Micro (nano) ampere meter (double):
@Nca78 , my HX711 board looks like yours. I'm a bit confused on how to connect the J1 pins to the load / power. Can you share how did you connected it? Thx!
Soldering is a bit messy and not helping much to understand, so I did a (gorgeous) drawing. I think I'll frame that in my living room :D
And in case you want to increase the data rate
@Nca78 , perfect, thank you! I was right with the two 1K resistors, but I connected the 1R 1W resistors both to E+, instead A+ and B+ separately...
One more question, how did you connect the load to be measured? Sorry for dumb question, but this is the first time I build such type of device...
-
@rvendrame said in 💬 Micro (nano) ampere meter (double):
@Nca78 , my HX711 board looks like yours. I'm a bit confused on how to connect the J1 pins to the load / power. Can you share how did you connected it? Thx!
Soldering is a bit messy and not helping much to understand, so I did a (gorgeous) drawing. I think I'll frame that in my living room :D
And in case you want to increase the data rate
@Nca78 , updating: I figured out how to connect the load, so I'm done with it (including calibration).
I changed the original code a bit, as I also wanted it a bit more responsive. I didn't lift pin 15 as you did.
BTW, what bootloader + clock are you using? Perhaps that could influence? I'm using MYSBootloaderV13pre.hex, 8Mhz internal clock...
Changes:
- Less average reading per cycle (from 32 to 4 ) --> Didn't notice significant changes in measurements.
- More accumulated avg reads ( from 16 to 32 ) --> Just to keep a less volatile avg numbers in display.
- Change the logic of short/long press. short press (~1s) = change mode, long press (~3s) = Offset.
In case you want to give it a try...
// uA meter with HX711
/*
 PROJECT: MySensors - uA meter with HX711
 PROGRAMMER: AWI
 DATE: 20170414/ last update:
 FILE: AWI_uA_meter.ino
 LICENSE: Public domain

 Performance improvements: rvendrame

Hardware: tbd Nano ATmega328p board w/ NRF24l01

Special:
	program with Arduino Nano

SUMMARY:
	Measures mV accross a shunt resistor ~ uA - channel A
	Measures mV on channel B
	Modes:
		- default: measure uV in full resolution (Stable reading only for 0.1uV)
		- other:
			A: channel A: default, amplification 128 - div 500: 0.1uV stable,  range +/- 20mV, (1ohm +/- 20mA, res 100 nA)
			B: channel B: amplification 32 - div 125: 100nA stable, range +/- 80mV,  (10 ohm +/- 8 mA, res 10 nA)
			AB: both channels:
		- uA - calibration: depending on the actual shunt:
			0.47 ohm -> 1 uV ~ 2uA, range -40 mA - 40 mA
			1 ohm -> 1 uV = 1uA, range -20 mA - 20 mA
			10 ohm -> 1 uv = 0.1uA
		- mV - calibration, depend on amplification
	Button switch:
		- Short press, reset current channel to offset 0 (keep terminals shorted, no need with uA ;-)
		- Long press, change channel A (uA) / B(uA)/ A & B (uA)

	Hx711 24bit weight scale sensor
		- Noise and temperature sensitive (x bit effective)
	OLED 128x64 display

Remarks:
	Size is large as result of font library for display
update:

*/

#include <U8g2lib.h>									// U8glib for OLED display
#include <Wire.h> 										// I2C
#include <Button.h>										// https://github.com/JChristensen/Button
#include "HX711.h"										// local ADC lib

const double calibrationFactorA = 599.18f ;				// calibration for channel A: set to 1.0 for known current and divide
const double calibrationFactorB = 149.76f ;				// calibration for channel B: set to 1.0 for known current and divide
long offsetChannelA = 0 ;								// channel offsets for A and B (drifts) are calibrated at startup and on command.
long offsetChannelB = 0 ;

const uint8_t HX711_dout = A1 ;							// HX711 data out pin
const uint8_t HX711_sck = A0 ;							// HX711 serial clock
const uint8_t buttonPin = A2 ;							// connects the button to select function and reset offset
//const unsigned long longPress = 1500UL ;				//	- long press set reference temperature - in ms												// 	- when alarm, short press resets alarm
Button myBtn(buttonPin, true,  true, 40);				// Declare the button( pin, pullup, invert, debounce ms)

enum convertMode_t {channelA, channelB, channelAB} ;	// measurement modes, 32 port B / 128 port A / A & B

HX711 scale;											// instantiate ADC

// U8G instantiate, Change this constructor to match the display!!!
U8G2_SSD1306_128X64_NONAME_1_HW_I2C u8g(U8G2_R0, /* reset=*/ U8X8_PIN_NONE);   // All Boards without Reset of the Display

const int nettReadingsSize = 32 ; 						// the number of readings to determine the average and calculate variance/ accuracy
double lastReading, lastReadingB ;
double nettReadings[nettReadingsSize] ; 				// store the rolling average of readings
int nettReadingPointer = 0 ;

convertMode_t convertMode = channelA ;					// default channelA

enum state_t {idleState, waitForRelease} ;      // define possible states
static state_t state = idleState ;


void setup() {
	Serial.begin(115200);

  Serial.println("AWI uA meter");

	// u8g setup
	u8g.begin() ;
	u8g.setFont(u8g2_font_helvR14_tf);					// 'r' = reduced (or 'n' = numeric) font only for size
	//u8g.setFont(u8g2_font_profont15_tf);					// 'r' = reduced (or 'n' = numeric) font only for size

	// HX711.DOUT	- pin #A1
	// HX711.PD_SCK	- pin #A0
	// if parameter "gain" is ommited; the default value 128 is used by the library
	//   64 & 128 is port A ; 32 is port B
	scale.begin(HX711_dout, HX711_sck, 128); 			// set port based on state of selection

	LCD_banner("Initializing") ;
	Serial.print("read average: \t\t");
	Serial.println(scale.read_average(20));  			// print the average of 20 raw readings from the ADC

	getOffset();										// get the offsets (drift values)
	scale.set_offset(offsetChannelA) ;					// set it for measured channel
	scale.set_scale(calibrationFactorA);				// this value is obtained by calibrating with known value; see the README for details

	Serial.print("read: \t\t");
	Serial.println(scale.read());						// print a raw reading from the ADC
	Serial.print("read average: \t\t");
	Serial.println(scale.read_average(10));				// print the average of 20 readings from the ADC
	Serial.print("get value: \t\t");
	Serial.println(scale.get_value(5));					// print the average of 5 readings from the ADC minus the tare weight, set with tare()
	Serial.print("get units: \t\t");
	Serial.println(scale.get_units(5), 3);				// print the average of 5 readings from the ADC minus tare weight, divided by scale
	Serial.println("Readings:");
}

void loop() {

	//Serial.print("one reading:\t");
	//Serial.print(scale.get_units(), 1);
	//Serial.print("\t| average:\t");
	//Serial.println(scale.get_units(30), 3);

  checkButton();

	// get ADC readings dependent on setting: read A, B or A & B
	// only A reads has average buffer when A&B mode is selected
	if (convertMode == channelA){
		scale.set_gain(128) ;
		scale.set_offset(offsetChannelA) ;
		scale.set_scale(calibrationFactorA );			// set division to A value and set mode to A
		lastReading = scale.get_units(4) ; 			// get value (average 4 readings)corrected with scaling
		nettReadings[nettReadingPointer] = lastReading ;	// store readings in averagebuffer
		nettReadingPointer = (++nettReadingPointer) % nettReadingsSize ; // increment and wrap
    checkButton();
    LCD_local_display();
	} else if (convertMode == channelB){
		scale.set_gain(32) ;
		scale.set_offset(offsetChannelB) ;
		scale.set_scale(calibrationFactorB);			// set division to B value and set mode to B
		lastReading = scale.get_units(4) ; 		  	// get value (average 4 readings)corrected with scaling
		nettReadings[nettReadingPointer] = lastReading ;	// store readings in averagebuffer
		nettReadingPointer = (++nettReadingPointer) % nettReadingsSize ; // increment and wrap
    checkButton();
    LCD_local_display();
	} else if (convertMode == channelAB){				// if both channels average 128 readings iso 32 (no buffer)
		scale.set_gain(128) ;
		scale.set_offset(offsetChannelA) ;
		scale.set_scale(calibrationFactorA);			// set division to A value and set mode to A
		lastReading = scale.get_units(2) ; 		  	// get value (average 4 readings)corrected with scaling
		checkButton();
		scale.set_gain(32) ;
		scale.set_offset(offsetChannelB) ;
		scale.set_scale(calibrationFactorB);			// set division to A value and set mode to A
		lastReadingB = scale.get_units(2) ; 			// get value (average 4 readings) corrected with scaling
    checkButton();
		LCD_local_displayAB();
	}
	//scale.power_down();			       				// put the ADC in sleep mode
	//delay(500);
	//scale.power_up();
	//delay(100);
}

void checkButton() {

  myBtn.read();                   // read button state

  switch (state){
     case idleState:                  // Idle
      if (myBtn.wasPressed()) {       // Pressed
        // change channel and wait release
        state = waitForRelease ;
      }
      break ;
    case waitForRelease:
      if (myBtn.pressedFor(3000UL)) {  // Long Press
         LCD_banner("Offset");
         getOffset();
         state = idleState;
      } else if (myBtn.wasReleased()) { // Short Press
        state = idleState;
        switchMode() ;
      }
      break ;

  }

}
void LCD_banner(const char *s){
/* prints all avaiable variables on LCD display with units
	input: all "last" variables
*/
	u8g.firstPage();
	do {
		int strWidth = u8g.getStrWidth(s) ;				// get the length of the string to determine print position
		u8g.drawStr((128- strWidth)/2, 40, s ) ;			// print right aligned
	} while (u8g.nextPage()) ;
}


void LCD_local_display(void){
/* prints all avaiable variables on LCD display with units
	input: all "last" variables
*/
	char buf[21];  										// buffer for max 20 char display
	char lastNettBuf[14];
	dtostrf(lastReading, 10, 2, lastNettBuf);			// Convert real to char
	char averageNettBuf[14];
	dtostrf(nettReadingsAverage(), 10, 2, averageNettBuf);	// Convert real to char
	char spreadNettBuf[14];
	dtostrf(nettReadingsSpread(), 10, 2, spreadNettBuf);	// Convert real to char
	Serial.print("Average: \t") ; Serial.print(nettReadingsAverage());
	Serial.print("\tSpread: \t") ; Serial.println(nettReadingsSpread());

	u8g.firstPage();
	do {
    checkButton();
		snprintf(buf, sizeof buf, "Current %s", (convertMode==channelB)?"B":"A"); // Header
		int strWidth = u8g.getStrWidth(buf) ;			//   length of the string to determine print position
		u8g.drawStr((128- strWidth)/2, 14, buf ) ;		//   print middle aligned
		u8g.drawStr(0,31,"I") ;							// Current
		snprintf(buf, sizeof buf, "%10s\xB5\A", lastNettBuf);
		strWidth = u8g.getStrWidth(buf) ;				//   length of the string to determine print position
		u8g.drawStr((128- strWidth), 31, buf ) ;		//   print right aligned
		u8g.drawStr(0,47,"avg") ;						// Average current
		snprintf(buf, sizeof buf, "%10s\xB5\A", averageNettBuf);
		strWidth = u8g.getStrWidth(buf) ;				// get the length of the string to determine print position
		u8g.drawStr((128- strWidth), 47, buf ) ;		// print right aligned
		u8g.drawStr(0,63,"d\xB1") ;						// delta +/-
		snprintf(buf, sizeof buf, "%10s\xB5\A", spreadNettBuf);
		strWidth = u8g.getStrWidth(buf) ;				// get the length of the string to determine print position
		u8g.drawStr((128- strWidth), 63, buf ) ;		// print right aligned
	} while (u8g.nextPage()) ;
}
void LCD_local_displayAB(void){
/* prints A & B channel on LCD display with units
	input: all "last" variables
*/
	char buf[21];  										// buffer for max 20 char display
	char lastNettBuf[14];
	dtostrf(lastReading, 10, 2, lastNettBuf);			// Convert real to char
	char lastNettBufB[14];
	dtostrf(lastReadingB, 10, 2, lastNettBufB);			// Convert real to char
	char lastNettBufAB[14];
	dtostrf(lastReading +lastReadingB, 10, 2, lastNettBufAB);	// Convert real to char for added values
	u8g.firstPage();
	do {
    checkButton();
		snprintf(buf, sizeof buf, "Current A+B"); 		// Header
		int strWidth = u8g.getStrWidth(buf) ;			//   length of the string to determine print position
		u8g.drawStr((128- strWidth)/2, 14, buf ) ;		//   print middle aligned
		u8g.drawStr(0,31,"IA");							// Current A
		snprintf(buf, sizeof buf, "%10s\xB5\A", lastNettBuf);
		strWidth = u8g.getStrWidth(buf) ;				//   length of the string to determine print position
		u8g.drawStr((128- strWidth), 31, buf ) ;		//   print right aligned
		u8g.drawStr(0,47,"IB");							// Current B
		snprintf(buf, sizeof buf, "%10s\xB5\A", lastNettBufB);
		strWidth = u8g.getStrWidth(buf) ;				//   length of the string to determine print position
		u8g.drawStr((128- strWidth), 47, buf ) ;		//   print right aligned
		u8g.drawStr(0,63,"A+B");						// Current A + B
		snprintf(buf, sizeof buf, "%10s\xB5\A", lastNettBufAB);
		strWidth = u8g.getStrWidth(buf) ;				//   length of the string to determine print position
		u8g.drawStr((128- strWidth), 63, buf ) ;		//   print right aligned
	} while (u8g.nextPage()) ;
}

// calculate average of nett readings
double nettReadingsAverage() {
	double sum = 0;
	for (byte i = 0; i < nettReadingsSize; i++) {
		sum += nettReadings[ i ];
	}
	return sum / nettReadingsSize;
}

// calculate spread of nett readings (+/-)
double nettReadingsSpread() {
	double minReading = nettReadings[0];
	double maxReading = minReading ;
	for (byte i = 1; i < nettReadingsSize; i++) {
    checkButton();
		if (minReading > nettReadings[ i ]){
			minReading = nettReadings[i] ;
		}
		if (maxReading < nettReadings[ i ]){
			maxReading = nettReadings[i] ;
		}
	}
	return (maxReading - minReading)/2 ;
}

// switch the mode
void switchMode(){
	if (convertMode == channelA){
		convertMode = channelB ;
	} else if (convertMode == channelB){
		convertMode = channelAB ;
	} else {
		convertMode = channelA ;
	}
}

// assuming both channels are shorted, calculate the offset values for channel A and B
double getOffset(){
	scale.set_gain(128) ;							// get channel A
	offsetChannelA = scale.read_average(32) ;		// average 512 readings for offset
	Serial.print("Offset A: \t") ;
	Serial.println(offsetChannelA);
	scale.set_gain(32) ;							// get channel B
	offsetChannelB = scale.read_average(32) ;		// average 512 readings for offset
	Serial.print("Offset B: \t") ;
	Serial.println(offsetChannelB);
}```
Home Assistant / Vera Plus UI7
ESP8266 GW + mySensors 2.3.2
Alexa / Google Home -
@Nca78 , updating: I figured out how to connect the load, so I'm done with it (including calibration).
I changed the original code a bit, as I also wanted it a bit more responsive. I didn't lift pin 15 as you did.
BTW, what bootloader + clock are you using? Perhaps that could influence? I'm using MYSBootloaderV13pre.hex, 8Mhz internal clock...
Changes:
- Less average reading per cycle (from 32 to 4 ) --> Didn't notice significant changes in measurements.
- More accumulated avg reads ( from 16 to 32 ) --> Just to keep a less volatile avg numbers in display.
- Change the logic of short/long press. short press (~1s) = change mode, long press (~3s) = Offset.
In case you want to give it a try...
// uA meter with HX711 /* PROJECT: MySensors - uA meter with HX711 PROGRAMMER: AWI DATE: 20170414/ last update: FILE: AWI_uA_meter.ino LICENSE: Public domain Performance improvements: rvendrame Hardware: tbd Nano ATmega328p board w/ NRF24l01 Special: program with Arduino Nano SUMMARY: Measures mV accross a shunt resistor ~ uA - channel A Measures mV on channel B Modes: - default: measure uV in full resolution (Stable reading only for 0.1uV) - other: A: channel A: default, amplification 128 - div 500: 0.1uV stable, range +/- 20mV, (1ohm +/- 20mA, res 100 nA) B: channel B: amplification 32 - div 125: 100nA stable, range +/- 80mV, (10 ohm +/- 8 mA, res 10 nA) AB: both channels: - uA - calibration: depending on the actual shunt: 0.47 ohm -> 1 uV ~ 2uA, range -40 mA - 40 mA 1 ohm -> 1 uV = 1uA, range -20 mA - 20 mA 10 ohm -> 1 uv = 0.1uA - mV - calibration, depend on amplification Button switch: - Short press, reset current channel to offset 0 (keep terminals shorted, no need with uA ;-) - Long press, change channel A (uA) / B(uA)/ A & B (uA) Hx711 24bit weight scale sensor - Noise and temperature sensitive (x bit effective) OLED 128x64 display Remarks: Size is large as result of font library for display update: */ #include <U8g2lib.h> // U8glib for OLED display #include <Wire.h> // I2C #include <Button.h> // https://github.com/JChristensen/Button #include "HX711.h" // local ADC lib const double calibrationFactorA = 599.18f ; // calibration for channel A: set to 1.0 for known current and divide const double calibrationFactorB = 149.76f ; // calibration for channel B: set to 1.0 for known current and divide long offsetChannelA = 0 ; // channel offsets for A and B (drifts) are calibrated at startup and on command. long offsetChannelB = 0 ; const uint8_t HX711_dout = A1 ; // HX711 data out pin const uint8_t HX711_sck = A0 ; // HX711 serial clock const uint8_t buttonPin = A2 ; // connects the button to select function and reset offset //const unsigned long longPress = 1500UL ; // - long press set reference temperature - in ms // - when alarm, short press resets alarm Button myBtn(buttonPin, true, true, 40); // Declare the button( pin, pullup, invert, debounce ms) enum convertMode_t {channelA, channelB, channelAB} ; // measurement modes, 32 port B / 128 port A / A & B HX711 scale; // instantiate ADC // U8G instantiate, Change this constructor to match the display!!! U8G2_SSD1306_128X64_NONAME_1_HW_I2C u8g(U8G2_R0, /* reset=*/ U8X8_PIN_NONE); // All Boards without Reset of the Display const int nettReadingsSize = 32 ; // the number of readings to determine the average and calculate variance/ accuracy double lastReading, lastReadingB ; double nettReadings[nettReadingsSize] ; // store the rolling average of readings int nettReadingPointer = 0 ; convertMode_t convertMode = channelA ; // default channelA enum state_t {idleState, waitForRelease} ; // define possible states static state_t state = idleState ; void setup() { Serial.begin(115200); Serial.println("AWI uA meter"); // u8g setup u8g.begin() ; u8g.setFont(u8g2_font_helvR14_tf); // 'r' = reduced (or 'n' = numeric) font only for size //u8g.setFont(u8g2_font_profont15_tf); // 'r' = reduced (or 'n' = numeric) font only for size // HX711.DOUT - pin #A1 // HX711.PD_SCK - pin #A0 // if parameter "gain" is ommited; the default value 128 is used by the library // 64 & 128 is port A ; 32 is port B scale.begin(HX711_dout, HX711_sck, 128); // set port based on state of selection LCD_banner("Initializing") ; Serial.print("read average: \t\t"); Serial.println(scale.read_average(20)); // print the average of 20 raw readings from the ADC getOffset(); // get the offsets (drift values) scale.set_offset(offsetChannelA) ; // set it for measured channel scale.set_scale(calibrationFactorA); // this value is obtained by calibrating with known value; see the README for details Serial.print("read: \t\t"); Serial.println(scale.read()); // print a raw reading from the ADC Serial.print("read average: \t\t"); Serial.println(scale.read_average(10)); // print the average of 20 readings from the ADC Serial.print("get value: \t\t"); Serial.println(scale.get_value(5)); // print the average of 5 readings from the ADC minus the tare weight, set with tare() Serial.print("get units: \t\t"); Serial.println(scale.get_units(5), 3); // print the average of 5 readings from the ADC minus tare weight, divided by scale Serial.println("Readings:"); } void loop() { //Serial.print("one reading:\t"); //Serial.print(scale.get_units(), 1); //Serial.print("\t| average:\t"); //Serial.println(scale.get_units(30), 3); checkButton(); // get ADC readings dependent on setting: read A, B or A & B // only A reads has average buffer when A&B mode is selected if (convertMode == channelA){ scale.set_gain(128) ; scale.set_offset(offsetChannelA) ; scale.set_scale(calibrationFactorA ); // set division to A value and set mode to A lastReading = scale.get_units(4) ; // get value (average 4 readings)corrected with scaling nettReadings[nettReadingPointer] = lastReading ; // store readings in averagebuffer nettReadingPointer = (++nettReadingPointer) % nettReadingsSize ; // increment and wrap checkButton(); LCD_local_display(); } else if (convertMode == channelB){ scale.set_gain(32) ; scale.set_offset(offsetChannelB) ; scale.set_scale(calibrationFactorB); // set division to B value and set mode to B lastReading = scale.get_units(4) ; // get value (average 4 readings)corrected with scaling nettReadings[nettReadingPointer] = lastReading ; // store readings in averagebuffer nettReadingPointer = (++nettReadingPointer) % nettReadingsSize ; // increment and wrap checkButton(); LCD_local_display(); } else if (convertMode == channelAB){ // if both channels average 128 readings iso 32 (no buffer) scale.set_gain(128) ; scale.set_offset(offsetChannelA) ; scale.set_scale(calibrationFactorA); // set division to A value and set mode to A lastReading = scale.get_units(2) ; // get value (average 4 readings)corrected with scaling checkButton(); scale.set_gain(32) ; scale.set_offset(offsetChannelB) ; scale.set_scale(calibrationFactorB); // set division to A value and set mode to A lastReadingB = scale.get_units(2) ; // get value (average 4 readings) corrected with scaling checkButton(); LCD_local_displayAB(); } //scale.power_down(); // put the ADC in sleep mode //delay(500); //scale.power_up(); //delay(100); } void checkButton() { myBtn.read(); // read button state switch (state){ case idleState: // Idle if (myBtn.wasPressed()) { // Pressed // change channel and wait release state = waitForRelease ; } break ; case waitForRelease: if (myBtn.pressedFor(3000UL)) { // Long Press LCD_banner("Offset"); getOffset(); state = idleState; } else if (myBtn.wasReleased()) { // Short Press state = idleState; switchMode() ; } break ; } } void LCD_banner(const char *s){ /* prints all avaiable variables on LCD display with units input: all "last" variables */ u8g.firstPage(); do { int strWidth = u8g.getStrWidth(s) ; // get the length of the string to determine print position u8g.drawStr((128- strWidth)/2, 40, s ) ; // print right aligned } while (u8g.nextPage()) ; } void LCD_local_display(void){ /* prints all avaiable variables on LCD display with units input: all "last" variables */ char buf[21]; // buffer for max 20 char display char lastNettBuf[14]; dtostrf(lastReading, 10, 2, lastNettBuf); // Convert real to char char averageNettBuf[14]; dtostrf(nettReadingsAverage(), 10, 2, averageNettBuf); // Convert real to char char spreadNettBuf[14]; dtostrf(nettReadingsSpread(), 10, 2, spreadNettBuf); // Convert real to char Serial.print("Average: \t") ; Serial.print(nettReadingsAverage()); Serial.print("\tSpread: \t") ; Serial.println(nettReadingsSpread()); u8g.firstPage(); do { checkButton(); snprintf(buf, sizeof buf, "Current %s", (convertMode==channelB)?"B":"A"); // Header int strWidth = u8g.getStrWidth(buf) ; // length of the string to determine print position u8g.drawStr((128- strWidth)/2, 14, buf ) ; // print middle aligned u8g.drawStr(0,31,"I") ; // Current snprintf(buf, sizeof buf, "%10s\xB5\A", lastNettBuf); strWidth = u8g.getStrWidth(buf) ; // length of the string to determine print position u8g.drawStr((128- strWidth), 31, buf ) ; // print right aligned u8g.drawStr(0,47,"avg") ; // Average current snprintf(buf, sizeof buf, "%10s\xB5\A", averageNettBuf); strWidth = u8g.getStrWidth(buf) ; // get the length of the string to determine print position u8g.drawStr((128- strWidth), 47, buf ) ; // print right aligned u8g.drawStr(0,63,"d\xB1") ; // delta +/- snprintf(buf, sizeof buf, "%10s\xB5\A", spreadNettBuf); strWidth = u8g.getStrWidth(buf) ; // get the length of the string to determine print position u8g.drawStr((128- strWidth), 63, buf ) ; // print right aligned } while (u8g.nextPage()) ; } void LCD_local_displayAB(void){ /* prints A & B channel on LCD display with units input: all "last" variables */ char buf[21]; // buffer for max 20 char display char lastNettBuf[14]; dtostrf(lastReading, 10, 2, lastNettBuf); // Convert real to char char lastNettBufB[14]; dtostrf(lastReadingB, 10, 2, lastNettBufB); // Convert real to char char lastNettBufAB[14]; dtostrf(lastReading +lastReadingB, 10, 2, lastNettBufAB); // Convert real to char for added values u8g.firstPage(); do { checkButton(); snprintf(buf, sizeof buf, "Current A+B"); // Header int strWidth = u8g.getStrWidth(buf) ; // length of the string to determine print position u8g.drawStr((128- strWidth)/2, 14, buf ) ; // print middle aligned u8g.drawStr(0,31,"IA"); // Current A snprintf(buf, sizeof buf, "%10s\xB5\A", lastNettBuf); strWidth = u8g.getStrWidth(buf) ; // length of the string to determine print position u8g.drawStr((128- strWidth), 31, buf ) ; // print right aligned u8g.drawStr(0,47,"IB"); // Current B snprintf(buf, sizeof buf, "%10s\xB5\A", lastNettBufB); strWidth = u8g.getStrWidth(buf) ; // length of the string to determine print position u8g.drawStr((128- strWidth), 47, buf ) ; // print right aligned u8g.drawStr(0,63,"A+B"); // Current A + B snprintf(buf, sizeof buf, "%10s\xB5\A", lastNettBufAB); strWidth = u8g.getStrWidth(buf) ; // length of the string to determine print position u8g.drawStr((128- strWidth), 63, buf ) ; // print right aligned } while (u8g.nextPage()) ; } // calculate average of nett readings double nettReadingsAverage() { double sum = 0; for (byte i = 0; i < nettReadingsSize; i++) { sum += nettReadings[ i ]; } return sum / nettReadingsSize; } // calculate spread of nett readings (+/-) double nettReadingsSpread() { double minReading = nettReadings[0]; double maxReading = minReading ; for (byte i = 1; i < nettReadingsSize; i++) { checkButton(); if (minReading > nettReadings[ i ]){ minReading = nettReadings[i] ; } if (maxReading < nettReadings[ i ]){ maxReading = nettReadings[i] ; } } return (maxReading - minReading)/2 ; } // switch the mode void switchMode(){ if (convertMode == channelA){ convertMode = channelB ; } else if (convertMode == channelB){ convertMode = channelAB ; } else { convertMode = channelA ; } } // assuming both channels are shorted, calculate the offset values for channel A and B double getOffset(){ scale.set_gain(128) ; // get channel A offsetChannelA = scale.read_average(32) ; // average 512 readings for offset Serial.print("Offset A: \t") ; Serial.println(offsetChannelA); scale.set_gain(32) ; // get channel B offsetChannelB = scale.read_average(32) ; // average 512 readings for offset Serial.print("Offset B: \t") ; Serial.println(offsetChannelB); }```@rvendrame thank you I will try it, good idea for the button change.
Just need to change the code for another screen as I broke my oled :( -
For the short press, with the original code, I noticed that an easy way to get it every time is to press until the display changes, then release. Anyhow, worked for me.
-
@mfalkvidd the 'local adc' library is the hx711 library which I placed in the sketch folder. Sorry for the confusion
-
@mfalkvidd the 'local adc' library is the hx711 library which I placed in the sketch folder. Sorry for the confusion
-
I am confused the 1k resistors seem to be wired differently in AWI photo's and Nca78 photo's.
I would like to build this but not certain how it is wired now@rmtucker said in 💬 Micro (nano) ampere meter (double):
I am confused the 1k resistors seem to be wired differently in AWI photo's and Nca78 photo's.
I would like to build this but not certain how it is wired nowIf you do like drawn on my post from July 7, it works.
-
@rmtucker said in 💬 Micro (nano) ampere meter (double):
I am confused the 1k resistors seem to be wired differently in AWI photo's and Nca78 photo's.
I would like to build this but not certain how it is wired nowIf you do like drawn on my post from July 7, it works.
@Nca78 said in 💬 Micro (nano) ampere meter (double):
@rmtucker said in 💬 Micro (nano) ampere meter (double):
I am confused the 1k resistors seem to be wired differently in AWI photo's and Nca78 photo's.
I would like to build this but not certain how it is wired nowIf you do like drawn on my post from July 7, it works.
Are the blue and green resistors you have drawn on the back of the adc module the 1k resistors?
Have you soldered them on the other side? -
@Nca78 said in 💬 Micro (nano) ampere meter (double):
@rmtucker said in 💬 Micro (nano) ampere meter (double):
I am confused the 1k resistors seem to be wired differently in AWI photo's and Nca78 photo's.
I would like to build this but not certain how it is wired nowIf you do like drawn on my post from July 7, it works.
Are the blue and green resistors you have drawn on the back of the adc module the 1k resistors?
Have you soldered them on the other side?@rmtucker said in 💬 Micro (nano) ampere meter (double):
Are the blue and green resistors you have drawn on the back of the adc module the 1k resistors?
Have you soldered them on the other side?Yes & yes.
-
@rvendrame said in 💬 Micro (nano) ampere meter (double):
@Nca78 , my HX711 board looks like yours. I'm a bit confused on how to connect the J1 pins to the load / power. Can you share how did you connected it? Thx!
Soldering is a bit messy and not helping much to understand, so I did a (gorgeous) drawing. I think I'll frame that in my living room :D
And in case you want to increase the data rate