Skip to content
  • MySensors
  • OpenHardware.io
  • Categories
  • Recent
  • Tags
  • Popular
Skins
  • Light
  • Brite
  • Cerulean
  • Cosmo
  • Flatly
  • Journal
  • Litera
  • Lumen
  • Lux
  • Materia
  • Minty
  • Morph
  • Pulse
  • Sandstone
  • Simplex
  • Sketchy
  • Spacelab
  • United
  • Yeti
  • Zephyr
  • Dark
  • Cyborg
  • Darkly
  • Quartz
  • Slate
  • Solar
  • Superhero
  • Vapor

  • Default (No Skin)
  • No Skin
Collapse
Brand Logo
  1. Home
  2. OpenHardware.io
  3. 💬 Easy/Newbie PCB (RFM69 HW/W edition) for MySensors

💬 Easy/Newbie PCB (RFM69 HW/W edition) for MySensors

Scheduled Pinned Locked Moved OpenHardware.io
mysensoreasynewbiepcbmysx
106 Posts 20 Posters 36.5k Views 19 Watching
  • Oldest to Newest
  • Newest to Oldest
  • Most Votes
Reply
  • Reply as topic
Log in to reply
This topic has been deleted. Only users with topic management privileges can see it.
  • ? A Former User

    @sundberg84 Dear sundberg,

    • I desoldered the voltage regulator and the power led from all my pro minis to prevent unnecessary consumption.

    • Yes, I'm using a booster like this

    My multimeter is not sensitive enough to measure as small ampers. I will write in the sketch to power the sensor from a digital pin and try out this.

    Thank you for the tips

    sundberg84S Offline
    sundberg84S Offline
    sundberg84
    Hardware Contributor
    wrote on last edited by
    #39

    @ZsoltZombori - the booster you are referring to seems to be a step-down converter from 5v as well... I have never seen these before and can't unfortunately say how they work.

    Another tip without the multimeter is to write a batterysketch and remove the sensors and see over some days how the battery reports back.

    Controller: Proxmox VM - Home Assistant
    MySensors GW: Arduino Uno - W5100 Ethernet, Gw Shield Nrf24l01+ 2,4Ghz
    MySensors GW: Arduino Uno - Gw Shield RFM69, 433mhz
    RFLink GW - Arduino Mega + RFLink Shield, 433mhz

    ? 1 Reply Last reply
    0
    • gohanG Offline
      gohanG Offline
      gohan
      Mod
      wrote on last edited by
      #40

      There is no datasheet for that buck boost so it is hard to have an estimate of its standby current. It would interesting to find out how it works.

      1 Reply Last reply
      0
      • sundberg84S sundberg84

        @ZsoltZombori - the booster you are referring to seems to be a step-down converter from 5v as well... I have never seen these before and can't unfortunately say how they work.

        Another tip without the multimeter is to write a batterysketch and remove the sensors and see over some days how the battery reports back.

        ? Offline
        ? Offline
        A Former User
        wrote on last edited by
        #41

        @sundberg84 - Thank you for the tips, I'll write a battery sketch as you suggested and check the voltages. I'll reply with the results.

        • And let me ask one more question; with switched off or lower BOD is it possible to reach longer battery life?
        sundberg84S gohanG 3 Replies Last reply
        0
        • ? A Former User

          @sundberg84 - Thank you for the tips, I'll write a battery sketch as you suggested and check the voltages. I'll reply with the results.

          • And let me ask one more question; with switched off or lower BOD is it possible to reach longer battery life?
          sundberg84S Offline
          sundberg84S Offline
          sundberg84
          Hardware Contributor
          wrote on last edited by
          #42

          @ZsoltZombori - I have DHT22 nodes running for 1.5years now, so yes! You need to find your way to build the node with your sensors so the currentdraw is minimal.

          Controller: Proxmox VM - Home Assistant
          MySensors GW: Arduino Uno - W5100 Ethernet, Gw Shield Nrf24l01+ 2,4Ghz
          MySensors GW: Arduino Uno - Gw Shield RFM69, 433mhz
          RFLink GW - Arduino Mega + RFLink Shield, 433mhz

          1 Reply Last reply
          0
          • ? A Former User

            @sundberg84 - Thank you for the tips, I'll write a battery sketch as you suggested and check the voltages. I'll reply with the results.

            • And let me ask one more question; with switched off or lower BOD is it possible to reach longer battery life?
            gohanG Offline
            gohanG Offline
            gohan
            Mod
            wrote on last edited by
            #43

            @ZsoltZombori you get a bit longer battery life because the bod will not kick in, but if you have something draining the power it will not solve the problem

            1 Reply Last reply
            1
            • ? A Former User

              @sundberg84 - Thank you for the tips, I'll write a battery sketch as you suggested and check the voltages. I'll reply with the results.

              • And let me ask one more question; with switched off or lower BOD is it possible to reach longer battery life?
              sundberg84S Offline
              sundberg84S Offline
              sundberg84
              Hardware Contributor
              wrote on last edited by sundberg84
              #44

              @ZsoltZombori - just to be clear, its either BOD or booster. They have the same result. BOD lowers the minimum voltage threshold before the chip dies, and the booster regulates the voltage up so the chip doesnt die. Same result, different methods.

              Controller: Proxmox VM - Home Assistant
              MySensors GW: Arduino Uno - W5100 Ethernet, Gw Shield Nrf24l01+ 2,4Ghz
              MySensors GW: Arduino Uno - Gw Shield RFM69, 433mhz
              RFLink GW - Arduino Mega + RFLink Shield, 433mhz

              ? 2 Replies Last reply
              0
              • sundberg84S sundberg84

                @ZsoltZombori - just to be clear, its either BOD or booster. They have the same result. BOD lowers the minimum voltage threshold before the chip dies, and the booster regulates the voltage up so the chip doesnt die. Same result, different methods.

                ? Offline
                ? Offline
                A Former User
                wrote on last edited by
                #45

                @sundberg84 - Ah, I see. Thank you for this information. I'll check the consumption of the node itself then with BME280 attached to find out which component is the highest power consumer.

                1 Reply Last reply
                1
                • sundberg84S sundberg84

                  @ZsoltZombori - just to be clear, its either BOD or booster. They have the same result. BOD lowers the minimum voltage threshold before the chip dies, and the booster regulates the voltage up so the chip doesnt die. Same result, different methods.

                  ? Offline
                  ? Offline
                  A Former User
                  wrote on last edited by A Former User
                  #46

                  @sundberg84 - I attached the BME280 to D5 to switch on/off (to achieve less power consumption) but if I upload the program the module powers up, and connecting, send a measurement with temp, hum, bat and goes to sleep than wake up, and does nothing. If I attach the sensor to normally VCC + GND, it works fine. How can it be? What could be the problem?

                  sundberg84S 1 Reply Last reply
                  0
                  • ? A Former User

                    @sundberg84 - I attached the BME280 to D5 to switch on/off (to achieve less power consumption) but if I upload the program the module powers up, and connecting, send a measurement with temp, hum, bat and goes to sleep than wake up, and does nothing. If I attach the sensor to normally VCC + GND, it works fine. How can it be? What could be the problem?

                    sundberg84S Offline
                    sundberg84S Offline
                    sundberg84
                    Hardware Contributor
                    wrote on last edited by
                    #47

                    @ZsoltZombori - Did you put the pin HIGH before read? (Comfirm with a multimeter?) If you did, you might want to add a wait(); before the readings so the sensors gets time to stabilise?

                    Or the BME module needs some sort of initialization/startup after powered on?

                    Controller: Proxmox VM - Home Assistant
                    MySensors GW: Arduino Uno - W5100 Ethernet, Gw Shield Nrf24l01+ 2,4Ghz
                    MySensors GW: Arduino Uno - Gw Shield RFM69, 433mhz
                    RFLink GW - Arduino Mega + RFLink Shield, 433mhz

                    ? 1 Reply Last reply
                    1
                    • gohanG Offline
                      gohanG Offline
                      gohan
                      Mod
                      wrote on last edited by
                      #48

                      I think you need to reinitialize the sensors before you actually read it after you power it down. I suggest you remove the instructions in setup and put everything in a function that you call every time you read the sensor, where in the beginning you set pin D5 high and at the end you set it low.

                      1 Reply Last reply
                      1
                      • sundberg84S sundberg84

                        @ZsoltZombori - Did you put the pin HIGH before read? (Comfirm with a multimeter?) If you did, you might want to add a wait(); before the readings so the sensors gets time to stabilise?

                        Or the BME module needs some sort of initialization/startup after powered on?

                        ? Offline
                        ? Offline
                        A Former User
                        wrote on last edited by A Former User
                        #49

                        @sundberg84 - Very good tip, I read the datasheet of bme280 sensor and it need time to initialize. I added 10 ms wait to program,
                        @gohan - I made a very beginner mistake as you said. The wire.begin was added to setup, I wrote it to loop, but it is not working..

                        1 Reply Last reply
                        0
                        • sundberg84S Offline
                          sundberg84S Offline
                          sundberg84
                          Hardware Contributor
                          wrote on last edited by sundberg84
                          #50

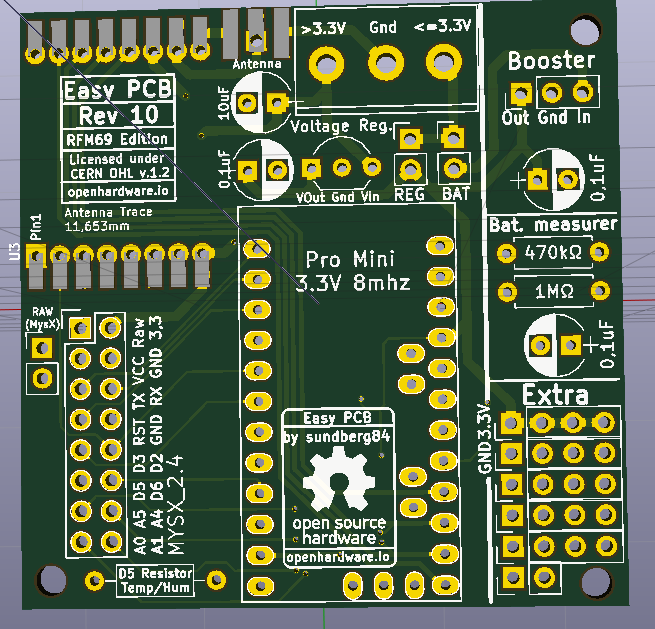
                          Some initial changes for Rev 10.

                          • MysX location changed to accept more MysX boards and align like Nrf24 version.
                          • Antenna location changed, radio rotated 180 degrees
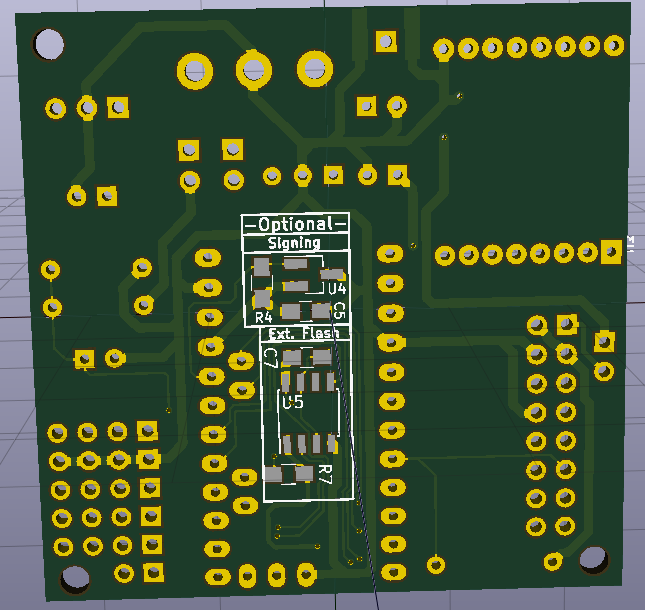
                          • Optional signing added
                          • Optional SPI flash added.
                          • Extra pins aligned to 2.45 vertical & horizontal
                          • Relocated Extra + Bat Measurer some to allow more space to booster
                          • Pinholes added for RFM Radio
                          • Changed pull-up resistor from D3 to D5 to have one more pin for Interrupt

                          0_1518897094787_0c89c2a0-6736-42b5-84fc-659e1d5b3c41-image.png

                          0_1518897119704_9b461c08-822e-46c9-8fa3-ac93c4b0d350-image.png

                          Controller: Proxmox VM - Home Assistant
                          MySensors GW: Arduino Uno - W5100 Ethernet, Gw Shield Nrf24l01+ 2,4Ghz
                          MySensors GW: Arduino Uno - Gw Shield RFM69, 433mhz
                          RFLink GW - Arduino Mega + RFLink Shield, 433mhz

                          1 Reply Last reply
                          1
                          • gohanG Offline
                            gohanG Offline
                            gohan
                            Mod
                            wrote on last edited by
                            #51

                            Are there any arduino pin left that could be connected to the "extra" area?

                            sundberg84S 1 Reply Last reply
                            0
                            • gohanG gohan

                              Are there any arduino pin left that could be connected to the "extra" area?

                              sundberg84S Offline
                              sundberg84S Offline
                              sundberg84
                              Hardware Contributor
                              wrote on last edited by
                              #52

                              @gohan - yes, but then you are not free to use the extra area as you like.

                              Controller: Proxmox VM - Home Assistant
                              MySensors GW: Arduino Uno - W5100 Ethernet, Gw Shield Nrf24l01+ 2,4Ghz
                              MySensors GW: Arduino Uno - Gw Shield RFM69, 433mhz
                              RFLink GW - Arduino Mega + RFLink Shield, 433mhz

                              1 Reply Last reply
                              0
                              • gohanG Offline
                                gohanG Offline
                                gohan
                                Mod
                                wrote on last edited by
                                #53

                                In that case a trace cut would solve the problem :-)

                                sundberg84S 1 Reply Last reply
                                0
                                • gohanG gohan

                                  In that case a trace cut would solve the problem :-)

                                  sundberg84S Offline
                                  sundberg84S Offline
                                  sundberg84
                                  Hardware Contributor
                                  wrote on last edited by sundberg84
                                  #54

                                  @gohan isn't a trace cut harder to achieve than solder a wire to the right pin?

                                  Controller: Proxmox VM - Home Assistant
                                  MySensors GW: Arduino Uno - W5100 Ethernet, Gw Shield Nrf24l01+ 2,4Ghz
                                  MySensors GW: Arduino Uno - Gw Shield RFM69, 433mhz
                                  RFLink GW - Arduino Mega + RFLink Shield, 433mhz

                                  1 Reply Last reply
                                  0
                                  • gohanG Offline
                                    gohanG Offline
                                    gohan
                                    Mod
                                    wrote on last edited by
                                    #55

                                    I don't know, but it has been quite tedious to bridge the pins that were just next to the "extra" area to test the fota. 😅

                                    1 Reply Last reply
                                    0
                                    • M Offline
                                      M Offline
                                      mickecarlsson
                                      wrote on last edited by mickecarlsson
                                      #56

                                      Please make the pad for the antenna on the "bottom" larger, same as "above". Most ready-made antennas are with a 90 degree wire for easier soldering.
                                      RFM69 antenna

                                      sundberg84S 1 Reply Last reply
                                      0
                                      • M Offline
                                        M Offline
                                        mickecarlsson
                                        wrote on last edited by
                                        #57

                                        Proposal.
                                        Make two of the pads at the extra area with A4 and A5 (I2C) as more and more sensors are I2C.
                                        Preferably the two pads next to VCC and GND.
                                        Like the BMP280 and BME280, they are I2C with VCC, GND, SCL and SDA, so first line of pins in the extra area should be:
                                        VCC o-o-o-o
                                        GND o-o-o-o
                                        A5 -o o o o
                                        A4 -o o o o

                                        The new layout with the SMD on the bottom layer looks good.

                                        1 Reply Last reply
                                        0
                                        • M mickecarlsson

                                          Please make the pad for the antenna on the "bottom" larger, same as "above". Most ready-made antennas are with a 90 degree wire for easier soldering.
                                          RFM69 antenna

                                          sundberg84S Offline
                                          sundberg84S Offline
                                          sundberg84
                                          Hardware Contributor
                                          wrote on last edited by sundberg84
                                          #58

                                          @mickecarlsson - im not sure what you mean with:

                                          make the pad for the antenna on the "bottom" larger, same as "above"

                                          Picture?

                                          I was thinking about I2c but the problem is that different sensors use different pin-orders.
                                          Also see the discussion with gohan above about extra area.

                                          Controller: Proxmox VM - Home Assistant
                                          MySensors GW: Arduino Uno - W5100 Ethernet, Gw Shield Nrf24l01+ 2,4Ghz
                                          MySensors GW: Arduino Uno - Gw Shield RFM69, 433mhz
                                          RFLink GW - Arduino Mega + RFLink Shield, 433mhz

                                          1 Reply Last reply
                                          0
                                          Reply
                                          • Reply as topic
                                          Log in to reply
                                          • Oldest to Newest
                                          • Newest to Oldest
                                          • Most Votes


                                          12

                                          Online

                                          11.7k

                                          Users

                                          11.2k

                                          Topics

                                          113.0k

                                          Posts


                                          Copyright 2019 TBD   |   Forum Guidelines   |   Privacy Policy   |   Terms of Service
                                          • Login

                                          • Don't have an account? Register

                                          • Login or register to search.
                                          • First post
                                            Last post
                                          0
                                          • MySensors
                                          • OpenHardware.io
                                          • Categories
                                          • Recent
                                          • Tags
                                          • Popular