What did you build today (Pictures) ?

-
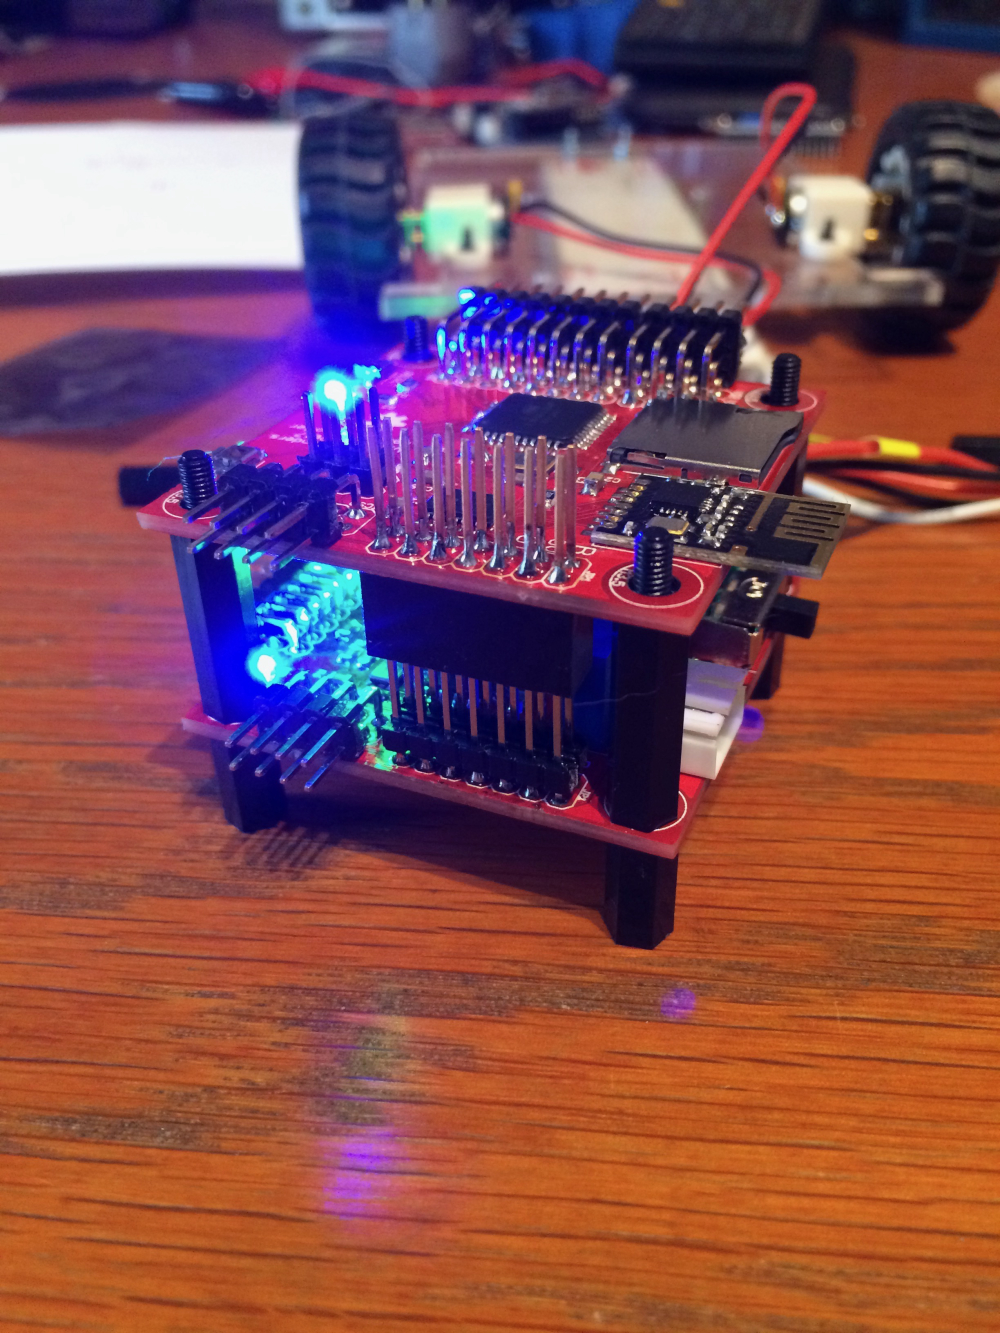
So here is my contribution to this tread: a differential drive "brain". A work in progress:
@gertsanders what is that?
-
...and deployed.
-
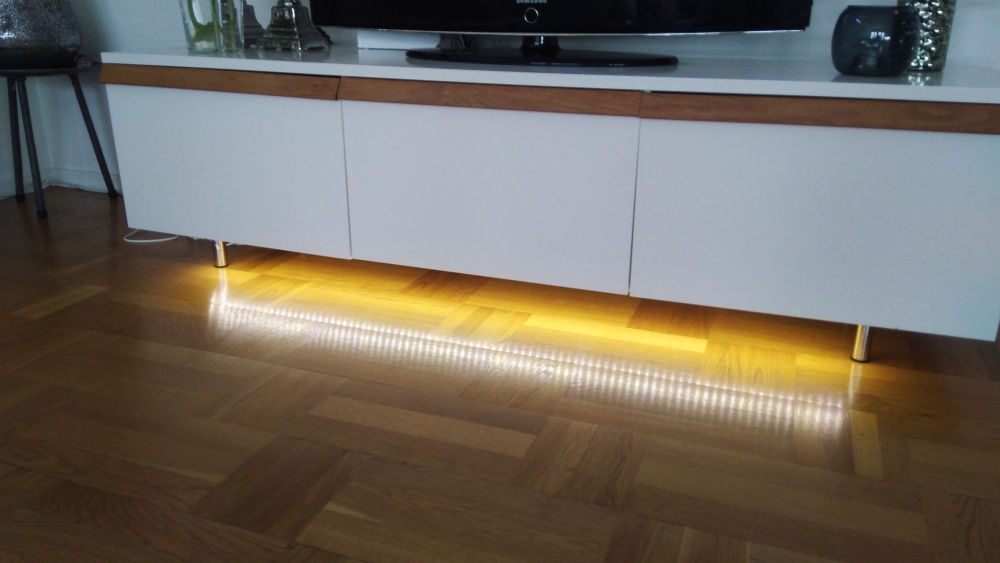
@sundberg84 Nice. I was wondering if I had an use for these. Now I want them everywhere!
@nagelc - easy to hide, looks good and awsome as night-lights for the kids. Its also a bit woav factor connecting them to a motion detector so they lights up when someone walks by.
-
Bathroom controller. It consist of a relaybox with a HLK 5v power source, it's hidden in the closet. Then I have realy to light, nightlight, mirrorheat, and extraction fan
And then the controller it self it's a Wemos D1 Mini Pro, Si7021 Temp/Hum, sensor and a PIR HC-SR501
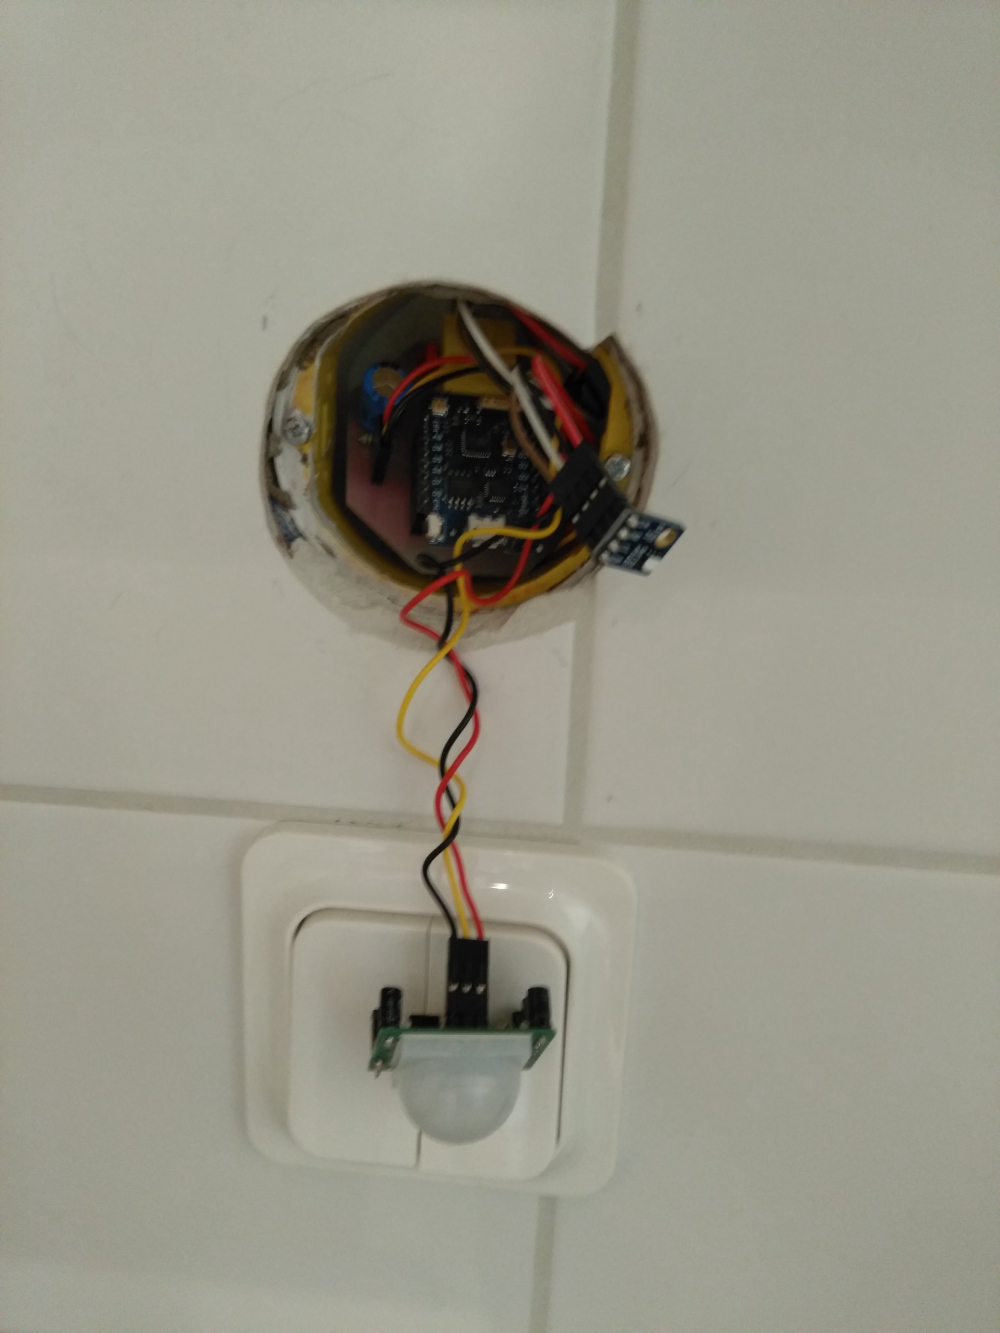
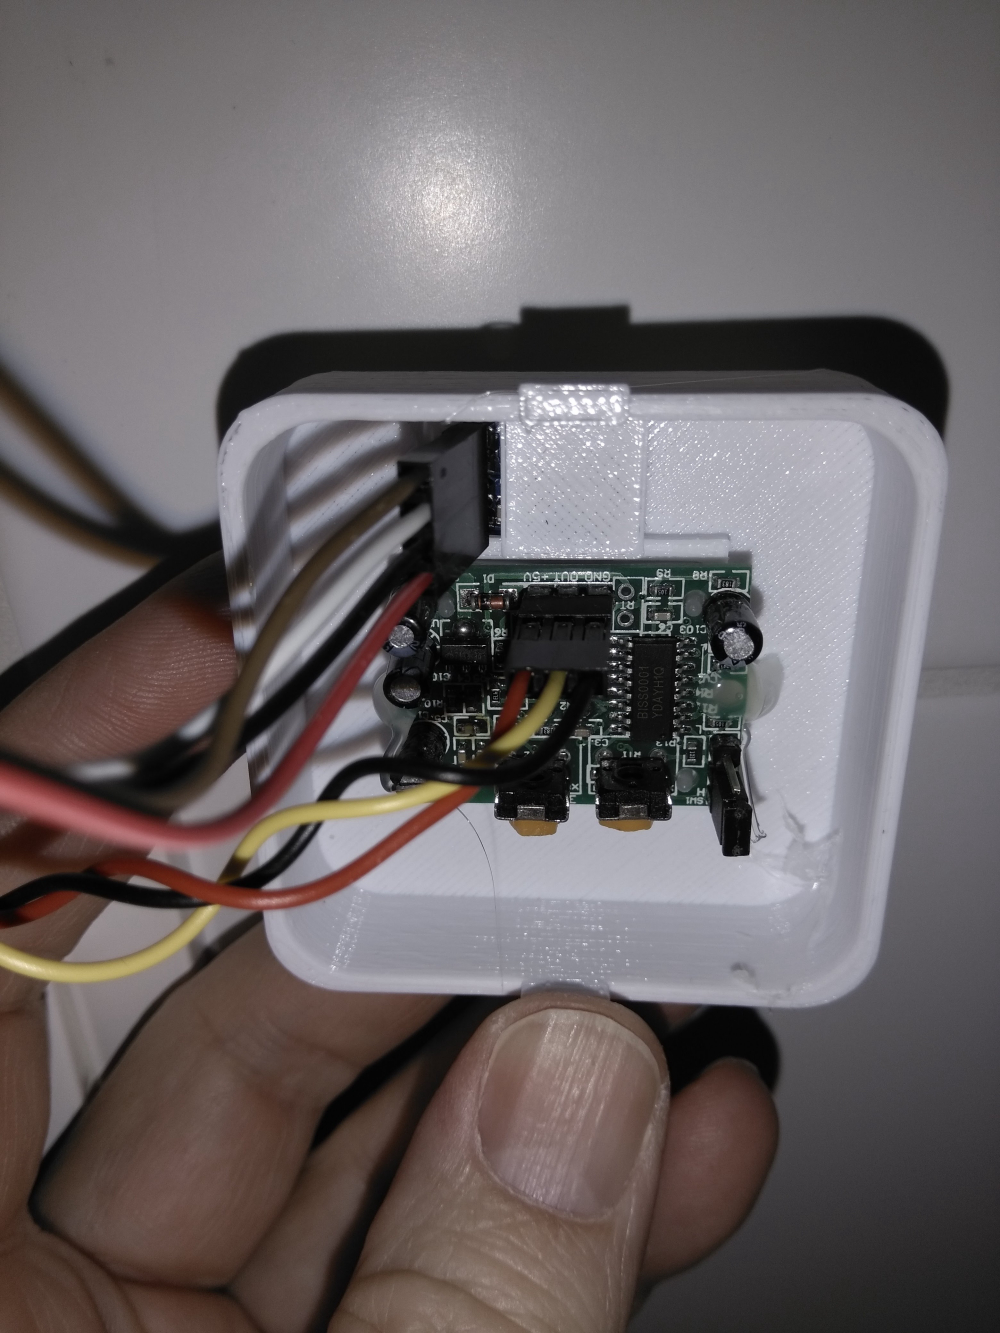

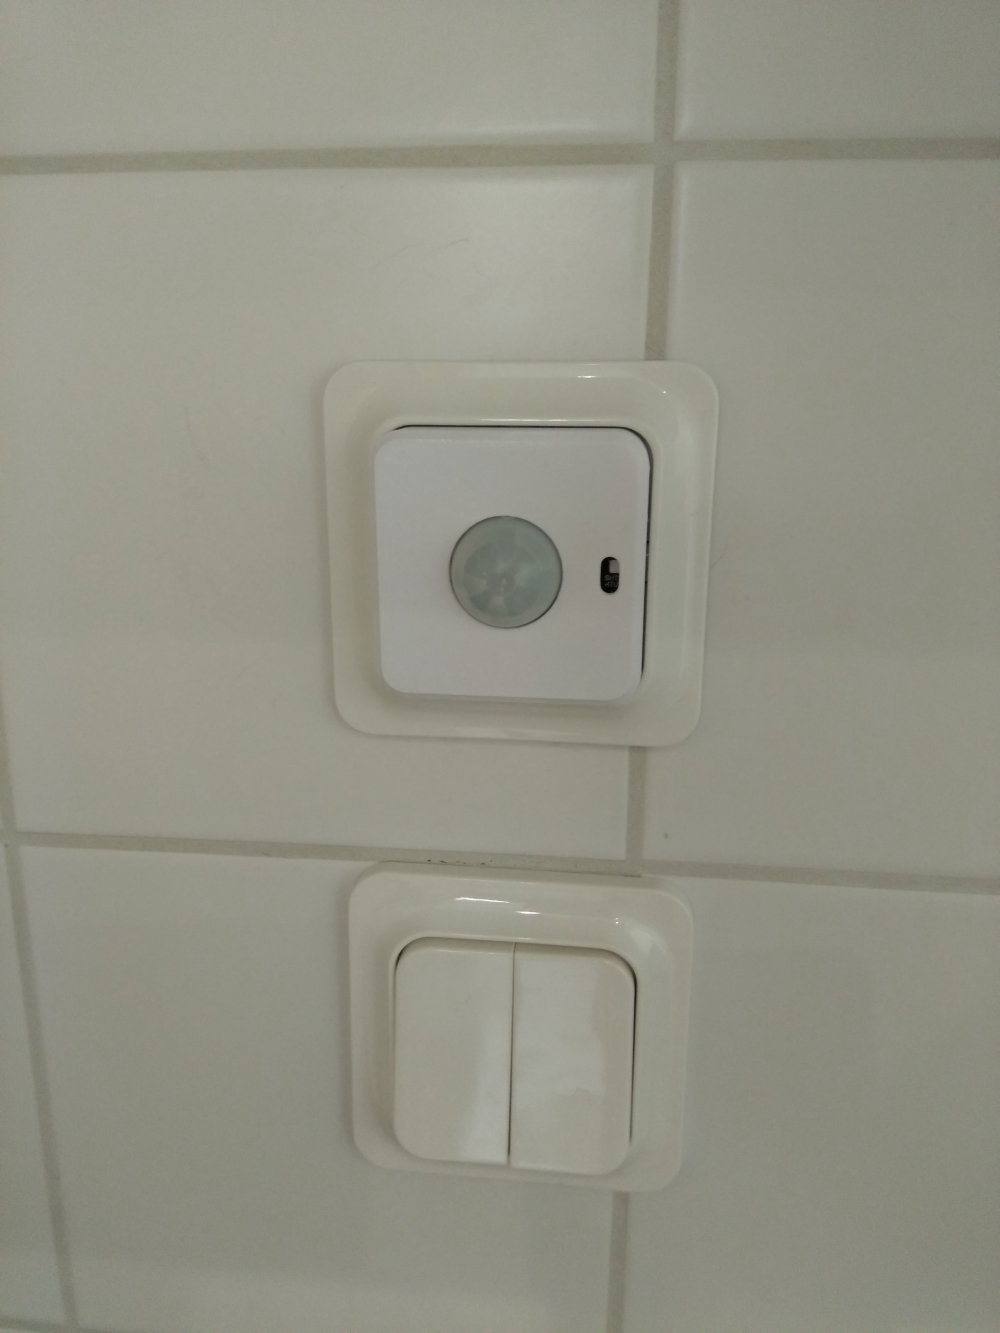
3D file is created with Freecad, STL files are available here:
https://www.thingiverse.com/thing:2890456 -
Bathroom controller. It consist of a relaybox with a HLK 5v power source, it's hidden in the closet. Then I have realy to light, nightlight, mirrorheat, and extraction fan
And then the controller it self it's a Wemos D1 Mini Pro, Si7021 Temp/Hum, sensor and a PIR HC-SR501
3D file is created with Freecad, STL files are available here:
https://www.thingiverse.com/thing:2890456@bjacobse Nice project. I like the 3D printed wall box. have you given any thought of having separate control of the lights and extraction fan? The reason I ask is that it may be beneficial to use the temp/humidity sensor to determine when the fan runs or gets shut off based on room humidity. This would be useful to reduce the chance of mold brought on by excess humidity.
-
Bathroom controller. It consist of a relaybox with a HLK 5v power source, it's hidden in the closet. Then I have realy to light, nightlight, mirrorheat, and extraction fan
And then the controller it self it's a Wemos D1 Mini Pro, Si7021 Temp/Hum, sensor and a PIR HC-SR501
3D file is created with Freecad, STL files are available here:
https://www.thingiverse.com/thing:2890456 -
@bjacobse Nice project. I like the 3D printed wall box. have you given any thought of having separate control of the lights and extraction fan? The reason I ask is that it may be beneficial to use the temp/humidity sensor to determine when the fan runs or gets shut off based on room humidity. This would be useful to reduce the chance of mold brought on by excess humidity.
@dbemowsk Thank you
For now as it's in early stage, I use the left switch to switch on (when I goto shower)on manually the fan, mirror heat, fan, and light and nightlight for 10min.
the right switch is only to start the fan for 5 min
I have not yet added humidity to start extraction fan automatically, but yes I will add this to the ESPEASY, rules -
@gohan
No, I have a fairly large electrolyte cap on power supply on the controller PCB, to stabilize the PIR/Wemod/si7021 power source.Actually when the bathroom door is open, and someone walk by the bathroom, the PIR will detect this and switch ON the light. I could consider to update 3D print to add a "wall" to block PIR.
The idea is that this PIR potentially can be used to connect to burglaralarm (but again I need to verify that I dont get false PIR reading due to sunlight) -
-
I was asking because quite some people had issues with the PIR being too close to the antenna as the antenna during transmission was inducing some noise that triggered the sensor so they needed to move them apart to solve the issue
-
Depending on the number of simultaneously active relays and the weemos tx power requirements make sure you don't overheat the HLK module, fire hazzard.
My 8 relay board draws a whooping 500ma @5V when all of them are active.@executivul
Good point, But I have looked at the power/current budget.
I have 4 pcs relay, JQC-3FF 5V DC, spec: https://www.futurlec.com/Relays/JQC-3FF-05.shtml uses 0,36W each x 4 pcs = total 1,44W.
Usage of Wemos D1 Mini Pro is unknown, at least there is no spec...https://wiki.wemos.cc/products:d1:d1_mini_pro#documentation let says it uses 1 W
HLK01 is rated to provide 3W
Should be all ok -
@gohan thanks I didn't think of the RF transmission from Wemos should impact PIR sensor, I only have thought of the power ripple. how far distance should affect PIR? I think mine is approx 2 cm apart
-
@bjacobse I had problems with ~3-4cm. Lots of false triggers on the pir. But if you are not experiencing false triggers your setup is probably fine.
More info: https://forum.mysensors.org/post/78771
@mfalkvidd Thanks for the link to the post, I think I should upgrade and use aluminium foil as you done to make a GND shield around the PIR sensor
-
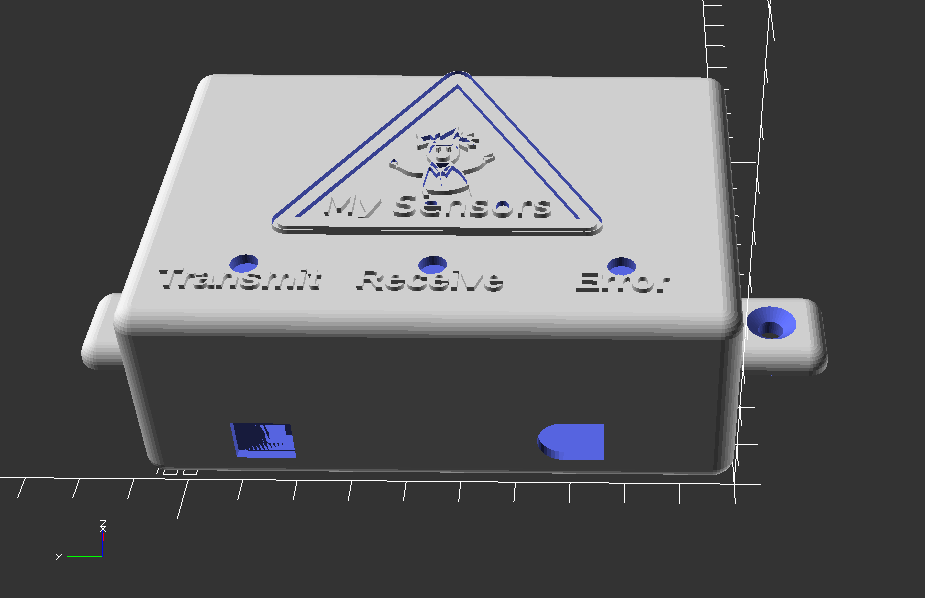
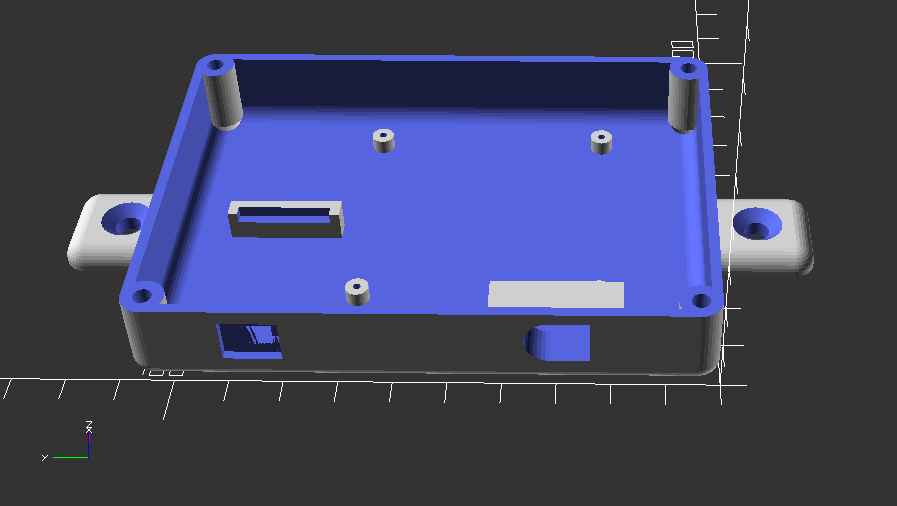
Finally finished my 2.2.0 gateway and have it mounted in the new enclosure. It appears to be talking to my 2.0.0 sensors just fine.!
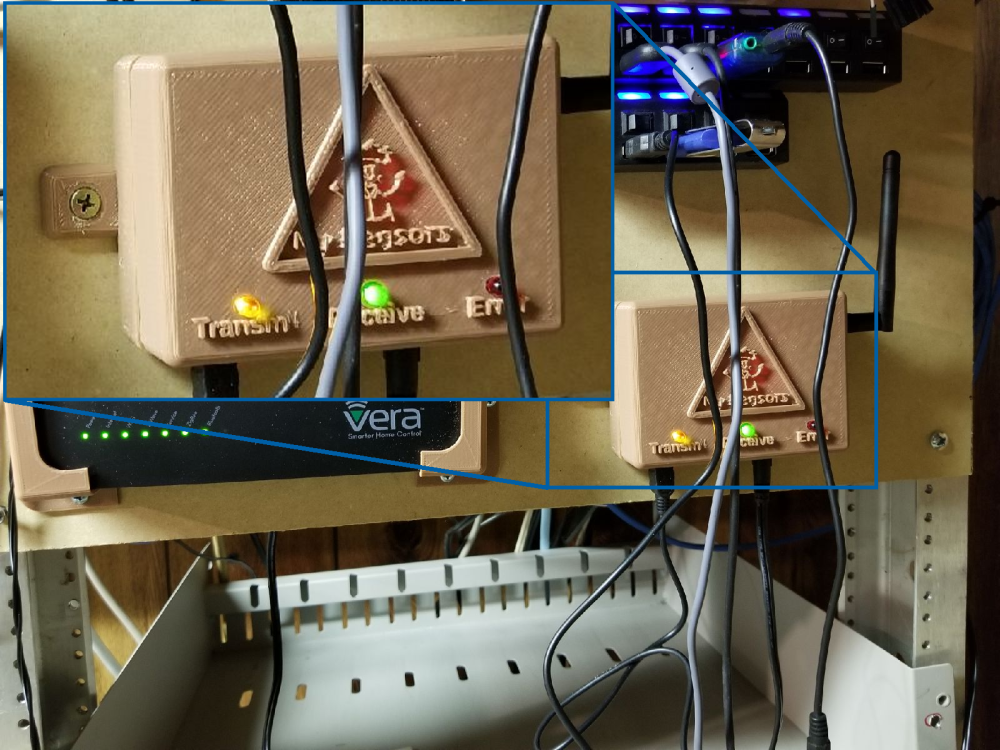
So I have uploaded the 3D design files for my MySensors gateway case to thingiverse for anyone that is interested.
https://www.thingiverse.com/thing:2904969
I have included the OpenSCAD file used to generate the .stl files. I would be interested in seeing posts of other makes or remixes of the design.
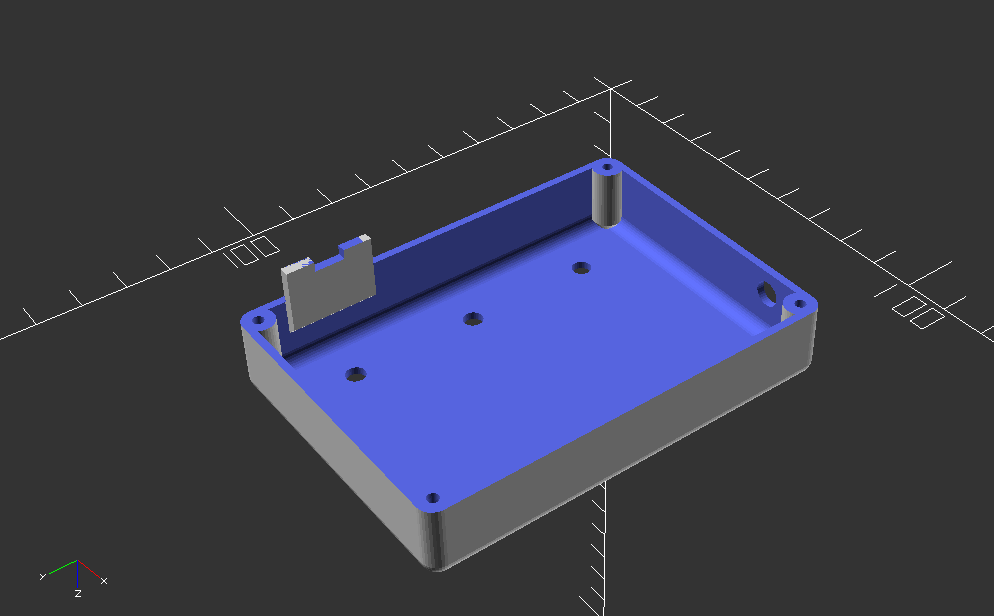
Vera Plus running UI7 with MySensors, Sonoffs and 1-Wire devices
Visit my website for more Bits, Bytes and Ramblings from me: http://dan.bemowski.info/ -
So I have uploaded the 3D design files for my MySensors gateway case to thingiverse for anyone that is interested.
https://www.thingiverse.com/thing:2904969
I have included the OpenSCAD file used to generate the .stl files. I would be interested in seeing posts of other makes or remixes of the design.
@dbemowsk Nice work!
Now that I finally own a 3D printer, I can't believe I waited so long to get one. I encourage anyone who doesn't yet have a 3D printer to get one too. Sharing enclosure files in addition to PCB designs is the next level.
-
@dbemowsk Nice work!
Now that I finally own a 3D printer, I can't believe I waited so long to get one. I encourage anyone who doesn't yet have a 3D printer to get one too. Sharing enclosure files in addition to PCB designs is the next level.
-
@dbemowsk Nice work!
Now that I finally own a 3D printer, I can't believe I waited so long to get one. I encourage anyone who doesn't yet have a 3D printer to get one too. Sharing enclosure files in addition to PCB designs is the next level.
@neverdie how are you getting on with setting the printer up? I have been struggling with the correct setting for some time with problems like the plastic would stick to the surface even though it is pre-heated. At the end I got really frustrated and retuned the printer. I am using www.3dhubs.com now if I need to print anything.
-
@neverdie how are you getting on with setting the printer up? I have been struggling with the correct setting for some time with problems like the plastic would stick to the surface even though it is pre-heated. At the end I got really frustrated and retuned the printer. I am using www.3dhubs.com now if I need to print anything.
@alexsh1 What brand/model of printer were you using? Also, what type of plastic were you trying to print with?
-
@neverdie how are you getting on with setting the printer up? I have been struggling with the correct setting for some time with problems like the plastic would stick to the surface even though it is pre-heated. At the end I got really frustrated and retuned the printer. I am using www.3dhubs.com now if I need to print anything.
@alexsh1 said in What did you build today (Pictures) ?:
@neverdie how are you getting on with setting the printer up? I have been struggling with the correct setting for some time with problems like the plastic would stick to the surface even though it is pre-heated. At the end I got really frustrated and retuned the printer. I am using www.3dhubs.com now if I need to print anything.
It's working like a dream with both PLA and PETG, which are the only plastics I've tried thus far. I'm using the Prusa I3 MK3 (Prusa's 4th generation 3D printer). Following dbemowsk's suggestion, I'm now using Octoprint, running on a Raspi3b, which is mostly useful for uploading print files and monitoring from a distance using a webcam. Honestly, though, once it gets past the first layer, I haven't had any failures, so the webcam probably isn't needed at all.