Navigation

    • Register
    • Login
    • OpenHardware.io
    • Categories
    • Recent
    • Tags
    • Popular
    1. Home
    2. Encrypt
    3. Posts
    • Profile
    • Following
    • Followers
    • Topics
    • Posts
    • Best
    • Groups

    Posts made by Encrypt

    • RE: Unable to read data from my (Linky) electricity meter

      Hello everyone!

      Thank you @mfalkvidd for your answer.
      I finally found the issue...

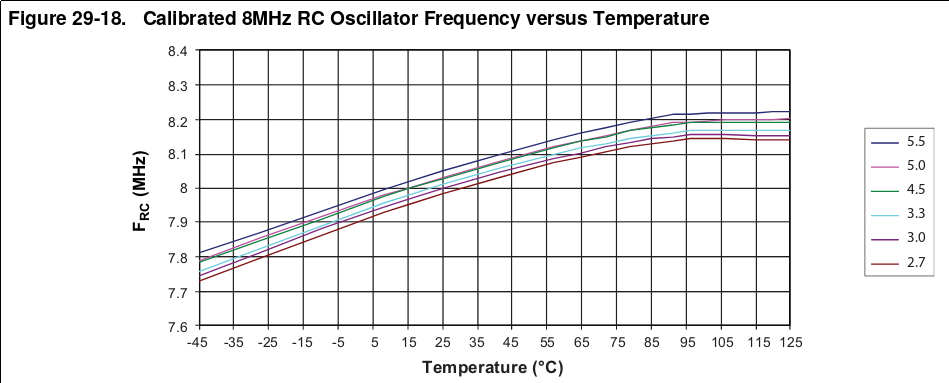
      Timing is particularly critical when reading UART and using the internal RC oscillator isn't a good idea... at all. Especially knowing that its frequency varies (quite a lot in my opinion) with temperature:

      capture.png
      (Page 274 of the ATMEGA328P datasheet available here: https://ww1.microchip.com/downloads/en/DeviceDoc/Atmel-7810-Automotive-Microcontrollers-ATmega328P_Datasheet.pdf)

      So, I changed the fuses of the ATMEGA328P to use an external 8 MHz crystal oscillator and now everything works perfectly! 🍾

      Regarding the code, I've initialized the "Serial" object with the configuration SERIAL_7E1, it works as expected!

      Cheers!
      Encrypt

      posted in Troubleshooting
      Encrypt
      Encrypt
    • Unable to read data from my (Linky) electricity meter

      Hello everyone!

      I am working on a new project, which goal is to read data sent by my "Linky" electricity meter here in France. This meter has a 3 pole terminal block on which I can connect a circuit to grab data about my power consumption.

      Here is a quick overview of how this works on the Linky meter: https://lucidar.me/en/home-automation/linky-customer-tele-information/

      A bit of context
      To do that, I'm using (as usual) a barebone ATMEGA328P running at 8MHz with its internal RC oscillator, an RFM69w radio and a few other components.

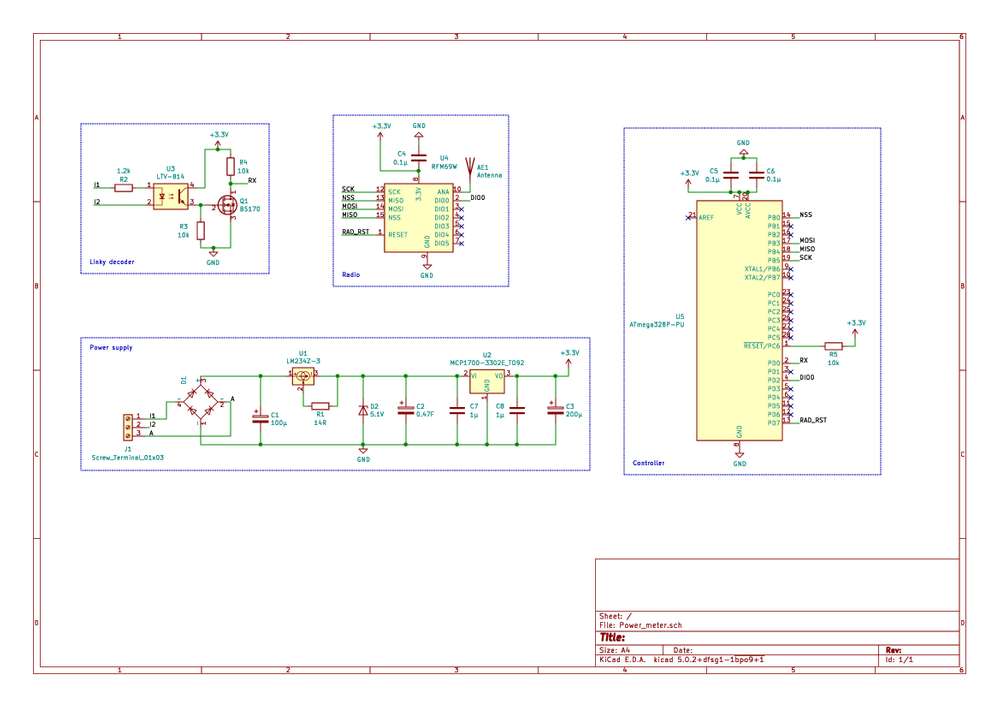
      The DIY circuit to get UART data out of the Linky meter can be found on various websites: an optocoupler makes the 50kHz modulated signal a digital signal and a mosfet ensures it outputs values between 0V and Vcc.
      This corresponds to the "Linky decoder" part of the schematics posted below.

      I tested that on a breadboard with an FTDI, so far so good, I can get data on my computer.

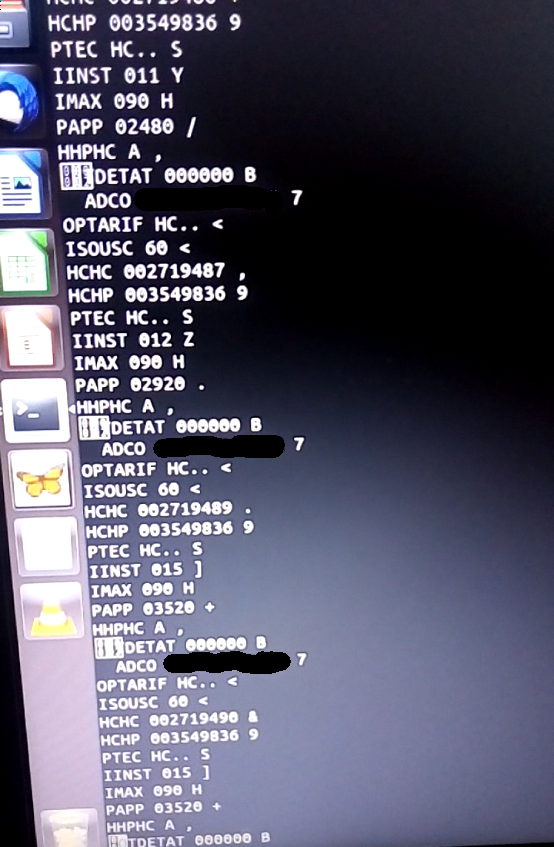
      capture.png

      On this screenshot, I'm running picocom like this:

      picocom -b 1200 -d 7 -p e -f n /dev/ttyUSB0
      

      Indeed, the Linky UART format is 7 bits data, even parity, one stop bit. The data is sent at 1200 bauds.

      Where I am now
      I'm currently integrating that circuit with my MySensors setup.
      I've made the same circuit on a breadboard, added components to directly power the board via the "I1 and A" terminals.

      Since only 130mW of current can be extracted between the I1 and A terminals, I'm using an LM234 to charge a 0.47F tank supercapacitor at a constant current of 5mA.
      Since the circuit (ATMEGA328P + "linky decoder") consume less than 5mA, it works pretty well. The radio is disabled between each loop so that the circuit only reads téléinfo frames (if not, the radio would consume 16mA in "listen mode").

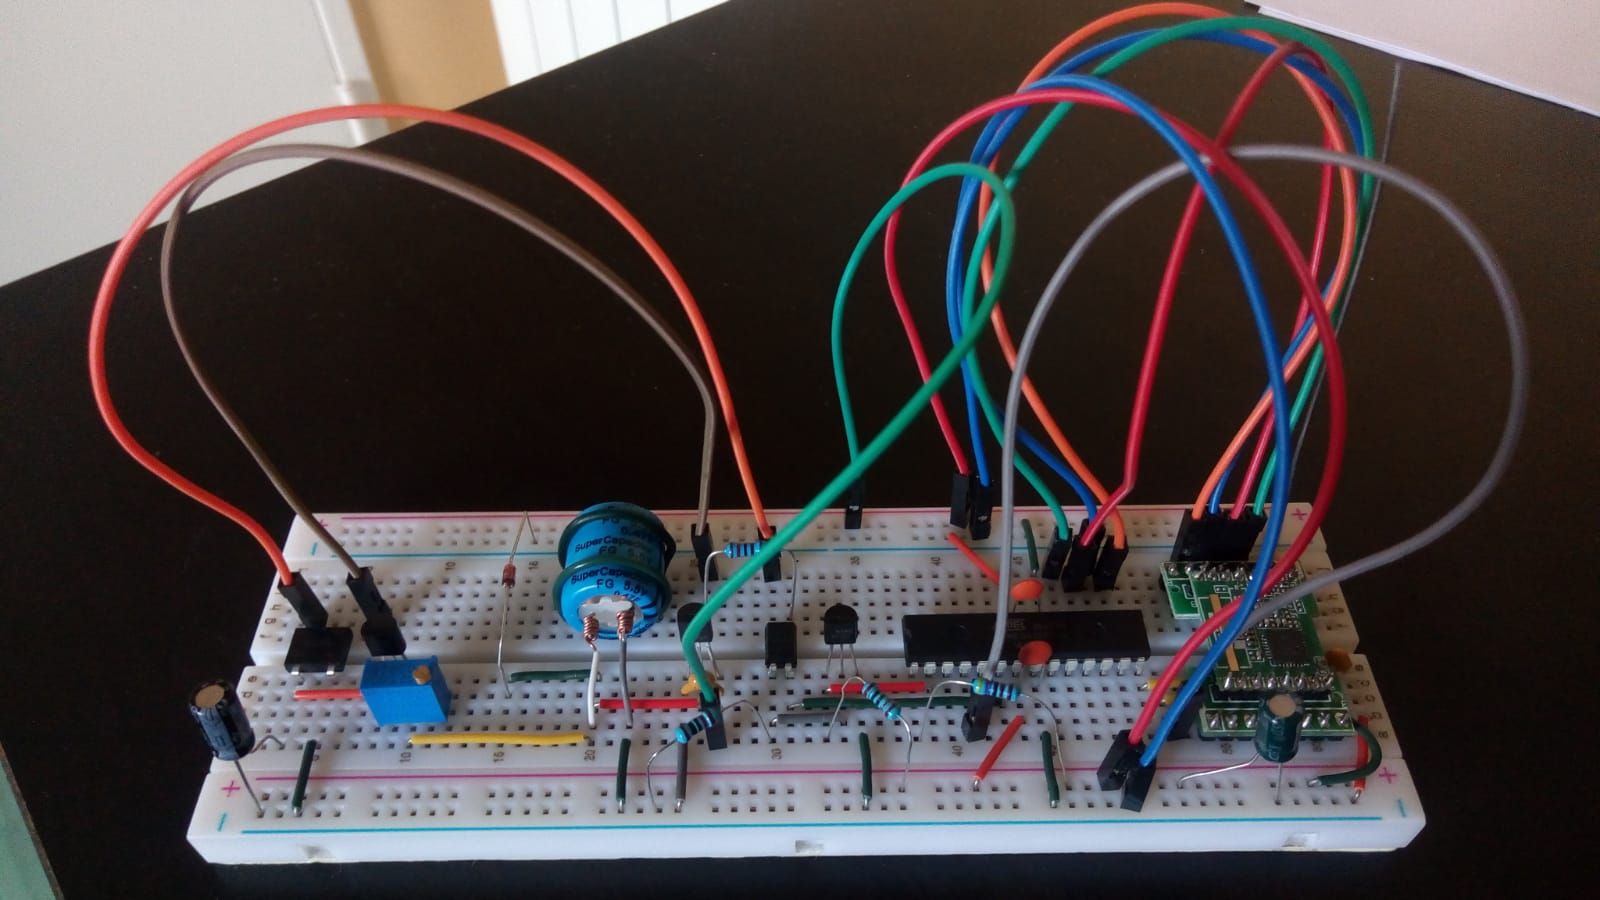
      Here are the schematics and a photograph of the board:
      schema.jpg
      circuit.jpg

      In terms of code, I'm using Hallard's LibTeleinfo library.
      It's a very well made library, available here: https://github.com/hallard/LibTeleinfo

      Here is the code running on the microcontroller:

      // MySensors configuration
      #define MY_RADIO_RFM69
      #define MY_RFM69_RST_PIN 8
      #define MY_RFM69_NEW_DRIVER
      #define MY_RFM69_ENABLE_ENCRYPTION
      #define MY_DISABLED_SERIAL
       
      // Global settings
      #define REPORT_TIMEOUT 180000
      #define PTEC_CHILD_ID 0
      #define PAPP_CHILD_ID 1
      #define HCHC_CHILD_ID 2
      #define HCHP_CHILD_ID 3
       
      // Include libraries
      #include <MySensors.h>
      #include <LibTeleinfo.h>
       
      // Global variables
      char ptec_value[3];
      unsigned long last_report = 0;
      long last_metrics[3] = {0, 0, 0}; // papp_max, hchc, hchp
      long cur_metrics[3] = {0, 0, 0};
      TInfo tinfo;
      MyMessage ptec_msg(PTEC_CHILD_ID, V_TEXT);
      MyMessage metrics_msg[3] = {
          MyMessage(PAPP_CHILD_ID, V_VA),
          MyMessage(HCHC_CHILD_ID, V_KWH),
          MyMessage(HCHP_CHILD_ID, V_KWH)
      };
       
      // Callback when a frame is received
      void data_callback(ValueList *me, uint8_t flags) {
       
          // Only take into account new / updated frames
          if (!(flags & (TINFO_FLAGS_ADDED | TINFO_FLAGS_UPDATED))) {
              return;
          }
       
          // Max apparent power
          if (strcmp(me->name, "PAPP") == 0) {
              cur_metrics[0] = max(cur_metrics[0], atol(me->value));
          }
       
          // "Heure creuse" counter
          else if (strcmp(me->name, "HCHC") == 0) {
              cur_metrics[1] = atol(me->value);
          }
       
          // "Heure pleine" counter
          else if (strcmp(me->name, "HCHP") == 0) {
              cur_metrics[2] = atol(me->value);
          }
       
          // Heure pleine / heure creuse
          else if (strcmp(me->name, "PTEC") == 0) {
       
              // Extract the two first characters ("HP" / "HC")
              strncpy(me->value, ptec_value, 2);
              ptec_value[2] = "\0";
       
              // Send the value immediately
              transportReInitialise();
              send(ptec_msg.set(ptec_value));
              transportDisable();
          }
      }
       
      void presentation() { 
       
          // Present the sensors
          sendSketchInfo("Power meter", "1.0");
          present(PTEC_CHILD_ID, S_INFO, "ptec");
          present(PAPP_CHILD_ID, S_POWER, "papp_max");
          present(HCHC_CHILD_ID, S_POWER, "hchc");
          present(HCHP_CHILD_ID, S_POWER, "hchp");
      }
       
      void setup() {
       
          // Setup serial
          Serial.begin(1200);
      //    Serial.begin(1200, SERIAL_7E1);
       
          // Initialise the teleinfo object
          tinfo.init(TINFO_MODE_HISTORIQUE);
          tinfo.attachData(data_callback);
      }
       
      void loop() {
       
          // Disable the radio
          transportDisable();
       
          // Read Linky frames for REPORT_TIMEOUT ms
          while ((unsigned long)(millis() - last_report) < REPORT_TIMEOUT) {
       
              // Read Teleinfo data and process it
              if (Serial.available()) {
                  tinfo.process(Serial.read());
              }
          }
       
          // Re-initialise the radio to send metrics
          transportReInitialise();
          
          // Potentially send the value of metrics that changed
          for (byte i = 0 ; i <= 2 ; i++) {
          
              // If the value indeed changed, send a message
              if (cur_metrics[i] != last_metrics[i]) {
                  send(metrics_msg[i].set(cur_metrics[i]));
                  last_metrics[i] = cur_metrics[i];
              }
          }
        
          // Reset the PAPP max value
          cur_metrics[0] = 0;
       
          // Set the new counter value
          last_report = millis();
      }
      

      My problem
      So, for an unknown reason (yet), I don't get any data on HomeAssistant.
      The node presents itself but that basically doesn't go further.

      Nov 20 17:53:48 DEBUG TSF:MSG:FPAR REQ,ID=7
      Nov 20 17:53:48 DEBUG TSF:CKU:OK,FCTRL
      Nov 20 17:53:48 DEBUG TSF:MSG:GWL OK
      Nov 20 17:53:49 DEBUG TSF:MSG:SEND,0-0-7-7,s=255,c=3,t=8,pt=1,l=1,sg=0,ft=0,st=OK:0
      Nov 20 17:53:50 DEBUG TSF:MSG:READ,7-7-0,s=255,c=3,t=24,pt=1,l=1,sg=0:1
      Nov 20 17:53:50 DEBUG TSF:MSG:PINGED,ID=7,HP=1
      Nov 20 17:53:50 DEBUG TSF:MSG:SEND,0-0-7-7,s=255,c=3,t=25,pt=1,l=1,sg=0,ft=0,st=OK:1
      Nov 20 17:53:50 DEBUG TSF:MSG:READ,7-7-0,s=255,c=3,t=15,pt=6,l=2,sg=0:0100
      Nov 20 17:53:50 DEBUG TSF:MSG:SEND,0-0-7-7,s=255,c=3,t=15,pt=6,l=2,sg=0,ft=0,st=OK:0100
      Nov 20 17:53:50 DEBUG TSF:MSG:READ,7-7-0,s=255,c=0,t=17,pt=0,l=5,sg=0:2.3.1
      Nov 20 17:53:50 DEBUG TSF:MSG:READ,7-7-0,s=255,c=3,t=6,pt=1,l=1,sg=0:0
      Nov 20 17:53:51 DEBUG TSF:MSG:SEND,0-0-7-7,s=255,c=3,t=6,pt=0,l=1,sg=0,ft=0,st=OK:M
      Nov 20 17:53:51 DEBUG TSF:MSG:READ,7-7-0,s=255,c=3,t=11,pt=0,l=11,sg=0:Power meter
      Nov 20 17:53:51 DEBUG TSF:MSG:READ,7-7-0,s=255,c=3,t=12,pt=0,l=3,sg=0:1.0
      Nov 20 17:53:51 DEBUG TSF:MSG:READ,7-7-0,s=0,c=0,t=36,pt=0,l=4,sg=0:ptec
      Nov 20 17:53:51 DEBUG TSF:MSG:READ,7-7-0,s=1,c=0,t=13,pt=0,l=8,sg=0:papp_max
      Nov 20 17:53:51 DEBUG TSF:MSG:READ,7-7-0,s=2,c=0,t=13,pt=0,l=4,sg=0:hchc
      Nov 20 17:53:51 DEBUG TSF:MSG:READ,7-7-0,s=3,c=0,t=13,pt=0,l=4,sg=0:hchp
      Nov 20 17:53:51 DEBUG TSF:MSG:READ,7-7-0,s=255,c=3,t=26,pt=1,l=1,sg=0:2
      Nov 20 17:53:51 DEBUG TSF:MSG:SEND,0-0-7-7,s=255,c=3,t=27,pt=1,l=1,sg=0,ft=0,st=OK:1
      

      As you could see earlier, I've managed to successfully read data out of the Linky meter via an FTDI. So I guess that somehow the ATMEGA328P should be able to read this as well...

      According to what I've understood, I have to use "SERIAL_7E1" to read the Linky frames via the UART hardware bus. I tried both with and without it, but without success yet.

      My question
      Do you eventually know what could be wrong here?
      Is there eventually a bug in my code (another pair of eyes won't hurt for sure)?

      I hope I explained everything. If I forgot a detail, please ask me for details!

      Thanks in advance for your help!
      Encrypt

      posted in Troubleshooting
      Encrypt
      Encrypt
    • RE: HLK-PMxx protection: choosing the right MOV / fuse value

      Hello @monte!

      Which kind of varistor did you use? What was its rated voltage?

      As @skywatch mentioned, if you chose a varistor which value was "too close" to your mains line, it probably got triggered too much...

      Also, if your fuse was "too big" (500mA or more), it's probably the reason why it didn't blow.

      posted in Hardware
      Encrypt
      Encrypt
    • RE: HLK-PMxx protection: choosing the right MOV / fuse value

      Hello @skywatch !

      Thank you very much for your answer! It is now clear for me! 🙂

      Cheers!

      posted in Hardware
      Encrypt
      Encrypt
    • HLK-PMxx protection: choosing the right MOV / fuse value

      Hello!

      I am still working on a MySensors project which uses an HLK-PM03 module to provide 3.3V DC from mains to my circuit. This project was almost finished when I came across posts on forums recommending adding a fuse / varistor in front of the HLK-PM03 module to protect it.

      So I dug that subject a bit more and I came across a recent HLK-PMxx datasheet in which this is mentioned: https://datasheet.lcsc.com/szlcsc/1912111437_HI-LINK-HLK-PM12_C209905.pdf

      capture.png

      The fuse and varistor are really needed to protect the circuit ; the capacitor / inductance are apparently optional. In the datasheet, the constructor recommends using a 0.5A slow blow fuse and a 350V varistor (10D561K).

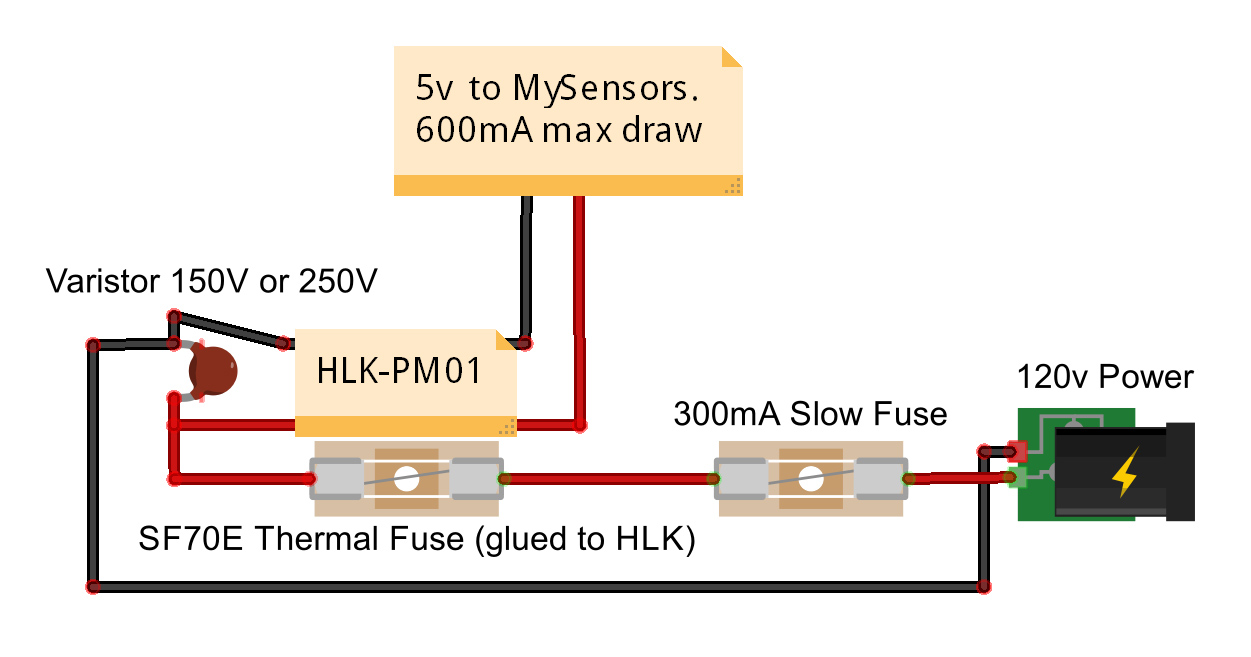
      But I found a discussion on the MySensors forums with completely different recommendations. This one typically: https://forum.mysensors.org/topic/1607/safe-in-wall-ac-to-dc-transformers
      The first post shows a diagram with a 0.3A slow blow fuse and a 250V varistor.

      alt text

      The choice of the "right" components really puzzled me recently, so here is my question: which varistor / fuse value should I select, at the end?

      I'm particularly interested in knowing how varistors (MOVs) should be chosen, because I have read so many conflicting arguments on different forums...

      A post of @skywatch I recently found (https://forum.mysensors.org/topic/9790/has-anyone-else-seen-a-varistor-mov-failure-in-a-power-supply?_=1597873012895) seems to confirm the choice of the manufacturer regarding the 350V RMS MOV.

      Finally, note that I live in France ; mains voltage here is 230V AC +/- 10%.

      Thanks in advance for your answers!
      Encrypt

      posted in Hardware
      Encrypt
      Encrypt
    • Collective purchase order of RFM69W radios (Paris area)

      Hello!

      I'll post a quick message on the forums this time 😛

      I will surely run out of RFM69W radios in the coming weeks, since I will finish one of my projects and I have a few other ideas of sensors to build.
      I am planning to order something like 10 RFM69W radios directly to HopeRF (its manufacturer) to be sure I get genuine parts.

      So, I thought: why not do a collective purchase order, so that we can all reduce shipping costs? 🙂

      Regarding the price of the radios, HopeRF sold them $2.60 each almost 2 years ago. The shipping cost was $8 (EMS packet) or $30 (DHL) and there was a $2 paypal charge.

      A friend of mine would also be interested in ordering 10 radios, so we are two for the moment. Is there anyone in the Paris area also interested?
      Once received, I could give you the radios in person in Paris since I work there.

      Cheers!

      posted in General Discussion
      Encrypt
      Encrypt
    • RE: What is the "robust" way to sleep / send messages?

      Hello!

      Thank you @TRS-80 and @zboblamont for your answers and sorry for the delay...

      To answer your question @TRS-80, I'm actually trying to figure out what is the most robust way to use the MySensors library.
      Most examples out there consider that all underlying layers (hardware, transmission...) will just work an the return value of sleep / send is never used.

      I've found that if the send call fails due to missing hardware ACKs, the node ends up registering again. So, I was considering retrying sending data if send failed, but MySensors already retries sending the data a few times as @zboblamont says.

      Regarding the sleep call, I'm now checking the return value and making sure that the return code is the interrupt, as specified by the API. Here is my new code:

      // MySensors configuration
      #define MY_SPLASH_SCREEN_DISABLED
      #define MY_RADIO_RFM69
      #define MY_RFM69_RST_PIN 8
      #define MY_RFM69_NEW_DRIVER
      #define MY_RFM69_ENABLE_ENCRYPTION 
      
      // Include libraries
      #include <MySensors.h>
      
      // Global settings
      #define BATT_ADC_PIN A1
      #define CHILD_ID 0
      #define SENSOR_PIN 3
      #define SENSOR_INT digitalPinToInterrupt(SENSOR_PIN)
      
      // Global variables
      byte last_batt_level = 0;
      unsigned long total_water = 0;
      MyMessage water_msg(CHILD_ID, V_VOLUME);
      
      // Check the battery voltage and eventually send it
      void report_battery_level() {
      
          // Read the battery voltage
          long adc = analogRead(BATT_ADC_PIN);
      
          // Compute the battery level
          // Vmin = 1.6/(3.3/1023) = 496
          // Vmax = 3/(3.3/1023) = 930
          long level = (adc-496)*100/434;
          byte batt_level = constrain(level, 0, 100);
          
          // The battery level changed, send it
          if (batt_level != last_batt_level) {
              sendBatteryLevel(batt_level);        
              last_batt_level = batt_level;
          }
      }
      
      void presentation() { 
          sendSketchInfo("Water meter", "1.0");
          present(CHILD_ID, S_WATER);
      }
      
      void setup() {
          pinMode(BATT_ADC_PIN, INPUT);
          pinMode(SENSOR_PIN, INPUT);
      }
      
      void loop() {
        
          // Sleep until we get a FALLING signal
          byte interrupt = sleep(SENSOR_INT, FALLING, 0);
      
          // We were woken up by the sensor
          if (interrupt == SENSOR_INT) {
      
              // Send the new water volume to the gateway
              total_water++;
              send(water_msg.set(total_water));
          
              // Send the battery level every 150L
              if (total_water % 150 == 0) {
                  report_battery_level();
              }
          }
      }
      

      I've had communication issues since I changed the code and the reported water consumption didn't skyrocket as previously, which is good.

      To answer to @zboblamont, the FALLING interrupt is fine actually. The water volume is incremented "rather slowly", at most every 7s I'd say (if we open all taps :P).

      I'll have to fix the communication problems and to do that I'll have to design proper PCBs. The sensors / gateway are on breadboards right now, which is surely suboptimal.

      Cheers!

      posted in Development
      Encrypt
      Encrypt
    • What is the "robust" way to sleep / send messages?

      Hello everyone!

      I recently built a water meter with MySensors based on:

      • A barebone ATMEGA328P
      • An RFM69W radio
      • The ITRON Cyble sensor (https://www.itron.com/-/media/feature/products/documents/brochure/cyble-sensor-water-brochure-english.pdf).
      • Two AA batteries, a 3.3V boost converter...

      Here is the code running on the microcontroller:

      // MySensors configuration
      #define MY_SPLASH_SCREEN_DISABLED
      #define MY_RADIO_RFM69
      #define MY_RFM69_RST_PIN 8
      #define MY_RFM69_NEW_DRIVER
      #define MY_RFM69_ENABLE_ENCRYPTION 
      
      // Include libraries
      #include <MySensors.h>
      
      // Global settings
      #define BATT_ADC_PIN A1
      #define CHILD_ID 0
      #define SENSOR_PIN 3
      
      // Global variables
      byte last_batt_level = 0;
      unsigned long total_water = 0;
      MyMessage water_msg(CHILD_ID, V_VOLUME);
      
      // Check the battery voltage and eventually send it
      void report_battery_level() {
      
          // Read the battery voltage
          long adc = analogRead(BATT_ADC_PIN);
      
          // Compute the battery level
          // Vmin = 2/(3.3/1023) = 620
          // Vmax = 3/(3.3/1023) = 930
          long level = (adc-620)*100/310;
          byte batt_level = constrain(level, 0, 100);
          
          // The battery level changed, send it
          if (batt_level != last_batt_level) {
              sendBatteryLevel(batt_level);        
              last_batt_level = batt_level;
          }
      }
      
      void presentation() { 
          sendSketchInfo("Water meter", "1.0");
          present(CHILD_ID, S_WATER);
      }
      
      void setup() {
          pinMode(BATT_ADC_PIN, INPUT);
          pinMode(SENSOR_PIN, INPUT);
      }
      
      void loop() {
        
          // Sleep until we get a FALLING signal
          sleep(digitalPinToInterrupt(SENSOR_PIN), FALLING, 0);
      
          // Send the new water volume to the gateway
          total_water++;
          send(water_msg.set(total_water));
      
          // Send the battery level every 150L
          if (total_water % 150 == 0) {
              report_battery_level();
          }
      }
      

      It has been working well globally. However I ran into two issues.

      First problem: For an unknown reason, my Raspberry Pi gateway stopped responding at some point. As a result, the send() call probably failed and I suspect the sleep() method to immediately return with a value I don't check. When I restarted the gateway, the node reported a water consumption of a million liters so the loop() method was surely called multiple times...
      This is the first issue to fix in the code.

      Second problem: When the voltage of the batteries was too low, the same kind of problem also occured. I could see in the gateway logs that the sensor tried to reconnect multiple times without success (there were NACKs during the presentation step), since the radio didn't have enough power to operate normally. When presentation finally succeeded, the node reposted a water consumption of a million litters. So here again, the loop() method had been called multiple times.

      So, what is the "robust" way to prevent these problems, in the code?

      The underlying questions probably are:

      • What will happen if the send() call fails? Will the code continue or will it retry sending the data a few times?
      • In which cases will the sleep() method actually not put the node into sleep mode?
      • Do you know why the loop() method was called multiple times, resulting in a large value of the total_water variable during the issue? According to this discussion, I would have thought the loop() method would not have been called again if the node wasn't successfully reconnected to the gateway due to the while (!isTransportReady() && (sleepDeltaMS < sleepingTimeMS) && (sleepDeltaMS < MY_SLEEP_TRANSPORT_RECONNECT_TIMEOUT_MS)) part of the code... Unless _process() actually calls loop()?

      It would be great to have complete "robust" sketch examples in the MySensors repository on GitHub, since all examples consider that the gateway will always be responding, that the node will always be correctly power and will always successfully send its payload.

      On the hardware side, the Connecting the radio page also assumes that the RFM69W radio will always be operating correctly and it's not recommended to connect the RESET pin of the radio to the Arduino / ATMEGA. That's unfortunate since connecting that pin on one of my projects recently fixed stability issues! 😉

      Thanks in advance for your help!

      posted in Development
      Encrypt
      Encrypt
    • RE: Is it worth it adding a reset circuit to MySensors nodes?

      Hello everyone and thank you for your feedback so far!

      @BearWithBeard gave a good argument since I'm also using HomeAssistant.

      Moreover, adding such a circuit will only add €0.50 per board, so it sounds good!

      posted in Hardware
      Encrypt
      Encrypt
    • Is it worth it adding a reset circuit to MySensors nodes?

      Helloes 👋

      I am back on the forums with a quite simple question for you 🙂

      I am currently finishing to design a PCB for a MySensors project with "elementary" components: an ATMEGA328P as microcontroller, an HLK-PM03 as power supply, an RFM69W as radio...
      This node will be directly connected to mains, therefore the only way to reboot it is to remove the fuse at the fuse box, which isn't very handy.

      This made me wonder: is it worth adding a reset circuit (connected to the RESET pin of the microcontroller) to a MySensors node?
      In other words, have you ever experienced issues with your nodes that required a power cycle / reset?

      I'm in touch with a MySensors user (brianx) over IRC (#mysensors on Freenode, which I invite you to join 😛 ). He told me that one of his nodes sometimes freezes and power cycling isn't very easy.

      On my side, I built a MySensors "pilot wire" node a few months ago. Sometimes, after something like 15 days to a month, the node also freezes: it stops responding to any command, including network discovery requests.
      I didn't add an electrolytic capacitor to the prototype -- which probably doesn't help -- but I guess a reset circuit could be worth in the final version of the board.

      So what are your opinions / experiences?

      posted in Hardware
      Encrypt
      Encrypt
    • RE: Solar Energy Harvesting for wireless motes

      Personally, I'd just use the AEM10941, ah ah.

      It has MPPT module, starts charging the storage medium when your solar cell reached 50mV... It's hard to beat that 😛

      That being said, it's made to work with small solar cells, so if you plan to use "big" panels (via V > 5V or I > 110 mA), then building your own circuit will be better.

      I can't say much about your design though, I haven't enough knowledge on that matter 😉

      posted in Hardware
      Encrypt
      Encrypt
    • RE: Signing fails due to NACKed messages

      Hello again!

      I restarted the node this morning, just out of curiosity...

      I'm actually very surprised to see that presentation works without any problem (and the node sends its initial value correctly), but commands sent later failed...

      Here are the logs:

      Nov 16 12:12:16 DEBUG TSF:MSG:READ,2-2-255,s=255,c=3,t=7,pt=0,l=0,sg=0:
      Nov 16 12:12:16 DEBUG TSF:MSG:BC
      Nov 16 12:12:16 DEBUG TSF:MSG:FPAR REQ,ID=2
      Nov 16 12:12:16 DEBUG TSF:PNG:SEND,TO=0
      Nov 16 12:12:16 DEBUG TSF:CKU:OK
      Nov 16 12:12:16 DEBUG TSF:MSG:GWL OK
      Nov 16 12:12:16 DEBUG TSF:MSG:SEND,0-0-2-2,s=255,c=3,t=8,pt=1,l=1,sg=0,ft=0,st=OK:0
      Nov 16 12:12:18 DEBUG TSF:MSG:READ,2-2-0,s=255,c=3,t=24,pt=1,l=1,sg=0:1
      Nov 16 12:12:18 DEBUG TSF:MSG:PINGED,ID=2,HP=1
      Nov 16 12:12:18 DEBUG TSF:MSG:SEND,0-0-2-2,s=255,c=3,t=25,pt=1,l=1,sg=0,ft=0,st=OK:1
      Nov 16 12:12:18 DEBUG TSF:MSG:READ,2-2-0,s=255,c=3,t=15,pt=6,l=2,sg=0:0101
      Nov 16 12:12:18 DEBUG TSF:MSG:SEND,0-0-2-2,s=255,c=3,t=15,pt=6,l=2,sg=0,ft=0,st=OK:0100
      Nov 16 12:12:18 DEBUG TSF:MSG:READ,2-2-0,s=255,c=3,t=16,pt=0,l=0,sg=0:
      Nov 16 12:12:18 DEBUG TSF:MSG:SEND,0-0-2-2,s=255,c=3,t=17,pt=6,l=25,sg=0,ft=0,st=OK:<NONCE>
      Nov 16 12:12:18 DEBUG TSF:MSG:READ,2-2-0,s=255,c=0,t=17,pt=0,l=5,sg=1:2.3.1
      Nov 16 12:12:19 DEBUG TSF:MSG:READ,2-2-0,s=255,c=3,t=16,pt=0,l=0,sg=1:
      Nov 16 12:12:19 DEBUG TSF:MSG:SEND,0-0-2-2,s=255,c=3,t=17,pt=6,l=25,sg=1,ft=0,st=OK:<NONCE>
      Nov 16 12:12:19 DEBUG TSF:MSG:READ,2-2-0,s=255,c=3,t=6,pt=1,l=1,sg=1:0
      Nov 16 12:12:19 DEBUG TSF:MSG:SEND,0-0-2-2,s=255,c=3,t=16,pt=0,l=0,sg=1,ft=0,st=OK:
      Nov 16 12:12:19 DEBUG TSF:MSG:READ,2-2-0,s=255,c=3,t=17,pt=6,l=25,sg=1:<NONCE>
      Nov 16 12:12:19 DEBUG TSF:MSG:SEND,0-0-2-2,s=255,c=3,t=6,pt=0,l=1,sg=1,ft=0,st=OK:M
      Nov 16 12:12:19 DEBUG TSF:MSG:READ,2-2-0,s=255,c=3,t=16,pt=0,l=0,sg=1:
      Nov 16 12:12:19 DEBUG TSF:MSG:SEND,0-0-2-2,s=255,c=3,t=17,pt=6,l=25,sg=1,ft=0,st=OK:<NONCE>
      Nov 16 12:12:19 DEBUG TSF:MSG:READ,2-2-0,s=255,c=3,t=11,pt=0,l=10,sg=1:Fil pilote
      Nov 16 12:12:20 DEBUG TSF:MSG:READ,2-2-0,s=255,c=3,t=16,pt=0,l=0,sg=1:
      Nov 16 12:12:20 DEBUG TSF:MSG:SEND,0-0-2-2,s=255,c=3,t=17,pt=6,l=25,sg=1,ft=0,st=OK:<NONCE>
      Nov 16 12:12:20 DEBUG TSF:MSG:READ,2-2-0,s=255,c=3,t=12,pt=0,l=3,sg=1:1.0
      Nov 16 12:12:20 DEBUG TSF:MSG:READ,2-2-0,s=0,c=3,t=16,pt=0,l=0,sg=1:
      Nov 16 12:12:20 DEBUG TSF:MSG:SEND,0-0-2-2,s=255,c=3,t=17,pt=6,l=25,sg=1,ft=0,st=OK:<NONCE>
      Nov 16 12:12:21 DEBUG TSF:MSG:READ,2-2-0,s=0,c=0,t=4,pt=0,l=0,sg=1:
      Nov 16 12:12:21 DEBUG TSF:MSG:READ,2-2-0,s=255,c=3,t=26,pt=1,l=1,sg=1:2
      Nov 16 12:12:21 DEBUG TSF:MSG:SEND,0-0-2-2,s=255,c=3,t=16,pt=0,l=0,sg=1,ft=0,st=OK:
      Nov 16 12:12:21 DEBUG TSF:MSG:READ,2-2-0,s=255,c=3,t=17,pt=6,l=25,sg=1:<NONCE>
      Nov 16 12:12:21 DEBUG TSF:MSG:SEND,0-0-2-2,s=255,c=3,t=27,pt=1,l=1,sg=1,ft=0,st=OK:1
      Nov 16 12:12:21 DEBUG TSF:MSG:READ,2-2-0,s=0,c=3,t=16,pt=0,l=0,sg=1:
      Nov 16 12:12:21 DEBUG TSF:MSG:SEND,0-0-2-2,s=255,c=3,t=17,pt=6,l=25,sg=1,ft=0,st=OK:<NONCE>
      Nov 16 12:12:21 DEBUG TSF:MSG:READ,2-2-0,s=0,c=1,t=2,pt=2,l=2,sg=1:1
      Nov 16 12:12:21 DEBUG TSF:MSG:READ,2-2-0,s=0,c=3,t=16,pt=0,l=0,sg=1:
      Nov 16 12:12:22 DEBUG TSF:MSG:SEND,0-0-2-2,s=255,c=3,t=17,pt=6,l=25,sg=1,ft=0,st=OK:<NONCE>
      Nov 16 12:12:22 DEBUG TSF:MSG:READ,2-2-0,s=0,c=1,t=3,pt=2,l=2,sg=1:2
      Nov 16 12:13:21 DEBUG TSF:MSG:SEND,0-0-2-2,s=0,c=3,t=16,pt=0,l=0,sg=1,ft=0,st=OK:
      Nov 16 12:13:21 DEBUG TSF:MSG:READ,2-2-0,s=255,c=3,t=17,pt=6,l=25,sg=1:<NONCE>
      Nov 16 12:13:21 DEBUG TSF:MSG:SEND,0-0-2-2,s=0,c=1,t=3,pt=0,l=1,sg=1,ft=0,st=OK:3
      Nov 16 12:13:25 DEBUG !TSF:MSG:SEND,0-0-2-2,s=0,c=3,t=16,pt=0,l=0,sg=1,ft=0,st=NACK:
      Nov 16 12:13:25 DEBUG !TSF:MSG:SIGN FAIL
      Nov 16 12:13:25 DEBUG TSF:MSG:READ,2-2-0,s=255,c=3,t=17,pt=6,l=25,sg=1:<NONCE>
      Nov 16 12:13:30 DEBUG !TSF:MSG:SEND,0-0-2-2,s=0,c=3,t=16,pt=0,l=0,sg=1,ft=0,st=NACK:
      Nov 16 12:13:30 DEBUG !TSF:MSG:SIGN FAIL
      Nov 16 12:13:30 DEBUG TSF:MSG:READ,2-2-0,s=255,c=3,t=17,pt=6,l=25,sg=1:<NONCE>
      Nov 16 12:13:39 DEBUG !TSF:MSG:SEND,0-0-2-2,s=0,c=3,t=16,pt=0,l=0,sg=1,ft=0,st=NACK:
      Nov 16 12:13:39 DEBUG !TSF:MSG:SIGN FAIL
      Nov 16 12:13:39 DEBUG TSF:MSG:READ,2-2-0,s=255,c=3,t=17,pt=6,l=25,sg=1:<NONCE>
      Nov 16 12:13:44 DEBUG !TSF:MSG:SEND,0-0-2-2,s=0,c=3,t=16,pt=0,l=0,sg=1,ft=0,st=NACK:
      Nov 16 12:13:44 DEBUG !TSF:MSG:SIGN FAIL
      Nov 16 12:13:44 DEBUG TSF:MSG:READ,2-2-0,s=255,c=3,t=17,pt=6,l=25,sg=1:<NONCE>
      Nov 16 12:13:47 DEBUG TSF:MSG:SEND,0-0-2-2,s=0,c=3,t=16,pt=0,l=0,sg=1,ft=0,st=OK:
      Nov 16 12:13:47 DEBUG TSF:MSG:READ,2-2-0,s=255,c=3,t=17,pt=6,l=25,sg=1:<NONCE>
      Nov 16 12:13:47 DEBUG TSF:MSG:SEND,0-0-2-2,s=0,c=1,t=3,pt=0,l=1,sg=1,ft=0,st=OK:0
      

      As you can see, the node finished starting at 12:13:25 but my first command at 12:13:25 failed.

      If it was really a noise / power supply issue, I would expect presentation to fail, considering that it's a long process taking more than 5s and using the radio quite intensively.

      I've read that people here got range issue with MySensors 2.3.x, isn't that linked? Here for instance:

      • https://forum.mysensors.org/topic/9321/rpi-ethernet-gateway-with-rfm69h-c-w-very-poor-range/9
      • https://forum.mysensors.org/topic/7912/rfm69-new-driver-delay/56

      @tekka: It seems you were working on that, was it supposed to be fixed in version 2.3.1?

      I can't enable radio logging easily but I suspect it could be caused by the auto-adjusting RSSI feature...
      posted in Troubleshooting
      Encrypt
      Encrypt
    • RE: Signing fails due to NACKed messages

      Well, I'm using RFM69W radios running on the 868MHz band.
      So, there should be a very low traffic on that band (compared to Wi-Fi).

      I'll probably add a capacitor near Vcc pin of the radio, I've just seen on the datasheet that it's recommended , although it seems there is already one on the board.

      Also, regarding the gateway, I plan to make a dipole antenna, since I don't have any space constraint.

      posted in Troubleshooting
      Encrypt
      Encrypt
    • RE: Signing fails due to NACKed messages

      Hello @Anticimex, thanks for your answer!

      You're right, since nothing changed on the hardware side, it may be a noise / power supply issue.

      Also, I should really finish making clean MySensors PCBs for that project and not rely on breadboards and stuff like that which is very likely to degrade the signal.

      I'll keep you updated with my progress, thanks again 🙂

      posted in Troubleshooting
      Encrypt
      Encrypt
    • RE: Signing fails due to NACKed messages

      Hello!

      The issue persists finally, but network discovery seems to be working, it seems... Here are relevant logs:

      Nov 14 21:32:00 DEBUG TSM:READY:NWD REQ
      Nov 14 21:32:00 DEBUG TSF:MSG:SEND,0-0-255-255,s=255,c=3,t=20,pt=0,l=0,sg=0,ft=0,st=OK:
      Nov 14 21:32:00 DEBUG TSF:MSG:READ,2-2-0,s=255,c=3,t=21,pt=1,l=1,sg=1:0
      Nov 14 21:41:59 DEBUG TSF:SRT:OK
      Nov 14 21:42:00 DEBUG TSF:SAN:OK
      Nov 14 21:52:00 DEBUG TSM:READY:NWD REQ
      Nov 14 21:52:00 DEBUG TSF:MSG:SEND,0-0-255-255,s=255,c=3,t=20,pt=0,l=0,sg=0,ft=0,st=OK:
      Nov 14 21:52:00 DEBUG TSF:MSG:READ,2-2-0,s=255,c=3,t=21,pt=1,l=1,sg=1:0
      Nov 14 21:57:00 DEBUG TSF:SAN:OK
      Nov 14 22:00:00 DEBUG !TSF:MSG:SEND,0-0-2-2,s=0,c=3,t=16,pt=0,l=0,sg=1,ft=0,st=NACK:
      Nov 14 22:00:00 DEBUG !TSF:MSG:SIGN FAIL
      Nov 14 22:00:00 DEBUG TSF:MSG:READ,2-2-0,s=255,c=3,t=17,pt=6,l=25,sg=1:<NONCE>
      Nov 14 22:00:41 DEBUG TSF:MSG:SEND,0-0-2-2,s=0,c=3,t=16,pt=0,l=0,sg=1,ft=0,st=OK:
      Nov 14 22:00:42 DEBUG TSF:MSG:READ,2-2-0,s=255,c=3,t=17,pt=6,l=25,sg=1:<NONCE>
      Nov 14 22:00:42 DEBUG TSF:MSG:SEND,0-0-2-2,s=0,c=1,t=3,pt=0,l=1,sg=1,ft=0,st=OK:6
      Nov 14 22:00:43 DEBUG TSF:MSG:SEND,0-0-2-2,s=0,c=3,t=16,pt=0,l=0,sg=1,ft=0,st=OK:
      Nov 14 22:00:43 DEBUG TSF:MSG:READ,2-2-0,s=255,c=3,t=17,pt=6,l=25,sg=1:<NONCE>
      Nov 14 22:00:43 DEBUG TSF:MSG:SEND,0-0-2-2,s=0,c=1,t=3,pt=0,l=1,sg=1,ft=0,st=OK:3
      

      As you can see, the heater was supposed to go into "Eco" mode at 22:00:00 but signing failed.
      It seems that the nonce was received though, but the nonce request wasn't acknowledged...

      At 22:00:43, I changed manually the mode to "Off" and to "Eco" again (in HomeAssistant) and it finally worked...

      Do you have any clue why this is happening?
      Maybe @Anticimex -- the awesome security guy of MySensors -- has an idea? 😛

      posted in Troubleshooting
      Encrypt
      Encrypt
    • RE: Solar Energy Harvesting for wireless motes

      Hello!

      Sorry for the delay, it seems I haven't been notified...

      As far as I'm concerned, I have no account on that website.
      I could create one, even if I'm planning to use the chip on the future...

      I'll come back to you if I do so 🙂

      posted in Hardware
      Encrypt
      Encrypt
    • RE: Signing fails due to NACKed messages

      Hello!

      I've just noticed in the logs I provided that the node doesn't respond to network discovery requests... So I'd say there is definitely something wrong with my setup now...

      I rebooted the gateway and the node and it is working again...
      I guess the issue is temporarily resolved.

      I have a question: does the TX/RX power of the (RFM69W) radio automatically changes over time, depending on signal quality?
      I think I've read that somewhere on the MySensors forums but I may be wrong.

      If it does, maybe the radio signal was automatically set to a too low value at some point?

      posted in Troubleshooting
      Encrypt
      Encrypt
    • RE: A water pulse meter using interrupts and the ATMEGA328P "power save" mode

      Thanks for the feedback @zboblamont!
      I was probably overthinking the whole thing 😛

      posted in Troubleshooting
      Encrypt
      Encrypt
    • RE: Solar Energy Harvesting for wireless motes

      There is a "Where to buy" button at the top of the page I linked.

      As you can see on, the page, they can be bought worldwide on the Fujitsu webshop for €4 per unit: https://shop.feeu.com/epages/es966226.sf/en_GB/?ObjectPath=/Shops/es966226/Products/AEM10941

      You can also buy the "ready to use" board built and sold by Jasper Sikken on Tindie:

      • The supercapaciors version: https://www.tindie.com/products/jaspersikken/solar-harvesting-into-supercapacitors/
      • The lithium-ion version: https://www.tindie.com/products/jaspersikken/solar-harvesting-into-li-ion-battery/
        They are a bit expensive though (€22.60 each), that's why I'm considering building my own boards.

      I've just found now that he has posted the schematics on GitHub, that's great:

      • https://github.com/jrsikken/AEMSUCA
      • https://github.com/jrsikken/AEMLION
      posted in Hardware
      Encrypt
      Encrypt
    • Signing fails due to NACKed messages

      Hello everyone!

      I am experiencing issues with my "pilot wire" node (controlling one of my heaters) since a few days.

      At 8:00 a.m., the MySensors gateway is supposed to send a V_PERCENTAGE message to the heater with "0" as payload, so that it goes into comfort mode and starts heating.
      At the opposite, at 10:00 p.m., a V_PERCENTAGE message with "3" as payload is sent to the heater so that it goes into "eco" mode.

      All communications are encrypted on my MySensors network and the pilot wire node requires signed messages. Everything was correctly set up (after long discussions here 😜) and it has been working well for months.

      However, I'm starting to get "!TSF:MSG:SIGN FAIL" messages on the MySensors gateway and the heater therefore fails to change of mode. Here are relevant logs:

      Nov 10 07:35:21 DEBUG TSM:READY:NWD REQ
      Nov 10 07:35:21 DEBUG TSF:MSG:SEND,0-0-255-255,s=255,c=3,t=20,pt=0,l=0,sg=0,ft=0,st=OK:
      Nov 10 07:35:21 DEBUG TSF:SAN:OK
      Nov 10 07:50:21 DEBUG TSF:SAN:OK
      Nov 10 07:55:21 DEBUG TSM:READY:NWD REQ
      Nov 10 07:55:21 DEBUG TSF:MSG:SEND,0-0-255-255,s=255,c=3,t=20,pt=0,l=0,sg=0,ft=0,st=OK:
      Nov 10 08:00:01 DEBUG !TSF:MSG:SEND,0-0-2-2,s=0,c=3,t=16,pt=0,l=0,sg=1,ft=0,st=NACK:
      Nov 10 08:00:01 DEBUG !TSF:MSG:SIGN FAIL
      Nov 10 08:05:21 DEBUG TSF:SRT:OK
      Nov 10 08:05:21 DEBUG TSF:SAN:OK
      Nov 10 08:15:21 DEBUG TSM:READY:NWD REQ
      Nov 10 08:15:21 DEBUG TSF:MSG:SEND,0-0-255-255,s=255,c=3,t=20,pt=0,l=0,sg=0,ft=0,st=OK:
      Nov 10 08:20:21 DEBUG TSF:SAN:OK
      Nov 10 08:35:21 DEBUG TSF:SRT:OK
      Nov 10 08:35:21 DEBUG TSM:READY:NWD REQ
      Nov 10 08:35:21 DEBUG TSF:MSG:SEND,0-0-255-255,s=255,c=3,t=20,pt=0,l=0,sg=0,ft=0,st=OK:
      Nov 10 08:35:21 DEBUG TSF:SAN:OK
      Nov 10 08:50:21 DEBUG TSF:SAN:OK
      Nov 10 08:55:21 DEBUG TSM:READY:NWD REQ
      Nov 10 08:55:21 DEBUG TSF:MSG:SEND,0-0-255-255,s=255,c=3,t=20,pt=0,l=0,sg=0,ft=0,st=OK:
      Nov 10 09:05:21 DEBUG TSF:SRT:OK
      Nov 10 09:05:21 DEBUG TSF:SAN:OK
      Nov 10 09:15:21 DEBUG TSM:READY:NWD REQ
      Nov 10 09:15:21 DEBUG TSF:MSG:SEND,0-0-255-255,s=255,c=3,t=20,pt=0,l=0,sg=0,ft=0,st=OK:
      Nov 10 09:20:21 DEBUG TSF:SAN:OK
      Nov 10 09:35:21 DEBUG TSF:SRT:OK
      Nov 10 09:35:21 DEBUG TSM:READY:NWD REQ
      Nov 10 09:35:21 DEBUG TSF:MSG:SEND,0-0-255-255,s=255,c=3,t=20,pt=0,l=0,sg=0,ft=0,st=OK:
      Nov 10 09:35:21 DEBUG TSF:SAN:OK
      Nov 10 09:50:21 DEBUG TSF:SAN:OK
      Nov 10 09:55:21 DEBUG TSM:READY:NWD REQ
      Nov 10 09:55:21 DEBUG TSF:MSG:SEND,0-0-255-255,s=255,c=3,t=20,pt=0,l=0,sg=0,ft=0,st=OK:
      Nov 10 10:05:21 DEBUG TSF:SRT:OK
      Nov 10 10:05:21 DEBUG TSF:SAN:OK
      Nov 10 10:10:30 DEBUG !TSF:MSG:SEND,0-0-2-2,s=0,c=3,t=16,pt=0,l=0,sg=1,ft=0,st=NACK:
      Nov 10 10:10:30 DEBUG !TSF:MSG:SIGN FAIL
      Nov 10 10:10:30 DEBUG TSF:MSG:READ,2-2-0,s=255,c=3,t=17,pt=6,l=25,sg=1:<NONCE>
      Nov 10 10:10:34 DEBUG TSF:MSG:SEND,0-0-2-2,s=0,c=3,t=16,pt=0,l=0,sg=1,ft=0,st=OK:
      Nov 10 10:10:34 DEBUG TSF:MSG:READ,2-2-0,s=255,c=3,t=17,pt=6,l=25,sg=1:<NONCE>
      Nov 10 10:10:34 DEBUG TSF:MSG:SEND,0-0-2-2,s=0,c=1,t=3,pt=0,l=1,sg=1,ft=0,st=OK:0
      

      As you can see, when I noticed that the heater was cold at 10:10 a.m. this morning, I changed the mode back to something else ("Off", which failed) and changed again to comfort (and this time, it worked).

      Do you have any clue why this is happening? Note that I haven't touched to the hardware.
      Is there a way to tell MySensors to re-send a message if it fails? Or maybe I could do something on the HomeAssistant side?

      Also, note that the radios used are RFM69W modules. Regarding location, the node is at the basement, the gateway is upstairs and if you drew a line through the walls, the distance between both is approximately 15 meters, I'd say.

      Thanks in advance for your help!

      #-------------------- Appendix --------------------#

      My Raspberry Pi serial Gateway:
      0_1573387957073_P_20191110_130510.jpg

      My pilot wire prototype:
      0_1573388005746_pilot_wire.jpg

      posted in Troubleshooting
      Encrypt
      Encrypt
    • RE: A water pulse meter using interrupts and the ATMEGA328P "power save" mode

      Hello everyone!

      First of all, thank you for all your answers!
      I've put in standby this project since I last replied here, however I wanted to give you an update about what I'm considering to do now.

      As a few of you pointed out, I don't consume water "fast enough" to spam the MySensors gateway with messages and I don't consume a cubic meter of water per day either.
      Moreover, I plan to solar-power this node with the AEM10941 chip from e-peas and a tiny solar cell.

      Therefore, sending a message to the MySensors gateway and making the ATMEGA328P wake up only when it gets an interrupt from the itron water sensor (= 1L consumed) seems to be a good idea, at the end...

      I'll probably do that and present my project in the '"Projects" section of the forum once it is done! 🙂

      That being said, it seems I'm not the only one who would be interested in using the SLEEP_MODE_PWR_SAVE mode of the ATMEGA328P to keep Timer2 running. I guess it could be worth adding it to the library?

      Cheers!

      posted in Troubleshooting
      Encrypt
      Encrypt
    • RE: Solar Energy Harvesting for wireless motes

      Hello! 🙂

      The topic of powering MySensors nodes with solar energy interests me and I have been looking for solutions lately to do so.

      I have found an awesome energy harvesting chip with a lot of features to create hassle-free solar-powered devices. It's called the AEM10941 by e-peas.

      What is really great with this chip is that it takes a solar cell as input, charges a battery / supercapacitor and outputs two stable selectable voltages. So it does energy harvesting & boost / buck converter.
      Moreover, if the sun isn't shining for a long period of time, you can also add a "backup battery" that will be used when your rechargeable medium runs out of juice.

      Jasper Sikken built a nice board during the Hackaday "energy harvesting" competition with this chip: https://hackaday.io/project/159139-tiny-solar-energy-module-tsem. As you can see, it requires very few components, which is great!

      I plan to use this chip for my outdoor weather station that I am building with MySensors (I have a BME280 which measures temperature, humidity & pressure). I'll very probably build my own board with 2.54mm-spaced pins to manipulate it more easily! 🙂

      posted in Hardware
      Encrypt
      Encrypt
    • RE: A water pulse meter using interrupts and the ATMEGA328P "power save" mode

      Hello everyone!

      @zboblamont: well, I guess that sending the number of liters consumed "in batch" should consume less energy, since it reduces the number of radio wake-ups and transmissions.
      According to the datasheet:

      • The ATMEGA328P "typically" consumes 5.2 mA in Active mode.
      • The RFM69W consumes 45 mA (when RFOP = 13 dBm) when it transmits data

      So I believed that doing so was a better option.

      Also, the SparkFun documentations regarding the BigTime Watch Kit (which basically does what I am trying to do) states that: « Thanks to some low-level hackery, the ATMega is running at super low power and should get an estimated 2 years of run time on a single CR2032 coin cell! ».

      @Jens-Jensen: I read somewhere that:

      • Timer0 is used for functions like delay(), millis()...
      • Timer1 is used for sound generation
      • Timer2 isn't used by defaults in Arduino libraries

      So if the MySensors library uses time somewhere, it probably uses Timer0. So it should be safe playing with Timer2 🙂
      Regarding my tests, I toggled LEDs both in the ISR and in the loop() function.

      I've had a closer look at how MySensors implements the sleep() function.
      It seems that @tekka is the one that essentially worked on it according to the history of the code.
      So, @tekka, if you're around, would you have an idea? 😛

      posted in Troubleshooting
      Encrypt
      Encrypt
    • RE: A water pulse meter using interrupts and the ATMEGA328P "power save" mode

      Also, regarding the static keyword in the ISR, it should be working fine.

      I first played with the asynchronous mode of Timer2 before integrating MySensors, the code successfully toggled an LED every 5 minutes. 🙂

      posted in Troubleshooting
      Encrypt
      Encrypt
    • RE: A water pulse meter using interrupts and the ATMEGA328P "power save" mode

      Hello @Jens-Jensen!

      Thanks for your answer, I'm asking a kind of tricky question here it seems! 😛

      Thanks for your link regarding the RTC project.
      I actually more or less based my code on the Sparkfun's BigTime watch project (https://www.sparkfun.com/products/11734) in which they handle interrupts the same way.

      As I explained in my first post, I'm indeed generating a Timer2 compare interrupt every 7.5s, waking up the microcontroller, making it add 1 to the overflows count and then it is (supposed) to go back to sleep. But it doesn't, for some reason.

      I may have found a clue regarding my problem, after spending more time Googling. There may be some kind of method to call before entering into the AVR sleep mode, to make the "MySensors state machine" aware of that.
      Here is the link about the post I found: https://forum.mysensors.org/topic/9590/timer2-does-not-work-after-including-mysensors-h

      @scalz may have an idea about my issue if he is around? He seems to have a very good knowledge about what's happening under the hood...

      Cheers!

      posted in Troubleshooting
      Encrypt
      Encrypt
    • A water pulse meter using interrupts and the ATMEGA328P "power save" mode

      Hello everyone!

      I'm back here with an exciting project and an exciting issue 😛 , after my post regarding the "pilot wire" (which works well by the way)!

      First, a bit of context, as usual:
      My new goal is know how much water is consumed in the house, still via HomeAssistant. The specifications I imposed to myself:

      1. The node will be powered on batteries. It should consume the minimum amount of power and therefore sleep as much as possible.
      2. I would like to send the amount of water consumed "reliably" every 5 minutes to avoid spamming the gateway and to save energy. And 5 minutes, no more (>= 5'01"), no less (<= 4'59").

      Similarly to my previous project, I am not using any Arduino board. Only an ATMEGA328P using its own internal 8MHz clock.

      To measure the amount of water I am using, I chose to buy a second-hand two-wires "Itron Cyble sensor", where "K=1". It is a very basic sensor which outputs a "signal equivalent to a dry contact signal (e.g. reed switch)".
      More information about it can be found in its brochure: https://www.itron.com/-/media/feature/products/documents/brochure/cyble-sensor-water-brochure-english.pdf

      Considerations:
      To consume as less energy as possible, the circuit must be interrupt-driven. I can see two interrupts here:

      • On the water sensor side: whenever the sensor simulates a pushed button (meaning I've consumed a liter of water), this has to increment a variable. Once done, the chip should go back to sleep.

      • To measure 5 minutes: I've spent quite a bit of time searching for solutions to reliably measure 5 minutes, without using external components (an RTC for instance).
        It seems I wasn't the only one to wonder how to have interrupts and a timer and I found this post for instance: https://forum.mysensors.org/topic/7263/remainder-sleep-time-upon-an-interrupt. However, I didn't like the solution given, which didn't look elegant to me...
        Moreover, the sleep() function provided by the MySensors API wakes the radio up after sleeping and I don't need waking it up when I simply have to increment the "water consumed" variable!

      And then, I discovered that the ATMEGA328P can run an asynchronous timer (called Timer2) and trigger interrupts on overflows / compare matches. But the really nice thing here is that this timer continues running in the power saving mode "SLEEP_MODE_PWR_SAVE", if a 32.768 kHz quartz is connected!

      Where I am right now:
      Right now, I have finished wiring the circuit on a breadboard and developing the code. Regarding the wiring, I have:

      • An ATMEGA328P flashed with my code (with encryption enabled) and using its internal 8 MHz clock to operate.
      • An RFM69W radio connected to the chip.
      • A button connected to the arduino-equivalent pin #3 (pin 2 is used by the RFM69W radio, DI0), to simulate my Itron sensor.
      • A 32.768 kHz quartz connected on the XTAL pins of the ATMEGA.
      • A few other capacitors here and there, where they are needed.

      Now, here is the code of my sketch:

      // MySensors configuration
      #define MY_RADIO_RFM69
      #define MY_RFM69_NEW_DRIVER
      #define MY_RFM69_ENABLE_ENCRYPTION 
      
      // Include the libraries
      #include <avr/power.h>
      #include <avr/sleep.h>
      #include <MySensors.h>
      
      // Global settings
      #define CHILD_ID 0
      
      // Global variables
      volatile bool time_elapsed = true;
      volatile int liters_consumed = 0;
      MyMessage measure_msg(CHILD_ID, V_VOLUME);
      
      // Interrupt triggered on Timer2 overflow
      ISR(TIMER2_COMPA_vect){
      
          // variable to count the number of overflows
          static byte timer2_ovfs = 0;
      
          // Increment the counter
          timer2_ovfs++;
      
          // Set the flag and reset the counter
          if (timer2_ovfs >= 40) {
              time_elapsed = true;
              timer2_ovfs = 0;
          }
      }
      
      void sensor_interrupt() {
          liters_consumed++;
      }
      
      void presentation() { 
          sendSketchInfo("Compteur d'eau", "1.0");
          present(CHILD_ID, S_WATER);
      }
      
      void setup() {
      
          // Setup Timer2
          ASSR = (1<<AS2);                        // Make Timer2 asynchronous
          TCCR2A = (1<<WGM21);                    // CTC mode
          TCCR2B = (1<<CS22)|(1<<CS21)|(1<<CS20); // Prescaler of 1024
          OCR2A = 239;                            // Count up to 240 (zero relative!)
          TIMSK2 = (1<<OCIE2A);                   // Enable compare match interrupt
      
          // Setup interrupt on pin (INT1)
          pinMode(3, INPUT);
          attachInterrupt(digitalPinToInterrupt(3), sensor_interrupt, RISING);
      
          // Disable unneeded peripherals
          power_adc_disable(); // Analog to digital converter
          power_twi_disable(); // I2C
      
          // Set the sleep mode as "Power Save"
          set_sleep_mode(SLEEP_MODE_PWR_SAVE);
      
          // Enable interrupts
          interrupts();
      }
      
      void loop() {
      
          // The 5 minutes period has passed
          if(time_elapsed) {
      
              // Wake up the radio
              transportReInitialise();
      
              // Send the value
              send(measure_msg.set(liters_consumed));
      
              // Reset the timer
              time_elapsed = false;
      
              // Make the radio sleep
              transportDisable();
          }
      
          // Go back to sleep
          sleep_mode();
      }
      

      The problem:
      However, there is a problem right now (otherwise, I wouldn't post in the "troubleshooting" section 😛 ).

      On the gateway side, I can see that the node successfully registers and gets its ID. But for an unknown reason, after a few seconds, it keeps sending data as if time_elapsed never changed to false. And it never goes to sleep.
      Here are the gateway logs after startup:

      Aug 18 17:01:05 INFO  Starting gateway...
      Aug 18 17:01:05 INFO  Protocol version - 2.3.1
      Aug 18 17:01:05 DEBUG Serial port /dev/ttyMySensorsGateway (115200 baud) created
      Aug 18 17:01:05 DEBUG MCO:BGN:INIT GW,CP=RPNGLS-X,REL=255,VER=2.3.1
      Aug 18 17:01:05 DEBUG TSF:LRT:OK
      Aug 18 17:01:05 DEBUG TSM:INIT
      Aug 18 17:01:05 DEBUG TSF:WUR:MS=0
      Aug 18 17:01:05 DEBUG TSM:INIT:TSP OK
      Aug 18 17:01:05 DEBUG TSM:INIT:GW MODE
      Aug 18 17:01:05 DEBUG TSM:READY:ID=0,PAR=0,DIS=0
      Aug 18 17:01:05 DEBUG MCO:REG:NOT NEEDED
      Aug 18 17:01:05 DEBUG MCO:BGN:STP
      Aug 18 17:01:05 DEBUG MCO:BGN:INIT OK,TSP=1
      Aug 18 17:01:05 DEBUG TSM:READY:NWD REQ
      Aug 18 17:01:05 DEBUG TSF:MSG:SEND,0-0-255-255,s=255,c=3,t=20,pt=0,l=0,sg=0,ft=0,st=OK:
      Aug 18 17:01:06 DEBUG TSF:MSG:READ,2-2-0,s=255,c=3,t=21,pt=1,l=1,sg=1:0
      Aug 18 17:01:15 DEBUG TSF:MSG:READ,3-3-255,s=255,c=3,t=7,pt=0,l=0,sg=0:
      Aug 18 17:01:15 DEBUG TSF:MSG:BC
      Aug 18 17:01:15 DEBUG TSF:MSG:FPAR REQ,ID=3
      Aug 18 17:01:15 DEBUG TSF:PNG:SEND,TO=0
      Aug 18 17:01:15 DEBUG TSF:CKU:OK
      Aug 18 17:01:15 DEBUG TSF:MSG:GWL OK
      Aug 18 17:01:16 DEBUG TSF:MSG:SEND,0-0-3-3,s=255,c=3,t=8,pt=1,l=1,sg=0,ft=0,st=OK:0
      Aug 18 17:01:17 DEBUG TSF:MSG:READ,3-3-0,s=255,c=3,t=24,pt=1,l=1,sg=0:1
      Aug 18 17:01:17 DEBUG TSF:MSG:PINGED,ID=3,HP=1
      Aug 18 17:01:17 DEBUG TSF:MSG:SEND,0-0-3-3,s=255,c=3,t=25,pt=1,l=1,sg=0,ft=0,st=OK:1
      Aug 18 17:01:17 DEBUG TSF:MSG:READ,3-3-0,s=255,c=3,t=15,pt=6,l=2,sg=0:0100
      Aug 18 17:01:18 DEBUG TSF:MSG:SEND,0-0-3-3,s=255,c=3,t=15,pt=6,l=2,sg=0,ft=0,st=OK:0100
      Aug 18 17:01:18 DEBUG TSF:MSG:READ,3-3-0,s=255,c=0,t=17,pt=0,l=5,sg=0:2.3.1
      Aug 18 17:01:18 DEBUG TSF:MSG:READ,3-3-0,s=255,c=3,t=6,pt=1,l=1,sg=0:0
      Aug 18 17:01:18 DEBUG TSF:MSG:SEND,0-0-3-3,s=255,c=3,t=6,pt=0,l=1,sg=0,ft=0,st=OK:M
      Aug 18 17:01:18 DEBUG TSF:MSG:READ,3-3-0,s=255,c=3,t=11,pt=0,l=14,sg=0:Compteur d'eau
      Aug 18 17:01:18 DEBUG TSF:MSG:READ,3-3-0,s=255,c=3,t=12,pt=0,l=3,sg=0:1.0
      Aug 18 17:01:18 DEBUG TSF:MSG:READ,3-3-0,s=0,c=0,t=21,pt=0,l=0,sg=0:
      Aug 18 17:01:18 DEBUG TSF:MSG:READ,3-3-0,s=255,c=3,t=26,pt=1,l=1,sg=0:2
      Aug 18 17:01:18 DEBUG TSF:MSG:SEND,0-0-3-3,s=255,c=3,t=27,pt=1,l=1,sg=0,ft=0,st=OK:1
      Aug 18 17:01:18 DEBUG TSF:MSG:READ,3-3-0,s=0,c=1,t=35,pt=2,l=2,sg=0:0
      Aug 18 17:01:34 DEBUG TSF:MSG:READ,3-3-0,s=0,c=1,t=35,pt=2,l=2,sg=0:0
      Aug 18 17:01:36 DEBUG TSF:MSG:READ,3-3-0,s=0,c=1,t=35,pt=2,l=2,sg=0:0
      Aug 18 17:01:37 DEBUG TSF:MSG:READ,3-3-0,s=0,c=1,t=35,pt=2,l=2,sg=0:0
      Aug 18 17:01:38 DEBUG TSF:MSG:READ,3-3-0,s=0,c=1,t=35,pt=2,l=2,sg=0:0
      Aug 18 17:01:39 DEBUG TSF:MSG:READ,3-3-0,s=0,c=1,t=35,pt=2,l=2,sg=0:0
      Aug 18 17:01:41 DEBUG TSF:MSG:READ,3-3-0,s=0,c=1,t=35,pt=2,l=2,sg=0:0
      Aug 18 17:01:42 DEBUG TSF:MSG:READ,3-3-0,s=0,c=1,t=35,pt=2,l=2,sg=0:0
      Aug 18 17:01:43 DEBUG TSF:MSG:READ,3-3-0,s=0,c=1,t=35,pt=2,l=2,sg=0:0
      Aug 18 17:01:44 DEBUG TSF:MSG:READ,3-3-0,s=0,c=1,t=35,pt=2,l=2,sg=0:1
      Aug 18 17:01:46 DEBUG TSF:MSG:READ,3-3-0,s=0,c=1,t=35,pt=2,l=2,sg=0:3
      Aug 18 17:01:47 DEBUG TSF:MSG:READ,3-3-0,s=0,c=1,t=35,pt=2,l=2,sg=0:7
      Aug 18 17:01:48 DEBUG TSF:MSG:READ,3-3-0,s=0,c=1,t=35,pt=2,l=2,sg=0:7
      

      As you can see, a few seconds after registering, the node spams the gateway, sending the liters_consumed variable every second.

      Do you guys know why? What can be wrong in this code?
      Also, does the MySensor library generate other kind of interrupts?

      Thanks in advance for your help!

      -+-+-+-+-+-+-+-+-+-+-+-+-+-+-

      Appendix / bonus: how I get the 5 minutes period.

      As mentioned, a 32.768 kHz quartz generates 32,768 clock cycles per second.

      The clock prescaler has been set to 1024, meaning that I need 1024 clock cycles to add "1" to Timer2. This means that each second, 32 is added to timer2.

      The "output compare register A" was set to 239, meaning that it will trigger an "Output Compare A interrupt" every time the counter reaches 239 (starting from 0 in CTC mode). So, such an interrupt will be triggered every 240 / 32 = 7.5s, waking up the microcontroller from sleep mode and adding 1 to the timer2_ovfs variable.

      Finally, when I reach 40 output compare interrupts, I'm (supposed) to send the data to the controller. Since 7.5s * 40 = 300s = 5 minutes! 🙂

      posted in Troubleshooting
      Encrypt
      Encrypt
    • RE: Failed to make encryption work on a barebone ATMEGA328P

      Hi @tekka!

      I'm indeed programming the ATMEGA328P using an Arduino Uno transformed as ISP with the ArduinoISP sketch.

      I've wired the circuit exactly as shown on the first picture of the tutorial here: https://www.arduino.cc/en/Tutorial/ArduinoToBreadboard. I used the same circuit to burn the bootloader and to upload my sketches.

      Your remark makes me wonder: do I really need a bootloader at the end?

      posted in Troubleshooting
      Encrypt
      Encrypt
    • RE: Failed to make encryption work on a barebone ATMEGA328P

      Hello @tekka and thank you for your remarks!

      Your input makes questions come to my mind:

      1. What is the difference between Optiboot and the bootloader given in the Arduino tutorial? I am quite new to the world of microcontrollers and I don't know much for the moment, I simply use what is working, eh eh 😛

      2. The configuration you gave here doesn't use the internal 8MHz clock, therefore it doesn't fit my needs here, eh eh. Could I just use the "regular" Arduino Uno bootloader and set the proper fuses values in the boards.txt file to use the internal 8MHz clock?

      3. You are saying that it's actually optiboot which does the page erase and not avrdude? I believed there the "chip erase" instruction is the only instruction possible to erase the flash, handled by avrdude. And according to the ATMEGA328P datasheet (page 297), I have understood that any "chip erase" instruction will also erase the EEPROM if the EESAVE fuse isn't set. That operation seems to be mandatory too as they say: « A Chip Erase must be performed before the Flash and/or EEPROM are reprogrammed ». So, how does Optiboot / avrdude handle that in such a configuration?

      Finally, it seems there is no tutorial in the MySensors documentation explaining how to build a project using a standalone ATMEGA328P and which bootloader to choose (there are a few discussions though). It could be worth creating a tutorial / post about that and I could contribute to it of course 🙂

      posted in Troubleshooting
      Encrypt
      Encrypt
    • RE: Failed to make encryption work on a barebone ATMEGA328P

      IT WORKS @Anticimex !!! 🤘

      The issue was indeed the EESAVE fuse not set, which caused the EEPROM to be erased after each sketch upload.

      Here is my modified boards.txt file:

      ##############################################################
      
      atmega328bb.name=ATmega328 on a breadboard (8 MHz internal clock)
      
      atmega328bb.upload.protocol=arduino
      atmega328bb.upload.maximum_size=30720
      atmega328bb.upload.speed=57600
      
      atmega328bb.bootloader.low_fuses=0xE2
      atmega328bb.bootloader.high_fuses=0xD2
      atmega328bb.bootloader.extended_fuses=0x05
      
      atmega328bb.bootloader.file=atmega/ATmegaBOOT_168_atmega328_pro_8MHz.hex
      atmega328bb.bootloader.unlock_bits=0x3F
      atmega328bb.bootloader.lock_bits=0x0F
      
      atmega328bb.build.board=AVR_ATMEGA328BB
      atmega328bb.build.mcu=atmega328p
      atmega328bb.build.f_cpu=8000000L
      atmega328bb.build.core=arduino:arduino
      atmega328bb.build.variant=arduino:standard
      
      
      atmega328bb.bootloader.tool=arduino:avrdude
      atmega328bb.upload.tool=arduino:avrdude
      

      So, basically, for people coming here in the future:
      Follow the tutorial https://www.arduino.cc/en/Tutorial/ArduinoToBreadboard to flash the bootloader of your ATMEGA328P but replace the given boards.txt file (in the breadboard-1-6-x.zip archive) by the one above.

      A useful link to calculate the fuses values: http://www.engbedded.com/fusecalc/

      Thanks for your help @Anticimex, @mfalkvidd and @kimot 🙂

      posted in Troubleshooting
      Encrypt
      Encrypt
    • RE: Failed to make encryption work on a barebone ATMEGA328P

      @Anticimex: I have just found that there is an EESAVE fuse on the ATMEGA328P which prevents the EEPROM from being erased whenever a new sketch is pushed to the microcontroller.

      It seems to be the root cause of the issue since I've found references in other posts of the MySensors forum to that problem.

      I'll test that now and let you know.

      posted in Troubleshooting
      Encrypt
      Encrypt
    • RE: Failed to make encryption work on a barebone ATMEGA328P

      According to that post, it seems there is a high correlation between the fuses value and the fact that security may or may not work.

      Here is the boards.txt file I got from the official "Arduino on a breadboard with internal 8MHz clock" bootloader:

      ##############################################################
      
      atmega328bb.name=ATmega328 on a breadboard (8 MHz internal clock)
      
      atmega328bb.upload.protocol=arduino
      atmega328bb.upload.maximum_size=30720
      atmega328bb.upload.speed=57600
      
      atmega328bb.bootloader.low_fuses=0xE2
      atmega328bb.bootloader.high_fuses=0xDA
      atmega328bb.bootloader.extended_fuses=0x05
      
      atmega328bb.bootloader.file=atmega/ATmegaBOOT_168_atmega328_pro_8MHz.hex
      atmega328bb.bootloader.unlock_bits=0x3F
      atmega328bb.bootloader.lock_bits=0x0F
      
      atmega328bb.build.board=AVR_ATMEGA328BB
      atmega328bb.build.mcu=atmega328p
      atmega328bb.build.f_cpu=8000000L
      atmega328bb.build.core=arduino:arduino
      atmega328bb.build.variant=arduino:standard
      
      
      atmega328bb.bootloader.tool=arduino:avrdude
      atmega328bb.upload.tool=arduino:avrdude
      

      Do you have any clue @Anticimex / @mfalkvidd?

      posted in Troubleshooting
      Encrypt
      Encrypt
    • RE: Failed to make encryption work on a barebone ATMEGA328P

      Hmmm... I'm starting to believe that the bootloader i used could be the problem.
      Someone using an "alternative" bootloader got problems with signing a few years ago: https://forum.mysensors.org/topic/4991/mysbootloader-1-3pre2-testing/2

      posted in Troubleshooting
      Encrypt
      Encrypt
    • RE: Failed to make encryption work on a barebone ATMEGA328P

      Here is what I get with the SecurityPersonalizer sketch directly from GitHub:

      +------------------------------------------------------------------------------------+
      |                           MySensors security personalizer                          |
      +------------------------------------------------------------------------------------+
      
      +------------------------------------------------------------------------------------+
      | You are running without any configuration flags set.                               |
      | No changes will be made to ATSHA204A or EEPROM except for the EEPROM checksum      |
      | which will be updated.                                                             |
      |                                                                                    |
      | If you want to personalize your device, you have two options.                      |
      |                                                                                    |
      | 1. a. Enable either GENERATE_KEYS_ATSHA204A or GENERATE_KEYS_SOFT                  |
      |       This will generate keys for ATSHA204A or software signing.                   |
      |    b. Execute the sketch. You will be guided through the steps below under         |
      |       WHAT TO DO NEXT?                                                             |
      |    c. Copy the generated keys and replace the topmost definitions in this file.    |
      |    d. Save the sketch and then disable the flag you just enabled.                  |
      |    e. Enable PERSONALIZE_ATSHA204A to personalize the ATSHA204A device.            |
      |       or                                                                           |
      |       Enable PERSONALIZE_SOFT to personalize the EEPROM for software signing.      |
      |       If you want to use whitelisting you need to pick a unique serial number      |
      |       for each device you run the sketch on and fill in MY_SOFT_SERIAL.            |
      |       or                                                                           |
      |       Enable PERSONALIZE_SOFT_RANDOM_SERIAL to personalzie the EEPROM and          |
      |       include a new random serial number every time the sketch is executed.        |
      |       Take note of each saved serial number if you plan to use whitelisting.       |
      |    f. Execute the sketch on each device you want to personalize that is supposed   |
      |       to communicate securely.                                                     |
      |                                                                                    |
      | 2. Enable any configuration flag as you see fit.                                   |
      |    It is assumed that you know what you are doing.                                 |
      +------------------------------------------------------------------------------------+
      
      +------------------------------------------------------------------------------------+
      |                           Hardware security peripherals                            |
      +--------------+--------------+--------------+------------------------------+--------+
      | Device       | Status       | Revision     | Serial number                | Locked |
      +--------------+--------------+--------------+------------------------------+--------+
      | AVR          | DETECTED     | N/A          | N/A (generation required)    | N/A    |
      +--------------+--------------+--------------+------------------------------+--------+
      | ATSHA204A    | NOT DETECTED | N/A          | N/A                          | N/A    |
      +--------------+--------------+--------------+------------------------------+--------+
      
      
      +------------------------------------------------------------------------------------+
      |                                  Execution result                                  |
      +------------------------------------------------------------------------------------+
      | FAILURE (last ATSHA204A return code: 0xE7)                                         |
      +------------------------------------------------------------------------------------+
      
      posted in Troubleshooting
      Encrypt
      Encrypt
    • RE: Failed to make encryption work on a barebone ATMEGA328P

      Maybe I've missed something but any #define set will make the code write to the EEPROM.

      I ran the SecurityPersonalizer again, it reset the EEPROM to FF's.
      I enabled the PERSONALIZE_SOFT_RANDOM_SERIAL flag ran it again and finally re-uploaded my pilot wire code.

      I still have that "tempered" message in the logs, I really don't know what I can do...
      I may just end up disabling encryption I guess...

      posted in Troubleshooting
      Encrypt
      Encrypt
    • RE: Failed to make encryption work on a barebone ATMEGA328P

      I've run the Arduino IDE in "debug" mode to be sure the F_CPU variable was taken into account and it seems it is indeed:

      /opt/arduino-1.8.7/arduino-builder -dump-prefs -logger=machine -hardware /opt/arduino-1.8.7/hardware -hardware /home/encrypt/Arduino/hardware -tools /opt/arduino-1.8.7/tools-builder -tools /opt/arduino-1.8.7/hardware/tools/avr -built-in-libraries /opt/arduino-1.8.7/libraries -libraries /home/encrypt/Arduino/libraries -fqbn=breadboard:avr:atmega328bb -vid-pid=0X2341_0X0043 -ide-version=10807 -build-path /tmp/arduino_build_879921 -warnings=none -build-cache /tmp/arduino_cache_286732 -prefs=build.warn_data_percentage=75 -prefs=runtime.tools.avr-gcc.path=/opt/arduino-1.8.7/hardware/tools/avr -prefs=runtime.tools.avr-gcc-5.4.0-atmel3.6.1-arduino2.path=/opt/arduino-1.8.7/hardware/tools/avr -prefs=runtime.tools.avrdude.path=/opt/arduino-1.8.7/hardware/tools/avr -prefs=runtime.tools.avrdude-6.3.0-arduino14.path=/opt/arduino-1.8.7/hardware/tools/avr -prefs=runtime.tools.arduinoOTA.path=/opt/arduino-1.8.7/hardware/tools/avr -prefs=runtime.tools.arduinoOTA-1.2.1.path=/opt/arduino-1.8.7/hardware/tools/avr -verbose /home/encrypt/Documents/Projets/Domotique/Fil_pilote/fil_pilote/fil_pilote.ino
      /opt/arduino-1.8.7/arduino-builder -compile -logger=machine -hardware /opt/arduino-1.8.7/hardware -hardware /home/encrypt/Arduino/hardware -tools /opt/arduino-1.8.7/tools-builder -tools /opt/arduino-1.8.7/hardware/tools/avr -built-in-libraries /opt/arduino-1.8.7/libraries -libraries /home/encrypt/Arduino/libraries -fqbn=breadboard:avr:atmega328bb -vid-pid=0X2341_0X0043 -ide-version=10807 -build-path /tmp/arduino_build_879921 -warnings=none -build-cache /tmp/arduino_cache_286732 -prefs=build.warn_data_percentage=75 -prefs=runtime.tools.avr-gcc.path=/opt/arduino-1.8.7/hardware/tools/avr -prefs=runtime.tools.avr-gcc-5.4.0-atmel3.6.1-arduino2.path=/opt/arduino-1.8.7/hardware/tools/avr -prefs=runtime.tools.avrdude.path=/opt/arduino-1.8.7/hardware/tools/avr -prefs=runtime.tools.avrdude-6.3.0-arduino14.path=/opt/arduino-1.8.7/hardware/tools/avr -prefs=runtime.tools.arduinoOTA.path=/opt/arduino-1.8.7/hardware/tools/avr -prefs=runtime.tools.arduinoOTA-1.2.1.path=/opt/arduino-1.8.7/hardware/tools/avr -verbose /home/encrypt/Documents/Projets/Domotique/Fil_pilote/fil_pilote/fil_pilote.ino
      Using board 'atmega328bb' from platform in folder: /home/encrypt/Arduino/hardware/breadboard/avr
      Using core 'arduino' from platform in folder: /opt/arduino-1.8.7/hardware/arduino/avr
      Detecting libraries used...
      /opt/arduino-1.8.7/hardware/tools/avr/bin/avr-g++ -c -g -Os -w -std=gnu++11 -fpermissive -fno-exceptions -ffunction-sections -fdata-sections -fno-threadsafe-statics -Wno-error=narrowing -flto -w -x c++ -E -CC -mmcu=atmega328p -DF_CPU=8000000L -DARDUINO=10807 -DARDUINO_AVR_ATMEGA328BB -DARDUINO_ARCH_AVR -I/opt/arduino-1.8.7/hardware/arduino/avr/cores/arduino -I/opt/arduino-1.8.7/hardware/arduino/avr/variants/standard /tmp/arduino_build_879921/sketch/fil_pilote.ino.cpp -o /dev/null
      /opt/arduino-1.8.7/hardware/tools/avr/bin/avr-g++ -c -g -Os -w -std=gnu++11 -fpermissive -fno-exceptions -ffunction-sections -fdata-sections -fno-threadsafe-statics -Wno-error=narrowing -flto -w -x c++ -E -CC -mmcu=atmega328p -DF_CPU=8000000L -DARDUINO=10807 -DARDUINO_AVR_ATMEGA328BB -DARDUINO_ARCH_AVR -I/opt/arduino-1.8.7/hardware/arduino/avr/cores/arduino -I/opt/arduino-1.8.7/hardware/arduino/avr/variants/standard -I/home/encrypt/Arduino/libraries/MySensors /tmp/arduino_build_879921/sketch/fil_pilote.ino.cpp -o /dev/null
      /opt/arduino-1.8.7/hardware/tools/avr/bin/avr-g++ -c -g -Os -w -std=gnu++11 -fpermissive -fno-exceptions -ffunction-sections -fdata-sections -fno-threadsafe-statics -Wno-error=narrowing -flto -w -x c++ -E -CC -mmcu=atmega328p -DF_CPU=8000000L -DARDUINO=10807 -DARDUINO_AVR_ATMEGA328BB -DARDUINO_ARCH_AVR -I/opt/arduino-1.8.7/hardware/arduino/avr/cores/arduino -I/opt/arduino-1.8.7/hardware/arduino/avr/variants/standard -I/home/encrypt/Arduino/libraries/MySensors -I/opt/arduino-1.8.7/hardware/arduino/avr/libraries/SPI/src /tmp/arduino_build_879921/sketch/fil_pilote.ino.cpp -o /dev/null
      Using cached library dependencies for file: /home/encrypt/Arduino/libraries/MySensors/MyASM.S
      Using cached library dependencies for file: /opt/arduino-1.8.7/hardware/arduino/avr/libraries/SPI/src/SPI.cpp
      Generating function prototypes...
      /opt/arduino-1.8.7/hardware/tools/avr/bin/avr-g++ -c -g -Os -w -std=gnu++11 -fpermissive -fno-exceptions -ffunction-sections -fdata-sections -fno-threadsafe-statics -Wno-error=narrowing -flto -w -x c++ -E -CC -mmcu=atmega328p -DF_CPU=8000000L -DARDUINO=10807 -DARDUINO_AVR_ATMEGA328BB -DARDUINO_ARCH_AVR -I/opt/arduino-1.8.7/hardware/arduino/avr/cores/arduino -I/opt/arduino-1.8.7/hardware/arduino/avr/variants/standard -I/home/encrypt/Arduino/libraries/MySensors -I/opt/arduino-1.8.7/hardware/arduino/avr/libraries/SPI/src /tmp/arduino_build_879921/sketch/fil_pilote.ino.cpp -o /tmp/arduino_build_879921/preproc/ctags_target_for_gcc_minus_e.cpp
      /opt/arduino-1.8.7/tools-builder/ctags/5.8-arduino11/ctags -u --language-force=c++ -f - --c++-kinds=svpf --fields=KSTtzns --line-directives /tmp/arduino_build_879921/preproc/ctags_target_for_gcc_minus_e.cpp
      Compilation du croquis...
      /opt/arduino-1.8.7/hardware/tools/avr/bin/avr-g++ -c -g -Os -w -std=gnu++11 -fpermissive -fno-exceptions -ffunction-sections -fdata-sections -fno-threadsafe-statics -Wno-error=narrowing -MMD -flto -mmcu=atmega328p -DF_CPU=8000000L -DARDUINO=10807 -DARDUINO_AVR_ATMEGA328BB -DARDUINO_ARCH_AVR -I/opt/arduino-1.8.7/hardware/arduino/avr/cores/arduino -I/opt/arduino-1.8.7/hardware/arduino/avr/variants/standard -I/home/encrypt/Arduino/libraries/MySensors -I/opt/arduino-1.8.7/hardware/arduino/avr/libraries/SPI/src /tmp/arduino_build_879921/sketch/fil_pilote.ino.cpp -o /tmp/arduino_build_879921/sketch/fil_pilote.ino.cpp.o
      Compiling libraries...
      Compiling library "MySensors"
      Utilisation du fichier déjà compilé : /tmp/arduino_build_879921/libraries/MySensors/MyASM.S.o
      Compiling library "SPI"
      Utilisation du fichier déjà compilé : /tmp/arduino_build_879921/libraries/SPI/SPI.cpp.o
      Compiling core...
      Using precompiled core: /tmp/arduino_cache_286732/core/core_breadboard_avr_atmega328bb_8bcbb10bb0e7a5b614c24d1e9ac07d80.a
      Linking everything together...
      /opt/arduino-1.8.7/hardware/tools/avr/bin/avr-gcc -w -Os -g -flto -fuse-linker-plugin -Wl,--gc-sections -mmcu=atmega328p -o /tmp/arduino_build_879921/fil_pilote.ino.elf /tmp/arduino_build_879921/sketch/fil_pilote.ino.cpp.o /tmp/arduino_build_879921/libraries/MySensors/MyASM.S.o /tmp/arduino_build_879921/libraries/SPI/SPI.cpp.o /tmp/arduino_build_879921/../arduino_cache_286732/core/core_breadboard_avr_atmega328bb_8bcbb10bb0e7a5b614c24d1e9ac07d80.a -L/tmp/arduino_build_879921 -lm
      /opt/arduino-1.8.7/hardware/tools/avr/bin/avr-objcopy -O ihex -j .eeprom --set-section-flags=.eeprom=alloc,load --no-change-warnings --change-section-lma .eeprom=0 /tmp/arduino_build_879921/fil_pilote.ino.elf /tmp/arduino_build_879921/fil_pilote.ino.eep
      /opt/arduino-1.8.7/hardware/tools/avr/bin/avr-objcopy -O ihex -R .eeprom /tmp/arduino_build_879921/fil_pilote.ino.elf /tmp/arduino_build_879921/fil_pilote.ino.hex
      Utilisation de la bibliothèque MySensors version 2.3.1 dans le dossier: /home/encrypt/Arduino/libraries/MySensors 
      Utilisation de la bibliothèque SPI version 1.0 dans le dossier: /opt/arduino-1.8.7/hardware/arduino/avr/libraries/SPI 
      /opt/arduino-1.8.7/hardware/tools/avr/bin/avr-size -A /tmp/arduino_build_879921/fil_pilote.ino.elf
      Le croquis utilise 21394 octets (69%) de l'espace de stockage de programmes. Le maximum est de 30720 octets.
      Les variables globales utilisent 1022 octets de mémoire dynamique.
      

      Now, to answer your question @Anticimex, how do you run the SecurityPersonalizer sketch to only print the content of the EEPROM and not do any write? I've commented out all options but now it reports that no #define has been set 😅

      posted in Troubleshooting
      Encrypt
      Encrypt
    • RE: Failed to make encryption work on a barebone ATMEGA328P

      Hello again,

      I don't know why I'm getting that "!SGN:PER:Tampered" message...
      I've run the SecurityPersonalizer sketch again and it reported that everything went as expected:

      +------------------------------------------------------------------------------------+
      |                           MySensors security personalizer                          |
      +------------------------------------------------------------------------------------+
      
      +------------------------------------------------------------------------------------+
      |                               Configuration settings                               |
      +------------------------------------------------------------------------------------+
      | * Guided personalization/storage of keys in EEPROM                                 |
      | * Software based personalization (no ATSHA204A usage whatsoever)                   |
      | * Will not require any UART confirmations                                          |
      | * Will store HMAC key to EEPROM                                                    |
      | * Will store AES key to EEPROM                                                     |
      | * Will generate soft serial using software                                         |
      | * Will store soft serial to EEPROM                                                 |
      +------------------------------------------------------------------------------------+
      
      +------------------------------------------------------------------------------------+
      |                           Hardware security peripherals                            |
      +--------------+--------------+--------------+------------------------------+--------+
      | Device       | Status       | Revision     | Serial number                | Locked |
      +--------------+--------------+--------------+------------------------------+--------+
      | AVR          | DETECTED     | N/A          | N/A (generation required)    | N/A    |
      +--------------+--------------+--------------+------------------------------+--------+
      
      +------------------------------------------------------------------------------------+
      |                                   Key generation                                   |
      +--------+--------+------------------------------------------------------------------+
      | Key ID | Status | Key                                                              |
      +--------+--------+------------------------------------------------------------------+
      | SERIAL | OK     | 2DFECBDAE05BB8414C                                               |
      +--------+--------+------------------------------------------------------------------+
      
      +------------------------------------------------------------------------------------+
      |                                  Key copy section                                  |
      +------------------------------------------------------------------------------------+
      #define MY_SOFT_SERIAL 0x2D,0xFE,0xCB,0xDA,0xE0,0x5B,0xB8,0x41,0x4C
      +------------------------------------------------------------------------------------+
      
      +------------------------------------------------------------------------------------+
      |                                    Key storage                                     |
      +--------+--------+------------------------------------------------------------------+
      | Key ID | Status | Key                                                              |
      +--------+--------+------------------------------------------------------------------+
      | HMAC   | OK     | XXXXXXXXXXXXXXXXXXXXXXXXXXXXXXXXXXXXXXXXXXXXXXXXXXXXXXXXXXXXXXXX |
      | AES    | OK     | XXXXXXXXXXXXXXXXXXXXXXXXXXXXXXXX                                 |
      | SERIAL | OK     | 2DFECBDAE05BB8414C                                               |
      +--------+--------+------------------------------------------------------------------+
      
      +------------------------------------------------------------------------------------+
      |                                       EEPROM                                       |
      +--------+--------+------------------------------------------------------------------+
      | Key ID | Status | Key                                                              |
      +--------+--------+------------------------------------------------------------------+
      | HMAC   | OK     | XXXXXXXXXXXXXXXXXXXXXXXXXXXXXXXXXXXXXXXXXXXXXXXXXXXXXXXXXXXXXXXX |
      | AES    | OK     | XXXXXXXXXXXXXXXXXXXXXXXXXXXXXXXX                                 |
      | SERIAL | OK     | 2DFECBDAE05BB8414C                                               |
      +--------+--------+------------------------------------------------------------------+
      
      +------------------------------------------------------------------------------------+
      |                      This nodes whitelist entry on other nodes                     |
      +------------------------------------------------------------------------------------+
      {.nodeId = <ID of this node>,.serial = {0x2D,0xFE,0xCB,0xDA,0xE0,0x5B,0xB8,0x41,0x4C}}
      +------------------------------------------------------------------------------------+
      
      +------------------------------------------------------------------------------------+
      |                                  WHAT TO DO NEXT?                                  |
      +------------------------------------------------------------------------------------+
      | This device has now been personalized. Run this sketch with its current settings   |
      | on all the devices in your network that have security enabled.                     |
      +------------------------------------------------------------------------------------+
      
      +------------------------------------------------------------------------------------+
      |                                  Execution result                                  |
      +------------------------------------------------------------------------------------+
      | SUCCESS                                                                            |
      +------------------------------------------------------------------------------------+
      

      Also, note I'm running the latest version of the SecurityPersonalizer sketch, which can be found here: https://github.com/mysensors/MySensors/blob/development/examples/SecurityPersonalizer/SecurityPersonalizer.ino

      I really don't know what can be wrong here...
      Could the 8MHz internal clock be the faulty part? Maybe it fails to correctly read the EEPROM data due to a misconfigured clock?

      Here is what avrdude shows in the debug view of the Arduino IDE ; using the Arduino Uno as a programmer:

      /opt/arduino-1.8.7/hardware/tools/avr/bin/avrdude -C/opt/arduino-1.8.7/hardware/tools/avr/etc/avrdude.conf -v -patmega328p -carduino -P/dev/ttyACM0 -b19200 -Uflash:w:/tmp/arduino_build_879921/fil_pilote.ino.hex:i 
      
      avrdude: Version 6.3-20171130
               Copyright (c) 2000-2005 Brian Dean, http://www.bdmicro.com/
               Copyright (c) 2007-2014 Joerg Wunsch
      
               System wide configuration file is "/opt/arduino-1.8.7/hardware/tools/avr/etc/avrdude.conf"
               User configuration file is "/home/encrypt/.avrduderc"
               User configuration file does not exist or is not a regular file, skipping
      
               Using Port                    : /dev/ttyACM0
               Using Programmer              : arduino
               Overriding Baud Rate          : 19200
               AVR Part                      : ATmega328P
               Chip Erase delay              : 9000 us
               PAGEL                         : PD7
               BS2                           : PC2
               RESET disposition             : dedicated
               RETRY pulse                   : SCK
               serial program mode           : yes
               parallel program mode         : yes
               Timeout                       : 200
               StabDelay                     : 100
               CmdexeDelay                   : 25
               SyncLoops                     : 32
               ByteDelay                     : 0
               PollIndex                     : 3
               PollValue                     : 0x53
               Memory Detail                 :
      
                                        Block Poll               Page                       Polled
                 Memory Type Mode Delay Size  Indx Paged  Size   Size #Pages MinW  MaxW   ReadBack
                 ----------- ---- ----- ----- ---- ------ ------ ---- ------ ----- ----- ---------
                 eeprom        65    20     4    0 no       1024    4      0  3600  3600 0xff 0xff
                 flash         65     6   128    0 yes     32768  128    256  4500  4500 0xff 0xff
                 lfuse          0     0     0    0 no          1    0      0  4500  4500 0x00 0x00
                 hfuse          0     0     0    0 no          1    0      0  4500  4500 0x00 0x00
                 efuse          0     0     0    0 no          1    0      0  4500  4500 0x00 0x00
                 lock           0     0     0    0 no          1    0      0  4500  4500 0x00 0x00
                 calibration    0     0     0    0 no          1    0      0     0     0 0x00 0x00
                 signature      0     0     0    0 no          3    0      0     0     0 0x00 0x00
      
               Programmer Type : Arduino
               Description     : Arduino
               Hardware Version: 2
               Firmware Version: 1.18
               Topcard         : Unknown
               Vtarget         : 0.0 V
               Varef           : 0.0 V
               Oscillator      : Off
               SCK period      : 0.1 us
      
      avrdude: AVR device initialized and ready to accept instructions
      
      Reading | ################################################## | 100% 0.01s
      
      avrdude: Device signature = 0x1e950f (probably m328p)
      avrdude: NOTE: "flash" memory has been specified, an erase cycle will be performed
               To disable this feature, specify the -D option.
      avrdude: erasing chip
      avrdude: reading input file "/tmp/arduino_build_879921/fil_pilote.ino.hex"
      avrdude: writing flash (21394 bytes):
      
      Writing | ################################################## | 100% 23.60s
      
      avrdude: 21394 bytes of flash written
      avrdude: verifying flash memory against /tmp/arduino_build_879921/fil_pilote.ino.hex:
      avrdude: load data flash data from input file /tmp/arduino_build_879921/fil_pilote.ino.hex:
      avrdude: input file /tmp/arduino_build_879921/fil_pilote.ino.hex contains 21394 bytes
      avrdude: reading on-chip flash data:
      
      Reading | ################################################## | 100% 13.37s
      
      avrdude: verifying ...
      avrdude: 21394 bytes of flash verified
      
      avrdude done.  Thank you.
      
      posted in Troubleshooting
      Encrypt
      Encrypt
    • RE: Failed to make encryption work on a barebone ATMEGA328P

      I've enabled MY_DEBUG_VERBOSE_SIGNING and MY_DEBUG_VERBOSE_RFM69, here is what I get:

       __  __       ____
      |  \/  |_   _/ ___|  ___ _ __  ___  ___  _ __ ___
      | |\/| | | | \___ \ / _ \ `_ \/ __|/ _ \| `__/ __|
      | |  | | |_| |___| |  __/ | | \__ \  _  | |  \__ \
      |_|  |_|\__, |____/ \___|_| |_|___/\___/|_|  |___/
              |___/                      2.3.1
      
      16 MCO:BGN:INIT NODE,CP=RPNNAS-X,REL=255,VER=2.3.1
      40 !SGN:PER:TAMPERED
      77 SGN:INI:BND OK
      79 TSM:INIT
      81 TSF:WUR:MS=0
      83 RFM69:INIT
      83 RFM69:INIT:PIN,CS=10,IQP=2,IQN=0
      90 RFM69:PTX:LEVEL=5 dBm
      92 TSM:INIT:TSP OK
      94 TSM:FPAR
      96 SGN:SGN:NREQ=255
      98 RFM69:SWR:SEND,TO=255,SEQ=0,RETRY=0
      102 RFM69:CSMA:RSSI=-108
      108 TSF:MSG:SEND,255-255-255-255,s=255,c=3,t=7,pt=0,l=0,sg=0,ft=0,st=OK:
      2117 !TSM:FPAR:NO REPLY
      2119 TSM:FPAR
      2121 SGN:SGN:NREQ=255
      2123 RFM69:SWR:SEND,TO=255,SEQ=1,RETRY=0
      2127 RFM69:CSMA:RSSI=-108
      2136 TSF:MSG:SEND,255-255-255-255,s=255,c=3,t=7,pt=0,l=0,sg=0,ft=0,st=OK:
      4145 !TSM:FPAR:NO REPLY
      4147 TSM:FPAR
      4149 SGN:SGN:NREQ=255
      4151 RFM69:SWR:SEND,TO=255,SEQ=2,RETRY=0
      4155 RFM69:CSMA:RSSI=-107
      4163 TSF:MSG:SEND,255-255-255-255,s=255,c=3,t=7,pt=0,l=0,sg=0,ft=0,st=OK:
      6172 !TSM:FPAR:NO REPLY
      6174 TSM:FPAR
      6176 SGN:SGN:NREQ=255
      6178 RFM69:SWR:SEND,TO=255,SEQ=3,RETRY=0
      6182 RFM69:CSMA:RSSI=-108
      6191 TSF:MSG:SEND,255-255-255-255,s=255,c=3,t=7,pt=0,l=0,sg=0,ft=0,st=OK:
      8200 !TSM:FPAR:FAIL
      8202 TSM:FAIL:CNT=1
      8204 TSM:FAIL:DIS
      8206 TSF:TDI:TSL
      8206 RFM69:RSL
      

      I'm wondering: maybe I should try to dump the EEPROM memory to be sure the keys were properly set?

      Also, regarding my question in the first post, do you know where messages are dropped if the AES key isn't correct? Is it at the radio or software level?

      posted in Troubleshooting
      Encrypt
      Encrypt
    • RE: Failed to make encryption work on a barebone ATMEGA328P

      @kimot: I used the SecurityPersonalizer sketch with the keys defined in it.
      Here is the beginning of the sketch:

      /*
       * The MySensors Arduino library handles the wireless radio link and protocol
       * between your home built sensors/actuators and HA controller of choice.
       * The sensors forms a self healing radio network with optional repeaters. Each
       * repeater and gateway builds a routing tables in EEPROM which keeps track of the
       * network topology allowing messages to be routed to nodes.
       *
       * Created by Henrik Ekblad <henrik.ekblad@mysensors.org>
       * Copyright (C) 2013-2018 Sensnology AB
       * Full contributor list: https://github.com/mysensors/MySensors/graphs/contributors
       *
       * Documentation: http://www.mysensors.org
       * Support Forum: http://forum.mysensors.org
       *
       * This program is free software; you can redistribute it and/or
       * modify it under the terms of the GNU General Public License
       * version 2 as published by the Free Software Foundation.
       *
       */
      /**
       * @ingroup MySigninggrp
       * @{
       * @file SecurityPersonalizer.ino
       * @brief Security personalization sketch
       *
       * REVISION HISTORY
       *  - See git log (git log libraries/MySensors/examples/SecurityPersonalizer/SecurityPersonalizer.ino)
       */
      
      /**
       * @example SecurityPersonalizer.ino
       * This sketch will personalize either none-volatile memory or ATSHA204A for security functions
       * available in the MySensors library.<br>
       * Details on personalization procedure is given in @ref personalization.<br>
       * This sketch will when executed without modifications also print a guided workflow on the UART.
       */
      
      #include "sha204_library.h"
      #include "sha204_lib_return_codes.h"
      /** @brief Make use of the MySensors framework without invoking the entire system */
      #define MY_CORE_ONLY
      #include <MySensors.h>
      
      /************************************ User defined key data ***************************************/
      
      /** @brief The user-defined HMAC key to use unless @ref GENERATE_HMAC_KEY is set */
      #define MY_HMAC_KEY 0x01,0x02,0x03,0x04,0x05,0x06,0x07,0x08,0x09,0x01,0x02,0x03,0x04,0x05,0x06,0x07,0x08,0x09,0x01,0x02,0x03,0x04,0x05,0x06,0x07,0x08,0x09,0x01,0x02,0x03,0x04,0x05
      
      /** @brief The user-defined AES key to store in EEPROM unless @ref GENERATE_AES_KEY is set */
      #define MY_AES_KEY 0x01,0x02,0x03,0x04,0x05,0x06,0x07,0x08,0x09,0x01,0x02,0x03,0x04,0x05,0x06,0x07
      
      /** @brief The user-defined soft serial to use for soft signing unless @ref GENERATE_SOFT_SERIAL is set */
      #define MY_SOFT_SERIAL 0xFF,0xFF,0xFF,0xFF,0xFF,0xFF,0xFF,0xFF,0xFF
      
      /***************************** Flags for guided personalization flow ******************************/
      
      /**
       * @def GENERATE_KEYS_ATSHA204A
       * @brief Default settings for generating keys using ATSHA204A
       *
       * @note The generated keys displayed in the serial log with this setting needs to be written down
       *       and transferred to all nodes this gateway will communicate with. This is mandatory for ALL
       *       nodes for encryption (AES key). For signing (HMAC key) it is only required for nodes that
       *       use signing. Typically you set the values for @ref MY_HMAC_KEY and @ref MY_AES_KEY.
       */
      //#define GENERATE_KEYS_ATSHA204A
      
      /**
       * @def GENERATE_KEYS_SOFT
       * @brief Default settings for generating keys using software
       *
       * @b Important<br>
       * You will need to ensure @ref MY_SIGNING_SOFT_RANDOMSEED_PIN is set to an unconnected analog pin
       * in order to provide entropy to the software RNG if your hardware has no HWRNG.
       *
       * @note The generated keys displayed in the serial log with this setting needs to be written down
       *       and transferred to all nodes this gateway will communicate with. This is mandatory for ALL
       *       nodes for encryption (AES key). For signing (HMAC key) it is only required for nodes that
       *       use signing. Typically you set the values for @ref MY_HMAC_KEY and @ref MY_AES_KEY.
       */
      //#define GENERATE_KEYS_SOFT
      
      /**
       * @def PERSONALIZE_ATSHA204A
       * @brief Default settings for personalizing an ATSHA204A
       *
       * It is assumed that you have updated @ref MY_HMAC_KEY and @ref MY_AES_KEY with the keys displayed
       * when executing this sketch with @ref GENERATE_KEYS_ATSHA204A or @ref GENERATE_KEYS_SOFT defined.
       */
      //#define PERSONALIZE_ATSHA204A
      
      /**
       * @def PERSONALIZE_SOFT
       * @brief Default settings for personalizing EEPROM for software signing
       *
       * It is assumed that you have updated @ref MY_HMAC_KEY and @ref MY_AES_KEY with the keys displayed
       * when executing this sketch with @ref GENERATE_KEYS_ATSHA204A or @ref GENERATE_KEYS_SOFT defined.
       */
      #define PERSONALIZE_SOFT
      
      /**
       * @def PERSONALIZE_SOFT_RANDOM_SERIAL
       * @brief This is an alternative to @ref PERSONALIZE_SOFT which will also store a randomly generated
       * serial to EEPROM in addition to the actions performed by @ref PERSONALIZE_SOFT. Take note of the
       * generated soft serial as it will be needed if you plan to use whitelisting. It should be
       * unique for each node.
       *
       * @note This is only needed for targets that lack unique device IDs. The sketch will inform you if
       *       there is a need for generating a random serial or not. Check the "Hardware security
       *       peripherals" listing. If a target has a unique device ID and a serial in EEPROM, the serial
       *       in EEPROM will be used. If erased (replaced with FF:es) the unique device ID will be used
       *       instead.
       */
      //#define PERSONALIZE_SOFT_RANDOM_SERIAL
      
      /*************************** The settings below are for advanced users ****************************/
      /**
       * @def USE_SOFT_SIGNING
       * @brief Uncomment this to generate keys by software and store them to EEPROM instead of ATSHA204A
       */
      //#define USE_SOFT_SIGNING
      
      /**
       * @def LOCK_ATSHA204A_CONFIGURATION
       * @brief Uncomment this to enable locking the ATSHA204A configuration zone
       *
       * It is still possible to change the key, and this also enable random key generation.
       * @warning BE AWARE THAT THIS PREVENTS ANY FUTURE CONFIGURATION CHANGE TO THE CHIP
       */
      //#define LOCK_ATSHA204A_CONFIGURATION
      
      /**
       * @def SKIP_UART_CONFIRMATION
       * @brief Uncomment this for boards that lack UART
       *
       * This will disable additional confirmation for actions that are non-reversible.
       *
       * @b Important<br> For ATSHA204A, no confirmation will be required for locking any zones with this
       * configuration! Also, if you generate keys on a board without UART, you have no way of determining
       * what the key is unless it is stored in EEPROM.
       */
      //#define SKIP_UART_CONFIRMATION
      
      /**
       * @def GENERATE_HMAC_KEY
       * @brief Uncomment this to generate a random HMAC key using ATSHA204A or software depending on
       *        @ref USE_SOFT_SIGNING
       * @note If not enabled, key defined by @ref MY_HMAC_KEY will be used instead.
       */
      //#define GENERATE_HMAC_KEY
      
      /**
       * @def STORE_HMAC_KEY
       * @brief Uncomment this to store HMAC key to ATSHA204A or EEPROM depending on @ref USE_SOFT_SIGNING
       */
      //#define STORE_HMAC_KEY
      
      /**
       * @def GENERATE_AES_KEY
       * @brief Uncomment this to generate a random AES key using ATSHA204A or software depending on
       * @ref USE_SOFT_SIGNING
       * @note If not enabled, key defined by @ref MY_AES_KEY will be used instead.
       */
      //#define GENERATE_AES_KEY
      
      /**
       * @def STORE_AES_KEY
       * @brief Uncomment this to store AES key to EEPROM
       */
      //#define STORE_AES_KEY
      
      /**
       * @def GENERATE_SOFT_SERIAL
       * @brief Uncomment this to generate a random serial number for software signing
       * @note If not enabled, serial defined by @ref MY_SOFT_SERIAL will be used instead.
       */
      #define GENERATE_SOFT_SERIAL
      
      /**
       * @def STORE_SOFT_SERIAL
       * @brief Uncomment this to store the serial number to EEPROM
       */
      //#define STORE_SOFT_SERIAL
      
      /**
       * @def PRINT_DETAILED_ATSHA204A_CONFIG
       * @brief Uncomment to print the detailed ATSHA204A configuration
       */
      //#define PRINT_DETAILED_ATSHA204A_CONFIG
      
      /**
       * @def RESET_EEPROM_PERSONALIZATION
       * @brief Uncomment to reset the personalization data in EEPROM to 0xFF:es
       */
      //#define RESET_EEPROM_PERSONALIZATION
      
      /********************* Guided mode flag configurations (don't change these) ***********************/
      #ifdef GENERATE_KEYS_ATSHA204A
      #define LOCK_ATSHA204A_CONFIGURATION // We have to lock configuration to enable random number generation
      #define GENERATE_HMAC_KEY // Generate random HMAC key
      #define GENERATE_AES_KEY // Generate random AES key
      #define SKIP_UART_CONFIRMATION // This is an automated mode
      #endif
      
      #ifdef GENERATE_KEYS_SOFT
      #define USE_SOFT_SIGNING // Use software backend
      #define GENERATE_HMAC_KEY // Generate random HMAC key
      #define GENERATE_AES_KEY // Generate random AES key
      #define SKIP_UART_CONFIRMATION // This is an automated mode
      #endif
      
      #ifdef PERSONALIZE_ATSHA204A
      #define LOCK_ATSHA204A_CONFIGURATION // We have to lock configuration to enable random number generation
      #define STORE_HMAC_KEY // Store the HMAC key
      #define STORE_AES_KEY // Store the AES key
      #define SKIP_UART_CONFIRMATION // This is an automated mode
      #endif
      
      #ifdef PERSONALIZE_SOFT_RANDOM_SERIAL
      #define GENERATE_SOFT_SERIAL // Generate a soft serial number
      #define PERSONALIZE_SOFT // Do the rest as PERSONALIZE_SOFT
      #endif
      
      #ifdef PERSONALIZE_SOFT
      #define USE_SOFT_SIGNING // Use software backend
      #define STORE_HMAC_KEY // Store the HMAC key
      #define STORE_AES_KEY // Store the AES key
      #define STORE_SOFT_SERIAL // Store the soft serial number
      #define SKIP_UART_CONFIRMATION // This is an automated mode
      #endif
      
      #if defined(GENERATE_HMAC_KEY) || defined(GENERATE_AES_KEY) || defined(GENERATE_SOFT_SERIAL)
      #define GENERATE_SOMETHING
      #endif
      
      #if defined(MY_LOCK_MCU)
      #undefine MY_LOCK_MCU  // The Sketch after SecurityPersonaliter should lock the MCU
      #endif
      
      /********************************** Preprocessor sanitychecks *************************************/
      

      Note that the values of MY_HMAC_KEY and MY_AES_KEY in the text above are not the ones I'm currently using.
      I re-checked that the AES and HMAC keys are indeed the same on the gateway and that's correct.

      I don't use the MY_SOFT_SERIAL key yet, so I let the sketch generate a random one.

      @Anticimex: I could indeed see in the file ~/Arduino/hardware/breadboard/avr/boards.txt that atmega328bb.build.f_cpu=8000000L is defined.

      posted in Troubleshooting
      Encrypt
      Encrypt
    • RE: Failed to make encryption work on a barebone ATMEGA328P

      Hmm... I haven't specified the frequency anywhere in a #define...

      @Anticimex: What should I add in my sketch if that is necessary? (I've posted the code of my sketch in the first post)

      posted in Troubleshooting
      Encrypt
      Encrypt
    • RE: Failed to make encryption work on a barebone ATMEGA328P

      @Anticimex: According to my Arduino 1.8.7 IDE -- with the DEBUG mode, encryption and signign enabled -- the sketch uses 18830 bytes (61%) of program storage space and 953 bytes of dynamic memory.

      Also, for an unknown reason, the SerialGateway stopped working 10 minutes ago when I re-launched the mysgw binary. I now get "!TSM:INIT:TSP FAIL" messages 😢

      posted in Troubleshooting
      Encrypt
      Encrypt
    • RE: Failed to make encryption work on a barebone ATMEGA328P

      I tried again pushing my pilot wire code to the ATMEGA328P with encryption and signing enabled... same issue 😞

      I really don't know what is wrong here...

      posted in Troubleshooting
      Encrypt
      Encrypt
    • RE: Failed to make encryption work on a barebone ATMEGA328P

      Hello @mfalkvidd, thanks for trying to help me 🙂

      I've just run the gateway compiled with encryption + signing enabled and here are the logs:

      Apr 20 16:26:01 INFO  Starting gateway...
      Apr 20 16:26:01 INFO  Protocol version - 2.3.1
      Apr 20 16:26:01 DEBUG Serial port /dev/ttyMySensorsGateway (115200 baud) created
      Apr 20 16:26:01 DEBUG MCO:BGN:INIT GW,CP=RPNGLS-X,REL=255,VER=2.3.1
      Apr 20 16:26:01 DEBUG TSF:LRT:OK
      Apr 20 16:26:01 DEBUG TSM:INIT
      Apr 20 16:26:01 DEBUG TSF:WUR:MS=0
      Apr 20 16:26:01 DEBUG TSM:INIT:TSP OK
      Apr 20 16:26:01 DEBUG TSM:INIT:GW MODE
      Apr 20 16:26:01 DEBUG TSM:READY:ID=0,PAR=0,DIS=0
      Apr 20 16:26:01 DEBUG MCO:REG:NOT NEEDED
      Apr 20 16:26:01 DEBUG MCO:BGN:STP
      Apr 20 16:26:01 DEBUG MCO:BGN:INIT OK,TSP=1
      Apr 20 16:26:01 DEBUG TSM:READY:NWD REQ
      Apr 20 16:26:01 DEBUG TSF:MSG:SEND,0-0-255-255,s=255,c=3,t=20,pt=0,l=0,sg=0,ft=0,st=OK:
      

      So I get CP=RPNGLS-X on the gateway side and I got CP=RPNNAS-X previously on the node side.
      Is that correct?

      posted in Troubleshooting
      Encrypt
      Encrypt
    • Failed to make encryption work on a barebone ATMEGA328P

      Hello everyone!

      First of all, thank you for building MySensors, it's really an awesome project!
      I had been searching a few months ago for a low-cost (and DIY) alternative to Zigbee / ZWave / Enocean... I'm glad I found it!

      This is my first post here ; I'm currently struggling to make encryption and signing work on a barebone ATMEGA328P, using the internal 8MHz clock.

      First, a bit of context:
      I am working on a project to control my heaters via MySensors and HomeAssistant.
      Basically, the idea is to send a (part) of the mains signal to the heater so that it enters the right mode: Comfort, Eco, Frost protection or Off mode.
      Pilot wire function
      The circuit behind that is really simple to build: a 3.3V power adapter, two optotriacs, two diodes, a microcontroller, a few resistors and a radio basically.

      On the gateway side, HomeAssistant is running on a Raspberry Pi 1 and I attached to that board an RFM69W radio in the "serial gateway" configuration.
      It has been built with the right configuration options: encryption enabled, rmf69w radio defined, etc.
      I also defined a random AES and HMAC key in the configuration file used by the gateway.

      On the "actuator" side if I can say so, I first tested the setup I'm trying to build with an Arduino Uno, another RFM69W, the right level converter between the radio and the Arduino Uno, and finally the controlling circuit.
      I followed the procedure to make signing work: run the SecurityPersonalizer sketch with the keys defined and then uploaded my pilot wire code.

      This first prototype using the Arduino Uno worked well: I could see nonces being exchanged in the debug view of the gateway, the commands sent / received and the state changing on the Arduino side (thanks to diodes). I am now planning to make a second more "realistic" prototype.
      My goal is to produce PCBs with the minimum number of components ; I'll therefore replace the Arduino Uno by an ATMEGA328P with the internal 8MHz clock, two capacitors between (A)Vin and GND, and a resistor near the "not RESET" pin.

      An important note before talking about the issue: I bought the ATMEGAs directly from Microchip (RIP Atmel :P) and the RFM69W radios directly from HopeRF.
      So, these are genuine components! 😉

      Now, the issue:
      I uploaded the SecurityPersonalizer sketch to the ATMEGA328P, made sure it was executed correctly and then I pushed my "pilot wire" sketch.
      For an unknown reason, the node fails to register and I can't see any message on the gateway side.
      Here are the "actuator" logs:

       __  __       ____
      |  \/  |_   _/ ___|  ___ _ __  ___  ___  _ __ ___
      | |\/| | | | \___ \ / _ \ `_ \/ __|/ _ \| `__/ __|
      | |  | | |_| |___| |  __/ | | \__ \  _  | |  \__ \
      |_|  |_|\__, |____/ \___|_| |_|___/\___/|_|  |___/
              |___/                      2.3.1
      
      16 MCO:BGN:INIT NODE,CP=RPNNAS-X,REL=255,VER=2.3.1
      63 TSM:INIT
      63 TSF:WUR:MS=0
      67 TSM:INIT:TSP OK
      67 TSM:FPAR
      75 TSF:MSG:SEND,255-255-255-255,s=255,c=3,t=7,pt=0,l=0,sg=0,ft=0,st=OK:
      2390 TSF:MSG:READ,51-180-176,s=199,c=3,t=129,pt=3,l=23,sg=1:0
      2398 !TSF:MSG:LEN=7,EXP=32
      2400 !TSM:FPAR:NO REPLY
      2402 TSM:FPAR
      2410 TSF:MSG:SEND,255-255-255-255,s=255,c=3,t=7,pt=0,l=0,sg=0,ft=0,st=OK:
      4278 TSF:MSG:READ,51-180-176,s=199,c=3,t=129,pt=3,l=23,sg=1:0
      4286 !TSF:MSG:LEN=7,EXP=32
      4419 !TSM:FPAR:NO REPLY
      4421 TSM:FPAR
      4427 TSF:MSG:SEND,255-255-255-255,s=255,c=3,t=7,pt=0,l=0,sg=0,ft=0,st=OK:
      6436 !TSM:FPAR:NO REPLY
      6438 TSM:FPAR
      6445 TSF:MSG:SEND,255-255-255-255,s=255,c=3,t=7,pt=0,l=0,sg=0,ft=0,st=OK:
      8454 !TSM:FPAR:FAIL
      8456 TSM:FAIL:CNT=1
      8458 TSM:FAIL:DIS
      8460 TSF:TDI:TSL
      18462 TSM:FAIL:RE-INIT
      18464 TSM:INIT
      18466 TSM:INIT:TSP OK
      18468 TSM:FPAR
      18477 TSF:MSG:SEND,255-255-255-255,s=255,c=3,t=7,pt=0,l=0,sg=0,ft=0,st=OK:
      20486 !TSM:FPAR:NO REPLY
      20488 TSM:FPAR
      20494 TSF:MSG:SEND,255-255-255-255,s=255,c=3,t=7,pt=0,l=0,sg=0,ft=0,st=OK:
      22503 !TSM:FPAR:NO REPLY
      22505 TSM:FPAR
      22511 TSF:MSG:SEND,255-255-255-255,s=255,c=3,t=7,pt=0,l=0,sg=0,ft=0,st=OK:
      24520 !TSM:FPAR:NO REPLY
      24522 TSM:FPAR
      24528 TSF:MSG:SEND,255-255-255-255,s=255,c=3,t=7,pt=0,l=0,sg=0,ft=0,st=OK:
      26540 !TSM:FPAR:FAIL
      26542 TSM:FAIL:CNT=2
      26544 TSM:FAIL:DIS
      26546 TSF:TDI:TSL
      36550 TSM:FAIL:RE-INIT
      (etc)
      

      When this problem appeared, I followed the pieces of advice given on this forum: I ran the "clear EEPROM" sketch, re-run the SecurityPersonalizer sketch and re-pushed my pilot wire sketch. Still no luck 😞

      I started to believe the problem could be at the hardware level.
      I disabled encryption on the gateway (after rebuilding it) and in my sketch... and the actuator managed to register:

       __  __       ____
      |  \/  |_   _/ ___|  ___ _ __  ___  ___  _ __ ___
      | |\/| | | | \___ \ / _ \ `_ \/ __|/ _ \| `__/ __|
      | |  | | |_| |___| |  __/ | | \__ \  _  | |  \__ \
      |_|  |_|\__, |____/ \___|_| |_|___/\___/|_|  |___/
              |___/                      2.3.1
      
      16 MCO:BGN:INIT NODE,CP=RPNNA---,REL=255,VER=2.3.1
      28 TSM:INIT
      28 TSF:WUR:MS=0
      30 TSM:INIT:TSP OK
      32 TSM:FPAR
      38 TSF:MSG:SEND,255-255-255-255,s=255,c=3,t=7,pt=0,l=0,sg=0,ft=0,st=OK:
      440 TSF:MSG:READ,0-0-255,s=255,c=3,t=8,pt=1,l=1,sg=0:0
      446 TSF:MSG:FPAR OK,ID=0,D=1
      2048 TSM:FPAR:OK
      2048 TSM:ID
      2050 TSM:ID:REQ
      2066 TSF:MSG:SEND,255-255-0-0,s=2,c=3,t=3,pt=0,l=0,sg=0,ft=0,st=OK:
      2574 TSF:MSG:READ,0-0-255,s=2,c=3,t=4,pt=0,l=1,sg=0:1
      2580 TSF:SID:OK,ID=1
      2584 TSM:ID:OK
      2584 TSM:UPL
      2600 TSF:MSG:SEND,1-1-0-0,s=255,c=3,t=24,pt=1,l=1,sg=0,ft=0,st=OK:1
      2820 TSF:MSG:READ,0-0-1,s=255,c=3,t=25,pt=1,l=1,sg=0:1
      2824 TSF:MSG:PONG RECV,HP=1
      2828 TSM:UPL:OK
      2830 TSM:READY:ID=1,PAR=0,DIS=1
      2844 TSF:MSG:SEND,1-1-0-0,s=255,c=3,t=15,pt=6,l=2,sg=0,ft=0,st=OK:0100
      3055 TSF:MSG:READ,0-0-1,s=255,c=3,t=15,pt=6,l=2,sg=0:0100
      3080 TSF:MSG:SEND,1-1-0-0,s=255,c=0,t=17,pt=0,l=5,sg=0,ft=0,st=OK:2.3.1
      3602 TSF:MSG:SEND,1-1-0-0,s=255,c=3,t=6,pt=1,l=1,sg=0,ft=0,st=OK:0
      3649 TSF:MSG:READ,0-0-1,s=255,c=3,t=6,pt=0,l=1,sg=0:M
      3674 TSF:MSG:SEND,1-1-0-0,s=255,c=3,t=11,pt=0,l=10,sg=0,ft=0,st=OK:Fil pilote
      4196 TSF:MSG:SEND,1-1-0-0,s=255,c=3,t=12,pt=0,l=3,sg=0,ft=0,st=OK:1.0
      4229 TSF:MSG:SEND,1-1-0-0,s=0,c=0,t=4,pt=0,l=0,sg=0,ft=0,st=OK:
      4237 MCO:REG:REQ
      4751 TSF:MSG:SEND,1-1-0-0,s=255,c=3,t=26,pt=1,l=1,sg=0,ft=0,st=OK:2
      4968 TSF:MSG:READ,0-0-1,s=255,c=3,t=27,pt=1,l=1,sg=0:1
      4974 MCO:PIM:NODE REG=1
      4978 MCO:BGN:STP
      4978 MCO:BGN:INIT OK,TSP=1
      4995 TSF:MSG:SEND,1-1-0-0,s=0,c=1,t=2,pt=2,l=2,sg=0,ft=0,st=OK:1
      5521 TSF:MSG:SEND,1-1-0-0,s=0,c=1,t=3,pt=2,l=2,sg=0,ft=0,st=OK:2
      589813 TSF:MSG:READ,0-0-1,s=0,c=1,t=3,pt=0,l=1,sg=0:6
      599988 TSF:MSG:READ,0-0-1,s=0,c=1,t=3,pt=0,l=1,sg=0:1
      611840 TSF:MSG:READ,0-0-1,s=0,c=1,t=3,pt=0,l=1,sg=0:3
      

      I could of course see messages being received / send on the gateway side too.

      To sum up
      Communication is successfully working between an Arduino Uno and the Serial Gateway with encryption + signing enabled but fails to work on a barebone ATMEGA328P.

      Here are a few questions / ideas I have regarding the issue:

      • Could the problem be the bootloader I used to flash the ATMEGA328P? I used the " breadboard-1-6-x.zip" found on the official Arduino website: https://www.arduino.cc/en/Tutorial/ArduinoToBreadboard. Maybe the fuses / EEPROM address it set / uses conflicts with what the SecurityPersonalizer sketch does?
      • It seems the encrypted packet is just ignored with encryption enabled since I can't see any logs on the gateway side. I was wondering: are the messages dropped at the radio level or at the software level?

      Thanks in advance for your help!

      Appendix -- Pilot wire code

      #define MY_DEBUG
      
      // MySensors configuration
      #define MY_RADIO_RFM69
      #define MY_RFM69_NEW_DRIVER
      #define MY_SIGNING_SOFT
      #define MY_SIGNING_SOFT_RANDOMSEED_PIN 7
      #define MY_SIGNING_REQUEST_SIGNATURES
      #define MY_RFM69_ENABLE_ENCRYPTION 
      
      // Include the libraries
      #include <MySensors.h>
      
      // Global settings
      #define CHILD_ID 0
      #define INITIAL_MODE 2
      #define MOC_P 3
      #define MOC_N 4
      
      // Global variables
      bool first_msg_sent = false;
      MyMessage status_msg(CHILD_ID, V_STATUS);
      MyMessage mode_msg(CHILD_ID, V_PERCENTAGE);
      
      void set_mode(int16_t mode) {
      	digitalWrite(MOC_N, mode & 1);
      	digitalWrite(MOC_P, mode & 2);
      }
      
      void presentation() { 
      	sendSketchInfo("Fil pilote", "1.0");
      	present(CHILD_ID, S_DIMMER);
      }
      
      void setup() {
      
      	// Make the MOC pins outputs
      	pinMode(MOC_P, OUTPUT);
      	pinMode(MOC_N, OUTPUT);
      
      	// Set the initial mode (2 = OFF)
      	set_mode(INITIAL_MODE);
      }
      
      void loop() {
      	if (!first_msg_sent) {
      		send(status_msg.set((int16_t) 1));
      		send(mode_msg.set((int16_t) INITIAL_MODE));
      		first_msg_sent = true;
      	}
      }
      
      void receive(const MyMessage &message) {
      	if(message.type == V_PERCENTAGE) {
      		set_mode(message.getInt());
      	}
      }
      
      posted in Troubleshooting
      Encrypt
      Encrypt