I will try tomorrow to do it without any voltage regulators together with a sensebender micro. I have the bigger pir sensor though, but I dont think its much difference on thoose. We will see.
Posts made by Fredrik Carlsson
-
RE: Stable battery PIR Sensor
-
RE: Stable battery PIR Sensor
@m26872 Hello, have you not used any voltage regultator for the pir sensor? You just give it direct connection to the batterypack?
-
RE: Heatpump controller
Hello
It would be nice to make it run on batteries, maybe with 10 seconds sleep, and then wake up only to check with gateway if there is a new command and then sleep again.I am building a pir sensor now based on 3*aa batteris running on 4,5 volt.I will ust use an LE33 step down directly after the battery pack to provide power to both sensebender+radio+pir. Dont know if that is the optimal way to do it but it should work
-
RE: Heatpump controller
@ToniA
Hey, thanks for all the work you have put down. I have had some other projects going the last year so have not really put down more time on this.How is it working with the sensebender? Are you using it on batteries?
Any ide about battery usage? -
RE: Stable battery PIR Sensor
Wonderful!
Maybe I will try this design then. But I dont need them so small so will probably use the bigger PIR sensor in mine.
I will revert when I'm done -
Stable battery PIR Sensor
Hello
I am busy building an burglar alarm for my home.
Because of this its important its a wireless system (to not go down during electrical failure in the house).I wonder is there any stable good PIR sensor that works with battery?
I have sourced the forum but not really found anything. I have a couple of Sensebender micro boads lying around that I would prefer to use for this.Its off course also important that there is no false triggers, because then it would be a very unreliable system.
-
RE: Measuring current
Yes i am. but there is mistake in the picture the R3 is connected between Pin 3 and VCC, not ground (pull up resistor).
Then that leaves me hanging a bit because that is way more than I will be comfortable with in terms off battery changes.
Any suggestion what to do? -
RE: Measuring current
#include <MySensor.h> #include <DHT.h> #define CHILD_ID_HUM 0 #define CHILD_ID_TEMP 1 #define CHILD_ID_SWITCH 2 #define BUTTON_PIN 3 #define HUMIDITY_SENSOR_DIGITAL_PIN 4 #define VBAT_PER_BITS 0.003363075 //(1mohm / 470 kohm) Calculated volts per bit from the used battery montoring voltage divider. Internal_ref=1.1V, res=10bit=2^10-1=1023, Eg for 3V (2AA): Vin/Vb=R1/(R1+R2)=470e3/(1e6+470e3), Vlim=Vb/Vin*1.1=3.44V, Volts per bit = Vlim/1023= 0.003363075 #define VMIN 1.9 // Battery monitor lower level. Vmin_radio=1.9V #define VMAX 3.3 // " " " high level. Vmin<Vmax<=3.44 int BATTERY_SENSE_PIN = A0; // select the input pin for the battery sense point unsigned long SLEEP_TIME = 60000; // Sleep time between reads (in milliseconds) MySensor gw; DHT dht; float lastTemp; float lastHum; boolean metric = true; int oldBatteryPcnt = 0; MyMessage msg(CHILD_ID_SWITCH,V_TRIPPED); MyMessage msgHum(CHILD_ID_HUM, V_HUM); MyMessage msgTemp(CHILD_ID_TEMP, V_TEMP); void setup() { analogReference(INTERNAL); gw.begin(); dht.setup(HUMIDITY_SENSOR_DIGITAL_PIN); // Send the Sketch Version Information to the Gateway gw.sendSketchInfo("Humidity", "1.0"); // Setup the button pinMode(BUTTON_PIN,INPUT); // Activate internal pull-up digitalWrite(BUTTON_PIN,HIGH); // Register all sensors to gw (they will be created as child devices) gw.present(CHILD_ID_SWITCH, S_DOOR); gw.present(CHILD_ID_HUM, S_HUM); gw.present(CHILD_ID_TEMP, S_TEMP); metric = gw.getConfig().isMetric; } void loop() { // Get the update value int value = digitalRead(BUTTON_PIN); // Send in the new value gw.send(msg.set(value==HIGH ? 1 : 0)); delay(dht.getMinimumSamplingPeriod()); float temperature = dht.getTemperature(); if (isnan(temperature)) { Serial.println("Failed reading temperature from DHT"); } else if (temperature != lastTemp) { lastTemp = temperature; if (!metric) { temperature = dht.toFahrenheit(temperature); } gw.send(msgTemp.set(temperature, 1)); Serial.print("T: "); Serial.println(temperature); } float humidity = dht.getHumidity(); if (isnan(humidity)) { Serial.println("Failed reading humidity from DHT"); } else if (humidity != lastHum) { lastHum = humidity; gw.send(msgHum.set(humidity, 1)); Serial.print("H: "); Serial.println(humidity); } int sensorValue = analogRead(BATTERY_SENSE_PIN); // Battery monitoring reading // Serial.println(sensorValue); float Vbat = sensorValue * VBAT_PER_BITS; // Serial.print("Battery Voltage: "); Serial.print(Vbat); Serial.println(" V"); //int batteryPcnt = sensorValue / 10; int batteryPcnt = static_cast<int>(((Vbat-VMIN)/(VMAX-VMIN))*100.); // Serial.print("Battery percent: "); Serial.print(batteryPcnt); Serial.println(" %"); if (oldBatteryPcnt != batteryPcnt) { gw.sendBatteryLevel(batteryPcnt); oldBatteryPcnt = batteryPcnt; } gw.sleep(BUTTON_PIN-2, CHANGE, SLEEP_TIME); }
-
RE: Measuring current
Hello again.
I just got some new 470k resistors today so i changed out the 10k/4,7k resistors on the battery circuit to 1mohm/470k
The current draw is now 0,63mA when sleeping and 17,6mA when sending.
Especially the sleeping current seem very high. Any ideas to why? -
RE: Problems with powermeter pulse sensor
hmm think i solved the problem. I tried with an arduino uno instead and now the sketch works fine. Very strange
-
Problems with powermeter pulse sensor
Hello
I have installed a 3 phase meter for my waterheater.
It is on 3 kw and is also equipped with a ledpulse.
I have made a sensor and flashed it with the standard sketch. I have only changed the pulse/whr to 800 as that is what my meter says.But I get this very strange watt values. I get in the serial log printed watt: around 42000
the meter says 2994 +- which is also correct because its a 3000 w heater.
I did a manual test and clocked 20 pulses looking at the meter and divided by 20.then i got 1,465 ms which calculates to around 3090 watt so the optical out on the sensor is working good. I have also tried putting a 10k resistor between ground and D3 pin without success.
The arduino is a arduino nano clone bought on ebay. I have also tried with another one but with same problem (arduino nano clone also). Could it be that the timing is corrupt on theese clones? Or do you have any other suggestions?
-
RE: Windows GUI/Controller for MySensors
Yes I tried now again an now it works. Maybe something temporary with Dropbox yesterday
-
RE: Windows GUI/Controller for MySensors
@tekka Hey, it seems like the downloadlink is broken. Can you check?
-
RE: Measuring current
@AWI Hello, yes I was aware of that. So it could be possible that configuration no 2 is working, just that it is not possible to measure. .. I will try when I come home. And yes the led is detached. I will also change resistors for the measurement circuit. Just need to order some 470k resistors
-
RE: Measuring current
Aha, that could probably be the cause then
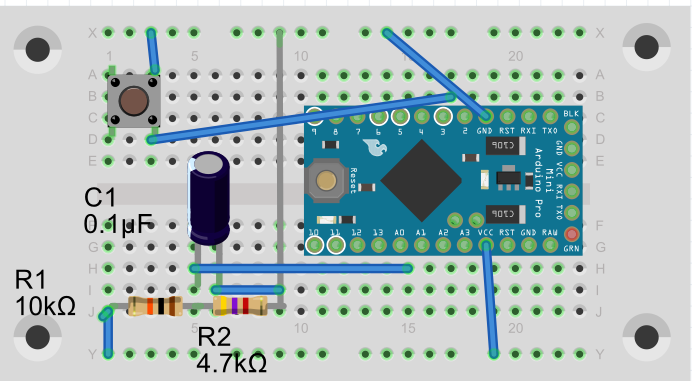
I have now tried with the following 2 scenarios:
Using internal pullup, then i get the current draw 2,85 mA in sleep, which is quite high?I tried to deactivate the internal pullup and used a 1Mohm resistor as external pullup instead but then the sketch doesnt even start.
As referenced to this thread: http://forum.mysensors.org/topic/1287/door-window-sensor-consuming-more-power-when-closed/3**Or is the cause the fact that I am using 10k/4,7k resistors for battery measurment instead of 1m/470K ? **
So this one is working
And this one is not working
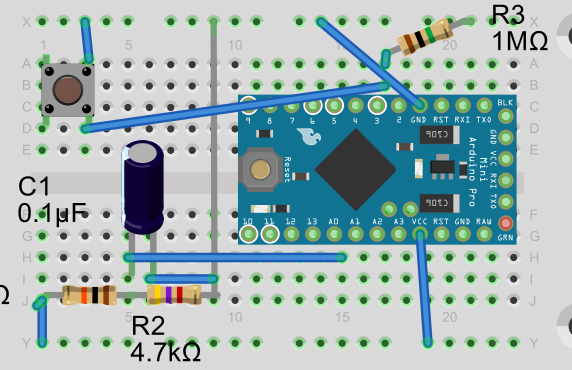
-
Measuring current
Hello
A somewhat stupid question
I have a arduino 3,3 volt without step up or anything. Driven by 2 1,5V batteries.
All positive lines (DHT22 +battery + battery measuring circuit) is connected on Vin pin and all ground cables on ground pin. So fairly simple circuit. Isnt it just to put in the multimeter somewhere in the circuit? Then i read around 4-5mA but the arduino restarts all the time, dont really know why?How to correctly read current on an arduino circuit?
-
RE: pimatic-mysensors controller plugin
@funky81
Hello. I have had a hard time testing this. Is the future for the pulsesensor implemented in 0.8.17 official plugin?If not, how get the latest commit in to pimatic? Have tried to git clone the plugin and then npm install inside the folder, but then none of the sensors shows up in pimatic (the plugin is not active)
With official 0.8.17 the arduino sketch just come in to an endless loop where it wants the latest pulsecount = no answer from pimatic
-
RE: pimatic-mysensors controller plugin
Hello
haven't had the opportunity to test yet.
will try to find time tomorrow -
RE: pimatic-mysensors controller plugin
Yes saw it on github, very interesting. Will try as soon as I am home again
-
RE: pimatic-mysensors controller plugin
@Dheeraj I wait patiently then
Yes the more im digging in to pimatic the more i like it and feel that it fits my needs perfectly -
RE: pimatic-mysensors controller plugin
Good morning @Dheeraj
Do you have any example for how you are configuring it? I have made a node with the "original" sketch and configured it with sensor array [0,1,2] in pimatic. I see the device, with parameters w/kw/kWh but no info comes in. Are you using a custom sketch then or how is your setup working?
I think one of the nicest things about pimatic is the graphing functionality. I want to log and and check how the heating is distributed throughout my house and at which consumption depending on heatpump / woodstove settings -
RE: pimatic-mysensors controller plugin
Hello @Dheeraj
Any info about how to setup a pulsecount sensor? -
RE: Node-Red as Controller
@vikasjee I am still working on my own system. Started to learn MongoDb and AngularJS so i am building my own frontend based on node-red as backend.
There is another guy at the node-red maillist that has made a simple "mobile-app" based on node-red with a pure javascript/jquery setup. Check it out here: https://github.com/industrialinternet/Node-red-flows-mobile-web-app
-
RE: MQTT Gateway "hangs" when reconnecting
Well.,
I have tried now for one hour to reproduce the problem without success. I have now a laptop running where the gateway is but have to take this down soon. I will try again another time -
RE: MQTT Gateway "hangs" when reconnecting
Yes it's the mqtt gateway. I will try tonight with a to take a debug log. I just have to find a long enough ethernet cable
-
MQTT Gateway "hangs" when reconnecting
Hello
I have experienced with both Node-RED and OpenHAB that when i restart this controllers the gateway stalls and i must manually reset it.
It is not every time it happens though.
I have tried to search the forum without success. Has anyone else experienced this? -
RE: Need help with pulse counter for power meter
@mbj said:
V_VAR2
Nice trick!
I did that also and now everything seems to work!I am currently working with node-RED.
Here a simple setup storing the pulsecount in a global variable (but is off course reset after reboot of the node-RED so store this in a database of choice)[{"id":"d0ff7866.2f0088","type":"mqtt-broker","broker":"192.168.1.201","port":"1883","clientid":"MQTT"},{"id":"dcd8de30.23272","type":"mqtt in","name":"MyMQTT/22/1/V_VAR2","topic":"MyMQTT/22/1/V_VAR2","broker":"d0ff7866.2f0088","x":119,"y":866,"z":"cda8f31c.32571","wires":[["cd8597d6.327a68"]]},{"id":"cd8597d6.327a68","type":"function","name":"","func":"msg.payload = context.global.pulsecount;\nif (context.global.pulsecount == null) {\nmsg.payload=0;} else {\nmsg.payload= context.global.pulsecount}\n\nreturn msg;","outputs":1,"x":342,"y":867,"z":"cda8f31c.32571","wires":[["fff8241c.0007d8","fe45e523.01ba18"]]},{"id":"fff8241c.0007d8","type":"mqtt out","name":"MyMQTT/22/1/V_VAR1","topic":"MyMQTT/22/1/V_VAR1","qos":"0","retain":"false","broker":"d0ff7866.2f0088","x":605,"y":871,"z":"cda8f31c.32571","wires":[]},{"id":"fe45e523.01ba18","type":"debug","name":"","active":true,"console":"false","complete":"false","x":552,"y":823,"z":"cda8f31c.32571","wires":[]},{"id":"c283bfb9.3d7c4","type":"mqtt in","name":"","topic":"MyMQTT/22/1/V_VAR1","broker":"d0ff7866.2f0088","x":104,"y":955,"z":"cda8f31c.32571","wires":[["4f883422.b077cc"]]},{"id":"4f883422.b077cc","type":"function","name":"","func":"context.global.pulsecount = context.global.pulsecount || new Object();\ncontext.global.pulsecount = msg.payload;\n\nreturn msg;","outputs":1,"x":282,"y":955,"z":"cda8f31c.32571","wires":[["10c4ee19.ef3b12"]]},{"id":"10c4ee19.ef3b12","type":"debug","name":"","active":true,"console":"false","complete":"false","x":424,"y":955,"z":"cda8f31c.32571","wires":[]}]
-
Need help with pulse counter for power meter
Hello
First I tried to use the sketch from MySensors, but it was a little bit to advanced for what i needed and also it didnt work to good with mqtt gateway (requested for variable 1 and got no answer).Anyhow I tried to make this more simple version which only sends current consumption (have not started on kwh yet, first want to get this working).
I try this scetch and it boot up, but then it completly stalls after sending first kwh message. I get 1 V_WATT message, but nothing in the serial monitor.
Any ideas?? I am very uncertain about the variable declarations, maybe I have done something strange there?#include <SPI.h> #include <MySensor.h> #define CHILD_ID 1 // Id of the sensor child MySensor gw; long pulseCount = 0; //Number of pulses, used to measure energy. unsigned long pulseTime,lastTime; //Used to measure power. unsigned long watt, elapsedkWh; //power and energy int ppwh = 1; //1000 pulses/kwh = 1 pulse per wh //Number of pulses per wh - found or set on the meter. MyMessage wattMsg(CHILD_ID,V_WATT); MyMessage kwhMsg(CHILD_ID,V_KWH); void setup() { gw.begin(); Serial.begin(115200); // Send the sketch version information to the gateway and Controller gw.sendSketchInfo("Energy Meter", "1.0"); // Register this device as power sensor gw.present(CHILD_ID, S_POWER); // KWH interrupt attached to IRQ 1 = pin3 attachInterrupt(1, onPulse, RISING); } void loop() { } void onPulse() { //used to measure time between pulses. lastTime = pulseTime; pulseTime = micros(); //pulseCounter pulseCount++; //Calculate power watt = (3600000000.0 / (pulseTime - lastTime))/ppwh; //Find kwh elapsed elapsedkWh = (1.0*pulseCount/(ppwh*1000)); //multiply by 1000 to pulses per wh to kwh convert wh to kwh //Print the values. Serial.print(watt); Serial.print(" "); Serial.println(elapsedkWh); //Send mqtt message gw.send(wattMsg.set(watt)); //gw.send(kwhMsg.set(elapsedkWh)); }
-
RE: Node-Red as Controller
ok so here is a example.
please note, i am not a programmer so the code might not be the slickest, but it does its job.
What this on is doing is basically emulating 3 mqtt inputs, whit options to see 2 different temperatures.
Send it over via websocket and also use a http request node to serve a webpage straight from nodered, styled and everything, but without use for a server. Pretty nifty
So now i must just create 3 temperature sensors and add them instead of the input nodes.Some pictures:
Node-RED:
And the webpage generated at localhost:1880/temp:
Here is the code for the nodes:
[{"id":"a770a428.588f58","type":"websocket-listener","path":"/admin/ws/temp","wholemsg":"false"},{"id":"40dd0e92.bf22f","type":"http in","name":"allow request on localhost:1880/temp","url":"/temp","method":"get","x":809,"y":578,"z":"cda8f31c.32571","wires":[["e2702220.1d8fe","baa85854.4557a8"]]},{"id":"e2702220.1d8fe","type":"template","name":"make HTTP response","field":"payload","template":"<!DOCTYPE HTML>\n<html>\n <head>\n <meta charset=\"utf-8\">\n <meta http-equiv=\"X-UA-Compatible\" content=\"IE=edge\">\n <meta name=\"viewport\" content=\"width=device-width, initial-scale=1\">\n <title>Temp</title>\n\n <!-- Bootstrap -->\n <link rel=\"stylesheet\" href=\"https://maxcdn.bootstrapcdn.com/bootstrap/3.3.1/css/bootstrap.min.css\">\n\n <!-- HTML5 shim and Respond.js for IE8 support of HTML5 elements and media queries -->\n <!-- WARNING: Respond.js doesn't work if you view the page via file:// -->\n <!--[if lt IE 9]>\n <script src=\"https://oss.maxcdn.com/html5shiv/3.7.2/html5shiv.min.js\"></script>\n <script src=\"https://oss.maxcdn.com/respond/1.4.2/respond.min.js\"></script>\n <![endif]-->\n \n </head>\n <script type=\"text/javascript\">\n var server = window.location.hostname;\n var topics = {};\n var wsUriC = \"ws://192.168.1.111:1880/admin/ws/temp\";\n function wsConnectC() {\n console.log(\"connect\",wsUriC);\n var ws = new WebSocket(wsUriC);\n ws.onmessage = function(msg) {\n \n var payloadObj = JSON.parse(msg.data);\n console.log(payloadObj);\n\t\t\t\tvar output = \"\";\n\t\t\t\t\tfor (var property in payloadObj) {\n \t\t\t\t\t\toutput += '<li class=\"list-group-item\"><strong>' +property + '</strong>' + ': ' + payloadObj[property]+'°C</li>';\n\t\t\t\t\t\t}\n document.getElementById('messages').innerHTML = output; \n \n }\n ws.onopen = function() {\n document.getElementById('status').innerHTML = \"<small>connected</small>\";\n console.log(\"connected\");\n }\n ws.onclose = function() {\n document.getElementById('status').innerHTML = \"not connected\";\n setTimeout(wsConnectC,1000);\n }\n }\n </script>\n <body onload=\"wsConnectC();\" onunload=\"ws.disconnect;\">\n <div class=\"container\">\n <div class=\"panel panel-default\" margin: 15px;>\n \t\t\t\t\t<div class=\"panel-heading\"><h3>Temperaturer</h3></div>\n \t\t\t\t\t <div class=\"panel-body\" id=\"messages\">\n \t\t\t\t\t <ul class=\"list-item\" id=\"messages\">\n \t\t\t\t\t </ul>\n \t\t\t\t\t \n \t\t\t\t\t </div>\n \t\t <div class=\"panel-footer\" id=\"status\"><small>disconnected</small></div>\n </div> \t\n </div> \n <script src=\"https://maxcdn.bootstrapcdn.com/bootstrap/3.3.1/js/bootstrap.min.js\"></script> \n \n </body>\n</html>","x":1156,"y":513,"z":"cda8f31c.32571","wires":[["ee850758.117af8"]]},{"id":"ee850758.117af8","type":"http response","name":"","x":1267,"y":439,"z":"cda8f31c.32571","wires":[]},{"id":"4f43f8f8.b0bc08","type":"websocket out","name":"","server":"a770a428.588f58","x":1226,"y":389,"z":"cda8f31c.32571","wires":[]},{"id":"77a6395f.8859c8","type":"function","name":"set topic Bedroom","func":"msg.topic=\"Bedroom\";\nreturn msg;","outputs":1,"x":298,"y":237,"z":"cda8f31c.32571","wires":[["e7a54f35.185ab"]]},{"id":"69bbfd9e.964404","type":"function","name":"set topic Kitchen","func":"msg.topic=\"Kitchen\";\nreturn msg;","outputs":1,"x":304,"y":319,"z":"cda8f31c.32571","wires":[["e7a54f35.185ab"]]},{"id":"e37062a.f1c8fa","type":"debug","name":"","active":true,"console":"false","complete":"false","x":1105,"y":238,"z":"cda8f31c.32571","wires":[]},{"id":"208f83d.fdf707c","type":"inject","name":"","topic":"","payload":"22.6","payloadType":"string","repeat":"","crontab":"","once":false,"x":109,"y":298,"z":"cda8f31c.32571","wires":[["69bbfd9e.964404"]]},{"id":"b9972cd4.4668d","type":"inject","name":"","topic":"","payload":"23.8","payloadType":"string","repeat":"","crontab":"","once":false,"x":109,"y":203,"z":"cda8f31c.32571","wires":[["77a6395f.8859c8"]]},{"id":"4ba6c90c.b45938","type":"inject","name":"","topic":"","payload":"24.7","payloadType":"string","repeat":"","crontab":"","once":false,"x":106,"y":409,"z":"cda8f31c.32571","wires":[["9d9cbe26.62634"]]},{"id":"e7a54f35.185ab","type":"function","name":"Add together all payloads and send over as JSON","func":"context.temp = context.temp || new Object();\n\nif (msg.payload == \"\") {\n\tmsg2 = new Object();\n\tmsg2 = context.temp;\n\tmsg.payload=JSON.stringify(msg2);\n\t} else {\n\tcontext.temp[msg.topic] = msg.payload; \n\tmsg2 = new Object();\n\tmsg2 = context.temp;\n\tmsg.payload=JSON.stringify(msg2);\n\t};\n\n\treturn msg;\n\n","outputs":1,"x":847,"y":296,"z":"cda8f31c.32571","wires":[["e37062a.f1c8fa","4f43f8f8.b0bc08"]]},{"id":"9d9cbe26.62634","type":"function","name":"set topic Basement","func":"msg.topic=\"Basement\";\nreturn msg;","outputs":1,"x":310,"y":388,"z":"cda8f31c.32571","wires":[["e7a54f35.185ab"]]},{"id":"3cb28a44.c34d76","type":"inject","name":"","topic":"","payload":"22.6","payloadType":"string","repeat":"","crontab":"","once":false,"x":110,"y":240,"z":"cda8f31c.32571","wires":[["77a6395f.8859c8"]]},{"id":"89646127.769ba","type":"inject","name":"","topic":"","payload":"24.7","payloadType":"string","repeat":"","crontab":"","once":false,"x":107,"y":331,"z":"cda8f31c.32571","wires":[["69bbfd9e.964404"]]},{"id":"dbd016fe.242fe8","type":"inject","name":"","topic":"","payload":"23.8","payloadType":"string","repeat":"","crontab":"","once":false,"x":106,"y":376,"z":"cda8f31c.32571","wires":[["9d9cbe26.62634"]]},{"id":"baa85854.4557a8","type":"function","name":"send empty payload to send last known temperatures","func":"msg.payload=\"\";\nreturn msg;","outputs":1,"x":749,"y":528,"z":"cda8f31c.32571","wires":[["5a9cc578.a5633c"]]},{"id":"5a9cc578.a5633c","type":"delay","name":"Delay so websocket is started before sending","pauseType":"delay","timeout":"2","timeoutUnits":"seconds","rate":"1","rateUnits":"second","randomFirst":"1","randomLast":"5","randomUnits":"seconds","drop":false,"x":776,"y":487,"z":"cda8f31c.32571","wires":[["e7a54f35.185ab"]]}]
-
RE: Node-Red as Controller
Hello
I have been tinkering a little with this and it does actually work.
The only thing is that you must point the topic of the mqtt node directly to a child. Its not possible to just subscribe to topics higher in the hierarchy.For example in MyMQTT app on Android i can just subscribe to topic MyMQTT and then i get messages from all nodes connected to the Gateway. This is not possible with the mqtt node in NodeRED. You must specifically point it.
below is and example of an mqtt node outputting to a debug node. My Gateway is at 192.168.1.201.[{"id":"d0ff7866.2f0088","type":"mqtt-broker","broker":"192.168.1.201","port":"1883","clientid":"MQTT"},{"id":"14e0544d.eb1fac","type":"debug","name":"","active":true,"console":"false","complete":"false","x":304,"y":827,"z":"cda8f31c.32571","wires":[]},{"id":"8792e08c.786d2","type":"mqtt in","name":"Temperatur","topic":"MyMQTT/21/1/V_TEMP","broker":"d0ff7866.2f0088","x":67.5,"y":791,"z":"cda8f31c.32571","wires":[["14e0544d.eb1fac"]]}]
I am working on some code to push temperatures as an object trough a websocket for live viewing on a simple webpage.
It maybe sounds advanced, but it is actually very easy. In my opinion Node-RED is just as powerfull as OpenHAB and not particulary more advanced either. Will post a full working example when i have everything ready. -
RE: Heatpump controller
Hello
nice that you cna use it for something
Sorry, I have no idea regarding Daikin, but if you build sometihng to record the codes with maybe you can figure it out and just add that to the library somehow?Anyway, i have thought more about this and i do actually want to be able to make it a little smarter than the code above.
It would be nice if its possible to send a whole string direct from the controller. ie "send(irSender, POWER_ON, MODE_HEAT, FAN_AUTO, 21, VDIR_AUTO, HDIR_AUTO)" Then I can on the controller side make all the logic and that way have complete control of how the heatpump behaves.I have tried to search a little, but can not find any concrete answer. How big is the maximum size of the payload you can send with this library?
-
RE: Heatpump controller
Well, after a few restarts of both the node, the gateway and openhab it suddenly works.
-
RE: Heatpump controller
well, i have run into some problems. It doesnt have anything to do with the sketch though. Its either OpenHab or the gateway that is causing headache.
First of all, I have changed the code into this:
// Example sketch showing how to control ir Heatpumps // An IR LED must be connected to Arduino PWM pin 3. #include <Arduino.h> #include <PanasonicHeatpumpIR.h> #include <MySensor.h> #include <SPI.h> #define CHILD_1 1 // childId IRSender irSender(3); // pin where ir diode is sitting MySensor gw; MyMessage msg(CHILD_1, V_VAR1); HeatpumpIR *heatpumpIR[] = {new PanasonicJKEHeatpumpIR(), NULL}; // will take away everything except PanasonicJKE when everything ready to reduce sketch size void setup() { gw.begin(incomingMessage); // Start listening // Send the sketch version information to the gateway and Controller gw.sendSketchInfo("IR Sensor", "1.0"); // Register a sensors to gw. Use binary light for test purposes. gw.present(CHILD_1, S_HEATER); Serial.begin(9600); delay(500); Serial.println(F("Starting")); Serial.print("Node Id is set to: "); Serial.println(gw.getNodeId()); } void loop() { gw.process(); } void incomingMessage(const MyMessage &message) { // We only expect one type of message from controller. But we better check anyway. if (message.type==V_HEATER) { int incomingHeatingStatus = message.getInt(); if (incomingHeatingStatus == 0) { heatpumpIR[0]->send(irSender, POWER_OFF, MODE_HEAT, FAN_AUTO, 22, VDIR_AUTO, HDIR_AUTO); delay(500); Serial.println("Setting mode to "); Serial.println(incomingHeatingStatus); } else if (incomingHeatingStatus == 1) { heatpumpIR[0]->send(irSender, POWER_ON, MODE_HEAT, FAN_AUTO, 21, VDIR_AUTO, HDIR_AUTO); delay(500); Serial.println("Setting mode to "); Serial.println(incomingHeatingStatus); } else if (incomingHeatingStatus == 2) { heatpumpIR[0]->send(irSender, POWER_ON, MODE_HEAT, FAN_AUTO, 22, VDIR_AUTO, HDIR_AUTO); delay(500); Serial.println("Setting mode to "); Serial.println(incomingHeatingStatus); } else if (incomingHeatingStatus == 3) { heatpumpIR[0]->send(irSender, POWER_ON, MODE_HEAT, FAN_AUTO, 23, VDIR_AUTO, HDIR_AUTO); delay(500); Serial.println("Setting mode to "); Serial.println(incomingHeatingStatus); } else if (incomingHeatingStatus == 4) { heatpumpIR[0]->send(irSender, POWER_ON, MODE_HEAT, FAN_AUTO, 24, VDIR_AUTO, HDIR_AUTO); delay(500); Serial.println("Setting mode to "); Serial.println(incomingHeatingStatus); } else if (incomingHeatingStatus == 5) { heatpumpIR[0]->send(irSender, POWER_ON, MODE_HEAT, FAN_AUTO, 25, VDIR_AUTO, HDIR_AUTO); delay(500); Serial.println("Setting mode to "); Serial.println(incomingHeatingStatus); } else if (incomingHeatingStatus == 6) { heatpumpIR[0]->send(irSender, POWER_ON, MODE_HEAT, FAN_AUTO, 22, VDIR_UP, HDIR_AUTO); delay(500); Serial.println("Setting mode to "); Serial.println(incomingHeatingStatus); } else if (incomingHeatingStatus == 7) { heatpumpIR[0]->send(irSender, POWER_ON, MODE_HEAT, FAN_1, 22, VDIR_UP, HDIR_AUTO); delay(500); Serial.println("Setting mode to "); Serial.println(incomingHeatingStatus); } else if (incomingHeatingStatus == 8) { heatpumpIR[0]->send(irSender, POWER_ON, MODE_HEAT, FAN_3, 22, VDIR_UP, HDIR_AUTO); delay(500); Serial.println("Setting mode to "); Serial.println(incomingHeatingStatus); } else if (incomingHeatingStatus == 9) { heatpumpIR[0]->send(irSender, POWER_ON, MODE_HEAT, FAN_4, 22, VDIR_UP, HDIR_AUTO); delay(500); Serial.println("Setting mode to "); Serial.println(incomingHeatingStatus); } else if (incomingHeatingStatus == 10) { heatpumpIR[0]->send(irSender, POWER_ON, MODE_COOL, FAN_AUTO, 18, VDIR_UP, HDIR_AUTO); delay(500); Serial.println("Setting mode to "); Serial.println(incomingHeatingStatus); } else if (incomingHeatingStatus == 11) { heatpumpIR[0]->send(irSender, POWER_ON, MODE_COOL, FAN_AUTO, 20, VDIR_UP, HDIR_AUTO); delay(500); Serial.println("Setting mode to "); Serial.println(incomingHeatingStatus); } else if (incomingHeatingStatus == 12) { heatpumpIR[0]->send(irSender, POWER_ON, MODE_COOL, FAN_AUTO, 22, VDIR_UP, HDIR_AUTO); delay(500); Serial.println("Setting mode to "); Serial.println(incomingHeatingStatus); } } }
With the Android app MyMQTT I have tried the different modes and all works, Currently the scetch has been up running a couple of days without problems.
The problem is when i try to do this from OpenHAB.
First of all, the Mqtt binding IS working, at least with inbound messages because I have also a couple of temperature sensors and that works fine. But when i try with the following setup the command line of openhab shows: "Heatpump received command ON", but nothing is happening with the arduino. Very strange. Any ideas?Openhab Item:
Switch Heatpump (varmesystem,All) {mqtt=">[mysensor:MyMQTT/20/1/V_HEATER:command:ON:1],> [mysensor:MyMQTT/20/1/V_HEATER:command:OFF:0]"}
OpenHAB Sitemap:
Switch item=Heatpump label="Värmepump"
Any ideas what is going wrong?
-
RE: Heatpump controller
TOUCHDOWN!
Here is working code. Whit this i can with mymqtt android app publish topic MyMQTT/20/1/V_LIGHT with message "1" for heatpump on (with 24 degrees etc etc) and "0" for heatpump off. I have tried it with my Panasonic heatpump and it works.
I also added a little serial string in order to find out node Id (mine was 20 then)Next step is to increase the different modes.
I was thinking from beginning of only having 5 different "hardcoded" modes that would actually be more then enough for my use, but it would be really nice to send over variables some how instead so you have complete control of the heatpump from OpenHAB (temp, heatingmode etc). I am just not sure about how long messages you can send with the nrf protocol. Must dig into thatThanks for all the help, as I said I have almost no programming nor Arduino knowledge since before. Just starting out.
// Example sketch showing how to control ir Heatpumps
// An IR LED must be connected to Arduino PWM pin 3.#include <Arduino.h> #include <FujitsuHeatpumpIR.h> #include <PanasonicCKPHeatpumpIR.h> #include <PanasonicHeatpumpIR.h> #include <CarrierHeatpumpIR.h> #include <MideaHeatpumpIR.h> #include <MitsubishiHeatpumpIR.h> #include <SamsungHeatpumpIR.h> #include <MySensor.h> #include <SPI.h> #define CHILD_1 1 // childId IRSender irSender(3); // pin where ir diode is sitting MySensor gw; MyMessage msg(CHILD_1, V_VAR1); HeatpumpIR *heatpumpIR[] = {new PanasonicCKPHeatpumpIR(), new PanasonicDKEHeatpumpIR(), new PanasonicJKEHeatpumpIR(), new PanasonicNKEHeatpumpIR(), new CarrierHeatpumpIR(), new MideaHeatpumpIR(), new FujitsuHeatpumpIR(), new MitsubishiFDHeatpumpIR(), new MitsubishiFEHeatpumpIR(), new SamsungHeatpumpIR(), NULL}; // will take away everything except PanasonicJKE when everything ready to reduce sketch size void setup() { gw.begin(incomingMessage); // Start listening // Send the sketch version information to the gateway and Controller gw.sendSketchInfo("IR Sensor", "1.0"); // Register a sensors to gw. Use binary light for test purposes. gw.present(CHILD_1, S_LIGHT); Serial.begin(9600); delay(500); Serial.println(F("Starting")); Serial.print("Node Id is set to: "); Serial.println(gw.getNodeId()); } void loop() { gw.process(); } void incomingMessage(const MyMessage &message) { // We only expect one type of message from controller. But we better check anyway. if (message.type==V_LIGHT) { int incomingRelayStatus = message.getInt(); if (incomingRelayStatus == 1) { int i = 0; //counter prog_char* buf; do { // Send the same IR command to all supported heatpumps Serial.print(F("Sending IR to ")); buf = (prog_char*)heatpumpIR[i]->model(); // 'model' is a PROGMEM pointer, so need to write a byte at a time while (char modelChar = pgm_read_byte(buf++)) { Serial.print(modelChar); } Serial.print(F(", info: ")); buf = (prog_char*)heatpumpIR[i]->info(); // 'info' is a PROGMEM pointer, so need to write a byte at a time while (char infoChar = pgm_read_byte(buf++)) { Serial.print(infoChar); } Serial.println(); // Send the IR command heatpumpIR[i]->send(irSender, POWER_ON, MODE_HEAT, FAN_2, 24, VDIR_UP, HDIR_AUTO); delay(500); } while (heatpumpIR[++i] != NULL); } else if (incomingRelayStatus == 0) { int i = 0; //counter prog_char* buf; do { // Send the same IR command to all supported heatpumps Serial.print(F("Sending IR to ")); buf = (prog_char*)heatpumpIR[i]->model(); // 'model' is a PROGMEM pointer, so need to write a byte at a time while (char modelChar = pgm_read_byte(buf++)) { Serial.print(modelChar); } Serial.print(F(", info: ")); buf = (prog_char*)heatpumpIR[i]->info(); // 'info' is a PROGMEM pointer, so need to write a byte at a time while (char infoChar = pgm_read_byte(buf++)) { Serial.print(infoChar); } Serial.println(); // Send the IR command heatpumpIR[i]->send(irSender, POWER_OFF, MODE_HEAT, FAN_2, 24, VDIR_UP, HDIR_AUTO); delay(500); } while (heatpumpIR[++i] != NULL); } } }
-
RE: Heatpump controller
Haha yes i have forgotten gw process in the loop. that is corrected now.
Yes i want to know which mqtt address the node has (for example i have 2 temperatures nodes with id MyMQTT/20/ and MyMQTT/21/ -
RE: Heatpump controller
@Fredrik-Carlsson no ideas?
How can i see which node id the sensor gets? -
RE: Heatpump controller
Hello
I have made the following code (actually not, made i have combined the heatpump example sketch and the ir mysensor sketch to make a controller that can turn ON/OFF the heatpump. But... It doesnt work. I am not sure which node id the controller gets **(how to check that??) **How is the MQTT message structured?
I have tried to send the following with an android app (who is connected to the gateway off course)
Topic: MyMQTT/22/1/V_LIGHT
Message:1Have also tried node id 23-28 without result.
I have a couple of temperature nodes working with MQTT and Openhab so the "system" is working for sure.
But its easier to just find a published message. Harder to publish i maybe??
Any ideas/suggestions?One thing I have noticed is that I dont get the "Starting" message in the serial monitor.
Is maybe something happening which stalls the code before that?All help I can get is highly appreciated!!
ps, the code inside the do loops is already tested and confirmed working in a simpler sketch without mysensors library.// Example sketch showing how to control ir devices // An IR LED must be connected to Arduino PWM pin 3. // When binary light on is clicked - sketch will send heatpump command with on // When binary light off is clicked - sketch will send heatpump command with off #include <Arduino.h> #include <FujitsuHeatpumpIR.h> #include <PanasonicCKPHeatpumpIR.h> #include <PanasonicHeatpumpIR.h> #include <CarrierHeatpumpIR.h> #include <MideaHeatpumpIR.h> #include <MitsubishiHeatpumpIR.h> #include <SamsungHeatpumpIR.h> #include <MySensor.h> #include <SPI.h> #define CHILD_1 1 // childId IRSender irSender(3); // pin where ir diode is sitting MySensor gw; MyMessage msg(CHILD_1, V_VAR1); HeatpumpIR *heatpumpIR[] = {new PanasonicCKPHeatpumpIR(), new PanasonicDKEHeatpumpIR(), new PanasonicJKEHeatpumpIR(), new PanasonicNKEHeatpumpIR(), new CarrierHeatpumpIR(), new MideaHeatpumpIR(), new FujitsuHeatpumpIR(), new MitsubishiFDHeatpumpIR(), new MitsubishiFEHeatpumpIR(), new SamsungHeatpumpIR(), NULL}; // will take away everything except PanasonicJKE when everything ready to reduce sketch size void setup() { gw.begin(incomingMessage); // Start listening // Send the sketch version information to the gateway and Controller gw.sendSketchInfo("IR Sensor", "1.0"); // Register a sensors to gw. Use binary light for test purposes. gw.present(CHILD_1, S_LIGHT); Serial.begin(9600); // Start serial only for debugging. Will be taken away when development is finished delay(500); Serial.println(F("Starting")); } void loop() { } void incomingMessage(const MyMessage &message) { // We only expect one type of message from controller. But we better check anyway. if (message.type==V_LIGHT) { int incomingRelayStatus = message.getInt(); if (incomingRelayStatus == 1) { int i = 0; //counter prog_char* buf; do { // Send the same IR command to all supported heatpumps Serial.print(F("Sending IR to ")); buf = (prog_char*)heatpumpIR[i]->model(); // 'model' is a PROGMEM pointer, so need to write a byte at a time while (char modelChar = pgm_read_byte(buf++)) { Serial.print(modelChar); } Serial.print(F(", info: ")); buf = (prog_char*)heatpumpIR[i]->info(); // 'info' is a PROGMEM pointer, so need to write a byte at a time while (char infoChar = pgm_read_byte(buf++)) { Serial.print(infoChar); } Serial.println(); // Send the IR command heatpumpIR[i]->send(irSender, POWER_ON, MODE_HEAT, FAN_2, 24, VDIR_UP, HDIR_AUTO); delay(500); } while (heatpumpIR[++i] != NULL); } else if (incomingRelayStatus == 1) { int i = 0; //counter prog_char* buf; do { // Send the same IR command to all supported heatpumps Serial.print(F("Sending IR to ")); buf = (prog_char*)heatpumpIR[i]->model(); // 'model' is a PROGMEM pointer, so need to write a byte at a time while (char modelChar = pgm_read_byte(buf++)) { Serial.print(modelChar); } Serial.print(F(", info: ")); buf = (prog_char*)heatpumpIR[i]->info(); // 'info' is a PROGMEM pointer, so need to write a byte at a time while (char infoChar = pgm_read_byte(buf++)) { Serial.print(infoChar); } Serial.println(); // Send the IR command heatpumpIR[i]->send(irSender, POWER_OFF, MODE_HEAT, FAN_2, 24, VDIR_UP, HDIR_AUTO); delay(500); } while (heatpumpIR[++i] != NULL); } } }
-
RE: Heatpump controller
Hello
You are of course right
I have successfully made a couple of temperature sensors and more or less also got a humid understanding about how the code works.
What I hesitate about now is how to go further.
I think the easiest is to evaluate the incoming message in a switch statement from where I send 5 different commandsI revert with some kind off code later this weekend
All input and help is highly appreciated
-
Heatpump controller
Hello
First of all, I know very little about programming and Arduino but I am trying to learn.
I just dont get the whole picture about how to use this library in the right way for this project.
I want a microcontroller for controlling my heatpump via OpenHAB. I have sucessfully tried this library with the simple example provided in the library and it works https://github.com/ToniA/arduino-heatpumpir
What I want to do is to make a sketch that is based on a arduino + the nrf24 and the mysensors library.
If you look in the sample sketch for the heatpump library https://github.com/ToniA/arduino-heatpumpir/blob/master/examples/simple/simple.ino it should be quite simple to adapt this.I dont have the need to send variables over the nrf24 i can hardcode maybe 4-5 different states the heatpump library sends and then just control them with different values (ie value 1 = heatpumpIR[i]->send(irSender, POWER_ON, MODE_HEAT, FAN_2, 24, VDIR_UP, HDIR_AUTO);, value 2 is maybe power off or something
Does anyone have a clue about how to customize this to a mysensor?
Which sensot item etc should i use?Any help and input in this matter will be higly appreciated