
States Relay
-
translate French--> Anglais
Hello
a request on the Eternal "status feedback" of a command.did the command activate my request?
a can like an existential, to be or not to beMy test model diagram
Domoticz ----> Arduino output ----> Relay
Domoticz <----- Arduino Input <----- °--°the scheme
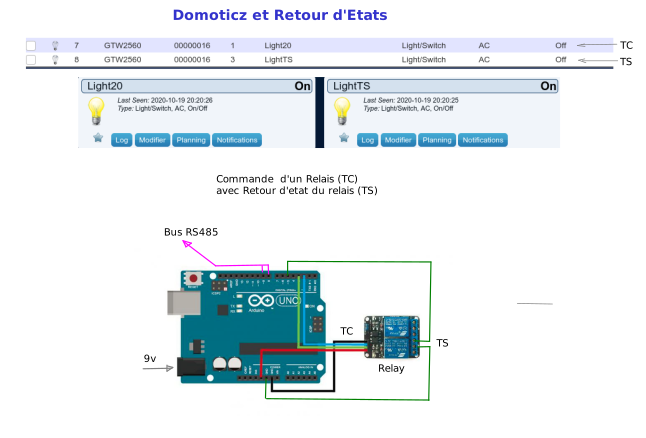
a skit tampering
/*
*
 * compilation de
 *  RelayActuator.ino et BinarySwitchSensor.ino
 *
 * LA DESCRIPTION
 * utilisation d'un contact auxilaire du relais pour retour d'etat d'une commande,
 *
 *
 */


//----------------------- Library Configuration ---------------------
 #define MY_DEBUG                          // uncomment to enable debug prints to serial monitor

 #define MY_NODE_ID 22                   /*Node en ID static*/

 #define MY_TRANSPORT_WAIT_READY_MS 3000 /*Tempo d'attente de mis en Com, des millisecondes*/
 #define  MY_SPLASH_SCREEN_DISABLED /*désactive écran de démarrage MySensors (économie 120oct. en flash)*/

//-------------------------------Bus RS485--------------------------------
 #define MY_RS485
 #define MY_RS485_DE_PIN 2
 #define MY_RS485_BAUD_RATE22 9600  /* débit du bus rs485*/
 // #define MY_RS485_HWSERIAL Serial1    /*pour Mega2560,Serial 1-2- ou 3 ? */

//---------------------------------------------------------------------------

#include <MySensors.h>
#include <Bounce2.h>  /*anti rebond*/

#define CHILD_ID 3 // contact enfant

//--------------- contact-----------------------
#define BUTTON_PIN  7   // Broche Arduino Digital I / O pour bouton / interrupteur reed

//------------------ relay------------------------------
#define RELAY_PIN 3  // Arduino Digital I/O pin number for first relay (second on pin+1 etc)
#define NUMBER_OF_RELAYS 1 // Total number of attached relays
#define RELAY_ON 1  // GPIO value to write to turn on attached relay
#define RELAY_OFF 0 // GPIO value to write to turn off attached relay

//----------------- contact
//Bounce debouncer = Bounce();
//int oldValue=-1;

Bounce debouncer = Bounce();
int oldValue=0;
bool state;

// -----------------contact--------------------

MyMessage msg(CHILD_ID,V_TRIPPED);  // V_LIGHT si vous utilisez S_LIGHT

//MyMessage msg(CHILD_ID,V_LIGHT);

//-------------------- Relay--------------------------------
//void before()
//{
//    for (int sensor=1, pin=RELAY_PIN; sensor<=NUMBER_OF_RELAYS; sensor++, pin++) {
//        pinMode(pin, OUTPUT);  // Then set relay pins in output mode
        // Set relay to last known state (using eeprom storage)
        //digitalWrite(pin, loadState(sensor)?RELAY_ON:RELAY_OFF);
//    }
//}
//----------------------  *************-----------------------------------

void setup()
{
  // Configurer le bouton
  pinMode(BUTTON_PIN,INPUT_PULLUP);
  digitalWrite(BUTTON_PIN,HIGH);

  // configure le bouton et debounce
  debouncer.attach(BUTTON_PIN);
  debouncer.interval(5);

 // Assurez-vous que les relais sont désactivés au démarrage
  digitalWrite(RELAY_PIN, RELAY_OFF);
  // Réglez ensuite les broches de relais en mode sortie
  pinMode(RELAY_PIN, OUTPUT);

}

void presentation()
  {
 //------------------ contact-----------------
  // pouvez utiliser S_DOOR, S_MOTION ou S_LIGHT,  Si S_LIGHT est utilisé,
  //n'oubliez pas de mettre à jour le type de variable que vous envoyez. Voir "msg" ci-dessus.
 // present(CHILD_ID, S_DOOR);
  //----------------- ************----------------
present(CHILD_ID, S_LIGHT);
  //-------------------- relay ---------------------------------------
      sendSketchInfo("Relay et State", "2.0");

    for (int sensor=1, pin=RELAY_PIN; sensor<=NUMBER_OF_RELAYS; sensor++, pin++)
    {
     present(sensor, S_BINARY);  // Register et  created as child devices
    }
 //--------------------****************-------------------------
}

void loop()
{
//      --------------- contact--------------
  debouncer.update(); // control Etat contact
  int value = debouncer.read(); // Récupère la valeur de mise à jour
//-----------------------------
  if (value != oldValue && value==0) {
      send(msg.set(state?false:true), true); // Envoyer un nouvel état et demander un accusé de réception
  }
  oldValue = value;
}

//------------------------------------------
//  if (value != oldValue)  // Envoyer la nouvelle valeur
//  {
//     send(msg.set(value==HIGH ? 1 : 0));
//     oldValue = value;
//  }
//}
//-----------------------------

//  --------------------************-------------------

// -------------------- Relay-----------------------
void receive(const MyMessage &message)
{

if (message.isAck()) {
     Serial.println("This is an ack from gateway");
  }

    // We only expect one type of message from controller. But we better check anyway.
   // if (message.getType()==V_STATUS) {
        // Change relay state
             // digitalWrite(message.getSensor()-1+RELAY_PIN, message.getBool()?RELAY_ON:RELAY_OFF);


//-----------------cmd local----------------
 if (message.type == V_LIGHT) {
     // Change relay state
     state = message.getBool();
     digitalWrite(RELAY_PIN, state?RELAY_ON:RELAY_OFF);

//-------------------------------------------
        // Write some debug info
        Serial.print("    Incoming change for sensor:");
        Serial.println(message.getSensor());
        Serial.print("   New status: ");
        Serial.println(message.getBool());

        Serial.print(" etat contact ");
        Serial.println(oldValue);
        }
}

// ----------------- fin Pgm -----------------
already made a request on
but no answer. https://easydomoticz.com/forum/viewtopic.php?f=20&t=10601so how to activate the relay state in Domoticz
Thank you
Hello! It looks like you're interested in this conversation, but you don't have an account yet.
Getting fed up of having to scroll through the same posts each visit? When you register for an account, you'll always come back to exactly where you were before, and choose to be notified of new replies (either via email, or push notification). You'll also be able to save bookmarks and upvote posts to show your appreciation to other community members.
With your input, this post could be even better 💗
Register Login