How To: Make a Simple/Cheap Scene Controller (with video)
-
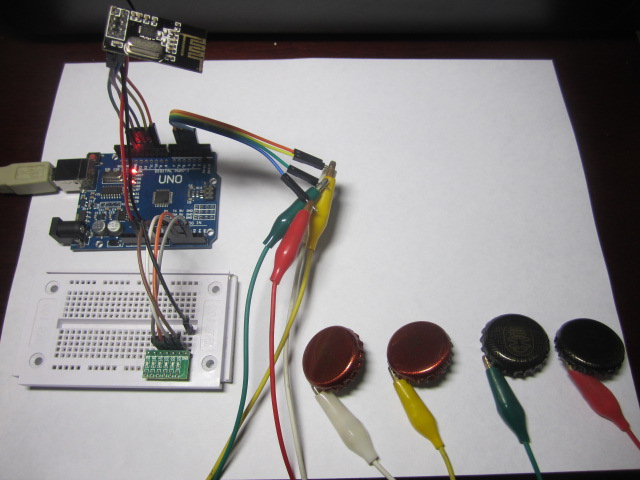
Hi all - Another capacitive version with an "out of the bottle" keypad - 4 buttons. Like AWI's version, also toggles between 'Scene ON' and 'Scene OFF', but states are kept in a variable (keyState) - LEDs added for better toogle visibility. Capacitive routine found at http://www.arduino.cc/playground/Code/CapacitiveSensor
Great post from @petewill and nice version from AWI. Thanks!
#include <SPI.h>
#include <MySensor.h>
#define SN "Scene Controller"
#define SV "1.2"
#define NODE_ID 20 // or set to AUTO if you want gw to assign a NODE_ID for you.
const byte KEYPAD_CHILD_ID = 1 ;
MySensor gw;
MyMessage scene_on(KEYPAD_CHILD_ID, V_SCENE_ON);
MyMessage scene_off(KEYPAD_CHILD_ID, V_SCENE_OFF);long time = 0;
long debounce = 800;
const byte keyLeds[] = {14, 15, 16, 17}; //LEDs to turn on/off
const byte keyPins[] = {2, 3, 4, 5}; //capacitive keys
byte keyState = B1111; //save LEDs statesvoid setup() {
Serial.begin(9600);
for (byte i = 0 ; i < sizeof(keyLeds) ; i++)
{ pinMode(keyLeds[i], OUTPUT);
}
gw.begin(NULL, NODE_ID);
gw.sendSketchInfo(SN, SV);
gw.present(KEYPAD_CHILD_ID, S_SCENE_CONTROLLER);
}void loop() {
uint8_t pinRead;
for (byte i = 0 ; i < sizeof(keyPins) ; i++){
pinRead = readCapacitivePin(keyPins[i]);
if (pinRead > 2 && millis() - time > debounce) {
digitalWrite(keyLeds[i], bitRead(keyState,i));
if (bitRead(keyState,i) == 1){
gw.send(scene_on.set(keyPins[i]));
bitWrite(keyState, i, 0);} else
{gw.send(scene_off.set(keyPins[i]));
bitWrite(keyState, i, 1);}
time = millis();
}
}
}// — readCapPin found at http://www.arduino.cc/playground/Code/CapacitiveSensor
uint8_t readCapacitivePin(int pinToMeasure) {// Variables used to translate from Arduino to AVR pin naming
volatile uint8_t* port;
volatile uint8_t* ddr;
volatile uint8_t* pin;
// Here we translate the input pin number from
// Arduino pin number to the AVR PORT, PIN, DDR,
// and which bit of those registers we care about.
byte bitmask;
port = portOutputRegister(digitalPinToPort(pinToMeasure));
ddr = portModeRegister(digitalPinToPort(pinToMeasure));
bitmask = digitalPinToBitMask(pinToMeasure);
pin = portInputRegister(digitalPinToPort(pinToMeasure));
// Discharge the pin first by setting it low and output
*port &= ~(bitmask);
*ddr |= bitmask;
delay(1);
// Make the pin an input with the internal pull-up on
*ddr &= ~(bitmask);
*port |= bitmask;// Now see how long the pin to get pulled up. This manual unrolling of the loop
// decreases the number of hardware cycles between each read of the pin,
// thus increasing sensitivity.
uint8_t cycles = 17;
if (*pin & bitmask) { cycles = 0;}
else if (*pin & bitmask) { cycles = 1;}
else if (*pin & bitmask) { cycles = 2;}
else if (*pin & bitmask) { cycles = 3;}
else if (*pin & bitmask) { cycles = 4;}
else if (*pin & bitmask) { cycles = 5;}
else if (*pin & bitmask) { cycles = 6;}
else if (*pin & bitmask) { cycles = 7;}
else if (*pin & bitmask) { cycles = 8;}
else if (*pin & bitmask) { cycles = 9;}
else if (*pin & bitmask) { cycles = 10;}
else if (*pin & bitmask) { cycles = 11;}
else if (*pin & bitmask) { cycles = 12;}
else if (*pin & bitmask) { cycles = 13;}
else if (*pin & bitmask) { cycles = 14;}
else if (*pin & bitmask) { cycles = 15;}
else if (*pin & bitmask) { cycles = 16;}// Discharge the pin again by setting it low and output
// It’s important to leave the pins low if you want to
// be able to touch more than 1 sensor at a time – if
// the sensor is left pulled high, when you touch
// two sensors, your body will transfer the charge between
// sensors.
*port &= ~(bitmask);
*ddr |= bitmask;return cycles;
} -
My domoticz found S_SCENE_CONTROLLER sensor but there is not any devices for such a hardware. Do you know how can I control scene with it?
-
My domoticz found S_SCENE_CONTROLLER sensor but there is not any devices for such a hardware. Do you know how can I control scene with it?
-
Domoticz v.2.4633
-
-
lua script?
-
My domoticz found S_SCENE_CONTROLLER sensor but there is not any devices for such a hardware. Do you know how can I control scene with it?
@Michal-Mormon
S_SCENE_CONTROLLER can send messages V_SCENE_ON and V_SCENE_OFF. If you send those messages for the first time, domoticz will create new switch with the name 'scene'. -
@Michal-Mormon
S_SCENE_CONTROLLER can send messages V_SCENE_ON and V_SCENE_OFF. If you send those messages for the first time, domoticz will create new switch with the name 'scene'.@Maciej-Kulawik
I found it as 'Scene' switch but this example send only V_SCENE_ON the first time (the switch is still ON later) -
@Maciej-Kulawik
I found it as 'Scene' switch but this example send only V_SCENE_ON the first time (the switch is still ON later)@Michal-Mormon
Yes, exactly! It looks like without scene_off sent from scene controller in domoticz it will be one-time action (since if this scene switch is switched on you cannot switch it on again). You can try to setup automatic switching it off in domoticz. -
I added 2 lines and works perfect with Domoticz:
MyMessage scene(KEYPAD_CHILD_ID, V_SCENE_ON);
MyMessage scene2(KEYPAD_CHILD_ID, V_SCENE_OFF); //added linegw.send(scene.set(keyInt));
gw.send(scene2.set(keyInt)); //added line -
I added 2 lines and works perfect with Domoticz:
MyMessage scene(KEYPAD_CHILD_ID, V_SCENE_ON);
MyMessage scene2(KEYPAD_CHILD_ID, V_SCENE_OFF); //added linegw.send(scene.set(keyInt));
gw.send(scene2.set(keyInt)); //added line@Michal-Mormon awesome!
-
-
@petewill Any news about the 2.0 code? I am in the process of making scene controllers in the different rooms but can't get it to work.
@dvr123 No, not yet :grimacing:
My thermostat project has taken priority over everything because I need one in my house. I have a prototype working but I need to finish it. It is taking much longer than expected and I also haven't had much time lately. Sorry.