Skip to content
  • MySensors
  • OpenHardware.io
  • Categories
  • Recent
  • Tags
  • Popular
Skins
  • Light
  • Brite
  • Cerulean
  • Cosmo
  • Flatly
  • Journal
  • Litera
  • Lumen
  • Lux
  • Materia
  • Minty
  • Morph
  • Pulse
  • Sandstone
  • Simplex
  • Sketchy
  • Spacelab
  • United
  • Yeti
  • Zephyr
  • Dark
  • Cyborg
  • Darkly
  • Quartz
  • Slate
  • Solar
  • Superhero
  • Vapor

  • Default (No Skin)
  • No Skin
Collapse
Brand Logo
  1. Home
  2. My Project
  3. How To: Make a Simple/Cheap Scene Controller (with video)

How To: Make a Simple/Cheap Scene Controller (with video)

Scheduled Pinned Locked Moved My Project
62 Posts 19 Posters 46.2k Views 15 Watching
  • Oldest to Newest
  • Newest to Oldest
  • Most Votes
Reply
  • Reply as topic
Log in to reply
This topic has been deleted. Only users with topic management privileges can see it.
  • B brom_snor

    Hi Petewill
    I 'd like to build your Scene Controller but I am missing the keypad.h library. Where can I get it?

    greetings
    Brom_Snor

    P Offline
    P Offline
    petewill
    Admin
    wrote on last edited by
    #18

    @brom_snor
    Sorry about that. I thought it was part of the default libraries. I must have downloaded it a while ago. This one should work: http://playground.arduino.cc/Code/Keypad

    My "How To" home automation video channel: https://www.youtube.com/channel/UCq_Evyh5PQALx4m4CQuxqkA

    1 Reply Last reply
    0
    • F Offline
      F Offline
      Fred LaR
      wrote on last edited by
      #19

      Hi all - Another capacitive version with an "out of the bottle" keypad - 4 buttons. Like AWI's version, also toggles between 'Scene ON' and 'Scene OFF', but states are kept in a variable (keyState) - LEDs added for better toogle visibility. Capacitive routine found at http://www.arduino.cc/playground/Code/CapacitiveSensor

      Great post from @petewill and nice version from AWI. Thanks!
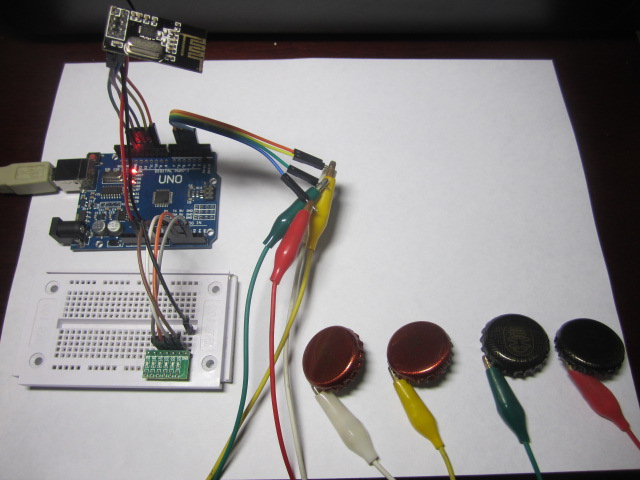
      Imagen.jpg

      #include <SPI.h>
      #include <MySensor.h>
      #define SN "Scene Controller"
      #define SV "1.2"
      #define NODE_ID 20 // or set to AUTO if you want gw to assign a NODE_ID for you.
      const byte KEYPAD_CHILD_ID = 1 ;
      MySensor gw;
      MyMessage scene_on(KEYPAD_CHILD_ID, V_SCENE_ON);
      MyMessage scene_off(KEYPAD_CHILD_ID, V_SCENE_OFF);

      long time = 0;
      long debounce = 800;
      const byte keyLeds[] = {14, 15, 16, 17}; //LEDs to turn on/off
      const byte keyPins[] = {2, 3, 4, 5}; //capacitive keys
      byte keyState = B1111; //save LEDs states

      void setup() {
      Serial.begin(9600);
      for (byte i = 0 ; i < sizeof(keyLeds) ; i++)
      { pinMode(keyLeds[i], OUTPUT);
      }
      gw.begin(NULL, NODE_ID);
      gw.sendSketchInfo(SN, SV);
      gw.present(KEYPAD_CHILD_ID, S_SCENE_CONTROLLER);
      }

      void loop() {
      uint8_t pinRead;
      for (byte i = 0 ; i < sizeof(keyPins) ; i++){
      pinRead = readCapacitivePin(keyPins[i]);
      if (pinRead > 2 && millis() - time > debounce) {
      digitalWrite(keyLeds[i], bitRead(keyState,i));
      if (bitRead(keyState,i) == 1){
      gw.send(scene_on.set(keyPins[i]));
      bitWrite(keyState, i, 0);} else
      {gw.send(scene_off.set(keyPins[i]));
      bitWrite(keyState, i, 1);}
      time = millis();
      }
      }
      }

      // — readCapPin found at http://www.arduino.cc/playground/Code/CapacitiveSensor
      uint8_t readCapacitivePin(int pinToMeasure) {

      // Variables used to translate from Arduino to AVR pin naming
      volatile uint8_t* port;
      volatile uint8_t* ddr;
      volatile uint8_t* pin;
      // Here we translate the input pin number from
      // Arduino pin number to the AVR PORT, PIN, DDR,
      // and which bit of those registers we care about.
      byte bitmask;
      port = portOutputRegister(digitalPinToPort(pinToMeasure));
      ddr = portModeRegister(digitalPinToPort(pinToMeasure));
      bitmask = digitalPinToBitMask(pinToMeasure);
      pin = portInputRegister(digitalPinToPort(pinToMeasure));
      // Discharge the pin first by setting it low and output
      *port &= ~(bitmask);
      *ddr |= bitmask;
      delay(1);
      // Make the pin an input with the internal pull-up on
      *ddr &= ~(bitmask);
      *port |= bitmask;

      // Now see how long the pin to get pulled up. This manual unrolling of the loop
      // decreases the number of hardware cycles between each read of the pin,
      // thus increasing sensitivity.
      uint8_t cycles = 17;
      if (*pin & bitmask) { cycles = 0;}
      else if (*pin & bitmask) { cycles = 1;}
      else if (*pin & bitmask) { cycles = 2;}
      else if (*pin & bitmask) { cycles = 3;}
      else if (*pin & bitmask) { cycles = 4;}
      else if (*pin & bitmask) { cycles = 5;}
      else if (*pin & bitmask) { cycles = 6;}
      else if (*pin & bitmask) { cycles = 7;}
      else if (*pin & bitmask) { cycles = 8;}
      else if (*pin & bitmask) { cycles = 9;}
      else if (*pin & bitmask) { cycles = 10;}
      else if (*pin & bitmask) { cycles = 11;}
      else if (*pin & bitmask) { cycles = 12;}
      else if (*pin & bitmask) { cycles = 13;}
      else if (*pin & bitmask) { cycles = 14;}
      else if (*pin & bitmask) { cycles = 15;}
      else if (*pin & bitmask) { cycles = 16;}

      // Discharge the pin again by setting it low and output
      // It’s important to leave the pins low if you want to
      // be able to touch more than 1 sensor at a time – if
      // the sensor is left pulled high, when you touch
      // two sensors, your body will transfer the charge between
      // sensors.
      *port &= ~(bitmask);
      *ddr |= bitmask;

      return cycles;
      }

      DrJeffD P 2 Replies Last reply
      4
      • F Fred LaR

        Hi all - Another capacitive version with an "out of the bottle" keypad - 4 buttons. Like AWI's version, also toggles between 'Scene ON' and 'Scene OFF', but states are kept in a variable (keyState) - LEDs added for better toogle visibility. Capacitive routine found at http://www.arduino.cc/playground/Code/CapacitiveSensor

        Great post from @petewill and nice version from AWI. Thanks!

        Imagen.jpg

        #include <SPI.h>
        #include <MySensor.h>
        #define SN "Scene Controller"
        #define SV "1.2"
        #define NODE_ID 20 // or set to AUTO if you want gw to assign a NODE_ID for you.
        const byte KEYPAD_CHILD_ID = 1 ;
        MySensor gw;
        MyMessage scene_on(KEYPAD_CHILD_ID, V_SCENE_ON);
        MyMessage scene_off(KEYPAD_CHILD_ID, V_SCENE_OFF);

        long time = 0;
        long debounce = 800;
        const byte keyLeds[] = {14, 15, 16, 17}; //LEDs to turn on/off
        const byte keyPins[] = {2, 3, 4, 5}; //capacitive keys
        byte keyState = B1111; //save LEDs states

        void setup() {
        Serial.begin(9600);
        for (byte i = 0 ; i < sizeof(keyLeds) ; i++)
        { pinMode(keyLeds[i], OUTPUT);
        }
        gw.begin(NULL, NODE_ID);
        gw.sendSketchInfo(SN, SV);
        gw.present(KEYPAD_CHILD_ID, S_SCENE_CONTROLLER);
        }

        void loop() {
        uint8_t pinRead;
        for (byte i = 0 ; i < sizeof(keyPins) ; i++){
        pinRead = readCapacitivePin(keyPins[i]);
        if (pinRead > 2 && millis() - time > debounce) {
        digitalWrite(keyLeds[i], bitRead(keyState,i));
        if (bitRead(keyState,i) == 1){
        gw.send(scene_on.set(keyPins[i]));
        bitWrite(keyState, i, 0);} else
        {gw.send(scene_off.set(keyPins[i]));
        bitWrite(keyState, i, 1);}
        time = millis();
        }
        }
        }

        // — readCapPin found at http://www.arduino.cc/playground/Code/CapacitiveSensor
        uint8_t readCapacitivePin(int pinToMeasure) {

        // Variables used to translate from Arduino to AVR pin naming
        volatile uint8_t* port;
        volatile uint8_t* ddr;
        volatile uint8_t* pin;
        // Here we translate the input pin number from
        // Arduino pin number to the AVR PORT, PIN, DDR,
        // and which bit of those registers we care about.
        byte bitmask;
        port = portOutputRegister(digitalPinToPort(pinToMeasure));
        ddr = portModeRegister(digitalPinToPort(pinToMeasure));
        bitmask = digitalPinToBitMask(pinToMeasure);
        pin = portInputRegister(digitalPinToPort(pinToMeasure));
        // Discharge the pin first by setting it low and output
        *port &= ~(bitmask);
        *ddr |= bitmask;
        delay(1);
        // Make the pin an input with the internal pull-up on
        *ddr &= ~(bitmask);
        *port |= bitmask;

        // Now see how long the pin to get pulled up. This manual unrolling of the loop
        // decreases the number of hardware cycles between each read of the pin,
        // thus increasing sensitivity.
        uint8_t cycles = 17;
        if (*pin & bitmask) { cycles = 0;}
        else if (*pin & bitmask) { cycles = 1;}
        else if (*pin & bitmask) { cycles = 2;}
        else if (*pin & bitmask) { cycles = 3;}
        else if (*pin & bitmask) { cycles = 4;}
        else if (*pin & bitmask) { cycles = 5;}
        else if (*pin & bitmask) { cycles = 6;}
        else if (*pin & bitmask) { cycles = 7;}
        else if (*pin & bitmask) { cycles = 8;}
        else if (*pin & bitmask) { cycles = 9;}
        else if (*pin & bitmask) { cycles = 10;}
        else if (*pin & bitmask) { cycles = 11;}
        else if (*pin & bitmask) { cycles = 12;}
        else if (*pin & bitmask) { cycles = 13;}
        else if (*pin & bitmask) { cycles = 14;}
        else if (*pin & bitmask) { cycles = 15;}
        else if (*pin & bitmask) { cycles = 16;}

        // Discharge the pin again by setting it low and output
        // It’s important to leave the pins low if you want to
        // be able to touch more than 1 sensor at a time – if
        // the sensor is left pulled high, when you touch
        // two sensors, your body will transfer the charge between
        // sensors.
        *port &= ~(bitmask);
        *ddr |= bitmask;

        return cycles;
        }

        DrJeffD Offline
        DrJeffD Offline
        DrJeff
        wrote on last edited by
        #20

        @Fred-LaR WOW!
        You just perked up my intrest got to try this one!

        1 Reply Last reply
        0
        • M Offline
          M Offline
          msebbe
          wrote on last edited by
          #21

          Anybody made some Nice enclosure for this?

          1 Reply Last reply
          0
          • F Fred LaR

            Hi all - Another capacitive version with an "out of the bottle" keypad - 4 buttons. Like AWI's version, also toggles between 'Scene ON' and 'Scene OFF', but states are kept in a variable (keyState) - LEDs added for better toogle visibility. Capacitive routine found at http://www.arduino.cc/playground/Code/CapacitiveSensor

            Great post from @petewill and nice version from AWI. Thanks!

            Imagen.jpg

            #include <SPI.h>
            #include <MySensor.h>
            #define SN "Scene Controller"
            #define SV "1.2"
            #define NODE_ID 20 // or set to AUTO if you want gw to assign a NODE_ID for you.
            const byte KEYPAD_CHILD_ID = 1 ;
            MySensor gw;
            MyMessage scene_on(KEYPAD_CHILD_ID, V_SCENE_ON);
            MyMessage scene_off(KEYPAD_CHILD_ID, V_SCENE_OFF);

            long time = 0;
            long debounce = 800;
            const byte keyLeds[] = {14, 15, 16, 17}; //LEDs to turn on/off
            const byte keyPins[] = {2, 3, 4, 5}; //capacitive keys
            byte keyState = B1111; //save LEDs states

            void setup() {
            Serial.begin(9600);
            for (byte i = 0 ; i < sizeof(keyLeds) ; i++)
            { pinMode(keyLeds[i], OUTPUT);
            }
            gw.begin(NULL, NODE_ID);
            gw.sendSketchInfo(SN, SV);
            gw.present(KEYPAD_CHILD_ID, S_SCENE_CONTROLLER);
            }

            void loop() {
            uint8_t pinRead;
            for (byte i = 0 ; i < sizeof(keyPins) ; i++){
            pinRead = readCapacitivePin(keyPins[i]);
            if (pinRead > 2 && millis() - time > debounce) {
            digitalWrite(keyLeds[i], bitRead(keyState,i));
            if (bitRead(keyState,i) == 1){
            gw.send(scene_on.set(keyPins[i]));
            bitWrite(keyState, i, 0);} else
            {gw.send(scene_off.set(keyPins[i]));
            bitWrite(keyState, i, 1);}
            time = millis();
            }
            }
            }

            // — readCapPin found at http://www.arduino.cc/playground/Code/CapacitiveSensor
            uint8_t readCapacitivePin(int pinToMeasure) {

            // Variables used to translate from Arduino to AVR pin naming
            volatile uint8_t* port;
            volatile uint8_t* ddr;
            volatile uint8_t* pin;
            // Here we translate the input pin number from
            // Arduino pin number to the AVR PORT, PIN, DDR,
            // and which bit of those registers we care about.
            byte bitmask;
            port = portOutputRegister(digitalPinToPort(pinToMeasure));
            ddr = portModeRegister(digitalPinToPort(pinToMeasure));
            bitmask = digitalPinToBitMask(pinToMeasure);
            pin = portInputRegister(digitalPinToPort(pinToMeasure));
            // Discharge the pin first by setting it low and output
            *port &= ~(bitmask);
            *ddr |= bitmask;
            delay(1);
            // Make the pin an input with the internal pull-up on
            *ddr &= ~(bitmask);
            *port |= bitmask;

            // Now see how long the pin to get pulled up. This manual unrolling of the loop
            // decreases the number of hardware cycles between each read of the pin,
            // thus increasing sensitivity.
            uint8_t cycles = 17;
            if (*pin & bitmask) { cycles = 0;}
            else if (*pin & bitmask) { cycles = 1;}
            else if (*pin & bitmask) { cycles = 2;}
            else if (*pin & bitmask) { cycles = 3;}
            else if (*pin & bitmask) { cycles = 4;}
            else if (*pin & bitmask) { cycles = 5;}
            else if (*pin & bitmask) { cycles = 6;}
            else if (*pin & bitmask) { cycles = 7;}
            else if (*pin & bitmask) { cycles = 8;}
            else if (*pin & bitmask) { cycles = 9;}
            else if (*pin & bitmask) { cycles = 10;}
            else if (*pin & bitmask) { cycles = 11;}
            else if (*pin & bitmask) { cycles = 12;}
            else if (*pin & bitmask) { cycles = 13;}
            else if (*pin & bitmask) { cycles = 14;}
            else if (*pin & bitmask) { cycles = 15;}
            else if (*pin & bitmask) { cycles = 16;}

            // Discharge the pin again by setting it low and output
            // It’s important to leave the pins low if you want to
            // be able to touch more than 1 sensor at a time – if
            // the sensor is left pulled high, when you touch
            // two sensors, your body will transfer the charge between
            // sensors.
            *port &= ~(bitmask);
            *ddr |= bitmask;

            return cycles;
            }

            P Offline
            P Offline
            petewill
            Admin
            wrote on last edited by
            #22

            @Fred-LaR That's a great idea. Nice!

            My "How To" home automation video channel: https://www.youtube.com/channel/UCq_Evyh5PQALx4m4CQuxqkA

            1 Reply Last reply
            0
            • Michal MormonM Offline
              Michal MormonM Offline
              Michal Mormon
              wrote on last edited by
              #23

              My domoticz found S_SCENE_CONTROLLER sensor but there is not any devices for such a hardware. Do you know how can I control scene with it?

              mfalkviddM M 2 Replies Last reply
              0
              • Michal MormonM Michal Mormon

                My domoticz found S_SCENE_CONTROLLER sensor but there is not any devices for such a hardware. Do you know how can I control scene with it?

                mfalkviddM Offline
                mfalkviddM Offline
                mfalkvidd
                Mod
                wrote on last edited by
                #24

                @Michal-Mormon which version of Domoticz are you using?

                1 Reply Last reply
                0
                • Michal MormonM Offline
                  Michal MormonM Offline
                  Michal Mormon
                  wrote on last edited by
                  #25

                  Domoticz v.2.4633

                  1 Reply Last reply
                  0
                  • Michel - ItM Offline
                    Michel - ItM Offline
                    Michel - It
                    wrote on last edited by
                    #26

                    lua script?

                    P 1 Reply Last reply
                    0
                    • Michel - ItM Michel - It

                      lua script?

                      P Offline
                      P Offline
                      petewill
                      Admin
                      wrote on last edited by
                      #27

                      @Michel---It said:

                      lua script?

                      Sorry, not sure what you're asking.

                      My "How To" home automation video channel: https://www.youtube.com/channel/UCq_Evyh5PQALx4m4CQuxqkA

                      1 Reply Last reply
                      0
                      • Michal MormonM Michal Mormon

                        My domoticz found S_SCENE_CONTROLLER sensor but there is not any devices for such a hardware. Do you know how can I control scene with it?

                        M Offline
                        M Offline
                        Maciej Kulawik
                        wrote on last edited by
                        #28

                        @Michal-Mormon
                        S_SCENE_CONTROLLER can send messages V_SCENE_ON and V_SCENE_OFF. If you send those messages for the first time, domoticz will create new switch with the name 'scene'.

                        Michal MormonM 1 Reply Last reply
                        1
                        • M Maciej Kulawik

                          @Michal-Mormon
                          S_SCENE_CONTROLLER can send messages V_SCENE_ON and V_SCENE_OFF. If you send those messages for the first time, domoticz will create new switch with the name 'scene'.

                          Michal MormonM Offline
                          Michal MormonM Offline
                          Michal Mormon
                          wrote on last edited by
                          #29

                          @Maciej-Kulawik
                          I found it as 'Scene' switch but this example send only V_SCENE_ON the first time (the switch is still ON later)

                          M 1 Reply Last reply
                          1
                          • Michal MormonM Michal Mormon

                            @Maciej-Kulawik
                            I found it as 'Scene' switch but this example send only V_SCENE_ON the first time (the switch is still ON later)

                            M Offline
                            M Offline
                            Maciej Kulawik
                            wrote on last edited by
                            #30

                            @Michal-Mormon
                            Yes, exactly! It looks like without scene_off sent from scene controller in domoticz it will be one-time action (since if this scene switch is switched on you cannot switch it on again). You can try to setup automatic switching it off in domoticz.

                            1 Reply Last reply
                            1
                            • Michal MormonM Offline
                              Michal MormonM Offline
                              Michal Mormon
                              wrote on last edited by
                              #31

                              I added 2 lines and works perfect with Domoticz:

                              MyMessage scene(KEYPAD_CHILD_ID, V_SCENE_ON);
                              MyMessage scene2(KEYPAD_CHILD_ID, V_SCENE_OFF); //added line

                              gw.send(scene.set(keyInt));
                              gw.send(scene2.set(keyInt)); //added line

                              Michel - ItM 1 Reply Last reply
                              1
                              • Michal MormonM Michal Mormon

                                I added 2 lines and works perfect with Domoticz:

                                MyMessage scene(KEYPAD_CHILD_ID, V_SCENE_ON);
                                MyMessage scene2(KEYPAD_CHILD_ID, V_SCENE_OFF); //added line

                                gw.send(scene.set(keyInt));
                                gw.send(scene2.set(keyInt)); //added line

                                Michel - ItM Offline
                                Michel - ItM Offline
                                Michel - It
                                wrote on last edited by
                                #32

                                @Michal-Mormon awesome!

                                1 Reply Last reply
                                0
                                • DrJeffD Offline
                                  DrJeffD Offline
                                  DrJeff
                                  wrote on last edited by
                                  #33

                                  @petewill Have you updated this code to 2.0 yet? What is different?

                                  H P 2 Replies Last reply
                                  0
                                  • DrJeffD DrJeff

                                    @petewill Have you updated this code to 2.0 yet? What is different?

                                    H Offline
                                    H Offline
                                    hek
                                    Admin
                                    wrote on last edited by
                                    #34

                                    @DrJeff

                                    https://forum.mysensors.org/topic/4276/converting-a-sketch-from-1-5-x-to-2-0-x

                                    DrJeffD 1 Reply Last reply
                                    0
                                    • H hek

                                      @DrJeff

                                      https://forum.mysensors.org/topic/4276/converting-a-sketch-from-1-5-x-to-2-0-x

                                      DrJeffD Offline
                                      DrJeffD Offline
                                      DrJeff
                                      wrote on last edited by
                                      #35

                                      @hek
                                      Yes I read but was soooo lazy! I just wanted it already done :grimacing:

                                      I just update one of my old sensors it was a simple single relay. My others are way more complicated! I will give this a try.

                                      1 Reply Last reply
                                      0
                                      • DrJeffD DrJeff

                                        @petewill Have you updated this code to 2.0 yet? What is different?

                                        P Offline
                                        P Offline
                                        petewill
                                        Admin
                                        wrote on last edited by
                                        #36

                                        @DrJeff said:

                                        @petewill Have you updated this code to 2.0 yet? What is different?

                                        Not yet, but I'm slowly working on it. :) The link hek gave is very helpful if you want to try it yourself. It's a good way to learn about the new features in 2.0.

                                        My "How To" home automation video channel: https://www.youtube.com/channel/UCq_Evyh5PQALx4m4CQuxqkA

                                        1 Reply Last reply
                                        0
                                        • dvr123D Offline
                                          dvr123D Offline
                                          dvr123
                                          wrote on last edited by
                                          #37

                                          @petewill Any news about the 2.0 code? I am in the process of making scene controllers in the different rooms but can't get it to work.

                                          P 1 Reply Last reply
                                          0

                                          Hello! It looks like you're interested in this conversation, but you don't have an account yet.

                                          Getting fed up of having to scroll through the same posts each visit? When you register for an account, you'll always come back to exactly where you were before, and choose to be notified of new replies (either via email, or push notification). You'll also be able to save bookmarks and upvote posts to show your appreciation to other community members.

                                          With your input, this post could be even better 💗

                                          Register Login
                                          Reply
                                          • Reply as topic
                                          Log in to reply
                                          • Oldest to Newest
                                          • Newest to Oldest
                                          • Most Votes


                                          18

                                          Online

                                          12.0k

                                          Users

                                          11.2k

                                          Topics

                                          113.4k

                                          Posts


                                          Copyright 2025 TBD   |   Forum Guidelines   |   Privacy Policy   |   Terms of Service
                                          • Login

                                          • Don't have an account? Register

                                          • Login or register to search.
                                          • First post
                                            Last post
                                          0
                                          • MySensors
                                          • OpenHardware.io
                                          • Categories
                                          • Recent
                                          • Tags
                                          • Popular