Decagon Leaf moisture sensor
-
Hi,
I'm trying to connect this sensor to measure the leaf moisture. This sensor is one of the most important leaf sensor of the market.
https://www.decagon.com/en/canopy/canopy-measurements/lws-leaf-wetness-sensor/

I used this code to read:{ Serial.begin(9600); //Start Serial Port with Baud = 9600 } void loop() { Serial.println("Leaf Sensor Arduino Data Logger"); // AgriHouse.com Serial.println("\nAnalog Pin #\tRaw Value\tPercent"); Serial.println("------------------------------------------"); for (int i = 0; i < 10; i++) { int val = analogRead(LeafSensor1); //Read Leaf Sensor Pin A0 int per = map(val, 0, 1023, 0, 100); //Convert to Percentage Serial.print("A0\t\t"); Serial.print(val); Serial.print("\t\t"); Serial.print(per); //Print Percentage Analog Value Serial.println("%"); //Print % Sign and Newline delay(1000); //Wait 1 second, then repeat } } // Note: Leaf Sensor Connection // Connected Leaf Sensor to 3.3 vdc power source and ground (gnd) // Leaf Sensor connected to analog input port:A0 // Note: How to read the leaf sensor signal val // Leaf Sensor Not Affixed (NA) is the highest %. // The Affixed (A) % is less than NA. // Thus (A%<NA%) or (Aval<NAval) means more water in the leaf i.e.(thicker leaf). //Notes: // The arduinos analog inputs have a 10-bit resolution. 2^10 (converting to decimal system) = 1024 // So that's 1024 states, divided in the range 0-5V. 5V / 1024 states = 0,00488V/state (4.88mV/state). // The leaf range is approximately 1.45 to 2.21V @3.3V = 0.77V or 157 states @ 4.88mV ea. // Basically means that when you read the arduinos analog inputs you'll get a value between 0 and 1023. // Each increase in this value signifies rougly a 4.88mV increase in the voltage measured.But I tried many combination to wire it, but I could not reach any reading from the sensor.
Does anybody knows anything from this sensor? or any idea?
Thank's
Eduard
-
Hi,
I'm trying to connect this sensor to measure the leaf moisture. This sensor is one of the most important leaf sensor of the market.
https://www.decagon.com/en/canopy/canopy-measurements/lws-leaf-wetness-sensor/
I used this code to read:{ Serial.begin(9600); //Start Serial Port with Baud = 9600 } void loop() { Serial.println("Leaf Sensor Arduino Data Logger"); // AgriHouse.com Serial.println("\nAnalog Pin #\tRaw Value\tPercent"); Serial.println("------------------------------------------"); for (int i = 0; i < 10; i++) { int val = analogRead(LeafSensor1); //Read Leaf Sensor Pin A0 int per = map(val, 0, 1023, 0, 100); //Convert to Percentage Serial.print("A0\t\t"); Serial.print(val); Serial.print("\t\t"); Serial.print(per); //Print Percentage Analog Value Serial.println("%"); //Print % Sign and Newline delay(1000); //Wait 1 second, then repeat } } // Note: Leaf Sensor Connection // Connected Leaf Sensor to 3.3 vdc power source and ground (gnd) // Leaf Sensor connected to analog input port:A0 // Note: How to read the leaf sensor signal val // Leaf Sensor Not Affixed (NA) is the highest %. // The Affixed (A) % is less than NA. // Thus (A%<NA%) or (Aval<NAval) means more water in the leaf i.e.(thicker leaf). //Notes: // The arduinos analog inputs have a 10-bit resolution. 2^10 (converting to decimal system) = 1024 // So that's 1024 states, divided in the range 0-5V. 5V / 1024 states = 0,00488V/state (4.88mV/state). // The leaf range is approximately 1.45 to 2.21V @3.3V = 0.77V or 157 states @ 4.88mV ea. // Basically means that when you read the arduinos analog inputs you'll get a value between 0 and 1023. // Each increase in this value signifies rougly a 4.88mV increase in the voltage measured.But I tried many combination to wire it, but I could not reach any reading from the sensor.
Does anybody knows anything from this sensor? or any idea?
Thank's
Eduard
@ecabanas it looks like it has 3 wires. Is that correct? If so, I would guess that one wire is for Vcc, one for Gnd and one is the 0.32-1V output.
The description says
Some programming is required; sample CSI programs are available on request.
So maybe the easiest way is to email them and ask?
-
@ecabanas it looks like it has 3 wires. Is that correct? If so, I would guess that one wire is for Vcc, one for Gnd and one is the 0.32-1V output.
The description says
Some programming is required; sample CSI programs are available on request.
So maybe the easiest way is to email them and ask?
-
Hi
Yes I already sent a question tonthese guys but the answered without any constructive answer... :-(I'm trying to connect with a 20k resistence and power with 3.3v but no anwer from the sensor
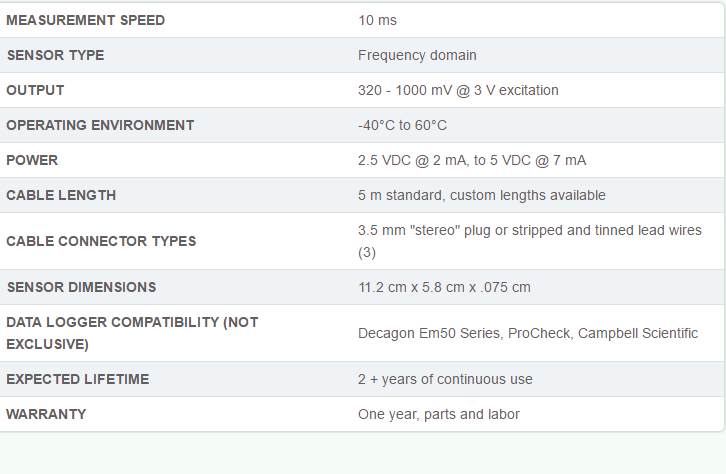
@ecabanas Their site contains a datasheet-ish document.
It states in section 3.2:It produces an output voltage that depends on the dielectric constant
of the medium surrounding the probe, and ranges between 10
to 50% of the excitation voltage. Any data logger which can produce
a 2.5 to 5 V excitation with approximately 10 millisecond duration
and read a volt level signal with 12-bit or better resolution should
be compatible with the LWS. The current requirement at 2.5 V is
around 2 mA, and a 5 V it is 7 to 8 mA.
Note: The LWS is intended only for use with data loggers and readout
devices which can provide short excitation pulses, leaving the probes
turned off most of the time. Continuous excitation not only wastes
battery power, but may, under certain circumstances, cause the probe
to exceed government specified limits on electromagnetic emissions.So, apparantly you have to supply it a pulse of max. 10ms on the exication input and and read the voltage level on the output line.
Furthermore:
White = Power 2.5 to 5 V excitation
Bare shield = Ground
Red = Sensor data output (single ended)I would suggest reading that document first completely!
-
Hi Eduard,
I know the topic is about 2 years old now. But since I am about to start a project and I plan to buy a decagon leaf wetness sensor I really wondered if you managed to get it running on the Arduino.Thank you very much
Best regards
Mathias