How can I monitor the humidity of a wall (house)
-
Hello,
The parent of a friend of my, have an house in France. We are based in Switzerland.
In winter, the wall get very very humid and each sprint his father repair the wall, which is creasy job.I do have soil moisture sensor, but it only work in soil. He asked me how he can monitor the wall of the most humid room, to watch the evolution of humidity during the cold season.
I wonder, if there are electrod / sensor, I can connect to Arduino and RFM95 (LoRaWAN) module to get the measure in realy time.
My concern is now the sensor. Do you know some thinks can help me?
I suppose, I could insert into the wall some electrod big as the nails and as I do with my soil sensor, apply an alternate voltage to get the resistance of the zone where are insert the electrod.
I could insert serveral couple of electrod into different location of the wall and monitor the resistance of the different location.But which kind of electrod? which kind of sensors?
Do a infrared camera can help?
(I do have an infrared temperature sensor, as well)Many thanks for your suggestion
Hello @pierrot10,
a basic solution could be to make a hole/cavity in the wall and put a temperature/humidity sensor inside ?
-
Hello,
The parent of a friend of my, have an house in France. We are based in Switzerland.
In winter, the wall get very very humid and each sprint his father repair the wall, which is creasy job.I do have soil moisture sensor, but it only work in soil. He asked me how he can monitor the wall of the most humid room, to watch the evolution of humidity during the cold season.
I wonder, if there are electrod / sensor, I can connect to Arduino and RFM95 (LoRaWAN) module to get the measure in realy time.
My concern is now the sensor. Do you know some thinks can help me?
I suppose, I could insert into the wall some electrod big as the nails and as I do with my soil sensor, apply an alternate voltage to get the resistance of the zone where are insert the electrod.
I could insert serveral couple of electrod into different location of the wall and monitor the resistance of the different location.But which kind of electrod? which kind of sensors?
Do a infrared camera can help?
(I do have an infrared temperature sensor, as well)Many thanks for your suggestion
@pierrot10 Maybe you could apply the same principle as with the soil sensor but attach to some stainless but conducting nails as you suggested. For calibration you could buy some cheap hand held meter: https://www.aliexpress.com/wholesale?catId=0&initiative_id=SB_20190919015529&SearchText=Wood+moisture+meter&switch_new_app=y ?
-
Hello,
The parent of a friend of my, have an house in France. We are based in Switzerland.
In winter, the wall get very very humid and each sprint his father repair the wall, which is creasy job.I do have soil moisture sensor, but it only work in soil. He asked me how he can monitor the wall of the most humid room, to watch the evolution of humidity during the cold season.
I wonder, if there are electrod / sensor, I can connect to Arduino and RFM95 (LoRaWAN) module to get the measure in realy time.
My concern is now the sensor. Do you know some thinks can help me?
I suppose, I could insert into the wall some electrod big as the nails and as I do with my soil sensor, apply an alternate voltage to get the resistance of the zone where are insert the electrod.
I could insert serveral couple of electrod into different location of the wall and monitor the resistance of the different location.But which kind of electrod? which kind of sensors?
Do a infrared camera can help?
(I do have an infrared temperature sensor, as well)Many thanks for your suggestion
@pierrot10
And what about using normal soil moisture sensor and replace its pcb electrodes with something tougher.
Stainless steel nail knocked into wall or drill hole and put carbon rod from disassembled AA battery into it.
And experiment with electrode distance. -
@kimot said in How can I monitor the humidity of a wall (house):
Stainless steel nail knocked into wall or drill hole and put carbon rod from disassembled AA battery into it
I already have an good experience with Soil Water Potential sensor and I have the code. The Stainless steel nail seem to be a good idea but I do not understand what you means with
drill hole and put carbon rod from disassembled AA battery
I could try to connect the Stainless steel nail into my module and see which kind of result I have. My module apply an alternate voltage and return frequences, but I can easly modify to get a resistance value of a zone of the wall.
My worries is the sensors (or electrod) to insert into the wall, but Stainless steel nail seem to be a good start.
-
Why not as proposed make a small hole in the wall and insert maybe Si7021 sensor into the hole in the wall:
https://www.mysensors.org/store/temperatureBut something else, why is the father not finding the rootcause for the wall to become wet?
-
Why not as proposed make a small hole in the wall and insert maybe Si7021 sensor into the hole in the wall:
https://www.mysensors.org/store/temperatureBut something else, why is the father not finding the rootcause for the wall to become wet?
@bjacobse I too was puzzled over cause v potential remedial work, but presumed it was either plastered rock or a wall with rock behind and no sealing membrane and wick drain between, as is modern construction practice, but no access to retrofit. Drilled bleed pipes could relieve pore pressure, forced ventilation can reduce humidity, but the focus is on measurement.
@pierrot10 If this room is normally sealed such as a cellar, conductivity would be your only option as humidity measurement only is useful if there is free flow air.
The battery/carbon suggestion was an alternative conductive rod option I think. -
if it's only to record humidity a capacitive soil moisture sensor could be an option.
-
"....as humidity measurement only is useful if there is free flow air...." I disagree.
To not damage the wall in any way, I would use a humidity sensor (several are available, I am using the BME280 for a different application)
I would mount the sensor inside a plastic box with no top (like a storage box) I would hold the box to the wall using perhaps a piece of furniture etc. You would have to "calibrate" how much humidity would be too much. There is a possibility the humidity sensor might be too sensitive and simply go to 100% with a small amount of moisture in the wall.
I'm curious, what would be done if moisturize was detected during the winter?
@johnrob I agree this is a better solution than the suggested hole in the wall (trapped supersaturated), but if the room does not vent is that not going to create the same issue only with a greater air volume?
To be clear, I've never investigated rock water intrusion as a hobby to ascertain some measureable value, but have used humidity measurements to verify that the engineering had reduced saturation to reasonable levels. -
Hello @pierrot10,
Firstly, let's talk about normal ambient (outdoor) humidity for a moment, 100% means the air is saturated with the maximum moisture as it can hold.In a normal hose, the humidity will typically be the same in every room, unless there is some special factor, e.g. the bathroom humidity will increase dramatically when someone takes a hot shower.
Next, let's think about a humidity sensor, it can only read the humidity in it's immediate (close) proximity.
Now, let's look at the wall in question, is it a normal wall in a normal house? This would be helpful to know, i.e. if it is a wall in an underground cellar (basement) it helps to explain why this particular wall is getting wet.
The fact that the wall is getting wet tells me the humidity in the immediate (close) proximity will almost certainly be 100% when wet and probably ambient 'room' humidity when not. This is where I believe your solution may be, and here is what I would suggest, assuming you want an alarm when the wall is in danger.
My Suggested Solution
I'd suggest you get two small humidity sensors and connect them both to an Arduino and make adjustments as needed in software so they read the same value (at your desk (workbench).Note: One sensor is to be mounted in the wall and the other to be located in the room, 500mm to 1 meter distance away from the wall, so make your wires the necessary length before you calibrate the sensor readings.
Drill the smallest diameter hole in the wall to fit one sensor in. If the hole needs to be say 20mm diameter, make the hole 40mm deep (100% deeper). I would suggest you angle the hole 3 to 5 degrees so any excess moisture can drain out (and not damage sensor).
Insert one sensor all the way inside the hole, then cover the hole, but NOT airtight. Some examples: Find a plastic bottle cap the same (similar) diameter as the hole in the wall and drill lots of small holes in it. Another option would be to go to your hardware store and buy a small amount of "fiberglass fly screen' (mesh). Use two layers to make the mesh finer (smaller).
The Arduino Code
There are many ways to do this, but based on previous work with humidity sensors, here is what I would do.
a Lora radio will not give you the distance you need, so I would use an ESP8266 or ESP32 chip (with WiFi). The ESP8266 Node 1 would be ideal for this project and is very well priced. This will allow the device to upload the data to a cloud server, of which there are many free ones to select from (check out AdaFruit's I/O Cloud Service, from memory it offers nice graphic display of data etc. I support / recommend AdaFruit because the provide lots of free code and drivers to the hobby community. It's a nice way of saying thanks!
The WiFi device will also allow you to remotely connect, read the data, modify sensor calibration values etc and most importantly, you will be able to perform OTA (over the air) software updates.
*Create a 3 by 24 array of bytes for data storage.
*Every 60 minutes, take 5 readings from in-wall sensor, discard any obviously bad readings, and average the good values. Repeat the same for the in-room sensor.
*Record the hourly average for each sensor as well as the difference between to two (just for convenience), into the array of bytes, using one set of 3 bytes for each hour of the day.
*Upload the three hourly values to a cloud server, along with the date/time as required.
*At midnight (hour zero), just overwrite previous array data values.Reasoning Behind Design
By placing the sensor deep in the wall and covering the hole a bit, this sensor will read the humidity in its immediate environment, but the holes are important to make sure water does not accumulate in the hole and damage the sensor or cause faulty readings.By having a second sensor away from the wall, it will read the general room temperature. Be comparing the two values, you can raise an alarm when the in-wall sensor is greater than the in-room sensor by x%. This way, on cold damp winter nights, when the in-room sensor and in-wall sensor read say 93% and drop the next morning to say 70%, you know that 'normal. But I am sure over time, you will see the the difference between sensors will steadily increase as the wall accumulates more and more moisture.
Once you 'prove the system', you could have the Arduino turn on a heater, blowin(g) on the wall etc etc.
Possible Adjustments
-
If during the first winter testing you find moisture collecting on the sensor PCB, increase the ventilation holes a bit at a time.
-
If you find the value of the in-hole sensor is almost always the same as the in-room values (even when the wall is damp / wet), Roll up a narrow (10mm) strip of newspaper, but NOT too tight and put a pin through it to hold it together as a roll (i.e. decrease the ventilation flow, but do not block it completely). You just want a small 'roll' of newspaper to put in the hole close to the vent. This paper will act as a 'buffer' to isolate the in-hole sensor from the outside, maybe a small piece of sponge will do, but just make sure nothing touches the sensor.
I can't guarantee you this design will work, but it is how I would tackle the problem and think you will find it produce fairly useful data to make a decision with.
Good luck, and please post your progress as I'm sure others would like to know also.
Paul
-
-
Why not as proposed make a small hole in the wall and insert maybe Si7021 sensor into the hole in the wall:
https://www.mysensors.org/store/temperatureBut something else, why is the father not finding the rootcause for the wall to become wet?
-
@bjacobse There is no point to measure it, he needs to put the energy in fixing the wall, permanently
@8667 I believe that is what @bjacobse was referring to, but zero response from @pierrot10 in the last 4 days, and no indication this study has some physical outcome rather than a potential data study.
I agree, and at the risk of parodying Trump, fix the goddam wall... -
@bjacobse There is no point to measure it, he needs to put the energy in fixing the wall, permanently
@8667 while you are probably correct, the lack of info makes that an assumption. I chose to answer in detail, just in case it was a serious question and there may well be reasons why fixing is not an option at this stage.
Regardless, I hope the answer / method may be of later use to someone else with a 'similar' need to measure the moisture content of something other than soil.
But yes, I too will be keen to see if or when the OP comes back.
Paul
-
@8667 I believe that is what @bjacobse was referring to, but zero response from @pierrot10 in the last 4 days, and no indication this study has some physical outcome rather than a potential data study.
I agree, and at the risk of parodying Trump, fix the goddam wall...@zboblamont maybe it was Trump asking the question (in disguise)?
Paul
-
Dear All
I am very sorry for the late reply but I did not give up that project. (I do not get a e-mail when you posted a message. (I will check my preferences).First I would like to tanks you for all of you suggestion and specially to @AffordableTech for his great proposal.
I have some BME280 and I can use one to measure the room humidity as suggested Paul.
I also red a suggestion to put another sensor on the wall (not into) the wall. I am a bit suspicious about that, because as long as it on the surface of the wall, the humidiity of the room will interfer with the measure of the wall.
I am agree with Paul, to drill the wall is a good idea.
But will the the wall have the same moisture in all of it surface? That the reason why, I though more easier to have some Stainless steel nail as the hole would be small.
By the way:
But something else, why is the father not finding the rootcause for the wall to become wet?
he needs to put the energy in fixing the wall, permanently
Yes of course, this should be done once, but now the request is to find where is the most wet zone of the wall, but first to obeserve how to wall get wet during the winter season.
No body compared the nails idea!
I could have 9 pair of nails (3 at the bottom, 3 at middle and 3 at the top of the wall). With a LMC555 . I already developped a such solution to measure the Soil Water Potential in soil, with Arduino and LoRaWAN. The nail hole are very smaller than a 20mm hole :)I have to assembled two PCB for that projects and I will do over the week-end. I am not sure if I will have time to try the discussed suggestion (Paul's suggestion and Stainless steel nail), but I will keep you informed about the progress
@AffordableTech if you are still around, how would you compare your suggestion and the Stainless steel nails idea?
here is how I plan to do. I already have a PCB ready for that working with a LMC555.
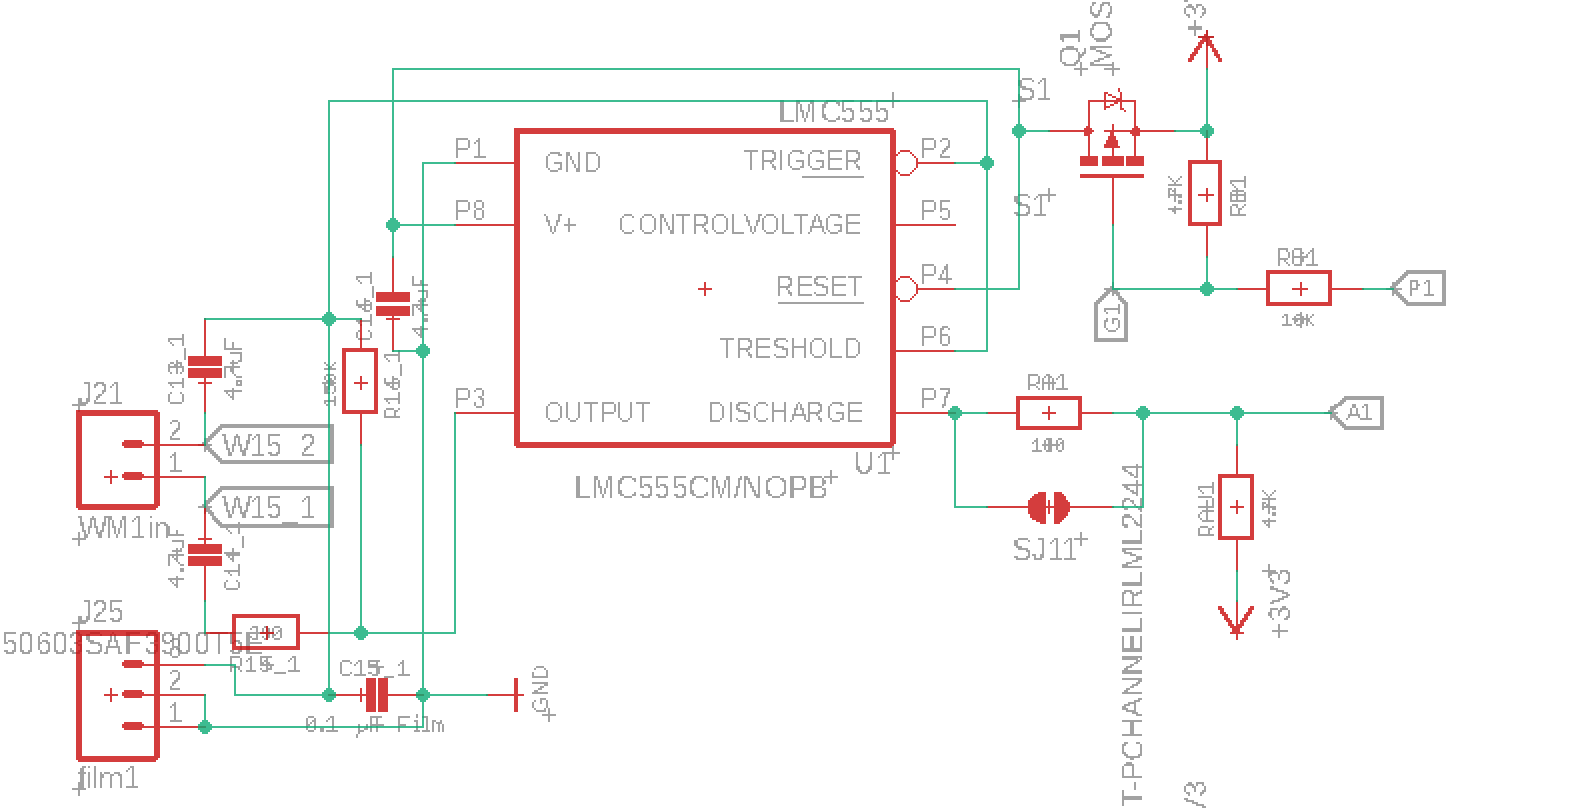
The nails will be connected to the J21. I think, the pair of nails, will be at 2-3cm each other. When P1 is Low, the LMC55 is powered with 3.2V for 2-3 sec. This circuit is designed to have a frequency in response on A1. More the frequency is high, more the zone is wet. More the frequency is low, more the zone is dry. For now, if I can analyse the zone with frequencies, is fine. I will have to adapt my Arduino code of course, but I think interesting to try. On my PCB , I have a LoRaWAN module to send the value to a gateway. Where is the house there is no GSM coverage, Then the gateway will be connected to a neighbour WiFi network. The two house are close, then no issue about distance and transmission. I will get the measure on my server (graph) in real time. That circuit is for Soil moisture, but as the Watermark sensor works with two electrod in a granular sand, I believe the 2 nails could be the two electrond but in a wall. Isn't? I will try it and see if I am a dreamer or nor (laugth). Can it be a good idea?
Note: my module is based on Adafruit boards (feather MO)
In any case, I will also try to drill the walls of my mother house, in the cave, as suggested me Paul. But I am not sure yet, how I will protect the BME280 (or other) to be damage after some months of measurement.
I will keep you inform about the progress in the following weeks (I am employed during the weeks)
I am still novice about that project and looking for experience and suggestion. Then feel you free to give me your point of view about nails idea and of course, I will consider all @AffordableTech suggestion. there are very interesting, for sure.
Let's see.
Thank a lot -
Dear All
I am very sorry for the late reply but I did not give up that project. (I do not get a e-mail when you posted a message. (I will check my preferences).First I would like to tanks you for all of you suggestion and specially to @AffordableTech for his great proposal.
I have some BME280 and I can use one to measure the room humidity as suggested Paul.
I also red a suggestion to put another sensor on the wall (not into) the wall. I am a bit suspicious about that, because as long as it on the surface of the wall, the humidiity of the room will interfer with the measure of the wall.
I am agree with Paul, to drill the wall is a good idea.
But will the the wall have the same moisture in all of it surface? That the reason why, I though more easier to have some Stainless steel nail as the hole would be small.
By the way:
But something else, why is the father not finding the rootcause for the wall to become wet?
he needs to put the energy in fixing the wall, permanently
Yes of course, this should be done once, but now the request is to find where is the most wet zone of the wall, but first to obeserve how to wall get wet during the winter season.
No body compared the nails idea!
I could have 9 pair of nails (3 at the bottom, 3 at middle and 3 at the top of the wall). With a LMC555 . I already developped a such solution to measure the Soil Water Potential in soil, with Arduino and LoRaWAN. The nail hole are very smaller than a 20mm hole :)I have to assembled two PCB for that projects and I will do over the week-end. I am not sure if I will have time to try the discussed suggestion (Paul's suggestion and Stainless steel nail), but I will keep you informed about the progress
@AffordableTech if you are still around, how would you compare your suggestion and the Stainless steel nails idea?
here is how I plan to do. I already have a PCB ready for that working with a LMC555.
The nails will be connected to the J21. I think, the pair of nails, will be at 2-3cm each other. When P1 is Low, the LMC55 is powered with 3.2V for 2-3 sec. This circuit is designed to have a frequency in response on A1. More the frequency is high, more the zone is wet. More the frequency is low, more the zone is dry. For now, if I can analyse the zone with frequencies, is fine. I will have to adapt my Arduino code of course, but I think interesting to try. On my PCB , I have a LoRaWAN module to send the value to a gateway. Where is the house there is no GSM coverage, Then the gateway will be connected to a neighbour WiFi network. The two house are close, then no issue about distance and transmission. I will get the measure on my server (graph) in real time. That circuit is for Soil moisture, but as the Watermark sensor works with two electrod in a granular sand, I believe the 2 nails could be the two electrond but in a wall. Isn't? I will try it and see if I am a dreamer or nor (laugth). Can it be a good idea?
Note: my module is based on Adafruit boards (feather MO)
In any case, I will also try to drill the walls of my mother house, in the cave, as suggested me Paul. But I am not sure yet, how I will protect the BME280 (or other) to be damage after some months of measurement.
I will keep you inform about the progress in the following weeks (I am employed during the weeks)
I am still novice about that project and looking for experience and suggestion. Then feel you free to give me your point of view about nails idea and of course, I will consider all @AffordableTech suggestion. there are very interesting, for sure.
Let's see.
Thank a lotHi @pierrot10 and others,
Sorry, I was called away unexpectedly...I've had no experience using nails other than testing the gyprock ones in the link I sent.
I think your idea of 9 pairs spread across the wall is excellent as the key data you seek is the moisture source and how it progress across the wall.
You can just connect the 9 sensors to one of those analog switch modules and the Feather and start logging data. You biggest problem will probably working out the distance between the 2 nails. Once it setup (in summer), you can make sure they all read the same value by a software 'calibration value' for each pair.
I'd also suggest putting a newer BMP680 device in the room, perhaps 3" to 6 " away from the wall, just to have a temp, humidity and barometric pressure. I don't know exactly what it my tell you, but one thing I have learned is 'data is like money', there is no such thing as too much! (especially when you only get one shot at it a year).
I think your chances of success look good as long as the distance between the two nails give you a sufficient data range.
Good luck, and I look forward to reading how it turns out.
Paul
Hello! It looks like you're interested in this conversation, but you don't have an account yet.
Getting fed up of having to scroll through the same posts each visit? When you register for an account, you'll always come back to exactly where you were before, and choose to be notified of new replies (either via email, or push notification). You'll also be able to save bookmarks and upvote posts to show your appreciation to other community members.
With your input, this post could be even better 💗
Register Login