Reinventing the motion controlled outside lamp
-
The former owners of my house installed a PIR sensors on my front door and the PIR motion controller is connected directlty to a lamp that's mounted next to my frontdoor. The thing that always bugged me, is that it turns on the light for the amount of minutes that it's set for. That causes the lamp to burn longer then necessary most of time, or that I have to wave my hand in front of the sensor whenever I'm talking to someone while standing in front of my door.
This weekend I designed a new node that I'll be using instead of the current PIR motion sensor. I'm still thinking about how I can mount the PIR sensor in a waterproof housing. But the sensor works as follows:
- It will keep the light on for 20 seconds after the last movement has been detected. The PIR sensor has been set to smallest movement detection time, which is about 2 seconds. This knowledge is programmed into the sensor, because there was always a short amount of delay between motion detection and turning on the relay. This is an improvement on how a motion sensor normally functions. Which is an amount of time after the first motion detection I've tested it and the light is on when I need it and off when I don't need it.
- Whether the relay that's controlling the light has to be turned on when motion is detected, will be controlled by Domoticz. I have a different use case for this kind of sensor where I want to able to turn on the relay on only when I'm a sleep or not at home. A kind of surveillance light.
- A doorsensor - since I have enough pins and memory left, I might as well monitor when the door is opened and closed
- A DS18b20 sensor. This is also for future useage. For now I just measure the outside temperature. But I've not included this temp sensor in Domoticz.
- Each movement is reported to the Domotica controller.
I'll add a Fritzing schema in a couple of days. I'm learning a lot about Fritzling lately. Here is how it looks on a PCB (not the best quality PCB). All used pin's can be looked up in the Sketch for now.
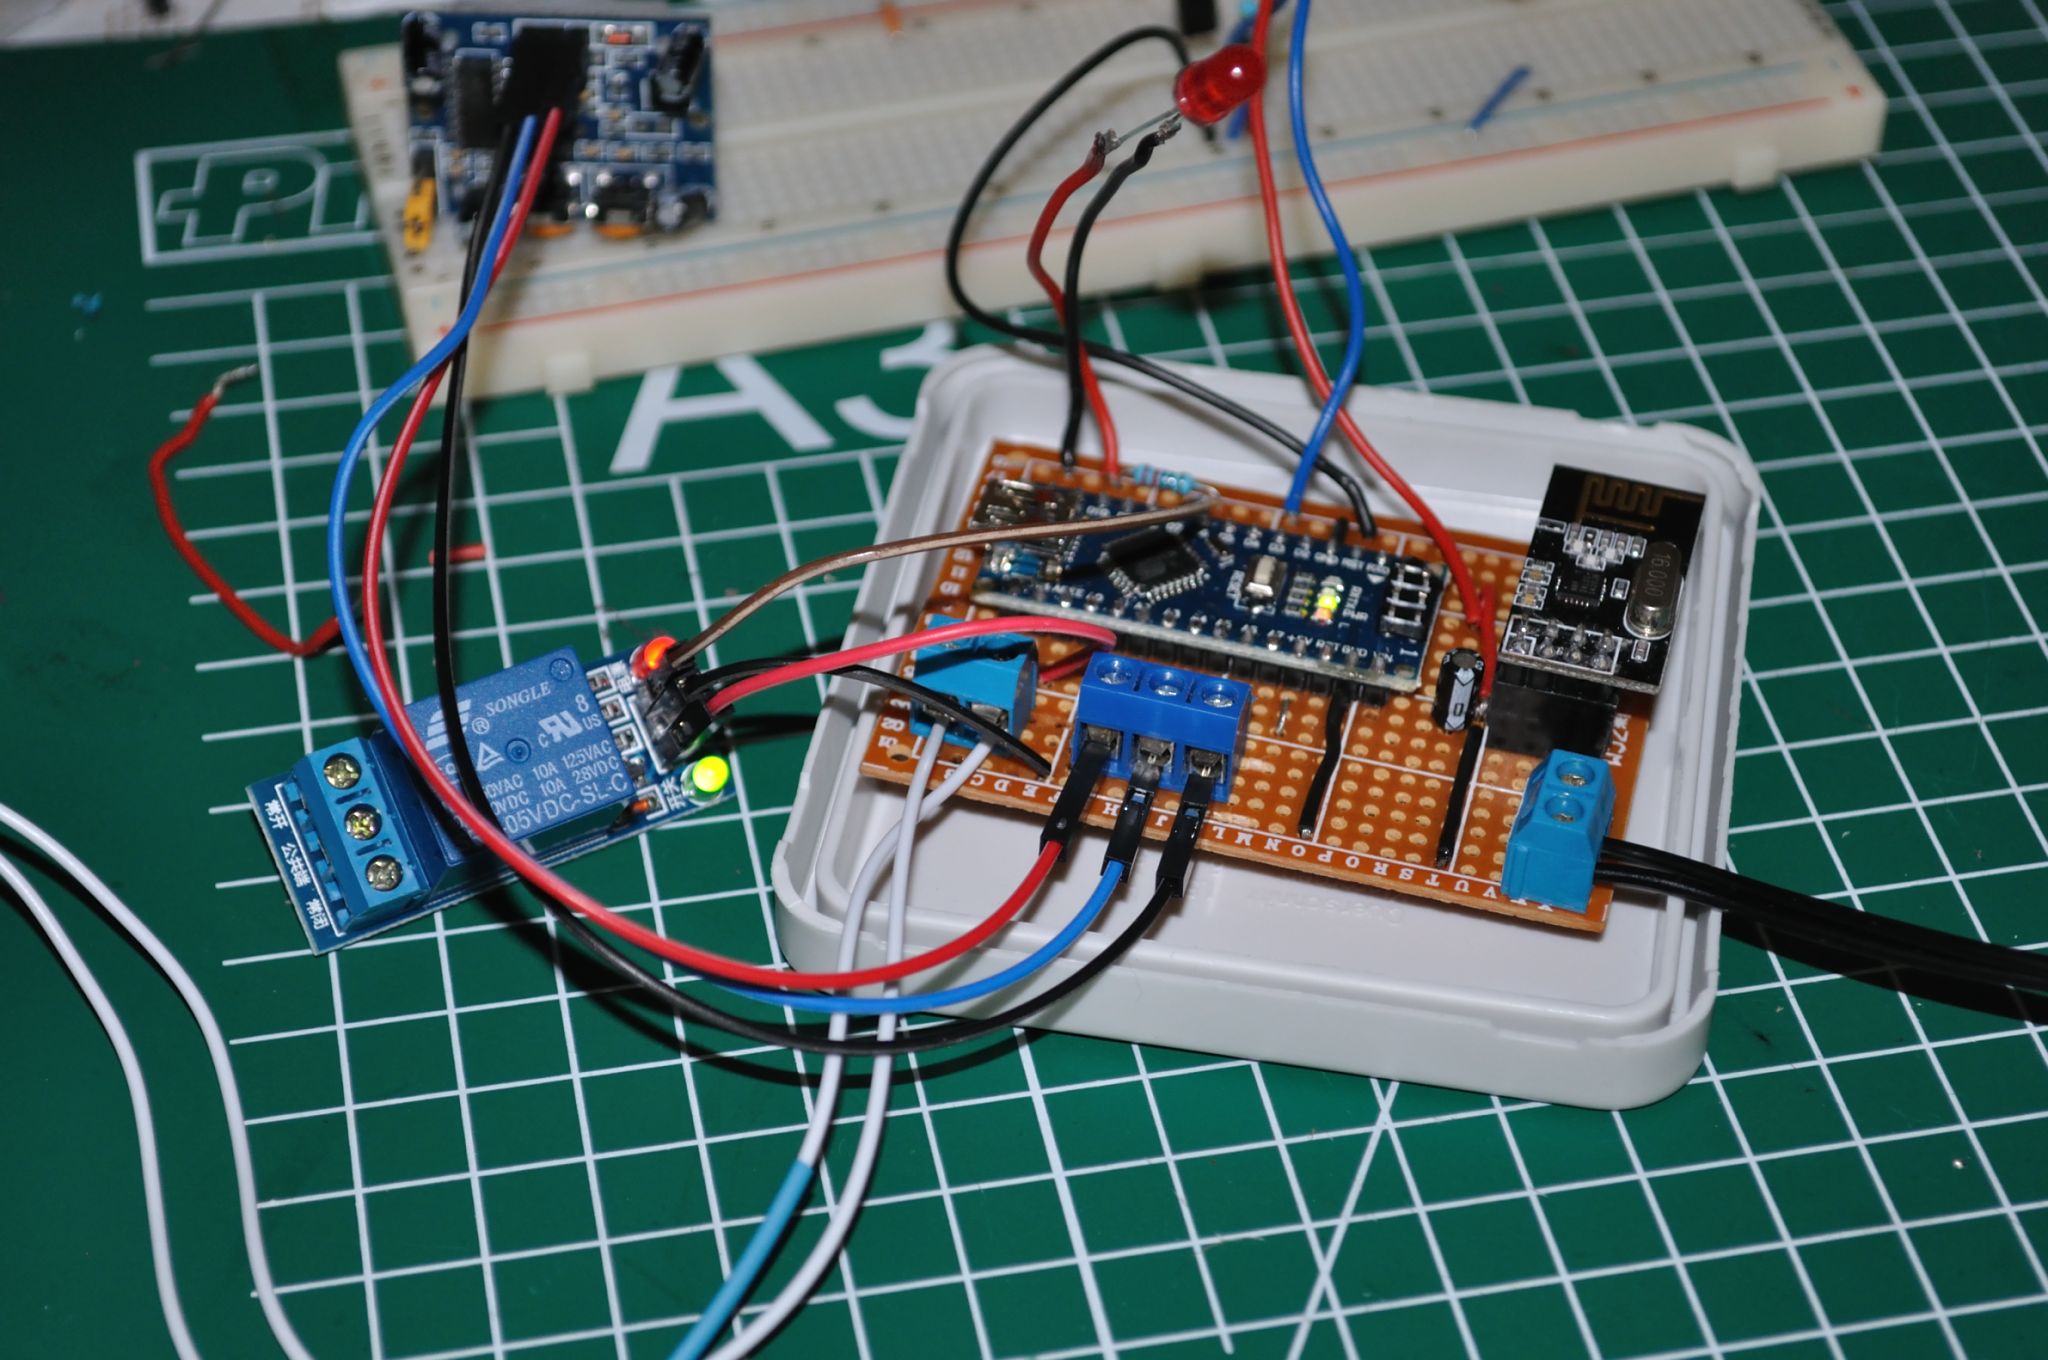
Parts used:
- Arduino Nano I power the relay and the PIR directly from the Nano's 5V output;
- A NRF24L01+ radio powered directly from the 3.3v output of the nano
- 4,7 uf capacitor for stabilizing the radio
- PIR motion sensor
- relay board
- DS18B20 temperature sensor with a 4K7 Ohm resistor over VCC and data pin
- a red 5mm led for motion indication, this will light up regardless of the fact that the relay has to be turned on or not.
- 220 ohm resister between digital out and the VCC of the led
I'll post a follow up of how I mounted this in a Waterproof box and how I mounted the PIR sensor in a waterproof housing.
This is the Sketch:
/** * Door, movement and temperature switch. * * This sensor has three main functions: * - A PIR Sensor for sensing movement around my front door. Each detected movement is being reported to the MySensors gateway. * if the NIGHTMODE switch is on, it will also turn on the relay when a movement is being detected. (See design decisions) * - A door sensor for monitoring when the door of my little workshop is open or closed. Will use this in the future to trigger * an alarm if the door is opened when we do not want it to be opened. E.g. when I'm a sleep at night. * - Since we've got some extra pins that are not in use, we might as well monitor the workshop's temperature. * * Created: September 26th 2015 * Version: 1.1 * Author: by Theo * Website: http://www.houtbewerken-voor-dummies.com/domotica-beweging-in-je-tuin-meten * * Changelog: * 02-10-2015 - V1.1 Added function to leave the relay on for a while after the last detected movement. * 26-09-2015 - V1.0 initial version * * Design decision(s): * - Use a Dalas DS18b20 as a temperature sensor. It's much faster than a DHT11 or DHT22. We don't need a super accurate sensor, we're not * going to control anything based upon the temperature in the Workshop. * - Add a dummy Light node for letting the PIR sensor controlling a relay. The switch needs to be turned on and off by the domotica controller * when it's dark or not. In an earlier version I controlled the relay from my Domotica Controller, but I had a delay of about 1 second before the * relay was switched on. Which was unacceptable to me. It would have been nice to read the delay value from Domoticz, but Domoticz doesn't allow user variables for MySensors nodes. Vera does, but I don't have Vera so I can't test and develop it. */ // Import the necessary libraries #include <MySensor.h> #include <SPI.h> #include <Bounce2.h> #include <DallasTemperature.h> #include <OneWire.h> // define constants. #define is more memory friendly than using static variables. #define TEMP_CHILD_ID 0 #define MOTION_CHILD_ID 1 #define SUNSET_CHILD_ID 2 #define DOOR_CHILD_ID 3 #define DOORSENSOR_PIN 4 // Arduino input pin for button/reed switch #define MOTIONSENSOR_PIN 5 // Arduino input pin for PIR motion sensor #define MOTIONLED_PIN 6 // Arduino output pun for visualization of detecting motion #define RELAY_PIN 7 // Arduino output pun for visualization of detecting motion #define ONE_WIRE_BUS 3 // Pin where dallas Ds18b20 sensor is connected #define TEMPERATURE_READING_INTERVAL 600000 // temperature reading interval in ms (min * 60000) in production we'll use 10 minutes #define LIGHTOFFDELAY 20000 // The amount of milliseconds the relay will be switched off after the last movement has been deteced (We'll use 20 seconds). Vera users can use a Vera variable for this. But I can not test this with Domoticz. // define sketch name and version #define SN "FrontdoorMotionDetection" #define SV "1.1" // Declare and initialize objects. MySensor gw; OneWire oneWire(ONE_WIRE_BUS); // Setup a oneWire instance to communicate with any OneWire devices (not just Maxim/Dallas temperature ICs) DallasTemperature dt_sensor(&oneWire); // Pass the oneWire reference to Dallas Temperature. Bounce doorDebouncer = Bounce(); // declare a software debounce for debouncing the door reed relay switch Bounce motionDebouncer = Bounce(); // declare a software debounce for debouncing the PIR motion sensor // declare and initialize global variables. Used to store old sensor and interval readings. int oldDoorSensorValue = -1; // remember the door sensor's current state for detecting changes int oldMotionSensorValue = -1; // remember the PIR motion sensor's current state for detecting changes float lastTemperature = 0.0; // remember the temperature for detecting changes bool sunsetActive = false; // state for indicating whether the relay has to be controllered by motion (domotica controller should set this to on after sunset and off after sunrise unsigned long previousMillis = 0; // interval variable for temperature sensor reading unsigned long scheduledRelayOffMillis = 0; // Scheduler for determining when the relay has to be switched off // Declare messages that will be sent to the MySensor's gateway. MyMessage doorMsg( DOOR_CHILD_ID, V_TRIPPED ); MyMessage tempMsg( TEMP_CHILD_ID, V_TEMP ); MyMessage motionMsg( MOTION_CHILD_ID, V_TRIPPED ); // Initialization code for the sketch void setup() { // Serial.begin( 115200 ); // uncomment during debugging. // setup a connection to the MySensor's gateway and request an ID if we do not have one yet. gw.begin(incomingMessage); gw.sendSketchInfo(SN, SV); // Initialize Dalles temp sensor dt_sensor.begin(); dt_sensor.setWaitForConversion( false ); // initialize the door sensor so that the arduino can read it's value. And use internal // pullup pinMode( DOORSENSOR_PIN, INPUT_PULLUP ); // setup debouncer doorDebouncer.attach( DOORSENSOR_PIN ); doorDebouncer.interval( 5 ); // initialize PIR motion sensor pinMode( MOTIONSENSOR_PIN, INPUT_PULLUP ); // setup debouncer motionDebouncer.attach( MOTIONSENSOR_PIN ); motionDebouncer.interval( 5 ); // initialize PIR visualization LED pinMode( MOTIONLED_PIN, OUTPUT ); // initialize RELAY pinMode( RELAY_PIN, OUTPUT ); // Serial.println( "Testing relay" ); // Testing relay just to let to knew everything is allright.. Used to test turnRelayOn and turnRelayOff method development. I liked it and kept it. for ( int i=0; i <3; i++ ) { turnOnRelay(); gw.wait( 2000 ); // delay(2000); turnOffRelay(); gw.wait( 2000 ); //delay(2000); } // Register binary input sensors to gw (they will be created as child devices) gw.present( DOOR_CHILD_ID, S_DOOR); gw.present( MOTION_CHILD_ID, S_MOTION ); gw.present( TEMP_CHILD_ID, S_TEMP ); gw.present( SUNSET_CHILD_ID, S_LIGHT ); gw.sendBatteryLevel( 100, false ); // Let the Domotica controller no that we're a 100% // powered sensor. gw.request( SUNSET_CHILD_ID, V_LIGHT ); // request current sunset state from // controller // check temperature. Next reading will occur after first interval has been reached. // so check the temperature as an initial reading checkTemperature(); } /** * Turn off the relay to which a light will be connected */ void turnOnRelay() { digitalWrite( RELAY_PIN, 0 ); // Relay needs inverted input. HIGH meaning off and LOW meaning ON } /** * Turn on the relay to which a light will be connected */ void turnOffRelay() { digitalWrite( RELAY_PIN, 1 ); // Relay needs inverted input. HIGH meaning off and LOW meaning ON } /** * Check current temperature and send changes to the MySensors gateway */ void checkTemperature() { // Serial.println( "Checking temp" ); // Fetch and round temperature to one decimal // Fetch temperatures from Dallas sensors dt_sensor.requestTemperatures(); // query conversion time and sleep until conversion completed int16_t conversionTime = dt_sensor.millisToWaitForConversion( dt_sensor.getResolution() ); // use gw.wait instead of Arduino's delay. That way the gw.process() is still working in the background // and we'll be able te receive messages from the Domotica controller. gw.wait(conversionTime); // delay(conversionTime); float temperature = static_cast<float>(static_cast<int>((dt_sensor.getTempCByIndex(0)) * 10.)) / 10.; if ( temperature < 85.0 && temperature > -127.0 && temperature != lastTemperature ) { lastTemperature = temperature; gw.send( tempMsg.set( temperature, 1 ) ); // Serial.println( temperature ); } } /** * Check the door sensor for state changes and send the state to the MySensor gateway of the state has been changed */ void checkDoorSensor() { doorDebouncer.update(); // Get the update value int value = doorDebouncer.read(); if (value != oldDoorSensorValue ) { // Notify the gateway of the new door status gw.send( doorMsg.set( value==HIGH ? 1 : 0 ) ); // Serial.println( (String)value + " door state " ); oldDoorSensorValue = value; } } /** * Check the motion sensor for state changes and send the state to the MySensor gateway of the state has been changed */ void checkMotionSensor() { motionDebouncer.update(); // Get the update value int value = motionDebouncer.read(); if (value != oldMotionSensorValue ) { // Notify the gateway of the new door status gw.send( motionMsg.set( value==HIGH ? 1 : 0 ) ); // Serial.println( (String)value + " motion state" ); oldMotionSensorValue = value; digitalWrite( MOTIONLED_PIN, value ); if ( sunsetActive == true ) { // check whether the active motion mode is set on to turn on relay and schedule for next relay off time // check whether motion has been detected if ( value == 1 ) { digitalWrite( RELAY_PIN, LOW ); // activate relay. But only when the OUTDOORLIGHT mode is active. // calculate next off interval if motion has been detected scheduledRelayOffMillis = millis() + LIGHTOFFDELAY; } } } } /** * Main loop. */ void loop() { // check if the temperature needs to be read. unsigned long currentMillis = millis(); if (currentMillis - previousMillis >= TEMPERATURE_READING_INTERVAL ) { previousMillis = currentMillis; checkTemperature(); } checkDoorSensor(); checkMotionSensor(); // check if the relay has to be turned off. Which will be LIGHTOFFDELAY milliseconds after last detected movement. currentMillis = millis(); if ( digitalRead( RELAY_PIN ) == LOW && currentMillis >= scheduledRelayOffMillis ) { turnOffRelay(); } gw.process(); // No delaying this needs to be a real-time sensor. At least for the door and motion sensor. } /** * Call back handler, for handling messages send by the MySensors gateway */ void incomingMessage(const MyMessage &message) { if ( message.type == V_LIGHT ) { // check if the SUNSET mode's state changed if ( message.sensor == SUNSET_CHILD_ID ) { sunsetActive = message.getBool(); // check if light needs to be turned on or off. bool relayOn = ( digitalRead( RELAY_PIN ) == LOW ); // Serial.println( (String)relayOn + " relais status" ); if ( sunsetActive == true && relayOn == false ) { turnOnRelay(); } else if ( sunsetActive == false && relayOn == true ) { turnOffRelay(); } } } } -
Hello,
Nice job.
How do your setup solve this : "that I have to wave my hand in front of the sensor whenever I'm talking to someone while standing in front of my door." ?
I understand that your light is on 20 seconds when switch on by the PIR sensor ?! So you must move to keep the light on, isn't it ? Or am i wrong ?Have you got more pics of your installation now ? I am very intersted.
Regards.
-
I've recently modified the code a bit. Will post an update soon. The way a PIR motion sensor works, is that you can setup the duration of a detected movement by tweaking a potentionometer. That will determine the amount of time the PIR sensor will report back as a motion detection. In reality you know only one thing. There was at least one motion detected that triggered the motion pin of the PIR sensor. Between that period and that and the interval you've setup, there might have been a lot of movement but the PIR doesn't report that back.
How I solved that is as follows. I turned the potentionometer to the lowest must interval duration. Whenever the first movement has been detected, it will report that to my Home Automation controller and it will start a timer that is 30 seconds after the detected motion. As my current motion detection interval of the PIR sensor is around 3 seconds, it will give me another 27 seconds to detect a follow up motion.
If a follow up motion has been detected, it will reset the 30 second timer. So that has another 27 seconds the time to detect another motion. If however no motion has been detected when the 30 seconds timer times out, it will tell my home automation controller that there's no longer any motion.
As most PIR sensors are quiet sensitive, they detect my presence by each small movement a wake. In most cases the movement caused by breathing is enough for the PIR sensor to detect my presence.
Hope's this explains is. I've tried it in my best English ;-)
Hello! It looks like you're interested in this conversation, but you don't have an account yet.
Getting fed up of having to scroll through the same posts each visit? When you register for an account, you'll always come back to exactly where you were before, and choose to be notified of new replies (either via email, or push notification). You'll also be able to save bookmarks and upvote posts to show your appreciation to other community members.
With your input, this post could be even better 💗
Register Login