Don't see my Arduino node device in Vera
-
I'm new to MySensors and Vera. I have a GoControl Z-Wave thermostat installed and working in Vera, so I know that Vera is working to that extent. I built a serial gateway using the GatewaySerialNano code and a genuine Arduino Nano board. I configured the gateway in Vera and I see "MySensors Plugin" in the "unknown category" devices. I then built a temp and humidity node using an Arduino Pro and a BME280 sensor. I don't see anything in Vera that indicates the BME280 is present. Here's the node code:
// WNG mods
// 8/08/17 - Used MySensors example plus Sparkfun BME280 example to make a sketch
//   that uses BME280 sensor. Not tested yet.

//-----------------------------------------------------------------
// Sparkfun example here:
// https://github.com/sparkfun/SparkFun_BME280_Arduino_Library/blob/master/examples/I2C_ReadAllData/I2C_ReadAllData.ino
// Original MySensors sketch here:
// https://www.mysensors.org/build/humidity

/**
 * The MySensors Arduino library handles the wireless radio link and protocol
 * between your home built sensors/actuators and HA controller of choice.
 * The sensors forms a self healing radio network with optional repeaters. Each
 * repeater and gateway builds a routing tables in EEPROM which keeps track of the
 * network topology allowing messages to be routed to nodes.
 *
 * Created by Henrik Ekblad <henrik.ekblad@mysensors.org>
 * Copyright (C) 2013-2015 Sensnology AB
 * Full contributor list: https://github.com/mysensors/Arduino/graphs/contributors
 *
 * Documentation: http://www.mysensors.org
 * Support Forum: http://forum.mysensors.org
 *
 * This program is free software; you can redistribute it and/or
 * modify it under the terms of the GNU General Public License
 * version 2 as published by the Free Software Foundation.
 *
 *******************************
 *
 * REVISION HISTORY
 * Version 1.0: Henrik EKblad
 * Version 1.1 - 2016-07-20: Converted to MySensors v2.0 and added various improvements - Torben Woltjen (mozzbozz)
 *
 * DESCRIPTION
 * This sketch provides an example of how to implement a humidity/temperature
 * sensor using a DHT11/DHT-22.
 *
 * For more information, please visit:
 * http://www.mysensors.org/build/humidity
 *
 */

// Enable debug prints
#define MY_DEBUG

// Enable and select radio type attached
#define MY_RADIO_NRF24

#include <SparkFunBME280.h>
#include <MySensors.h>
//BME Library allows either I2C or SPI, so include both.
#include "Wire.h"  //I'm using I2C
#include "SPI.h"

//Global sensor object
BME280 mySensor;

// Set this offset if the sensor has a permanent small offset to the real temperatures
#define SENSOR_TEMP_OFFSET 0

// Sleep time between sensor updates (in milliseconds)
// Must be >1000ms for DHT22 and >2000ms for DHT11
static const uint64_t UPDATE_INTERVAL = 5000;

// Force sending an update of the temperature after n sensor reads, so a controller showing the
// timestamp of the last update doesn't show something like 3 hours in the unlikely case, that
// the value didn't change since;
// i.e. the sensor would force sending an update every UPDATE_INTERVAL*FORCE_UPDATE_N_READS [ms]
static const uint8_t FORCE_UPDATE_N_READS = 10;

#define CHILD_ID_HUM  0
#define CHILD_ID_TEMP 1

float lastTemp;
float lastHum;
uint8_t nNoUpdatesTemp;
uint8_t nNoUpdatesHum;
bool metric = false;

MyMessage msgHum(CHILD_ID_HUM, V_HUM);
MyMessage msgTemp(CHILD_ID_TEMP, V_TEMP);


void presentation()
{
  // Send the sketch version information to the gateway
  sendSketchInfo("BME280_Node", "1.0");

  // Register all sensors to gw (they will be created as child devices)
  present(CHILD_ID_HUM, S_HUM);
  present(CHILD_ID_TEMP, S_TEMP);

  metric = getControllerConfig().isMetric;
}


void setup()
{
  //set up BME280
  //For I2C, enable the following and disable the SPI section
  mySensor.settings.commInterface   = I2C_MODE;
  mySensor.settings.I2CAddress      = 0x77;
  mySensor.settings.runMode         = 3; //Normal mode
  mySensor.settings.tStandby        = 0;  //0.5ms
  mySensor.settings.filter          = 0; //filter off
  mySensor.settings.tempOverSample  = 1;
  mySensor.settings.pressOverSample = 1;
  mySensor.settings.pressOverSample = 1;

  Serial.begin(115200);
  delay(3000);
  Serial.print("Program Started\n");
  Serial.print("Starting BME280... result of .begin(): 0x");

  //Calling .begin() causes the settings to be loaded
  delay(10);  //Make sure sensor had enough time to turn on. BME280 requires 2ms to start up.
  Serial.println(mySensor.begin(), HEX);

  Serial.print("Displaying ID, reset and ctrl regs\n");
  Serial.print("ID(0xD0): 0x");
  Serial.println(mySensor.readRegister(BME280_CHIP_ID_REG), HEX);
  Serial.print("Reset register(0xE0): 0x");
  Serial.println(mySensor.readRegister(BME280_RST_REG), HEX);
  Serial.print("ctrl_meas(0xF4): 0x");
  Serial.println(mySensor.readRegister(BME280_CTRL_MEAS_REG), HEX);
  Serial.print("ctrl_hum(0xF2): 0x");
  Serial.println(mySensor.readRegister(BME280_CTRL_HUMIDITY_REG), HEX);
  Serial.print("\n\n");

  // Sleep for the time of the minimum sampling period to give the sensor time to power up
  // (otherwise, timeout errors might occure for the first reading)
  delay(1000);
}


void loop()
{
  // Force reading sensor, so it works also after sleep()
  float temperature = mySensor.readTempF();
  float humidity    = mySensor.readFloatHumidity();

  // Get temperature
  temperature = mySensor.readTempF();
  if (isnan(temperature)) {
    Serial.println("Failed reading temperature!");
  } else if (temperature != lastTemp || nNoUpdatesTemp == FORCE_UPDATE_N_READS) {
    // Only send temperature if it changed since the last measurement or if we didn't send an update for n times
    lastTemp = temperature;
    // Reset no updates counter
    nNoUpdatesTemp = 0;
    temperature += SENSOR_TEMP_OFFSET;
    send(msgTemp.set(temperature, 1));

    #ifdef MY_DEBUG
    Serial.print("T: ");
    Serial.println(temperature);
    #endif
  } else {
    // Increase no update counter if the temperature stayed the same
    nNoUpdatesTemp++;
  }

  // Get humidity
  humidity = mySensor.readFloatHumidity();
  if (isnan(humidity)) {
    Serial.println("Failed reading humidity!");
  } else if (humidity != lastHum || nNoUpdatesHum == FORCE_UPDATE_N_READS) {
    // Only send humidity if it changed since the last measurement or if we didn't send an update for n times
    lastHum = humidity;
    // Reset no updates counter
    nNoUpdatesHum = 0;
    send(msgHum.set(humidity, 1));

    #ifdef MY_DEBUG
    Serial.print("H: ");
    Serial.println(humidity);
    #endif
  } else {
    // Increase no update counter if the humidity stayed the same
    nNoUpdatesHum++;
  }

  // Sleep for a while to save energy
  sleep(UPDATE_INTERVAL);
}
Here's the debug output of the BME280 node, including startup and a few sensor transmissions:
0 MCO:BGN:INIT NODE,CP=RNNNA--,VER=2.1.1
4 TSM:INIT
4 TSF:WUR:MS=0
12 TSM:INIT:TSP OK
14 TSF:SID:OK,ID=1
16 TSM:FPAR
51 TSF:MSG:SEND,1-1-255-255,s=255,c=3,t=7,pt=0,l=0,sg=0,ft=0,st=OK:
149 TSF:MSG:READ,0-0-1,s=255,c=3,t=8,pt=1,l=1,sg=0:0
153 TSF:MSG:FPAR OK,ID=0,D=1
2060 TSM:FPAR:OK
2060 TSM:ID
2062 TSM:ID:OK
2064 TSM:UPL
2068 TSF:MSG:SEND,1-1-0-0,s=255,c=3,t=24,pt=1,l=1,sg=0,ft=0,st=OK:1
2076 TSF:MSG:READ,0-0-1,s=255,c=3,t=25,pt=1,l=1,sg=0:1
2082 TSF:MSG:PONG RECV,HP=1
2086 TSM:UPL:OK
2088 TSM:READY:ID=1,PAR=0,DIS=1
2093 TSF:MSG:SEND,1-1-0-0,s=255,c=3,t=15,pt=6,l=2,sg=0,ft=0,st=OK:0100
2101 TSF:MSG:READ,0-0-1,s=255,c=3,t=15,pt=6,l=2,sg=0:0100
2109 TSF:MSG:SEND,1-1-0-0,s=255,c=0,t=17,pt=0,l=5,sg=0,ft=0,st=OK:2.1.1
2119 TSF:MSG:SEND,1-1-0-0,s=255,c=3,t=6,pt=1,l=1,sg=0,ft=0,st=OK:0
4128 TSF:MSG:SEND,1-1-0-0,s=255,c=3,t=11,pt=0,l=11,sg=0,ft=0,st=OK:BME280_Node
4139 TSF:MSG:SEND,1-1-0-0,s=255,c=3,t=12,pt=0,l=3,sg=0,ft=0,st=OK:1.0
4147 TSF:MSG:SEND,1-1-0-0,s=0,c=0,t=7,pt=0,l=0,sg=0,ft=0,st=OK:
4157 TSF:MSG:SEND,1-1-0-0,s=1,c=0,t=6,pt=0,l=0,sg=0,ft=0,st=OK:
4163 MCO:REG:REQ
4167 TSF:MSG:SEND,1-1-0-0,s=255,c=3,t=26,pt=1,l=1,sg=0,ft=0,st=OK:2
4175 TSF:MSG:READ,0-0-1,s=255,c=3,t=27,pt=1,l=1,sg=0:1
4179 MCO:PIM:NODE REG=1
4184 MCO:BGN:STP
Program Started
Starting BME280... result of .begin(): 0x60
Displaying ID, reset and ctrl regs
ID(0xD0): 0x60
Reset register(0xE0): 0x0
ctrl_meas(0xF4): 0x27
ctrl_hum(0xF2): 0x0


8220 MCO:BGN:INIT OK,TSP=1
8230 TSF:MSG:SEND,1-1-0-0,s=1,c=1,t=0,pt=7,l=5,sg=0,ft=0,st=OK:74.1
T: 74.14
8243 TSF:MSG:SEND,1-1-0-0,s=0,c=1,t=1,pt=7,l=5,sg=0,ft=0,st=OK:76.3
H: 76.28
8249 MCO:SLP:MS=5000,SMS=0,I1=255,M1=255,I2=255,M2=255
8255 MCO:SLP:TPD
8257 MCO:SLP:WUP=-1
8267 TSF:MSG:SEND,1-1-0-0,s=0,c=1,t=1,pt=7,l=5,sg=0,ft=0,st=OK:76.3
H: 76.28
8275 MCO:SLP:MS=5000,SMS=0,I1=255,M1=255,I2=255,M2=255
8282 MCO:SLP:TPD
8284 MCO:SLP:WUP=-1
8294 TSF:MSG:SEND,1-1-0-0,s=0,c=1,t=1,pt=7,l=5,sg=0,ft=0,st=OK:76.3
H: 76.28
8302 MCO:SLP:MS=5000,SMS=0,I1=255,M1=255,I2=255,M2=255
8308 MCO:SLP:TPD
8310 MCO:SLP:WUP=-1
8321 TSF:MSG:SEND,1-1-0-0,s=0,c=1,t=1,pt=7,l=5,sg=0,ft=0,st=OK:76.3
H: 76.28
8329 MCO:SLP:MS=5000,SMS=0,I1=255,M1=255,I2=255,M2=255
8335 MCO:SLP:TPD
8337 MCO:SLP:WUP=-1
8347 TSF:MSG:SEND,1-1-0-0,s=1,c=1,t=0,pt=7,l=5,sg=0,ft=0,st=OK:74.2
T: 74.16
8357 TSF:MSG:SEND,1-1-0-0,s=0,c=1,t=1,pt=7,l=5,sg=0,ft=0,st=OK:76.3
H: 76.28
8366 MCO:SLP:MS=5000,SMS=0,I1=255,M1=255,I2=255,M2=255
8372 MCO:SLP:TPD
8374 MCO:SLP:WUP=-1
8384 TSF:MSG:SEND,1-1-0-0,s=1,c=1,t=0,pt=7,l=5,sg=0,ft=0,st=OK:74.1
T: 74.14
8394 TSF:MSG:SEND,1-1-0-0,s=0,c=1,t=1,pt=7,l=5,sg=0,ft=0,st=OK:76.3
H: 76.28
8402 MCO:SLP:MS=5000,SMS=0,I1=255,M1=255,I2=255,M2=255
8409 MCO:SLP:TPD
8411 MCO:SLP:WUP=-1
8419 MCO:SLP:MS=5000,SMS=0,I1=255,M1=255,I2=255,M2=255
8425 MCO:SLP:TPD
8427 MCO:SLP:WUP=-1
8435 TSF:MSG:SEND,1-1-0-0,s=1,c=1,t=0,pt=7,l=5,sg=0,ft=0,st=OK:74.1
T: 74.12
8448 TSF:MSG:SEND,1-1-0-0,s=0,c=1,t=1,pt=7,l=5,sg=0,ft=0,st=OK:76.3
H: 76.28
This looks normal to me, yes?
My question: Why don't I see the node in Vera? There must be something I haven't set up.
Thanks! -
I'm new to MySensors and Vera. I have a GoControl Z-Wave thermostat installed and working in Vera, so I know that Vera is working to that extent. I built a serial gateway using the GatewaySerialNano code and a genuine Arduino Nano board. I configured the gateway in Vera and I see "MySensors Plugin" in the "unknown category" devices. I then built a temp and humidity node using an Arduino Pro and a BME280 sensor. I don't see anything in Vera that indicates the BME280 is present. Here's the node code:
// WNG mods
// 8/08/17 - Used MySensors example plus Sparkfun BME280 example to make a sketch
//   that uses BME280 sensor. Not tested yet.

//-----------------------------------------------------------------
// Sparkfun example here:
// https://github.com/sparkfun/SparkFun_BME280_Arduino_Library/blob/master/examples/I2C_ReadAllData/I2C_ReadAllData.ino
// Original MySensors sketch here:
// https://www.mysensors.org/build/humidity

/**
 * The MySensors Arduino library handles the wireless radio link and protocol
 * between your home built sensors/actuators and HA controller of choice.
 * The sensors forms a self healing radio network with optional repeaters. Each
 * repeater and gateway builds a routing tables in EEPROM which keeps track of the
 * network topology allowing messages to be routed to nodes.
 *
 * Created by Henrik Ekblad <henrik.ekblad@mysensors.org>
 * Copyright (C) 2013-2015 Sensnology AB
 * Full contributor list: https://github.com/mysensors/Arduino/graphs/contributors
 *
 * Documentation: http://www.mysensors.org
 * Support Forum: http://forum.mysensors.org
 *
 * This program is free software; you can redistribute it and/or
 * modify it under the terms of the GNU General Public License
 * version 2 as published by the Free Software Foundation.
 *
 *******************************
 *
 * REVISION HISTORY
 * Version 1.0: Henrik EKblad
 * Version 1.1 - 2016-07-20: Converted to MySensors v2.0 and added various improvements - Torben Woltjen (mozzbozz)
 *
 * DESCRIPTION
 * This sketch provides an example of how to implement a humidity/temperature
 * sensor using a DHT11/DHT-22.
 *
 * For more information, please visit:
 * http://www.mysensors.org/build/humidity
 *
 */

// Enable debug prints
#define MY_DEBUG

// Enable and select radio type attached
#define MY_RADIO_NRF24

#include <SparkFunBME280.h>
#include <MySensors.h>
//BME Library allows either I2C or SPI, so include both.
#include "Wire.h"  //I'm using I2C
#include "SPI.h"

//Global sensor object
BME280 mySensor;

// Set this offset if the sensor has a permanent small offset to the real temperatures
#define SENSOR_TEMP_OFFSET 0

// Sleep time between sensor updates (in milliseconds)
// Must be >1000ms for DHT22 and >2000ms for DHT11
static const uint64_t UPDATE_INTERVAL = 5000;

// Force sending an update of the temperature after n sensor reads, so a controller showing the
// timestamp of the last update doesn't show something like 3 hours in the unlikely case, that
// the value didn't change since;
// i.e. the sensor would force sending an update every UPDATE_INTERVAL*FORCE_UPDATE_N_READS [ms]
static const uint8_t FORCE_UPDATE_N_READS = 10;

#define CHILD_ID_HUM  0
#define CHILD_ID_TEMP 1

float lastTemp;
float lastHum;
uint8_t nNoUpdatesTemp;
uint8_t nNoUpdatesHum;
bool metric = false;

MyMessage msgHum(CHILD_ID_HUM, V_HUM);
MyMessage msgTemp(CHILD_ID_TEMP, V_TEMP);


void presentation()
{
  // Send the sketch version information to the gateway
  sendSketchInfo("BME280_Node", "1.0");

  // Register all sensors to gw (they will be created as child devices)
  present(CHILD_ID_HUM, S_HUM);
  present(CHILD_ID_TEMP, S_TEMP);

  metric = getControllerConfig().isMetric;
}


void setup()
{
  //set up BME280
  //For I2C, enable the following and disable the SPI section
  mySensor.settings.commInterface   = I2C_MODE;
  mySensor.settings.I2CAddress      = 0x77;
  mySensor.settings.runMode         = 3; //Normal mode
  mySensor.settings.tStandby        = 0;  //0.5ms
  mySensor.settings.filter          = 0; //filter off
  mySensor.settings.tempOverSample  = 1;
  mySensor.settings.pressOverSample = 1;
  mySensor.settings.pressOverSample = 1;

  Serial.begin(115200);
  delay(3000);
  Serial.print("Program Started\n");
  Serial.print("Starting BME280... result of .begin(): 0x");

  //Calling .begin() causes the settings to be loaded
  delay(10);  //Make sure sensor had enough time to turn on. BME280 requires 2ms to start up.
  Serial.println(mySensor.begin(), HEX);

  Serial.print("Displaying ID, reset and ctrl regs\n");
  Serial.print("ID(0xD0): 0x");
  Serial.println(mySensor.readRegister(BME280_CHIP_ID_REG), HEX);
  Serial.print("Reset register(0xE0): 0x");
  Serial.println(mySensor.readRegister(BME280_RST_REG), HEX);
  Serial.print("ctrl_meas(0xF4): 0x");
  Serial.println(mySensor.readRegister(BME280_CTRL_MEAS_REG), HEX);
  Serial.print("ctrl_hum(0xF2): 0x");
  Serial.println(mySensor.readRegister(BME280_CTRL_HUMIDITY_REG), HEX);
  Serial.print("\n\n");

  // Sleep for the time of the minimum sampling period to give the sensor time to power up
  // (otherwise, timeout errors might occure for the first reading)
  delay(1000);
}


void loop()
{
  // Force reading sensor, so it works also after sleep()
  float temperature = mySensor.readTempF();
  float humidity    = mySensor.readFloatHumidity();

  // Get temperature
  temperature = mySensor.readTempF();
  if (isnan(temperature)) {
    Serial.println("Failed reading temperature!");
  } else if (temperature != lastTemp || nNoUpdatesTemp == FORCE_UPDATE_N_READS) {
    // Only send temperature if it changed since the last measurement or if we didn't send an update for n times
    lastTemp = temperature;
    // Reset no updates counter
    nNoUpdatesTemp = 0;
    temperature += SENSOR_TEMP_OFFSET;
    send(msgTemp.set(temperature, 1));

    #ifdef MY_DEBUG
    Serial.print("T: ");
    Serial.println(temperature);
    #endif
  } else {
    // Increase no update counter if the temperature stayed the same
    nNoUpdatesTemp++;
  }

  // Get humidity
  humidity = mySensor.readFloatHumidity();
  if (isnan(humidity)) {
    Serial.println("Failed reading humidity!");
  } else if (humidity != lastHum || nNoUpdatesHum == FORCE_UPDATE_N_READS) {
    // Only send humidity if it changed since the last measurement or if we didn't send an update for n times
    lastHum = humidity;
    // Reset no updates counter
    nNoUpdatesHum = 0;
    send(msgHum.set(humidity, 1));

    #ifdef MY_DEBUG
    Serial.print("H: ");
    Serial.println(humidity);
    #endif
  } else {
    // Increase no update counter if the humidity stayed the same
    nNoUpdatesHum++;
  }

  // Sleep for a while to save energy
  sleep(UPDATE_INTERVAL);
}
Here's the debug output of the BME280 node, including startup and a few sensor transmissions:
0 MCO:BGN:INIT NODE,CP=RNNNA--,VER=2.1.1
4 TSM:INIT
4 TSF:WUR:MS=0
12 TSM:INIT:TSP OK
14 TSF:SID:OK,ID=1
16 TSM:FPAR
51 TSF:MSG:SEND,1-1-255-255,s=255,c=3,t=7,pt=0,l=0,sg=0,ft=0,st=OK:
149 TSF:MSG:READ,0-0-1,s=255,c=3,t=8,pt=1,l=1,sg=0:0
153 TSF:MSG:FPAR OK,ID=0,D=1
2060 TSM:FPAR:OK
2060 TSM:ID
2062 TSM:ID:OK
2064 TSM:UPL
2068 TSF:MSG:SEND,1-1-0-0,s=255,c=3,t=24,pt=1,l=1,sg=0,ft=0,st=OK:1
2076 TSF:MSG:READ,0-0-1,s=255,c=3,t=25,pt=1,l=1,sg=0:1
2082 TSF:MSG:PONG RECV,HP=1
2086 TSM:UPL:OK
2088 TSM:READY:ID=1,PAR=0,DIS=1
2093 TSF:MSG:SEND,1-1-0-0,s=255,c=3,t=15,pt=6,l=2,sg=0,ft=0,st=OK:0100
2101 TSF:MSG:READ,0-0-1,s=255,c=3,t=15,pt=6,l=2,sg=0:0100
2109 TSF:MSG:SEND,1-1-0-0,s=255,c=0,t=17,pt=0,l=5,sg=0,ft=0,st=OK:2.1.1
2119 TSF:MSG:SEND,1-1-0-0,s=255,c=3,t=6,pt=1,l=1,sg=0,ft=0,st=OK:0
4128 TSF:MSG:SEND,1-1-0-0,s=255,c=3,t=11,pt=0,l=11,sg=0,ft=0,st=OK:BME280_Node
4139 TSF:MSG:SEND,1-1-0-0,s=255,c=3,t=12,pt=0,l=3,sg=0,ft=0,st=OK:1.0
4147 TSF:MSG:SEND,1-1-0-0,s=0,c=0,t=7,pt=0,l=0,sg=0,ft=0,st=OK:
4157 TSF:MSG:SEND,1-1-0-0,s=1,c=0,t=6,pt=0,l=0,sg=0,ft=0,st=OK:
4163 MCO:REG:REQ
4167 TSF:MSG:SEND,1-1-0-0,s=255,c=3,t=26,pt=1,l=1,sg=0,ft=0,st=OK:2
4175 TSF:MSG:READ,0-0-1,s=255,c=3,t=27,pt=1,l=1,sg=0:1
4179 MCO:PIM:NODE REG=1
4184 MCO:BGN:STP
Program Started
Starting BME280... result of .begin(): 0x60
Displaying ID, reset and ctrl regs
ID(0xD0): 0x60
Reset register(0xE0): 0x0
ctrl_meas(0xF4): 0x27
ctrl_hum(0xF2): 0x0


8220 MCO:BGN:INIT OK,TSP=1
8230 TSF:MSG:SEND,1-1-0-0,s=1,c=1,t=0,pt=7,l=5,sg=0,ft=0,st=OK:74.1
T: 74.14
8243 TSF:MSG:SEND,1-1-0-0,s=0,c=1,t=1,pt=7,l=5,sg=0,ft=0,st=OK:76.3
H: 76.28
8249 MCO:SLP:MS=5000,SMS=0,I1=255,M1=255,I2=255,M2=255
8255 MCO:SLP:TPD
8257 MCO:SLP:WUP=-1
8267 TSF:MSG:SEND,1-1-0-0,s=0,c=1,t=1,pt=7,l=5,sg=0,ft=0,st=OK:76.3
H: 76.28
8275 MCO:SLP:MS=5000,SMS=0,I1=255,M1=255,I2=255,M2=255
8282 MCO:SLP:TPD
8284 MCO:SLP:WUP=-1
8294 TSF:MSG:SEND,1-1-0-0,s=0,c=1,t=1,pt=7,l=5,sg=0,ft=0,st=OK:76.3
H: 76.28
8302 MCO:SLP:MS=5000,SMS=0,I1=255,M1=255,I2=255,M2=255
8308 MCO:SLP:TPD
8310 MCO:SLP:WUP=-1
8321 TSF:MSG:SEND,1-1-0-0,s=0,c=1,t=1,pt=7,l=5,sg=0,ft=0,st=OK:76.3
H: 76.28
8329 MCO:SLP:MS=5000,SMS=0,I1=255,M1=255,I2=255,M2=255
8335 MCO:SLP:TPD
8337 MCO:SLP:WUP=-1
8347 TSF:MSG:SEND,1-1-0-0,s=1,c=1,t=0,pt=7,l=5,sg=0,ft=0,st=OK:74.2
T: 74.16
8357 TSF:MSG:SEND,1-1-0-0,s=0,c=1,t=1,pt=7,l=5,sg=0,ft=0,st=OK:76.3
H: 76.28
8366 MCO:SLP:MS=5000,SMS=0,I1=255,M1=255,I2=255,M2=255
8372 MCO:SLP:TPD
8374 MCO:SLP:WUP=-1
8384 TSF:MSG:SEND,1-1-0-0,s=1,c=1,t=0,pt=7,l=5,sg=0,ft=0,st=OK:74.1
T: 74.14
8394 TSF:MSG:SEND,1-1-0-0,s=0,c=1,t=1,pt=7,l=5,sg=0,ft=0,st=OK:76.3
H: 76.28
8402 MCO:SLP:MS=5000,SMS=0,I1=255,M1=255,I2=255,M2=255
8409 MCO:SLP:TPD
8411 MCO:SLP:WUP=-1
8419 MCO:SLP:MS=5000,SMS=0,I1=255,M1=255,I2=255,M2=255
8425 MCO:SLP:TPD
8427 MCO:SLP:WUP=-1
8435 TSF:MSG:SEND,1-1-0-0,s=1,c=1,t=0,pt=7,l=5,sg=0,ft=0,st=OK:74.1
T: 74.12
8448 TSF:MSG:SEND,1-1-0-0,s=0,c=1,t=1,pt=7,l=5,sg=0,ft=0,st=OK:76.3
H: 76.28
This looks normal to me, yes?
My question: Why don't I see the node in Vera? There must be something I haven't set up.
Thanks!Another question: Is there a way to see debug output from the serial gateway? Since its USB port is connected to Vera, I don't see a way to get debug info from it.
-
If you go to Apps>Develop apps>Serial Port configuration, do you have the settings there set correctly? This is what mine looks like:
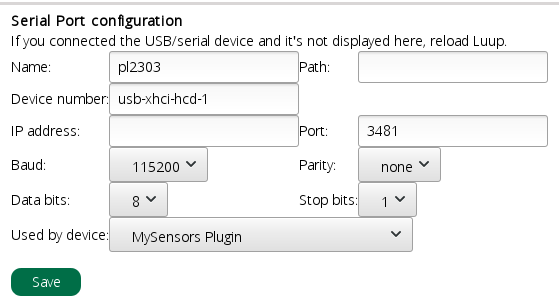
Your name and device number may be different depending on your serial adapter that you are using. The other settings should be the same though. Baud should be 115200, Parity should be none, data bits should be 8 and stop bits should be 1. Then select your MySensors Plugin that you created under "Used by device". If these settings are not correct, the gateway will not work. -
@billgoolsby said in Don't see my Arduino node device in Vera:
MySensors Plugin
Did you go into the MySensors Plugin setting and include the new sensor?
-
@gohan, I do have a W5100 I could try, but I thought of a way to see the serial stream between the gateway and Vera: put a TTL-to-USB serial adapter on either the TX or RX lines from the Nano. I'll try that first.
-
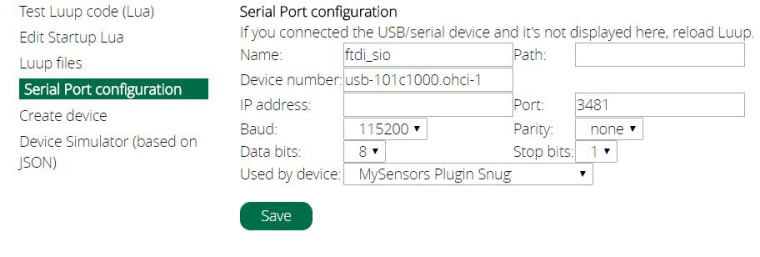
If you go to Apps>Develop apps>Serial Port configuration, do you have the settings there set correctly? This is what mine looks like:
Your name and device number may be different depending on your serial adapter that you are using. The other settings should be the same though. Baud should be 115200, Parity should be none, data bits should be 8 and stop bits should be 1. Then select your MySensors Plugin that you created under "Used by device". If these settings are not correct, the gateway will not work.@dbemowsk, This is my configuration:
-
@billgoolsby said in Don't see my Arduino node device in Vera:
MySensors Plugin
Did you go into the MySensors Plugin setting and include the new sensor?
@r-nox, No, didn't do that - where do I go in the Vera menus to do it? I don't see anything that looks likely.
-
@r-nox, No, didn't do that - where do I go in the Vera menus to do it? I don't see anything that looks likely.
@billgoolsby Go to Devices in the menu and click on the MySensors Plugin device. Next, click on Settings. You should now see something like this:
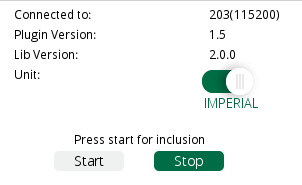
Click on the start button and then reset your node that you built. The node should go through it's initialization process and present itself to the controller. Below the start / stop buttons you will see "0 devices found" at first, and then once the plugin sees the node, you will see that number change. If you have a node with one sensor, you should see 2 devices found. One is the sensor, and the other is an object for the node itself.Once this process is complete, you can back out to the devices menu. Under "No Room" you should see something like this if your node is a temperature sensor for example:
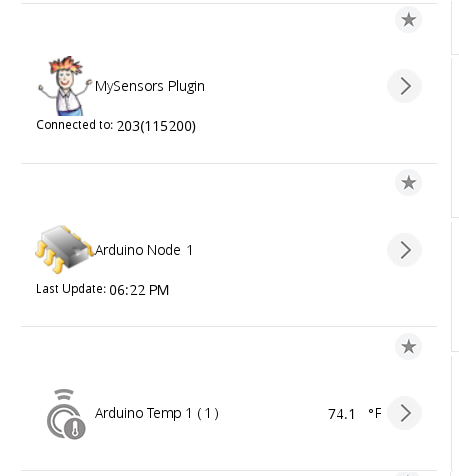
Of your node has more than one sensor, then you will see an object for the "Arduino Node X" and an object for each sensor on that node.Once the inclusion process is complete, you won't have to add the node again. You can then go into each object and set it's properties such as what room it is under, and any configuration properties for the device if any.
Let us know if you have further trouble.
-
@billgoolsby Go to Devices in the menu and click on the MySensors Plugin device. Next, click on Settings. You should now see something like this:
Click on the start button and then reset your node that you built. The node should go through it's initialization process and present itself to the controller. Below the start / stop buttons you will see "0 devices found" at first, and then once the plugin sees the node, you will see that number change. If you have a node with one sensor, you should see 2 devices found. One is the sensor, and the other is an object for the node itself.Once this process is complete, you can back out to the devices menu. Under "No Room" you should see something like this if your node is a temperature sensor for example:
Of your node has more than one sensor, then you will see an object for the "Arduino Node X" and an object for each sensor on that node.Once the inclusion process is complete, you won't have to add the node again. You can then go into each object and set it's properties such as what room it is under, and any configuration properties for the device if any.
Let us know if you have further trouble.
@dbemowsk, Wow! It worked! Thanks so much. Very happy to get to this point.
-
@dbemowsk, Wow! It worked! Thanks so much. Very happy to get to this point.
@billgoolsby We were all there at one point. Happy to help.
Hello! It looks like you're interested in this conversation, but you don't have an account yet.
Getting fed up of having to scroll through the same posts each visit? When you register for an account, you'll always come back to exactly where you were before, and choose to be notified of new replies (either via email, or push notification). You'll also be able to save bookmarks and upvote posts to show your appreciation to other community members.
With your input, this post could be even better 💗
Register Login