nRF5 action!
-
This looks like an Arduino-nano/pro-mini style device with an NRF51:
@alowhum said in nRF5 action!:
This looks like an Arduino-nano/pro-mini style device with an NRF51:
I tried uploading a simple blink sketch today. I found some code on github which suggested pin 23 and 24 are LED pins.
I got an error uploading via STM32 though.
debug_level: 2
0x4000
Info : The selected transport took over low-level target control. The results might differ compared to plain JTAG/SWD
adapter speed: 10000 kHz
Info : Unable to match requested speed 10000 kHz, using 4000 kHz
Info : Unable to match requested speed 10000 kHz, using 4000 kHz
Info : clock speed 4000 kHz
Info : STLINK v2 JTAG v17 API v2 SWIM v4 VID 0x0483 PID 0x3748
Info : using stlink api v2
Info : Target voltage: 3.233552
Warn : UNEXPECTED idcode: 0x0bb11477
Error: expected 1 of 1: 0x2ba01477
in procedure 'program'
in procedure 'init' called at file "embedded:startup.tcl", line 473
in procedure 'ocd_bouncer'
** OpenOCD init failed **
shutdown command invoked -
@maciekczwa said in nRF5 action!:
Licensed under GNU GPL v2
For bug reports, read
http://openocd.org/doc/doxygen/bugs.html
debug_level: 2
0x4000
Info : The selected transport took over low-level target control. The results might differ compared to plain JTAG/SWD
adapter speed: 10000 kHz
Info : Unable to match requested speed 10000 kHz, using 4000 kHz
Info : Unable to match requested speed 10000 kHz, using 4000 kHz
Info : clock speed 4000 kHz
Info : STLINK v2 JTAG v17 API v2 SWIM v4 VID 0x0483 PID 0x3748
Info : using stlink api v2
Info : Target voltage: 3.241270
Info : nrf52.cpu: hardware has 0 breakpoints, 2 watchpoints
Error: timed out while waiting for target halted
TARGET: nrf52.cpu - Not halted
in procedure 'program'
in procedure 'reset' called at file "embedded:startup.tcl", line 478
in procedure 'ocd_bouncer'**embedded:startup.tcl:454: Error: ** Unable to reset target ****
in procedure 'program'
in procedure 'program_error' called at file "embedded:startup.tcl", line 479
at file "embedded:startup.tcl", line 454
wybrany port szeregowy at file "embedded:startup.tcl", line 454maybe someone else already found the solution, but it took me a while to figure it out for myself.
So for documentation sake:
Just had the exact same things with new Ebyte NRF52832 modules, ST-Link v2 couldn't erase it. (the old once did erase without a single problem )
After some digging, I found the following:
(I'm using my NRF52832-DK for it, maybe other devices work as well, just tested this one)DK => Ebyte module
GND(detect) => GND
SWDIO => SWDIO
SWDCLK => SWCLK
VTG => 3,3V
3,3V => 3,3V
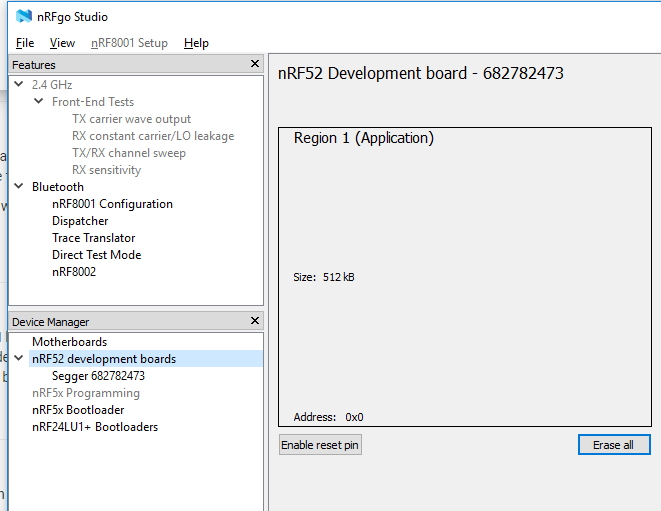
GND =>GNDyou can erase the protection using nRFgo Studio
- On the left, you can find a header named Segger, click on that.
- then it shows that it is locked, and you can click recover.
- after that you can erase it
- upload a new sketch using an ST-link V2 or the DK while you are still at it.
-
@toyman yup, I tried that one, but all it kept saying was something like; can't find programmer.. and this method, which has a GUI, worked without incident :)
@omemanti that's strange, I use the methos regularly and it worls fine.
Oh! Actually, sandeep's installation messes up Jlink drivers so they require reinstall for the method to work.
That's why I am using arduino nrf5 with BMP to completely separate Arduino from Jlink -
FYI, I'm switching from uPython over to uLisp. It already worked on the BBC:microbit, and I just now got uLisp working on the nRF52832. Because uLisp relies on Sandeep's library, it doesn't yet support the nRF52840. However, if/when Sandeep's library does support the nRF52840, the uLisp upgrade will be fairly easy.
-
FYI, I'm switching from uPython over to uLisp. It already worked on the BBC:microbit, and I just now got uLisp working on the nRF52832. Because uLisp relies on Sandeep's library, it doesn't yet support the nRF52840. However, if/when Sandeep's library does support the nRF52840, the uLisp upgrade will be fairly easy.
@neverdie said in nRF5 action!:
FYI, I'm switching from uPython over to uLisp.
What is the reason for this switch ?
-
@neverdie said in nRF5 action!:
FYI, I'm switching from uPython over to uLisp.
What is the reason for this switch ?
- uPython seemed to require an intimate understanding of a rather complicated build process. I kept running into build-related snags. Maybe in the future they will simplify it.
- Its garbage collector can't handle heap fragmentation, and it appears that it never will.
- Adding c-extensions is a rather arcane process.
In contrast, the uLisp build process is far simpler, and uLisp appears to have a proper garbage collector. Adding c-extensions is relatively easy.
-
For anyone interested, I posted a simple nRF52 Tx and Rx demo program written in Forth: https://github.com/rabbithat/nRF52_SimpleTxRxDemo
This code is a good starting point for beginners, because it is already working. You can easily modify the code to do whatever transmitting and receiving you want.
-
I just now posted a wireless Forth REPL for nRF52's on github:
https://github.com/rabbithat/nRF52_wireless_Forth_REPLThis allows you to wirelessly connect with a nRF52 remote node to update and/or interact with your code exactly the same as if the remote node was directly connected to your computer.
:grinning: :grinning: :grinning: -
I have recently installed an Ebyte E73 as my gateway with a DHT22. The problem is that I need to restart the gateway every 2 days and I can't figure out why. Can someone help me?
/** The MySensors Arduino library handles the wireless radio link and protocol between your home built sensors/actuators and HA controller of choice. The sensors forms a self healing radio network with optional repeaters. Each repeater and gateway builds a routing tables in EEPROM which keeps track of the network topology allowing messages to be routed to nodes. Created by Henrik Ekblad <henrik.ekblad@mysensors.org> Copyright (C) 2013-2017 Sensnology AB Full contributor list: https://github.com/mysensors/Arduino/graphs/contributors Documentation: http://www.mysensors.org Support Forum: http://forum.mysensors.org This program is free software; you can redistribute it and/or modify it under the terms of the GNU General Public License version 2 as published by the Free Software Foundation. ******************************* REVISION HISTORY */ // Enable debug prints #define MY_DEBUG // Enable serial gateway #define MY_GATEWAY_SERIAL // Set blinking period #define MY_DEFAULT_LED_BLINK_PERIOD 300 // Enable and select radio type attached //#define MY_RADIO_NRF24 #define MY_RADIO_NRF5_ESB //#define MY_RADIO_RFM69 //#define MY_RADIO_RFM95 #include <SPI.h> #include <MySensors.h> #include "DHT.h" int switch_led = 1; #define ledPin 11 // Set this to the pin you connected the DHT's data pin to #define DHT_DATA_PIN 02 #define DHTTYPE DHT22 // DHT 22 (AM2302), AM2321 // Set this offset if the sensor has a permanent small offset to the real temperatures. // In Celsius degrees (as measured by the device) #define SENSOR_TEMP_OFFSET 0 // Sleep time between sensor updates (in milliseconds) // Must be >1000ms for DHT22 and >2000ms for DHT11 static const uint64_t UPDATE_INTERVAL = 600000; // Force sending an update of the temperature after n sensor reads, so a controller showing the // timestamp of the last update doesn't show something like 3 hours in the unlikely case, that // the value didn't change since; // i.e. the sensor would force sending an update every UPDATE_INTERVAL*FORCE_UPDATE_N_READS [ms] static const uint8_t FORCE_UPDATE_N_READS = 10; #define CHILD_ID_HUM 1 #define CHILD_ID_TEMP 0 float lastTemp; float lastHum; uint8_t nNoUpdatesTemp; uint8_t nNoUpdatesHum; bool metric = true; MyMessage msgHum(CHILD_ID_HUM, V_HUM); MyMessage msgTemp(CHILD_ID_TEMP, V_TEMP); DHT dht(DHT_DATA_PIN, DHTTYPE); void setup() { hwPinMode(LED_BUILTIN,OUTPUT_D0H1); NRF_CLOCK->INTENSET=B11; //enable interrupts for EVENTS_HFCLKSTARTED and EVENTS_LFCLKSTARTED NRF_CLOCK->TASKS_HFCLKSTART=1; //start the high frequency crystal oscillator clock while (!(NRF_CLOCK->EVENTS_HFCLKSTARTED)) {} //wait until high frequency crystal oscillator clock is up to speed and working pinMode(PIN_LED1, OUTPUT); digitalWrite(PIN_LED1, HIGH); dht.begin(); // set data pin of DHT sensor } void presentation() { // Send the sketch version information to the gateway and controller sendSketchInfo("Serial Gateway nrf52", "1.0"); wait(500); // Register all sensors to gw (they will be created as child devices) present(CHILD_ID_TEMP, S_TEMP); present(CHILD_ID_HUM, S_HUM); } void loop() { // Reading temperature or humidity takes about 250 milliseconds! // Sensor readings may also be up to 2 seconds 'old' (its a very slow sensor) float h = dht.readHumidity(); // Read temperature as Celsius (the default) float t = dht.readTemperature(); // Read temperature as Fahrenheit (isFahrenheit = true) float f = dht.readTemperature(true); Serial.print("Test print"); // Check if any reads failed and exit early (to try again). if (isnan(h) || isnan(t) || isnan(f)) { //Serial.println("Failed to read from DHT sensor!"); return; } else { send(msgHum.set(h, 1)); send(msgTemp.set(t, 1)); } wait(UPDATE_INTERVAL); } -
Hi every one. I'm very new in mysensors (I use bad English)
in my sketch how to setup sleep,interrupt for 3 button (์NRF51822)
thank you#define MY_DEBUG #define MY_NODE_ID 4 //#define MY_RADIO_NRF24 #define MY_RADIO_NRF5_ESB #include <SPI.h> #include <MySensors.h> #define CHILD_ID_SW1 1 #define CHILD_ID_SW2 2 #define CHILD_ID_SW3 3 #define BUTTON1_PIN 3 #define BUTTON2_PIN 4 #define BUTTON3_PIN 5 boolean sw1State; boolean lastState1; boolean tripped1 = HIGH; boolean sw2State; boolean lastState2; boolean tripped2 = HIGH; boolean sw3State; boolean lastState3; boolean tripped3 = HIGH; MyMessage msg1(CHILD_ID_SW1, V_TRIPPED); MyMessage msg2(CHILD_ID_SW2, V_TRIPPED); MyMessage msg3(CHILD_ID_SW3, V_TRIPPED); void presentation() { sendSketchInfo("Push Button 1", "1.0"); present(CHILD_ID_SW1, S_DOOR); present(CHILD_ID_SW2, S_DOOR); present(CHILD_ID_SW3, S_DOOR); } void setup() { pinMode (BUTTON1_PIN,INPUT_PULLUP); pinMode (BUTTON2_PIN,INPUT_PULLUP); pinMode (BUTTON3_PIN,INPUT_PULLUP); } void loop() { sw1State = digitalRead(BUTTON1_PIN); if ( ( sw1State == LOW) && (lastState1 == HIGH) ) tripped1 = !tripped1; send(msg1.set(tripped1==HIGH ? "1" : "0")); lastState1 = sw1State; sw2State = digitalRead(BUTTON2_PIN); if ( ( sw2State == LOW) && (lastState2 == HIGH) ) tripped2 = !tripped2; send(msg2.set(tripped2==HIGH ? "1" : "0")); lastState2 = sw2State; sw3State = digitalRead(BUTTON3_PIN); if ( ( sw3State == LOW) && (lastState3 == HIGH) ) tripped3 = !tripped3; send(msg3.set(tripped3==HIGH ? "1" : "0")); lastState3 = sw3State; //sleep(digitalPinToInterrupt(BUTTON1_PIN), CHANGE, 0); //sleep(INTERRUPT, CHANGE, 0); } -
I have recently installed an Ebyte E73 as my gateway with a DHT22. The problem is that I need to restart the gateway every 2 days and I can't figure out why. Can someone help me?
/** The MySensors Arduino library handles the wireless radio link and protocol between your home built sensors/actuators and HA controller of choice. The sensors forms a self healing radio network with optional repeaters. Each repeater and gateway builds a routing tables in EEPROM which keeps track of the network topology allowing messages to be routed to nodes. Created by Henrik Ekblad <henrik.ekblad@mysensors.org> Copyright (C) 2013-2017 Sensnology AB Full contributor list: https://github.com/mysensors/Arduino/graphs/contributors Documentation: http://www.mysensors.org Support Forum: http://forum.mysensors.org This program is free software; you can redistribute it and/or modify it under the terms of the GNU General Public License version 2 as published by the Free Software Foundation. ******************************* REVISION HISTORY */ // Enable debug prints #define MY_DEBUG // Enable serial gateway #define MY_GATEWAY_SERIAL // Set blinking period #define MY_DEFAULT_LED_BLINK_PERIOD 300 // Enable and select radio type attached //#define MY_RADIO_NRF24 #define MY_RADIO_NRF5_ESB //#define MY_RADIO_RFM69 //#define MY_RADIO_RFM95 #include <SPI.h> #include <MySensors.h> #include "DHT.h" int switch_led = 1; #define ledPin 11 // Set this to the pin you connected the DHT's data pin to #define DHT_DATA_PIN 02 #define DHTTYPE DHT22 // DHT 22 (AM2302), AM2321 // Set this offset if the sensor has a permanent small offset to the real temperatures. // In Celsius degrees (as measured by the device) #define SENSOR_TEMP_OFFSET 0 // Sleep time between sensor updates (in milliseconds) // Must be >1000ms for DHT22 and >2000ms for DHT11 static const uint64_t UPDATE_INTERVAL = 600000; // Force sending an update of the temperature after n sensor reads, so a controller showing the // timestamp of the last update doesn't show something like 3 hours in the unlikely case, that // the value didn't change since; // i.e. the sensor would force sending an update every UPDATE_INTERVAL*FORCE_UPDATE_N_READS [ms] static const uint8_t FORCE_UPDATE_N_READS = 10; #define CHILD_ID_HUM 1 #define CHILD_ID_TEMP 0 float lastTemp; float lastHum; uint8_t nNoUpdatesTemp; uint8_t nNoUpdatesHum; bool metric = true; MyMessage msgHum(CHILD_ID_HUM, V_HUM); MyMessage msgTemp(CHILD_ID_TEMP, V_TEMP); DHT dht(DHT_DATA_PIN, DHTTYPE); void setup() { hwPinMode(LED_BUILTIN,OUTPUT_D0H1); NRF_CLOCK->INTENSET=B11; //enable interrupts for EVENTS_HFCLKSTARTED and EVENTS_LFCLKSTARTED NRF_CLOCK->TASKS_HFCLKSTART=1; //start the high frequency crystal oscillator clock while (!(NRF_CLOCK->EVENTS_HFCLKSTARTED)) {} //wait until high frequency crystal oscillator clock is up to speed and working pinMode(PIN_LED1, OUTPUT); digitalWrite(PIN_LED1, HIGH); dht.begin(); // set data pin of DHT sensor } void presentation() { // Send the sketch version information to the gateway and controller sendSketchInfo("Serial Gateway nrf52", "1.0"); wait(500); // Register all sensors to gw (they will be created as child devices) present(CHILD_ID_TEMP, S_TEMP); present(CHILD_ID_HUM, S_HUM); } void loop() { // Reading temperature or humidity takes about 250 milliseconds! // Sensor readings may also be up to 2 seconds 'old' (its a very slow sensor) float h = dht.readHumidity(); // Read temperature as Celsius (the default) float t = dht.readTemperature(); // Read temperature as Fahrenheit (isFahrenheit = true) float f = dht.readTemperature(true); Serial.print("Test print"); // Check if any reads failed and exit early (to try again). if (isnan(h) || isnan(t) || isnan(f)) { //Serial.println("Failed to read from DHT sensor!"); return; } else { send(msgHum.set(h, 1)); send(msgTemp.set(t, 1)); } wait(UPDATE_INTERVAL); }@smilvert do you have some more information? like some serial output?
I had some issues with statements that uses millis(), in about 1,5 up to 2 days (much shorter the normaly I suppose) it did its rollover back to 0. This messed some waiting times for me.
-
Hi every one. I'm very new in mysensors (I use bad English)
in my sketch how to setup sleep,interrupt for 3 button (์NRF51822)
thank you#define MY_DEBUG #define MY_NODE_ID 4 //#define MY_RADIO_NRF24 #define MY_RADIO_NRF5_ESB #include <SPI.h> #include <MySensors.h> #define CHILD_ID_SW1 1 #define CHILD_ID_SW2 2 #define CHILD_ID_SW3 3 #define BUTTON1_PIN 3 #define BUTTON2_PIN 4 #define BUTTON3_PIN 5 boolean sw1State; boolean lastState1; boolean tripped1 = HIGH; boolean sw2State; boolean lastState2; boolean tripped2 = HIGH; boolean sw3State; boolean lastState3; boolean tripped3 = HIGH; MyMessage msg1(CHILD_ID_SW1, V_TRIPPED); MyMessage msg2(CHILD_ID_SW2, V_TRIPPED); MyMessage msg3(CHILD_ID_SW3, V_TRIPPED); void presentation() { sendSketchInfo("Push Button 1", "1.0"); present(CHILD_ID_SW1, S_DOOR); present(CHILD_ID_SW2, S_DOOR); present(CHILD_ID_SW3, S_DOOR); } void setup() { pinMode (BUTTON1_PIN,INPUT_PULLUP); pinMode (BUTTON2_PIN,INPUT_PULLUP); pinMode (BUTTON3_PIN,INPUT_PULLUP); } void loop() { sw1State = digitalRead(BUTTON1_PIN); if ( ( sw1State == LOW) && (lastState1 == HIGH) ) tripped1 = !tripped1; send(msg1.set(tripped1==HIGH ? "1" : "0")); lastState1 = sw1State; sw2State = digitalRead(BUTTON2_PIN); if ( ( sw2State == LOW) && (lastState2 == HIGH) ) tripped2 = !tripped2; send(msg2.set(tripped2==HIGH ? "1" : "0")); lastState2 = sw2State; sw3State = digitalRead(BUTTON3_PIN); if ( ( sw3State == LOW) && (lastState3 == HIGH) ) tripped3 = !tripped3; send(msg3.set(tripped3==HIGH ? "1" : "0")); lastState3 = sw3State; //sleep(digitalPinToInterrupt(BUTTON1_PIN), CHANGE, 0); //sleep(INTERRUPT, CHANGE, 0); }@magkudjee
MySensors will support 2 interrupts using sleep. I do not think it will support 3.
Use this format for the sleep call:
sleep(interrupt1, mode1, interrupt2, mode2, ms=0);
In your case: sleep(BUTTON1_PIN, CHANGE, BUTTON2_PIN, CHANGE, 0);I don't know how to handle the 3rd interrupt.
Check the MySensors API document here: https://www.mysensors.org/download/sensor_api_20#sleeping
-
@smilvert do you have some more information? like some serial output?
I had some issues with statements that uses millis(), in about 1,5 up to 2 days (much shorter the normaly I suppose) it did its rollover back to 0. This messed some waiting times for me.
-
For Documentations sake:
I was having the same problems of the Ebyte E73 Module of being locked.
The ST_LinkV2 Clone Firmware are not able to recover the modules as the swd implementation is missing some direct register write capabilities.
The nfrjprog and nor openocd are working with the ST_LinkV2.As suggested in this thread somewhere, I was able to get the modules unlocked with the Jlink clone and nrfjprog.
see also :
https://github.com/micooke/arduino-nRF5-smartwatches/blob/master/nrf52_disable_read_protection.txtThat (pirated) Firmware is working with swd and is able to recover the modules. Had to solve some dll-issues before, but got it working.
After the recovery with nrfjprog the stlink and the jlink are working as expected with openocd.To find out if your wiring etc. is fine and it is really the locked devices you get this when starting your openocd interface.
The voltage is fine but the breakpoints are recognized.Info : STLINK v2 JTAG v17 API v2 SWIM v4 VID 0x0483 PID 0x3748 Info : using stlink api v2 Info : Target voltage: 3.241270 Info : nrf52.cpu: hardware has 0 breakpoints, 2 watchpoints Error: timed out while waiting for target halted TARGET: nrf52.cpu - Not haltedIt should be
Info : nrf52.cpu: hardware has 6 breakpoints, 4 watchpoints -
For Documentations sake:
I was having the same problems of the Ebyte E73 Module of being locked.
The ST_LinkV2 Clone Firmware are not able to recover the modules as the swd implementation is missing some direct register write capabilities.
The nfrjprog and nor openocd are working with the ST_LinkV2.As suggested in this thread somewhere, I was able to get the modules unlocked with the Jlink clone and nrfjprog.
see also :
https://github.com/micooke/arduino-nRF5-smartwatches/blob/master/nrf52_disable_read_protection.txtThat (pirated) Firmware is working with swd and is able to recover the modules. Had to solve some dll-issues before, but got it working.
After the recovery with nrfjprog the stlink and the jlink are working as expected with openocd.To find out if your wiring etc. is fine and it is really the locked devices you get this when starting your openocd interface.
The voltage is fine but the breakpoints are recognized.Info : STLINK v2 JTAG v17 API v2 SWIM v4 VID 0x0483 PID 0x3748 Info : using stlink api v2 Info : Target voltage: 3.241270 Info : nrf52.cpu: hardware has 0 breakpoints, 2 watchpoints Error: timed out while waiting for target halted TARGET: nrf52.cpu - Not haltedIt should be
Info : nrf52.cpu: hardware has 6 breakpoints, 4 watchpoints@mr_red
I can add some of my own "documentation" on this issue. I only recently was able to program an Ebyte E73 module, and it was a long struggle. I used the NRF DK, and had help from a Nordic engineer.- The recommended way to connect to the external device is:
Using the P20 and P1 headers, connect:
P20 VDD -> 3.3v on EBYTE 2G4M04S1B module
P20 SWDIO -> SWDIO on EBYTE 2G4M04S1B module
P20 SWDCLK -> SWDCLK on EBYTE 2G4M04S1B module
P20 VTG -> P1 VDD
P1 GND -> GND on EBYTE 2G4M04S1B moduleTo unlock the chip, execute:
nrfjprog -f nrf52 --recover
They also recommend using nrfjprog to program the device, because nRFgo Studio is deprecated. But I used the Studio and it worked fine. I gave Studio the .hex produced by the Arduino IDE using "Sketch" -> "Export compiled Binary".
As mentioned in the previous post, it is unlikely to unlock the board with anything but the NRF DK or a genuine J-Link. (Maybe a good fake J-Link).
Mistakes others may be able to learn from:
- Soldering the module onto a custom board can be hard. If you miss a little solder on SWDCLK or SWDIO, there is no hope. Check continuity on every pin you need!
- Make sure you don't order a NRF52810 module - only NRF52832 . You can program them, but Mysensors is not compatible. It's easy to hit the wrong link on AliExpress as they look identical.
- The NRF DK seems to deliver only 2.8V to the device. I first thought there was a problem, and tried to connect external power sources. But it seems to work powered from the DK.
-
@magkudjee
MySensors will support 2 interrupts using sleep. I do not think it will support 3.
Use this format for the sleep call:
sleep(interrupt1, mode1, interrupt2, mode2, ms=0);
In your case: sleep(BUTTON1_PIN, CHANGE, BUTTON2_PIN, CHANGE, 0);I don't know how to handle the 3rd interrupt.
Check the MySensors API document here: https://www.mysensors.org/download/sensor_api_20#sleeping
-
@mr_red
I can add some of my own "documentation" on this issue. I only recently was able to program an Ebyte E73 module, and it was a long struggle. I used the NRF DK, and had help from a Nordic engineer.- The recommended way to connect to the external device is:
Using the P20 and P1 headers, connect:
P20 VDD -> 3.3v on EBYTE 2G4M04S1B module
P20 SWDIO -> SWDIO on EBYTE 2G4M04S1B module
P20 SWDCLK -> SWDCLK on EBYTE 2G4M04S1B module
P20 VTG -> P1 VDD
P1 GND -> GND on EBYTE 2G4M04S1B moduleTo unlock the chip, execute:
nrfjprog -f nrf52 --recover
They also recommend using nrfjprog to program the device, because nRFgo Studio is deprecated. But I used the Studio and it worked fine. I gave Studio the .hex produced by the Arduino IDE using "Sketch" -> "Export compiled Binary".
As mentioned in the previous post, it is unlikely to unlock the board with anything but the NRF DK or a genuine J-Link. (Maybe a good fake J-Link).
Mistakes others may be able to learn from:
- Soldering the module onto a custom board can be hard. If you miss a little solder on SWDCLK or SWDIO, there is no hope. Check continuity on every pin you need!
- Make sure you don't order a NRF52810 module - only NRF52832 . You can program them, but Mysensors is not compatible. It's easy to hit the wrong link on AliExpress as they look identical.
- The NRF DK seems to deliver only 2.8V to the device. I first thought there was a problem, and tried to connect external power sources. But it seems to work powered from the DK.
@ileneken3
It is a struggle indeed. I wanted to stay "low cost" with clone stlink and clone jlink.
As this is in preparation for a local hackspace workshop the entry level should be as low as possible.
And I suceeded to get this running for under 10€. (only one Jlink needed to unlock the modules once)I am using platform.io and arduino, which use openocd internally. No need for nrfgo or an second programm and take the hex somewhere else.
Highly recommend platform.io for this! Flashing & Serial output are superfast, nice IDE and my dev-cycle speed up by an order of magnitude.Question:
I am using an second device for USB-Serial convertion to get some print-msg out of the nrf52832.
Is there any way to do this over the programmer?You can define the RX/TX pins in the nrf52832 to the pins you want.
Hardware Workaround by Neverdie: Connector Board -openhardware.io -
@ileneken3
It is a struggle indeed. I wanted to stay "low cost" with clone stlink and clone jlink.
As this is in preparation for a local hackspace workshop the entry level should be as low as possible.
And I suceeded to get this running for under 10€. (only one Jlink needed to unlock the modules once)I am using platform.io and arduino, which use openocd internally. No need for nrfgo or an second programm and take the hex somewhere else.
Highly recommend platform.io for this! Flashing & Serial output are superfast, nice IDE and my dev-cycle speed up by an order of magnitude.Question:
I am using an second device for USB-Serial convertion to get some print-msg out of the nrf52832.
Is there any way to do this over the programmer?You can define the RX/TX pins in the nrf52832 to the pins you want.
Hardware Workaround by Neverdie: Connector Board -openhardware.io@mr_red said in nRF5 action!:
Is there any way to do this over the programmer?
Not in Arduino. In KEIL you can use RTT (pretty cool stuff, debug via SWD)
But if you just want to decrease a number of programmers, you can use Black Magic Probe, made from BluePill ($2 at Ali). It is 2-in-1 SWD and USB-UART converter on one PCB -
@ileneken3 @mr_red Thanks for this! Glad to hear I wasn't going crazy, but that others have had the same issue.