Skip to content
  • MySensors
  • OpenHardware.io
  • Categories
  • Recent
  • Tags
  • Popular
Skins
  • Light
  • Brite
  • Cerulean
  • Cosmo
  • Flatly
  • Journal
  • Litera
  • Lumen
  • Lux
  • Materia
  • Minty
  • Morph
  • Pulse
  • Sandstone
  • Simplex
  • Sketchy
  • Spacelab
  • United
  • Yeti
  • Zephyr
  • Dark
  • Cyborg
  • Darkly
  • Quartz
  • Slate
  • Solar
  • Superhero
  • Vapor

  • Default (No Skin)
  • No Skin
Collapse
Brand Logo
  1. Home
  2. My Project
  3. nRF5 action!

nRF5 action!

Scheduled Pinned Locked Moved My Project
1.9k Posts 49 Posters 1.4m Views 44 Watching
  • Oldest to Newest
  • Newest to Oldest
  • Most Votes
Reply
  • Reply as topic
Log in to reply
This topic has been deleted. Only users with topic management privileges can see it.
  • N NeverDie

    @toyman Micropython on the BBC micro:bit (which uses the nRF51822) has a Radio library that uses Nordic's proprietary radio modes and doesn't involve Bluetooth. I suppose the question is: what would be involved in getting it to run on the nRF52832 or the nRF52840. Seems like it would be substantially the same.

    Faiing that, if I can directly manipulate the radio registers from miropython as I can from C, then it shouldn't be too hard to get at least minimal radio capability up and running from within micropython.

    If I can get rudimentary radio communications working in micropython, then from there it should be easy to do OTA updates via REPL. I did some proof of concept to that effect on the micro:bit, but quickly ran out of memory--the micro:bit has only a total of 16K of RAM, so there's very little headroom to begin with. On the nRF52840, lack of RAM shouldn't be an issue.

    U Offline
    U Offline
    Uhrheber
    wrote on last edited by
    #1739

    @neverdie There are three ways to manipulate registers directly from Micropython:

    1. Use machine.mem16

    2. Use the decorator @micropython_viper
      The Viper code emitter implements integer types and pointers, allowing to access memory and registers directly.

    3. Use the decorator @micropython.asm_thumb
      Write your code in ARM assembler.

    Problem: I don't know whether any of this is already implemented and works reliably in Micropython for nRF.

    N 1 Reply Last reply
    1
    • S speechsupply

      @neverdie
      1737 posts and counting
      Spend hours reading this. Amazing journey so far.

      T Offline
      T Offline
      Toyman
      wrote on last edited by
      #1740

      @speechsupply this thread is golden. I was so empowered that was able to easily switch to nRF SDK and to start producing (semi) commercial BLE-ANT device

      S 1 Reply Last reply
      1
      • T Toyman

        @speechsupply this thread is golden. I was so empowered that was able to easily switch to nRF SDK and to start producing (semi) commercial BLE-ANT device

        S Offline
        S Offline
        speechsupply
        wrote on last edited by
        #1741

        @toyman
        Yea, On monday I'll order a couple of nRF52840 EVAL boards. Any suggestion regarding what to get?
        Looked at both the BMD-340-EVAL and ofcourse the NRF52840-DK

        1 Reply Last reply
        0
        • U Uhrheber

          @neverdie There are three ways to manipulate registers directly from Micropython:

          1. Use machine.mem16

          2. Use the decorator @micropython_viper
            The Viper code emitter implements integer types and pointers, allowing to access memory and registers directly.

          3. Use the decorator @micropython.asm_thumb
            Write your code in ARM assembler.

          Problem: I don't know whether any of this is already implemented and works reliably in Micropython for nRF.

          N Offline
          N Offline
          NeverDie
          Hero Member
          wrote on last edited by NeverDie
          #1742

          @uhrheber said in nRF5 action!:

          @neverdie There are three ways to manipulate registers directly from Micropython:

          1. Use machine.mem16

          2. Use the decorator @micropython_viper
            The Viper code emitter implements integer types and pointers, allowing to access memory and registers directly.

          3. Use the decorator @micropython.asm_thumb
            Write your code in ARM assembler.

          Problem: I don't know whether any of this is already implemented and works reliably in Micropython for nRF.

          Thanks! We finally nailed it all the way down on this thread here: https://forum.micropython.org/viewtopic.php?f=12&t=5377

          :smiley:

          1 Reply Last reply
          0
          • O Offline
            O Offline
            Omemanti
            wrote on last edited by Omemanti
            #1743

            I see somewhat strange behaviour when using millis() for intervals.

            I'm not sure it's my mistake, but one thing is that it seems that the millis rollover is around; 131.068.570 (36 hours)

            When the rollover happens, it looks like it interrupts my sleep. Does that make sense?

            sleep(digitalPinToInterrupt(PIR_Pin), CHANGE, LongSleep); 
            

            Debug lines => (Temp / RH - Millis)

            21.44 / 61.15 - 130977952
            21.43 / 61.16 - 131008158
            21.42 / 61.15 - 131038364
            21.44 / 61.14 - 131068570
            I woke up because I saw movement at: 26576
            Sleep Duration : -131042000  Im going back to sleep for 150000       
            21.43 / 61.16 - 176822


            20-10-2018 => its been ±36 hours laters, and he woke up again at the same moment.

            18.57 / 56.88 - 131007553
            18.56 / 56.86 - 131037759
            18.58 / 56.85 - 131067965
            I woke up because I saw movement at: 25971
            Sleep duration : -131042000 => Rollover??
            18.55 / 56.89 - 206423
            18.53 / 56.89 - 236628
            18.54 / 56.90 - 266834
            18.55 / 56.89 - 297040
            18.54 / 56.90 - 327246
            1 Reply Last reply
            0
            • M maciekczwa

              I have the same problem with brand news ebyte modeules.

              Here are my openocd logs:

              Open On-Chip Debugger 0.10.0-dev-gdc53227 (2016-04-09-13:45)
              Licensed under GNU GPL v2
              For bug reports, read
              http://openocd.org/doc/doxygen/bugs.html
              debug_level: 2
              0x4000
              Info : The selected transport took over low-level target control. The results might differ compared to plain JTAG/SWD
              adapter speed: 10000 kHz
              Info : Unable to match requested speed 10000 kHz, using 4000 kHz
              Info : Unable to match requested speed 10000 kHz, using 4000 kHz
              Info : clock speed 4000 kHz
              Info : STLINK v2 JTAG v17 API v2 SWIM v4 VID 0x0483 PID 0x3748
              Info : using stlink api v2
              Info : Target voltage: 3.241270
              Info : nrf52.cpu: hardware has 0 breakpoints, 2 watchpoints
              Error: timed out while waiting for target halted
              TARGET: nrf52.cpu - Not halted
              in procedure 'program'
              in procedure 'reset' called at file "embedded:startup.tcl", line 478
              in procedure 'ocd_bouncer'

              embedded:startup.tcl:454: Error: ** Unable to reset target **
              in procedure 'program'
              in procedure 'program_error' called at file "embedded:startup.tcl", line 479
              at file "embedded:startup.tcl", line 454
              wybrany port szeregowy at file "embedded:startup.tcl", line 454
              nie istnieje albo Twoja płytka nie jest podłączona

              O Offline
              O Offline
              Omemanti
              wrote on last edited by Omemanti
              #1744

              @maciekczwa said in nRF5 action!:

              Licensed under GNU GPL v2
              For bug reports, read
              http://openocd.org/doc/doxygen/bugs.html
              debug_level: 2
              0x4000
              Info : The selected transport took over low-level target control. The results might differ compared to plain JTAG/SWD
              adapter speed: 10000 kHz
              Info : Unable to match requested speed 10000 kHz, using 4000 kHz
              Info : Unable to match requested speed 10000 kHz, using 4000 kHz
              Info : clock speed 4000 kHz
              Info : STLINK v2 JTAG v17 API v2 SWIM v4 VID 0x0483 PID 0x3748
              Info : using stlink api v2
              Info : Target voltage: 3.241270
              Info : nrf52.cpu: hardware has 0 breakpoints, 2 watchpoints
              Error: timed out while waiting for target halted
              TARGET: nrf52.cpu - Not halted
              in procedure 'program'
              in procedure 'reset' called at file "embedded:startup.tcl", line 478
              in procedure 'ocd_bouncer'

              **embedded:startup.tcl:454: Error: ** Unable to reset target ****
              in procedure 'program'
              in procedure 'program_error' called at file "embedded:startup.tcl", line 479
              at file "embedded:startup.tcl", line 454
              wybrany port szeregowy at file "embedded:startup.tcl", line 454

              maybe someone else already found the solution, but it took me a while to figure it out for myself.

              So for documentation sake:

              Just had the exact same things with new Ebyte NRF52832 modules, ST-Link v2 couldn't erase it. (the old once did erase without a single problem )

              After some digging, I found the following:
              (I'm using my NRF52832-DK for it, maybe other devices work as well, just tested this one)

              DK => Ebyte module
              GND(detect) => GND
              SWDIO => SWDIO
              SWDCLK => SWCLK
              VTG => 3,3V
              3,3V => 3,3V
              GND =>GND

              you can erase the protection using nRFgo Studio

              1. On the left, you can find a header named Segger, click on that.
              2. then it shows that it is locked, and you can click recover.
              3. after that you can erase it
              4. upload a new sketch using an ST-link V2 or the DK while you are still at it.
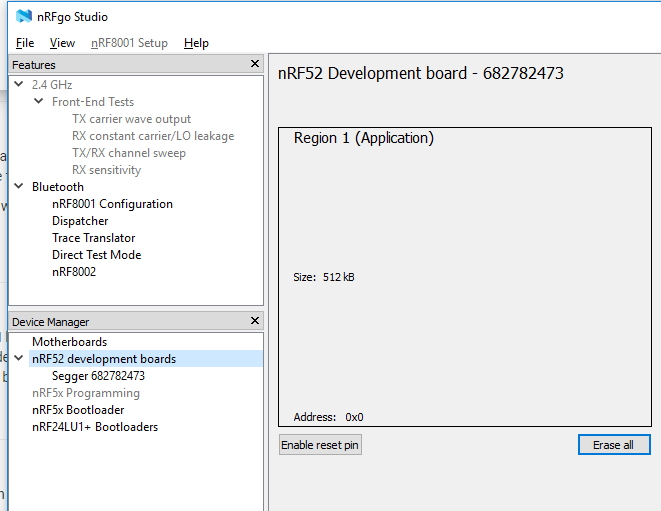
              0_1540825164917_f8695040-bd25-422c-9f43-49e1d762c29d-image.png

              T 1 Reply Last reply
              2
              • alowhumA alowhum

                This looks like an Arduino-nano/pro-mini style device with an NRF51:

                https://www.aliexpress.com/item/Nrf51822-LIS3DH-Bluetooth-Module-CJMCU-8223-Bluetooth-acceleration-module/32821873481.html

                alowhumA Offline
                alowhumA Offline
                alowhum
                Plugin Developer
                wrote on last edited by
                #1745

                @alowhum said in nRF5 action!:

                This looks like an Arduino-nano/pro-mini style device with an NRF51:

                https://www.aliexpress.com/item/Nrf51822-LIS3DH-Bluetooth-Module-CJMCU-8223-Bluetooth-acceleration-module/32821873481.html

                I tried uploading a simple blink sketch today. I found some code on github which suggested pin 23 and 24 are LED pins.

                I got an error uploading via STM32 though.

                debug_level: 2
                0x4000
                Info : The selected transport took over low-level target control. The results might differ compared to plain JTAG/SWD
                adapter speed: 10000 kHz
                Info : Unable to match requested speed 10000 kHz, using 4000 kHz
                Info : Unable to match requested speed 10000 kHz, using 4000 kHz
                Info : clock speed 4000 kHz
                Info : STLINK v2 JTAG v17 API v2 SWIM v4 VID 0x0483 PID 0x3748
                Info : using stlink api v2
                Info : Target voltage: 3.233552
                Warn : UNEXPECTED idcode: 0x0bb11477
                Error: expected 1 of 1: 0x2ba01477

                in procedure 'program'
                in procedure 'init' called at file "embedded:startup.tcl", line 473
                in procedure 'ocd_bouncer'
                ** OpenOCD init failed **
                shutdown command invoked

                1 Reply Last reply
                0
                • O Omemanti

                  @maciekczwa said in nRF5 action!:

                  Licensed under GNU GPL v2
                  For bug reports, read
                  http://openocd.org/doc/doxygen/bugs.html
                  debug_level: 2
                  0x4000
                  Info : The selected transport took over low-level target control. The results might differ compared to plain JTAG/SWD
                  adapter speed: 10000 kHz
                  Info : Unable to match requested speed 10000 kHz, using 4000 kHz
                  Info : Unable to match requested speed 10000 kHz, using 4000 kHz
                  Info : clock speed 4000 kHz
                  Info : STLINK v2 JTAG v17 API v2 SWIM v4 VID 0x0483 PID 0x3748
                  Info : using stlink api v2
                  Info : Target voltage: 3.241270
                  Info : nrf52.cpu: hardware has 0 breakpoints, 2 watchpoints
                  Error: timed out while waiting for target halted
                  TARGET: nrf52.cpu - Not halted
                  in procedure 'program'
                  in procedure 'reset' called at file "embedded:startup.tcl", line 478
                  in procedure 'ocd_bouncer'

                  **embedded:startup.tcl:454: Error: ** Unable to reset target ****
                  in procedure 'program'
                  in procedure 'program_error' called at file "embedded:startup.tcl", line 479
                  at file "embedded:startup.tcl", line 454
                  wybrany port szeregowy at file "embedded:startup.tcl", line 454

                  maybe someone else already found the solution, but it took me a while to figure it out for myself.

                  So for documentation sake:

                  Just had the exact same things with new Ebyte NRF52832 modules, ST-Link v2 couldn't erase it. (the old once did erase without a single problem )

                  After some digging, I found the following:
                  (I'm using my NRF52832-DK for it, maybe other devices work as well, just tested this one)

                  DK => Ebyte module
                  GND(detect) => GND
                  SWDIO => SWDIO
                  SWDCLK => SWCLK
                  VTG => 3,3V
                  3,3V => 3,3V
                  GND =>GND

                  you can erase the protection using nRFgo Studio

                  1. On the left, you can find a header named Segger, click on that.
                  2. then it shows that it is locked, and you can click recover.
                  3. after that you can erase it
                  4. upload a new sketch using an ST-link V2 or the DK while you are still at it.

                  0_1540825164917_f8695040-bd25-422c-9f43-49e1d762c29d-image.png

                  T Offline
                  T Offline
                  Toyman
                  wrote on last edited by
                  #1746

                  @omemanti actually, all you need is to issue the following command:
                  nrfjprog.exe --recover

                  O M 2 Replies Last reply
                  0
                  • T Toyman

                    @omemanti actually, all you need is to issue the following command:
                    nrfjprog.exe --recover

                    O Offline
                    O Offline
                    Omemanti
                    wrote on last edited by Omemanti
                    #1747

                    @toyman yup, I tried that one, but all it kept saying was something like; can't find programmer.. and this method, which has a GUI, worked without incident :)

                    T 1 Reply Last reply
                    0
                    • O Omemanti

                      @toyman yup, I tried that one, but all it kept saying was something like; can't find programmer.. and this method, which has a GUI, worked without incident :)

                      T Offline
                      T Offline
                      Toyman
                      wrote on last edited by
                      #1748

                      @omemanti that's strange, I use the methos regularly and it worls fine.
                      Oh! Actually, sandeep's installation messes up Jlink drivers so they require reinstall for the method to work.
                      That's why I am using arduino nrf5 with BMP to completely separate Arduino from Jlink

                      1 Reply Last reply
                      1
                      • N Offline
                        N Offline
                        NeverDie
                        Hero Member
                        wrote on last edited by NeverDie
                        #1749

                        FYI, I'm switching from uPython over to uLisp. It already worked on the BBC:microbit, and I just now got uLisp working on the nRF52832. Because uLisp relies on Sandeep's library, it doesn't yet support the nRF52840. However, if/when Sandeep's library does support the nRF52840, the uLisp upgrade will be fairly easy.

                        http://www.ulisp.com/

                        N 1 Reply Last reply
                        1
                        • N NeverDie

                          FYI, I'm switching from uPython over to uLisp. It already worked on the BBC:microbit, and I just now got uLisp working on the nRF52832. Because uLisp relies on Sandeep's library, it doesn't yet support the nRF52840. However, if/when Sandeep's library does support the nRF52840, the uLisp upgrade will be fairly easy.

                          http://www.ulisp.com/

                          N Offline
                          N Offline
                          Nca78
                          Hardware Contributor
                          wrote on last edited by
                          #1750

                          @neverdie said in nRF5 action!:

                          FYI, I'm switching from uPython over to uLisp.

                          What is the reason for this switch ?

                          N 1 Reply Last reply
                          0
                          • N Nca78

                            @neverdie said in nRF5 action!:

                            FYI, I'm switching from uPython over to uLisp.

                            What is the reason for this switch ?

                            N Offline
                            N Offline
                            NeverDie
                            Hero Member
                            wrote on last edited by NeverDie
                            #1751

                            @nca78

                            1. uPython seemed to require an intimate understanding of a rather complicated build process. I kept running into build-related snags. Maybe in the future they will simplify it.
                            2. Its garbage collector can't handle heap fragmentation, and it appears that it never will.
                            3. Adding c-extensions is a rather arcane process.

                            In contrast, the uLisp build process is far simpler, and uLisp appears to have a proper garbage collector. Adding c-extensions is relatively easy.

                            1 Reply Last reply
                            1
                            • N Offline
                              N Offline
                              NeverDie
                              Hero Member
                              wrote on last edited by
                              #1752

                              For anyone interested, I posted a simple nRF52 Tx and Rx demo program written in Forth: https://github.com/rabbithat/nRF52_SimpleTxRxDemo

                              This code is a good starting point for beginners, because it is already working. You can easily modify the code to do whatever transmitting and receiving you want.

                              1 Reply Last reply
                              1
                              • N Offline
                                N Offline
                                NeverDie
                                Hero Member
                                wrote on last edited by NeverDie
                                #1753

                                I just now posted a wireless Forth REPL for nRF52's on github:
                                https://github.com/rabbithat/nRF52_wireless_Forth_REPL

                                This allows you to wirelessly connect with a nRF52 remote node to update and/or interact with your code exactly the same as if the remote node was directly connected to your computer.
                                :grinning: :grinning: :grinning:

                                1 Reply Last reply
                                0
                                • S Offline
                                  S Offline
                                  smilvert
                                  wrote on last edited by
                                  #1754

                                  I have recently installed an Ebyte E73 as my gateway with a DHT22. The problem is that I need to restart the gateway every 2 days and I can't figure out why. Can someone help me?

                                  /**
                                     The MySensors Arduino library handles the wireless radio link and protocol
                                     between your home built sensors/actuators and HA controller of choice.
                                     The sensors forms a self healing radio network with optional repeaters. Each
                                     repeater and gateway builds a routing tables in EEPROM which keeps track of the
                                     network topology allowing messages to be routed to nodes.
                                  
                                     Created by Henrik Ekblad <henrik.ekblad@mysensors.org>
                                     Copyright (C) 2013-2017 Sensnology AB
                                     Full contributor list: https://github.com/mysensors/Arduino/graphs/contributors
                                  
                                     Documentation: http://www.mysensors.org
                                     Support Forum: http://forum.mysensors.org
                                  
                                     This program is free software; you can redistribute it and/or
                                     modify it under the terms of the GNU General Public License
                                     version 2 as published by the Free Software Foundation.
                                  
                                   *******************************
                                  
                                     REVISION HISTORY
                                  
                                  
                                  */
                                  
                                  // Enable debug prints
                                  #define MY_DEBUG
                                  
                                  // Enable serial gateway
                                  #define MY_GATEWAY_SERIAL


                                  // Set blinking period
                                  #define MY_DEFAULT_LED_BLINK_PERIOD 300
                                  
                                  // Enable and select radio type attached
                                  //#define MY_RADIO_NRF24
                                  #define MY_RADIO_NRF5_ESB
                                  //#define MY_RADIO_RFM69
                                  //#define MY_RADIO_RFM95
                                  
                                  #include <SPI.h>
                                  #include <MySensors.h>
                                  #include "DHT.h"
                                  
                                  int switch_led = 1;
                                  #define ledPin 11
                                  // Set this to the pin you connected the DHT's data pin to
                                  #define DHT_DATA_PIN 02
                                  #define DHTTYPE DHT22   // DHT 22  (AM2302), AM2321
                                  
                                  
                                  // Set this offset if the sensor has a permanent small offset to the real temperatures.
                                  // In Celsius degrees (as measured by the device)
                                  #define SENSOR_TEMP_OFFSET 0
                                  
                                  // Sleep time between sensor updates (in milliseconds)
                                  // Must be >1000ms for DHT22 and >2000ms for DHT11
                                  static const uint64_t UPDATE_INTERVAL = 600000;
                                  
                                  // Force sending an update of the temperature after n sensor reads, so a controller showing the
                                  // timestamp of the last update doesn't show something like 3 hours in the unlikely case, that
                                  // the value didn't change since;
                                  // i.e. the sensor would force sending an update every UPDATE_INTERVAL*FORCE_UPDATE_N_READS [ms]
                                  static const uint8_t FORCE_UPDATE_N_READS = 10;
                                  
                                  #define CHILD_ID_HUM 1
                                  #define CHILD_ID_TEMP 0
                                  
                                  float lastTemp;
                                  float lastHum;
                                  uint8_t nNoUpdatesTemp;
                                  uint8_t nNoUpdatesHum;
                                  bool metric = true;
                                  
                                  MyMessage msgHum(CHILD_ID_HUM, V_HUM);
                                  MyMessage msgTemp(CHILD_ID_TEMP, V_TEMP);
                                  DHT dht(DHT_DATA_PIN, DHTTYPE);
                                  
                                  void setup()
                                  {
                                      hwPinMode(LED_BUILTIN,OUTPUT_D0H1);
                                  
                                      NRF_CLOCK->INTENSET=B11;  //enable interrupts for EVENTS_HFCLKSTARTED and  EVENTS_LFCLKSTARTED
                                      NRF_CLOCK->TASKS_HFCLKSTART=1;  //start the high frequency crystal oscillator clock
                                      while (!(NRF_CLOCK->EVENTS_HFCLKSTARTED)) {} //wait until high frequency crystal oscillator clock is up to speed and working
                                  
                                      pinMode(PIN_LED1, OUTPUT);
                                      digitalWrite(PIN_LED1, HIGH);
                                  
                                      dht.begin(); // set data pin of DHT sensor
                                  }
                                  
                                  void presentation()
                                  {
                                      // Send the sketch version information to the gateway and controller
                                      sendSketchInfo("Serial Gateway nrf52", "1.0");
                                      wait(500);
                                      // Register all sensors to gw (they will be created as child devices)
                                      present(CHILD_ID_TEMP, S_TEMP);
                                      present(CHILD_ID_HUM, S_HUM);
                                  }
                                  
                                  void loop()
                                  {
                                  
                                      // Reading temperature or humidity takes about 250 milliseconds!
                                      // Sensor readings may also be up to 2 seconds 'old' (its a very slow sensor)
                                      float h = dht.readHumidity();
                                      // Read temperature as Celsius (the default)
                                      float t = dht.readTemperature();
                                      // Read temperature as Fahrenheit (isFahrenheit = true)
                                      float f = dht.readTemperature(true);
                                      Serial.print("Test print");
                                      // Check if any reads failed and exit early (to try again).
                                      if (isnan(h) || isnan(t) || isnan(f)) {
                                      //Serial.println("Failed to read from DHT sensor!");
                                      return;
                                      } else {
                                      send(msgHum.set(h, 1));
                                      send(msgTemp.set(t, 1));
                                  
                                      }
                                  
                                      wait(UPDATE_INTERVAL);
                                  }
                                  
                                  
                                  O 1 Reply Last reply
                                  0
                                  • M Offline
                                    M Offline
                                    magkudjee
                                    wrote on last edited by
                                    #1755

                                    Hi every one. I'm very new in mysensors (I use bad English)
                                    in my sketch how to setup sleep,interrupt for 3 button (์NRF51822)
                                    thank you

                                    #define MY_DEBUG 
                                    #define MY_NODE_ID 4
                                    
                                    //#define MY_RADIO_NRF24
                                    #define MY_RADIO_NRF5_ESB
                                    
                                    #include <SPI.h>
                                    #include <MySensors.h>
                                    
                                    #define CHILD_ID_SW1 1
                                    #define CHILD_ID_SW2 2
                                    #define CHILD_ID_SW3 3
                                    
                                    #define BUTTON1_PIN 3
                                    #define BUTTON2_PIN 4
                                    #define BUTTON3_PIN 5
                                    
                                    boolean sw1State;
                                    boolean lastState1;
                                    boolean tripped1 = HIGH;
                                    
                                    boolean sw2State;
                                    boolean lastState2;
                                    boolean tripped2 = HIGH;
                                    
                                    boolean sw3State;
                                    boolean lastState3;
                                    boolean tripped3 = HIGH;
                                    
                                    MyMessage msg1(CHILD_ID_SW1, V_TRIPPED);
                                    MyMessage msg2(CHILD_ID_SW2, V_TRIPPED);
                                    MyMessage msg3(CHILD_ID_SW3, V_TRIPPED);
                                    
                                    void presentation() 
                                    {
                                      sendSketchInfo("Push Button 1", "1.0");
                                      
                                      present(CHILD_ID_SW1, S_DOOR); 
                                      present(CHILD_ID_SW2, S_DOOR);
                                      present(CHILD_ID_SW3, S_DOOR); 
                                    }
                                    
                                    void setup() 
                                    {
                                      pinMode (BUTTON1_PIN,INPUT_PULLUP);
                                      pinMode (BUTTON2_PIN,INPUT_PULLUP);
                                      pinMode (BUTTON3_PIN,INPUT_PULLUP);
                                    
                                    }
                                     
                                    void loop() 
                                    { 
                                      sw1State = digitalRead(BUTTON1_PIN);
                                      if ( ( sw1State == LOW) && (lastState1 == HIGH) ) tripped1 = !tripped1;
                                      send(msg1.set(tripped1==HIGH ? "1" : "0"));
                                         lastState1 = sw1State;
                                    
                                      sw2State = digitalRead(BUTTON2_PIN);
                                      if ( ( sw2State == LOW) && (lastState2 == HIGH) ) tripped2 = !tripped2;
                                      send(msg2.set(tripped2==HIGH ? "1" : "0"));
                                         lastState2 = sw2State;
                                    
                                      sw3State = digitalRead(BUTTON3_PIN);
                                      if ( ( sw3State == LOW) && (lastState3 == HIGH) ) tripped3 = !tripped3;
                                      send(msg3.set(tripped3==HIGH ? "1" : "0"));
                                         lastState3 = sw3State;
                                    
                                      //sleep(digitalPinToInterrupt(BUTTON1_PIN), CHANGE, 0);    
                                      //sleep(INTERRUPT, CHANGE, 0);
                                    }
                                    
                                    nagelcN 1 Reply Last reply
                                    0
                                    • S smilvert

                                      I have recently installed an Ebyte E73 as my gateway with a DHT22. The problem is that I need to restart the gateway every 2 days and I can't figure out why. Can someone help me?

                                      /**
                                         The MySensors Arduino library handles the wireless radio link and protocol
                                         between your home built sensors/actuators and HA controller of choice.
                                         The sensors forms a self healing radio network with optional repeaters. Each
                                         repeater and gateway builds a routing tables in EEPROM which keeps track of the
                                         network topology allowing messages to be routed to nodes.
                                      
                                         Created by Henrik Ekblad <henrik.ekblad@mysensors.org>
                                         Copyright (C) 2013-2017 Sensnology AB
                                         Full contributor list: https://github.com/mysensors/Arduino/graphs/contributors
                                      
                                         Documentation: http://www.mysensors.org
                                         Support Forum: http://forum.mysensors.org
                                      
                                         This program is free software; you can redistribute it and/or
                                         modify it under the terms of the GNU General Public License
                                         version 2 as published by the Free Software Foundation.
                                      
                                       *******************************
                                      
                                         REVISION HISTORY
                                      
                                      
                                      */
                                      
                                      // Enable debug prints
                                      #define MY_DEBUG
                                      
                                      // Enable serial gateway
                                      #define MY_GATEWAY_SERIAL


                                      // Set blinking period
                                      #define MY_DEFAULT_LED_BLINK_PERIOD 300
                                      
                                      // Enable and select radio type attached
                                      //#define MY_RADIO_NRF24
                                      #define MY_RADIO_NRF5_ESB
                                      //#define MY_RADIO_RFM69
                                      //#define MY_RADIO_RFM95
                                      
                                      #include <SPI.h>
                                      #include <MySensors.h>
                                      #include "DHT.h"
                                      
                                      int switch_led = 1;
                                      #define ledPin 11
                                      // Set this to the pin you connected the DHT's data pin to
                                      #define DHT_DATA_PIN 02
                                      #define DHTTYPE DHT22   // DHT 22  (AM2302), AM2321
                                      
                                      
                                      // Set this offset if the sensor has a permanent small offset to the real temperatures.
                                      // In Celsius degrees (as measured by the device)
                                      #define SENSOR_TEMP_OFFSET 0
                                      
                                      // Sleep time between sensor updates (in milliseconds)
                                      // Must be >1000ms for DHT22 and >2000ms for DHT11
                                      static const uint64_t UPDATE_INTERVAL = 600000;
                                      
                                      // Force sending an update of the temperature after n sensor reads, so a controller showing the
                                      // timestamp of the last update doesn't show something like 3 hours in the unlikely case, that
                                      // the value didn't change since;
                                      // i.e. the sensor would force sending an update every UPDATE_INTERVAL*FORCE_UPDATE_N_READS [ms]
                                      static const uint8_t FORCE_UPDATE_N_READS = 10;
                                      
                                      #define CHILD_ID_HUM 1
                                      #define CHILD_ID_TEMP 0
                                      
                                      float lastTemp;
                                      float lastHum;
                                      uint8_t nNoUpdatesTemp;
                                      uint8_t nNoUpdatesHum;
                                      bool metric = true;
                                      
                                      MyMessage msgHum(CHILD_ID_HUM, V_HUM);
                                      MyMessage msgTemp(CHILD_ID_TEMP, V_TEMP);
                                      DHT dht(DHT_DATA_PIN, DHTTYPE);
                                      
                                      void setup()
                                      {
                                          hwPinMode(LED_BUILTIN,OUTPUT_D0H1);
                                      
                                          NRF_CLOCK->INTENSET=B11;  //enable interrupts for EVENTS_HFCLKSTARTED and  EVENTS_LFCLKSTARTED
                                          NRF_CLOCK->TASKS_HFCLKSTART=1;  //start the high frequency crystal oscillator clock
                                          while (!(NRF_CLOCK->EVENTS_HFCLKSTARTED)) {} //wait until high frequency crystal oscillator clock is up to speed and working
                                      
                                          pinMode(PIN_LED1, OUTPUT);
                                          digitalWrite(PIN_LED1, HIGH);
                                      
                                          dht.begin(); // set data pin of DHT sensor
                                      }
                                      
                                      void presentation()
                                      {
                                          // Send the sketch version information to the gateway and controller
                                          sendSketchInfo("Serial Gateway nrf52", "1.0");
                                          wait(500);
                                          // Register all sensors to gw (they will be created as child devices)
                                          present(CHILD_ID_TEMP, S_TEMP);
                                          present(CHILD_ID_HUM, S_HUM);
                                      }
                                      
                                      void loop()
                                      {
                                      
                                          // Reading temperature or humidity takes about 250 milliseconds!
                                          // Sensor readings may also be up to 2 seconds 'old' (its a very slow sensor)
                                          float h = dht.readHumidity();
                                          // Read temperature as Celsius (the default)
                                          float t = dht.readTemperature();
                                          // Read temperature as Fahrenheit (isFahrenheit = true)
                                          float f = dht.readTemperature(true);
                                          Serial.print("Test print");
                                          // Check if any reads failed and exit early (to try again).
                                          if (isnan(h) || isnan(t) || isnan(f)) {
                                          //Serial.println("Failed to read from DHT sensor!");
                                          return;
                                          } else {
                                          send(msgHum.set(h, 1));
                                          send(msgTemp.set(t, 1));
                                      
                                          }
                                      
                                          wait(UPDATE_INTERVAL);
                                      }
                                      
                                      
                                      O Offline
                                      O Offline
                                      Omemanti
                                      wrote on last edited by
                                      #1756

                                      @smilvert do you have some more information? like some serial output?

                                      I had some issues with statements that uses millis(), in about 1,5 up to 2 days (much shorter the normaly I suppose) it did its rollover back to 0. This messed some waiting times for me.


                                      S 1 Reply Last reply
                                      0
                                      • M magkudjee

                                        Hi every one. I'm very new in mysensors (I use bad English)
                                        in my sketch how to setup sleep,interrupt for 3 button (์NRF51822)
                                        thank you

                                        #define MY_DEBUG 
                                        #define MY_NODE_ID 4
                                        
                                        //#define MY_RADIO_NRF24
                                        #define MY_RADIO_NRF5_ESB
                                        
                                        #include <SPI.h>
                                        #include <MySensors.h>
                                        
                                        #define CHILD_ID_SW1 1
                                        #define CHILD_ID_SW2 2
                                        #define CHILD_ID_SW3 3
                                        
                                        #define BUTTON1_PIN 3
                                        #define BUTTON2_PIN 4
                                        #define BUTTON3_PIN 5
                                        
                                        boolean sw1State;
                                        boolean lastState1;
                                        boolean tripped1 = HIGH;
                                        
                                        boolean sw2State;
                                        boolean lastState2;
                                        boolean tripped2 = HIGH;
                                        
                                        boolean sw3State;
                                        boolean lastState3;
                                        boolean tripped3 = HIGH;
                                        
                                        MyMessage msg1(CHILD_ID_SW1, V_TRIPPED);
                                        MyMessage msg2(CHILD_ID_SW2, V_TRIPPED);
                                        MyMessage msg3(CHILD_ID_SW3, V_TRIPPED);
                                        
                                        void presentation() 
                                        {
                                          sendSketchInfo("Push Button 1", "1.0");
                                          
                                          present(CHILD_ID_SW1, S_DOOR); 
                                          present(CHILD_ID_SW2, S_DOOR);
                                          present(CHILD_ID_SW3, S_DOOR); 
                                        }
                                        
                                        void setup() 
                                        {
                                          pinMode (BUTTON1_PIN,INPUT_PULLUP);
                                          pinMode (BUTTON2_PIN,INPUT_PULLUP);
                                          pinMode (BUTTON3_PIN,INPUT_PULLUP);
                                        
                                        }
                                         
                                        void loop() 
                                        { 
                                          sw1State = digitalRead(BUTTON1_PIN);
                                          if ( ( sw1State == LOW) && (lastState1 == HIGH) ) tripped1 = !tripped1;
                                          send(msg1.set(tripped1==HIGH ? "1" : "0"));
                                             lastState1 = sw1State;
                                        
                                          sw2State = digitalRead(BUTTON2_PIN);
                                          if ( ( sw2State == LOW) && (lastState2 == HIGH) ) tripped2 = !tripped2;
                                          send(msg2.set(tripped2==HIGH ? "1" : "0"));
                                             lastState2 = sw2State;
                                        
                                          sw3State = digitalRead(BUTTON3_PIN);
                                          if ( ( sw3State == LOW) && (lastState3 == HIGH) ) tripped3 = !tripped3;
                                          send(msg3.set(tripped3==HIGH ? "1" : "0"));
                                             lastState3 = sw3State;
                                        
                                          //sleep(digitalPinToInterrupt(BUTTON1_PIN), CHANGE, 0);    
                                          //sleep(INTERRUPT, CHANGE, 0);
                                        }
                                        
                                        nagelcN Offline
                                        nagelcN Offline
                                        nagelc
                                        wrote on last edited by
                                        #1757

                                        @magkudjee
                                        MySensors will support 2 interrupts using sleep. I do not think it will support 3.
                                        Use this format for the sleep call:
                                        sleep(interrupt1, mode1, interrupt2, mode2, ms=0);
                                        In your case: sleep(BUTTON1_PIN, CHANGE, BUTTON2_PIN, CHANGE, 0);

                                        I don't know how to handle the 3rd interrupt.

                                        Check the MySensors API document here: https://www.mysensors.org/download/sensor_api_20#sleeping

                                        M 1 Reply Last reply
                                        1
                                        • O Omemanti

                                          @smilvert do you have some more information? like some serial output?

                                          I had some issues with statements that uses millis(), in about 1,5 up to 2 days (much shorter the normaly I suppose) it did its rollover back to 0. This messed some waiting times for me.
                                          S Offline
                                          S Offline
                                          smilvert
                                          wrote on last edited by
                                          #1758

                                          @omemanti Well it seems to start working now... Hopefully it works :) Havn't restart the gateway in 2 weeks now

                                          1 Reply Last reply
                                          0

                                          Hello! It looks like you're interested in this conversation, but you don't have an account yet.

                                          Getting fed up of having to scroll through the same posts each visit? When you register for an account, you'll always come back to exactly where you were before, and choose to be notified of new replies (either via email, or push notification). You'll also be able to save bookmarks and upvote posts to show your appreciation to other community members.

                                          With your input, this post could be even better 💗

                                          Register Login
                                          Reply
                                          • Reply as topic
                                          Log in to reply
                                          • Oldest to Newest
                                          • Newest to Oldest
                                          • Most Votes


                                          27

                                          Online

                                          12.0k

                                          Users

                                          11.2k

                                          Topics

                                          113.4k

                                          Posts


                                          Copyright 2025 TBD   |   Forum Guidelines   |   Privacy Policy   |   Terms of Service
                                          • Login

                                          • Don't have an account? Register

                                          • Login or register to search.
                                          • First post
                                            Last post
                                          0
                                          • MySensors
                                          • OpenHardware.io
                                          • Categories
                                          • Recent
                                          • Tags
                                          • Popular