
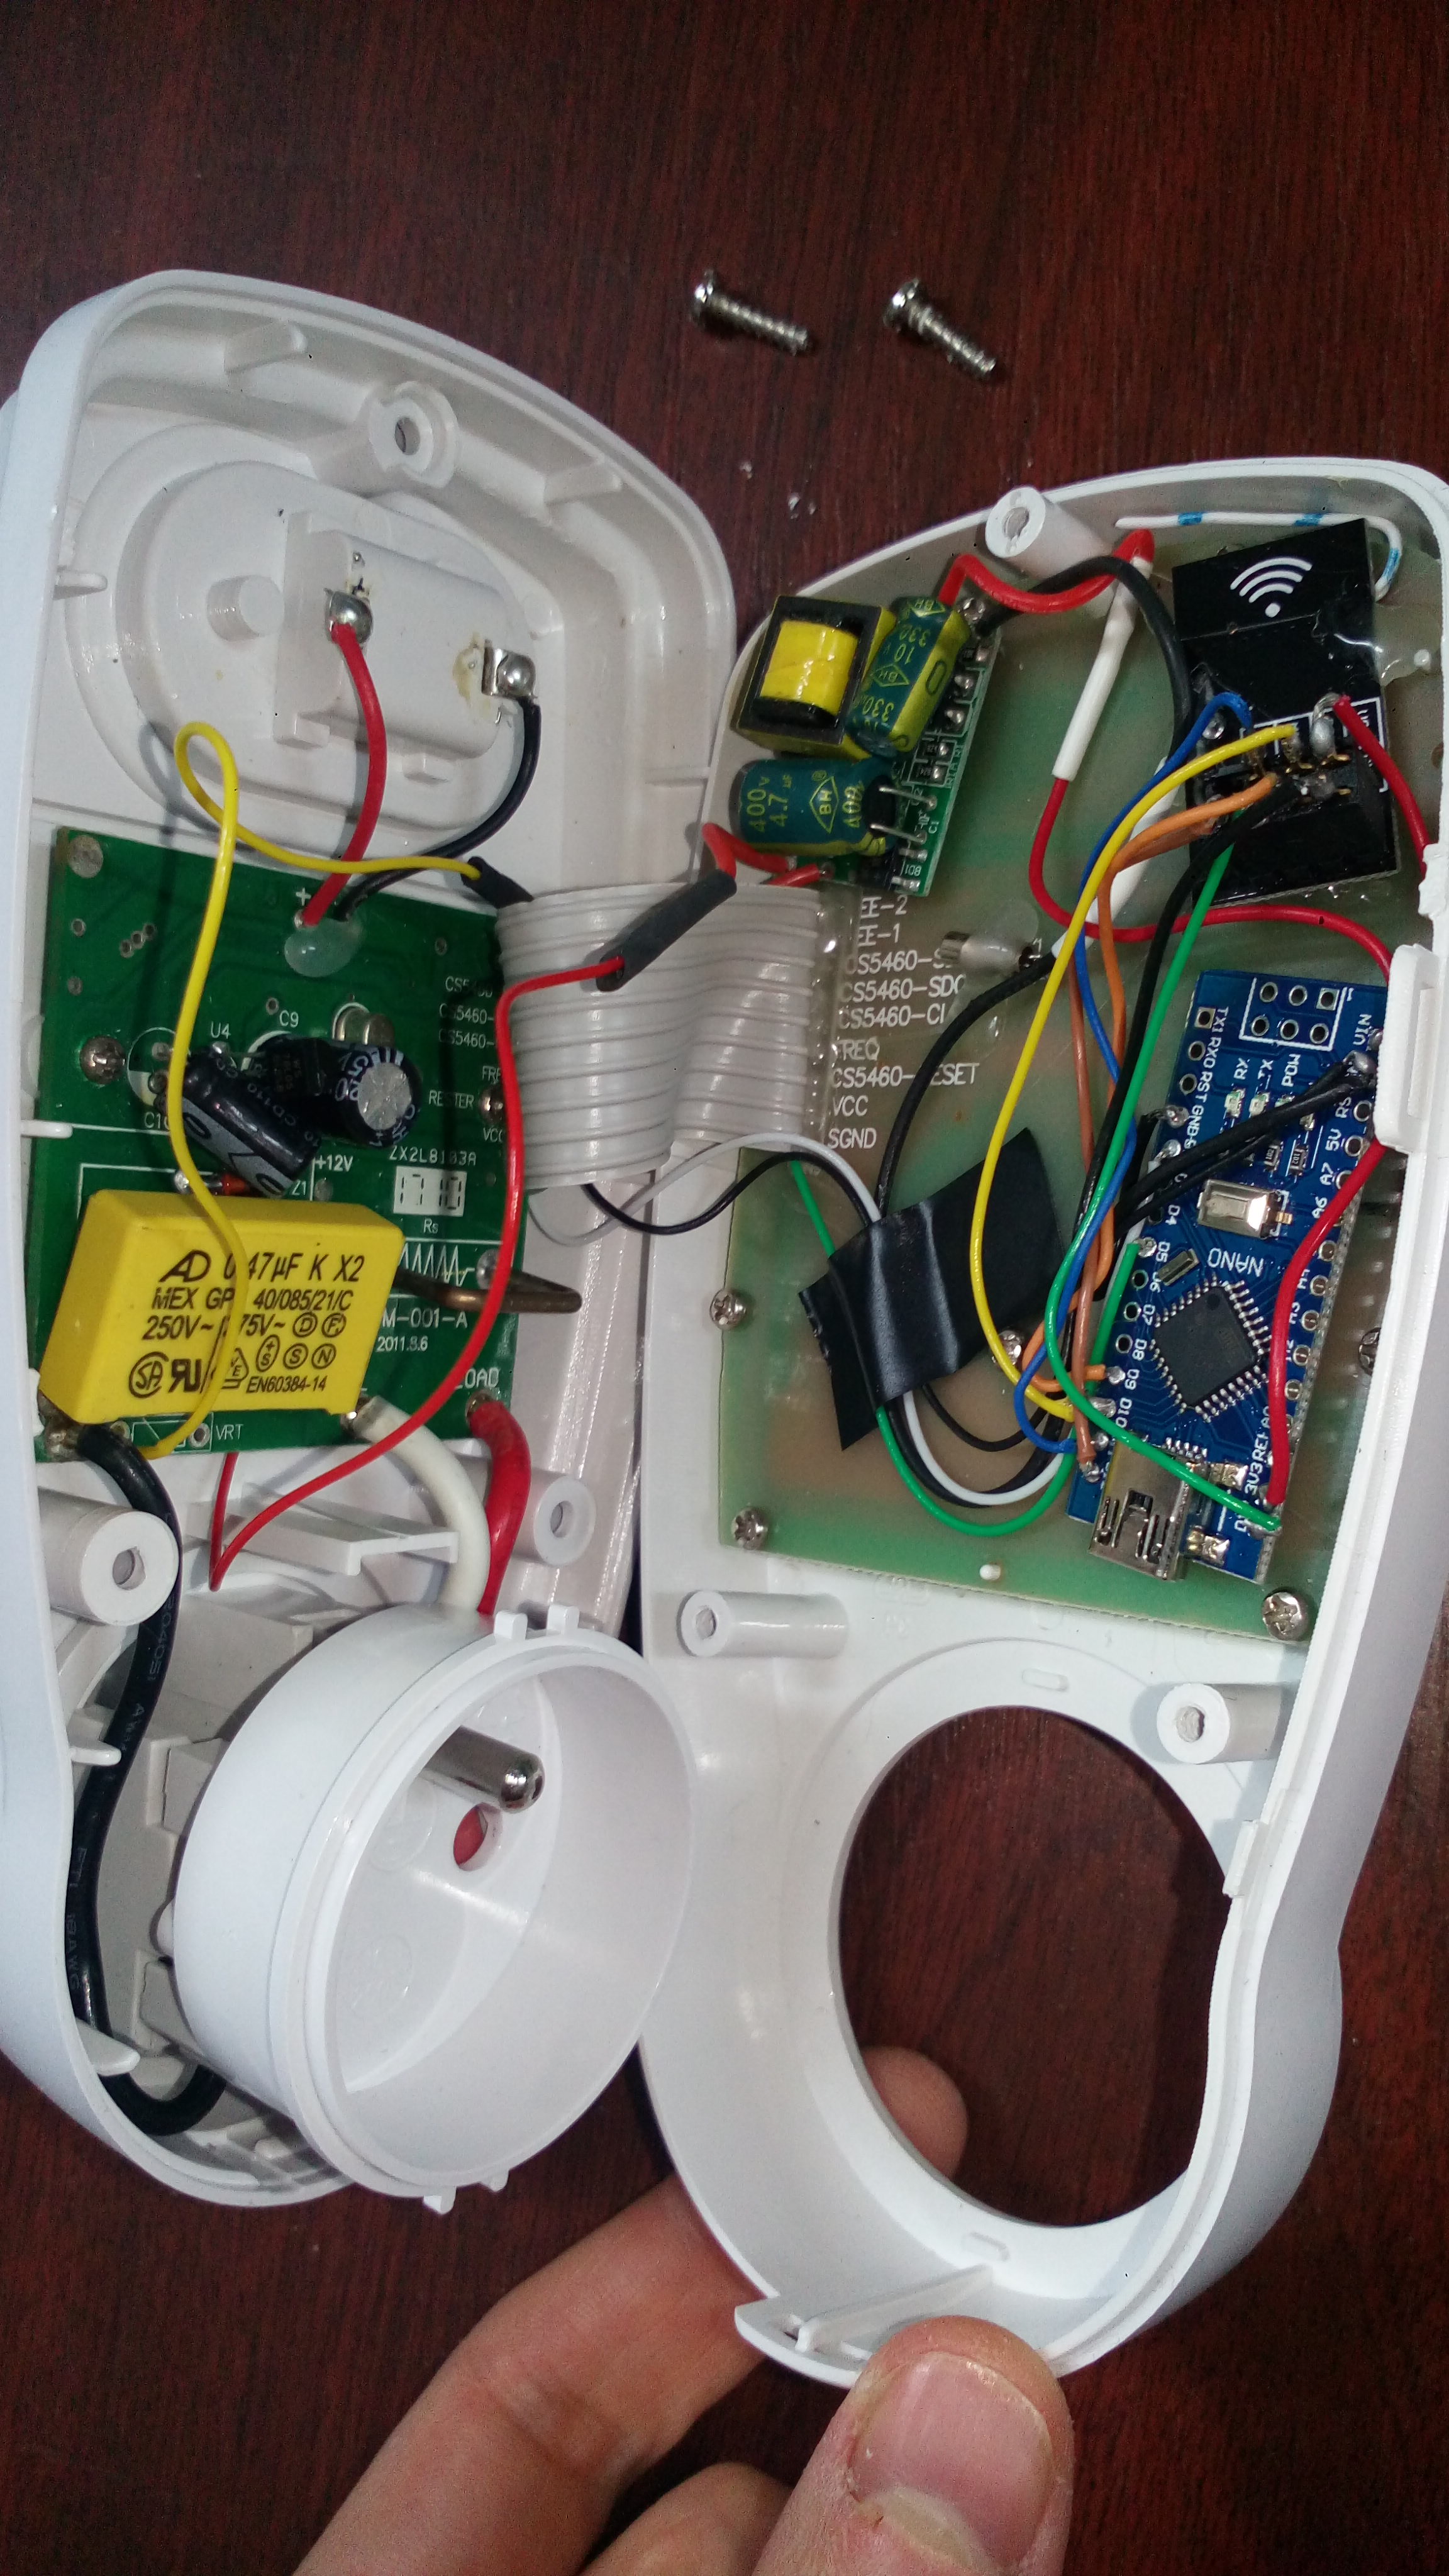
Power Meter with product energy power meter socket (based on IC CS5460A)

-
Hello,
I would like to use Karl's work on the hack of an energy power meter socket:
http://gizmosnack.blogspot.fr/2014/10/power-plug-energy-meter-hack.html
and add a mysensors node to retrieve the values in Domoticz.
I bought this one: https://www.amazon.fr/GreenBlue-GB202-consommation-dénergie-wattmètre/dp/B00E5BONDU/ref=sr_1_2?ie=UTF8&qid=1510248821&sr=8-2&keywords=wattmetre
It's the same model based on IC CS5460A (datasheet).I uploaded the sketch of Karl in a Arduino Nano, and i can read the values correctly by displaying them on 16x2 LCD screen.
Good news !
I modified my sketch, and it's OK: the values are read correctly.My sketch:
//Enable debug prints
//#define MY_DEBUG

// Enable and select radio type attached
#define MY_RADIO_NRF24

#include <MySensors.h>

#include <Wire.h>
#include <LiquidCrystal_I2C.h>

#define BACKLIGHT_PIN 3
#define En_pin 2
#define Rw_pin 1
#define Rs_pin 0
#define D4_pin 4
#define D5_pin 5
#define D6_pin 6
#define D7_pin 7

LiquidCrystal_I2C lcd(0x27,En_pin,Rw_pin,Rs_pin,D4_pin,D5_pin,D6_pin,D7_pin);

//#define CHILD_ID 5              // Id of the sensor child

const int CLKPin = 2; // Pin connected to CLK (D2 & INT0)
const int MISOPin = 5;  // Pin connected to MISO (D5)

//All variables that is changed in the interrupt function must be volatile to make sure changes are saved.
volatile int Ba = 0;   //Store MISO-byte 1
volatile int Bb = 0;   //Store MISO-byte 2
volatile int Bc = 0;   //Store MISO-byte 2
float U = 0;    //voltage
float P = 0;    //power
float ReadData[3] = {0, 0, 0}; //Array to hold mean values of [U,I,P]

volatile long CountBits = 0;      //Count read bits
volatile int Antal = 0;           //number of read values (to calculate mean)
volatile long ClkHighCount = 0;   //Number of CLK-highs (find start of a Byte)
volatile boolean inSync = false;  //as long as we ar in SPI-sync
volatile boolean NextBit = true;  //A new bit is detected


unsigned long SEND_FREQUENCY = 30000;
volatile unsigned int tension = 0;
volatile unsigned long watt = 0;
unsigned int oldTension = 0;
unsigned long oldWatt = 0;
unsigned long lastSend;

bool recupOK = false;

MyMessage wattMsg(CHILD_ID,V_WATT);
MyMessage voltMsg(CHILD_ID,V_VOLTAGE);


//Function that triggers whenever CLK-pin is rising (goes high)
void CLK_ISR(){
  //if we are trying to find the sync-time (CLK goes high for 1-2ms)
  if(inSync==false){
    ClkHighCount = 0;
    //Register how long the ClkHigh is high to evaluate if we are at the part wher clk goes high for 1-2 ms
    while(digitalRead(CLKPin)==HIGH){
      ClkHighCount += 1;
      delayMicroseconds(30);  //can only use delayMicroseconds in an interrupt.
    }
    //if the Clk was high between 1 and 2 ms than, its a start of a SPI-transmission
    if(ClkHighCount >= 33 && ClkHighCount <= 67){
       inSync = true;
    }
  }
  else{ //we are in sync and logging CLK-highs
    //increment an integer to keep track of how many bits we have read.
    CountBits += 1;
    NextBit = true;
  }
}


void setup()
{
    attachInterrupt(0, CLK_ISR, RISING);

    //Set the CLK-pin (D5) to input
    pinMode(CLKPin, INPUT);
    //Set the MISO-pin (D5) to input
    pinMode(MISOPin, INPUT);

    lastSend=millis();

    lcd.begin(16,2);               // initialize the lcd
    lcd.setBacklightPin(BACKLIGHT_PIN,POSITIVE);
    lcd.setBacklight(HIGH);
    lcd.setCursor(0,0);
    lcd.print("initialised");
}

void presentation()
{
	// Send the sketch version information to the gateway and Controller
	sendSketchInfo("Energy Power", "1.0");

	// Register this device as power sensor
	present(CHILD_ID, S_POWER);
}

void loop()
{
	// Only send values at a maximum frequency or woken up from sleep
	bool sendTime = (millis() - lastSend) > SEND_FREQUENCY;

	//do nothing until the CLK-interrupt occures and sets inSync=true
  if(inSync)
	{
		CountBits = 0;  //CLK-interrupt increments CountBits when new bit is received
		while(CountBits<40){}  //skip the uninteresting 5 first bytes
		CountBits=0;
		Ba=0;
		Bb=0;
		while(CountBits<24){  //Loop through the next 3 Bytes (6-8) and save byte 6 and 7 in Ba and Bb
		  if(NextBit == true){ //when rising edge on CLK is detected, NextBit = true in in interrupt.
			if(CountBits < 9){  //first Byte/8 bits in Ba
			  Ba = (Ba << 1);  //Shift Ba one bit to left and store MISO-value (0 or 1) (see http://arduino.cc/en/Reference/Bitshift)
			  //read MISO-pin, if high: make Ba[0] = 1
			  if(digitalRead(MISOPin)==HIGH){
				Ba |= (1<<0);  //changes first bit of Ba to "1"
			  }   //doesn't need "else" because BaBb[0] is zero if not changed.
			  NextBit=false; //reset NextBit in wait for next CLK-interrupt
			}
			else if(CountBits < 17){  //bit 9-16 is byte 7, stor in Bb
			  Bb = Bb << 1;  //Shift Ba one bit to left and store MISO-value (0 or 1)
			  //read MISO-pin, if high: make Ba[0] = 1
			  if(digitalRead(MISOPin)==HIGH){
				Bb |= (1<<0);  //changes first bit of Bb to "1"
			  }
			  NextBit=false;  //reset NextBit in wait for next CLK-interrupt
			}
		  }
		}
		if(Bb!=3){ //if bit Bb is not 3, we have reached the important part, U is allready in Ba and Bb and next 8 Bytes will give us the Power.
		  Antal += 1;  //increment for mean value calculations

		  //Voltage = 2*(Ba+Bb/255)
		  U=2.0*((float)Ba+(float)Bb/255.0);

		  //Power:
		  CountBits=0;
		  while(CountBits<40){}//Start reading the next 8 Bytes by skipping the first 5 uninteresting ones

		  CountBits=0;
		  Ba=0;
		  Bb=0;
		  Bc=0;
		  while(CountBits<24){  //store byte 6, 7 and 8 in Ba and Bb & Bc.
  			if(NextBit == true){
  			  if(CountBits < 9){
  				Ba = (Ba << 1);  //Shift Ba one bit to left and store MISO-value (0 or 1)
  				//read MISO-pin, if high: make Ba[0] = 1
  				if(digitalRead(MISOPin)==HIGH){
  				  Ba |= (1<<0);  //changes first bit of Ba to "1"
  				}
  				NextBit=false;
  			  }
  			  else if(CountBits < 17){
  				Bb = Bb << 1;  //Shift Ba one bit to left and store MISO-value (0 or 1)
  				//read MISO-pin, if high: make Ba[0] = 1
  				if(digitalRead(MISOPin)==HIGH){
  				  Bb |= (1<<0);  //changes first bit of Bb to "1"
  				}
  				NextBit=false;
  			  }
  			  else{
  				Bc = Bc << 1;  //Shift Bc one bit to left and store MISO-value (0 or 1)
  				//read MISO-pin, if high: make Bc[0] = 1
  				if(digitalRead(MISOPin)==HIGH){
  				  Bc |= (1<<0);  //changes first bit of Bc to "1"
  				}
  				NextBit=false;
  			  }
  			}
			}

		  //Power = (Ba*255+Bb)/2
      Ba=255-Ba;
      Bb=255-Bb;
      Bc=255-Bc;
		  P=((float)Ba*255+(float)Bb+(float)Bc/255.0)/2;

		  //Voltage mean
		  ReadData[0] = (U+ReadData[0]*((float)Antal-1))/(float)Antal;
		  //Current mean
		  ReadData[1] = (P/U+ReadData[1]*((float)Antal-1))/(float)Antal;
		  //Power mean
		  ReadData[2] = (P+ReadData[2]*((float)Antal-1))/(float)Antal;

      //Serial.print("U: ");
      //Serial.println(U,1);
      if (U > 250){
        U = oldTension;
      }
      if (P > 4000){
        P = 0;
      }
      watt = P;
      tension = U;
      float i = P / U;
      if (P == 0){ i = 0; }
      String texteT = "U: " + String(tension) + " - I: " + String(i);
      lcd.setCursor(0,0);
      lcd.print(texteT);
      texteT = "P: " + String(watt) + "             ";
      lcd.setCursor(0,1);
      lcd.print(texteT);

		  if(Antal==10){ //every 10th 70-package = every ~10s
        //transmit ReadData-array to nRF or Wifi-module here:
        //transmission function here...

        //Reset ReadData-array
        ReadData[0] = 0;
        ReadData[1] = 0;
        ReadData[2] = 0;
        //reset mean-value counter
        Antal=0;
      }
      inSync=false;  //reset sync variable to make sure next reading is in sync.
			recupOK = true;
		}

		if(Bb==0){  //If Bb is not 3 or something else than 0, something is wrong!
		  inSync=false;
		}
	}

	if (recupOK && sendTime)
	{
		// New watt value has been calculated
		if (watt != oldWatt) {
			send(wattMsg.set(watt));  // Send watt value to gw

			Serial.print("Watt:");
			Serial.println(watt);
			oldWatt = watt;
		}

		if (tension != oldTension) {
		  send(voltMsg.set(tension));  // Send watt value to gw

		  Serial.print("Tension:");
		  Serial.println(tension);
		  oldTension = tension;
		}

		lastSend = millis();
		recupOK = false;
	}
}
Schema:
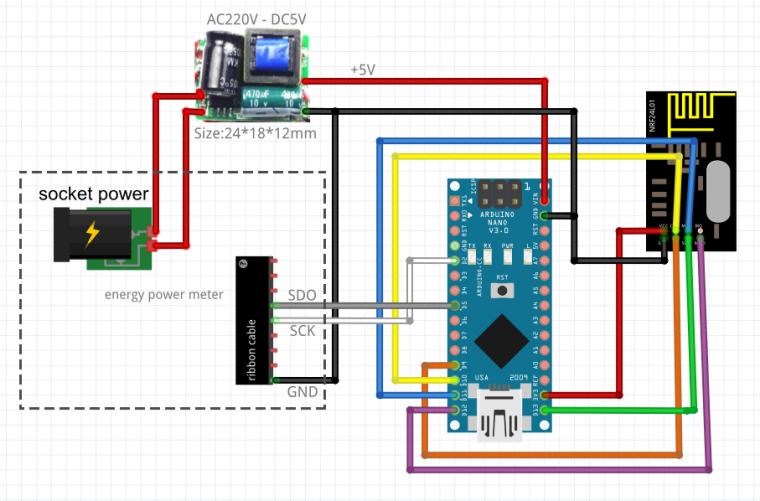
Note:
On PCB of energy power meter, there is a regulator L7805, with +12V in input.
But the step-down power supply (combo condo+resistor with protect diode zener) for PCB is calculated for a fixed and known current.
Add Arduino and NRF24L01 increase this current and so the values with C+R are wrong for to have +12V (It's more than +12V and diode zener turn on for protect electronics IC).
So we have to add a small step-down power supply for arduino+nrf24L01./!\ Warning:
Don't connect the USB port of arduino on PC with the energy power meter socket connected on wall socket: The DC ground is not isolated from the electrical neutral and this causes a leakage current.
Your differential circuit breaker turns on.The solution is to use a serial connection with optocoupler for isolate the 2 parts (arduino and PC).
Hello! It looks like you're interested in this conversation, but you don't have an account yet.
Getting fed up of having to scroll through the same posts each visit? When you register for an account, you'll always come back to exactly where you were before, and choose to be notified of new replies (either via email, or push notification). You'll also be able to save bookmarks and upvote posts to show your appreciation to other community members.
With your input, this post could be even better 💗
Register Login