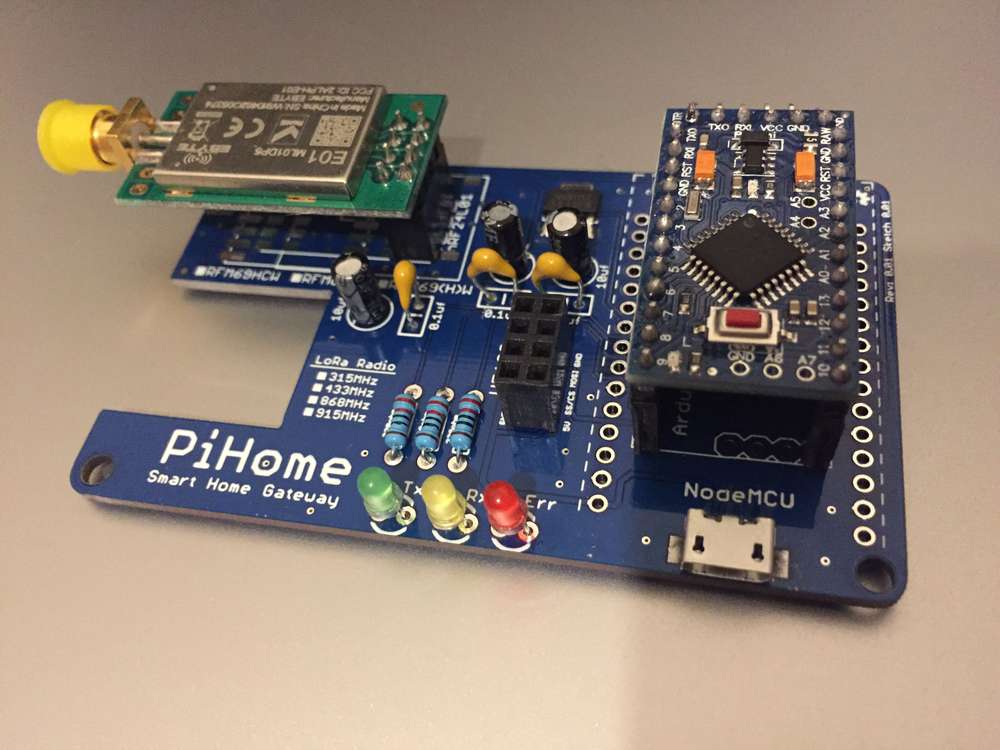
Very first attempt to solder smd components on pcb with hot air soldering station. lots of mistakes but i m learning...
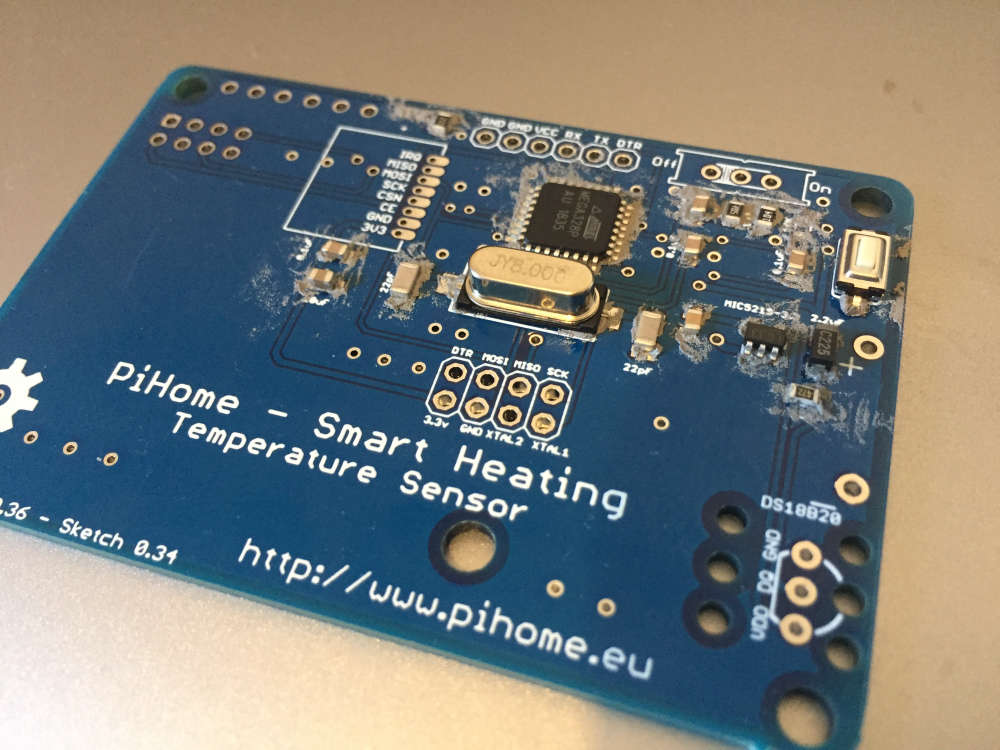
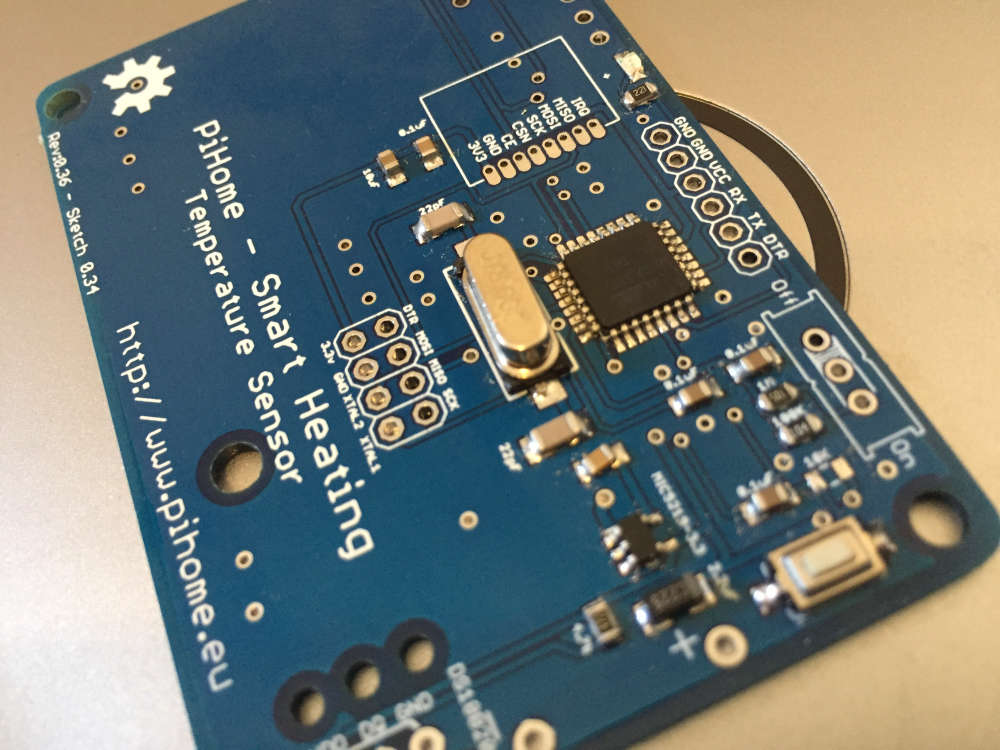
Very first attempt to solder smd components on pcb with hot air soldering station. lots of mistakes but i m learning...
Hi Guys,
This is more of missing piece of puzzle, i have googled a lot to find some simple way to communicate with mysensors gateway but google this time failed me hence i decided to do this myself.
i have this script running over one year, yes i have made some improvements over the year and here is final version. its self explanatory, feel free to use it as you wish and modify and if you think some improvements can be made let me know my ears are all yours... :ear:
i have this raspberry pi base heating control that i built but i m not sure if i can share it here and what are the implications etc.... until then have fun and enjoy creating things (IOT)....
#!/usr/bin/python
print " "
print "  _____    _   _    _                            "
print " |  __ \  (_) | |  | |                           "
print " | |__) |  _  | |__| |   ___    _ __ ___     ___ "
print " |  ___/  | | |  __  |  / _ \  | |_  \_ \   / _ \ "
print " | |      | | | |  | | | (_) | | | | | | | |  __/"
print " |_|      |_| |_|  |_|  \___/  |_| |_| |_|  \___|"
print " "
print "    S M A R T   H E A T I N G   C O N T R O L "
print "*******************************************************"
print "*  Serial Gateway Build for Wireless sensors using    *"
print "*  MySeonsors serial API Build Date: 18/09/2017       *"
print "*                                Have Fun - PiHome.eu *"
print "*******************************************************"
print " "
print " "

import MySQLdb as mdb
import sys
import serial
import time
# ps. you can troubleshoot with "screen"
#screen /dev/ttyAMA0 115200
ser = serial.Serial('/dev/ttyAMA0', 115200, timeout=0)
in_str = ser.readline()
print in_str
while 1:
	try:
		con = mdb.connect('localhost', 'root', 'passw0rd', 'pihome') # MySQL Database Connection Settings
		cur = con.cursor()  Cursor object to Current Connection
		cur.execute('SELECT COUNT(*) FROM `messages_out` where sent = 0') # MySQL query statement
		count = cur.fetchone() # Grab all messages from database for Outgoing.
		count = count[0] # Parse first and the only one part of data table named "count" - there is number of records grabbed in SELECT above
		if count > 0: #If greater then 0 then we have something to send out.
			print "Total Messages to Sent : ",count # Print how many Messages we have to send out.
			cur.execute('SELECT * FROM `messages_out` where sent = 0') #grab all messages that where not send yet (sent ==0)
			msg = cur.fetchone(); 	#Grab first record and build a message: if you change table fields order you need to change following lines as well.
			out_id = int(msg[0]) 	#Record ID - only DB info,
			out_node_id = msg[1] 	#Node ID
			out_child_id = msg[2] 	#Child ID of the node where sensor/relay is attached.
			out_sub_type = msg[3] 	#Command Type
			out_ack = msg[4] 		#Ack req/resp
			out_type = msg[5]  		#Type
			out_payload = msg[6] 	#Payload to send out.
			sent = msg[7] 			#Status of message either its sent or not. (1 for sent, 0 for not sent yet)
			print "Date & Time:            ",time.ctime()
			print "Message From Database:  ",out_id, out_node_id, out_child_id, out_sub_type, out_ack, out_type, out_payload, sent #Print what will be sent including record id and sent status.
			msg = str(out_node_id) 	#Node ID
			msg += ';' 				#Separator
			msg += str(out_child_id) #Child ID of the Node.
			msg += ';' 				#Separator
			msg += str(out_sub_type)
			msg += ';' 				#Separator
			msg += str(out_ack)
			msg += ';' 				#Separator
			msg += str(out_type)
			msg += ';' 				#Separator
			msg += str(out_payload) #Payload from DB
			msg += ' \n'			#New line
			print "Full Message to Send:   ",msg #Print Full Message
			print "Node ID:                 ",out_node_id
			print "Child Sensor ID:         ",out_child_id
			print "Command Type:            ",out_sub_type
			print "Ack Req/Resp:            ",out_ack
			print "Type:                    ",out_type
			print "Pay Load:                ",out_payload
			print " \n"
			# node-id ; child-sensor-id ; command ; ack ; type ; payload \n
			ser.write(msg) # !!!! send it to serial (arduino attached to rPI by USB port)
			# help http://stackoverflow.com/questions/21740359/python-mysqldb-typeerror-not-all-arguments-converted-during-string-formatting
			cur.execute('UPDATE `messages_out` set sent=1 where id=%s', [out_id]) #update DB so this message will not be processed in next loop
			con.commit() #commit above
	except mdb.Error, e:
		print "Error %d: %s" % (e.args[0], e.args[1])
		sys.exit(1)
	finally:
		if con:
			con.close()
	in_str = ser.readline() #Here is receiving part of the code
	# ..:: Un-comments Following two lines to see what you are receing and size of string ::..
	# print "Size of String:          ", sys.getsizeof(in_str)," \n"
	# print "String as Received:      ",in_str," \n"
	if not sys.getsizeof(in_str) <= 22 : # and in_str[:1] == '0': #here is the line where sensor IDs over 100 are processed
		print "Date & Time:                 ",time.ctime()
		print "Size of the String:      ", sys.getsizeof(in_str)
		print "Full String Received:        ",in_str
		statement = in_str.split(";")
		print "Full Statement Received:     ",statement
		node_id = int(statement[0])
		print "Node ID:                     ",node_id
		child_sensor_id = int(statement[1])
		print "Child Sensor ID:             ",child_sensor_id
		message_type = int(statement[2])
		print "Message Type:                ",message_type
		ack = int(statement[3])
		print "Acknowledge:                 ",ack
		sub_type = int(statement[4])
		print "Sub Type:                    ",sub_type
		payload = statement[5]
		print "Pay Load:                    ",payload
		try:
			con = mdb.connect('localhost', 'root', 'passw0rd', 'pihome')#Database Connection Settings
			cur = con.cursor()

			# ..::Step One::..
			# First time sensor comes online and add node to nodes table,
			if (child_sensor_id != 255 and message_type == 0):
				cur.execute('SELECT COUNT(*) FROM `nodes` where node_id = (%s)', (node_id))
				row = cur.fetchone()
				row = int(row[0])
				if (row == 0):
					print "1 Add Node: ", node_id, " Child Sensor ID:", child_sensor_id
					cur.execute('INSERT INTO nodes(node_id, child_id_1) VALUES(%s,%s)', (node_id,child_sensor_id))
					con.commit()

			# ..::Step Two ::..
			# Add Nodes name ie. relay, temperature sensor etc... to Database
			if (child_sensor_id == 255 and message_type == 3 and sub_type == 11):
				payload = payload[:-1] # remove \n from payload otherwise you will endup two lines sensors name in database.
				print "2 Update NodeID:", node_id, "Child Sensor ID:", child_sensor_id, " Sensor Type:", payload
				cur.execute('UPDATE nodes SET name = %s where node_id = %s', (payload, node_id))
				con.commit()

			# ..::Step Three ::..
			# Add Nodes MySensors Version to database
			if (node_id != 0 and child_sensor_id == 255 and message_type == 0 and sub_type == 17):
				payload = payload[:-1] # remove \n from payload otherwise you will endup two lines sensors name in database.
				print "3 Update NodeID:", node_id, "Child Sensor ID:", child_sensor_id, " Sensor Type:", payload
				cur.execute('UPDATE nodes SET ms_version = %s where node_id = %s', (payload, node_id))
				con.commit()

			# ..::Step Four ::..
			# Add Nodes MySensors Version to database
			if (node_id != 0 and child_sensor_id == 255 and message_type == 3 and sub_type == 12):
				payload = payload[:-1] # remove \n from payload otherwise you will endup two lines sensors name in database.
				print "4 Update NodeID:", node_id, "Child Sensor ID:", child_sensor_id, " Sensor Type:", payload
				cur.execute('UPDATE nodes SET sketch_version = %s where node_id = %s', (payload, node_id))
				con.commit()

			# ..::Step Five::..
			# Add temperature Reading to database
			if (node_id != 0 and child_sensor_id != 255 and message_type == 1 and sub_type == 0):
				print "5. Adding Database Record: Node ID:", node_id, " Child Sensor ID:", child_sensor_id, " PayLoad:", payload, "\n"
				cur.execute('INSERT INTO messages_in(node_id, child_id, sub_type, payload) VALUES(%s,%s,%s,%s)', (node_id,child_sensor_id,sub_type,payload))
				con.commit()
				cur.execute('UPDATE `nodes` SET `last_seen`=now() WHERE node_id = %s', [node_id])
				con.commit()

			# ..::Step Six::..
			# Add Battery Level to Database
			# 20;255;3;0;0;102
			if (child_sensor_id == 255 and message_type == 3 and sub_type == 0):  #BATTERY Level
				print "6. Adding Database Record: Node ID:", node_id, " Battery Level:", payload, "Battery Voltage ", b_volt, "\n"
				cur.execute('INSERT INTO nodes_battery(node_id, bat_level, bat_voltage) VALUES(%s,%s,%s)', (node_id,payload,b_volt))
				cur.execute('UPDATE `nodes` SET `last_seen`=now() WHERE node_id = %s', [node_id])
				con.commit()

			# ..::Step Seven::..
			# Add Battery Voltage to Database
			# 20;1;1;0;38;3.78
			# node-id ; child-sensor-id ; command ; ack ; type ; payload \n
			if (child_sensor_id != 255 and message_type == 1 and sub_type == 38):  #BATTERY VOLTAGE
				b_volt = payload

				# ..::Step Eight::..
			# Add Bost Status Level to Database
			if (node_id != 0 and child_sensor_id != 255 and message_type == 1 and sub_type == 2):
			# print "2 insert: ", node_id, " , ", child_sensor_id, "payload", payload
				print "8. Adding Database Record: Node ID:", node_id, " Child Sensor ID:", child_sensor_id, " PayLoad:", payload, "\n"
				xboost = "UPDATE boost SET status=%s WHERE boost_button_id=%s AND boost_button_child_id = %s"
				cur.execute(xboost, (payload, node_id,child_sensor_id,))
				con.commit()
				cur.execute('UPDATE `nodes` SET `last_seen`=now() WHERE node_id = %s', [node_id])
				con.commit()
		except mdb.Error, e:
				print "Error %d: %s" % (e.args[0], e.args[1])
				sys.exit(1)
		finally:
			if con:
				con.close()
	time.sleep(1)	```


Table for all in-coming message in mysql database:
CREATE TABLE messages_in (
id INT(11) NOT NULL AUTO_INCREMENT,
node_id TINYINT(4) NULL DEFAULT NULL,
child_id TINYINT(4) NULL DEFAULT NULL,
sub_type INT(11) NULL DEFAULT NULL,
payload DECIMAL(10,2) NULL DEFAULT NULL,
datetime TIMESTAMP NOT NULL DEFAULT CURRENT_TIMESTAMP,
PRIMARY KEY (id)
)
COLLATE='utf16_bin'
ENGINE=InnoDB
AUTO_INCREMENT=1;
Table for all outgoing message in mysql database:
CREATE TABLE messages_out (
id INT(11) NOT NULL AUTO_INCREMENT,
node_id INT(11) NOT NULL COMMENT 'Node ID',
child_id INT(11) NOT NULL COMMENT 'Child Sensor',
sub_type INT(11) NOT NULL COMMENT 'Command Type',
ack INT(11) NOT NULL COMMENT 'Ack Req/Resp',
type INT(11) NOT NULL COMMENT 'Type',
payload VARCHAR(100) NOT NULL COMMENT 'Payload' COLLATE 'utf8_general_ci',
sent TINYINT(1) NOT NULL DEFAULT '0' COMMENT 'Sent Status 0 No - 1 Yes',
datetime TIMESTAMP NOT NULL DEFAULT CURRENT_TIMESTAMP ON UPDATE CURRENT_TIMESTAMP COMMENT 'Current datetime',
zone_id INT(11) NOT NULL COMMENT 'Zone ID related to this entery',
PRIMARY KEY (id)
)
COLLATE='utf32_bin'
ENGINE=InnoDB
AUTO_INCREMENT=1;```
@avelo
thank you for suggestion, i have made prototype based on MIC5219-3.3
but sure TPS61291 / TPS61221 are good options. once i get pcb delivered i'll you know here.
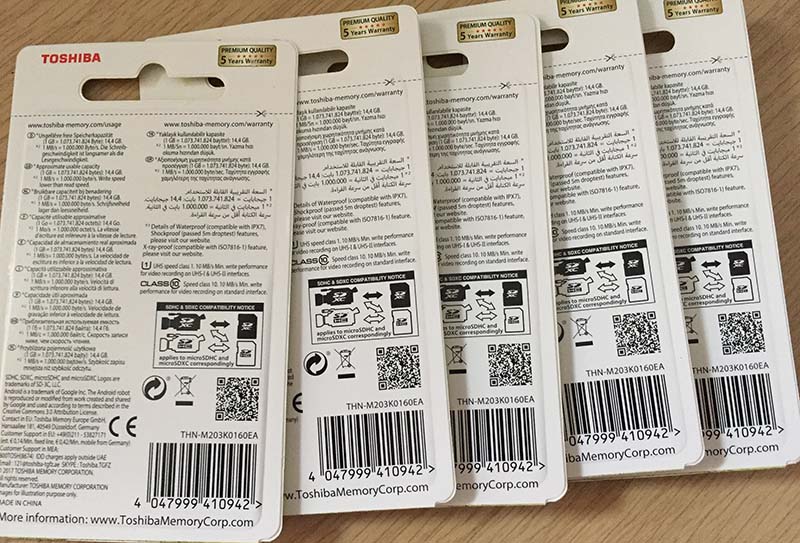
i know this is old thread but here is what i have to deal with, truck load of different sd card ordered from amazon from different supplier, some full filled by amazon and some sold by amazon and all of them are fake and devil is in serial number so until you order more then one SD card you can never know if its real or fake.


@thomasdr thank you for the info, and sorry for late reply, changing wait(500) to delay(500) worked.
Hi Guys,
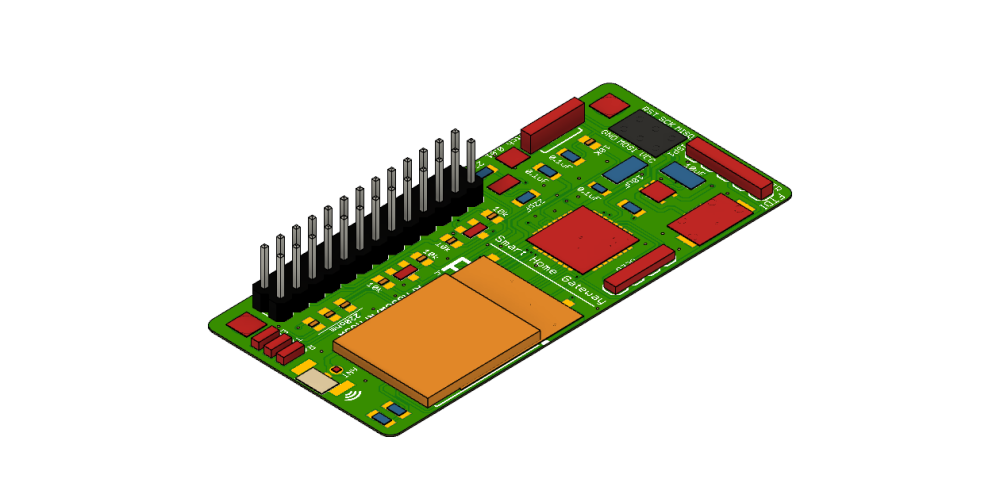
i thought i better start new thread here instead hijacking someone's, i have uploaded all the code on http://www.pihome.eu i can answer any question you have here. its open source raspberry pi based smart heating control.


Thank you to all MySensorss Community other wise this project wasn't easy to make it wireless.
PiHome
First of all thanks to all who worked on this tutorial and bootloaders. i got fascinated about 8mhz and 1mhz with internal clock after reading this tutorial.
Some might say 1mhz 8 times slower then 8mhz hence need longer awake time to do perform task before it can go back to sleep and consumes more power but what i found: point is not it takes 8 times longer to perform task but it can run it on battery longer and on lower voltage when battery ist at its peak youth.
Anyway i wanted to share my experience and errors i had and the fix i found after googling around and spending hours trying to figure out what is going on.
if you follow instructions as it is then you will end up with second boards.txt file located at C:\Program Files (x86)\Arduino\hardware\breadboard\avr\boards.txt, this file contact info about ATmegaBOOT_168_atmega328_pro_8MHz.hex only. So far so good and it works but for some reason when i try to add 1mhz bootloader to C:\Program Files (x86)\Arduino\hardware\arduino\avr\boards.txt it just wouldn't work, the 1mhz bootloader wouldn't show in in board selection option but if i add info about 1mhz bootloader to "C:\Program Files (x86)\Arduino\hardware\breadboard\avr\boards.txt" then i could see option for "APM Optiboot internal 1MHz noBOD 9600baud" but when i try to burn this bootloader i get all sorts of error on burning bootloader, one of the error: Could not find tool avrdude (sorry didn't copy all error messages)
Then some forums suggest to start clean i.e uninstall Arduino ID and reinstall but simply uninstalling and reinstalling ID doesn't work you need to delete Arduino15 folder from following location(s) and reinstall Arduino ID:
C:\Users(username)\AppData\Local\Arduino15 or C:\Users<username>\AppData\Roaming\Arduino15 or C:\Users<username>\AppData\Local\Arduino15
What i think is best to keep your boards.txt file in one location and modify it and add bootloaders in it and this worked for me. Simply copy your bootloaders to C:\Program Files (x86)\Arduino\hardware\arduino\avr\bootloaders and modify C:\Program Files (x86)\Arduino\hardware\arduino\avr\boards.txt for additional bootloaders.
here is my boards.txt
##############################################################
# Add the new board to boards.txt (normally located at "C:\Program Files\Arduino\hardware\arduino\avr"
# The *.bootloader.* etries only matters if you want to program bootloader (and fuses) from Arduino IDE.
# See http://www.engbedded.com/fusecalc (select Atmega328p) for interpretation of fuse values and how
# extended fuses are written in different applications (07h in Arduino IDE = FFh in Atmel studio).
##############################################################

apm96.name=APM Optiboot internal 1MHz noBOD 9600baud

apm96.upload.tool=avrdude
apm96.upload.protocol=arduino
apm96.upload.maximum_size=32256
apm96.upload.speed=9600
apm96.bootloader.tool=avrdude
apm96.bootloader.low_fuses=0x62
apm96.bootloader.high_fuses=0xde
# all the possible values:
#bootloader.extended_fuses=0x04 -> BOD at 4.3V
#bootloader.extended_fuses=0x05 -> BOD at 2.7V
#bootloader.extended_fuses=0x06 -> BOD at 1.8V
#bootloader.extended_fuses=0x07 -> BOD disabled
apm96.bootloader.extended_fuses=0x07
apm96.bootloader.path=optiboot_v50
apm96.bootloader.file=atmega328_1a.hex
apm96.bootloader.unlock_bits=0x3F
apm96.bootloader.lock_bits=0x2F
apm96.build.mcu=atmega328p
apm96.build.f_cpu=1000000L
apm96.build.core=arduino
apm96.build.variant=standard

##############################################################

##############################################################

atmega328bb.name=ATmega328 on a breadboard (8 MHz internal clock)

atmega328bb.upload.protocol=arduino
atmega328bb.upload.maximum_size=30720
atmega328bb.upload.speed=57600

atmega328bb.bootloader.low_fuses=0xE2
atmega328bb.bootloader.high_fuses=0xDA
atmega328bb.bootloader.extended_fuses=0x05

atmega328bb.bootloader.file=atmega/ATmegaBOOT_168_atmega328_pro_8MHz.hex
atmega328bb.bootloader.unlock_bits=0x3F
atmega328bb.bootloader.lock_bits=0x0F

atmega328bb.build.mcu=atmega328p
atmega328bb.build.f_cpu=8000000L
atmega328bb.build.core=arduino:arduino
atmega328bb.build.variant=arduino:standard


atmega328bb.bootloader.tool=arduino:avrdude
atmega328bb.upload.tool=arduino:avrdude```@mfalkvidd thank, i got it working but i think pi gateway isn't reliable or its just me :( once every while i get DEBUG !TSF:RTE:100 UNKNOWN whereas esp gateway works flawless
Aug 05 11:31:36 INFO  Starting gateway...
Aug 05 11:31:36 INFO  Protocol version - 2.3.0
Aug 05 11:31:36 DEBUG Serial port /dev/ttyMySensorsGateway (115200 baud) created
Aug 05 11:31:36 DEBUG MCO:BGN:INIT GW,CP=RNNGL-Q-,VER=2.3.0
Aug 05 11:31:36 DEBUG TSF:LRT:OK
Aug 05 11:31:36 DEBUG TSM:INIT
Aug 05 11:31:36 DEBUG TSF:WUR:MS=0
Aug 05 11:31:36 DEBUG TSM:INIT:TSP OK
Aug 05 11:31:36 DEBUG TSM:INIT:GW MODE
Aug 05 11:31:36 DEBUG TSM:READY:ID=0,PAR=0,DIS=0
Aug 05 11:31:36 DEBUG MCO:REG:NOT NEEDED
Aug 05 11:31:36 DEBUG MCO:BGN:STP
Aug 05 11:31:36 DEBUG MCO:BGN:INIT OK,TSP=1
Aug 05 11:31:45 DEBUG TSF:MSG:READ,26-26-0,s=255,c=3,t=0,pt=1,l=1,sg=0:82
Aug 05 11:32:23 DEBUG TSF:MSG:READ,25-25-0,s=1,c=1,t=38,pt=7,l=5,sg=0:0.28
Aug 05 11:32:23 DEBUG TSF:MSG:READ,25-25-0,s=255,c=3,t=0,pt=1,l=1,sg=0:6
Aug 05 11:32:27 DEBUG TSF:MSG:READ,21-21-0,s=0,c=1,t=0,pt=7,l=5,sg=0:23.0
Aug 05 11:32:45 DEBUG TSF:MSG:READ,26-26-0,s=255,c=3,t=0,pt=1,l=1,sg=0:82
Aug 05 11:33:25 DEBUG TSF:MSG:READ,25-25-0,s=1,c=1,t=38,pt=7,l=5,sg=0:0.28
Aug 05 11:33:25 DEBUG TSF:MSG:READ,25-25-0,s=255,c=3,t=0,pt=1,l=1,sg=0:6
Aug 05 11:33:45 DEBUG TSF:MSG:READ,26-26-0,s=1,c=1,t=38,pt=7,l=5,sg=0:3.45
Aug 05 11:33:45 DEBUG TSF:MSG:READ,26-26-0,s=255,c=3,t=0,pt=1,l=1,sg=0:82
Aug 05 11:34:01 DEBUG TSF:MSG:SEND,0-0-101-101,s=1,c=1,t=2,pt=0,l=2,sg=0,ft=0,st=OK:0
Aug 05 11:34:01 DEBUG TSF:MSG:READ,101-101-0,s=1,c=1,t=2,pt=0,l=2,sg=0:0
Aug 05 11:34:01 DEBUG TSF:MSG:ACK
Aug 05 11:34:02 DEBUG TSF:MSG:SEND,0-0-101-101,s=3,c=1,t=2,pt=0,l=2,sg=0,ft=0,st=OK:0
Aug 05 11:34:02 DEBUG TSF:MSG:READ,101-101-0,s=3,c=1,t=2,pt=0,l=2,sg=0:0
Aug 05 11:34:02 DEBUG TSF:MSG:ACK
Aug 05 11:34:03 DEBUG !TSF:RTE:100 UNKNOWN
Aug 05 11:34:03 DEBUG !TSF:MSG:SEND,0-0-100-100,s=1,c=1,t=2,pt=0,l=2,sg=0,ft=0,st=NACK:0
Aug 05 11:34:26 DEBUG TSF:MSG:READ,25-25-0,s=1,c=1,t=38,pt=7,l=5,sg=0:0.28
Aug 05 11:34:26 DEBUG TSF:MSG:READ,25-25-0,s=255,c=3,t=0,pt=1,l=1,sg=0:6
Aug 05 11:34:27 DEBUG TSF:MSG:READ,25-25-0,s=0,c=1,t=0,pt=7,l=5,sg=0:23.4
Aug 05 11:34:46 DEBUG TSF:MSG:READ,26-26-0,s=1,c=1,t=38,pt=7,l=5,sg=0:3.45
Aug 05 11:35:02 DEBUG TSF:MSG:SEND,0-0-101-101,s=1,c=1,t=2,pt=0,l=2,sg=0,ft=0,st=OK:0
Aug 05 11:35:02 DEBUG TSF:MSG:READ,101-101-0,s=1,c=1,t=2,pt=0,l=2,sg=0:0
Aug 05 11:35:02 DEBUG TSF:MSG:ACK
Aug 05 11:35:03 DEBUG TSF:MSG:SEND,0-0-101-101,s=3,c=1,t=2,pt=0,l=2,sg=0,ft=0,st=OK:0
Aug 05 11:35:03 DEBUG TSF:MSG:READ,101-101-0,s=3,c=1,t=2,pt=0,l=2,sg=0:0
Aug 05 11:35:03 DEBUG TSF:MSG:ACK
Aug 05 11:35:04 DEBUG !TSF:RTE:100 UNKNOWN
Aug 05 11:35:04 DEBUG !TSF:MSG:SEND,0-0-100-100,s=1,c=1,t=2,pt=0,l=2,sg=0,ft=0,st=NACK:0
Aug 05 11:35:18 DEBUG TSF:MSG:READ,20-20-0,s=0,c=1,t=0,pt=7,l=5,sg=0:21.3
Aug 05 11:35:28 DEBUG TSF:MSG:READ,25-25-0,s=1,c=1,t=38,pt=7,l=5,sg=0:0.28
Aug 05 11:35:28 DEBUG TSF:MSG:READ,25-25-0,s=255,c=3,t=0,pt=1,l=1,sg=0:6
Aug 05 11:35:29 DEBUG TSF:MSG:READ,25-25-0,s=0,c=1,t=0,pt=7,l=5,sg=0:23.5
Aug 05 11:36:01 DEBUG TSF:MSG:SEND,0-0-101-101,s=1,c=1,t=2,pt=0,l=2,sg=0,ft=0,st=OK:0
Aug 05 11:36:01 DEBUG TSF:MSG:READ,101-101-0,s=1,c=1,t=2,pt=0,l=2,sg=0:0
Aug 05 11:36:01 DEBUG TSF:MSG:ACK
Aug 05 11:36:02 DEBUG TSF:MSG:SEND,0-0-101-101,s=2,c=1,t=2,pt=0,l=2,sg=0,ft=0,st=OK:0
Aug 05 11:36:02 DEBUG TSF:MSG:READ,101-101-0,s=2,c=1,t=2,pt=0,l=2,sg=0:0
Aug 05 11:36:02 DEBUG TSF:MSG:ACK
Aug 05 11:36:03 DEBUG !TSF:RTE:100 UNKNOWN
Aug 05 11:36:03 DEBUG !TSF:MSG:SEND,0-0-100-100,s=1,c=1,t=2,pt=0,l=2,sg=0,ft=0,st=NACK:0
Aug 05 11:36:16 DEBUG TSF:MSG:READ,101-101-255,s=255,c=3,t=7,pt=0,l=0,sg=0:
Aug 05 11:36:16 DEBUG TSF:MSG:BC
Aug 05 11:36:16 DEBUG TSF:MSG:FPAR REQ,ID=101
Aug 05 11:36:16 DEBUG TSF:PNG:SEND,TO=0
Aug 05 11:36:16 DEBUG TSF:CKU:OK
Aug 05 11:36:16 DEBUG TSF:MSG:GWL OK
Aug 05 11:36:17 DEBUG TSF:MSG:SEND,0-0-101-101,s=255,c=3,t=8,pt=1,l=1,sg=0,ft=0,st=OK:0
Aug 05 11:36:17 DEBUG TSF:MSG:READ,20-20-0,s=0,c=1,t=0,pt=7,l=5,sg=0:21.2
Aug 05 11:36:18 DEBUG TSF:MSG:READ,101-101-0,s=255,c=3,t=24,pt=1,l=1,sg=0:1
Aug 05 11:36:18 DEBUG TSF:MSG:PINGED,ID=101,HP=1
Aug 05 11:36:18 DEBUG TSF:MSG:SEND,0-0-101-101,s=255,c=3,t=25,pt=1,l=1,sg=0,ft=0,st=OK:1
Aug 05 11:36:18 DEBUG TSF:MSG:READ,101-101-0,s=255,c=3,t=15,pt=6,l=2,sg=0:0100
Aug 05 11:36:18 DEBUG TSF:MSG:SEND,0-0-101-101,s=255,c=3,t=15,pt=6,l=2,sg=0,ft=0,st=OK:0100
Aug 05 11:36:18 DEBUG TSF:MSG:READ,101-101-0,s=255,c=0,t=18,pt=0,l=5,sg=0:2.1.1
Aug 05 11:36:18 DEBUG TSF:MSG:READ,101-101-0,s=255,c=3,t=6,pt=1,l=1,sg=0:0
Aug 05 11:36:20 DEBUG TSF:MSG:READ,101-101-0,s=255,c=3,t=11,pt=0,l=21,sg=0:Zone Controller Relay
Aug 05 11:36:20 DEBUG TSF:MSG:READ,101-101-0,s=255,c=3,t=12,pt=0,l=3,sg=0:1.2
Aug 05 11:36:20 DEBUG TSF:MSG:READ,101-101-0,s=1,c=0,t=3,pt=0,l=0,sg=0:
Aug 05 11:36:20 DEBUG TSF:MSG:READ,101-101-0,s=2,c=0,t=3,pt=0,l=0,sg=0:
Aug 05 11:36:20 DEBUG TSF:MSG:READ,101-101-0,s=3,c=0,t=3,pt=0,l=0,sg=0:
Aug 05 11:36:20 DEBUG TSF:MSG:READ,101-101-0,s=4,c=0,t=3,pt=0,l=0,sg=0:
Aug 05 11:36:20 DEBUG TSF:MSG:READ,101-101-0,s=255,c=3,t=26,pt=1,l=1,sg=0:2
Aug 05 11:36:20 DEBUG TSF:MSG:SEND,0-0-101-101,s=255,c=3,t=27,pt=1,l=1,sg=0,ft=0,st=OK:1
Aug 05 11:36:30 DEBUG TSF:MSG:READ,21-21-0,s=0,c=1,t=0,pt=7,l=5,sg=0:22.9
Aug 05 11:36:30 DEBUG TSF:MSG:READ,25-25-0,s=1,c=1,t=38,pt=7,l=5,sg=0:0.28
Aug 05 11:36:30 DEBUG TSF:MSG:READ,25-25-0,s=255,c=3,t=0,pt=1,l=1,sg=0:6
Aug 05 11:36:46 DEBUG TSF:MSG:READ,26-26-0,s=1,c=1,t=38,pt=7,l=5,sg=0:3.45
Aug 05 11:36:46 DEBUG TSF:MSG:READ,26-26-0,s=255,c=3,t=0,pt=1,l=1,sg=0:82
Aug 05 11:37:02 DEBUG TSF:MSG:SEND,0-0-101-101,s=1,c=1,t=2,pt=0,l=2,sg=0,ft=0,st=OK:0
Aug 05 11:37:02 DEBUG TSF:MSG:READ,101-101-0,s=1,c=1,t=2,pt=0,l=2,sg=0:0
Aug 05 11:37:02 DEBUG TSF:MSG:ACK
Aug 05 11:37:03 DEBUG TSF:MSG:SEND,0-0-101-101,s=3,c=1,t=2,pt=0,l=2,sg=0,ft=0,st=OK:0
Aug 05 11:37:03 DEBUG TSF:MSG:READ,101-101-0,s=3,c=1,t=2,pt=0,l=2,sg=0:0
Aug 05 11:37:03 DEBUG TSF:MSG:ACK
Aug 05 11:37:04 DEBUG !TSF:RTE:100 UNKNOWN
Aug 05 11:37:04 DEBUG !TSF:MSG:SEND,0-0-100-100,s=1,c=1,t=2,pt=0,l=2,sg=0,ft=0,st=NACK:0
Aug 05 11:37:30 DEBUG TSF:MSG:READ,21-21-0,s=0,c=1,t=0,pt=7,l=5,sg=0:23.0
Aug 05 11:37:32 DEBUG TSF:MSG:READ,25-25-0,s=1,c=1,t=38,pt=7,l=5,sg=0:0.28
Aug 05 11:37:32 DEBUG TSF:MSG:READ,25-25-0,s=255,c=3,t=0,pt=1,l=1,sg=0:6
Its not bug but a workaround just in case if any one is searching for solution. I was using WiFiManager with MySensors 2.3.1 for WiFi gateway and it was working fine and now i upgraded MySensors from 2.3.1 to 2.3.2 and my WiFi gateway sketch refuse to compile. for the time being workaround: You need to comment out two location in core/MyGatewayTransportEthernet.cpp
may be there is better way but this is quick fix.
Line 49 to 55
/*
#if defined(MY_GATEWAY_ESP8266) || defined(MY_GATEWAY_ESP32)
#if !defined(MY_WIFI_SSID)
#error ESP8266/ESP32 gateway: MY_WIFI_SSID not defined!
#endif
#endif
*/
Line 184 to 189
/*	(void)WiFi.begin(MY_WIFI_SSID, MY_WIFI_PASSWORD, 0, MY_WIFI_BSSID);
	while (WiFi.status() != WL_CONNECTED) {
		delay(1000);
		GATEWAY_DEBUG(PSTR("GWT:TIN:CONNECTING...\n"));
	}
	GATEWAY_DEBUG(PSTR("GWT:TIN:IP: %s\n"), WiFi.localIP().toString().c_str());*/
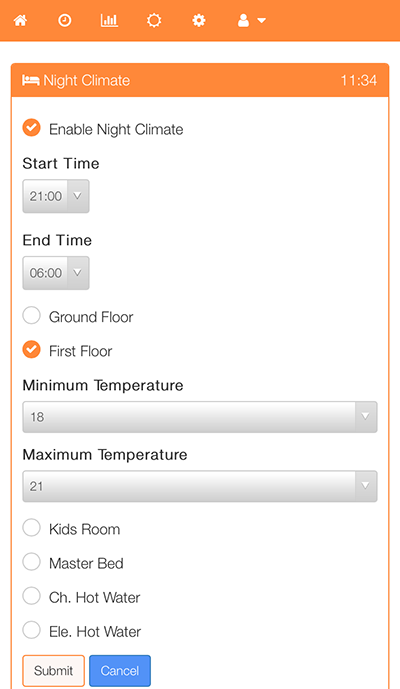
PiHome have that feature as well where you can specify temperature and leave it at that and then it keeps temperature at that level or you can add schedule for any zone.
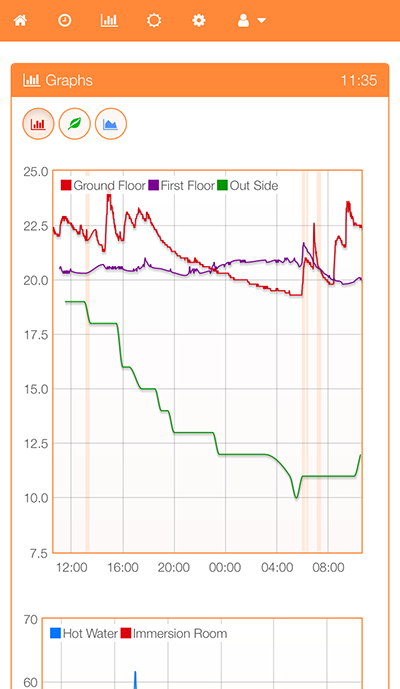
My Usage graph for last one year. and boiler time it saved me.
My Boiler Usage graph

Schedule List

Past 24 hours temperature graph with boiler status in vertical lines in background.
Night Climate (i should rename it to just climate)
@zboblamont, i love your analogy about ash-try in car.
i just feed arduino with 1mhz bootloader through raw pin with 2xAAA batteries (i know it was very long shot) and it didnt work onboard regulator can not supply enough voltage to ds18b20, but sure i need to look into boost converter.
before i dive into boost convert i wanted to ask what others are doing and how they are managing voltage for voltage hungry sensors. i have found few examples on openhardware.io all of them are by @NeverDie
I Just did quick calculation for total cost for this project
Temperature Sensors Node
NRF24L01+ 2.4GHz Wireless Transceiver 0.66€
Pro Mini 328 Mini 3.3V/8M 1.35€
DS18B20 Thermometer Temperature Sensor 0.53€
Temperature and humidity sensor plastic box 3.48€
18650 Battery 3.7V Li-ion Rechargeable Battery 1.56€
MySensors Gateway
Wireless module CH340 NodeMcu V3 Lua 2.39€
NRF24L01 PA LNA 20dBm 2500m Long Distance SPI 2.4GHz 3.87€
Multi Zone Controller Relay
4 Channel relay module with optocoupler 1.74€
NRF24L01+ 2.4GHz Wireless Transceiver 0.66€
Boiler Controller Relay
2 Channel relay module with optocoupler 0.84€
NRF24L01+ 2.4GHz Wireless Transceiver 0.66€
Raspberry Pi for PiHome
Raspberry Pi 3 or 2 or B+ which ever you want to use. 35€
Raspberry pi Casing 1€
Raspberry Power Supply 6€
SD Card for Raspberry Pi 5€
General Items used in project
Double Side Copper Prototype PCB Universal Board 6.66€
Metal Film Resistor Kit Pack Mix 4.92€
Single Female Pin Header Case For Arduino 2.20€
0.1 uF 104 50V Mono Monolithic Capacitors 0.78€
4Pin Double Row Straight Pin Female Header 0.87€
values 0.22UF-470UF Aluminum electrolytic capacitor assortment kit 1.35€
Total Cost for this project is 80.02€
@bjacobse
reason behind 1mhz mcu is to run it on lower voltage but switching between speed still need higher voltage. if i m not wrong!!!
@alowhum love the safety "is there a gas leak" i m thinking to implement this as well but haven't came to agreement between 220v powered vs battery powered sensors, on same note my home heating is scheduled for ground floor and DHW but i want to have some exhaust fan to run for 10 to 15 minuts to re-fresh air on ground floor again its on my to do list.
i have implemented zone max temperature, boiler max temperature and boiler hysteresis time (time between off and on again) but haven't implemented zone max run time or zone hysteresis time.
some time adding extra feature/options to heating control may not suite everyone and it requires lots and lots of testing and time.
Ps: i think all these commercially available options are way behind on options for domestic heating needs.
here is log when gateway is connected to wifi router, and then i powered off wifi router and then in few seconds powered on again, all other devicess connected to wifi router as expected apart from mysensors esp gateway. no special code in my gateway controller sketch.
pm open,type:2 0
0;255;3;0;9;TSF:MSG:READ,30-30-0,s=0,c=1,t=0,pt=7,l=5,sg=0:35.0
0;255;3;0;9;Client 0 connected
0;255;3;0;9;TSF:MSG:READ,30-30-0,s=0,c=1,t=0,pt=7,l=5,sg=0:35.8
0;255;3;0;9;TSF:MSG:READ,21-21-0,s=0,c=1,t=0,pt=7,l=5,sg=0:21.6
bcn_timout,ap_probe_send_start
ap_probe_send over, rest wifi status to disassoc
state: 5 -> 0 (1)
rm 0
pm close 7
f r0, 0;255;3;0;9;Client 0 disconnected
scandone
no mynet-915C found, reconnect after 1s
reconnect
f 0, scandone
no mynet-915C found, reconnect after 1s
reconnect
f -180, scandone
state: 0 -> 2 (b0)
state: 2 -> 3 (0)
state: 3 -> 5 (10)
add 0
aid 1
cnt
chg_B1:-140

connected with mynet-915C, channel 7
dhcp client start...
chg_B1:-100
ip:192.168.99.3,mask:255.255.255.0,gw:192.168.99.1
chg_B1:-60
chg_B1:-20
0;255;3;0;9;TSF:MSG:READ,21-21-0,s=0,c=1,t=0,pt=7,l=5,sg=0:21.9
pm open,type:2 0
0;255;3;0;9;TSF:MSG:READ,30-30-0,s=0,c=1,t=0,pt=7,l=5,sg=0:35.8
0;255;3;0;9;TSF:MSG:READ,25-25-0,s=0,c=1,t=0,pt=7,l=5,sg=0:20.8```it looks from log as it is connected to wifi but i can not even ping mysensors gateway, until i press reset button on esp.
yes you are right gateway receive all message from notes.