@helmchen81
I recently soldered a modile

.... but couldn't win the sketch. Since I am just a gynecologist, not a programmer and I do not understand with the code for 16 relay module using SN74HC595. :) On this site are a lot of professionals for whom this is not the problem, the code may soon emerge. I use just 3 separate Arduinos for my 16 channel relay.

T
tjay4x4
@tjay4x4
Posts
-
Code is required for 16-relays shift register actuator -
DoubleWaterMeterPulseSensor on 1 Node v2.0@mfalkvidd Thank you for reply!
I'm trying this before, when I change it todefine PULSE_FACTOR 1000I get this red line in the code;
 attachInterrupt(digitalPinToInterrupt(HW_DIGITAL_INPUT_SENSOR), onPulse, FALLING);
 attachInterrupt(digitalPinToInterrupt(CW_DIGITAL_INPUT_SENSOR), onPulse, FALLING);
C:\Users\Барков\Desktop\_2WaterMeterPulseSensor\_2WaterMeterPulseSensor.ino: In function 'void setup()': _2WaterMeterPulseSensor:105: error: 'onPulse' was not declared in this scope exit status 1 'onPulse' was not declared in this scope ``` -
DoubleWaterMeterPulseSensor on 1 Node v2.0Please help me to compile this scetch for hot (HW_) and cold (CW_) water meter on 1 arduino.
I use the original code from Water Meter Pulse Sensor, but I dont know how to fix "PULSE_FACTOR" - error// Enable debug prints to serial monitor #define MY_DEBUG // Enable and select radio type attached #define MY_RADIO_NRF24 //#define MY_RADIO_RFM69 #include <MySensors.h> #define HW_DIGITAL_INPUT_SENSOR 2 // The digital input you attached your sensor. (Only 2 and 3 generates interrupt!) #define CW_DIGITAL_INPUT_SENSOR 3 // The digital input you attached your sensor. (Only 2 and 3 generates interrupt!) #define HW_PULSE_FACTOR 1000 // Nummber of blinks per m3 of your meter (One rotation/liter) #define CW_PULSE_FACTOR 1000 // Nummber of blinks per m3 of your meter (One rotation/liter) #define SLEEP_MODE false // flowvalue can only be reported when sleep mode is false. #define MAX_FLOW 40 // Max flow (l/min) value to report. This filters outliers. #define CHILD_ID_HW 1 // Id of the sensor child #define CHILD_ID_CW 2 // Id of the sensor child unsigned long SEND_FREQUENCY = 30000; // Minimum time between send (in milliseconds). We don't want to spam the gateway. MyMessage flowMsg1(CHILD_ID_HW,V_FLOW); MyMessage flowMsg2(CHILD_ID_CW,V_FLOW); MyMessage volumeMsg1(CHILD_ID_HW,V_VOLUME); MyMessage volumeMsg2(CHILD_ID_CW,V_VOLUME); MyMessage lastCounterMsg1(CHILD_ID_HW,V_VAR1); MyMessage lastCounterMsg2(CHILD_ID_CW,V_VAR1); double ppl = ((double)PULSE_FACTOR)/1000; // Pulses per liter volatile unsigned long pulseCount = 0; volatile unsigned long lastBlink = 0; volatile double flow = 0; bool pcReceived = false; unsigned long oldPulseCount = 0; unsigned long newBlink = 0; double oldflow = 0; double volume =0; double oldvolume =0; unsigned long lastSend =0; unsigned long lastPulse =0; void setup() { // initialize our digital pins internal pullup resistor so one pulse switches from high to low (less distortion) pinMode(HW_DIGITAL_INPUT_SENSOR, INPUT_PULLUP); // initialize our digital pins internal pullup resistor so one pulse switches from high to low (less distortion) pinMode(CW_DIGITAL_INPUT_SENSOR, INPUT_PULLUP); pulseCount = oldPulseCount = 0; // Fetch last known pulse count value from gw request(CHILD_ID_HW, V_VAR1); request(CHILD_ID_CW, V_VAR1); lastSend = lastPulse = millis(); attachInterrupt(digitalPinToInterrupt(HW_DIGITAL_INPUT_SENSOR), onPulse, FALLING); attachInterrupt(digitalPinToInterrupt(CW_DIGITAL_INPUT_SENSOR), onPulse, FALLING); } void presentation() { // Send the sketch version information to the gateway and Controller sendSketchInfo("Water Meter", "1.1"); // Register this device as Waterflow sensor present(CHILD_ID_HW, S_WATER); present(CHILD_ID_CW, S_WATER); } void loop() { unsigned long currentTime = millis(); // Only send values at a maximum frequency or woken up from sleep if (SLEEP_MODE || (currentTime - lastSend > SEND_FREQUENCY)) { lastSend=currentTime; if (!pcReceived) { //Last Pulsecount not yet received from controller, request it again request(CHILD_ID_HW, V_VAR1); request(CHILD_ID_CW, V_VAR1); return; } if (!SLEEP_MODE && flow != oldflow) { oldflow = flow; Serial.print("l/min:"); Serial.println(flow); // Check that we dont get unresonable large flow value. // could hapen when long wraps or false interrupt triggered if (flow<((unsigned long)MAX_FLOW)) { send(flowMsg1.set(flow, 2)); // Send flow value to gw send(flowMsg2.set(flow, 2)); // Send flow value to gw } } // No Pulse count received in 2min if(currentTime - lastPulse > 120000) { flow = 0; } // Pulse count has changed if ((pulseCount != oldPulseCount)||(!SLEEP_MODE)) { oldPulseCount = pulseCount; Serial.print("pulsecount:"); Serial.println(pulseCount); send(lastCounterMsg1.set(pulseCount)); // Send pulsecount value to gw in VAR1 send(lastCounterMsg2.set(pulseCount)); // Send pulsecount value to gw in VAR1 double volume = ((double)pulseCount/((double)PULSE_FACTOR)); if ((volume != oldvolume)||(!SLEEP_MODE)) { oldvolume = volume; Serial.print("volume:"); Serial.println(volume, 3); send(volumeMsg1.set(volume, 3)); // Send volume value to gw send(volumeMsg2.set(volume, 3)); // Send volume value to gw } } } if (SLEEP_MODE) { sleep(SEND_FREQUENCY); } } void receive(const MyMessage &message) { if (message.type==V_VAR1) { unsigned long gwPulseCount=message.getULong(); pulseCount += gwPulseCount; flow=oldflow=0; Serial.print("Received last pulse count from gw:"); Serial.println(pulseCount); pcReceived = true; } } void onPulse() { if (!SLEEP_MODE) { unsigned long newBlink = micros(); unsigned long interval = newBlink-lastBlink; if (interval!=0) { lastPulse = millis(); if (interval<500000L) { // Sometimes we get interrupt on RISING, 500000 = 0.5sek debounce ( max 120 l/min) return; } flow = (60000000.0 /interval) / ppl; } lastBlink = newBlink; } pulseCount++; }```_2WaterMeterPulseSensor:75: error: 'PULSE_FACTOR' was not declared in this scope C:\Users\Барков\Desktop\_2WaterMeterPulseSensor\_2WaterMeterPulseSensor.ino: In function 'void setup()': _2WaterMeterPulseSensor:105: error: 'onPulse' was not declared in this scope C:\Users\Барков\Desktop\_2WaterMeterPulseSensor\_2WaterMeterPulseSensor.ino: In function 'void loop()': _2WaterMeterPulseSensor:163: error: 'PULSE_FACTOR' was not declared in this scope exit status 1 'PULSE_FACTOR' was not declared in this scope -
Single button operated Led Strip Dimmer@BartE said:
@Axel yes you can use this sketch stand alone.
In the sketch just:
- remove #include <MySensor.h> and #include <SPI.h>
- remove MyMessage from struct LEDS (6 times on 4 lines)
- remove all lines with "gw." except for gw.wait() replace this function with delay()
- remove the function incomingMessage
That should be it, not sure if all compilers are gone now (did not test it)
And of course there is no needs anymore to add the NFR radio module
Hello BartE
Could you post the sketch (post 1) for Mysensors2.0.0, please?
Or what I have to change on this sketch to make it's compilated with arduino 1.6.9 Mysensors Library 2.0.02 hours and "Done compiling". So I have wrong library version. And now It's ready to upload. :)
/** * REVISION HISTORY * Version 1.0 - February 15, 2014 - Bruce Lacey * Version 1.1 - August 13, 2014 - Converted to 1.4 (hek) * Version 1.2 - Januari 2016 - Bart Eversdijk * * DESCRIPTION * This sketch provides a Dimmable LED Light using PWM and based on Henrik Ekblad * <henrik.ekblad@gmail.com> Vera Arduino Sensor project. * Developed by Bruce Lacey, inspired by Hek's MySensor's example sketches. * * The circuit uses a MOSFET for Pulse-Wave-Modulation to dim the attached LED or LED strip. * The MOSFET Gate pin is connected to Arduino pin 3 (LED_PIN), the MOSFET Drain pin is connected * to the LED negative terminal and the MOSFET Source pin is connected to ground. * * V1.2 Additions: * control by normal ON/OFF switch * The sketch is now optimized for integration in an existing house wiring situation, Where a standard light switch can be used to control * the dimmer. Just toggling the switch will light the LED-(strip) smooth to 100% level or back to 0% when turning the light off. * By a short ON-OFF switch-pulse the LED will dim to the last set dim level (when it was OFF) or dim to 0% when the LED was on. * Setting a new target dim level can be done by keeping the switch on until it reaches the desired dim-level and the switch OFF again. * Now the LED will stay on keeping the dim level. * In all situations your home automation controller will be informed on the changing situations and off course can override the switch situation * * This sketch controls 2 LED-(strips) but can be easily extended by adding a LEDS entry to the led array (on line 70) * The dim level can be set linear i.s.o. logarithmic (for your eyes this will look more linear) * * http://www.mysensors.org/build/dimmer */ #define MY_RADIO_NRF24 #include <SPI.h> #include <MySensors.h> #include <Bounce2.h> #include <math.h> #define LED1_PIN 6 // Arduino pin attached to MOSFET Gate pin #define SW1_PIN 4 #define LED2_PIN 3 // Arduino pin attached to MOSFET Gate pin #define SW2_PIN 2 #define MYS_INIT_DELAY 500 #define FADE_DELAY 10 // Delay in ms for each percentage fade up/down (10ms = 1s full-range dim) enum DIMCURVES { DIM_LINEAR = 0, // Normal linear curve DIM_LINEAR_INV, // Inverted linear curve DIM_LOGARITHMIC, // Normal logarithmic curve DIM_LOGARITHMIC_INV, // Inverted logarithmic curve DIM_CUSTOM // Define your own dimming curve }; struct LEDS { int currentLevel; // Current dim level int toLevel; // Level to dim to Bounce debouncer; int LedPin; int SwitchPin; byte switchValue; int savedLevel; // level to dim to when on is pressed int switchCount; bool ignoreNextSw; // if true ignore next OFF switch (was overriden by controller in ON state) DIMCURVES dimcurve; // Set the dim curve mode (linear, logarithmic, inverted, custom) MyMessage dimmerMsg; MyMessage lightMsg; }; LEDS led[] = { {0, 0, Bounce(), LED1_PIN, SW1_PIN, 0, 100, 0, false, DIM_LINEAR_INV, MyMessage(0, V_DIMMER), MyMessage(0, V_LIGHT)}, {0, 0, Bounce(), LED2_PIN, SW2_PIN, 0, 100, 0, false, DIM_CUSTOM, MyMessage(1, V_DIMMER), MyMessage(1, V_LIGHT)} }; #define MAXLED (sizeof(led)/sizeof(LEDS)) /*** * Dimmable LED initialization method */ void setup() { // Switch off all leds for (byte id = 0; id < MAXLED; id++) { pinMode(led[id].LedPin, OUTPUT); setLedLevel(id); } // Register the LED Dimmable Light with the gateway for (byte id = 0; id < MAXLED; id++) { pinMode(led[id].SwitchPin, INPUT); // Activate internal pull-up digitalWrite(led[id].SwitchPin, HIGH); present( id, S_DIMMER ); delay( MYS_INIT_DELAY ); // Pull the gateway's current dim level - restore light level upon sendor node power-up request( id, V_DIMMER ); delay( MYS_INIT_DELAY ); // After setting up the button, setup debouncer led[id].debouncer.attach(led[id].SwitchPin); led[id].debouncer.interval(5); } sendSketchInfo("1.2", "LedStripSwitch"); } /*** * Dimmable LED main processing loop */ void loop() { for (byte id = 0; id < MAXLED; id++) { // If target level is not reached fade a little bit more if (led[id].currentLevel != led[id].toLevel) { led[id].currentLevel += ((led[id].toLevel - led[id].currentLevel ) < 0 ? -1 : 1); setLedLevel(id); } // Check debounced button led[id].debouncer.update(); byte switchValue = led[id].debouncer.read() ? 0 : 1; // Inverted signal // Button change detected if (led[id].switchValue != switchValue) { Serial.print (F("Switch ")); Serial.println (switchValue); led[id].switchValue = switchValue; // If key released switch on when off or off when on --> when we where fading (above 100 steps) this is the end state // When we just left the button (> 500) we now turning the lights off again if (!switchValue && !led[id].ignoreNextSw) { if (led[id].switchCount <= 100 || led[id].switchCount > 500) { led[id].toLevel = (led[id].currentLevel ? 0 : led[id].savedLevel); } else { led[id].savedLevel = led[id].toLevel; // Store new saved level } // Inform the gateway of the current DimmableLED's SwitchPower1 and LoadLevelStatus value... send(led[id].lightMsg.set(led[id].toLevel > 0 ? 1 : 0)); send(led[id].dimmerMsg.set(led[id].toLevel) ); } led[id].ignoreNextSw = false; led[id].switchCount = 0; } else if (switchValue && led[id].switchCount <= 500) { // Keep counting until we reached 500 (@ 500 we asume we are in switch ON / OFF mode) led[id].switchCount++; // So this in not just a switch on (or off) but a new target led level key press if (led[id].switchCount > 100) { // Smooth led level increment, until the user found his/here desired dim lever if ((led[id].switchCount % 3) == 0) { // Stop increasing led level @ 100% if (led[id].currentLevel < 100) { if (led[id].currentLevel == 99) { // Inform the gateway we've reached 100% send(led[id].lightMsg.set(1)); send(led[id].dimmerMsg.set(100)); } led[id].currentLevel++; led[id].toLevel = led[id].currentLevel; setLedLevel(id); } } } } } // Wait FADE_DELAY ms to smooth the dim level adjustments wait(FADE_DELAY); } void incomingMessage(const MyMessage &message) { if (message.type == V_LIGHT || message.type == V_DIMMER) { byte id = (message.sensor % MAXLED); // Retrieve the power or dim level from the incoming request message // if this is a V_LIGHT variable update [0 == off, 1 == on] use savedLevel int requestedLevel = ( message.type == V_LIGHT ? led[id].savedLevel * atoi( message.data ) : atoi( message.data ) ); if (requestedLevel > 0) { // Store as lastLevel led[id].savedLevel = requestedLevel; } // Make sure the new level is between 0 - 100 led[id].toLevel = (requestedLevel >= 0 ? min(requestedLevel, 100) : 0); Serial.print(F("Changing node: ")); Serial.print( id ); Serial.print(F(", from: ")); Serial.print( led[id].currentLevel ); Serial.print(F("%, to: ")); Serial.print( requestedLevel ); Serial.println(F("%")); // Inform the gateway of the current DimmableLED's SwitchPower1 and LoadLevelStatus value... send(led[id].lightMsg.set(requestedLevel > 0 ? 1 : 0)); send(led[id].dimmerMsg.set(requestedLevel) ); // Ignore next OFF switch when switch is ON and controller switches LED to OFF state) led[id].ignoreNextSw = (led[id].toLevel == 0 && led[id].SwitchPin); } } void setLedLevel(byte id) { // Convert level 0% - 100% to logathimic OR linear PWM range of 0 to 255 switch (led[id].dimcurve) { case DIM_LINEAR: // Normal linear curve analogWrite(led[id].LedPin, (int)(led[id].currentLevel * 2.5)); break; case DIM_LINEAR_INV: // Inverted linear curve analogWrite(led[id].LedPin, 255 - (int)(led[id].currentLevel * 2.5)); break; case DIM_LOGARITHMIC: // Normal logarithmic curve analogWrite(led[id].LedPin, fscale( 0, 100, 0, 255, led[id].currentLevel, -2)); break; case DIM_LOGARITHMIC_INV: // Inverted logarithmic curve analogWrite(led[id].LedPin, 255 - fscale( 0, 100, 0, 255, led[id].currentLevel, -2)); break; case DIM_CUSTOM: analogWrite(led[id].LedPin, 255 - led[id].currentLevel); break; } } /* fscale Floating Point Autoscale Function V0.1 Paul Badger 2007 Modified from code by Greg Shakar */ float fscale( float originalMin, float originalMax, float newBegin, float newEnd, float inputValue, float curve) { float OriginalRange = 0; float NewRange = 0; float zeroRefCurVal = 0; float normalizedCurVal = 0; float rangedValue = 0; boolean invFlag = 0; // condition curve parameter // limit range if (curve > 10) curve = 10; if (curve < -10) curve = -10; curve = (curve * -.1) ; // - invert and scale - this seems more intuitive - postive numbers give more weight to high end on output curve = pow(10, curve); // convert linear scale into lograthimic exponent for other pow function // Check for out of range inputValues if (inputValue < originalMin) { inputValue = originalMin; } if (inputValue > originalMax) { inputValue = originalMax; } // Zero Refference the values OriginalRange = originalMax - originalMin; if (newEnd > newBegin){ NewRange = newEnd - newBegin; } else { NewRange = newBegin - newEnd; invFlag = 1; } zeroRefCurVal = inputValue - originalMin; normalizedCurVal = zeroRefCurVal / OriginalRange; // normalize to 0 - 1 float // Check for originalMin > originalMax - the math for all other cases i.e. negative numbers seems to work out fine if (originalMin > originalMax ) { return 0; } if (invFlag == 0) { rangedValue = (pow(normalizedCurVal, curve) * NewRange) + newBegin; } else { // invert the ranges rangedValue = newBegin - (pow(normalizedCurVal, curve) * NewRange); } return rangedValue; }``` -
Code is required for 16-relays shift register actuator@ferpando said:
This <MyBuffer.h> is not really needed if you don't want to check if message is received on the node.
Just remove that line and everything should work.
Thank you so mutch. I'll try this.
And I have to try to do like you explain here link text Just another nube quastion, how to create a function in the startup Lua? -
💬 jModule@aproxx said:
Any chance you will be creating a 'panelized' version of this board? With these small sizes 4 boards can be fitted on a 5 by 5cm board, while still keeping the same price. I'd be happy to order a few if that's available!
I'm just order it, on Dirtyboard not tested yet. Maybe this what you need?
http://dirtypcbs.com/view.php?share=18851&accesskey=01fcfdedf25cb9105e13f2d50d9ea385 -
Code is required for 16-relays shift register actuatorFirst of all I want to say thanks for a very in-demand Irrigation Controller (up to 16 valves with Shift Registers). I managed to repeat it. And it works fine. But I couldn't find a sketch for 16 relays shift register actuator operating as a simple relay actuator and running separately.
I find sketch by @ferpando 16 relay with arduino But it's need to change startup Lua and using <MyBuffer.h>
So please help me find sketch. Maybe someone already uses something like this? -
ESP8266 WiFi gateway port for MySensors@Yveaux Now everything working! I reinstall all "Arduino-master" to Arduino 1.6 folder and now ALL Ok. Sorry for disturb. Thank you!!!
-
ESP8266 WiFi gateway port for MySensors@Yveaux I use https://github.com/mysensors/Arduino/archive/master.zip
Just reupload library
Some additionl information.
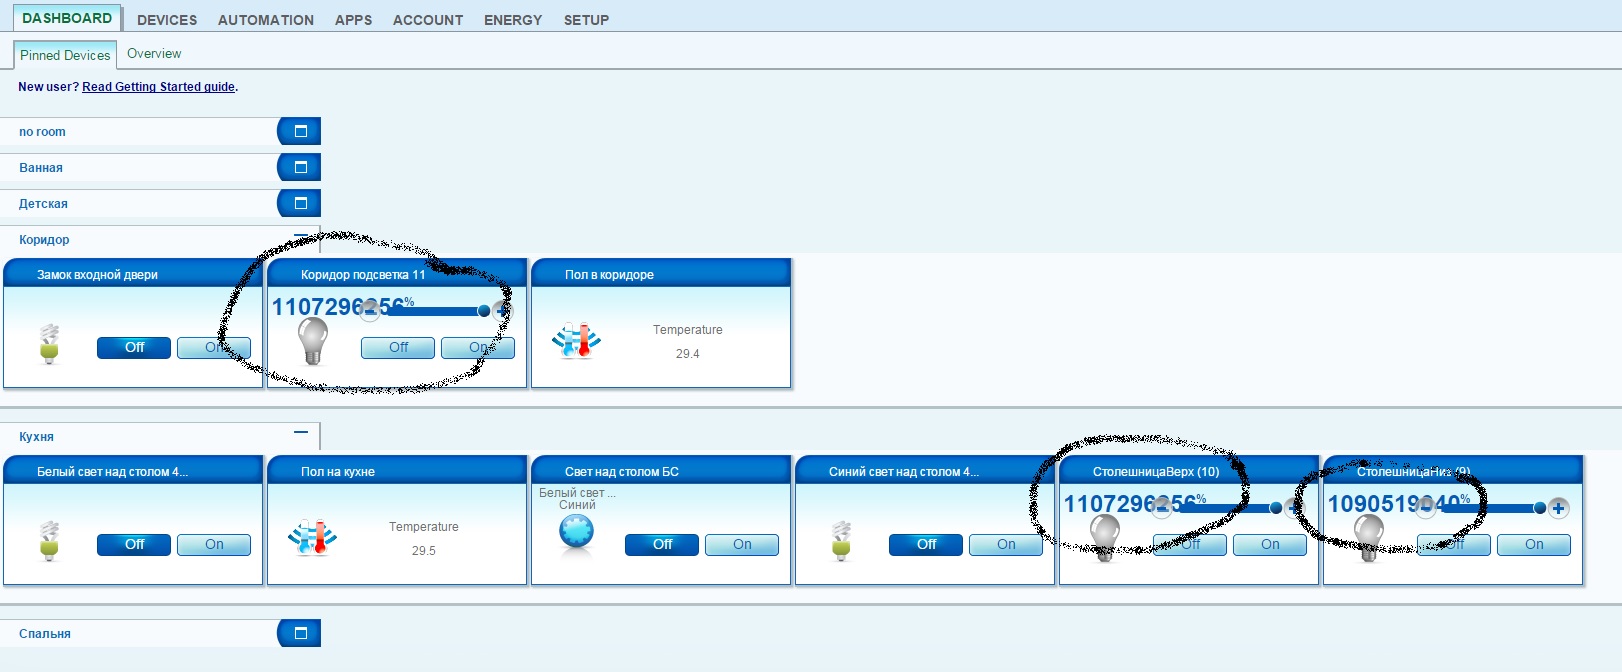
100%-90%-80%70%-60%-50%- OK 40%-bug :)
10%-20%-30%-40% -OK 50%-bugESP8266 MySensors Gateway Connecting to 1111 ................Connected! IP: 192.168.1.44 0;0;3;0;9;gateway started, id=0, parent=0, distance=0 0;0;3;0;9;read: 9-8-0 s=3,c=1,t=1,pt=7,l=5,sg=0:20.0 9;3;1;0;1;20.0 0;0;3;0;9;read: 1-8-0 s=1,c=1,t=0,pt=7,l=5,sg=0:44.5 1;1;1;0;0;44.5 Client 0 connected 0;0;3;0;14;Gateway startup complete. Client 0: 0;0;3;0;2;Get Version 0;0;3;0;2;1.5.1 Client 0: 11;0;1;1;3;0 0;0;3;0;9;send: 0-0-11-11 s=0,c=1,t=3,pt=0,l=1,sg=0,st=ok:0 0;0;3;0;9;read: 11-11-0 s=0,c=1,t=3,pt=0,l=1,sg=0:0 11;0;1;1;3;0 0;0;3;0;9;read: 11-11-0 s=0,c=1,t=2,pt=2,l=2,sg=0:536870912 11;0;1;0;2;536870912 0;0;3;0;9;read: 11-11-0 s=0,c=1,t=3,pt=2,l=2,sg=0:536870912 11;0;1;0;3;536870912 Client 0: 11;0;1;1;3;100 0;0;3;0;9;send: 0-0-11-11 s=0,c=1,t=3,pt=0,l=3,sg=0,st=ok:100 0;0;3;0;9;read: 11-11-0 s=0,c=1,t=3,pt=0,l=3,sg=0:100 11;0;1;1;3;100 0;0;3;0;9;read: 11-11-0 s=0,c=1,t=2,pt=2,l=2,sg=0:1 11;0;1;0;2;1 0;0;3;0;9;read: 11-11-0 s=0,c=1,t=3,pt=2,l=2,sg=0:100 11;0;1;0;3;100 Client 0: 11;0;1;1;3;80 0;0;3;0;9;send: 0-0-11-11 s=0,c=1,t=3,pt=0,l=2,sg=0,st=ok:80 0;0;3;0;9;read: 11-11-0 s=0,c=1,t=3,pt=0,l=2,sg=0:80 11;0;1;1;3;80 0;0;3;0;9;read: 11-11-0 s=0,c=1,t=2,pt=2,l=2,sg=0:1 11;0;1;0;2;1 0;0;3;0;9;read: 11-11-0 s=0,c=1,t=3,pt=2,l=2,sg=0:80 11;0;1;0;3;80 Client 0: 11;0;1;1;3;70 0;0;3;0;9;send: 0-0-11-11 s=0,c=1,t=3,pt=0,l=2,sg=0,st=ok:70 0;0;3;0;9;read: 11-11-0 s=0,c=1,t=3,pt=0,l=2,sg=0:70 11;0;1;1;3;70 0;0;3;0;9;read: 11-11-0 s=0,c=1,t=2,pt=2,l=2,sg=0:1 11;0;1;0;2;1 0;0;3;0;9;read: 11-11-0 s=0,c=1,t=3,pt=2,l=2,sg=0:70 11;0;1;0;3;70 Client 0: 11;0;1;1;3;60 0;0;3;0;9;send: 0-0-11-11 s=0,c=1,t=3,pt=0,l=2,sg=0,st=ok:60 0;0;3;0;9;read: 11-11-0 s=0,c=1,t=3,pt=0,l=2,sg=0:60 11;0;1;1;3;60 0;0;3;0;9;read: 11-11-0 s=0,c=1,t=2,pt=2,l=2,sg=0:1 11;0;1;0;2;1 0;0;3;0;9;read: 11-11-0 s=0,c=1,t=3,pt=2,l=2,sg=0:60 11;0;1;0;3;60 0;0;3;0;9;read: 1-8-0 s=1,c=1,t=0,pt=7,l=5,sg=0:44.6 1;1;1;0;0;44.6 Client 0: 11;0;1;1;3;50 0;0;3;0;9;send: 0-0-11-11 s=0,c=1,t=3,pt=0,l=2,sg=0,st=ok:50 0;0;3;0;9;read: 11-11-0 s=0,c=1,t=3,pt=0,l=2,sg=0:50 11;0;1;1;3;50 0;0;3;0;9;read: 11-11-0 s=0,c=1,t=2,pt=2,l=2,sg=0:1107296257 11;0;1;0;2;1107296257 0;0;3;0;9;read: 11-11-0 s=0,c=1,t=3,pt=2,l=2,sg=0:1107296306 11;0;1;0;3;1107296306 0;0;3;0;9;read: 7-5-0 s=0,c=1,t=0,pt=7,l=5,sg=0:30.7 7;0;1;0;0;30.7 0;0;3;0;9;read: 3-2-0 s=0,c=1,t=0,pt=7,l=5,sg=0:30.2 3;0;1;0;0;30.2 0;0;3;0;9;read: 7-5-0 s=0,c=1,t=0,pt=7,l=5,sg=0:30.6 7;0;1;0;0;30.6 0;0;3;0;9;read: 3-2-0 s=0,c=1,t=0,pt=7,l=5,sg=0:30.1 3;0;1;0;0;30.1 0;0;3;0;9;read: 1-8-0 s=1,c=1,t=0,pt=7,l=5,sg=0:44.5 1;1;1;0;0;44.5 Client 0: 11;0;1;1;3;0 0;0;3;0;9;send: 0-0-11-11 s=0,c=1,t=3,pt=0,l=1,sg=0,st=ok:0 0;0;3;0;9;read: 11-11-0 s=0,c=1,t=3,pt=0,l=1,sg=0:0 11;0;1;1;3;0 0;0;3;0;9;read: 11-11-0 s=0,c=1,t=2,pt=2,l=2,sg=0:1107296256 11;0;1;0;2;1107296256 0;0;3;0;9;read: 11-11-0 s=0,c=1,t=3,pt=2,l=2,sg=0:1107296256 11;0;1;0;3;1107296256 Client 0: 11;0;1;1;3;100 0;0;3;0;9;send: 0-0-11-11 s=0,c=1,t=3,pt=0,l=3,sg=0,st=ok:100 0;0;3;0;9;read: 11-11-0 s=0,c=1,t=3,pt=0,l=3,sg=0:100 11;0;1;1;3;100 0;0;3;0;9;read: 11-11-0 s=0,c=1,t=2,pt=2,l=2,sg=0:1 11;0;1;0;2;1 0;0;3;0;9;read: 11-11-0 s=0,c=1,t=3,pt=2,l=2,sg=0:100 11;0;1;0;3;100 Client 0: 11;0;1;1;3;0 0;0;3;0;9;send: 0-0-11-11 s=0,c=1,t=3,pt=0,l=1,sg=0,st=ok:0 0;0;3;0;9;read: 11-11-0 s=0,c=1,t=3,pt=0,l=1,sg=0:0 11;0;1;1;3;0 0;0;3;0;9;read: 11-11-0 s=0,c=1,t=2,pt=2,l=2,sg=0:0 11;0;1;0;2;0 0;0;3;0;9;read: 11-11-0 s=0,c=1,t=3,pt=2,l=2,sg=0:0 11;0;1;0;3;0 Client 0: 11;0;1;1;3;10 0;0;3;0;9;send: 0-0-11-11 s=0,c=1,t=3,pt=0,l=2,sg=0,st=ok:10 0;0;3;0;9;read: 11-11-0 s=0,c=1,t=3,pt=0,l=2,sg=0:10 11;0;1;1;3;10 0;0;3;0;9;read: 11-11-0 s=0,c=1,t=2,pt=2,l=2,sg=0:1 11;0;1;0;2;1 0;0;3;0;9;read: 11-11-0 s=0,c=1,t=3,pt=2,l=2,sg=0:10 11;0;1;0;3;10 Client 0: 11;0;1;1;3;20 0;0;3;0;9;send: 0-0-11-11 s=0,c=1,t=3,pt=0,l=2,sg=0,st=ok:20 0;0;3;0;9;read: 11-11-0 s=0,c=1,t=3,pt=0,l=2,sg=0:20 11;0;1;1;3;20 0;0;3;0;9;read: 11-11-0 s=0,c=1,t=2,pt=2,l=2,sg=0:1 11;0;1;0;2;1 0;0;3;0;9;read: 11-11-0 s=0,c=1,t=3,pt=2,l=2,sg=0:20 11;0;1;0;3;20 Client 0: 11;0;1;1;3;30 0;0;3;0;9;send: 0-0-11-11 s=0,c=1,t=3,pt=0,l=2,sg=0,st=ok:30 0;0;3;0;9;read: 11-11-0 s=0,c=1,t=3,pt=0,l=2,sg=0:30 11;0;1;1;3;30 0;0;3;0;9;read: 11-11-0 s=0,c=1,t=2,pt=2,l=2,sg=0:1 11;0;1;0;2;1 0;0;3;0;9;read: 11-11-0 s=0,c=1,t=3,pt=2,l=2,sg=0:30 11;0;1;0;3;30 0;0;3;0;9;read: 1-8-0 s=1,c=1,t=0,pt=7,l=5,sg=0:44.6 1;1;1;0;0;44.6 Client 0: 11;0;1;1;3;40 0;0;3;0;9;send: 0-0-11-11 s=0,c=1,t=3,pt=0,l=2,sg=0,st=ok:40 0;0;3;0;9;read: 11-11-0 s=0,c=1,t=3,pt=0,l=2,sg=0:40 11;0;1;1;3;40 0;0;3;0;9;read: 11-11-0 s=0,c=1,t=2,pt=2,l=2,sg=0:1107296257 11;0;1;0;2;1107296257 0;0;3;0;9;read: 11-11-0 s=0,c=1,t=3,pt=2,l=2,sg=0:1107296296 11;0;1;0;3;1107296296 Client 0: 11;0;1;1;3;100 0;0;3;0;9;send: 0-0-11-11 s=0,c=1,t=3,pt=0,l=3,sg=0,st=ok:100 0;0;3;0;9;read: 11-11-0 s=0,c=1,t=3,pt=0,l=3,sg=0:100 11;0;1;1;3;100 0;0;3;0;9;read: 11-11-0 s=0,c=1,t=2,pt=2,l=2,sg=0:1 11;0;1;0;2;1 0;0;3;0;9;read: 11-11-0 s=0,c=1,t=3,pt=2,l=2,sg=0:100 11;0;1;0;3;100 Client 0: 11;0;1;1;3;0 0;0;3;0;9;send: 0-0-11-11 s=0,c=1,t=3,pt=0,l=1,sg=0,st=ok:0 0;0;3;0;9;read: 11-11-0 s=0,c=1,t=3,pt=0,l=1,sg=0:0 11;0;1;1;3;0 0;0;3;0;9;read: 11-11-0 s=0,c=1,t=2,pt=2,l=2,sg=0:0 11;0;1;0;2;0 0;0;3;0;9;read: 11-11-0 s=0,c=1,t=3,pt=2,l=2,sg=0:0 11;0;1;0;3;0 0;0;3;0;9;read: 7-5-0 s=0,c=1,t=0,pt=7,l=5,sg=0:30.7 7;0;1;0;0;30.7 0;0;3;0;9;read: 1-8-0 s=1,c=1,t=0,pt=7,l=5,sg=0:44.5 1;1;1;0;0;44.5 0;0;3;0;9;read: 9-8-0 s=3,c=1,t=1,pt=7,l=5,sg=0:21.0 9;3;1;0;1;21.0 0;0;3;0;9;read: 3-2-0 s=0,c=1,t=0,pt=7,l=5,sg=0:30.2 3;0;1;0;0;30.2 0;0;3;0;9;read: 1-8-0 s=0,c=1,t=0,pt=7,l=5,sg=0:33.4 1;0;1;0;0;33.4 0;0;3;0;9;read: 9-8-0 s=3,c=1,t=1,pt=7,l=5,sg=0:20.0 9;3;1;0;1;20.0 -
ESP8266 WiFi gateway port for MySensors@Yveaux Thank you for reply. Here is the serial monitor.When I put 100% light it shows Ok. But 70% and others, shows some digitals. But all working fine! :)
Insert Code Here.................Connected! 0;0;3;0;9;gateway started, id=0, parent=0, distance=0 0;0;3;0;9;read: 1-8-0 s=0,c=1,t=0,pt=7,l=5,sg=0:33.1 1;0;1;0;0;33.1 0;0;3;0;9;read: 1-8-0 s=1,c=1,t=0,pt=7,l=5,sg=0:44.2 1;1;1;0;0;44.2 0;0;3;0;9;read: 1-8-0 s=2,c=1,t=0,pt=7,l=5,sg=0:32.2 1;2;1;0;0;32.2 0;0;3;0;9;read: 1-8-0 s=1,c=1,t=0,pt=7,l=5,sg=0:44.3 1;1;1;0;0;44.3 Client 0 connected 0;0;3;0;14;Gateway startup complete. Client 0 disconnected 0;0;3;0;9;read: 9-8-0 s=4,c=1,t=0,pt=7,l=5,sg=0:27.0 9;4;1;0;0;27.0 0;0;3;0;9;read: 9-8-0 s=3,c=1,t=1,pt=7,l=5,sg=0:21.0 9;3;1;0;1;21.0 Client 0 connected 0;0;3;0;14;Gateway startup complete. Client 0: 0;0;3;0;2;Get Version 0;0;3;0;2;1.5.1 Client 0: 11;0;1;1;3;1090519100 0;0;3;0;9;send: 0-0-11-11 s=0,c=1,t=3,pt=0,l=10,sg=0,st=ok:1090519100 0;0;3;0;9;read: 11-11-0 s=0,c=1,t=3,pt=0,l=10,sg=0:1090519100 11;0;1;1;3;1090519100 0;0;3;0;9;read: 11-11-0 s=0,c=1,t=2,pt=2,l=2,sg=0:805306369 11;0;1;0;2;805306369 0;0;3;0;9;read: 11-11-0 s=0,c=1,t=3,pt=2,l=2,sg=0:805306428 11;0;1;0;3;805306428 Client 0: 11;0;1;1;3;0 0;0;3;0;9;send: 0-0-11-11 s=0,c=1,t=3,pt=0,l=1,sg=0,st=ok:0 0;0;3;0;9;read: 11-11-0 s=0,c=1,t=3,pt=0,l=1,sg=0:0 11;0;1;1;3;0 0;0;3;0;9;read: 11-11-0 s=0,c=1,t=2,pt=2,l=2,sg=0:805306368 11;0;1;0;2;805306368 0;0;3;0;9;read: 11-11-0 s=0,c=1,t=3,pt=2,l=2,sg=0:805306368 11;0;1;0;3;805306368 Client 0: 11;0;1;1;3;100 0;0;3;0;9;send: 0-0-11-11 s=0,c=1,t=3,pt=0,l=3,sg=0,st=ok:100 0;0;3;0;9;read: 11-11-0 s=0,c=1,t=3,pt=0,l=3,sg=0:100 11;0;1;1;3;100 0;0;3;0;9;read: 11-11-0 s=0,c=1,t=2,pt=2,l=2,sg=0:1 11;0;1;0;2;1 0;0;3;0;9;read: 11-11-0 s=0,c=1,t=3,pt=2,l=2,sg=0:100 11;0;1;0;3;100 Client 0: 11;0;1;1;3;80 0;0;3;0;9;send: 0-0-11-11 s=0,c=1,t=3,pt=0,l=2,sg=0,st=ok:80 0;0;3;0;9;read: 11-11-0 s=0,c=1,t=3,pt=0,l=2,sg=0:80 11;0;1;1;3;80 0;0;3;0;9;read: 11-11-0 s=0,c=1,t=2,pt=2,l=2,sg=0:1 11;0;1;0;2;1 0;0;3;0;9;read: 11-11-0 s=0,c=1,t=3,pt=2,l=2,sg=0:80 11;0;1;0;3;80 0;0;3;0;9;read: 1-8-0 s=2,c=1,t=0,pt=7,l=5,sg=0:32.3 1;2;1;0;0;32.3 Client 0: 11;0;1;1;3;70 0;0;3;0;9;send: 0-0-11-11 s=0,c=1,t=3,pt=0,l=2,sg=0,st=ok:70 0;0;3;0;9;read: 11-11-0 s=0,c=1,t=3,pt=0,l=2,sg=0:70 11;0;1;1;3;70 0;0;3;0;9;read: 11-11-0 s=0,c=1,t=2,pt=2,l=2,sg=0:1107296257 11;0;1;0;2;1107296257 0;0;3;0;9;read: 11-11-0 s=0,c=1,t=3,pt=2,l=2,sg=0:1107296326 11;0;1;0;3;1107296326 Client 0: 11;0;1;1;3;1107296326 0;0;3;0;9;send: 0-0-11-11 s=0,c=1,t=3,pt=0,l=10,sg=0,st=ok:1107296326 0;0;3;0;9;read: 11-11-0 s=0,c=1,t=3,pt=0,l=10,sg=0:1107296326 11;0;1;1;3;1107296326 0;0;3;0;9;read: 11-11-0 s=0,c=1,t=2,pt=2,l=2,sg=0:922746881 11;0;1;0;2;922746881 0;0;3;0;9;read: 11-11-0 s=0,c=1,t=3,pt=2,l=2,sg=0:922746950 11;0;1;0;3;922746950 0;0;3;0;9;read: 9-8-0 s=3,c=1,t=1,pt=7,l=5,sg=0:20.0 9;3;1;0;1;20.0 Client 0: 11;0;1;1;3;922746950 0;0;3;0;9;send: 0-0-11-11 s=0,c=1,t=3,pt=0,l=9,sg=0,st=ok:922746950 0;0;3;0;9;read: 11-11-0 s=0,c=1,t=3,pt=0,l=9,sg=0:922746950 11;0;1;1;3;922746950 0;0;3;0;9;read: 11-11-0 s=0,c=1,t=2,pt=2,l=2,sg=0:922746881 11;0;1;0;2;922746881 0;0;3;0;9;read: 11-11-0 s=0,c=1,t=3,pt=2,l=2,sg=0:922746950 11;0;1;0;3;922746950 Client 0: 11;0;1;1;3;922746950 0;0;3;0;9;send: 0-0-11-11 s=0,c=1,t=3,pt=0,l=9,sg=0,st=ok:922746950 Client 0: 11;0;1;1;3;0 0;0;3;0;9;send: 0-0-11-11 s=0,c=1,t=3,pt=0,l=1,sg=0,st=ok:0 0;0;3;0;9;read: 11-11-0 s=0,c=1,t=3,pt=0,l=1,sg=0:0 11;0;1;1;3;0 0;0;3;0;9;read: 11-11-0 s=0,c=1,t=2,pt=2,l=2,sg=0:922746880 11;0;1;0;2;922746880 0;0;3;0;9;read: 11-11-0 s=0,c=1,t=3,pt=2,l=2,sg=0:922746880 11;0;1;0;3;922746880 Client 0: 11;0;1;1;3;100 0;0;3;0;9;send: 0-0-11-11 s=0,c=1,t=3,pt=0,l=3,sg=0,st=ok:100 0;0;3;0;9;read: 11-11-0 s=0,c=1,t=3,pt=0,l=3,sg=0:100 11;0;1;1;3;100 0;0;3;0;9;read: 11-11-0 s=0,c=1,t=2,pt=2,l=2,sg=0:1 11;0;1;0;2;1 0;0;3;0;9;read: 11-11-0 s=0,c=1,t=3,pt=2,l=2,sg=0:100 11;0;1;0;3;100 -
ESP8266 WiFi gateway port for MySensorsYesterday I have successfully installed the ESP8266 module and it works fine, but the Vera3 show something strange now.
Has anyone experienced this? -
Error compiling serial gateway. Please help.Ha! It's solved by deliting Mysensors from Personal Libraries on codebender.cc and Cloning Sketch&Libraries.
Thaks Sparkman for Idea! -
Error compiling serial gateway. Please help.It all started with the setting up of separate Arduino Uno as a serial gateway but now I've managed to reinstall Chrome, restarted "Getstarted" on codebender.cc when connected to the computer working 1.4 serial arduino nano. Now my ex-serial gateway 1.4 only Blinking. :) And Vera is hanging without a controller. And I cant compile old or new serial gw!
Alsow I try to install IDE from arduino site but it has the same problem even before installing from codebender.
How to install Mysensor libraries to codebender? Or it more easy to make a new accaunt? -
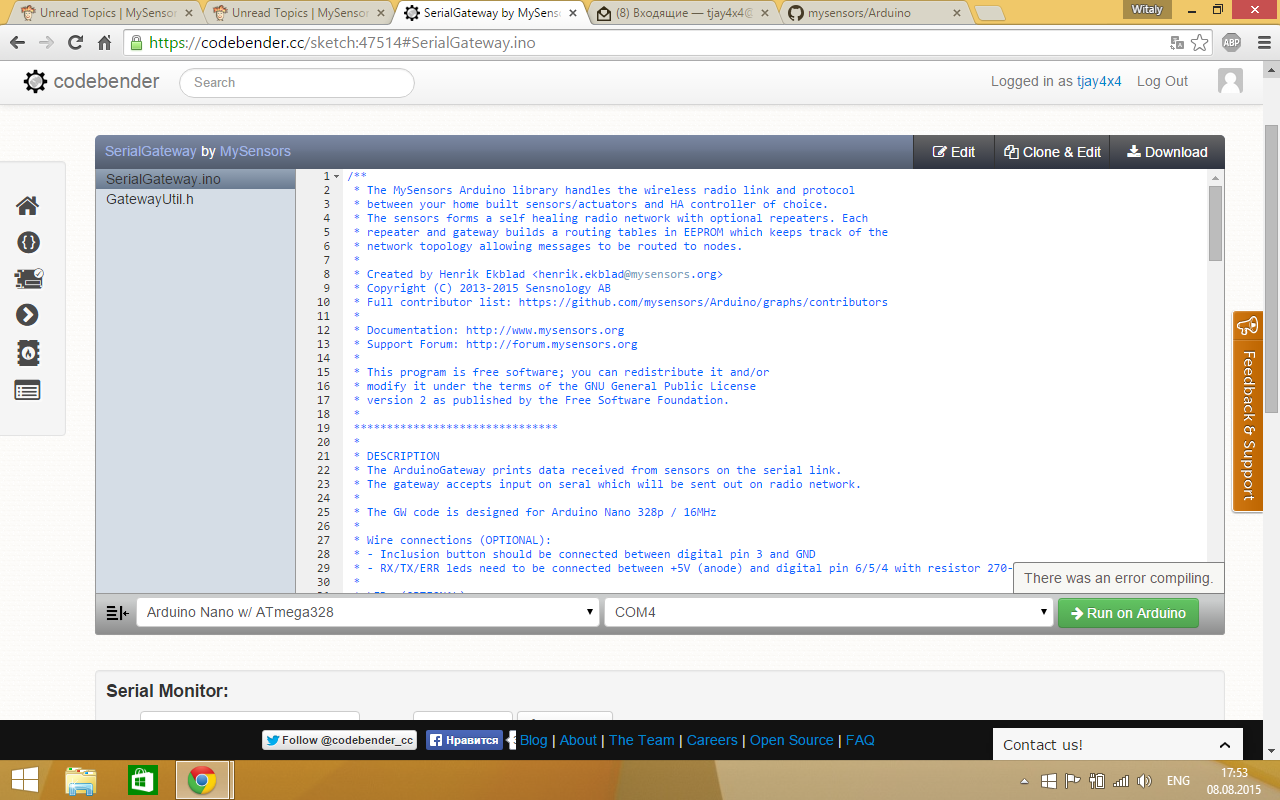
Error compiling serial gateway. Please help.Have anyone problem with compiling serial gateway? Everything works fine before I try to update my serial gw to 1.5 with codebender. So I try to use Arduino Uno, and Arduino nano (witch works on 1.4) It could compiling something like "clear eeprom" or "blink" but when I try to compile gw in shows:
Looks like your project uses header files or libraries that do not exist in our system, in your personal libraries or in your sketch. More info

In file included from  SerialGateway.ino:26:
libraries/28475_cb_personal_lib_MySensors/MyGateway.h:39:28: error: use of undeclared identifier 'DEFAULT_CE_PIN'
                MyGateway(uint8_t _cepin=DEFAULT_CE_PIN, uint8_t _cspin=DEFAULT_CS_PIN, uint8_t _inclusion_time = 1, uint8_t _inclusion_pin = 3, uint8_t _rx=6, uint8_t _tx=5, uint8_t _er=4);
                                         ^
libraries/28475_cb_personal_lib_MySensors/MyGateway.h:39:59: error: use of undeclared identifier 'DEFAULT_CS_PIN'
                MyGateway(uint8_t _cepin=DEFAULT_CE_PIN, uint8_t _cspin=DEFAULT_CS_PIN, uint8_t _inclusion_time = 1, uint8_t _inclusion_pin = 3, uint8_t _rx=6, uint8_t _tx=5, uint8_t _er=4);
                                                                        ^
 SerialGateway.ino:33:14: error: use of undeclared identifier 'DEFAULT_CE_PIN'
MyGateway gw(DEFAULT_CE_PIN, DEFAULT_CS_PIN, INCLUSION_MODE_TIME, INCLUSION_MODE_PIN,  6, 5, 4);
             ^
3 errors generated.
And with 1.5 i have:
So, what i doing wrong?
-
Controlling Blinds.com RF Dooya Motors with Arduino and Vera@Dwalt said:
How did you determine what your codes were? Did you use a RF library or did you 'sniff' them directly?
I used Audacity. As written in the instructions. For each button sequentially rewriting the code. Comparing them with Blinds.com it became clear that the differences in the combinations of digits. If in the original, the first 28 are the same, I have to differ for each controller first 12 digits and last 12 digits. UP, DOWN, STOP bits are the same for all remotes. The question is how to write it to this code? But first I need to check High and Low time.
-
Controlling Blinds.com RF Dooya Motors with Arduino and Vera@petewill Thank you! Actually I dont trying my code just on arduino. You mean it could be different high and low time for 1 and 0 on my code. Well, then I went to check.
-
Controlling Blinds.com RF Dooya Motors with Arduino and Vera@petewill Thank you for reply!
I'm using not blinds.com and this is really big problem. :) I'm not a progarmmer, and now I have two ways
1 solder relays to remote buttons. In this case I destroy remotes. Or order another 3 remotes for donation.
2 ask somebody to change this sketch for a fee. It's better, but who can? -
Controlling Blinds.com RF Dooya Motors with Arduino and VeraI'm trying to do the same but my RF code is different. The number of bits is the same. I have first 20 bits witch I can set for remote 1;2;3 but the last 20 bits depands on command.
I delete remote1Bits4, and channel (child_Id) and add eightBits action1;2;3 for up\down\stop But it dont work.
Could you check this code changes, please?Remote 1
1100 01111100 01001000 00110000 0011 01011110 up
1100 01111100 01001000 10100000 0011 01010111 stop
1100 01111100 01001000 10000000 0011 01010100 down
Remote2
0100 01110010 01001000 00110000 0011 01011110 up
0100 01110010 01001000 10100000 0011 01010111 stop
0100 01110010 01001000 10000000 0011 01010100 down
Remote3
1110 00100100 01001000 00110000 0011 11101000 up
1110 00100100 01001000 10100000 0011 11100001 stop
1110 00100100 01001000 10000000 0011 11100011 down/* // This program is free software; you can redistribute it and/or // modify it under the terms of the GNU General Public License // version 2 as published by the Free Software Foundation. // // DESCRIPTION // This sketch provides a way to control blinds from www.blinds.com using a 433MHz RF // signal. The motors in the blinds are Dooya DV24CE motors. // // Watch a video of everything working together here: https://www.youtube.com/watch?v=EorIqw-9eJw // // The sketch is based on Henrik Ekblad's <henrik.ekblad@gmail.com> MySensors project // (http://www.mysensors.org). Credit also goes to Ray (http://rayshobby.net/?p=3381) // for instruction on how to decode the RF signal from the remote as well as code for // sending the RF signal. // // Developed by Pete B. // // REVISION HISTORY // Version 1.0 - March 19, 2014 - Original Program // Version 1.1 - April 17, 2014 - Added support for multiple remotes that are programmed from blinds.com // Version 1.2 - May 16, 2014 - Added gw.send() to update Vera blinds up/down status // Version 1.3 - Nov 21, 2014 - Upgraded code to work with MySensors v1.4 */ //Include Vera related libraries #include <MySensor.h> #include <SPI.h> #include <EEPROM.h> #include <RF24.h> //Define Constants #define SEND_DATA 3 //Data pin for RF Transmitter #define ZERO_HIGH 395 //Delay for the high part of a 0 in microseconds #define ZERO_LOW 687 //Delay for the low part of a 0 in microseconds #define ONE_HIGH 750 //Delay for the high part of a 1 in microseconds #define ONE_LOW 333//Delay for the low part of a 1 in microseconds //Vera related constants // Set NODE_ID to something unique in your sensor network (1-254) // or set to AUTO if you want gw to assign a NODE_ID for you. #define NODE_ID auto /* //List all your blinds here. These will have to be added as child nodes in setup() //The numbers will be used to assign the different remotes in the remote() method //So, make a note of which blind uses which remote then add it to the if statement //in remote(). This is referred to as the blindNumber in remote(). */ #define NUMBER_OF_BLINDS 3 //Child Node Numbers //Family Room = Node 1, Remote 2, Channel 1 //Kitchen = Node 2, Remote 2, Channel 2 //Dining Room = Node 3, Remote 2, Channel 3 //Kid's Room = Node 4, Remote 1, Channel 1 //Kids's Room = Node 5, Remote 1, Channel 2 //Guest Room = Node 6, Remote 1, Channel 3 //Master Bedroom = Node 7, Remote 1, Channel 4 //Master Closet = Node 8, Remote 1, Channel 5 //Living Room = Node 9, Remote 2, Channel 4 MySensor gw; /* //These 28 standard bits appear at the beginning of each transmit sequence: //0111011100000101010111001011. They are then followed by 12 other //bits depending on the command being sent to the blind. These bits //distinguish between the different remotes. //Because I'm not good at Arduino coding I needed to use someone else's //code to send the bits. They only used 8 bits and I couldn't get any //more to send. Because if this I have broken up the 28 bits into 8 bit //sections. Make sure to put 4 zeros at the beginning of the first //sequence. They will be ignored later in the code. //I added support for multiple remotes so you don't have to reprogram //anything when you buy more blinds. Just add the additional remote codes. */ //Remote One unsigned char remote1Bits1 = 0b00001100; //integer value of the 28 bit standard sequence referenced above. "0b" prefix is for ?? unsigned char remote1Bits2 = 0b01111100; unsigned char remote1Bits3 = 0b01001000; //Remote Two unsigned char remote2Bits1 = 0b00000100; //integer value of the 28 bit standard sequence referenced above. "0b" prefix is for ?? unsigned char remote2Bits2 = 0b01110010; unsigned char remote2Bits3 = 0b01001000; //Remote Three unsigned char remote3Bits1 = 0b00001110; //integer value of the 28 bit standard sequence referenced above. "0b" prefix is for ?? unsigned char remote3Bits2 = 0b00100100; unsigned char remote3Bits3 = 0b01001000; //Remote codes will be put in standardBits with remote() method, depending on which remote is used unsigned char standardBits1 = 0b00000000; unsigned char standardBits2 = 0b00000000; unsigned char standardBits3 = 0b00000000; void setup() { gw.begin(incomingMessage, NODE_ID); // Send the sketch version information to the gateway and Controller gw.sendSketchInfo("Blind Control", "1.3"); // Register sensors to gw (they will be created as child devices) for (int i = 0; i < NUMBER_OF_BLINDS; i++) { gw.present(i + 1, S_COVER); } } void loop() { gw.process(); } void incomingMessage(const MyMessage &message) { Serial.print("Blind Channel: "); Serial.println(message.sensor); Serial.print("Message Data: "); Serial.println(message.data); Serial.print("Message Type: "); Serial.println(message.type); int incomingBlindData = atoi(message.data); if (message.type == V_STOP) //Stop { //unsigned char i; for(uint8_t i = 0; i < 2; i++) { blindAction(message.sensor, 3); //blindAction(channel, action) action: 1=up, 2=down, 3=stop delay(50); } Serial.println("STOP command"); } else if(incomingBlindData == 100 || message.type == V_UP) //100 = Open/Up { //unsigned char i; for(uint8_t i = 0; i < 2; i++) { blindAction(message.sensor, 1); delay(50); } Serial.println("UP command"); //gw.sendgw.send(message.sensor, V_DIMMER, 100); // Update Vera with status of blinds (up/down) MyMessage blindMsg(message.sensor, V_DIMMER); //may need to assign message.sensor to a variable if this doesn't work gw.send(blindMsg.set(100)); // Update Vera with status of blinds (up/down) } else if (incomingBlindData == 0 || message.type == V_DOWN) //0 = Closed/Down { //unsigned char i; for(uint8_t i = 0; i < 2; i++) { blindAction(message.sensor, 2); delay(50); } Serial.println("DOWN command"); MyMessage blindMsg(message.sensor, V_DIMMER); //may need to assign message.sensor to a variable if this doesn't work //gw.send(message.sensor, V_DIMMER, 0); // Update Vera with status of blinds (up/down) gw.send(blindMsg.set(0)); // Update Vera with status of blinds (up/down) } } void remote(int remoteNum) { if (remoteNum == 1) //Which remote will be used? { standardBits1 = remote1Bits1; //Assign remote specific codes to standardBits variable used throughout the code standardBits2 = remote1Bits2; standardBits3 = remote1Bits3; } else if { standardBits1 = remote2Bits1; //Assign remote specific codes to standardBits variable used throughout the code standardBits2 = remote2Bits2; standardBits3 = remote2Bits3; } else { standardBits1 = remote3Bits1; //Assign remote specific codes to standardBits variable used throughout the code standardBits2 = remote3Bits2; standardBits3 = remote3Bits3; } } void fourBits(unsigned char bits) { unsigned char i; int delayTime; for(i = 0; i < 4; i++) { int highTime; int lowTime; delayTime = ((bits >> (3 - i)) & 1 ? 1 : 0); if (delayTime == 1) { highTime = ONE_HIGH; lowTime = ONE_LOW; } else { highTime = ZERO_HIGH; lowTime = ZERO_LOW; } digitalWrite(SEND_DATA, HIGH); delayMicroseconds(highTime); digitalWrite(SEND_DATA, LOW); delayMicroseconds(lowTime); } } void eightBits(unsigned char bits) { unsigned char k; int delayTime; for(k = 0; k < 8; k++) { int highTime; int lowTime; delayTime = ((bits >> (7 - k)) & 1 ? 1 : 0); if (delayTime == 1) { highTime = ONE_HIGH; lowTime = ONE_LOW; } else { highTime = ZERO_HIGH; lowTime = ZERO_LOW; } digitalWrite(SEND_DATA, HIGH); delayMicroseconds(highTime); digitalWrite(SEND_DATA, LOW); delayMicroseconds(lowTime); } } //Separator Delay Method (this is repeated frequently) void separatorDelay(boolean upDown) { if(upDown == true) { digitalWrite(SEND_DATA, LOW); delayMicroseconds(8020); } digitalWrite(SEND_DATA, HIGH); delayMicroseconds(4812); digitalWrite(SEND_DATA, LOW); delayMicroseconds(1479); } void endDelay() { digitalWrite(SEND_DATA, LOW); delayMicroseconds(51895); //Time of delay at the end of each sequence } void blindAction(int a) { //c or channel: Order on the remote from left to right 1-16 available //a or action: 1=up, 2=down, 3=stop unsigned char action; //8 action bits. Only the first 4 bits are used in the up/down end sequence unsigned char action2; //Last 4 bits from the up/down end sequence unsigned char action3; //Last 4 bits from the up/down end sequence if(a == 1) { action = 0b00110000; //code for up action2 = 0b00110101; action3 = 0b00001110; } else if (a == 2) { action = 0b00010001; //code for down action2 = 0b00001110; action3 = 0b00001110; } else (a == 3) { action = 0b00010001; //code for down action2 = 0b00001110; action3 = 0b00001110; } int i = 0; //first 6 transmissions are the same for each blind action (up, down & stop) while(i < 6) { separatorDelay(false); //false unless in the last part of the up or down commands fourBits(standardBits1); eightBits(standardBits2); eightBits(standardBits3); eightBits(action); fourBits(action2); eightBits(action3); i++; } if (a == 3) //If a stop command is issued just send the end delay then exit the method { endDelay(); } else //No stop issued so run through the last sequence { separatorDelay(false); //send true because we are in the up/down end sequence so there is an additional delay fourBits(standardBits1); eightBits(standardBits2); eightBits(standardBits3); eightBits(standardBits4); eightBits(action); fourBits(action2); eightBits(action3); int j = 0; while(j < 3) { separatorDelay(true); fourBits(standardBits1); eightBits(standardBits2); eightBits(standardBits3); eightBits(standardBits4); eightBits(action); fourBits(action1); eightBits(action2); j++; } endDelay(); } }``` -
Strange value being sent from controller using mixed temp/relay nodeSorry. :) Hek, I using this code. Vera3 find relay and it works, but also appears 3 door sensors instead of 3 temp sensors.
I try to use the my arduino board only with sd18b20 sketch and it work's and show temperature. Is it sketch suitale for vera?@Gambituk said:
and here is the modified relay/temp sketch
// Running DS temperature sensor(s) and relay(s) on one mysensor arduino node // Combines Onewire and Relay code // 2014-10-14 Pego: Tested and Running on Uno/Clone and MQTT gateway // Example sketch showing how to send in OneWire temperature readings // Example sketch showing how to control physical relays. // This example will remember relay state even after power failure. #include <MySensor.h> #include <SPI.h> #include <DallasTemperature.h> #include <OneWire.h>presen #define ONE_WIRE_BUS 3 // Pin where dallase sensor is connected #define MAX_ATTACHED_DS18B20 16 #define RELAY_1 4 // Arduino Digital I/O pin number for first relay (second on pin+1 etc) #define NUMBER_OF_RELAYS 2 // Total number of attached relays #define RELAY_ON 1 // GPIO value to write to turn on attached relay #define RELAY_OFF 0 // GPIO value to write to turn off attached relay unsigned long SLEEP_TIME = 30000; // Sleep time between reads (in milliseconds) 30000 orig OneWire oneWire(ONE_WIRE_BUS); DallasTemperature sensors(&oneWire); MySensor gw; float lastTemperature[MAX_ATTACHED_DS18B20]; int numSensors=0; boolean receivedConfig = false; boolean metric = true; // Initialize temperature message MyMessage msg(0,V_TEMP); void setup() { // Startup OneWire sensors.begin(); // Startup and initialize MySensors library. Set callback for incoming messages. //gw.begin(); gw.begin(incomingMessage, AUTO, true); // Send the sketch version information to the gateway and Controller gw.sendSketchInfo("Temp and Relays", "1.0"); // Fetch the number of attached temperature sensors numSensors = sensors.getDeviceCount(); // Present all sensors to controller for (int i=0; i<numSensors && i<MAX_ATTACHED_DS18B20; i++) { gw.present(i, V_TEMP); } // Fetch relay status for (int sensor=1, pin=RELAY_1; sensor<=NUMBER_OF_RELAYS;sensor++, pin++) { // Register all sensors to gw (they will be created as child devices) gw.present(sensor, S_LIGHT); // Then set relay pins in output mode pinMode(pin, OUTPUT); // Set relay to last known state (using eeprom storage) digitalWrite(pin, gw.loadState(sensor)?RELAY_ON:RELAY_OFF); } } void loop() { // Process incoming messages (like config from server) gw.process(); // Fetch temperatures from Dallas sensors sensors.requestTemperatures(); // Read temperatures and send them to controller for (int i=0; i<numSensors && i<MAX_ATTACHED_DS18B20; i++) { // Fetch and round temperature to one decimal float temperature = static_cast<float>(static_cast<int>((gw.getConfig().isMetric?sensors.getTempCByIndex(i):sensors.getTempFByIndex(i)) * 10.)) / 10.; // Only send data if temperature has changed more then 1 degC and no error if (int(lastTemperature[i]) != int(temperature) && temperature != -127.00) { //added integer // Send in the new temperature gw.send(msg.setSensor(i).set(temperature,1)); lastTemperature[i]=temperature; } } //gw.sleep(SLEEP_TIME); //no sleep for relays!!!! } void incomingMessage(const MyMessage &message) { // We only expect one type of message from controller. But we better check anyway. if (message.type==V_LIGHT) { // Change relay state digitalWrite(message.sensor-1+RELAY_1, message.getBool()?RELAY_ON:RELAY_OFF); // Store state in eeprom gw.saveState(message.sensor, message.getBool()); // Write some debug info Serial.print("Incoming change for sensor:"); Serial.print(message.sensor); Serial.print(", New status: "); Serial.println(message.getBool()); } } -
Strange value being sent from controller using mixed temp/relay nodeI try this code on pro mini with Vera3 but then I implementing it I have a DOOR Switch instead of Ds18b20. So is it possile to show temperature on vera and what's wrong?
repeater started, id 1
send: 1-1-0-0 s=255,c=0,t=18,pt=0,l=5,st=ok:1.4.1
send: 1-1-0-0 s=255,c=3,t=6,pt=1,l=1,st=ok:0
send: 1-1-0-0 s=255,c=3,t=11,pt=0,l=25,st=ok:Liquid warm floore relay
send: 1-1-0-0 s=255,c=3,t=12,pt=0,l=3,st=ok:1.0
send: 1-1-0-0 s=0,c=0,t=0,pt=0,l=5,st=ok:1.4.1
send: 1-1-0-0 s=1,c=0,t=0,pt=0,l=5,st=ok:1.4.1
send: 1-1-0-0 s=2,c=0,t=0,pt=0,l=5,st=ok:1.4.1
send: 1-1-0-0 s=4,c=0,t=3,pt=0,l=5,st=ok:1.4.1
send: 1-1-0-0 s=5,c=0,t=3,pt=0,l=5,st=ok:1.4.1
send: 1-1-0-0 s=0,c=1,t=0,pt=7,l=5,st=ok:28.6
send: 1-1-0-0 s=1,c=1,t=0,pt=7,l=5,st=ok:28.2
send: 1-1-0-0 s=2,c=1,t=0,pt=7,l=5,st=ok:28.5