Office plant monitoring
-
@carlierd yes this is planned, but don't know yet when ..I have already started something few months ago, but I need to think about few points mostly about the overall assembly, and to be sure of the power supply/battery I prefer..I will tell you when I will have something nice :)
-
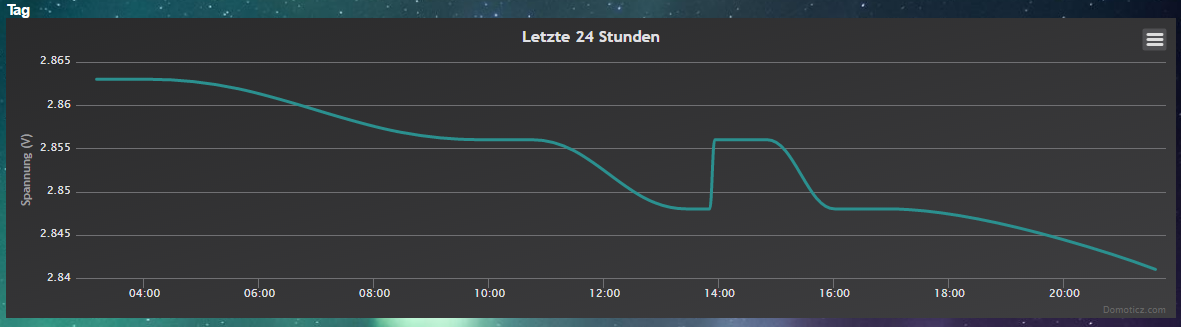
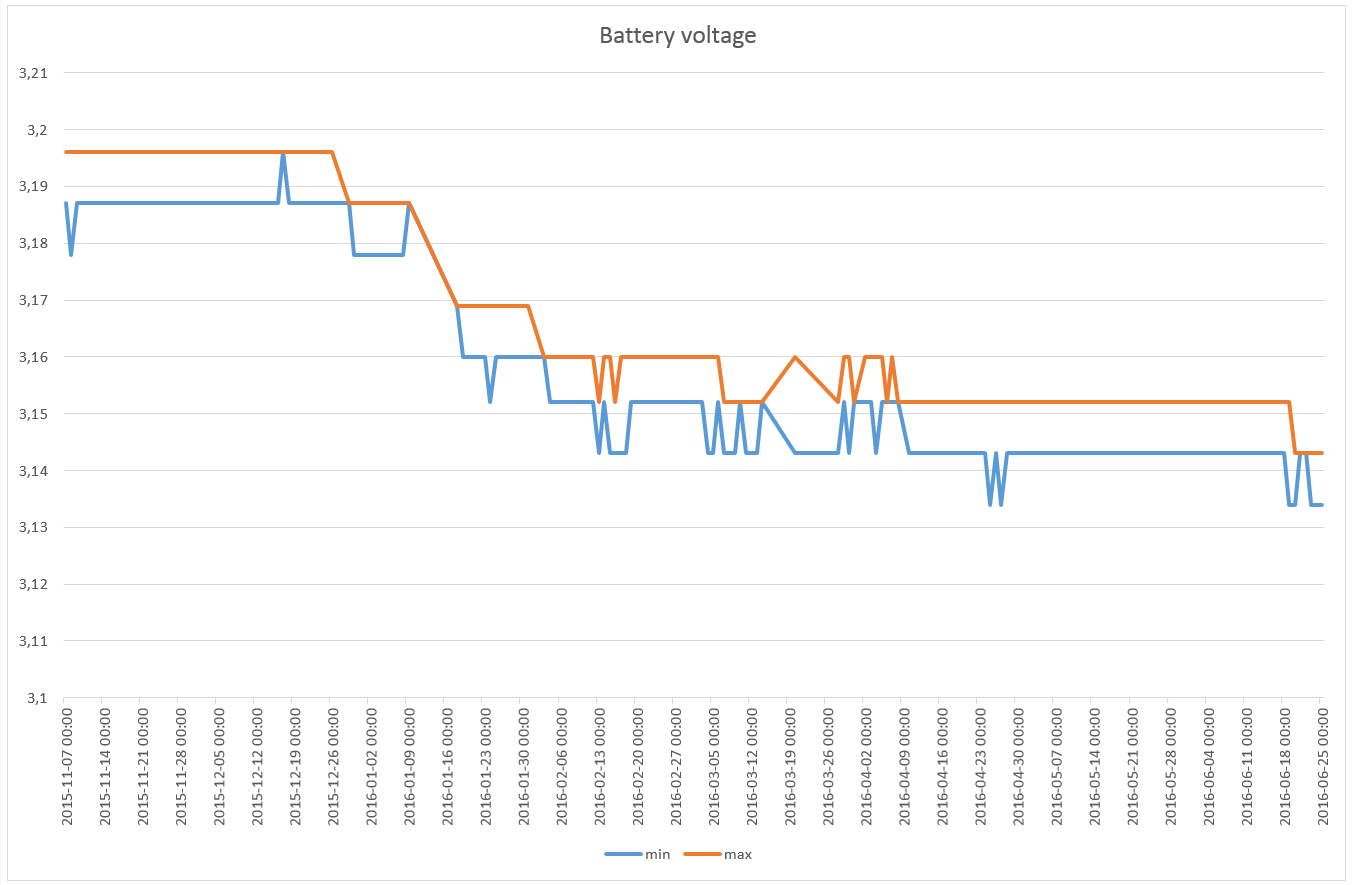
Another update on battery life:
The sensor in my bonsai tree has been reporting every 11,5 minutes since 2015-11-07, so over the last ~seven months it has done 48,965 measurements. It sends data over the radio every time, regardless if the value has changed. The battery level has gone from 3.187V to 3.134V, which means a drop of 0.0076V per month. Assuming I let it go down to 2.34V (limit for 8MHz according to the datasheet) and that the voltage drop is linear, I should get (3.187-2.34)/0.0076 = 111 months = ~9 years. There are several error sources in this calculation, but it looks like battery life will be quite good, even though the sensor reports much more often than necessary.
-
@mfalkvidd That sounds great! Are you using a pro mini too?
I am using a 3V pro mini with power led and regulator removed and the nrf + sensor (on A0 and A1) connected and in about 1 day it dropped from 2945mV to 2907mV. Its running of of 2aa batteries and its on a breadboard for now (for testing).
I am using your (slightly modified) code from above. Any idea why my power usage is so much higher?Here is my code:
/* Based on https://github.com/mfalkvidd/arduino-plantmoisture This sketch uses the soilmoisture "forks" only that are found on ebay. They are connected between 2 analog pins where one gets pulled low and the other one measures. The pins are switched every time to avoid corrosion. Between readings the sensos sleeps to preserve batterylife. 21.06.2016 V1.0 Base sketch */ #include <SPI.h> #include <MySensor.h> #define round(x) ((x)>=0?(long)((x)+0.5):(long)((x)-0.5)) #define CHILD_ID_MOISTURE 0 #define CHILD_ID_BATTERY 1 #define SLEEP_TIME 1800000 // Sleep time between reads (in milliseconds) - 30 minutes #define THRESHOLD 1.1 // Only make a new reading with reverse polarity if the change is larger than 10%. #define STABILIZATION_TIME 1000 // Let the sensor stabilize before reading #define BATTERY_FULL 3143 // 2xAA usually give 3.143V when full #define BATTERY_ZERO 1900 // 2.34V limit for 328p at 8MHz. 1.9V, limit for nrf24l01 without step-up. 2.8V limit for Atmega328 with default BOD settings. const int SENSOR_ANALOG_PINS[] = {A0, A1}; // Sensor is connected to these two pins. Avoid A3 if using ATSHA204. A6 and A7 cannot be used because they don't have pullups. MySensor gw; MyMessage msg(CHILD_ID_MOISTURE, V_HUM); MyMessage voltage_msg(CHILD_ID_BATTERY, V_VOLTAGE); long oldvoltage = 0; byte direction = 0; int oldMoistureLevel = -1; void setup() { gw.begin(); gw.sendSketchInfo("Plant moisture w bat", "1.0 21062016"); gw.present(CHILD_ID_MOISTURE, S_HUM); delay(250); gw.present(CHILD_ID_BATTERY, S_CUSTOM); Serial.println("Setting up pins..."); // init sensor pins pinMode(SENSOR_ANALOG_PINS[0], OUTPUT); pinMode(SENSOR_ANALOG_PINS[1], OUTPUT); digitalWrite(SENSOR_ANALOG_PINS[0], LOW); digitalWrite(SENSOR_ANALOG_PINS[1], LOW); } void loop() { int moistureLevel = readMoisture(); // Send rolling average of 2 samples to get rid of the "ripple" produced by different resistance in the internal pull-up resistors // See http://forum.mysensors.org/topic/2147/office-plant-monitoring/55 for more information if (oldMoistureLevel == -1) { // First reading, save current value as old oldMoistureLevel = moistureLevel; } if (moistureLevel > (oldMoistureLevel * THRESHOLD) || moistureLevel < (oldMoistureLevel / THRESHOLD)) { // The change was large, so it was probably not caused by the difference in internal pull-ups. // Measure again, this time with reversed polarity. moistureLevel = readMoisture(); } // send value and reset level gw.send(msg.set((moistureLevel + oldMoistureLevel) / 2.0 / 10.23, 1)); oldMoistureLevel = moistureLevel; long voltage = readVcc(); if (oldvoltage != voltage) { // Only send battery information if voltage has changed, to conserve battery. gw.send(voltage_msg.set(voltage / 1000.0, 3)); // redVcc returns millivolts. Set wants volts and how many decimals (3 in our case) gw.sendBatteryLevel(round((voltage - BATTERY_ZERO) * 100.0 / (BATTERY_FULL - BATTERY_ZERO))); oldvoltage = voltage; } // sleep to conserve energy gw.sleep(SLEEP_TIME); } /* Reads the current moisture level from the sensor. Alternates the polarity to reduce corrosion */ int readMoisture() { pinMode(SENSOR_ANALOG_PINS[direction], INPUT_PULLUP); // Power on the sensor by activating the internal pullup analogRead(SENSOR_ANALOG_PINS[direction]);// Read once to let the ADC capacitor start charging gw.sleep(STABILIZATION_TIME); int sensorRead = analogRead(SENSOR_ANALOG_PINS[direction]); int moistureLevel = (1023 - sensorRead); // take the actual reading Serial.print("Sensor read: "); Serial.println(sensorRead); Serial.print("Moisture level: "); Serial.println(moistureLevel); // Turn off the sensor to conserve battery and minimize corrosion pinMode(SENSOR_ANALOG_PINS[direction], OUTPUT); digitalWrite(SENSOR_ANALOG_PINS[direction], LOW); direction = (direction + 1) % 2; // Make direction alternate between 0 and 1 to reverse polarity which reduces corrosion return moistureLevel; } long readVcc() { // From http://provideyourown.com/2012/secret-arduino-voltmeter-measure-battery-voltage/ // Read 1.1V reference against AVcc // set the reference to Vcc and the measurement to the internal 1.1V reference #if defined(__AVR_ATmega32U4__) || defined(__AVR_ATmega1280__) || defined(__AVR_ATmega2560__) ADMUX = _BV(REFS0) | _BV(MUX4) | _BV(MUX3) | _BV(MUX2) | _BV(MUX1); #elif defined (__AVR_ATtiny24__) || defined(__AVR_ATtiny44__) || defined(__AVR_ATtiny84__) ADMUX = _BV(MUX5) | _BV(MUX0); #elif defined (__AVR_ATtiny25__) || defined(__AVR_ATtiny45__) || defined(__AVR_ATtiny85__) ADMUX = _BV(MUX3) | _BV(MUX2); #else ADMUX = _BV(REFS0) | _BV(MUX3) | _BV(MUX2) | _BV(MUX1); #endif delay(2); // Wait for Vref to settle ADCSRA |= _BV(ADSC); // Start conversion while (bit_is_set(ADCSRA, ADSC)); // measuring uint8_t low = ADCL; // must read ADCL first - it then locks ADCH uint8_t high = ADCH; // unlocks both long result = (high << 8) | low; result = 1125300L / result; // Calculate Vcc (in mV); 1125300 = 1.1*1023*1000 return result; // Vcc in millivolts } -
@mfalkvidd That sounds great! Are you using a pro mini too?
I am using a 3V pro mini with power led and regulator removed and the nrf + sensor (on A0 and A1) connected and in about 1 day it dropped from 2945mV to 2907mV. Its running of of 2aa batteries and its on a breadboard for now (for testing).
I am using your (slightly modified) code from above. Any idea why my power usage is so much higher?Here is my code:
/* Based on https://github.com/mfalkvidd/arduino-plantmoisture This sketch uses the soilmoisture "forks" only that are found on ebay. They are connected between 2 analog pins where one gets pulled low and the other one measures. The pins are switched every time to avoid corrosion. Between readings the sensos sleeps to preserve batterylife. 21.06.2016 V1.0 Base sketch */ #include <SPI.h> #include <MySensor.h> #define round(x) ((x)>=0?(long)((x)+0.5):(long)((x)-0.5)) #define CHILD_ID_MOISTURE 0 #define CHILD_ID_BATTERY 1 #define SLEEP_TIME 1800000 // Sleep time between reads (in milliseconds) - 30 minutes #define THRESHOLD 1.1 // Only make a new reading with reverse polarity if the change is larger than 10%. #define STABILIZATION_TIME 1000 // Let the sensor stabilize before reading #define BATTERY_FULL 3143 // 2xAA usually give 3.143V when full #define BATTERY_ZERO 1900 // 2.34V limit for 328p at 8MHz. 1.9V, limit for nrf24l01 without step-up. 2.8V limit for Atmega328 with default BOD settings. const int SENSOR_ANALOG_PINS[] = {A0, A1}; // Sensor is connected to these two pins. Avoid A3 if using ATSHA204. A6 and A7 cannot be used because they don't have pullups. MySensor gw; MyMessage msg(CHILD_ID_MOISTURE, V_HUM); MyMessage voltage_msg(CHILD_ID_BATTERY, V_VOLTAGE); long oldvoltage = 0; byte direction = 0; int oldMoistureLevel = -1; void setup() { gw.begin(); gw.sendSketchInfo("Plant moisture w bat", "1.0 21062016"); gw.present(CHILD_ID_MOISTURE, S_HUM); delay(250); gw.present(CHILD_ID_BATTERY, S_CUSTOM); Serial.println("Setting up pins..."); // init sensor pins pinMode(SENSOR_ANALOG_PINS[0], OUTPUT); pinMode(SENSOR_ANALOG_PINS[1], OUTPUT); digitalWrite(SENSOR_ANALOG_PINS[0], LOW); digitalWrite(SENSOR_ANALOG_PINS[1], LOW); } void loop() { int moistureLevel = readMoisture(); // Send rolling average of 2 samples to get rid of the "ripple" produced by different resistance in the internal pull-up resistors // See http://forum.mysensors.org/topic/2147/office-plant-monitoring/55 for more information if (oldMoistureLevel == -1) { // First reading, save current value as old oldMoistureLevel = moistureLevel; } if (moistureLevel > (oldMoistureLevel * THRESHOLD) || moistureLevel < (oldMoistureLevel / THRESHOLD)) { // The change was large, so it was probably not caused by the difference in internal pull-ups. // Measure again, this time with reversed polarity. moistureLevel = readMoisture(); } // send value and reset level gw.send(msg.set((moistureLevel + oldMoistureLevel) / 2.0 / 10.23, 1)); oldMoistureLevel = moistureLevel; long voltage = readVcc(); if (oldvoltage != voltage) { // Only send battery information if voltage has changed, to conserve battery. gw.send(voltage_msg.set(voltage / 1000.0, 3)); // redVcc returns millivolts. Set wants volts and how many decimals (3 in our case) gw.sendBatteryLevel(round((voltage - BATTERY_ZERO) * 100.0 / (BATTERY_FULL - BATTERY_ZERO))); oldvoltage = voltage; } // sleep to conserve energy gw.sleep(SLEEP_TIME); } /* Reads the current moisture level from the sensor. Alternates the polarity to reduce corrosion */ int readMoisture() { pinMode(SENSOR_ANALOG_PINS[direction], INPUT_PULLUP); // Power on the sensor by activating the internal pullup analogRead(SENSOR_ANALOG_PINS[direction]);// Read once to let the ADC capacitor start charging gw.sleep(STABILIZATION_TIME); int sensorRead = analogRead(SENSOR_ANALOG_PINS[direction]); int moistureLevel = (1023 - sensorRead); // take the actual reading Serial.print("Sensor read: "); Serial.println(sensorRead); Serial.print("Moisture level: "); Serial.println(moistureLevel); // Turn off the sensor to conserve battery and minimize corrosion pinMode(SENSOR_ANALOG_PINS[direction], OUTPUT); digitalWrite(SENSOR_ANALOG_PINS[direction], LOW); direction = (direction + 1) % 2; // Make direction alternate between 0 and 1 to reverse polarity which reduces corrosion return moistureLevel; } long readVcc() { // From http://provideyourown.com/2012/secret-arduino-voltmeter-measure-battery-voltage/ // Read 1.1V reference against AVcc // set the reference to Vcc and the measurement to the internal 1.1V reference #if defined(__AVR_ATmega32U4__) || defined(__AVR_ATmega1280__) || defined(__AVR_ATmega2560__) ADMUX = _BV(REFS0) | _BV(MUX4) | _BV(MUX3) | _BV(MUX2) | _BV(MUX1); #elif defined (__AVR_ATtiny24__) || defined(__AVR_ATtiny44__) || defined(__AVR_ATtiny84__) ADMUX = _BV(MUX5) | _BV(MUX0); #elif defined (__AVR_ATtiny25__) || defined(__AVR_ATtiny45__) || defined(__AVR_ATtiny85__) ADMUX = _BV(MUX3) | _BV(MUX2); #else ADMUX = _BV(REFS0) | _BV(MUX3) | _BV(MUX2) | _BV(MUX1); #endif delay(2); // Wait for Vref to settle ADCSRA |= _BV(ADSC); // Start conversion while (bit_is_set(ADCSRA, ADSC)); // measuring uint8_t low = ADCL; // must read ADCL first - it then locks ADCH uint8_t high = ADCH; // unlocks both long result = (high << 8) | low; result = 1125300L / result; // Calculate Vcc (in mV); 1125300 = 1.1*1023*1000 return result; // Vcc in millivolts }@LastSamurai that drop is just two bits difference so you can't really tell anything from it. There are lots of reasons that could cause it, for example measurement noise, temperature variation in the batteries, temperature variation in the internal reference, temporary drain of the battery.
-
Thanks I will keep testing for some days and then report again.
-
To get rid of the ripple effect, maybe use the rolling average of the last two measurements for the voltage measurements also?
-
To get rid of the ripple effect, maybe use the rolling average of the last two measurements for the voltage measurements also?
-
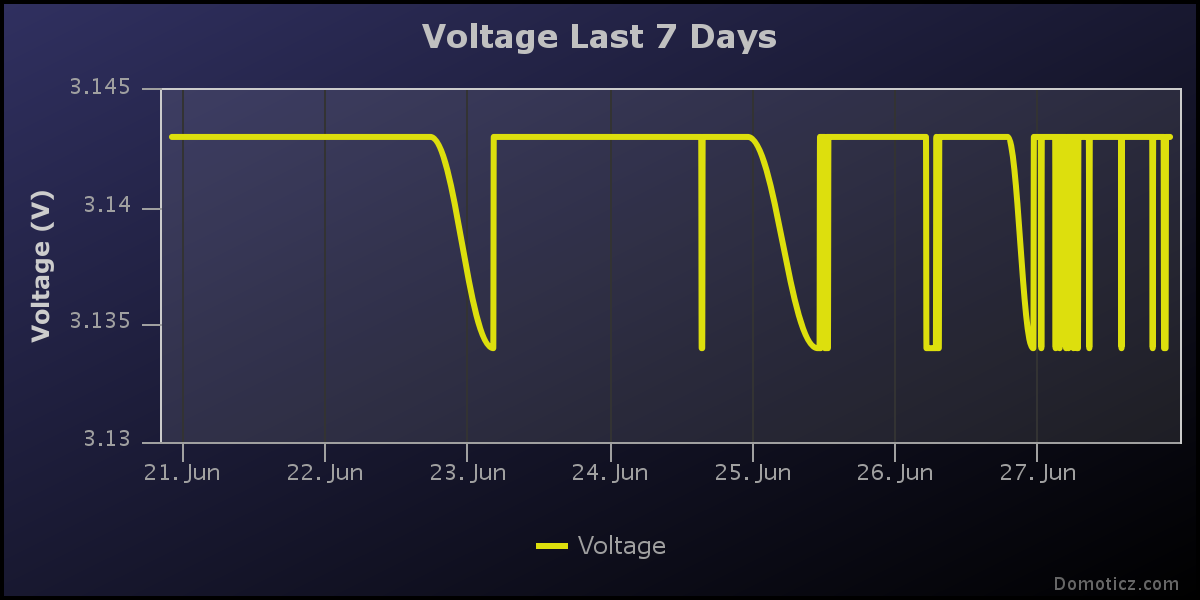
@martinhjelmare which ripple effect are you referring to?
Looking at your chart and also my own battery reporting charts, they contain small and tight ups and downs, "ripples". I was thinking about smoothing them out to have a nicer chart. But I also think this could make the measurement more accurate, which could help in @LastSamurai 's case where there's an unexpected dip in voltage. Maybe the next measurement will be higher again? Taking an average will give you more confidence in your measurement.
-
Mhm so I measured it for 2 days now and I am loosing about about 25mV per day (a little over 50mV overall). Thats really strange as I am using the pro mini without regulator or led. Has anybody seen similar problems?
Otherwise I guess I have to start measuring, although I don't know how well my multimeter can do this :( -
@LastSamurai is the drop steady or does it go up and down a lot? Mine goes up and down in the last bit (9mV) quite often, but not as much as 50mV.
@mfalkvidd Its more or less stable.
-
@mfalkvidd Its more or less stable.
-
Thanks! I will (later) and post the results here.
-
Thanks! I will (later) and post the results here.
@LastSamurai
I think Delay will really stop the MCU, Wait(xx) will continue to work in background? can anyone confirm this pleaseYou can try to use Delay(2000) between each step to know if the power is low between the steps, maybe it do something that increase the power consumption.
Try to disconnect the Sensor, maybe it is damage? When sensor is disconnected it shall report 0%.
Can you try with another Pro Mini?
-
Great idea @carlierd!
One that has everything mounted and you just stick into the plant soil would be really useful.
-
How did thinks go @Lars65 ?
I thought a bit more about this problem and I think I have come up with a pretty neat solution:
Throw away the chip on the moisture sensor and connect the "pitchfork" directly to the Arduino. Connect one prong to GND and one prong to an analog pin. No power pins are required.
https://codebender.cc/sketch:177182
The chip on the moisture sensor is basically a voltage divider. We get the same thing if we use the internal pull-up resistor on the Atmega processor.
EDIT: This means you can buy just the "pitchforks" really cheap: http://www.aliexpress.com/item/10pcs-Soil-Hygrometer-Detection-Module-Soil-Moisture-Sensor-Probes/2051713873.htmlOops! Looks like there was a serious issue with your project.
If you are not sure what could be wrong please contact us.
(file in sketch) Soil moisture for houseplants - multi-sensor internal pull-up.o: In function
global constructors keyed to oldvoltage': Soil moisture for houseplants - multi-sensor internal pull-up.cpp:(.text._GLOBAL__I_oldvoltage+0xc): undefined reference toMySensor::MySensor(unsigned char, unsigned char)'
(file in sketch) Soil moisture for houseplants - multi-sensor internal pull-up.o: In functionsetup': Soil moisture for houseplants - multi-sensor internal pull-up.cpp:(.text.setup+0x30): undefined reference toMySensor::begin(void (*)(MyMessage const&), unsigned char, unsigned char, unsigned char, rf24_pa_dbm_e, unsigned char, rf24_datarate_e)'
Soil moisture for houseplants - multi-sensor internal pull-up.cpp:(.text.setup+0x50): undefined reference toMySensor::present(unsigned char, unsigned char, bool)' Soil moisture for houseplants - multi-sensor internal pull-up.cpp:(.text.setup+0x78): undefined reference toMySensor::present(unsigned char, unsigned char, bool)'This errors.
@mfalkvidd said:
How did thinks go @Lars65 ?
I thought a bit more about this problem and I think I have come up with a pretty neat solution:
Throw away the chip on the moisture sensor and connect the "pitchfork" directly to the Arduino. Connect one prong to GND and one prong to an analog pin. No power pins are required.
https://codebender.cc/sketch:177182
The chip on the moisture sensor is basically a voltage divider. We get the same thing if we use the internal pull-up resistor on the Atmega processor.
EDIT: This means you can buy just the "pitchforks" really cheap: http://www.aliexpress.com/item/10pcs-Soil-Hygrometer-Detection-Module-Soil-Moisture-Sensor-Probes/2051713873.html