Office plant monitoring


  • @mfalkvidd said:

    @Nicklas-Starkel last weekend one of my sensors broke. Both pins were completely corroded and broke

    Did you try to just paint the sensors ?
    I've seen that here: https://www.tindie.com/products/miceuz/i2c-soil-moisture-sensor/

    It doesn't work for me. I go double check the wiring. EDIT: not it's okay now. Great !
    0_1453567276371_IMG_20160123_173901-2.jpg

    But is it possible to use A0-A1, A2-A3, A4-A5 on a atmega328P or there is the same pullup problem ?


  • Painted fork seem to work. 0% on dry heart, and now:
    0_1453725695799_jeedom-008.png

    But the pourcentage of batterie seem to change a lot lot lot.

    ps: i'll tell you if it's corroding.


  • Mod

    @Pierre-P said

    But is it possible to use A0-A1, A2-A3, A4-A5 on a atmega328P or there is the same pullup problem ?

    A0-A5 can be used. A6 and A7 do not have built-in pullup resistors and can not be set high or low. The sketch in http://forum.mysensors.org/topic/2147/office-plant-monitoring/21 mentions that but there have been many revisions and this thread is long so I don't blame you for missing it ๐Ÿ™‚


  • @Pierre-P
    That i2c thing is painted and works because it's capacitive (it can even sense when your finger is hovering a millimeter or two away from it, like a capacitive touch screen (your phone)). I put one of them into the soil yesterday. If I remember, I will get back regarding results.. I placed it into the same flower as a resistive fork, with the middle chip (so I have some corrosion).


  • @doblanch said:

    I'm on the same project personally...I using 2 battery... this part should work between 3.3 V and 5V...
    finally with 2XAA we only have 3V, and the max value for me is 750 not 1023... did you get 1023 when into the water?

    If you have the XD-28 sensor, I think air is about 1023 (so minimal connection). If you put it in water it will be much lower, 300 to 400. 100% water isn't realistic of course and because of that, I get my first reading with the sensor in the air and the second one I initiate with a button press when it's planted and the spot is fully watered.

    The button press is just a way to get the different readings for different soil. It does actually read the sensor 200 times and takes a median of that and set the "0" point after that.

    I'm trying to measure the centibar which is (apparently, I did not know this a week ago) the right way to measure the soil. Of course, soil temperature has something to do with it also. I'm working on that at the moment.


  • I'm already at 2.73Volts on my two AAA batteries. Is the last sketch a batteries killer ? With a 10 hours sleeping ??


  • Mod

    @Pierre-P after how long time?
    This is the battery level for my oldest sensor, which is using 2xAA and reporting every 2 hours 0_1454780283967_9nov-6feb.png


  • A week.
    New accus i think. I do it again but this time, i'm making voltage report with my voltmeter and a picture.


  • My node doesn't work anymore. Even with new set of accus. I will check again when I'll solder it.


  • @mfalkvidd Great project. Had few questions...Is it OK to provide 6V to Arduio Mini ? Can you show /explain how you have provided power supply to Mini and Moisture Controller ? In the set up you have , how long does the battery last ?

    Thanks


  • Mod

    @iotcrazy

    6V is OK if you connect power on the "raw" pin. 6V is NOT OK if you connect power to the Vcc pin.

    I use 2xAA batteries. - on the battery holder is connected to GND on the Arduino and + on the battery holder to Vcc. Power led and voltage regulator have been removed.

    My sensors report every two hours and I expect to get 1-2 years battery life.


  • Just built this sensor and it is working great. However I am seeing different results with every run. It seems as if the value is always higher with one polarity than with the other one. Is this normal?

    0_1456353874082_soil.PNG


  • Mod

    @Jan-Gatzke yes I'm seeing that as well. The built-in pullup resistors are not 100% accurate, which yields slightly different result when polarity is reversed.

    The easiest way is probably to let the Arduino report a rolling average of the last 2 readings instead of reporting the latest reading.

    0_1456394895794_humidity.png
    0_1456405610141_chart.png


  • @mfalkvidd I was looking to your sketch and could not quite understand this piece of line

    result = 1125300L / result; // Calculate Vcc (in mV); 1125300 = 1.110231000

    How will this above line change if I use 4 AA battery ?.

    Thanks in advance


  • Mod

    If you use 4xAA and wire power to Vcc you will break the nrf and the mcu. They are not rated for that high voltage.

    If you wire power to Raw you can not use readVcc, you'll have to use a voltage divider to one of the pins.

    Is there a reason you want to use 4xAA?


  • @mfalkvidd Yes I am connecting to RAW input. My 4 battery holder for some reason does not work with 2 or 3 batteries so connecting 6V to RAW.

    "...you'll have to use a voltage divider to one of the pins..." Can you elaborate this part ? Can you share a link which wherein Arduino Pro Mini is powered through RAW input and battery percentage is calculated. I very new to hardware but loving the mysensors projects. Kindly bear with my stupid questions.

    Appreciate your patience..


  • @iotcrazy I understood the voltage divider part by googling. So this is the only option to find the battery percentage right ? We cannot determine by connecting directly to Raw when input if more than 3.3 v.


  • Mod

    That's correct. The Arduino cannot measure voltages above it's Vcc level.

    Great that you found information on voltage dividers.

    Powering on Raw will keep the voltage regulator active all the time, so you might get worse batttery life than when using 2xAA on Vcc. Therefore I suggest you order a 2xAA battery holder for later use. In the meanwhile, you can make your 4xAA holder work by putting two wires instead of batteries in the unused slots.

    If you still want to use 4 batteries, http://www.mysensors.org/build/battery#measuring-and-reporting-battery-level has more details and code to use for battery measurement.


  • Mod

    @Jan-Gatzke I have updated my skech on codebender to report rolling average. I have not tested it yet though.
    The change is available at https://github.com/mfalkvidd/arduino-plantmoisture/commit/5e98c5e625075d62ae27956ab8dc3ea9dec4a29e


  • Mod


  • @mfalkvidd At the moment I am testing a modified version of the sketch which always does two readings. I don't think this will have a big impact on the battery life because most power is consumend by the nrf and not by the sensor. Or am I wrong? The pullups are rated at 10k Ohm. The sensors resistance will be about the same in average. So we talk about 20k at 3V which is 0.15 mA. The nrf uses abot 15 mA when sending.


  • Mod

    Yes, but the nrf needs to be active approximately 1ms while the moisture reading needs about a second to be stable. So the consumption while reading is much larger than the consumption while sending.


  • Hi.

    I have been trying to connect two sensors to the same arduino nano using this code and i have add sensor 1 pin to A0 and GND, and sensor 2 pin A1 and GND.
    But i only get the reads from sensor 1 sensor 2 doesn't appear...
    Can anyone help me with this on how to get more than one moisture sensor working.

    Thanks.


  • Mod

    @mrc-core there have been quite a few revisions of the sketch. The latest version (which can be found at github) only support one sensor, which is connected to A0 and A1 in the default configuration. Both pins are required to enable alternating the direction of the current when measuring, to try to minimize corrosion.

    Adding support for up to three sensors is technically possible (using A0-A5), but would make the code harder to read and since I have no use for multiple sensor I haven't spent the time required to program and test a sketch with multiple sensors.


  • Mod

    An update on battery life: The sensor in my bonsai tree has been reporting every 11,5 minutes since 2015-11-07, so over the last ~four months it has done 24,504 measurements. The battery level has gone from 3.187V to 3.142V, which means a drop of 0.01125V per month. Assuming I let it go down to 2.34V (limit for 8MHz according to the datasheet) and that the voltage drop is linear, I should get (3.187-2.34)/0.01125 = 75 months = ~6 years. There are several error sources in this calculation, but it looks like battery life will be quite good, even though the sensor reports much more often than necessary.

    0_1457905111939_chart.png


  • @mfalkvidd Thanks for the replay.
    Will use only one sensor per arduino.

    Once again thanks


  • @mfalkvidd since you are using 2 AA battery(3V max) with a sensor , how are you powering the sensors ? What sensors are you using ?.Most of the sensors need 5V right ? how are you providing the required voltage for sensor ?. If possible can you share a circuit diagram or close up picture for your sensor node with connection to NRF , Sensor and battery ?

    Appreciate it .


  • Mod

    @iotcrazy the fork is entirely passive so no requirements on voltage. See earlier posts in this thread for wiring information.


  • @mfalkvidd sorry if questions seems like a dump . What do you mean by passive ? every sensors needs some voltage to perform a task right ?

    I tried connecting a DHt11 Temp and humidity sensor using a arduino pro min(with led and voltage divider removed). It is connected to 2 AA battery. Unfortunate the node sends out value(proper value) only when I power on the Mini. It never sends the data again. However if I disconnect power supply and re attach it , it again sends the data. any idea what I am doing wrong ?

    Also , whats the best way to create a Node which needs to monitor a sensor which uses 5 V . Arduino Mini is 3.3 V which.

    Thanks


  • Hello,

    Thanks for this useful and simple project !
    My first node is running perfectly since 10 days.
    Next step is to create a PCB and try running on a CR2032 to minimize the size (WAF request ;))

    One question on the uses : when do you set a warning on the result ? When I need to water the flower ?

    0_1461308771999_2016-04-21 17.21.41.png

    My first node is close to 50%, is it time ? Off course it depends on the nature of the flower but I was not able to found the information on Google ...

    David.


  • Mod

    I do just like I did before I had the sensors: stick a finger into the pot to feel if it needs water. If it does, I set the warning level to whatever level the sensor reports (or slightly higher).


  • Admin

    Great idea @carlierd!

    One that has everything mounted and you just stick into the plant soil would be really useful.


  • Hardware Contributor

    yep, I think that would be a nice module!

    @mfalkvidd @hek I hope to not OT ๐Ÿ˜ณ I just want to show you few old school pics, a small jump back of 20years! My dad's stuff, a real maker ๐Ÿ˜‰

    This one was, I guess, the smallest soil moisture, in "virtual bulb", meaning there was no external electrodes, so no corrosion :
    0_1461316115256_2016-04-22_10-58-38.png
    2nd: still in virtual bulb, humidity, salinity, roots temperature, temperature compensated, pH tendancy
    0_1461316160275_2016-04-22_10-59-39.png
    Multi level soil moisture:
    0_1461316305917_2016-04-22_11-02-44.png
    And these old Aurel 433mhz emitter/receiver !
    0_1462008084352_IMAG0394.jpg
    I have lot of others old pics like this lol! He was selling his devices.

    Few months ago, I have started to mix some of his old project with our new techno, but not finished! I would like to have sort of flo** pow** but more professional..still open. what!!


  • @scalz : very interesting ! Will you plan to make one ? I am pretty sure that your design could be very very very small ๐Ÿ˜‰


  • Hardware Contributor

    @carlierd yes this is planned, but don't know yet when ..I have already started something few months ago, but I need to think about few points mostly about the overall assembly, and to be sure of the power supply/battery I prefer..I will tell you when I will have something nice ๐Ÿ™‚


  • Hello,

    I finally spent some hours on Eagles.

    See the result in this post !

    Do not hesitate to give me advice.

    David.


  • Mod

    Another update on battery life:
    The sensor in my bonsai tree has been reporting every 11,5 minutes since 2015-11-07, so over the last ~seven months it has done 48,965 measurements. It sends data over the radio every time, regardless if the value has changed. The battery level has gone from 3.187V to 3.134V, which means a drop of 0.0076V per month. Assuming I let it go down to 2.34V (limit for 8MHz according to the datasheet) and that the voltage drop is linear, I should get (3.187-2.34)/0.0076 = 111 months = ~9 years. There are several error sources in this calculation, but it looks like battery life will be quite good, even though the sensor reports much more often than necessary.
    0_1466870465803_Batteri plantmoisture.png


  • Hardware Contributor

    @mfalkvidd That sounds great! Are you using a pro mini too?
    I am using a 3V pro mini with power led and regulator removed and the nrf + sensor (on A0 and A1) connected and in about 1 day it dropped from 2945mV to 2907mV. Its running of of 2aa batteries and its on a breadboard for now (for testing).
    I am using your (slightly modified) code from above. Any idea why my power usage is so much higher?

    Here is my code:

    /*
    Based on https://github.com/mfalkvidd/arduino-plantmoisture
    
    This sketch uses the soilmoisture "forks" only that are found on ebay. They are connected between 2 analog pins where one gets pulled low and the other one measures.
    The pins are switched every time to avoid corrosion. Between readings the sensos sleeps to preserve batterylife.
    
    21.06.2016 V1.0 Base sketch
    */
    
    #include <SPI.h>
    #include <MySensor.h>
    
    #define round(x) ((x)>=0?(long)((x)+0.5):(long)((x)-0.5))
    
    #define CHILD_ID_MOISTURE 0
    #define CHILD_ID_BATTERY 1
    #define SLEEP_TIME 1800000 // Sleep time between reads (in milliseconds) - 30 minutes
    #define THRESHOLD 1.1 // Only make a new reading with reverse polarity if the change is larger than 10%.
    #define STABILIZATION_TIME 1000 // Let the sensor stabilize before reading
    #define BATTERY_FULL 3143 // 2xAA usually give 3.143V when full
    #define BATTERY_ZERO 1900 // 2.34V limit for 328p at 8MHz. 1.9V, limit for nrf24l01 without step-up. 2.8V limit for Atmega328 with default BOD settings.
    const int SENSOR_ANALOG_PINS[] = {A0, A1}; // Sensor is connected to these two pins. Avoid A3 if using ATSHA204. A6 and A7 cannot be used because they don't have pullups.
    
    MySensor gw;
    MyMessage msg(CHILD_ID_MOISTURE, V_HUM);
    MyMessage voltage_msg(CHILD_ID_BATTERY, V_VOLTAGE);
    long oldvoltage = 0;
    byte direction = 0;
    int oldMoistureLevel = -1;
    
    void setup()
    {
      gw.begin();
    
      gw.sendSketchInfo("Plant moisture w bat", "1.0 21062016");
    
      gw.present(CHILD_ID_MOISTURE, S_HUM);
      delay(250);
      gw.present(CHILD_ID_BATTERY, S_CUSTOM);
    
      Serial.println("Setting up pins...");  
      // init sensor pins
      pinMode(SENSOR_ANALOG_PINS[0], OUTPUT);
      pinMode(SENSOR_ANALOG_PINS[1], OUTPUT);
      digitalWrite(SENSOR_ANALOG_PINS[0], LOW);
      digitalWrite(SENSOR_ANALOG_PINS[1], LOW);
    }
    
    void loop()
    {
      int moistureLevel = readMoisture();
    
      // Send rolling average of 2 samples to get rid of the "ripple" produced by different resistance in the internal pull-up resistors
      // See http://forum.mysensors.org/topic/2147/office-plant-monitoring/55 for more information
      if (oldMoistureLevel == -1) { // First reading, save current value as old
        oldMoistureLevel = moistureLevel;
      }
      if (moistureLevel > (oldMoistureLevel * THRESHOLD) || moistureLevel < (oldMoistureLevel / THRESHOLD)) {
        // The change was large, so it was probably not caused by the difference in internal pull-ups.
        // Measure again, this time with reversed polarity.
        moistureLevel = readMoisture();
      }
    
      // send value and reset level
      gw.send(msg.set((moistureLevel + oldMoistureLevel) / 2.0 / 10.23, 1));
      oldMoistureLevel = moistureLevel;
    
    
      long voltage = readVcc();
    
      if (oldvoltage != voltage) { // Only send battery information if voltage has changed, to conserve battery.
        gw.send(voltage_msg.set(voltage / 1000.0, 3)); // redVcc returns millivolts. Set wants volts and how many decimals (3 in our case)
        gw.sendBatteryLevel(round((voltage - BATTERY_ZERO) * 100.0 / (BATTERY_FULL - BATTERY_ZERO)));
        oldvoltage = voltage;
      }
    
      // sleep to conserve energy
      gw.sleep(SLEEP_TIME);
    }
    
    /*
      Reads the current moisture level from the sensor.
      Alternates the polarity to reduce corrosion
    */
    int readMoisture() {
      pinMode(SENSOR_ANALOG_PINS[direction], INPUT_PULLUP); // Power on the sensor by activating the internal pullup
      analogRead(SENSOR_ANALOG_PINS[direction]);// Read once to let the ADC capacitor start charging
      gw.sleep(STABILIZATION_TIME);
    
      int sensorRead = analogRead(SENSOR_ANALOG_PINS[direction]);
      int moistureLevel = (1023 - sensorRead); // take the actual reading
    
      Serial.print("Sensor read: ");
      Serial.println(sensorRead);
      Serial.print("Moisture level: ");  
      Serial.println(moistureLevel);  
    
      // Turn off the sensor to conserve battery and minimize corrosion
      pinMode(SENSOR_ANALOG_PINS[direction], OUTPUT);
      digitalWrite(SENSOR_ANALOG_PINS[direction], LOW);
    
      direction = (direction + 1) % 2; // Make direction alternate between 0 and 1 to reverse polarity which reduces corrosion
      return moistureLevel;
    }
    
    long readVcc() {
      // From http://provideyourown.com/2012/secret-arduino-voltmeter-measure-battery-voltage/
      // Read 1.1V reference against AVcc
      // set the reference to Vcc and the measurement to the internal 1.1V reference
    #if defined(__AVR_ATmega32U4__) || defined(__AVR_ATmega1280__) || defined(__AVR_ATmega2560__)
      ADMUX = _BV(REFS0) | _BV(MUX4) | _BV(MUX3) | _BV(MUX2) | _BV(MUX1);
    #elif defined (__AVR_ATtiny24__) || defined(__AVR_ATtiny44__) || defined(__AVR_ATtiny84__)
      ADMUX = _BV(MUX5) | _BV(MUX0);
    #elif defined (__AVR_ATtiny25__) || defined(__AVR_ATtiny45__) || defined(__AVR_ATtiny85__)
      ADMUX = _BV(MUX3) | _BV(MUX2);
    #else
      ADMUX = _BV(REFS0) | _BV(MUX3) | _BV(MUX2) | _BV(MUX1);
    #endif
    
      delay(2); // Wait for Vref to settle
      ADCSRA |= _BV(ADSC); // Start conversion
      while (bit_is_set(ADCSRA, ADSC)); // measuring
    
      uint8_t low  = ADCL; // must read ADCL first - it then locks ADCH
      uint8_t high = ADCH; // unlocks both
    
      long result = (high << 8) | low;
    
      result = 1125300L / result; // Calculate Vcc (in mV); 1125300 = 1.1*1023*1000
      return result; // Vcc in millivolts
    }
    

  • Mod

    @LastSamurai that drop is just two bits difference so you can't really tell anything from it. There are lots of reasons that could cause it, for example measurement noise, temperature variation in the batteries, temperature variation in the internal reference, temporary drain of the battery.


  • Hardware Contributor

    Thanks I will keep testing for some days and then report again.


  • Plugin Developer

    To get rid of the ripple effect, maybe use the rolling average of the last two measurements for the voltage measurements also?


  • Mod

    @martinhjelmare which ripple effect are you referring to?


  • Plugin Developer

    @mfalkvidd

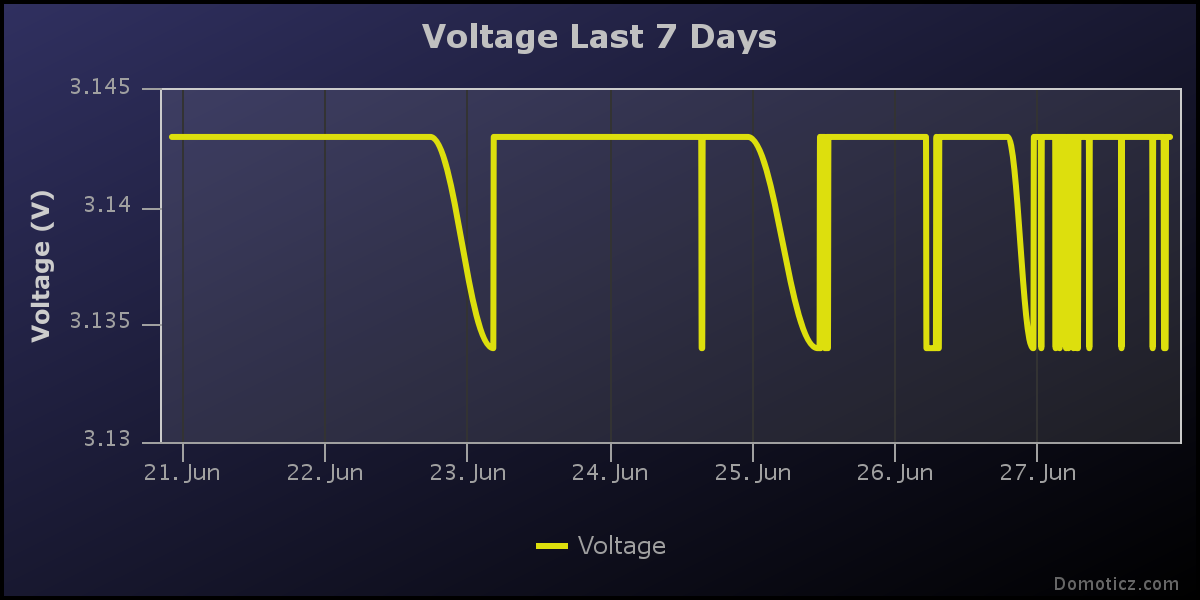
    Looking at your chart and also my own battery reporting charts, they contain small and tight ups and downs, "ripples". I was thinking about smoothing them out to have a nicer chart. But I also think this could make the measurement more accurate, which could help in @LastSamurai 's case where there's an unexpected dip in voltage. Maybe the next measurement will be higher again? Taking an average will give you more confidence in your measurement.


  • Hardware Contributor

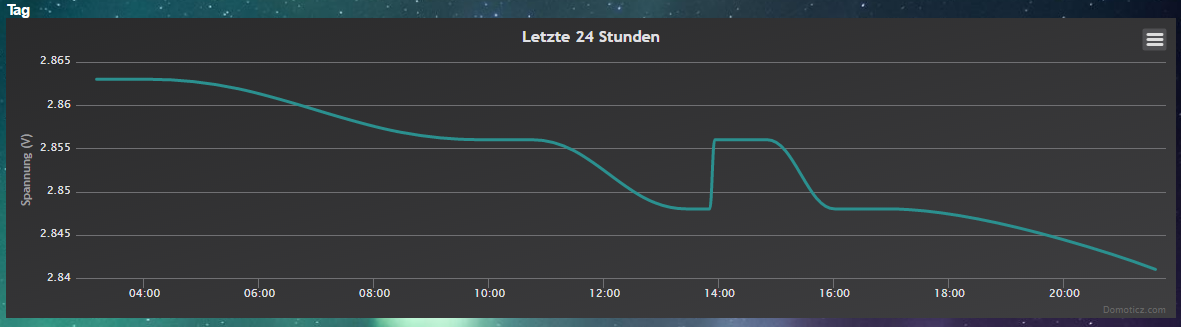
    Mhm so I measured it for 2 days now and I am loosing about about 25mV per day (a little over 50mV overall). Thats really strange as I am using the pro mini without regulator or led. Has anybody seen similar problems?
    Otherwise I guess I have to start measuring, although I don't know how well my multimeter can do this ๐Ÿ˜ž


  • Mod

    @LastSamurai is the drop steady or does it go up and down a lot? Mine goes up and down in the last bit (9mV) quite often, but not as much as 50mV.0_1467058275738_chart.png


  • Hardware Contributor

    @mfalkvidd Its more or less stable.
    0_1467058760247_upload-947392a5-8f6d-47f4-914b-dd6de12e6d09


  • Mod

    @LastSamurai that's a pity. Can you try measuring the current consumed from the battery in different situations (disconnect power to the nrf, disconnect the moisture sensor, disconnect both the nrf and the moisture sensor)?


  • Hardware Contributor

    Thanks! I will (later) and post the results here.


  • @LastSamurai
    I think Delay will really stop the MCU, Wait(xx) will continue to work in background? can anyone confirm this please

    You can try to use Delay(2000) between each step to know if the power is low between the steps, maybe it do something that increase the power consumption.

    Try to disconnect the Sensor, maybe it is damage? When sensor is disconnected it shall report 0%.

    Can you try with another Pro Mini?


  • Admin

    @flopp said:

    Wait(xx) will continue to work in background? can anyone confirm this please

    Yes, wait() continue processing incoming messages and does not sleep the MCU.


  • Hi.

    What is the last version from this ?


  • Oops! Looks like there was a serious issue with your project.

    If you are not sure what could be wrong please contact us.

    (file in sketch) Soil moisture for houseplants - multi-sensor internal pull-up.o: In function global constructors keyed to oldvoltage': Soil moisture for houseplants - multi-sensor internal pull-up.cpp:(.text._GLOBAL__I_oldvoltage+0xc): undefined reference to MySensor::MySensor(unsigned char, unsigned char)'
    (file in sketch) Soil moisture for houseplants - multi-sensor internal pull-up.o: In function setup': Soil moisture for houseplants - multi-sensor internal pull-up.cpp:(.text.setup+0x30): undefined reference to MySensor::begin(void (*)(MyMessage const&), unsigned char, unsigned char, unsigned char, rf24_pa_dbm_e, unsigned char, rf24_datarate_e)'
    Soil moisture for houseplants - multi-sensor internal pull-up.cpp:(.text.setup+0x50): undefined reference to MySensor::present(unsigned char, unsigned char, bool)' Soil moisture for houseplants - multi-sensor internal pull-up.cpp:(.text.setup+0x78): undefined reference to MySensor::present(unsigned char, unsigned char, bool)'

    This errors.

    @mfalkvidd said:

    How did thinks go @Lars65 ?

    I thought a bit more about this problem and I think I have come up with a pretty neat solution:
    Throw away the chip on the moisture sensor and connect the "pitchfork" directly to the Arduino. Connect one prong to GND and one prong to an analog pin. No power pins are required.
    https://codebender.cc/sketch:177182
    The chip on the moisture sensor is basically a voltage divider. We get the same thing if we use the internal pull-up resistor on the Atmega processor.
    EDIT: This means you can buy just the "pitchforks" really cheap: http://www.aliexpress.com/item/10pcs-Soil-Hygrometer-Detection-Module-Soil-Moisture-Sensor-Probes/2051713873.html


  • @Fat-Fly
    I have used the latest version of this sketch and it worked perfect.
    If you use the latest version it must be something with your PC/Arduino IDE


  • I trying compile from this and these errors.


  • Mod

    @Fat-Fly as flopp said, there is something wrong with your environment.

    Are you using the development version of MySensors? If so, remove it and install 1.5 or convert the sketch to the development version by following the conversion guide.

    If you already have 1.5, remove it and re-install it closely following the instructions. You can try verifying any of the stock MySensors example sketches if you like.


  • Good morning. I try after work. I use linux. I want monitor this https://goo.gl/photos/oqnXUU8Pa5wmz8k87 . Moisture and if needed open valves and switch on pump.At the moment i have 3 goups what i can control.Left , right tomatoes and 3 raised beds in center, sweet peppers.


  • Mod

    @Fat-Fly very nice greenhouse!


  • Greenhouse

    I want to monitor soil moisture and switch on irrigation valves and pump. Windows open arduino but why not mysensors+domoticz. I can't and not want every morning go to open greenhouse windows. let this make computer ๐Ÿ™‚

    Kastmistest nr. 007. Paprikad. โ€“ 02:04
    โ€” Ants Kosmos


  • This post is deleted!

  • Mod

    @Fat-Fly replace

    const int SENSOR_ANALOG_PINS[] = { 0 };
    

    with

    const int SENSOR_ANALOG_PINS[] = { A0 };
    

    Connect like this, except use D8 instead of A1 (the connection displayed is for a newer version of the sketch, which supports alternating polarity)


  • Hardware Contributor

    @mfalkvidd So after running my sensor for 3 days with the "fork" connected I had a pretty big loss of voltage. So (as you suggested) I ran it for ~2 days without the fork connected (just the pro mini + radio) and the loss has gone down to ~0 (it keeps alternating between 2806 and 2799mV).
    So its obviously the fork itself that is the problem. I connected it directly to A0 and A1 and my code is above.
    Any idea where the error might be? I will try some other cables later because thats the only idea I have...

    @LastSamurai said:

    @mfalkvidd That sounds great! Are you using a pro mini too?
    I am using a 3V pro mini with power led and regulator removed and the nrf + sensor (on A0 and A1) connected and in about 1 day it dropped from 2945mV to 2907mV. Its running of of 2aa batteries and its on a breadboard for now (for testing).
    I am using your (slightly modified) code from above. Any idea why my power usage is so much higher?

    Here is my code:

    /*
    Based on https://github.com/mfalkvidd/arduino-plantmoisture
    
    This sketch uses the soilmoisture "forks" only that are found on ebay. They are connected between 2 analog pins where one gets pulled low and the other one measures.
    The pins are switched every time to avoid corrosion. Between readings the sensos sleeps to preserve batterylife.
    
    21.06.2016 V1.0 Base sketch
    */
    
    #include <SPI.h>
    #include <MySensor.h>
    
    #define round(x) ((x)>=0?(long)((x)+0.5):(long)((x)-0.5))
    
    #define CHILD_ID_MOISTURE 0
    #define CHILD_ID_BATTERY 1
    #define SLEEP_TIME 1800000 // Sleep time between reads (in milliseconds) - 30 minutes
    #define THRESHOLD 1.1 // Only make a new reading with reverse polarity if the change is larger than 10%.
    #define STABILIZATION_TIME 1000 // Let the sensor stabilize before reading
    #define BATTERY_FULL 3143 // 2xAA usually give 3.143V when full
    #define BATTERY_ZERO 1900 // 2.34V limit for 328p at 8MHz. 1.9V, limit for nrf24l01 without step-up. 2.8V limit for Atmega328 with default BOD settings.
    const int SENSOR_ANALOG_PINS[] = {A0, A1}; // Sensor is connected to these two pins. Avoid A3 if using ATSHA204. A6 and A7 cannot be used because they don't have pullups.
    
    MySensor gw;
    MyMessage msg(CHILD_ID_MOISTURE, V_HUM);
    MyMessage voltage_msg(CHILD_ID_BATTERY, V_VOLTAGE);
    long oldvoltage = 0;
    byte direction = 0;
    int oldMoistureLevel = -1;
    
    void setup()
    {
      gw.begin();
    
      gw.sendSketchInfo("Plant moisture w bat", "1.0 21062016");
    
      gw.present(CHILD_ID_MOISTURE, S_HUM);
      delay(250);
      gw.present(CHILD_ID_BATTERY, S_CUSTOM);
    
      Serial.println("Setting up pins...");  
      // init sensor pins
      pinMode(SENSOR_ANALOG_PINS[0], OUTPUT);
      pinMode(SENSOR_ANALOG_PINS[1], OUTPUT);
      digitalWrite(SENSOR_ANALOG_PINS[0], LOW);
      digitalWrite(SENSOR_ANALOG_PINS[1], LOW);
    }
    
    void loop()
    {
      int moistureLevel = readMoisture();
    
      // Send rolling average of 2 samples to get rid of the "ripple" produced by different resistance in the internal pull-up resistors
      // See http://forum.mysensors.org/topic/2147/office-plant-monitoring/55 for more information
      if (oldMoistureLevel == -1) { // First reading, save current value as old
        oldMoistureLevel = moistureLevel;
      }
      if (moistureLevel > (oldMoistureLevel * THRESHOLD) || moistureLevel < (oldMoistureLevel / THRESHOLD)) {
        // The change was large, so it was probably not caused by the difference in internal pull-ups.
        // Measure again, this time with reversed polarity.
        moistureLevel = readMoisture();
      }
    
      // send value and reset level
      gw.send(msg.set((moistureLevel + oldMoistureLevel) / 2.0 / 10.23, 1));
      oldMoistureLevel = moistureLevel;
    
    
      long voltage = readVcc();
    
      if (oldvoltage != voltage) { // Only send battery information if voltage has changed, to conserve battery.
        gw.send(voltage_msg.set(voltage / 1000.0, 3)); // redVcc returns millivolts. Set wants volts and how many decimals (3 in our case)
        gw.sendBatteryLevel(round((voltage - BATTERY_ZERO) * 100.0 / (BATTERY_FULL - BATTERY_ZERO)));
        oldvoltage = voltage;
      }
    
      // sleep to conserve energy
      gw.sleep(SLEEP_TIME);
    }
    
    /*
      Reads the current moisture level from the sensor.
      Alternates the polarity to reduce corrosion
    */
    int readMoisture() {
      pinMode(SENSOR_ANALOG_PINS[direction], INPUT_PULLUP); // Power on the sensor by activating the internal pullup
      analogRead(SENSOR_ANALOG_PINS[direction]);// Read once to let the ADC capacitor start charging
      gw.sleep(STABILIZATION_TIME);
    
      int sensorRead = analogRead(SENSOR_ANALOG_PINS[direction]);
      int moistureLevel = (1023 - sensorRead); // take the actual reading
    
      Serial.print("Sensor read: ");
      Serial.println(sensorRead);
      Serial.print("Moisture level: ");  
      Serial.println(moistureLevel);  
    
      // Turn off the sensor to conserve battery and minimize corrosion
      pinMode(SENSOR_ANALOG_PINS[direction], OUTPUT);
      digitalWrite(SENSOR_ANALOG_PINS[direction], LOW);
    
      direction = (direction + 1) % 2; // Make direction alternate between 0 and 1 to reverse polarity which reduces corrosion
      return moistureLevel;
    }
    
    long readVcc() {
      // From http://provideyourown.com/2012/secret-arduino-voltmeter-measure-battery-voltage/
      // Read 1.1V reference against AVcc
      // set the reference to Vcc and the measurement to the internal 1.1V reference
    #if defined(__AVR_ATmega32U4__) || defined(__AVR_ATmega1280__) || defined(__AVR_ATmega2560__)
      ADMUX = _BV(REFS0) | _BV(MUX4) | _BV(MUX3) | _BV(MUX2) | _BV(MUX1);
    #elif defined (__AVR_ATtiny24__) || defined(__AVR_ATtiny44__) || defined(__AVR_ATtiny84__)
      ADMUX = _BV(MUX5) | _BV(MUX0);
    #elif defined (__AVR_ATtiny25__) || defined(__AVR_ATtiny45__) || defined(__AVR_ATtiny85__)
      ADMUX = _BV(MUX3) | _BV(MUX2);
    #else
      ADMUX = _BV(REFS0) | _BV(MUX3) | _BV(MUX2) | _BV(MUX1);
    #endif
    
      delay(2); // Wait for Vref to settle
      ADCSRA |= _BV(ADSC); // Start conversion
      while (bit_is_set(ADCSRA, ADSC)); // measuring
    
      uint8_t low  = ADCL; // must read ADCL first - it then locks ADCH
      uint8_t high = ADCH; // unlocks both
    
      long result = (high << 8) | low;
    
      result = 1125300L / result; // Calculate Vcc (in mV); 1125300 = 1.1*1023*1000
      return result; // Vcc in millivolts
    }


  • I correct this and try again after work. Yesterday i do not find time.

    @mfalkvidd said:

    @Fat-Fly replace

    const int SENSOR_ANALOG_PINS[] = { 0 };
    

    with

    const int SENSOR_ANALOG_PINS[] = { A0 };
    

    Connect like this, except use D8 instead of A1 (the connection displayed is for a newer version of the sketch, which supports alternating polarity)


  • @mfalkvidd : Maybe change sleeping time to 60 min and STABILIZATION_TIME 1000 to 500 ms or smaller ? This place is pure lost energy. Why not to try without stablization time ?


  • Mod

    @Fat-Fly with the current solution it looks like I will get many years of battery life. Why make the solution worse without any gain?

    Without stabilization time you will get very unreliable results. I suggest you try and see what happens. Compare readings with and without stabilization times.


  • I in home and try this at the moment.


  • I upload sketch from here and pro mini not connect to gateway. GW from this pro mini away maybe 50 cm.


  • end: 0-0-1-0 s=255,c=0,t=17,pt=0,l=5,sg=0,st=fail:1.5.3
    send: 0-0-1-0 s=255,c=3,t=6,pt=1,l=1,sg=0,st=fail:1
    sensor started, id=0, parent=1, distance=2
    send: 0-0-1-0 s=255,c=3,t=11,pt=0,l=21,sg=0,st=fail:Plants moisture w bat
    send: 0-0-1-0 s=255,c=3,t=12,pt=0,l=3,sg=0,st=fail:1.2
    send: 0-0-1-0 s=0,c=0,t=23,pt=0,l=0,sg=0,st=fail:
    find parent


  • sensor started, id=0, parent=1, distance=2

    You have no connection to GW since ID=0.

    Looks you have a Repeater node since distance=2?


  • I deleted all my libaries catalog and unpack mysensors 1.4. Previous was 1.5. Too many options what i do not understand. After work i try again and to let you know from results.


  • 2016-07-04 14:58:10.793 MySensors: Gateway Ready...
    2016-07-04 14:58:10.869 MySensors: Gateway Version: 1.4.2
    This domoticz log

    This from Arduino ide
    sensor started, id 0
    send: 0-0-1-0 s=255,c=0,t=17,pt=0,l=5,st=fail:1.4.2
    send: 0-0-1-0 s=255,c=3,t=6,pt=1,l=1,st=fail:1
    send: 0-0-1-0 s=255,c=3,t=11,pt=0,l=8,st=fail:Humidity
    send: 0-0-1-0 s=255,c=3,t=12,pt=0,l=3,st=fail:1.0
    send: 0-0-1-0 s=0,c=0,t=7,pt=0,l=0,st=fail:
    send: 0-0-1-0 s=1,c=0,t=6,pt=0,l=0,st=fail:
    send: 0-0-1-0 s=1,c=1,t=0,pt=7,l=5,st=fail:80.2
    send: 0-0-255-255 s=255,c=3,t=7,pt=0,l=0,st=fail:
    T: 80.24
    send: 0-0-1-0 s=0,c=1,t=1,pt=7,l=5,st=fail:38.7
    H: 38.70
    send: 0-0-1-0 s=0,c=1,t=1,pt=7,l=5,st=fail:38.5
    H: 38.50
    send: 0-0-1-0 s=0,c=1,t=1,pt=7,l=5,st=fail:37.8
    H: 37.80
    send: 0-0-1-0 s=1,c=1,t=0,pt=7,l=5,st=fail:80.1
    T: 80.06

    This is not moisture sketch. I try with different sketches.

    Maybe need change nrf? I try.2016-07-04 15:42:12.816 MySensors: Gateway Ready...
    2016-07-04 15:42:12.891 MySensors: Gateway Version: 1.5.3


  • Hardware Contributor

    Version 1.5 should work if you do it right. It does for me.
    In your case the sensor can't seem to get any connection to your gateway.
    You should try adding a capacitor to the radio, check your power supply and change the nrf module. These are the reasons for most errors imo (especially the power supply)

    There are extra Threads/Topics to finding an error with your setup here in the forum. I think this doesn't really belong to this thread anymore.


  • Okay. I search


  • Hardware Contributor

    @Fat-Fly said:

    Okay. I search

    This might help.


  • Today morning i can say : working. I bought arduinos 3,3v 10 pcs from Aliexpress. Yesterday i change this to 5V pro mini and this sensor get work. I take picture from this Arduino. Maybe 5volts not 3,3. Voltage stabilizer on the arduino is S201 ?
    0_1467781824908_13607043_10210198205936111_585322452755227500_n.jpg
    I'll change this china moisture fork with something stainless steel


  • One question. This sketch measure moisture every 60000 ms, 10 min.It is possible to measure every 30 min ? Battery power lost is minimal.
    If this fork in water domoticz reported 88% of moisture. How to change value?


  • @Fat-Fly Hi there! This is Fay from codebender.cc Thank you for using codebender! I just wanted to let you know that the sketch you are using here has been deleted and so it is not available for users to view it. Let me know if you have any question!
    Cheers!
    Fay


  • @Fay Candiliari good morning.
    I copied this scketch to my comp and delete all mysensors libraries and install development. After this all in ok.


  • Thought I would throw this in the pot
    Why not change the sensor Probe ?? no credit to me , just was googleing as you do,
    Home made sensors I think less prone to corrosion
    here's the link

    http://www.cheapvegetablegardener.com/how-to-make-cheap-soil-moisture-sensor-2/

    Had some seeds from very tasty tomatoes last year ,have planted and this year growing like tiffids !!
    Getting quite big so have move from kitchen to Greenhouse ASP really
    Will try with this type of sensor


  • Mod

    @mutantx nice idea, thanks for sharing!


  • I build moisture sensors from stainless wire. If this in pot at a depth of 1 inch domoticz reported 83% of moistre level.Real plant was dry and needed watering. I put moisture level on the soil

    0_1468159204580_IMG_4526.JPG

    and sensor reported moisture level 43%. I test and put moisture sensor to the soil at depth 1 inch

    0_1468159222643_IMG_4527.JPG

    Sensor reported moisture level 96%.


  • Hello,

    After several weeks I finally succeed to create a dedicated PCB ! It was started yesterday evening and works fine.

    Some pictures:
    0_1469782265724_Photo 1.jpg
    0_1469782279459_Photo 2.jpg
    0_1469782286758_Photo 3.jpg

    Measure is reported each two hours. So I expect more than two years on a CR2032 (using @GertSanders firmware).

    I can off course provide any information as PCB.

    Thanks @mfalkvidd for the idea and the code. The project is now WAF ๐Ÿ˜‰

    David.


  • Great. Nothing to say. But i need build this. 10 pcs first time. ๐Ÿ™‚ I live in farm or how to right say in english. With rubber boots from the land ?


  • Is it possible to purchase it somewhere? ๐Ÿ™‚


  • Why not mastered it self ?


  • Yesterday my sensor reported moisture 80% but soil was very wet. Thoughts.


  • Mod

    @Fat-Fly that is normal. Did you expect something else? If so, what did you expect?


  • @Fat-Fly
    I have sensors that report 25-35% and they are still not dry.
    I water for 10-20 min and they report 40%, sometimes 45%. But I know that when they report 25% it starts to be time to water.


  • Mod

    @flopp the level reported will depend on the following things (maybe more):

    • the pullup resistor - varies between different arduinos
    • the soil composition - varies between different pots
    • the temperature - varies throughout the day

    That means it is impossible to compare readings from two different Arduinos in the same pot and it is impossible to compare readings from different pots using the same Arduino.


  • @mfalkvidd
    Thanks


  • From temp varies moisture level and from fertilizer too. At the bottom of the bucket was more. Yesterday i install moisture sensor to the greenhouse. Level was 60-70%. This is normal if i check with finger. :). Today i try drive relays and water pump.
    0_1470039173699_34c652b1-4f64-42a6-9ffd-f41f8e3964ca.jpg


  • This sort of sensor is not good, because the electrolyticeffect.
    You always should use soil sensors, which are based on the capacitive effect.

    Like this one:
    https://forum.mysensors.org/topic/4474/capacitive-soilsensor-for-measurement-the-humidity-of-flowers

    Best regards,
    NetRap


  • My sensors is not good yes. I do not understand what is soil moisture % really. ๐Ÿ˜ž My pepper was overwatering. Very wet and moisture was 80% only.


  • Mod

    @NetRap there are downsides but "no good" is incorrect. I have used these sensors successfully for almost a year.


  • The problem is, that your design is based on conductivity.
    This means, that the electrodes will be destroyed over time
    and the produced metal salts are in your flower,garden,...

    I don't will have metal salts in my tomatoes !!! ๐Ÿ˜‰


  • Mod

    @NetRap I doubt that one second of 3V electric power every hour (0.03% duty cycle) will produce measurable amount of salt but yes, for food production capacitive measurements are probably better. The topic of this thread is "office plant monitoring" though and I hope you don't have to live off your office plants ๐Ÿ™‚


  • Hardware Contributor

    "Metal salts" doesn't sound very dangerous unless you're more specific. I prefer some NaCl on my tomatoes.

    How about some gold- or silver plated electrodes if you're of the worrying kind?


  • I want to try electrodes from stainless steel.


  • Normaly when you use eletricity and water, you need to sacrify something. For an example, when you cool a boat engine with water, you normaly use zinkanodes. I guess this is also the same when we want to messure humidity for an plant.
    So, if you should use copper anodes for messuring, you could paint them with a zink color.
    What it effects the resistance, I don't know.


  • Maybe in scketch needed change measure time? Maybe need use function round ?


Log in to reply
 

Suggested Topics

  • 8
  • 2
  • 1
  • 3
  • 2
  • 1

0
Online

11.2k
Users

11.1k
Topics

112.5k
Posts