๐Ÿ’ฌ Easy/Newbie PCB for MySensors


  • same hear...i ordered from itead...i had to upload the gerbers myself....


  • I have some issues with battery powered version with this board, maybe someone can point out what I did wrong. I have several of these boards working great (rev 8 says on them, the radio cap is however properly connected). I recently noticed that battery powered sensors do not work if battery is under 2.7v (on one pro mini it goes under 2.3v) even thought I have 3.3v booster. I have one dht22 sensor, measuring resistors and cap, bat jumper, basically my board looks exactly like example on the openharware, this one https://www.openhardware.io//uploads/568ed84b60aa3f8965fbf095/image/Rev8 Bat.jpg
    Also did the battery hack, removed led and removed onboard regulator.
    I have rechecked several times, changed several radios and several arduinos, but they just wont work reliably on lover battery power then 2.8v . Is that the limit?
    I cannot debug using serial adapter, as when I connect it, then pro works fine as it gets 3.3v from the pc.
    But here is some debug measurements I did on 2.5v batteries: vcc - gnd pins on pro mini show 3.3v. Pins out of booster do show 3.3v. So do pins on the dht22.
    Pins on the radio show 2.5v, so do D2-gnd show 2.5v (or -2.5v i forgot). Why does pin2 have 2.5v, I have desoldered it so it is not connected to anything, I guess that is some feedback voltage from the radio (as dht22 gets 3.3v) Can this pin (or voltage measurement a0) somehow disturb the pro mini?
    Do you have some suggestions on how I can debug what is going on?
    The led on arduino goes red for 3-4s, then goes off for 2s then again red for 3s, then off...
    I have two identical boards, and only thing that is determining the lov limit is pro mini modules. Some of them go to 2.7v (on both boards) and on of them goes down to 2.3v on both boards. I do not understand why when they do get 3.3v on the vcc from the booster?

    What is the lowest voltage the batteries can go (with the 3.3v booster)?


  • Hardware Contributor

    @dakipro - hi!

    but they just wont work reliably on lover battery power then 2.8v . Is that the limit?

    No, the limit should be (if you have a genuine radio) 1,9v. Im not sure what kind of voltages a clone will manage, but my nodes goes below 2.8v!

    I cannot debug using serial adapter, as when I connect it, then pro works fine as it gets 3.3v from the pc.

    This should not be a problem - you can power the node from the "normal" way and just connect RX/TX and GND from the ftdi to the arduino ftdi header. I have done this several times.

    D2-gnd show 2.5v

    The IRQ line from the radio is 2.5v since thats what the radio gets. Im not exactly sure what this does, but in SPI which is what the radio are using, its either HIGH or LOW so 2.5v sounds right since the radio has that voltage. This should not disturb the arduino! This is changed in REV9 so you can disconnect D2 from the radio if wanted. You should not use D2 for any sensor below Rev9.

    The led on arduino goes red for 3-4s, then goes off for 2s then again red for 3s, then off...

    Sounds like the radio is transmitting... if this goes on and on it can mean the radio isnt getting connected/ack or establish a way to the gateway.

    Do you have some suggestions on how I can debug what is going on?

    You need to check the debut output (see above)!
    Could you describe the issue? Are the node lost from the controller?

    What is the lowest voltage the batteries can go (with the 3.3v booster)?

    1.9v is the minimum to the radio.
    0,8v is the minimum for the booster.


  • Thank you for your answer, the tip about debugging helped a lot.
    I now checked on one board and it looks that some pro minis are having problems when battery voltage goes bellow certain level (f.eks. 2.7v).
    Testing results:
    "good pro mini" works up to 2.0v , on 1.9v it shows fallowing errors

    send: 4-4-0-0 s=1,c=0,t=7,pt=0,l=0,sg=0,st=fail:
    find parent
    send: 4-4-255-255 s=255,c=3,t=7,pt=0,l=0,sg=0,st=bc:
    send: 4-4-0-0 s=2,c=0,t=6,pt=0,l=0,sg=0,st=fail:
    temp: nan
    nan
    send: 4-4-0-0 s=255,c=3,t=0,pt=1,l=1,sg=0,st=fail:62
    send: 4-4-0-0 s=2,c=1,t=0,pt=7,l=5,sg=0,st=fail:0.00
    send: 4-4-0-0 s=1,c=1,t=1,pt=7,l=5,sg=0,st=fail:0.0
    

    "bad pro mini" works fine above 2.7, on 2.6 it logs

    
    84973 MCO:SLP:MS=15000,SMS=1,I1=255,M1=255,I2=255,M2=255
    85047 !MCO:SLP:TNR
    85874 TSM:FAIL:RE-INIT
    85897 TSM:INIT
    85919 TSM:INIT:TSP OK
    85942 TSM:INIT:STATID=3
    85968 TSF:SID:OK,ID=3
    85991 TSM:FPAR
    86042 TSF:MSG:SEND,3-3-255-255,s=255,c=3,t=7,pt=0,l=0,sg=0,ft=0,st=OK:
    88117 !TSM:FPAR:NO REPLY
    88141 TSM:FPAR
    88193 TSF:MSG:SEND,3-3-255-255,s=255,c=3,t=7,pt=0,l=0,sg=0,ft=0,st=OK:
    90269 !TSM:FPAR:NO REPLY
    90294 TSM:FPAR
    90345 TSF:MSG:SEND,3-3-255-255,s=255,c=3,t=7,pt=0,l=0,sg=0,ft=0,st=OK:
    92422 !TSM:FPAR:NO REPLY
    92446 TSM:FPAR
    92497 TSF:MSG:SEND,3-3-255-255,s=255,c=3,t=7,pt=0,l=0,sg=0,ft=0,st=OK:
    94574 !TSM:FPAR:FAIL
    94595 TSM:FAIL:CNT=4
    94617 TSM:FAIL:PDT
    95066 MCO:SLP:MS=4999
    95088 !TSF:SND:TNR
    95610 MCO:SLP:TPD


    What I see on the log parser is that the "No potential parents replied to find parent request" pops out as the biggest issue, suggesting that radio communication is not doing well.

    I am testing using the small bench power supply (the Chinese ones with the oled screen) so the current should not be the problem. Why would pro mini be the problem, when it is getting 3.3v directly from same stepup?
    The radio and all other components are exactly the same in all the tests i just swap the minis, I think radio would have failed with both minis if it is the radio... or perhaps the signal to the radio is not good/stable enough? No idea to be honest ๐Ÿ™‚

    If that matters: they are all getting 2.7v (or what I set) on pin 2 even though I have physically cut the connection to the radio irq (with the knife, on the board, they are not touching anything else on the board).

    p.s. now that I write this, i realize that another difference is the sketch on them, "the good one" is "vanilla" mysensors 1.5 code and all the bad ones are latest mysensors using the node-manager library. I do not know enough about chip programming, but as a web developer I would think that the code should not determine minimum voltage needed on board? (or there are some routines in some strange combination doing some magic... hm...)


  • Well I just tested with latest example from mysensors library, and we can exclude my latest p.s., nothing to do with using the node-manager (as expected).
    Only difference is the pro minis (but again, they should all get 3.3v via popup)?
    and on the "good" node I have mysensors 1.5 while on the others I use 2.1.


  • Hardware Contributor

    @dakipro - It looks like when the voltage drops, you are having issues with your radio (No reply and ST=Fail).
    This should not be a problem, since this is powered directly from the batteries and you say there are 2.8v left.

    The first thing that comes to my mind is that as the voltage drops, the booster needs to work harder and introduces more noice into the board. As the noice increase, the radio gets in trouble.
    The other I can imagine is that you have a bad clone which cant handle lower voltages.

    Both problems are a bit tricky to diagnose. First I would try some different radios, if possible from different batches. Second I would look more close to the booster. They vary greatly in quality and some are just really bad. Sometimes a cheramic capacitor might help (from output to gnd on the booster). You could also just disconnect the booster and see if it works (the pro mini shoudl be able to handle down to 2.8v).


  • After several hours of debugging and changing all possible components, i built exactly same circuit on prototype board and with exactly same (active) components I was able to go down to 1.9, sometimes to 1.8, while on the easyboard only down to 2.6. I also used exactly the same booster on both prototype and on the easyboard.

    But then a breakthrough, I have found one passive component that was different between the two mentioned boards! It was the radio freaking capacitor, on the "good" board it was 47uf, and on the problematic board had 4.7uf!
    I changed radio cap to 47uf and I am now able to go on both boards down to 2.3v. Which is ok, not the 1.9v but it is good enough (for now ๐Ÿ™‚ ) So those 42.3uf were missing for radio to go ~0.5v lower in voltage I guess.

    The one thing I am missing on the prototyping board is the voltage measurement circuit, so I guess that gives some 0.4v lowest threshold or something, i will test these days on the prototyping board, just to verify.

    Thank you @sundberg84 for attention and help ๐Ÿ™‚

    Are you able to provide 1.9v on battery input on some easy board with the dht22? Like the one from the photos on the openhardware?


  • Hardware Contributor

    @dakipro - the radio capacitor is crusial which has been proven many times before so good you found out your problem. What can be a pain with the radios is that some clones/batches seems to work with on capacitor value and the next need some higher/lower value on the capacitor to work at its best.

    The source is most likley what i explained above, the booster noice which interfere with the radio. On a breadboard you have much more space and possibility to put the booster further away from the radio with longer wires. This is most likley your case here...

    Are you able to provide 1.9v on battery input on some easy board with the dht22? Like the one from the photos on the openhardware?

    I have not made any a large quantity of measurments, because i almost never have to change my AA batteries. I have 5 Easy nodes (different revs though) with DHT22 and the only time I measured it was around 2 if I remember right. Cant remember if it was 2.0 or 2.2 though... I will keep that in mind for the next battery change but the lowest node is at 2.5V at the moment so it might take a while. If I remember right according to Domoticz I will not have to change these batteries for atleast a couple of months.

    So the short answer... im not far from 1.9V, but It will depend on the radio and the booster quality.


  • @dakipro Jut to test, now that you have your voltages closer with the change in capacitor, you may want to just try swapping the radio modules between the two (provided you have them in sockets) and see if the voltage drop follows the radio.
    .


  • both boards are now identical, they go down to 2.3, but I will put 2.4 in scripts as the minimum, just to be sure.
    If a board boots at 2.4 it can go down til 2.2 and maybe 2.1, and it will work, but cannot reboot at that voltage.


  • Hardware Contributor

    @dakipro - 2.4 volts will last you a long time.

    If you want to go further I would suggest you look at the advanced user section of the EasyPCB and remove the booster and lower BOD instead. This will not work with the DHT22 but you could change that to BME280 and the radio @ 1.9v will be your lowest point. Either that or go for a more expensive booster. Im accually trying this in another project (https://www.sparkfun.com/products/10967) so I can give some feedback in a near future.

    Im also building a variable power supply which might help me to try different volt levels on my boards as well... all I need now is a oscilloscope - anyone wants to fund (and teach) me ๐Ÿ™‚ ?


  • I will consider that for new nodes. Where is a "advanced user section of the EasyPCB", i tried searching the forum and openhardware, but not sure what exactly you are referring to?


  • Mod

    @sundberg84 wow, that's a quite expensive booster ๐Ÿ˜ฐ


  • Hardware Contributor

    @gohan - yes almost 5 times more expensive but I'm building it myself and it's probably five times better...

    @dakipro https://www.openhardware.io/view/4/EasyNewbie-PCB-for-MySensors check "Battery without step up booster (advanced users)"


  • Hardware Contributor

    @gohan said in ๐Ÿ’ฌ Easy/Newbie PCB for MySensors:

    @sundberg84 wow, that's a quite expensive booster ๐Ÿ˜ฐ

    The chip itself is less than 0.7$ on Arrow.com (so, legit one) so with additional components it should be 2$.

    But I see in the datasheet that typical operating current for 3.3V version is 45uA, added to the 15% of losses (max 85% efficiency) I'm a bit skeptical about the battery life you can get using it ?

    @sundberg84 if you find someone funding oscilloscopes, please send me the contact ๐Ÿ˜„ Else you have the captures in the datasheet for the most critical cases ๐Ÿ˜›


  • Hardware Contributor

    @Nca78 45 uA will last me a long time. On my dht nodes I aim for <100uA so if you sleep between readings that's ok. If this circuit would be much better than these cheap eBay boosters I'm happy even if they run at a couple of more uA

    Will let you know if I find oscilloscope funder ๐Ÿ˜‰


  • Hardware Contributor

    @sundberg84 said in ๐Ÿ’ฌ Easy/Newbie PCB for MySensors:

    @Nca78 45 uA will last me a long time. On my dht nodes I aim for <100uA so if you sleep between readings that's ok. If this circuit would be much better than these cheap eBay boosters I'm happy even if they run at a couple of more uA

    Will let you know if I find oscilloscope funder ๐Ÿ˜‰

    But I still fail to see the interest of all the pain with the boosters and keeping the DHT22 which need "high" voltage of 3.3V when a sht21/si7021 is 3$ or less on aliexpress and can run way over 1 year with a simple cr2032 ? And if you use 2 AA it will run for 5 years. No problem with noise/stability, no booster to buy, just a 0.x$ big capacitor to add in parallel with the battery if you're using a CR2032 (and nothing if you're using 2 AA/AAA).


  • @Nca78 Another option that I went with is an HDC1080. The only problem with this one is that according to the datasheet, the recommended operating minimum voltage is 2.7v, where the si7021's minimum is 1.9v. When I was looking on ebay, these said that they were a replacement for the si7021, and it was my mistake not checking the datasheet before buying. They do seem to be working good though and I have had one of them running for about 5 months with no trouble so far.


  • Hardware Contributor

    @Nca78 that's why I added the option without boosters. The only downside is that it's not that easy changing bod. When you get the booster function to work you can also run a motion dec in 3.3v for example. 3.3v will give you more sensor options.


  • @sundberg84 said in ๐Ÿ’ฌ Easy/Newbie PCB for MySensors:

    Battery without step up booster (advanced users)

    I could just (do it very very ugly) and cut the vcc line near the board and solder it directly to the battery input?
    That way both arduino and radio will get battery power, and dht22 would still receive 3.3v? (then I can lower the BOD)
    Or would that not work due to some other connection?

    Also, would flashing pro mini to 1Mhz benefit battery consumption at all? (while still using 3.3 booster)

    (p.s. I stole your signature ๐Ÿ™‚ )


  • @sundberg84 That is one of the nice things about your board is it's flexibility.


  • Hardware Contributor

    @sundberg84 said in ๐Ÿ’ฌ Easy/Newbie PCB for MySensors:

    @Nca78 that's why I added the option without boosters. The only downside is that it's not that easy changing bod. When you get the booster function to work you can also run a motion dec in 3.3v for example. 3.3v will give you more sensor options.

    Well, it is pretty easy IMHO, you just have to follow on of the many tutorials, and you learn a lot on the way ๐Ÿ™‚
    For motion detection isn't a booster a bad idea ? You can use AM312 anyway, very small and very stable, no soldering necessary to run it down to 2.7V meaning you can use most of the capacity of a lithum cell like CR123.

    @dbemowsk thanks for the information I didn't even know about this sensor, looks like a very precise one with a very low power consumption. Can you link to where you bought it from I see nothing below 4$ on aliexpress ?


  • @Nca78 said in ๐Ÿ’ฌ Easy/Newbie PCB for MySensors:

    when a sht21/si7021 is 3$ or less on aliexpress

    The thing is that when people start with mysensors and arduinos, none of these are listed on Store page, so using them would be experimenting basically. And experimenting before you have even begun anything is a bit masochistic. At least in my case that is how I was thinking, so I ordered several of dht22, not really knowing that there are better/efficient alternatives. Maybe we can get those sensors in the store page, perhaps mention them on the examples page, noting that they are more efficient?


  • I went for the BME280, a little expensive, but it uses I2C and can be run from 1.71 volt to 3.3 volt.


  • @Nca78 I believe this is the same one that I bought, at least the carrier board looks to be labeled the same. Mine was just listed as an HDC1080, where this one is listed as a GY-213V-HDC1080. I am assuming it is the same chip. When I bought the 2 that I have I paid $5/module shipped which after looking at this one was a bit high. Live and learn though.

    http://www.ebay.com/itm/Low-Power-GY-213V-HDC1080-I2C-High-Accuracy-Digital-Humidity-Temperature-Sensor-/172666252980?hash=item2833b5eeb4:g:1C8AAOSwi7RZELpK


  • Hardware Contributor

    @dakipro the dht22 is a hot potato not only due to 3.3 req but also quality... I know this has been requested for removal on homepage before and I think it's just a matter of someone makes a good example for another sensor to replace it with.

    Yes you can cut the trace for vcc and hardwire it from bat if you want to lower bod.

    And yes it's not that hard to lower bod... but harder than booster and therefore I choose the easiest option since that's my board goal.

    I'm running 1mhz with booster and motion without problems... but same there, with a bad booster it will false trigger.


  • Mod

    This might be the better example you are looking for https://github.com/mysensors/MySensorsArduinoExamples/pull/25


  • Hardware Contributor

    @mfalkvidd so all we need is some graphics and some text ๐Ÿ‘?


  • Hardware Contributor

    @sundberg84 said in ๐Ÿ’ฌ Easy/Newbie PCB for MySensors:

    @dakipro the dht22 is a hot potato not only due to 3.3 req but also quality... I know this has been requested for removal on homepage before and I think it's just a matter of someone makes a good example for another sensor to replace it with.

    The only thing for the DHT sensors is they have their own pins, so you don't have to solder pins like on the breakout board of the I2C sensors. That's a good reason to keep them in example section otherwise a soldering iron is necessary, but it should at least talk about the existence of I2C sensors.


  • Mod

    Mod: Fuse/bootloader discussion moved to https://forum.mysensors.org/topic/7296/burning-fuses on request by @sundberg84


  • @sundberg84 just to update success of the story, I cut the vcc trace and connected mini directly to battery, burned the fuses based on your advice here https://forum.mysensors.org/topic/7296/burning-fuses/8, and now the sensor goes down to 2.0v ๐Ÿ™‚
    Booster is still used but only for dht22, radio and pro mini run directly from the battery.

    Thank you very much guys for help, now I have a foundation (and the knowledge) for more awesome sensors! ๐Ÿ™‚


  • Dear All!

    I would like to use this PCB. I would like power it with 5V, but I would like to use a 3.3V version mini Pro. How should I do it? I would like to use it from 5V (USB adapter) or battery 2xAA . Could I do it?

    Best regards,
    T


  • Mod

    just power it from the usb adapter, the pro mini can work at 5V. If you have other HW not 5V tolerant you need to use the RAW pin and let the pro mini regulator to its job. It all depends on what you want to do with the node


  • Dear @gohan !

    Thank for your help!
    Which configuratation should i use? Or do i have to modify one of the above configurations? (3.3V , 5V regulated, or 6-12V) ?


  • Mod

    There is no right answer since without knowing what you want to do, they could be all wrong or even all correct. ๐Ÿ™‚


  • Hardware Contributor

    @Tommas 5v + 3.3v pro mini there is no example for this. Add your 3.3v pro mini and radio. Connect 5v to raw and put a jumper/connect both reg and bat.

    If you want to use to for 2xaa please follow the example.


  • @sundberg84 I do have the same problem with my setup. As soon as power drops below 2.8 the radio will have problem connecting to gateway. Sometimes it connect after 10-15 tryes. Is there any way to see if nrf sending or any outer way to test stuff? Any ideas are welcome //Hรฅkan


  • Hardware Contributor

    @keldandorin - are you using a booster as mentioned above?
    The problem is in that case noice introduces in the radio from the booster (a known issue). I will in the future try to buy me a oscilloscope and diagnose more... but for now, if you add a "bad/cheap" booster it will be this problem. 2.8v sounds really bad though, and most likley a really bad clone.

    You have two options.

    1. Try another booster, and/or try to filter with capacitors.
    2. Load a new bootloader that can handle lower voltages accoring to link above.

    Let me know if I can assist you in any way.


  • Dear @sundberg84 !
    Thank you! ANd which example should i follow with this modification?
    Thanks
    T


  • @gohan

    Dear gohan!
    I would like to power all my nodes from a central power source with 5V . I would like to use 3.3V microcontroller with 3V sensors... because of the voltage drop down caused by the distance (5-15m from the power source). Maybe there will be 1-2 battery powered sensor nodes..
    This is my plan.
    I dont like using battery. It is too hard for me to optimize the sensors for battery...

    Best regards
    T


  • Mod

    In that case you could also go for rs485 bus. Voltage sources could be also 7 or 9v since you will be using the internal regulator anyway. Most sensor can operate at 5v too, so you don't actually need 3.3v. Optimizing for battery isn't that bad too. Since you are powering the nodes you could also use esp8266 nodes


  • Dear @sundberg84

    If i use 5V regulated example, has it got 3.3V output for the sensors?

    Thanks
    T


  • Mod

    if you install the voltage regulator in the top left area, you will have the 3.3v ( if I got your question right)


  • @gohan

    Oh OK! Thank you! The decision is hard for me, which solution i should use:) .


  • @Tommas If you are using 5 volts in and not using a 3.3v pro mini that has the 3.3v regulated output, then you have to add a TO92 case style 3.3v regulator and two capacitors to the board. Here are some that should work. Whatever one you get, make sure you check the pinout against the markings on the board as not all regulators have the same pinout.
    http://www.mouser.com/Semiconductors/Power-Management-ICs/LDO-Voltage-Regulators/_/N-5cgac?P=1z0y3jsZ1z0wa2e&pop=88zz


  • Dear @dbemowsk

    I bought these: https://www.ebay.com/itm/401088383355

    Thank you!


  • Hardware Contributor

    @Tommas - this is the voltage regulator that the board is designed for so the markings/pinout will be right for you. If you put 5v on the PCB input and use 3.3v pro mini though, the only choise you have is to put 5v on RAW and let the onboard voltage regulator on the PCB regulate it down to 3.3v. The voltage regulator on the PCB only regulate the voltage to the radio and are meant for a 5v input on a 5v pro mini. Using raw means there is no need for the LE33.


  • @sundberg84 Is there any way to say if booster is a bad one or not before ordering them?
    The one I ordered was the one on shoping list from aliexpress. Will try I capacitator and see if I can get a new booster from kjell&Comany tomorrow just to try. Build a setup on bread bord where I powered radio with 2 AA and got the same result. Got a fju places where I like to put some sensors with no power so realy need to get this working :). Could the radiomodules be bad to?


  • Mod

    Bad quality from cheap Chinese suppliers, is always an option ๐Ÿ˜


  • Hardware Contributor

    @keldandorin - could be a weak clone radio yes.
    Just to get your hopes up, I got booster driven nodes all around the place with Nrf24l01+ radio and they works great!
    I change battery every 1-1.5 years but as I said, the experience is that the radio - booster needs a good teamwork ๐Ÿ™‚


  • @sundberg84 Sounds good, Thats what I'm looking for. Have never worked with tinkers like this befor so everything is new. But this place is great thx for taking time.


  • Sorry, I'm a bit slow and maybe a little off-topic: A quicky:

    Can I read somewhere how payment is done when ordering from openhardware.io? On the start page for openhardware.io there is no clue. I've also tried to search this section (easy-newbie-pcb-for-mysensors) for "payment".

    Yes, I've read that the "order" is more like a forward of orderinformation to the supplier, but do I really need to order first and after that ask what payment solution is present?

    ๐Ÿ™‚


  • Hardware Contributor

    @pellusfromtellus - to get a 100% right answer we ping @hek but I recommend paypal!


  • Admin

    @pellusfromtellus

    I think most of them handle paypal/card. You can press the "Order" button to find out. Nothing is binding until payment has been done.


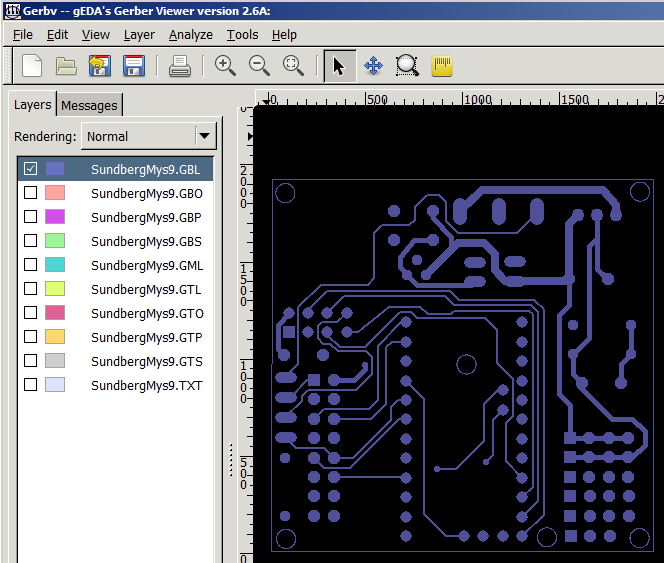
  • Is there a drilling and outline file available?


  • Hardware Contributor

    @Paul-Robertson - hi!
    Yes, but this is Eagles output gerber files.

    Drill: SundbergMys9.TXT
    Outline can be found in all other files:

    https://www.pcbway.com/project/share/How_to_generate_Gerber_from_Eagle.html

    0_1505990995661_upload-c5e3c1d3-3dfb-46dc-9e10-e2d5dbfaca0d


  • MySensors Evangelist

    Damn. Just missing the 0,1uF capacitor ..... to complete the 5v build. This will be my smallest build yet ๐Ÿ˜‰ using PCB v9


  • This post is deleted!


  • Mod

    If you want to use a lipo battery, you need a voltage regulator


  • Hardware Contributor

    @hiddenuser - well not out of the box as mentioned by gohan. Im not really sure what you want to do. Its not possible to use this instead of step-up booster since it outputs 5v and the step-up needs to output 3.3v. But with a voltage regulator in between maybe? As I said - don really understand so maybe you can explain some more about your project?


  • Mod

    @sundberg84 that tp4056 outputs just the lipo battery voltage


  • Thanks @sundberg84 and @gohan

    I have used made the board for 3.3v set up as per the instruction. I have usd the output from tp4056 into the Battery connector of the board I have a step board from https://www.aliexpress.com/item/New-Electric-Unit-1-PC-NEW-DC-0-8-3-3V-to-DC-3-3V-StepUP/32724361266.html According to the specification given in the same link it is supposed to stabilize to 3.3v above 3v but the sensor reports something else back to the gateway.

    0_1512985662819_a428954d-5f74-4026-8782-e12b51f52bf3-image.png


  • Hardware Contributor

    @hiddenuser - well, what would a battery measurer be if it reported a constant 3.3v boosted voltage? ๐Ÿ˜‰
    It all depends on how everything is connected (pictures?) but if you have connected it as battery instryctions the radio and voltage divider that measured the incoming battery are not a part of the booster circuit. This to prevent noice to the radio and to be able to actually measure the battery voltage and not step-up voltage which is the idea behind the board.


  • Mod

    @hiddenuser I'm missing how can you use a booster to get 3.3v from a lipo battery


  • hey, has anyone maybe made a fritzing drawing/component of the board?
    I know, I'm lazy as f but.. since the board is that easy, documenting with it could be easy as well ๐Ÿ™‚


  • @sundberg84 interesting question...or maybe stupid question not sure...

    i have a tonn of 3v pro mini's but im thinking of mains powering some for motion sensors.... would i set it up as battery, and then just use a voltage regulator on where the step up usually would be? or is there a better way to handle it?


  • Mod

    there is a voltage regulator footprint on the pcb made for that


  • ahhh thats cool... so use regulated instead and it will pull down the voltage for antenna over that side
    ...and the board can handle the voltage anyway so it should be fine....


  • @gohan The only voltage regulator that I know of on the board is mainly for the radio. Unless you are talking the one on the pro mini.

    @markjgabb If you want to do them from mains power, you might wan t to look at the HLK modules like these
    https://www.ebay.com/itm/1Pcs-Power-Supply-Step-Down-Buck-Isolated-Hlk-Pm03-220V-To-3-3V-Module-New-Ic-N/332047987473?epid=571729397&hash=item4d4f9a3311:g:nyMAAOSw4GVYPa8q
    Otherwise an old phone charger should work.


  • Mod

    @dbemowsk if I remember well the regulator Vout is also connected to the pro mini vcc


  • @gohan Have a bare board right in front of me. Ran continuity and no connection from regulator V-Out to VCC. VCC goes to the REG jumper and V-Out goes to the BAT jumper. VCC ties to the V-In on the regulator.


  • @gohan ayou wouldn't want to run the pro mini and the radio both off of that small regulator anyway. Takes too much from the radio.


  • @dbemowsk cheers for that...yeah i have a tonn of old 5v bricks lying around from old nokia chargers, so was just going to try use some of them up without having to buy anythiing else, as i have all of it on hand.... i have some LE33a's which should take care of any step down issues i think?


  • @markjgabb If you connect your 5V brick to the RAW pin, the onboard regulator on the pro mini will do.


  • @dbemowsk cheers mate, thats awesome...now i can blitz out some room based designs


  • @gohan @sundberg84
    This is my setup. my battery reading is a constant 2.75v, this is not true the multi meter says ~4v

    0_1513062564871_IMG_20171212_180306_1.jpg


  • Hardware Contributor

    @markjgabb @dbemowsk @gohan - I dont have much else to add, thanks for the input here. Using mains power I would also use HLK-PM01 and input the 5v to the pro mini. If you only have 3.3v pro mini you need to input this to RAW. I have made a breakout board for the HLK module if needed as well.

    https://www.openhardware.io/view/504/HLK-PM01-breakout-board


  • Hardware Contributor

    Well it looks like your battery goes to some sort of regulator before the Easy board? If so my guess is that that board is providing 2.7 v regardless of battery voltage? Have a look at @gohan and his posts about solar power and different batteries. EasyPCB is designed for 2xAA and it will not work with other voltages out of the box. The voltage divider is also dimensioned for 3.3v max and will not work with higher voltages. Again @gohan has made some experiments with this. Check his posts out. If you re-dimension the voltage divider it will work with your higher voltage.


  • Mod

    @hiddenuser I don't know why you have a booster in place (unless it is a buck boost) and you need to change the voltage divider resistors if you want to read higher voltages (look at my solar project). In addition I'd put in place a LDO regulator if you want to use a lipo battery since a normal voltage regulator would require a higher Vin than a lipo battery can provide.


  • @gohan said in ๐Ÿ’ฌ Easy/Newbie PCB for MySensors:

    Thanks @gohan for the feedback. Can I have the link to your solar project!


  • Mod

    @hiddenuser look in the my project section (I'm on mobile now)


  • Hi Sundberg,

    I have read there could be some problem about radio connection if the temperature is ~0C or minus, I have met this issue so I will replace the existing 4.7ยต capacitor with a bigger, e.g. ~20ยต.
    The battery measurement contains a 0.1 uF capacitor, What do you think I do have to replace it with an another bigger one ?
    thanks

    Barna


  • Hardware Contributor

    @barna - i don't know to be honest. As I wrote I had issues last winter but never with that 0.1 cap. I'm running second winter now (have been as low as -8C so far) without issues.


  • Hardware Contributor

    @barna said in ๐Ÿ’ฌ Easy/Newbie PCB for MySensors:

    Hi Sundberg,

    I have read there could be some problem about radio connection if the temperature is ~0C or minus, I have met this issue so I will replace the existing 4.7ยต capacitor with a bigger, e.g. ~20ยต.
    The battery measurement contains a 0.1 uF capacitor, What do you think I do have to replace it with an another bigger one ?
    thanks

    Barna

    I don't think you need, it's made to stabilize the measured voltage, in the worst case the measured voltage will be a little bit unstable but your node will still run fine.


  • on the subject of batteries i have to say im really impressed with the setup of these boards....
    ive got a DHT and lux resistor measuring every 10 minutes, and i cant even remember how long ago i last changed the batteries...i think its about 3-4 months now....nothing special, just aldi batteries (australian cheap shopping chain)

    last check they are still 65%


  • @markjgabb Don't know if it's the same chain, but we have aldi stores here in the US.
    0_1513550068757_11f86073-b6bf-40a7-be80-0b6115b268af-image.png


  • @dbemowsk It is. It's a german chain though ๐Ÿ˜‰


  • @marvin78 Never knew that.


  • Hi everybody. Finally got my newb pcb and I soldered everything needed for the pro mini 3.3v. But I ran into problems.

    I think it's the cheap chinese pdo mini but I want to ask you guys. Problem id that my node doesn't work. But when I debug my node I plug my pro mini in my computer's usb and then it works.

    What I could see is that when it is battery operated I can read a 3.3v value on the vcc pin of the pro mini. When I also connect via usb this value is about 3.5v.

    Could it be that my pro mini requires 3.5v.
    I did solder the capacitor for the radio and i'm using a 3.3v step up converter also.

    Thank you


  • @akamap an you post a picture of your board setup?


  • Mod

    @akamap without knowing how you are powering the node, it is difficult to say.


  • Hardware Contributor

    @akamap - listen to the guys above, let us know with pictures ๐Ÿ™‚ Its the best.
    Did you by any chance miss to solder to jumpers?
    The best approach is to measure with a multimeter... put the black to GND and measure your way through the circuit from batteries, booster, jumper, pro mini and radio with the red put on each components VCC (or Vout on booster). Then you know where it goes wrong. Try to follow the schematics or the traces in the pcb to figure out how the current flows.


  • @sundberg84 That's why I wanted him to send pictures. There are a number of variables that need to be in place depending on the configuration that you are using with this board. Is he using a 3.3 or 5 volt arduino, does he have a regulator, are the correct jumpers in place. Any one of these missing factors can make it not work.


  • EDIT : Seeing the pictures this big, I think I know why and it is my fault. I tried to save energy by desoldering the led on the arduino. I followed a post here on mysensors.org. But I just realized I might have desoldered the wrong thing on this arduino. I'm not sure what I desoldered, but it might be what is causing the problems (I desoldered the tiny thing below the led) I'll put a fresh one to see if this is working.

    Thanks

    Original response :

    Ok, thank for all the answers and here is more information.

    I power it via 2AA battery. I did put a jumper on the battery point. And I am using a pro mini 3.3v (Cheap chinese clone). I am using a step up regulator to step it up to 3.3v for the arduino.

    I measured the voltages and they are as follow :

    Without USB programmer (Not working) :
    Battery : 3.00V
    Input step up : 3.00V
    Output Step UP : 3.35V
    VCC and GND on arduino : 3.34V
    VCC and GND on Radio : 3.01V

    With the USB programmer pluggued in (Working) :
    Battery : 3.00V
    Input step up : 3.00V
    Output Step UP : 3.47V
    VCC and GND on arduino : 3.48V
    VCC and GND on Radio : 3.00V

    Another information, I did not solder directly the arduino pro mini (you will see on the pictures). I don't know what the are called but I'll call them "extender". I use them so I can unplug the arduino in case I fried the pro mini.

    Here are some pictures with and without the usb programmer plugged in :

    3_1515614804192_20180110_145714.jpg

    2_1515614804191_20180110_145654.jpg

    1_1515614804191_20180110_145643.jpg

    0_1515614804191_20180110_145634.jpg


  • Hardware Contributor

    @akamap thats just the resistor... should not be the problem.
    I cant see anything obvious. I have some radios without silkscreen and they work....... like a clone. Not the best but most work ok. Try adding a capacitor on the booster - might be a noisy one... I would recommend to try a 0,1uF ceramic if you have. Otherwise just wack in what you have... not to big i think.

    If you power it from the booster/bat you cant power it the same time from USB! Disconnect VCC from the ftdi adapter.
    Connet RX/TX and GND to begin with. RST if you need to upload. Two power sources makes one to much.


  • Mod

    @akamap remember also the cap on the battery measurement side if you want to get good readings. If you want to use batteries you need to remove the voltage regulator from the pro mini, once you done your troubleshooting


  • Thank you everyone. Everythings seems to be working now. I did solder a capacitor on the booster.

    But I don't think this was all that was bad. I also find out that when I touched the capacitor for the radio, I was having mixed result. So I soldered the capacitor directly on the radio.

    Now, everything works fine. I guess I burned the trace or something was creating a short with this part.

    I just need to remove the voltage regulator as suggested by gohan now and I can start testing my battery life.

    Thanks again. Great library, great forum but most of all, great community.


  • Hardware Contributor

    So its coming up for a new revision of the EasyPCB (both Nrf + RFM edition).
    I have had some suggestions from the community so far and some thoughs of myself:

    • ATSHA204A (signing)
    • Change 0,1uF and 10uF capacitor so now 10uF is on the input and 0,1uF on the output
    • Line up MysX connector for a more clean placement of daugherboards.

    Anyone have any other input before i start the work?
    I will not take any suggestions that will make the board heavy or non user-friendly. Still the same goal - only easy to use components, easy to assemble and easy to understand.


Suggested Topics

21
Online

11.2k
Users

11.1k
Topics

112.5k
Posts