💬 Easy/Newbie PCB for MySensors
-
@sundberg84 I just finished my first battery sensor node based on the Easy PCB Rev 9. I have two questions i hope you can help me with:
The first is about the battery measurement. Because i didn't have a 0.1 uf lying around i used an 0.2 uf capacitor. I am using the following script to measure the battery.
//=========================
// BATTERY VOLTAGE DIVIDER SETUP
// 1M, 470K divider across battery and using internal ADC ref of 1.1V
// Sense point is bypassed with 0.1 uF cap to reduce noise at that point
// ((1e6+470e3)/470e3)*1.1 = Vmax = 3.44 Volts
// 3.44/1023 = Volts per bit = 0.003363075
#define VBAT_PER_BITS 0.003363075
#define VMIN 1.9                                  //  Vmin (radio Min Volt)=1.9V (564v)
#define VMAX 3.0                                  //  Vmax = (2xAA bat)=3.0V (892v)
int batteryPcnt = 0;                              // Calc value for battery %
int batLoop = 0;                                  // Loop to help calc average
int batArray[3];                                  // Array to store value for average calc.
int BATTERY_SENSE_PIN = A0;                       // select the input pin for the battery sense point
//=========================


   // Calculate the battery in %
   float Vbat  = sensorValue * VBAT_PER_BITS;
   int batteryPcnt = static_cast<int>(((Vbat-VMIN)/(VMAX-VMIN))*100.);
   Serial.print("Battery percent: "); Serial.print(batteryPcnt); Serial.println(" %");
Do i need to change anything in the formula? Because i getting reading around the 130%
Requesting temperature...DONE
Temperatuur : 26.62 Degrees C
11935 TSF:MSG:SEND,25-25-0-0,s=5,c=1,t=0,pt=7,l=5,sg=0,ft=0,st=OK:26.6
Battery percent: 131 %
Battery Voltage: 3.35 V
Sleep...
12945 MCO:SLP:MS=900000,SMS=0,I1=0,M1=1,I2=254,M2=1
12955 TSF:TDI:TSL
If i use the following method:
//----
   // 1M, 470K divider across battery and using internal ADC ref of 1.1V
   // Sense point is bypassed with 0.1 uF cap to reduce noise at that point
   // ((1e6+470e3)/470e3)*1.1 = Vmax = 3.44 Volts
   // 3.44/1023 = Volts per bit = 0.003363075
   float batteryV  = sensorValue * 0.003363075;
   int batteryPcntNEW = sensorValue / 10;

   Serial.print("Battery percent: ");
   Serial.print(batteryPcntNEW);
   Serial.println(" %");
//----
I am getting: (this is expected, because batteries are new)
Battery percent: 99 %
Sleep...
12945 MCO:SLP:MS=900000,SMS=0,I1=0,M1=1,I2=254,M2=1
12955 TSF:TDI:TSL
My second question is about casing: any tips on which case to use which fit your board and a battery pack? and is as small as possible? Do you perhaps have links of your favourite (Chinese) sellers?
@mister_ik said in 💬 Easy/Newbie PCB for MySensors:
@sundberg84 I just finished my first battery sensor node based on the Easy PCB Rev 9. I have two questions i hope you can help me with:
The first is about the battery measurement. Because i didn't have a 0.1 uf lying around i used an 0.2 uf capacitor. I am using the following script to measure the battery.
Do i need to change anything in the formula? Because i getting reading around the 130%
Hello, this is normal as your maximum voltage is set at 3V, while initial voltage of an alkaline AA/AAA cell can be a bit over 1.6V. But voltage will quickly drop toward 1.5V (much faster than remaining capacity), so the best instead of changing the maximum voltage is to check the value of batteryPcnt and if it's over 100, just set it to 100.
Make sure the VBAT_PER_BITS makes you read a voltage that matches the voltage you read with your multimeter, else fix it. Each Atmega is different so you need to calibrate each board.For the capacitor it's not a problem, it's just made to stabilize the voltage as it's very sensible to electrical noise. Twice the value will be good enough for this job :)
-
@sundberg84 I just finished my first battery sensor node based on the Easy PCB Rev 9. I have two questions i hope you can help me with:
The first is about the battery measurement. Because i didn't have a 0.1 uf lying around i used an 0.2 uf capacitor. I am using the following script to measure the battery.
//=========================
// BATTERY VOLTAGE DIVIDER SETUP
// 1M, 470K divider across battery and using internal ADC ref of 1.1V
// Sense point is bypassed with 0.1 uF cap to reduce noise at that point
// ((1e6+470e3)/470e3)*1.1 = Vmax = 3.44 Volts
// 3.44/1023 = Volts per bit = 0.003363075
#define VBAT_PER_BITS 0.003363075
#define VMIN 1.9                                  //  Vmin (radio Min Volt)=1.9V (564v)
#define VMAX 3.0                                  //  Vmax = (2xAA bat)=3.0V (892v)
int batteryPcnt = 0;                              // Calc value for battery %
int batLoop = 0;                                  // Loop to help calc average
int batArray[3];                                  // Array to store value for average calc.
int BATTERY_SENSE_PIN = A0;                       // select the input pin for the battery sense point
//=========================


   // Calculate the battery in %
   float Vbat  = sensorValue * VBAT_PER_BITS;
   int batteryPcnt = static_cast<int>(((Vbat-VMIN)/(VMAX-VMIN))*100.);
   Serial.print("Battery percent: "); Serial.print(batteryPcnt); Serial.println(" %");
Do i need to change anything in the formula? Because i getting reading around the 130%
Requesting temperature...DONE
Temperatuur : 26.62 Degrees C
11935 TSF:MSG:SEND,25-25-0-0,s=5,c=1,t=0,pt=7,l=5,sg=0,ft=0,st=OK:26.6
Battery percent: 131 %
Battery Voltage: 3.35 V
Sleep...
12945 MCO:SLP:MS=900000,SMS=0,I1=0,M1=1,I2=254,M2=1
12955 TSF:TDI:TSL
If i use the following method:
//----
   // 1M, 470K divider across battery and using internal ADC ref of 1.1V
   // Sense point is bypassed with 0.1 uF cap to reduce noise at that point
   // ((1e6+470e3)/470e3)*1.1 = Vmax = 3.44 Volts
   // 3.44/1023 = Volts per bit = 0.003363075
   float batteryV  = sensorValue * 0.003363075;
   int batteryPcntNEW = sensorValue / 10;

   Serial.print("Battery percent: ");
   Serial.print(batteryPcntNEW);
   Serial.println(" %");
//----
I am getting: (this is expected, because batteries are new)
Battery percent: 99 %
Sleep...
12945 MCO:SLP:MS=900000,SMS=0,I1=0,M1=1,I2=254,M2=1
12955 TSF:TDI:TSL
My second question is about casing: any tips on which case to use which fit your board and a battery pack? and is as small as possible? Do you perhaps have links of your favourite (Chinese) sellers?
@Nca78 thanks for the help/answer. 😀 About the case I'm using some plastic electronic cases from my hardware shop but @ openhardware you will find some links to 3d projects.
Let us know @Mister_ik if you need anything else.
-
-
No sign of the new revision yet:
@mickecarlsson - not on the RFM69 version, no. PCBway has updated the NRF24 version so a good sign.
Something went wrong with the update of the RFM69 version so I had to activate it 21hours ago:
Lets hope PCBway picks this up today.
-
@mickecarlsson - not on the RFM69 version, no. PCBway has updated the NRF24 version so a good sign.
Something went wrong with the update of the RFM69 version so I had to activate it 21hours ago:Lets hope PCBway picks this up today.
@sundberg84
OK, good news. I will check it tomorrow and hopefully order a batch (or two). -
Still no rev 6 on itead or pcbway for rfm69 version :-(
-
Still no rev 6 on itead or pcbway for rfm69 version :-(
@mickecarlsson no something went wrong so Rev 5 is ok to order! This is easy rev 10!
-
Hello @sundberg84
What if feeding a Pro Mini 3.3V (EasyPCB Nrf24l01+ edition rev 10) with regulated power on RAW. (I have 5 VDC). I guess I can feed the radio via the VCC terminal instead of using an external voltage regulator. Can the EasyPCB be used in such a setup?
Edit: To answer my own question. I should RTFM :facepunch:
It states clearly that:
"(If you are using regulated 3.3v, use 5v instructions but skip the voltage regulator and bypass this with a jumper between Vin and Vout"
Thanks anyway!
@รอเร-อ I have a similar need, but not exactly the same.
My power route is:
18650 Lipo (2.7 - 4.2 V) -> TP4056 (charger) -> Booster (5V) -> Raw pin of pro mini 3.3V -> Vcc of pro mini 3.3V -> Radio (NRF24)In my case the easy newbie pcb is not directly suitable because the Vout of the Booster is connected to Vcc instead of raw.
So my idea is to use a modified version of the easy newbie pcb with the schematic posted here
in order to have more flexibility in the power options.Actually I don't have the skills to design a pcb, but maybe, if the idea is good, someone else could design it.
This schematic is compatible with all the power options actually supported by the easy newbie pcb, and supports also new possibility, simply changing a couple of jumpers
-
Hello @franz-unix, can't you just bend the output pin of the booster at 90° and solder a wire from it to the raw pin ?
-
@nca78 Yes it should work.
If I connect the output of the tp4056 to the gnd and reg input of the screw terminal of the easy newbie pcb and then I run a wire from the Vout of the booster to the raw input of the screw terminal, the final result is also quite clean and it is not necessary to solder the wire directly on the pro mini.
I think that, in this case, the reg jumper must be NOT shortened.
-
Hi,
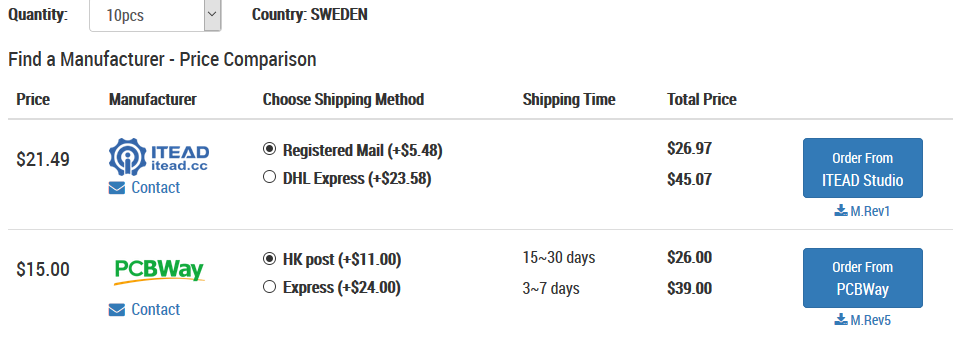
I ordered 10 PCBs using "Order from PCBWay" button. It only asked me about PayPal card and din't require any registration on PCBWay. So, everything looks good, PayPal transaction is completed. Can somebody tell me please how can I track it? Probably I'm missing tracking option somewhere... Thank you!
P.S.
Cant wait to try it out. :) -
Hi,
I ordered 10 PCBs using "Order from PCBWay" button. It only asked me about PayPal card and din't require any registration on PCBWay. So, everything looks good, PayPal transaction is completed. Can somebody tell me please how can I track it? Probably I'm missing tracking option somewhere... Thank you!
P.S.
Cant wait to try it out. :)@zelen I'm not sure. You didn't receive any email? I normally get a email once they are finished and shipped with tracking.
-
@zelen I'm not sure. You didn't receive any email? I normally get a email once they are finished and shipped with tracking.
@sundberg84 thank you for clarification. I expected email right after making an order. So, I will wait for finishing production and shipment.
-
I use some of old rev8 boards. I have noticed that I use a ceramic capacitor instead of an electric capacitor compared to the images for the battery measurement. Does it matter? Or should I replace the ceramic capacitor (104) with an electric capacitor?
-
I use some of old rev8 boards. I have noticed that I use a ceramic capacitor instead of an electric capacitor compared to the images for the battery measurement. Does it matter? Or should I replace the ceramic capacitor (104) with an electric capacitor?
@harrdy should work just fine.
-
I use some of old rev8 boards. I have noticed that I use a ceramic capacitor instead of an electric capacitor compared to the images for the battery measurement. Does it matter? Or should I replace the ceramic capacitor (104) with an electric capacitor?