Leaf Wetness
-
so my 5000mAh lasted outside... 4 days... btw I didn't remove all leds from the comparator that could be an improvement and the outside weather is quite cold.
I had a reading every 30 secs, way to quick surely...
@hek is there a way to power the radio only when necessary ? I guess the gw.sleep could be a gw.sleep and a gw.wakeup and manage the delay outside ?
-
gw.sleep() sleeps the radio as well. What do you mean by power down radio? Like cutting power using digital pin?
@hek said:
gw.sleep() sleeps the radio as well. What do you mean by power down radio? Like cutting power using digital pin?
yes, now you combine sleep for the radio and delay, what I mean is to have loop() run without radio, and if a transmission is needed to have a command that power it.If you have a long dry period, a device on battery will consume a lot of power having the radion on and off, if it is always off until a sensor finds something, that would save more power, no ?
-
Wake only on interrupt?
-
In my idea, a value above 0 would mean sending the info, an interrupt could be generated this way ?
-
Hey,
I am a newbie (in the forum) and in the arduino/sensors development. I bought the Leaf Wetness from cooking-hacks.com. Can I connected it to my Arduino via Analog input? Is it easy? -
Hey,
I am a newbie (in the forum) and in the arduino/sensors development. I bought the Leaf Wetness from cooking-hacks.com. Can I connected it to my Arduino via Analog input? Is it easy?@elisavetgrig Welcome to the forum. The answer is yes to both questions. Given that the sensor is a resistive element, you need to build a voltage divider. Google "voltage divider" Arduino and you'll find lots of examples.
Cheers
Al -
Measuring the current with DC doesn't seem to be the ideal solution:
thread -
Measuring the current with DC doesn't seem to be the ideal solution:
thread@FotoFieber That thread is regarding soil moisture measurements which is different than leaf wetness. For soil, capacitive is the best way to go IMHO.
Cheers
Al -
-
ok...Thank you... I will try the "voltage divider" and I will see what will happen!
-
-
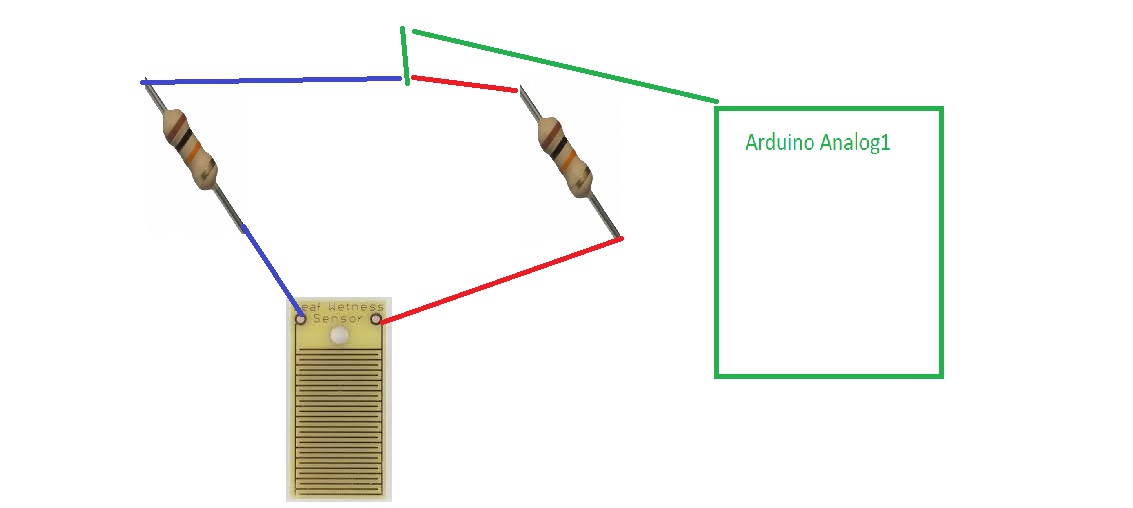
Did you mean something like the figure above? Or I only need to connect one resistor to one wire and the other wire to another pin in the Arduino?
-
Did you mean something like the figure above? Or I only need to connect one resistor to one wire and the other wire to another pin in the Arduino?
@elisavetgrig You're missing the connections to a voltage source and ground. You also only need one resistor as the wetness sensor is the 2nd resistor in the voltage divider circuit. Take a look at this: http://homepage.cs.uri.edu/faculty/hamel/workshops/as220-sept-09/sensors-voltage-dividers.html.
Cheers
Al -
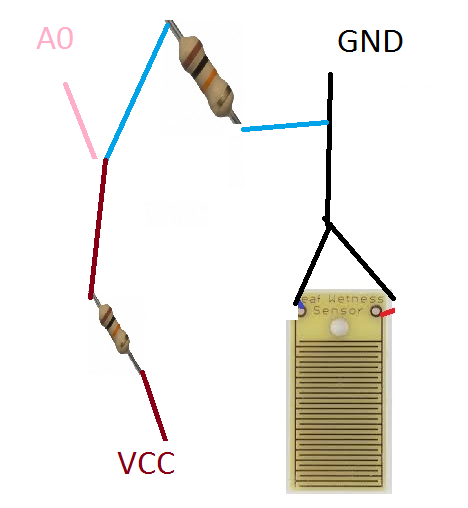
You are right! I thought that I missing something... always there are Data connection, VCC connection and GND.. and I had only one! I made another dummy scheme... Is that better?

-
You are right! I thought that I missing something... always there are Data connection, VCC connection and GND.. and I had only one! I made another dummy scheme... Is that better?
@elisavetgrig Take a look at the second diagram of the link I posted. Right now you show the GND pin connected to the Analog pin and Vcc is also connected to the same spot, so that's not going to work.
Cheers
Al -
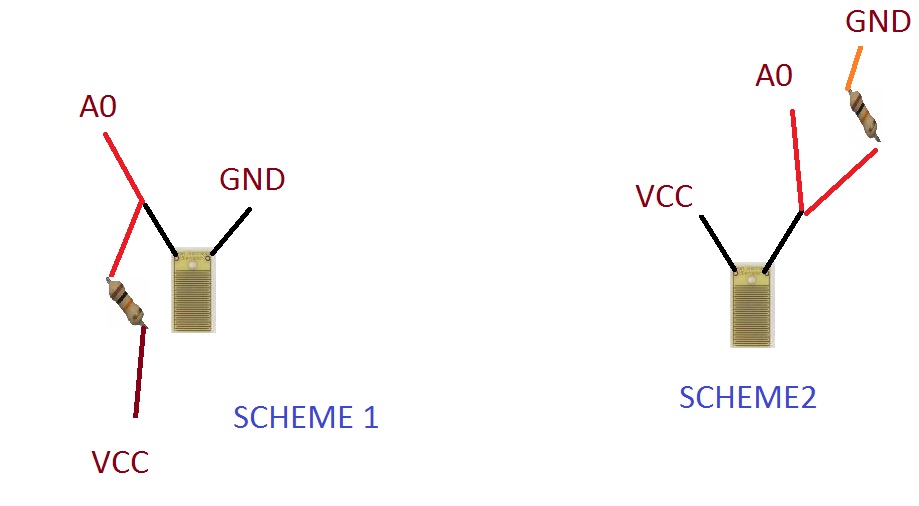
I based in the second diagram... i think that I understand it...
-
I based in the second diagram... i think that I understand it...
@elisavetgrig As I mentioned a few posts ago and how it's shown in the diagram on that link, is that you only need one resistor. The leaf wetness sensor becomes the other resistor in the circuit. In your last diagram, you have both the terminals of the wetness sensor connected to ground. Think of the wetness sensor as a resistor, with each of the terminals representing one leg of a regular resistor.
Cheers
Al -
OK... So I need only one resister... I think that "Scheme 2" is closer to the solution...
Hello! It looks like you're interested in this conversation, but you don't have an account yet.
Getting fed up of having to scroll through the same posts each visit? When you register for an account, you'll always come back to exactly where you were before, and choose to be notified of new replies (either via email, or push notification). You'll also be able to save bookmarks and upvote posts to show your appreciation to other community members.
With your input, this post could be even better 💗
Register Login