Skip to content
  • 0 Votes
    2 Posts
    1k Views
    E
    @OldSurferDude well, the ESP8266 is limited to 4 TCP clients in arduino IDE. This can't be really increased. I did som experiments and you can set it up to 15, but after the 5th client on my web server, I got a freeze. Maybe you got something wrong. #define MY_GATEWAY_MAX_CLIENTS 2 defines how many controllers (eg Home Assistant) can connect to the gateway, not how many sensors/MySensors devices. And yes, you can have multiple TCP gateways in HomeAssistant. I got an NRF24, an RFM95 long range and a RFM95 short range gateway (all based on ESP32) on the same Home Assistant. Regards, Edi
  • Sleep mode for bmp280

    Hardware
    7
    4 Votes
    7 Posts
    5k Views
    __isded___
    Just wanted to say thanks for this, it is still relevant and useful six years later !
  • Serial Gateway woes

    Development
    1
    0 Votes
    1 Posts
    661 Views
    No one has replied
  • 0 Votes
    10 Posts
    2k Views
    E
    @wrendral said in "Remote Irrigation with LoRaWAN: LM27313 Challenges and PCB Design": I will go with a Li-Po Battery type: 304048 3.7V 1200mAh Might work, but maybe the internal protection will trigger with the high current peaks. I'd suggest you plan a 0 Ohm, (2512/THT) resistor as R2 and then replace it with a 100Ohm/1Watt if the protection triggers.
  • 0 Votes
    3 Posts
    1k Views
    A
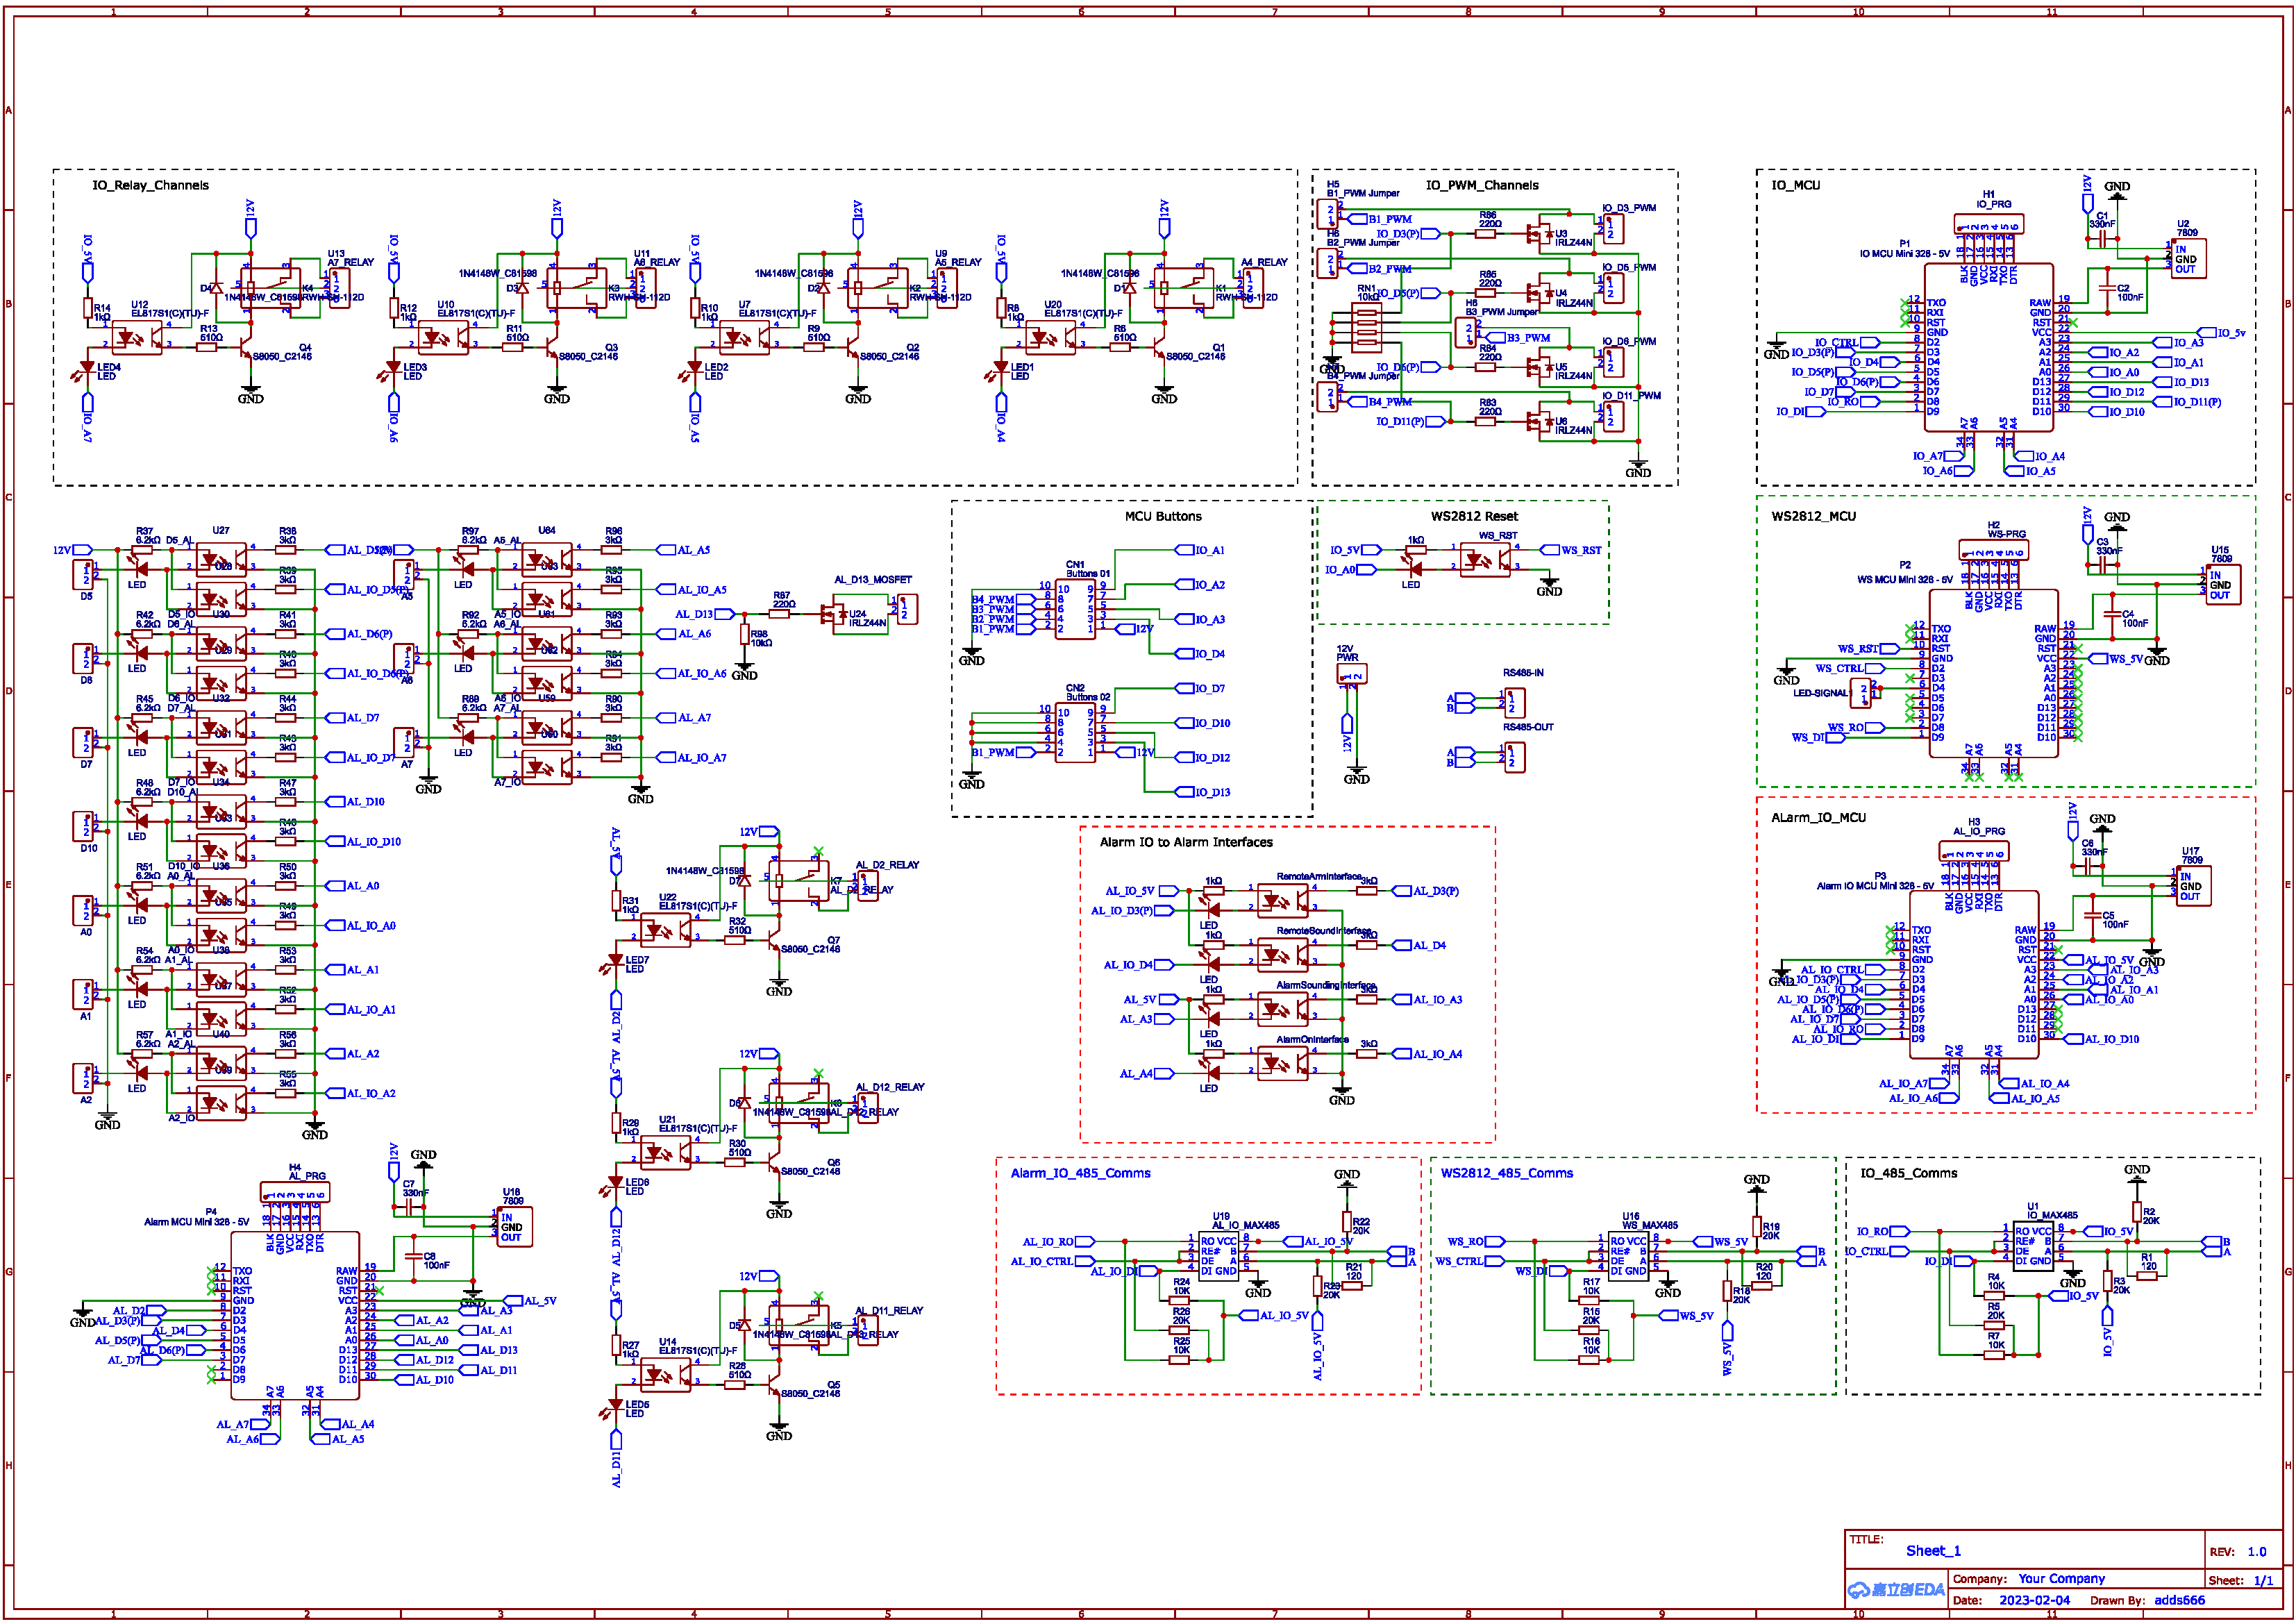
    Hi OSD, thanks for your input. Those are the 4 relays on IO-MCU. I buzzed out the circuit and found that I had an open circuit on the 12v line to the relays. Furthermore 2 of the relays indicator LEDs were illuminating, 2 were not. I suspect, when I first juiced up the circuit on this MCU, the 2 relays fired, but I'd made the trace too thin for the required current. I wired up some jumper wire on the reverse of the PCB and the 2 relays started working. The 2 that remain inoperable? https://forum.arduino.cc/t/using-pins-a6-a7-on-pro-mini-compatible/118050 A6 and A7 can only be analogue inputs, cannot be digitally written to..... - so this part of my PCB is now redundant. However, all in all, some good fault finding, found the two issues, and I'm now going away to re-think my PCB trace widths and reading the datasheets more accurately ;) Thanks

  • Gateway on Raspberry pi 1

    General Discussion
    9
    0 Votes
    9 Posts
    2k Views
    E
    @mimaret It was a pleasure. Thank you for your feedback!
  • 0 Votes
    1 Posts
    551 Views
    No one has replied
  • Most reliable "best" radio

    General Discussion
    274
    1 Votes
    274 Posts
    67k Views
    L
    It has been a long time but I’ve learned a few things that I wanted to share. This library of information (Thank you NeverDie and others) has been so helpful in my hobby developments. Software Defined Radios for signal analysis. With the help of Andreas Spiess explanation of IQ transformations, I learned about Software Defined Radios and I bought one (RTL-SDR). Using this I can clearly discriminate between effective 433 MHz transmitters and bad ones. Not only is the signal density displayed on the software (SDR#) but so is the frequency. Power Profiler Kit II has been indispensable in watching power usage and seeing into the details of the radio transmission. In effect this thing has saved me from buying an oscilloscope for my simple little bench. Tonight, I saw this video: https://www.youtube.com/watch?v=Z9nycymUd-I It describes common PCB errors. It is too advanced for me, but I did pick-up a few ideas about ground planes (tip #6 from the video). I hope this is of some value for folks.
  • Home Assistant update changed USB port name

    Home Assistant
    3
    0 Votes
    3 Posts
    642 Views
    E
    What I did not try but might work: copy your persistence file, delete the old GW and create a new one with the persistence file you copied. Maybe the devices are preserved like this. Maybe you should create a full backup before... <edit: typo>
  • 0 Votes
    2 Posts
    1k Views
    OldSurferDudeO
    I have success! (oops, that's suppose to be Timer1) I only sample for 1/60 of a second. What I did was to back up all the timer registered I used and then resorted them after I was done sampling. (As opposed to initializing the registers in setup and then starting the timer when needed.) Now I have a Nano sampling the data and sending it to a MySensors Gateway on an RPi3B+ which then sends it to an MQTT broker runing on an old laptop. Also running on the laptop is Home Assistant running inside of VirtualBox. If MySensors does use Timer1, it appears that restoring the registers allows it to be shared. //------------------------------------------------------ISR ISR(TIMER1_OVF_vect){ // interrupt service routine for overflow TCNT1 = TimerPreloadValue; // must be first line! starts the timer counting again digitalWrite(TRIGGER_START_SAMPLE_PIN,HIGH); samplesVolts[--sample]=analogRead(VOLTS_IN_PIN); // decrement before capturing samplesCurrent[sample]=analogRead(CURRENT_IN_PIN); digitalWrite(TRIGGER_START_SAMPLE_PIN,LOW); if (!sample){ // count down to zero digitalWrite(TRIGGER_START_SAMPLE_PERIOD_PIN,LOW); // indicate that sampling is complete samplingEnd = micros(); TCCR1B &= 248; // turns off timer } } //------------------------------------------------------sampleOneCycle void sampleOneCycle(){ // back up timer registers uint8_t TCNT1_b = TCNT1; uint8_t TCCR1B_b = TCCR1B; uint8_t TCCR1A_b = TCCR1A; uint8_t TIMSK1_b = TIMSK1; // configure timer which starts the sampling noInterrupts(); // disable all interrupts TCCR1A = 0; TCCR1B = 0; TCNT1 = TimerPreloadValue; // preload timer //TCCR1B |= (1 << CS10)|(1 << CS12); // 1024 prescaler TCCR1B &= 248; // turns off timer? TIMSK1 |= (1 << TOIE1); // enable timer overflow interrupt ISR // demark sampling sample = NUMBER_OF_SAMPLES; // count down to zero digitalWrite(TRIGGER_START_SAMPLE_PERIOD_PIN,HIGH); samplingStart = micros(); TCNT1 = 65535; // first trigger right away! TCCR1B |= 1; // turns on timer interrupts(); // enable all interrupts // wait for sampling to be complete while(digitalRead(TRIGGER_START_SAMPLE_PERIOD_PIN)){}; samplingEnd = micros(); // restore timer registers TCNT1 = TCNT1_b; TCCR1B = TCCR1B_b; TCCR1A = TCCR1A_b; TIMSK1 = TIMSK1_b; }
  • 0 Votes
    1 Posts
    537 Views
    No one has replied
  • Raspberry pi gateway problem after change of Pi

    General Discussion
    2
    0 Votes
    2 Posts
    986 Views
    Vasilis VlachoudisV
    After re-installing the previous 32bit raspbian version, the gateway seems to work ok. It seems to me there is a problem with the 64bit version.
  • 2 Votes
    1 Posts
    826 Views
    No one has replied
  • Sensebender Gateway (SAMD21)

    Development
    10
    0 Votes
    10 Posts
    2k Views
    P
    Just for completeness: the right way to do this is to add the json under ~/.platformio/boards and the other files as described in https://community.platformio.org/t/how-use-a-same-chip-but-with-different-environment/18082/4
  • Can not compile on Arduino Nano ESP 32

    Troubleshooting
    15
    0 Votes
    15 Posts
    3k Views
    E
    @ctodor You are very welcome
  • Gateway stops communicating (again)

    Troubleshooting
    2
    0 Votes
    2 Posts
    995 Views
    E
    Hm, maybe the problem is that your rPI has a short interruption in the WIFI connection, the MQTT TCP connection is interrupted and does not autostart again. Maybe there is something in the logs. Maybe you can find something about reconnects in one of these: journalctl --unit=systemd-networkd journalctl --unit=wpa_supplicant You could try to run wpa_cli in daemon mode to react to disconnects and connects. Create a script like this: #!/bin/bash case "$2" in CONNECTED) <your command to start the gateway>; ;; DISCONNECTED) <your command to stop the gateway>; ;; esac then, start wpa_cli in deamon mode: wpa_cli -a /path/to/your/script #use sudo if your gateway commands need sudo If that helps, you could create a service from this command. Regards, Edi
  • FOTA using OptiBoot copy_flash_pages

    Development
    2
    2
    0 Votes
    2 Posts
    962 Views
    E
    IT WORKS I got a first working version, using an ATmega1284P running on MightyCore 2.2.2 (as soon as I began developement, they switched from Optiboot to Urboot in version 3.0.0, whicht does not include the copy_flash_pages function anymore, but I'm working on a work around there). Only thing I could not solve is to do a CRC check of the image after download... You can try it out here: https://github.com/eiten/MySensors/tree/FOTAInternalFlashTest It's not beautiful yet with much Serial.prints in it, but maybe it helps you if you find errors.
  • HVAC Controller

    My Project
    3
    2
    1 Votes
    3 Posts
    2k Views
    OldSurferDudeO
    We are of like minds, Don't like the cloud based controls (that's another discussion). In my case I have a Bryant/Connex system, heat pump, variable speed fan and 4 zones. There's a lot going on: the 4 zones creates 16 profiles. The fan speed for a profile will depend on the indoor and outdoor temperature. The thermal fluid pump also has to be controlled. A profile will have an optimal air pressure, so there's a sensor there. The controller works just fine not being connected to the cloud. But I want to set the parameters remotely, Bryant/Connex can do this. I also wnat the status of the various actuators and sensors to show up in Home Assistant. The signals sent over the RS422 are proprietary. My plan was to reverse-engineer the signals. After doing this I'll have to experiment to get the right mix of air pressue, fan speed and thermal fluid flow for each profile. I'd like to do the same for my AO Smith heat pump water heater. I'd like to follow your progress. OSD

22

Online

12.1k

Users

11.2k

Topics

113.4k

Posts