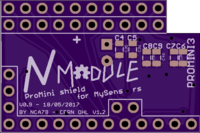
💬 NModule
-
@hek it refused the .dri and .gpi files.
dri is Drill Station Info File
gpi is Photoplotter Info FileBut it seems they are "information" files and not mandatory to make the PCBs so there're enough on openhardware to get the boards produced.
-
WOW man, this is THE board for mysensors... I've been dreaming about this since I started making nodes :)
And the documentation is equally impressive, one of the best boards and documentations available.Just wanted to thank you and ask where donations can be made, you deserve at least a beer for this?
P.S. I guess I would be pushing it now after all your hard work documenting the board, but hopefully it would be possible to ordered them directly from the website. But it is not difficult to compile necessary files manually.
Thanks again, keep up the excellent work!
P.S. I guess I would be pushing it now after all your hard work documenting the board, but hopefully it would be possible to ordered them directly from the website. But it is not difficult to compile necessary files manually.
Missed the option on the openhardware website. I just created a revision so you can order directly if you want...
-
@Nca78
Looks cool :)
I'm also preparing docs actually, for same sort of project (mainboard and sub boards, proto ok). Mine is a bit different (not 328p) but I also have a board for PIRs (AM312 compatible with sr501fresnel).Nice work :+1:
-
P.S. I guess I would be pushing it now after all your hard work documenting the board, but hopefully it would be possible to ordered them directly from the website. But it is not difficult to compile necessary files manually.
Missed the option on the openhardware website. I just created a revision so you can order directly if you want...
@Nca78 - really nice!
What kind of connector do you use? Did you consider the MysX connector by @Anticimex for your shields ?
That would be great because then it could be used with other boards as well (EasyPCB for example and alof of other). -
@Nca78 - really nice!
What kind of connector do you use? Did you consider the MysX connector by @Anticimex for your shields ?
That would be great because then it could be used with other boards as well (EasyPCB for example and alof of other).@sundberg84 said in 💬 NModule:
@Nca78 - really nice!
What kind of connector do you use? Did you consider the MysX connector by @Anticimex for your shields ?
That would be great because then it could be used with other boards as well (EasyPCB for example and alof of other).Thank you :)
I didn't really make a connector, in that case I would have used the MysX connector.
What I wanted was to have all pins on one side, and when necessary enough pins on one row to manage the sensors on the shield so that the full sensor can be as small as possible. Starting from a ProMini this was very limiting so my "connector" consist of power pins (RAW, GND, VCC), A1-A3 from the other side of the board (and at the moment only used as digital pins on the shields) and A4/A5 to have I2C.There's only a small step to adapt the shields to MySX connector so I will do it for the more popular/used shields when I will have cleared my "PCB backlog" :D (12 PCBs in production right now...)
I also want to make sure the current versions run as expected before forking them. -
@Nca78 - really nice!
What kind of connector do you use? Did you consider the MysX connector by @Anticimex for your shields ?
That would be great because then it could be used with other boards as well (EasyPCB for example and alof of other).@sundberg84 I see on openhardware.io that there's nothing except your board using MysX connector, so maybe instead of adapting each of my shields I could make a MysX sensor shield specially adapted for EasyPCB ? It would contain sensors easy to solder and to program, I supposed what makes sense with your board: temperature/humidity/light/general I2C, reed switch, connectors for switches, accelerometer, ... You can contact me by private message to discuss it if you want as you know better than me what usage people do of your board.
-
@sundberg84 I see on openhardware.io that there's nothing except your board using MysX connector, so maybe instead of adapting each of my shields I could make a MysX sensor shield specially adapted for EasyPCB ? It would contain sensors easy to solder and to program, I supposed what makes sense with your board: temperature/humidity/light/general I2C, reed switch, connectors for switches, accelerometer, ... You can contact me by private message to discuss it if you want as you know better than me what usage people do of your board.
@Nca78 - thanks for your reply!
I know anticimex boards should have MysX and the MYS/sensebender gateway as well (without doublechecking).
Here is a published info about the connector https://www.mysensors.org/hardware/mysx and I personally think its a great idea that if everyone uses this it could be easy to swap mother and daughterboards. Anyways... not always easy to design and fit but just a thought for you in the future.Great design and idea with your boards! Keep up the good work! :+1:
-
This looks like an excellent project. In the end i'm not sure which is easier and faster: unsoldering parts from a pro mini or soldering an atmega328p and a few parts onto a pcb. I suppose a pro mini is less expensive though in small volume. For me, since I burn the latest optiboot, the dip chip seems maybe slightly easier to setup.
Having a bunch of pre_made shields, though, is a definite time saver. This project should, justifiably, appeal to a lot of people.
Fantastic!
By the way, for those who don't already know, ChipQuik is a great aid in unsoldering parts from a Pro Mini: https://www.amazon.com/ChipQuik-SMD1-Leaded-Temperature-Removal/dp/B0019UZP7I/ref=sr_1_sc_1?ie=UTF8&qid=1495997244&sr=8-1-spell&keywords=chipqwik
I use it all the time whenever I need to unsolder SMD parts. -
This looks like an excellent project. In the end i'm not sure which is easier and faster: unsoldering parts from a pro mini or soldering an atmega328p and a few parts onto a pcb. I suppose a pro mini is less expensive though in small volume. For me, since I burn the latest optiboot, the dip chip seems maybe slightly easier to setup.
Having a bunch of pre_made shields, though, is a definite time saver. This project should, justifiably, appeal to a lot of people.
Fantastic!
@NeverDie thank you !
I agree about the SMD atmega it's quicker to solder than all the pins on the ProMini, but if you take the full process including the 2 or 3 extra caps, pullup resistor for RST, cleaning the flux, checking you didn't make any shortcuts between those tiny pins etc etc I think it's faster with the ProMini as it's pretty hard to miss a through-hole solder point and removing 2 leds and regulator is less than one minute for me even with bad eyes and short term experience only with SMD.About ChipQuik I find it expensive, it seems cheaper to fail on a less-than-2$ ProMini once in a while :D
And for max efficiency there's the hot air gun, I have a cheap one (65€ I think, express delivery included) but it's still magic enough to bring the time to only a few seconds per board when you process a bunch at the same time.
-
@NeverDie thank you !
I agree about the SMD atmega it's quicker to solder than all the pins on the ProMini, but if you take the full process including the 2 or 3 extra caps, pullup resistor for RST, cleaning the flux, checking you didn't make any shortcuts between those tiny pins etc etc I think it's faster with the ProMini as it's pretty hard to miss a through-hole solder point and removing 2 leds and regulator is less than one minute for me even with bad eyes and short term experience only with SMD.About ChipQuik I find it expensive, it seems cheaper to fail on a less-than-2$ ProMini once in a while :D
And for max efficiency there's the hot air gun, I have a cheap one (65€ I think, express delivery included) but it's still magic enough to bring the time to only a few seconds per board when you process a bunch at the same time.
I'll give the hot air gun a try. Thanks for the suggestion!
I hadn't realized that the PCB for this project is as big as it is until I went to order one from Osh Park just now. They want $18.85 for three. Maybe you can post a version with just the core pro mini shield but with the battery related part and the antenna silkscreen amputated? That would reduce the PCB cost by a lot. I haven't delved into it, so sorry in advance if perhaps the question is overly simplistic. I'm guessing there may be others like me who want to try it and who have alternate ways of powering it.
-
I'll give the hot air gun a try. Thanks for the suggestion!
I hadn't realized that the PCB for this project is as big as it is until I went to order one from Osh Park just now. They want $18.85 for three. Maybe you can post a version with just the core pro mini shield but with the battery related part and the antenna silkscreen amputated? That would reduce the PCB cost by a lot. I haven't delved into it, so sorry in advance if perhaps the question is overly simplistic. I'm guessing there may be others like me who want to try it and who have alternate ways of powering it.
@NeverDie yes that's how it was not so long ago, that's why it's small like that on the pictures I didn't have the battery/power part nor antenna support.
I'm more used to Seeed, DirtyPCB, Elecrow and PCBWay so size doesn't matter if you stay below 55cm or 1010cm.I added the small part below antenna because with previous version I had a case when I unsoldered the radio module during manipulation. But I get the point it's not worth it if you pay board per surface.
It's easy to make so I'll add NModule_Core.xxx gerber files ASAP. -
Thanks! I just now ordered it:
$4.80 is a lot better than $18.85. :) -
Christmas in June ! :D
-
NModule works with 3.3V power from header/programmer, and with a coin cell on the "power" board attached to it (tested with CR2025 and 220µF electrolytic capacitor).
I'll continue the tests tomorrow.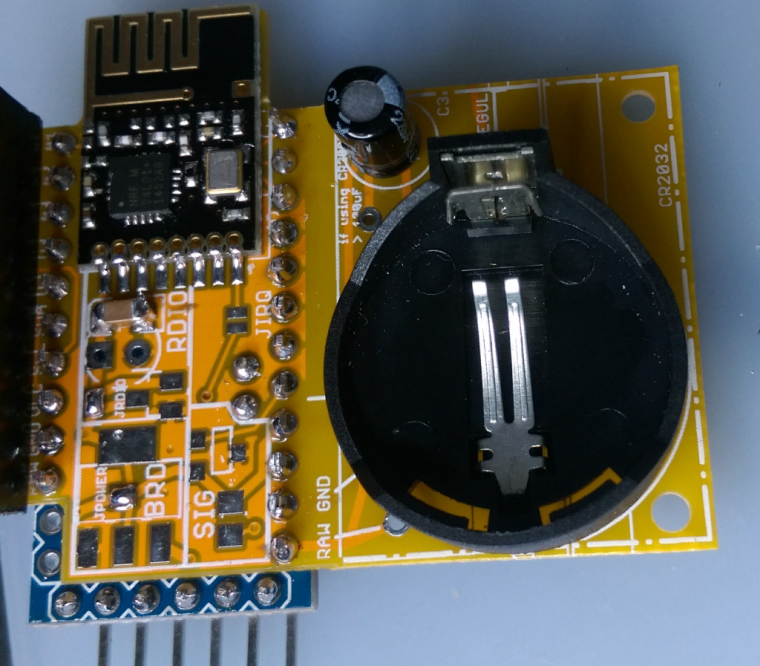
-
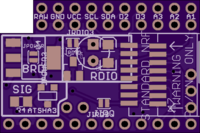
Not a big deal, but the silkscreen printing is jumbled together, making it hard to read:
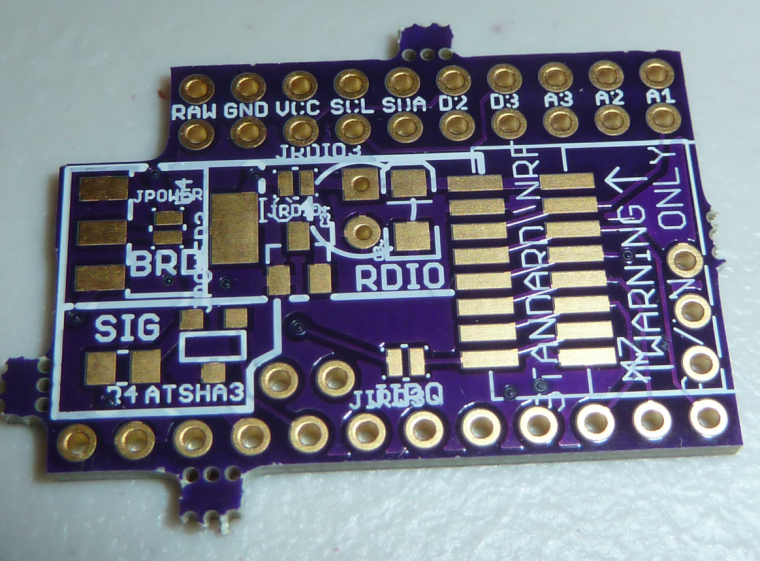
Not sure if you're seeing it on your boards that way or not, but that's how OSH PARK did it.
-
Also, there are a number of "Pro Mini" type boards on the marketplace, and not all of them are 100% pin compatible. Which did you choose as your model? Is it the Sparkfun Pro Mini (which, if I'm not mistaken, was the first and the root of it all)? You may want to show a photo of the pro mini you're assuming along with a caption reading "your pro mini should look like this" just to avoid confusion.
Hello! It looks like you're interested in this conversation, but you don't have an account yet.
Getting fed up of having to scroll through the same posts each visit? When you register for an account, you'll always come back to exactly where you were before, and choose to be notified of new replies (either via email, or push notification). You'll also be able to save bookmarks and upvote posts to show your appreciation to other community members.
With your input, this post could be even better 💗
Register Login