I have a very well working setup with jeedom & mysensors.
do you have access to the logs in debug mode ?
H
hlehoux
@hlehoux
Posts
-
INCLUSION TROUBLE -
Code Garage to the rescue.Well, i've swiched all my sensors from nRF24 to RFM69 for longer range
-
Code Garage to the rescue.Thank you @CodeGarage , you really thrive !
As for the suggestions, i would say most important point would be to look at the project code base.
I guess the development branch has quiet evolved since the 2.3.2 release.Next would be to sort the features and decide a roadmap for mysensors because the project can live only if it evolves
Long live MySensors!
-
Water Filtering and Sterilization and Hot Water Recirculationexcellent!
-
Please I need some helpyou will for sure also find many other "display" node example in the forum.
-
Please I need some helpOK, for the receiver you could use this example: https://www.mysensors.org/build/display
you will have to adapt the example code which is displaying the current time.
and add the receive function
void receive(const MyMessage &message)
{
}and inside the receive function extract the the values you want and display it through lcd.print()
hope this helps
-
Please I need some help@Emmanuel-Abraham sorry but i’m not sure i understand what you want to achieve.
i think you already have a working water pulse sensor but can you explain what you want to do ? why another node ? what do you want this node to do ? what data do you want to send to the node ?what is your programming knowledge ?
-
Please I need some helpHello @Emmanuel-Abraham , i've never used this pulse meter sensor.
as far as i can see, it's sending 3 different values to the gateaway:
flow value : send(flowMsg.set(flow, 2));
pulse count : send(lastCounterMsg.set(pulseCount));
volume : send(volumeMsg.set(volume, 3));so if you want to send say the flow value to another node, let's say node 34
you should
flowMsg.setDestination(34);and you have to add the
void receive(const MyMessage &message)
{
}
function in the code of your node n°34 -
Please I need some helpHello here is an example i use at home: sending value 99 to node n°1
#define TARGET_NODE 1 // Id node Relay entree et couloir au tableau electrique

MyMessage MsgRelayGlobal(0,V_STATUS); // Message for the Relay actuator on node id 1, sensor 0

  // set the Destination of message to the node id of the relay actuator
  MsgRelayGlobal.setDestination(TARGET_NODE);

      MsgRelayGlobal.set( (const uint8_t ) 99 );
      Serial.println("Send Message to node 1");
      send(MsgRelayGlobal); // send message to node id 1
and here an example of how to deal with the message at target node:
void MyRelay::Receive(const MyMessage &message) { uint8_t payload= 0; payload= message.getByte(); if (message.type==V_STATUS) { if (payload==99) { // do something -
Zigbee gateway with support for multiple vendors?What is also most interesting with zigbee is a very important number of devices, and low price of them compared to zwave for instance.
-
MySensors PC Gateway - is it possible?more info here https://www.mysensors.org/build/select_gateway
-
MySensors PC Gateway - is it possible?You need to connect a MySensors Gateaway to your home assistant home automation controler.
usually you can build a gateaway based on an arduino uno and connect it through serial port USB to the machine running your home assistant.
alternatively you can build an ethernet gateaway (for instance with an ethernet enabled arduino) and communicate with your home assistant through tcp/ip
-
long-term usage of nRF24L01+ with PA: no reliable transmissionMaybe try E01-ML01DP5 Long Range SPI nRF24L01P 2.4Ghz 100mW SMA Antenna IoT Wireless Transceiver
After several years of usage, i can tell i sometimes need to reboot a node after several weeks or months… hard to tell why because i don’t have logs and when node is restarted usely everything works well.
On some nodes i have setup a routine to reboot once a day; difficult to have clues if this is far better or not.
Sometimes, you can have the case where your node finds an unusual « parent id » because the regular parent is not responding so
if you are confident with your topology gateaway and repeaters then you can #define the prefered parent id of each node
especially if some repeaters have a better antenna than others -
Newbie: Sensors do not connect@mariusl i use the pcb from @sundberg84 EasyPCB RFM69 version and it works very well
-
Newbie: Sensors do not connectMaybe try E01-ML01DP5 Long Range SPI nRF24L01P 2.4Ghz 100mW SMA Antenna IoT Wireless Transceiver Transmitter Receiver RF Module
In my experience with an antenna it provided far better results.
Anymay, i have swiched my sensors to RFM69, which works better, if not perfect
-
Zigbee gateway with support for multiple vendors?@NeverDie avoid tuya devices: they are intendly made to work only with the tuya app.
people try to work this around , for instance in ZHA quirks, but this is a nightmare of reverse engineering -
Zigbee gateway with support for multiple vendors?I confirm care has to be taken: some brands want to lock you, the worst being Tuya, their devices are programmed in a way for them to work only with their gateway.
I’m very happy with the « silvercrest » gateway ; it works well and there is an « easy » hack to gain control of it there: https://paulbanks.org/projects/lidl-zigbee/#overview
(and here for french speaking people: https://faire-ca-soi-meme.fr/domotique/2021/03/22/hack-detournement-de-la-passerelle-lidl-silvercrest/)
-
💬 Easy/Newbie PCB (RFM69 HW/W edition) for MySensors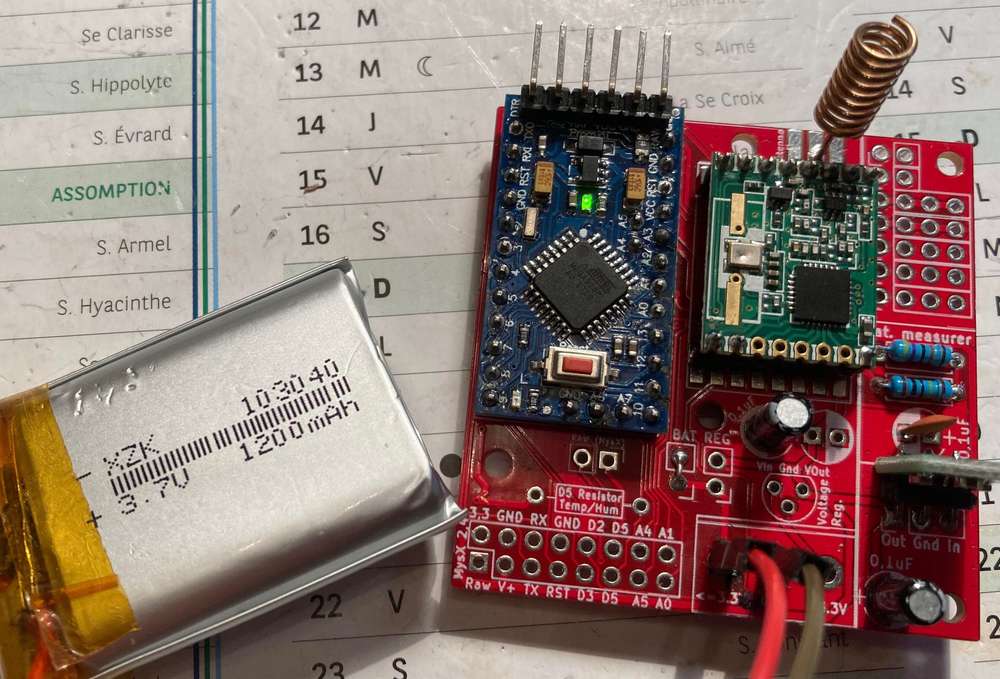
-
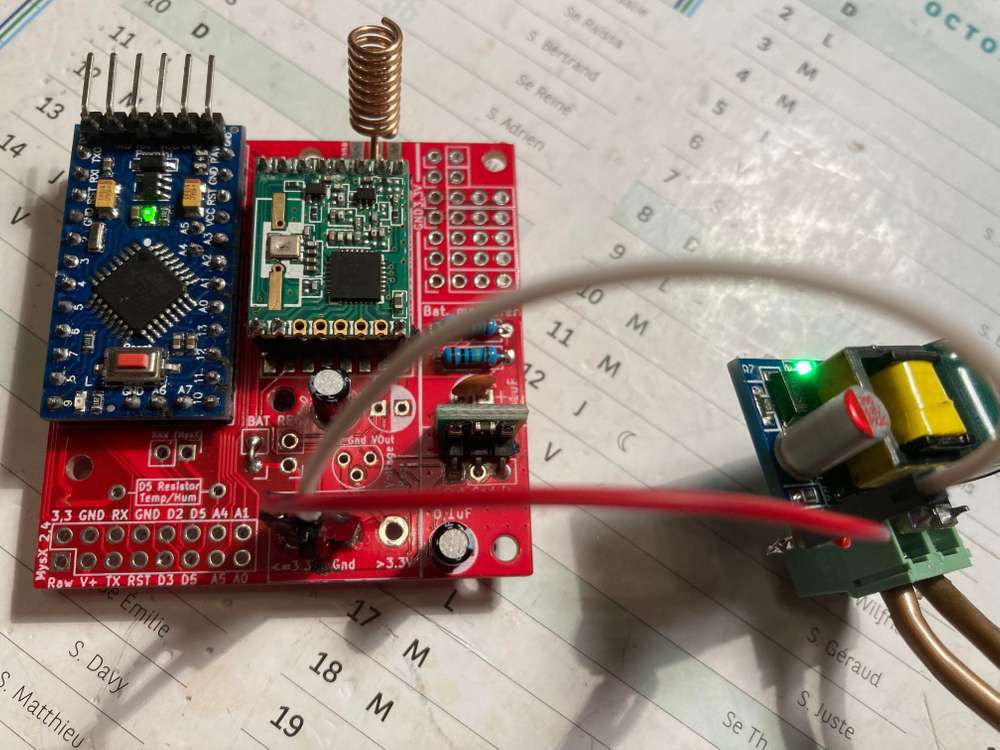
💬 Easy/Newbie PCB (RFM69 HW/W edition) for MySensorsFor those who use this wonderfull PCB, it is possible to use it with a regulated 5V input or with a lithium 3.7V battery :: with the following two actions:
-
as a booster use a "1.8V 3V 3.7V 5V to 3.3V Boost & Buck Low Noise Regulated Charge Pump 2 in 1 DC/DC Converter"
This will convert anything between 1.8 - 5V to 3.3V- works with regulated 5V down to 3.3V
- works with lithium battery that start at 3.7V above 3.3, and then after sometime the battery goes down less than 3.3 and is boosted to 3.3
-
connect the "BAT" jumper so that input goes through you DC/DC converter
-
-
MQTT gateway sends duplicate messages to controller?@hlehoux BTW, in my case this seems to be related to the battery being very low.