Navigation

    • Register
    • Login
    • OpenHardware.io
    • Categories
    • Recent
    • Tags
    • Popular
    1. Home
    2. Takero
    3. Posts
    • Profile
    • Following
    • Followers
    • Topics
    • Posts
    • Best
    • Groups

    Posts made by Takero

    • RE: πŸ’¬ Door/Window Sensor

      In deep Sleep the cunsumption is below 19Β΅A, but i have to send with PA_MAX. On some Windows the open/close frequency is verry high, so the battery is to fast emty.

      The CR2032 is good, but i want more "lifetime"

      posted in OpenHardware.io
      Takero
      Takero
    • RE: πŸ’¬ Door/Window Sensor

      Yes the consumption is still at 19Β΅A, but while sending it increase up to 100mA. The Standby Time is depends on the interval of open/close Windows. For me it was not really ennoth (2-3 month), so i redesigned this Project.

      Just look in my Projects -> Door/Windows AAA

      Greetings

      posted in OpenHardware.io
      Takero
      Takero
    • RE: Battery powered outdoor sensor drops connection in cold weather

      Insert an delay between sends will help to refresh the load in the capacitor. I prefer to wait for 100ms before send a new message. And increase the capacitor. My Sensor (not battery) works fine until -15Β°C.

      posted in Hardware
      Takero
      Takero
    • RE: πŸ’¬ Security & Signing

      @egadgetjnr where dit u come from?

      posted in Announcements
      Takero
      Takero
    • RE: Battery Operated Door Magnet Sensor

      Look at my node: I used HW-Debounce and deep sleep.
      Sketch inside.

      https://www.openhardware.io/view/266/DoorWindow-Sensor

      posted in My Project
      Takero
      Takero
    • RE: πŸ’¬ Roller Shutter Node

      I was a little bit bussy the last days.
      My Nodes are completed installed right now, it works well. BUT, i had to change some thinks.

      I had the Probleme of automatic reset of the device if i set the shutter to 50% or anythink else 0% or 100%.
      The Diode alone dont solve these Probleme. I think the Problem is to stop the shutter while running. If i set it to 100% or 0% the shutter shut of before the relay falls down.

      I solve the Problem with a 220uF Capacitor at the 3.3V Out and deactivate the BOD.

      My Fuses right now: L: CF // H:DA // E:07

      Now it works very well!!

      @Fabien: I dont change the amp . . i just tested some thinks but it wont work . . for i dont use the current messurment and setup the Node with the manual endstop. It works realy good!

      Finaly again, Thanks @scalz
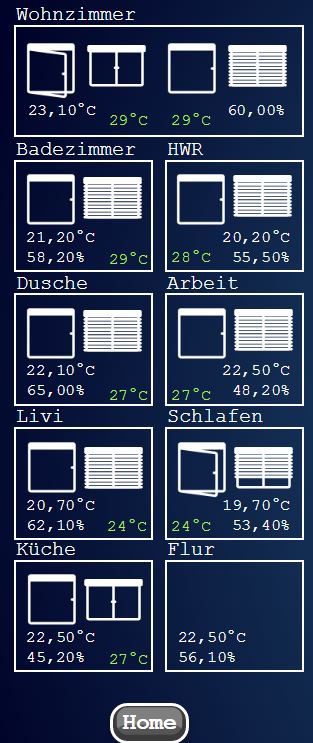
      The Temp. of the devices is below 30Β°C πŸ˜‰

      In the picture the green temp.

      0_1481916187089_Unbenannt.JPG

      posted in OpenHardware.io
      Takero
      Takero
    • RE: πŸ’¬ Door/Window Sensor

      Final Version is tested and released. Have fun!

      posted in OpenHardware.io
      Takero
      Takero
    • RE: πŸ’¬ FOTA (Wireless Programming)

      @Alex-B-Goode Yes this is the Way. If you dont like to disconnect the Gateway from Pi you Can use my procedure was i wrote some posts before. If the nodes discovered One time you dont need to wait again. MYScontroller save the discovered nodes.

      posted in Announcements
      Takero
      Takero
    • RE: πŸ’¬ FOTA (Wireless Programming)

      For OTA Update under Rpi i used this: http://www.virtualhere.com/

      • just install it on the Pi, stop the controler software
      wget http://www.virtualhere.com/sites/default/files/usbserver/vhusbdarmpi2
      

      vhusbdarmpi2 -> for Pi2 only (see homepage for other platforms)

      sudo chmod +x ./vhusbdarmpi2
      
      • start the virtualhere server
      sudo ./vhusbdarmpi2
      
      • install the client on your Windows System
      • Mount the Com-Port
      • start MYSControler
      • do what you want to do
      • stop client

      now you have to reboot your rpi, stop virtualhere server its not enoth, cant mount device again. After restart everythinks works well.

      Greetings

      posted in Announcements
      Takero
      Takero
    • RE: πŸ’¬ Roller Shutter Node

      Dont Care πŸ™‚ its cool. Zenner its not enoth but dont worry. I need it .. the nrf is verry "female" πŸ˜„ (sensible). But i think for both version, you have to modify the current messurment. No Roller shutter has >200w so u are on the Limit below 100w of adc scale.

      But hey it Works and your Layout is verry cool and Safe.

      posted in OpenHardware.io
      Takero
      Takero
    • RE: πŸ’¬ Roller Shutter Node

      @scalz said:

      for the wheeling diode if i remember it's integrated in the relay driver. depends what you mean

      It isn't πŸ™‚

      posted in OpenHardware.io
      Takero
      Takero
    • RE: πŸ’¬ Roller Shutter Node

      With a Little Bit Trouble yes. The Problem is the Dimension of the amplifier. Below 60W the messured voltage is to Low.

      I think it is netter the Diode must be in the Feedback cycle of the amplifier. But in my case the Free running voltage is below 6 and with running Roller above 20. So it is possible to detect the End stops. Just modify the variables.

      I will Test it in the"real" System tomorow. If it Works i will post the Sketch.

      posted in OpenHardware.io
      Takero
      Takero
    • RE: πŸ’¬ Roller Shutter Node

      I am finished and everythink is working well right now.

      I dit some modifications on PCB:

      • add an 470uF near to NRF24
      • add two Diodes recovery diode (or free-wheeling diode) dunno how it called in english πŸ™‚ at the relays

      And some changes in your example code πŸ‘

      Thanks for the Layout, thanks for the code, thanks for help!

      I design a 3D Case, but only the bottom side. . . but not tested right now . .

      alt text

      0_1478263225360_RollerShutter_back.stl
      0_1478263256093_RollerShutter_Back.123dx

      posted in OpenHardware.io
      Takero
      Takero
    • RE: πŸ’¬ Roller Shutter Node

      Level detection work right now . . .

      my modifications:

      // send % progression for controller widgets NOT TESTED  
        static uint8_t oldpos = getPosition();
        
        if (oldpos != getPosition() && getCalibrationState()==0) {
          send(msgShutterPosition.set(getPosition()));
          send(msgPercent.set(getPosition()));
          oldpos = getPosition();
        } 
      
      posted in OpenHardware.io
      Takero
      Takero
    • RE: πŸ’¬ Roller Shutter Node

      Dont know why but while autocali. they stop messurement of current . . .

      If i start the process the first is go UP, my messurment of power is: 30W
      if i Power of the attached Bulb the value stays on 30W, so it is normal he cant detect anythink

      In your loop:

       // Read current sensor, endstop
        uint16_t acsread = 0;  
        acsread = readAdcWithFilter(ACS712_SENSOR, PS_64); 
        if (acsread < ACS712_LEVELDETECT) {
            // Endstop detected  
            if (getCalibrationState() > 0) setEndStopState(true); 
            else {};
        }
      

      I modified for debug like this:

      // Read current sensor, endstop
        uint16_t acsread = 0;  
        acsread = readAdcWithFilter(ACS712_SENSOR, PS_64); 
      
      
        Serial.print(F("ACS712: READ DEBUG: ")); 
        Serial.println(acsread);
      
      
        if (acsread < ACS712_LEVELDETECT) {
            // Endstop detected  
            if (getCalibrationState() > 0) setEndStopState(true); 
            else {};
        }
      

      It never change the value of acsread after the init process is started. . .

      LOG:

      TSP:MSG:READ 0-0-50 s=2,c=1,t=2,pt=0,l=1,sg=1:1
      CMD: Autocalibration
      ACS712: READ DEBUG: 7
      ACS712: READ DEBUG: 29
      ACS712: READ: 29
      TSP:MSG:SEND 50-50-0-0 s=6,c=1,t=17,pt=3,l=2,sg=0,ft=0,st=ok:29
      ACS712: READ DEBUG: 29
      ACS712: READ DEBUG: 29
      ACS712: READ DEBUG: 29
      ACS712: READ DEBUG: 29
      ACS712: READ DEBUG: 29
      ACS712: READ DEBUG: 29
      ACS712: READ DEBUG: 29
      ACS712: READ DEBUG: 29
      ACS712: READ DEBUG: 29
      ACS712: READ DEBUG: 29
      ACS712: READ DEBUG: 29
      ACS712: READ DEBUG: 29
      ACS712: READ DEBUG: 29
      ACS712: READ DEBUG: 29
      ACS712: READ DEBUG: 29
      ACS712: READ DEBUG: 29
      ACS712: READ DEBUG: 29
      ACS712: READ DEBUG: 29
      ACS712: READ DEBUG: 29
      ACS712: READ DEBUG: 29
      ACS712: READ DEBUG: 29
      ACS712: READ DEBUG: 29
      ACS712: READ DEBUG: 29
      ACS712: READ DEBUG: 29
      ACS712: READ DEBUG: 29
      ACS712: READ DEBUG: 29
      ACS712: READ DEBUG: 29
      ACS712: READ DEBUG: 29
      ACS712: READ DEBUG: 29
      ACS712: READ DEBUG: 29
      ACS712: READ DEBUG: 29
      

      29 will stay until timout stop. . . between this i power of the attached test bulb (20W)

      posted in OpenHardware.io
      Takero
      Takero
    • RE: πŸ’¬ Roller Shutter Node

      @scalz

      Yes, i work on it . . . still my ACS wont work well. At the moment i init the node with the Endstop Bool, that works fine.

      I work also on an delay between the UP/DOWN States, i don't like it if the shutter change the direktion directly. But . . . not find the right way yet πŸ™‚

      EDIT: ACS works right now!!! πŸ‘ I think my IC was defective πŸ‘Ž

      posted in OpenHardware.io
      Takero
      Takero
    • RE: πŸ’¬ Security & Signing

      @tonnerre33 Thanks, i solved it already, but you are right that was my Problem πŸ™‚

      posted in Announcements
      Takero
      Takero
    • RE: πŸ’¬ Roller Shutter Node

      It is possible that you dont use the asc for the autocalibration yet? I cant find it in your Code .... I found only the read process.

      Corect me if i am wrong. πŸ™‚

      posted in OpenHardware.io
      Takero
      Takero
    • RE: πŸ’¬ Door/Window Sensor

      I will try it direct on the CR2032.

      You are right, OTA not needed and not possible. The second Reed is for a second Window, i would trace it seperatly.
      It's for a doble Window, the sensor is placed in the middle of booth windows.

      posted in OpenHardware.io
      Takero
      Takero
    • RE: πŸ’¬ Roller Shutter Node

      Yaah dont hurry πŸ˜„

      here is the log:

       [2016-11-01 10:49:04.702 Info] RX	0;255;3;0;9;TSP:MSG:READ 50-50-0 s=6,c=1,t=17,pt=3,l=2,sg=0:465
       [2016-11-01 10:49:04.727 Info] RX	50;6;1;0;17;465
       [2016-11-01 10:49:04.728 Info] RX	0;255;3;0;9;TSP:MSG:READ 50-50-0 s=6,c=1,t=17,pt=3,l=2,sg=0:466
       [2016-11-01 10:49:04.728 Info] RX	50;6;1;0;17;466
       [2016-11-01 10:49:14.731 Info] RX	0;255;3;0;9;TSP:SANCHK:OK
       [2016-11-01 10:49:28.130 Info] RX	0;255;3;0;9;TSP:MSG:READ 50-50-0 s=6,c=1,t=17,pt=3,l=2,sg=0:445
       [2016-11-01 10:49:28.137 Info] RX	50;6;1;0;17;445
       [2016-11-01 10:49:28.265 Info] RX	0;255;3;0;9;TSP:MSG:READ 50-50-0 s=6,c=1,t=17,pt=3,l=2,sg=0:446
       [2016-11-01 10:49:28.267 Info] RX	50;6;1;0;17;446
       [2016-11-01 10:49:54.722 Info] RX	0;255;3;0;9;TSP:MSG:READ 50-50-0 s=6,c=1,t=17,pt=3,l=2,sg=0:425
       [2016-11-01 10:49:54.727 Info] RX	50;6;1;0;17;425
       [2016-11-01 10:49:54.787 Info] RX	0;255;3;0;9;TSP:MSG:READ 50-50-0 s=6,c=1,t=17,pt=3,l=2,sg=0:426
       [2016-11-01 10:49:54.788 Info] RX	50;6;1;0;17;426
       [2016-11-01 10:50:14.760 Info] RX	0;255;3;0;9;TSP:SANCHK:OK
       [2016-11-01 10:50:23.029 Info] RX	0;255;3;0;9;TSP:MSG:READ 50-50-0 s=6,c=1,t=17,pt=3,l=2,sg=0:405
       [2016-11-01 10:50:23.032 Info] RX	50;6;1;0;17;405
       [2016-11-01 10:50:23.054 Info] RX	0;255;3;0;9;TSP:MSG:READ 50-50-0 s=6,c=1,t=17,pt=3,l=2,sg=0:406
       [2016-11-01 10:50:23.055 Info] RX	50;6;1;0;17;406
       [2016-11-01 10:50:53.223 Info] RX	0;255;3;0;9;TSP:MSG:READ 50-50-0 s=6,c=1,t=17,pt=3,l=2,sg=0:385
       [2016-11-01 10:50:53.226 Info] RX	50;6;1;0;17;385
       [2016-11-01 10:50:53.261 Info] RX	0;255;3;0;9;TSP:MSG:READ 50-50-0 s=6,c=1,t=17,pt=3,l=2,sg=0:386
       [2016-11-01 10:50:53.262 Info] RX	50;6;1;0;17;386
       [2016-11-01 10:51:14.788 Info] RX	0;255;3;0;9;TSP:SANCHK:OK
       [2016-11-01 10:51:25.712 Info] RX	0;255;3;0;9;TSP:MSG:READ 50-50-0 s=6,c=1,t=17,pt=3,l=2,sg=0:365
       [2016-11-01 10:51:25.718 Info] RX	50;6;1;0;17;365
       [2016-11-01 10:51:25.725 Info] RX	0;255;3;0;9;TSP:MSG:READ 50-50-0 s=6,c=1,t=17,pt=3,l=2,sg=0:366
       [2016-11-01 10:51:25.732 Info] RX	50;6;1;0;17;366
       [2016-11-01 10:51:59.985 Info] RX	0;255;3;0;9;TSP:MSG:READ 50-50-0 s=6,c=1,t=17,pt=3,l=2,sg=0:345
       [2016-11-01 10:51:59.989 Info] RX	50;6;1;0;17;345
       [2016-11-01 10:52:00.013 Info] RX	0;255;3;0;9;TSP:MSG:READ 50-50-0 s=6,c=1,t=17,pt=3,l=2,sg=0:346
       [2016-11-01 10:52:00.014 Info] RX	50;6;1;0;17;346
       [2016-11-01 10:52:14.818 Info] RX	0;255;3;0;9;TSP:SANCHK:OK
       [2016-11-01 10:52:36.088 Info] RX	0;255;3;0;9;TSP:MSG:READ 50-50-0 s=6,c=1,t=17,pt=3,l=2,sg=0:325
       [2016-11-01 10:52:36.091 Info] RX	50;6;1;0;17;325
       [2016-11-01 10:52:36.117 Info] RX	0;255;3;0;9;TSP:MSG:READ 50-50-0 s=6,c=1,t=17,pt=3,l=2,sg=0:326
       [2016-11-01 10:52:36.119 Info] RX	50;6;1;0;17;326
       [2016-11-01 10:53:14.248 Info] RX	0;255;3;0;9;TSP:MSG:READ 50-50-0 s=6,c=1,t=17,pt=3,l=2,sg=0:305
       [2016-11-01 10:53:14.251 Info] RX	50;6;1;0;17;305
       [2016-11-01 10:53:14.278 Info] RX	0;255;3;0;9;TSP:MSG:READ 50-50-0 s=6,c=1,t=17,pt=3,l=2,sg=0:306
       [2016-11-01 10:53:14.279 Info] RX	50;6;1;0;17;306
       [2016-11-01 10:53:14.848 Info] RX	0;255;3;0;9;TSP:SANCHK:OK
       [2016-11-01 10:53:54.586 Info] RX	0;255;3;0;9;TSP:MSG:READ 50-50-0 s=6,c=1,t=17,pt=3,l=2,sg=0:285
       [2016-11-01 10:53:54.590 Info] RX	50;6;1;0;17;285
       [2016-11-01 10:53:54.613 Info] RX	0;255;3;0;9;TSP:MSG:READ 50-50-0 s=6,c=1,t=17,pt=3,l=2,sg=0:286
       [2016-11-01 10:53:54.614 Info] RX	50;6;1;0;17;286
       [2016-11-01 10:54:14.876 Info] RX	0;255;3;0;9;TSP:SANCHK:OK
       [2016-11-01 10:54:36.813 Info] RX	0;255;3;0;9;TSP:MSG:READ 50-50-0 s=6,c=1,t=17,pt=3,l=2,sg=0:265
       [2016-11-01 10:54:36.817 Info] RX	50;6;1;0;17;265
       [2016-11-01 10:54:36.843 Info] RX	0;255;3;0;9;TSP:MSG:READ 50-50-0 s=6,c=1,t=17,pt=3,l=2,sg=0:266
       [2016-11-01 10:54:36.845 Info] RX	50;6;1;0;17;266
       [2016-11-01 10:55:14.904 Info] RX	0;255;3;0;9;TSP:SANCHK:OK
       [2016-11-01 10:55:21.198 Info] RX	0;255;3;0;9;TSP:MSG:READ 50-50-0 s=6,c=1,t=17,pt=3,l=2,sg=0:245
       [2016-11-01 10:55:21.202 Info] RX	50;6;1;0;17;245
       [2016-11-01 10:55:21.223 Info] RX	0;255;3;0;9;TSP:MSG:READ 50-50-0 s=6,c=1,t=17,pt=3,l=2,sg=0:246
       [2016-11-01 10:55:21.224 Info] RX	50;6;1;0;17;246
       [2016-11-01 10:56:08.275 Info] RX	0;255;3;0;9;TSP:MSG:READ 50-50-0 s=6,c=1,t=17,pt=3,l=2,sg=0:225
       [2016-11-01 10:56:08.278 Info] RX	50;6;1;0;17;225
       [2016-11-01 10:56:08.304 Info] RX	0;255;3;0;9;TSP:MSG:READ 50-50-0 s=6,c=1,t=17,pt=3,l=2,sg=0:226
       [2016-11-01 10:56:08.306 Info] RX	50;6;1;0;17;226
       [2016-11-01 10:56:14.934 Info] RX	0;255;3;0;9;TSP:SANCHK:OK
       [2016-11-01 10:56:58.403 Info] RX	0;255;3;0;9;TSP:MSG:READ 50-50-0 s=6,c=1,t=17,pt=3,l=2,sg=0:205
       [2016-11-01 10:56:58.406 Info] RX	50;6;1;0;17;205
       [2016-11-01 10:56:58.432 Info] RX	0;255;3;0;9;TSP:MSG:READ 50-50-0 s=6,c=1,t=17,pt=3,l=2,sg=0:206
       [2016-11-01 10:56:58.434 Info] RX	50;6;1;0;17;206
       [2016-11-01 10:57:14.963 Info] RX	0;255;3;0;9;TSP:SANCHK:OK
       [2016-11-01 10:57:51.378 Info] RX	0;255;3;0;9;TSP:MSG:READ 50-50-0 s=6,c=1,t=17,pt=3,l=2,sg=0:185
       [2016-11-01 10:57:51.381 Info] RX	50;6;1;0;17;185
       [2016-11-01 10:57:51.403 Info] RX	0;255;3;0;9;TSP:MSG:READ 50-50-0 s=6,c=1,t=17,pt=3,l=2,sg=0:186
       [2016-11-01 10:57:51.404 Info] RX	50;6;1;0;17;186
       [2016-11-01 10:58:14.991 Info] RX	0;255;3;0;9;TSP:SANCHK:OK
       [2016-11-01 10:58:47.254 Info] RX	0;255;3;0;9;TSP:MSG:READ 50-50-0 s=6,c=1,t=17,pt=3,l=2,sg=0:165
       [2016-11-01 10:58:47.280 Info] RX	50;6;1;0;17;165
       [2016-11-01 10:58:47.281 Info] RX	0;255;3;0;9;TSP:MSG:READ 50-50-0 s=6,c=1,t=17,pt=3,l=2,sg=0:166
       [2016-11-01 10:58:47.282 Info] RX	50;6;1;0;17;166
       [2016-11-01 10:59:15.019 Info] RX	0;255;3;0;9;TSP:SANCHK:OK
       [2016-11-01 10:59:46.972 Info] RX	0;255;3;0;9;TSP:MSG:READ 50-50-0 s=6,c=1,t=17,pt=3,l=2,sg=0:145
       [2016-11-01 10:59:46.977 Info] RX	50;6;1;0;17;145
       [2016-11-01 10:59:47.040 Info] RX	0;255;3;0;9;TSP:MSG:READ 50-50-0 s=6,c=1,t=17,pt=3,l=2,sg=0:146
       [2016-11-01 10:59:47.041 Info] RX	50;6;1;0;17;146
       [2016-11-01 11:00:15.047 Info] RX	0;255;3;0;9;TSP:SANCHK:OK
       [2016-11-01 11:00:52.176 Info] RX	0;255;3;0;9;TSP:MSG:READ 50-50-0 s=6,c=1,t=17,pt=3,l=2,sg=0:125
       [2016-11-01 11:00:52.181 Info] RX	50;6;1;0;17;125
       [2016-11-01 11:00:52.244 Info] RX	0;255;3;0;9;TSP:MSG:READ 50-50-0 s=6,c=1,t=17,pt=3,l=2,sg=0:126
       [2016-11-01 11:00:52.245 Info] RX	50;6;1;0;17;126
       [2016-11-01 11:01:15.076 Info] RX	0;255;3;0;9;TSP:SANCHK:OK
       [2016-11-01 11:02:08.445 Info] RX	0;255;3;0;9;TSP:MSG:READ 50-50-0 s=6,c=1,t=17,pt=3,l=2,sg=0:105
       [2016-11-01 11:02:08.449 Info] RX	50;6;1;0;17;105
       [2016-11-01 11:02:08.505 Info] RX	0;255;3;0;9;TSP:MSG:READ 50-50-0 s=6,c=1,t=17,pt=3,l=2,sg=0:106
       [2016-11-01 11:02:08.506 Info] RX	50;6;1;0;17;106
      

      Bootup Log:

      57	01.11.2016 12:34:04	TX	50	50		0	6	C_SET	V_WATT	UINT16	2	NO		62
      59	01.11.2016 12:34:05	TX	50	50		0	6	C_SET	V_WATT	UINT16	2	NO		63
      61	01.11.2016 12:34:05	TX	50	50		0	6	C_SET	V_WATT	UINT16	2	NO		64
      63	01.11.2016 12:34:06	TX	50	50		0	6	C_SET	V_WATT	UINT16	2	NO		65
      65	01.11.2016 12:34:07	TX	50	50		0	6	C_SET	V_WATT	UINT16	2	NO		66
      67	01.11.2016 12:34:08	TX	50	50		0	3	C_SET	V_TEMP	BYTE	1	NO		25
      69	01.11.2016 12:34:08	TX	0	0	50	50	3	C_SET	V_TEMP	BYTE	1	NO	ok	25
      71	01.11.2016 12:34:08	TX	50	50		0	6	C_SET	V_WATT	UINT16	2	NO		67
      73	01.11.2016 12:34:09	TX	50	50		0	6	C_SET	V_WATT	UINT16	2	NO		68
      75	01.11.2016 12:34:10	TX	50	50		0	6	C_SET	V_WATT	UINT16	2	NO		69
      77	01.11.2016 12:34:11	TX	50	50		0	6	C_SET	V_WATT	UINT16	2	NO		70
      79	01.11.2016 12:34:12	TX	50	50		0	6	C_SET	V_WATT	UINT16	2	NO		71
      81	01.11.2016 12:34:14	TX	50	50		0	6	C_SET	V_WATT	UINT16	2	NO		72
      83	01.11.2016 12:34:15	TX	50	50		0	6	C_SET	V_WATT	UINT16	2	NO		73
      85	01.11.2016 12:34:17	TX	50	50		0	6	C_SET	V_WATT	UINT16	2	NO		74
      87	01.11.2016 12:34:19	TX	50	50		0	6	C_SET	V_WATT	UINT16	2	NO		75
      89	01.11.2016 12:34:21	TX	50	50		0	6	C_SET	V_WATT	UINT16	2	NO		76
      91	01.11.2016 12:34:24	TX	50	50		0	6	C_SET	V_WATT	UINT16	2	NO		77
      93	01.11.2016 12:34:26	TX	50	50		0	6	C_SET	V_WATT	UINT16	2	NO		78
      95	01.11.2016 12:34:30	TX	50	50		0	6	C_SET	V_WATT	UINT16	2	NO		79
      97	01.11.2016 12:34:33	TX	50	50		0	6	C_SET	V_WATT	UINT16	2	NO		80
      99	01.11.2016 12:34:38	TX	50	50		0	6	C_SET	V_WATT	UINT16	2	NO		81
      101	01.11.2016 12:34:43	TX	50	50		0	6	C_SET	V_WATT	UINT16	2	NO		82
      103	01.11.2016 12:34:50	TX	50	50		0	6	C_SET	V_WATT	UINT16	2	NO		83
      106	01.11.2016 12:34:59	TX	50	50		0	6	C_SET	V_WATT	UINT16	2	NO		84
      108	01.11.2016 12:35:10	TX	50	50		0	6	C_SET	V_WATT	UINT16	2	NO		85
      110	01.11.2016 12:35:23	TX	50	50		0	6	C_SET	V_WATT	UINT16	2	NO		86
      
      
      posted in OpenHardware.io
      Takero
      Takero
    • RE: πŸ’¬ Door/Window Sensor

      Thanks for review πŸ™‚

      Yes 19uA is to mutch!

      Your circuit works with MCP1640 or an other IC? In my experience the NRF24 needs a stable 3.3V Power to work well,
      especially if you use Signing and OTA.

      I look around for another solution. . .

      posted in OpenHardware.io
      Takero
      Takero
    • RE: πŸ’¬ Roller Shutter Node

      Hey Scalz,

      my prototype of your RollerShutter works well right now. I have add an Capacitor (470uF) near the NRF (it is realy needed! otherwise OTA CRC Fail, lost packages)

      I have a litte bit trouble with the Current Sensor or the calculation of this.
      I Used 2 60W Bulbs, if i PressDown or UP the Power Value increase up to 350W and need a loooooooonng time to decrease. round about 1W per sec.

      Is this normal? In my opinion not but maybe my ASC is defective? I use a modification of your pre-alpha Sketch

      posted in OpenHardware.io
      Takero
      Takero
    • RE: Signing ATSHA Key?

      Works πŸ‘

      posted in Troubleshooting
      Takero
      Takero
    • RE: Signing ATSHA Key?

      @alexsh1 Thanks! I will try it later if my doughter is sleeping.

      posted in Troubleshooting
      Takero
      Takero
    • RE: Signing ATSHA Key?

      Thanks! Now i am on the right way πŸ˜„

      Finaly i'f got a HMAC_KEY.

      On my Soft_Signing GW i have to enable USE_SOFT_SIGNING and STORE_SOFT_KEY (with the HMAC_KEY) and run the SercurePersonalizer.ino on my GW? Right?

      posted in Troubleshooting
      Takero
      Takero
    • RE: Signing ATSHA Key?

      No Prob, i hate phone typing too πŸ™‚

      I know it is possible to mix hard and soft. In my way i want to use hand signing only on my new nodes . . . i will not change all nodes yet.

      If i understood you right i have to generate the Key on my node (Lock Data is optional / i dont want to do that).

      Now i have a HARD Signing node, but Sign failed. So in my opinion i have to generate a Key on my GW too?! Right? Use this points, this the Random Key if i generate before?:

      If you do not have the ATSHA204A device and need to generate random keys:
      Enable USE_SOFT_SIGNING

      If you want to review existing EEPROM configuration to determine if anything needs to be updated:
      Make sure to disable any ATSHA204A update features if you use it (enable SKIP_KEY_STORAGE, disable LOCK_CONFIGURATION and LOCK_DATA)
      Disable STORE_SOFT_KEY
      Disable STORE_SOFT_SERIAL
      Disable STORE_AES_KEY

      After this, it it possible to communicate with the "old" Soft_Signing Nodes?

      posted in Troubleshooting
      Takero
      Takero
    • RE: Signing ATSHA Key?

      I just follow the Tutorial:

      Pick a β€œmaster” device with serial debug port.
      Set the following sketch configuration of the personalizer:
      Enable LOCK_CONFIGURATION
      Disable LOCK_DATA
      Enable SKIP_KEY_STORAGE
      Disable SKIP_UART_CONFIRMATION
      Disable USER_KEY
      Execute the sketch on the β€œmaster” device to obtain a randomized key. Save this key to a secure location and keep it confidential so that you can retrieve it if you need to personalize more devices later on.
      Now reconfigure the sketch with these settings:
      Enable LOCK_CONFIGURATION
      Enable LOCK_DATA (if you are sure you do not need to replace/revoke the key, this is the most secure option to protect from key readout according to Atmel, but they also claim that key is not readable even if data region remains unlocked from the slot we are using)
      Disable SKIP_KEY_STORAGE
      Enable SKIP_UART_CONFIRMATION
      Enable USER_KEY
      Put the saved key in the user_key_data variable.
      Now execute the sketch on all devices you want to personalize with this secret key.
      

      But i dont lock data for now . .

      An other question, it is needed to store this Key in the Gateway too?

      At the moment is my Gateway only set to SOFT_Sign

      I read the Tut many times but some Informations are missing or i dont understood it. My plan is to implement new Nodes, but i want to activate HARD Signing on these Nodes. My Gateway and my Nodes still exisist jet, are only set to handle SoftSign.

      What steps are nessecery to use the new HARD_Sign nodes? Any changes at the Gateway needed?

      Thanks a lot!

      posted in Troubleshooting
      Takero
      Takero
    • Signing ATSHA Key?

      Hello,

      i try to personalized my Nodes. I follow the tut. but i am stuck on this point:
      *
      Execute the sketch on the β€œmaster” device to obtain a randomized key. Save this key to a secure location and keep it confidential so that you can retrieve it if you need to personalize more devices later on.

      there can i found the randomized Key? !

      My Output:

      Personalization sketch for MySensors usage.
      -------------------------------------------
      Device revision: 00020009
      Device serial:   {0x01,0x23,0x86,0x59,0x78,0xB5,0xB2,0xC3,0xEE}
      0123865978B5B2C3EE
      Chip configuration:
      EEPROM DATA:
      SOFT_HMAC_KEY | FFFFFFFFFFFFFFFFFFFFFFFFFFFFFFFFFFFFFFFFFFFFFFFFFFFFFFFFFFFFFFFF
      SOFT_SERIAL   | FFFFFFFFFFFFFFFFFF
      AES_KEY       | FFFFFFFFFFFFFFFFFFFFFFFFFFFFFFFF
      ATSHA204A DATA:
                 SN[0:1]           |         SN[2:3]           | 01   23 | 86   59   
                                Revnum                         | 00   09   04   00   
                                SN[4:7]                        | 78   B5   B2   C3   
          SN[8]    |  Reserved13   | I2CEnable | Reserved15    | EE | 12 | 00 | 00   
        I2CAddress |  TempOffset   |  OTPmode  | SelectorMode  | C8 | 00 | 55 | 00   
               SlotConfig00        |       SlotConfig01        | 8F   80 | 80   A1   
               SlotConfig02        |       SlotConfig03        | 82   E0 | A3   60   
               SlotConfig04        |       SlotConfig05        | 94   40 | A0   85   
               SlotConfig06        |       SlotConfig07        | 86   40 | 87   07   
               SlotConfig08        |       SlotConfig09        | 0F   00 | 89   F2   
               SlotConfig0A        |       SlotConfig0B        | 8A   7A | 0B   8B   
               SlotConfig0C        |       SlotConfig0D        | 0C   4C | DD   4D   
               SlotConfig0E        |       SlotConfig0F        | C2   42 | AF   8F   
        UseFlag00  | UpdateCount00 | UseFlag01 | UpdateCount01 | FF | 00 | FF | 00   
        UseFlag02  | UpdateCount02 | UseFlag03 | UpdateCount03 | FF | 00 | FF | 00   
        UseFlag04  | UpdateCount04 | UseFlag05 | UpdateCount05 | FF | 00 | FF | 00   
        UseFlag06  | UpdateCount06 | UseFlag07 | UpdateCount07 | FF | 00 | FF | 00   
                            LastKeyUse[0:3]                    | FF   FF   FF   FF   
                            LastKeyUse[4:7]                    | FF   FF   FF   FF   
                            LastKeyUse[8:B]                    | FF   FF   FF   FF   
                            LastKeyUse[C:F]                    | FF   FF   FF   FF   
        UserExtra  |    Selector   | LockValue |  LockConfig   | 00 | 00 | 55 | 55   
      Send SPACE character now to lock the configuration...
      Locking configuration...
      Configuration locked.
      Disable SKIP_KEY_STORAGE to store key.
      Data not locked. Define LOCK_DATA to lock for real.
      --------------------------------
      Personalization is now complete.
      Configuration is LOCKED
      Data is UNLOCKED
      
      posted in Troubleshooting
      Takero
      Takero
    • RE: DualOptiboot Bootloader (Solved)

      I does not work again . . . i dont know why 😞

      After Upload new Firmware, the device wont reboot and hanging in an bootloop.

      Log from MYSController:

      [2016-10-29 14:30:37.589 Info] RX	0;255;3;0;9;TSP:MSG:SEND 0-0-50-50 s=255,c=4,t=3,pt=6,l=22,sg=0,ft=0,st=ok:6400020001000C941F040C941F040C9409140C941F04
       [2016-10-29 14:30:37.602 Info] RX	0;255;3;0;9;TSP:MSG:READ 50-50-0 s=255,c=4,t=2,pt=6,l=6,sg=0:640002000000
       [2016-10-29 14:30:37.612 Info] TX	50;255;4;0;3;6400020000000C94F7030C94A3190C947C190C941F04
       [2016-10-29 14:30:37.622 Info] RX	50;255;4;0;2;640002000000
       [2016-10-29 14:30:37.641 Info] RX	0;255;3;0;9;TSP:MSG:SEND 0-0-50-50 s=255,c=4,t=3,pt=6,l=22,sg=0,ft=0,st=ok:6400020000000C94F7030C94A3190C947C190C941F04
       [2016-10-29 14:30:40.031 Info] RX	0;255;3;0;9;TSP:MSG:READ 50-50-255 s=255,c=3,t=7,pt=0,l=0,sg=0:
       [2016-10-29 14:30:40.046 Info] RX	0;255;3;0;9;TSP:MSG:BC
       [2016-10-29 14:30:40.060 Info] RX	0;255;3;0;9;TSP:MSG:FPAR REQ (sender=50)
       [2016-10-29 14:30:40.069 Info] RX	0;255;3;0;9;TSP:CHKUPL:OK
       [2016-10-29 14:30:40.077 Info] RX	0;255;3;0;9;TSP:MSG:GWL OK
       [2016-10-29 14:30:40.576 Info] RX	0;255;3;0;9;!TSP:MSG:SEND 0-0-50-50 s=255,c=3,t=8,pt=1,l=1,sg=0,ft=0,st=fail:0
       [2016-10-29 14:30:40.594 Info] RX	0;255;3;0;9;TSP:MSG:READ 50-50-255 s=255,c=3,t=7,pt=0,l=0,sg=0:
       [2016-10-29 14:30:40.606 Info] RX	0;255;3;0;9;TSP:MSG:BC
       [2016-10-29 14:30:40.615 Info] RX	0;255;3;0;9;TSP:MSG:FPAR REQ (sender=50)
       [2016-10-29 14:30:40.624 Info] RX	0;255;3;0;9;TSP:CHKUPL:OK (FLDCTRL)
       [2016-10-29 14:30:40.633 Info] RX	0;255;3;0;9;TSP:MSG:GWL OK
       [2016-10-29 14:30:40.643 Info] RX	0;255;3;0;9;TSP:MSG:SEND 0-0-50-50 s=255,c=3,t=8,pt=1,l=1,sg=0,ft=0,st=ok:0
       [2016-10-29 14:30:40.653 Info] RX	0;255;3;0;9;TSP:MSG:READ 50-50-255 s=255,c=3,t=7,pt=0,l=0,sg=0:
       [2016-10-29 14:30:40.662 Info] RX	0;255;3;0;9;TSP:MSG:BC
       [2016-10-29 14:30:40.673 Info] RX	0;255;3;0;9;TSP:MSG:FPAR REQ (sender=50)
       [2016-10-29 14:30:40.682 Info] RX	0;255;3;0;9;TSP:CHKUPL:OK (FLDCTRL)
       [2016-10-29 14:30:40.692 Info] RX	0;255;3;0;9;TSP:MSG:GWL OK
       [2016-10-29 14:30:40.774 Info] RX	0;255;3;0;9;!TSP:MSG:SEND 0-0-50-50 s=255,c=3,t=8,pt=1,l=1,sg=0,ft=0,st=fail:0
       [2016-10-29 14:30:40.784 Info] RX	0;255;3;0;9;TSP:MSG:READ 50-50-255 s=255,c=3,t=7,pt=0,l=0,sg=0:
       [2016-10-29 14:30:40.794 Info] RX	0;255;3;0;9;TSP:MSG:BC
       [2016-10-29 14:30:40.806 Info] RX	0;255;3;0;9;TSP:MSG:FPAR REQ (sender=50)
       [2016-10-29 14:30:40.815 Info] RX	0;255;3;0;9;TSP:CHKUPL:OK (FLDCTRL)
       [2016-10-29 14:30:40.825 Info] RX	0;255;3;0;9;TSP:MSG:GWL OK
       [2016-10-29 14:30:41.089 Info] RX	0;255;3;0;9;!TSP:MSG:SEND 0-0-50-50 s=255,c=3,t=8,pt=1,l=1,sg=0,ft=0,st=fail:0
       [2016-10-29 14:30:41.110 Info] RX	0;255;3;0;9;TSP:MSG:READ 50-50-255 s=255,c=3,t=7,pt=0,l=0,sg=0:
       [2016-10-29 14:30:41.120 Info] RX	0;255;3;0;9;TSP:MSG:BC
       [2016-10-29 14:30:41.129 Info] RX	0;255;3;0;9;TSP:MSG:FPAR REQ (sender=50)
       [2016-10-29 14:30:41.139 Info] RX	0;255;3;0;9;TSP:CHKUPL:OK (FLDCTRL)
       [2016-10-29 14:30:41.148 Info] RX	0;255;3;0;9;TSP:MSG:GWL OK


      Any Tips?

      posted in Troubleshooting
      Takero
      Takero
    • RE: πŸ’¬ Security & Signing

      Hi,

      i have a little bit problem to understand the Signing System. May Be an language Problem.

      If i want to use HW-Signing it is nessesary to use a ATSHA Chip on booth Systems (Gateway and Nodes)? Or is it possible to use ATSHA on the Node side (with REQUEST SIGNING) and set "MY_SINGING_SOFT" on the Gateway?

      In the last case it does not work. . . may be somthink wrong in my sketch.

      My Test-Sketch (Node)

      /**
       * The MySensors Arduino library handles the wireless radio link and protocol
       * between your home built sensors/actuators and HA controller of choice.
       * The sensors forms a self healing radio network with optional repeaters. Each
       * repeater and gateway builds a routing tables in EEPROM which keeps track of the
       * network topology allowing messages to be routed to nodes.
       *
       * Created by Henrik Ekblad <henrik.ekblad@mysensors.org>
       * Copyright (C) 2013-2015 Sensnology AB
       * Full contributor list: https://github.com/mysensors/Arduino/graphs/contributors
       *
       * Documentation: http://www.mysensors.org
       * Support Forum: http://forum.mysensors.org
       *
       * This program is free software; you can redistribute it and/or
       * modify it under the terms of the GNU General Public License
       * version 2 as published by the Free Software Foundation.
       *
       *******************************
       *
       * DESCRIPTION
       *
       * Example sketch showing how to send in DS1820B OneWire temperature readings back to the controller
       * http://www.mysensors.org/build/temp
       */
      
      
      // Enable debug prints to serial monitor
      #define MY_DEBUG 
      #define MY_DEBUG_VERBOSE_SIGNING
      
      // Enable and select radio type attached
      #define MY_RADIO_NRF24
      #define MY_RF24_PA_LEVEL RF24_PA_MAX
      #define MY_BAUD_RATE 115200
      #define MY_NODE_ID 50
      #define MY_RF24_CHANNEL 105
      //#define MY_SIGNING_SOFT
      #define MY_SIGNING_ATSHA204
      #define MY_SIGNING_ATSHA204_PIN 17
      #define MY_SIGNING_REQUEST_SIGNATURES
      
      
      #include <SPI.h>
      #include <MySensors.h>  
      #include <DallasTemperature.h>
      #include <OneWire.h>
      
      #define COMPARE_TEMP 1 // Send temperature only if changed? 1 = Yes 0 = No
      
      #define ONE_WIRE_BUS 4 // Pin where dallase sensor is connected 
      #define MAX_ATTACHED_DS18B20 16
      unsigned long SLEEP_TIME = 30000; // Sleep time between reads (in milliseconds)
      OneWire oneWire(ONE_WIRE_BUS); // Setup a oneWire instance to communicate with any OneWire devices (not just Maxim/Dallas temperature ICs)
      DallasTemperature sensors(&oneWire); // Pass the oneWire reference to Dallas Temperature. 
      float lastTemperature[MAX_ATTACHED_DS18B20];
      int numSensors=0;
      bool receivedConfig = false;
      bool metric = true;
      // Initialize temperature message
      MyMessage msg(0,V_TEMP);
      
      void before()
      {
        // Startup up the OneWire library
        sensors.begin();
      }
      
      void setup()  
      { 
        // requestTemperatures() will not block current thread
        sensors.setWaitForConversion(false);
      }
      
      void presentation() {
        // Send the sketch version information to the gateway and Controller
        sendSketchInfo("Gartenhaus", "1.0");
      
        // Fetch the number of attached temperature sensors  
        numSensors = sensors.getDeviceCount();
      
        // Present all sensors to controller
        for (int i=0; i<numSensors && i<MAX_ATTACHED_DS18B20; i++) {   
           present(i, S_TEMP);
        }
      }
      
      void loop()     
      {     
        // Fetch temperatures from Dallas sensors
        sensors.requestTemperatures();
      
        // query conversion time and sleep until conversion completed
        int16_t conversionTime = sensors.millisToWaitForConversion(sensors.getResolution());
        // sleep() call can be replaced by wait() call if node need to process incoming messages (or if node is repeater)
        //sleep(conversionTime);
      
        // Read temperatures and send them to controller 
        for (int i=0; i<numSensors && i<MAX_ATTACHED_DS18B20; i++) {
      
          // Fetch and round temperature to one decimal
          float temperature = static_cast<float>(static_cast<int>((getConfig().isMetric?sensors.getTempCByIndex(i):sensors.getTempFByIndex(i)) * 10.)) / 10.;
      
          // Only send data if temperature has changed and no error
          #if COMPARE_TEMP == 1
          if (lastTemperature[i] != temperature && temperature != -127.00 && temperature != 85.00) {
          #else
          if (temperature != -127.00 && temperature != 85.00) {
          #endif
      
            // Send in the new temperature
            send(msg.setSensor(i).set(temperature,1));
            // Save new temperatures for next compare
            lastTemperature[i]=temperature;
          }
        }
        //sleep(SLEEP_TIME);
      }
      

      My Test-Sketch Gateway:

       /**
       * The MySensors Arduino library handles the wireless radio link and protocol
       * between your home built sensors/actuators and HA controller of choice.
       * The sensors forms a self healing radio network with optional repeaters. Each
       * repeater and gateway builds a routing tables in EEPROM which keeps track of the
       * network topology allowing messages to be routed to nodes.
       *
       * Created by Henrik Ekblad <henrik.ekblad@mysensors.org>
       * Copyright (C) 2013-2015 Sensnology AB
       * Full contributor list: https://github.com/mysensors/Arduino/graphs/contributors
       *
       * Documentation: http://www.mysensors.org
       * Support Forum: http://forum.mysensors.org
       *
       * This program is free software; you can redistribute it and/or
       * modify it under the terms of the GNU General Public License
       * version 2 as published by the Free Software Foundation.
       *
       *******************************
       *
       * DESCRIPTION
       * The ArduinoGateway prints data received from sensors on the serial link.
       * The gateway accepts input on seral which will be sent out on radio network.
       *
       * The GW code is designed for Arduino Nano 328p / 16MHz
       *
       * Wire connections (OPTIONAL):
       * - Inclusion button should be connected between digital pin 3 and GND
       * - RX/TX/ERR leds need to be connected between +5V (anode) and digital pin 6/5/4 with resistor 270-330R in a series
       *
       * LEDs (OPTIONAL):
       * - To use the feature, uncomment any of the MY_DEFAULT_xx_LED_PINs
       * - RX (green) - blink fast on radio message recieved. In inclusion mode will blink fast only on presentation recieved
       * - TX (yellow) - blink fast on radio message transmitted. In inclusion mode will blink slowly
       * - ERR (red) - fast blink on error during transmission error or recieve crc error
       *
       */
      
      // Enable debug prints to serial monitor
      #define MY_DEBUG
      
      
      // Enable and select radio type attached
      #define MY_RADIO_NRF24
      
      // Set LOW transmit power level as default, if you have an amplified NRF-module and
      // power your radio separately with a good regulator you can turn up PA level.
      #define MY_RF24_PA_LEVEL RF24_PA_MAX
      
      // Enable serial gateway
      #define MY_GATEWAY_SERIAL
      
      // Define a lower baud rate for Arduino's running on 8 MHz (Arduino Pro Mini 3.3V & SenseBender)
      #define MY_BAUD_RATE 115200
      #define MY_NODE_ID 200
      #define MY_RF24_CHANNEL 105
      #define MY_SIGNING_SOFT
      
      // Enable inclusion mode
      #define MY_INCLUSION_MODE_FEATURE
      #define MY_INCLUSION_MODE_DURATION 60
      
      #include <MySensors.h>
      
      void setup() {
        // Setup locally attached sensors
      }
      
      void presentation() {
       // Present locally attached sensors
      }
      
      void loop() {
        // Send locally attached sensor data here
      }
      

      Log File from my Node:

      Starting sensor (RNNNAA, 2.0.0)
      TSM:INIT
      TSM:RADIO:OK
      TSP:ASSIGNID:OK (ID=50)
      TSM:FPAR
      TSP:MSG:SEND 50-50-255-255 s=255,c=3,t=7,pt=0,l=0,sg=0,ft=0,st=bc:
      TSP:MSG:READ 0-0-50 s=255,c=3,t=8,pt=1,l=1,sg=1:0
      Skipping security for command 3 type 8
      TSP:MSG:FPAR RES (ID=0, dist=0)
      TSP:MSG:PAR OK (ID=0, dist=1)
      TSM:FPAR:OK
      TSM:ID
      TSM:CHKID:OK (ID=50)
      TSM:UPL
      TSP:PING:SEND (dest=0)
      TSP:MSG:SEND 50-50-0-0 s=255,c=3,t=24,pt=1,l=1,sg=0,ft=0,st=ok:1
      TSP:MSG:READ 0-0-50 s=255,c=3,t=25,pt=1,l=1,sg=1:1
      Skipping security for command 3 type 25
      TSP:MSG:PONG RECV (hops=1)
      TSP:CHKUPL:OK
      TSM:UPL:OK
      TSM:READY
      Signing required
      TSP:MSG:SEND 50-50-0-0 s=255,c=3,t=15,pt=6,l=2,sg=0,ft=0,st=ok:0101
      Waiting for GW to send signing preferences...
      TSP:MSG:READ 0-0-50 s=255,c=3,t=15,pt=6,l=2,sg=0:0100
      Skipping security for command 3 type 15
      Mark node 0 as one that do not require signed messages
      Mark node 0 as one that do not require whitelisting
      TSP:MSG:SEND 50-50-0-0 s=255,c=0,t=17,pt=0,l=5,sg=0,ft=0,st=ok:2.0.0
      TSP:MSG:SEND 50-50-0-0 s=255,c=3,t=6,pt=1,l=1,sg=0,ft=0,st=ok:0
      TSP:MSG:SEND 50-50-0-0 s=255,c=3,t=11,pt=0,l=10,sg=0,ft=0,st=ok:Gartenhaus
      TSP:MSG:SEND 50-50-0-0 s=255,c=3,t=12,pt=0,l=3,sg=0,ft=0,st=ok:1.0
      TSP:MSG:SEND 50-50-0-0 s=0,c=0,t=6,pt=0,l=0,sg=0,ft=0,st=ok:
      Request registration...
      TSP:MSG:SEND 50-50-0-0 s=255,c=3,t=26,pt=1,l=1,sg=0,ft=0,st=ok:2
      TSP:MSG:READ 0-0-50 s=255,c=3,t=16,pt=0,l=0,sg=1:
      Skipping security for command 3 type 16
      Signing backend: ATSHA204
      SHA256: C218FD3906EE8FB300A7E3537C21E2F28655A522DEC5AAAD30810E7AADB3285F
      TSP:MSG:SEND 50-50-0-0 s=255,c=3,t=17,pt=6,l=25,sg=0,ft=0,st=ok:C218FD3906EE8FB300A7E3537C21E2F28655A522DEC5AAAD30
      Transmitted nonce
      TSP:MSG:READ 0-0-50 s=255,c=3,t=27,pt=1,l=1,sg=1:1
      Signature in message: 01BA5BD0193F0E5B474833E395DFA6C08715EA4E462A9EA2
      Message to process: 00320E231BFF01
      Current nonce: C218FD3906EE8FB300A7E3537C21E2F28655A522DEC5AAAD30AAAAAAAAAAAAAA
      HMAC: 737DE7BFBB721A51D231D02D2606DA19CB0F4E7EE04634DC21D19C3F90F791FD
      Signature bad: 017DE7BFBB721A51D231D02D2606DA19CB0F4E7EE04634DC
      Signature verification failed!
      !TSP:MSG:SIGN verify fail
      Init complete, id=50, parent=0, distance=1, registration=1
      
      posted in Announcements
      Takero
      Takero
    • RE: No new devices where found

      i dont know Homey, but you have to enable "Inclusion Mode" before add new Sensor?!

      posted in Homey
      Takero
      Takero
    • RE: DualOptiboot Bootloader (Solved)

      @scalz
      OK, tested with R14 again and it works πŸ‘

      Thanks again for the PCB and help!!

      posted in Troubleshooting
      Takero
      Takero
    • RE: DualOptiboot Bootloader (Solved)

      I know but i had Trouble with the nrf is it pluged. I will try it again and give you a Feedback.

      posted in Troubleshooting
      Takero
      Takero
    • RE: DualOptiboot Bootloader (Solved)

      @scalz yahh i know. I dit but i dont found the right bootloader and arduinos ide folder structure is horrorbil.

      Btw.... On the nrf24 Layout you have to remove the pullup R14

      posted in Troubleshooting
      Takero
      Takero
    • RE: DualOptiboot Bootloader (Solved)

      Works right now. . . my faulty was to flash the first Programm with the wrong Bootloader. 😑

      posted in Troubleshooting
      Takero
      Takero
    • RE: DualOptiboot Bootloader (Solved)

      OK . . . The Upload is successful right now, dont know why but it works.

      Now i have the Problem after transfer Data it stops at "Ongoing 100%" and nothing happens anymore. The Node needs Powercycle, Resetbutton has no effect.... (scalz Rollershutter HW)

      alt text

      posted in Troubleshooting
      Takero
      Takero
    • RE: DualOptiboot Bootloader (Solved)

      @scalz

      That works, i think πŸ˜‰

      Init OK!
      Start...Init OK!
      Flash content:
      0.0.0.0.0.0.0.0.0.0.0.0.0.0.0.0.0.0.0.0.0.0.0.0.0.0.0.0.0.0.0.0.0.0.0.0.0.0.0.0.0.0.0.0.0.0.0.0.0.0.0.0.0.0.0.0.0.0.0.0.0.0.0.0.0.0.0.0.0.0.0.0.0.0.0.0.0.0.0.0.0.0.0.0.0.0.0.0.0.0.0.0.0.0.0.0.0.0.0.0.0.0.0.0.0.0.0.0.0.0.0.0.0.0.0.0.0.0.0.0.0.0.0.0.0.0.0.0.0.0.0.0.0.0.0.0.0.0.0.0.0.0.0.0.0.0.0.0.0.0.0.0.0.0.0.0.0.0.0.0.0.0.0.0.0.0.0.0.0.0.0.0.0.0.0.0.0.0.0.0.0.0.0.0.0.0.0.0.0.0.0.0.0.0.0.0.0.0.0.0.0.0.0.0.0.0.0.0.0.0.0.0.0.0.0.0.0.0.0.0.0.0.0.0.0.0.0.0.0.0.0.0.0.0.0.0.0.0.0.0.0.0.0.0.0.0.0.0.0.0.0.0.0.0.0.0.0.
      Erasing Flash chip ... DONE
      DeviceID: 0
      

      But OTA does not work . . .

      My Test-Sketch:

      /**
       * The MySensors Arduino library handles the wireless radio link and protocol
       * between your home built sensors/actuators and HA controller of choice.
       * The sensors forms a self healing radio network with optional repeaters. Each
       * repeater and gateway builds a routing tables in EEPROM which keeps track of the
       * network topology allowing messages to be routed to nodes.
       *
       * Created by Henrik Ekblad <henrik.ekblad@mysensors.org>
       * Copyright (C) 2013-2015 Sensnology AB
       * Full contributor list: https://github.com/mysensors/Arduino/graphs/contributors
       *
       * Documentation: http://www.mysensors.org
       * Support Forum: http://forum.mysensors.org
       *
       * This program is free software; you can redistribute it and/or
       * modify it under the terms of the GNU General Public License
       * version 2 as published by the Free Software Foundation.
       *
       *******************************
       *
       * DESCRIPTION
       *
       * Example sketch showing how to send in DS1820B OneWire temperature readings back to the controller
       * http://www.mysensors.org/build/temp
       */
      
      
      // Enable debug prints to serial monitor
      #define MY_DEBUG 
      
      // Enable and select radio type attached
      #define MY_RADIO_NRF24
      #define MY_RF24_PA_LEVEL RF24_PA_MAX
      #define MY_BAUD_RATE 115200
      #define MY_NODE_ID 50
      #define MY_RF24_CHANNEL 105
      #define MY_OTA_FIRMWARE_FEATURE
      #define MY_OTA_FLASH_SS   8     // EEprom CS pin
      //#define OTA_WAIT_PERIOD 300
      
      //#define ATSHA204_PIN      12    // A3 Arduino Digital I/O pin number for ATSHA204A sot23 ic (for authentication)
      //#define MY_SIGNING_SOFT
      //#define MY_SIGNING_ATSHA204
      //#define MY_SIGNING_NODE_WHITELISTING {{.nodeId = GATEWAY_ADDRESS,.serial = {0x09,0x08,0x07,0x06,0x05,0x04,0x03,0x02,0x01}}}
      //#define MY_SIGNING_REQUEST_SIGNATURES
      //#ifndef MY_SIGNING_SOFT_RANDOMSEED_PIN
      //#define MY_SIGNING_SOFT_RANDOMSEED_PIN 7
      //#endif
      //#ifndef MY_SIGNING_ATSHA204_PIN
      //#define MY_SIGNING_ATSHA204_PIN 17
      //#endif
      
      #include <SPI.h>
      #include <MySensors.h>  
      #include <DallasTemperature.h>
      #include <OneWire.h>
      
      #define COMPARE_TEMP 1 // Send temperature only if changed? 1 = Yes 0 = No
      
      #define ONE_WIRE_BUS 4 // Pin where dallase sensor is connected 
      #define MAX_ATTACHED_DS18B20 16
      unsigned long SLEEP_TIME = 30000; // Sleep time between reads (in milliseconds)
      OneWire oneWire(ONE_WIRE_BUS); // Setup a oneWire instance to communicate with any OneWire devices (not just Maxim/Dallas temperature ICs)
      DallasTemperature sensors(&oneWire); // Pass the oneWire reference to Dallas Temperature. 
      float lastTemperature[MAX_ATTACHED_DS18B20];
      int numSensors=0;
      bool receivedConfig = false;
      bool metric = true;
      // Initialize temperature message
      MyMessage msg(0,V_TEMP);
      
      void before()
      {
        // Startup up the OneWire library
        sensors.begin();
      }
      
      void setup()  
      { 
        // requestTemperatures() will not block current thread
        sensors.setWaitForConversion(false);
      }
      
      void presentation() {
        // Send the sketch version information to the gateway and Controller
        sendSketchInfo("Temperature Sensor", "1.1");
      
        // Fetch the number of attached temperature sensors  
        numSensors = sensors.getDeviceCount();
      
        // Present all sensors to controller
        for (int i=0; i<numSensors && i<MAX_ATTACHED_DS18B20; i++) {   
           present(i, S_TEMP);
        }
      }
      
      void loop()     
      {     
        // Fetch temperatures from Dallas sensors
        sensors.requestTemperatures();
      
        // query conversion time and sleep until conversion completed
        int16_t conversionTime = sensors.millisToWaitForConversion(sensors.getResolution());
        // sleep() call can be replaced by wait() call if node need to process incoming messages (or if node is repeater)
        //sleep(conversionTime);
      
        // Read temperatures and send them to controller 
        for (int i=0; i<numSensors && i<MAX_ATTACHED_DS18B20; i++) {
      
          // Fetch and round temperature to one decimal
          float temperature = static_cast<float>(static_cast<int>((getConfig().isMetric?sensors.getTempCByIndex(i):sensors.getTempFByIndex(i)) * 10.)) / 10.;
      
          // Only send data if temperature has changed and no error
          #if COMPARE_TEMP == 1
          if (lastTemperature[i] != temperature && temperature != -127.00 && temperature != 85.00) {
          #else
          if (temperature != -127.00 && temperature != 85.00) {
          #endif
      
            // Send in the new temperature
            send(msg.setSensor(i).set(temperature,1));
            // Save new temperatures for next compare
            lastTemperature[i]=temperature;
          }
        }
      }
      

      MYSController log Node 50:

      21.10.2016 12:25:37	NODE	New node discovered, node id=50
      21.10.2016 12:25:37	CHILD	New child discovered, node id=50, child id=internal
      21.10.2016 12:25:37	INFO	BL version=768
      21.10.2016 12:25:37	INFO	No FW assigned
      21.10.2016 12:25:37	RX	50;255;4;0;0;0A000200B004B6D30300
      21.10.2016 12:25:37	RX	0;255;3;0;9;TSP:MSG:READ 50-50-0 s=255,c=3,t=15,pt=6,l=2,sg=0:0100
      21.10.2016 12:25:37	RX	0;255;3;0;9;TSP:MSG:SEND 0-0-50-50 s=255,c=3,t=15,pt=6,l=2,sg=0,ft=0,st=ok:0100
      21.10.2016 12:25:37	RX	0;255;3;0;9;TSP:MSG:READ 50-50-0 s=255,c=0,t=17,pt=0,l=5,sg=0:2.0.0
      21.10.2016 12:25:37	DEBUG	Update child id=255, type=ARDUINO_NODE
      21.10.2016 12:25:37	RX	50;255;0;0;17;2.0.0
      21.10.2016 12:25:37	RX	0;255;3;0;9;TSP:MSG:READ 50-50-0 s=255,c=3,t=6,pt=1,l=1,sg=0:0
      21.10.2016 12:25:37	TX	50;255;3;0;6;M
      21.10.2016 12:25:37	RX	50;255;3;0;6;0
      21.10.2016 12:25:37	RX	0;255;3;0;9;TSP:MSG:SEND 0-0-50-50 s=255,c=3,t=6,pt=0,l=1,sg=0,ft=0,st=ok:M
      21.10.2016 12:25:37	RX	0;255;3;0;9;TSP:MSG:READ 50-50-0 s=255,c=3,t=11,pt=0,l=18,sg=0:Temperature Sensor
      21.10.2016 12:25:37	RX	50;255;3;0;11;Temperature Sensor
      21.10.2016 12:25:37	RX	0;255;3;0;9;TSP:MSG:READ 50-50-0 s=255,c=3,t=12,pt=0,l=3,sg=0:1.1
      21.10.2016 12:25:37	RX	50;255;3;0;12;1.1
      21.10.2016 12:25:37	RX	0;255;3;0;9;TSP:MSG:READ 50-50-0 s=0,c=0,t=6,pt=0,l=0,sg=0:
      21.10.2016 12:25:37	CHILD	New child discovered, node id=50, child id=0
      21.10.2016 12:25:37	DEBUG	Update child id=0, type=TEMP
      21.10.2016 12:25:37	RX	50;0;0;0;6;
      21.10.2016 12:25:37	RX	0;255;3;0;9;TSP:MSG:READ 50-50-0 s=255,c=3,t=26,pt=1,l=1,sg=0:2
      21.10.2016 12:25:37	RX	0;255;3;0;9;TSP:MSG:SEND 0-0-50-50 s=255,c=3,t=27,pt=1,l=1,sg=0,ft=0,st=ok:1
      21.10.2016 12:25:37	RX	0;255;3;0;9;TSP:MSG:READ 50-50-0 s=0,c=1,t=0,pt=7,l=5,sg=0:25.3
      

      If i assigning new FW, following in log, but nothing happens . . ..

      21.10.2016 12:28:43	INFO	FW "Test02" assigned to node 50
      21.10.2016 12:28:43	INFO	Send FW info to node 50: type=A, version=2, blocks=0x04B0, CRC=0xD3B6
      21.10.2016 12:28:43	TX	50;0;4;0;1;0A000200B004B6D3
      21.10.2016 12:28:43	RX	0;255;3;0;9;TSP:MSG:SEND 0-0-50-50 s=0,c=4,t=1,pt=6,l=8,sg=0,ft=0,st=ok:0A000200B004B6D3
      
      posted in Troubleshooting
      Takero
      Takero
    • RE: DualOptiboot Bootloader (Solved)

      I found that Sketch now . . SPIFlash_ReadWrite.ino

      Start...Init FAIL!
      

      I use AT25DF512C-SSHN-B

      posted in Troubleshooting
      Takero
      Takero
    • RE: DualOptiboot Bootloader (Solved)

      Hey, thanks for Respons...

      how can i test it? I try this sketch but it is hanging around init. . .

      /*
        |~~~~~~~~~~~~~~~~~~~~~~~~~~~~~~~~~~~~~~~~~~~~~~~~~~~~~~~~~~~~~~~~~~~~~~~~~~~~~~~~~~~~~~~~~~~~~~~~~~~~~~~~~~~~~~~~~~~~~~~~~~~~~~~~~~~~~~~~~~~~~~~|
        |                                                                Diagnostics.ino                                                                |
        |                                                               SPIFlash library                                                                |
        |                                                                   v 2.4.0                                                                     |
        |~~~~~~~~~~~~~~~~~~~~~~~~~~~~~~~~~~~~~~~~~~~~~~~~~~~~~~~~~~~~~~~~~~~~~~~~~~~~~~~~~~~~~~~~~~~~~~~~~~~~~~~~~~~~~~~~~~~~~~~~~~~~~~~~~~~~~~~~~~~~~~~|
        |                                                                    Marzogh                                                                    |
        |                                                                  11.09.2016                                                                   |
        |~~~~~~~~~~~~~~~~~~~~~~~~~~~~~~~~~~~~~~~~~~~~~~~~~~~~~~~~~~~~~~~~~~~~~~~~~~~~~~~~~~~~~~~~~~~~~~~~~~~~~~~~~~~~~~~~~~~~~~~~~~~~~~~~~~~~~~~~~~~~~~~|
        |                                                                                                                                               |
        |                                  For a full diagnostics rundown - with error codes and details of the errors                                  |
        |                                uncomment #define RUNDIAGNOSTIC in SPIFlash.cpp in the library before compiling                                |
        |                                             and loading this application onto your Arduino.                                                   |
        |                                                                                                                                               |
        |~~~~~~~~~~~~~~~~~~~~~~~~~~~~~~~~~~~~~~~~~~~~~~~~~~~~~~~~~~~~~~~~~~~~~~~~~~~~~~~~~~~~~~~~~~~~~~~~~~~~~~~~~~~~~~~~~~~~~~~~~~~~~~~~~~~~~~~~~~~~~~~|
      */
      
      #include<SPIFlash.h>
      #include<SPI.h>
      
      #define WINBOND     0xEF
      #define MICROCHIP   0xBF
      
      char printBuffer[128];
      
      SPIFlash flash;
      
      void setup() {
        Serial.begin(115200);
        Serial.print(F("Initialising Flash memory"));
        for (int i = 0; i < 10; ++i)
        {
          Serial.print(F("."));
        }
        Serial.println();
        flash.begin();
        Serial.println();
        Serial.println();
      
        randomSeed(analogRead(A0));
        getID();
        diagnose();
      }
      
      void loop() {
      
      }
      
      
      //~~~~~~~~~~~~~~~~~~~~~~~~~~~~~~~~~~~~~~~~~~~~~~~~~~~~~~Serial Print Functions~~~~~~~~~~~~~~~~~~~~~~~~~~~~~~~~~~~~~~~~~~~~~~~~~~~~~~~~~~~~~~//
      
      void clearprintBuffer()
      {
        for (uint8_t i = 0; i < 128; i++) {
          printBuffer[i] = 0;
        }
      }
      
      void printLine() {
        Serial.println(F("---------------------------------------------------------------------------------------------------------------------------------------------------------------------------------"));
      }
      
      void printPass() {
        Serial.print(F("Pass"));
      }
      
      void printFail() {
        Serial.print(F("Fail"));
      }
      
      void printTab(uint8_t a, uint8_t b) {
        for (uint8_t i = 0; i < a; i++) {
          Serial.print(F("\t"));
        }
        if (b > 0) {
          Serial.print("||");
          for (uint8_t i = 0; i < b; i++) {
            Serial.print(F("\t"));
          }
        }
      }
      
      void printTime(uint32_t _wTime, uint32_t _rTime) {
        printTab(2, 1);
        printTimer(_wTime);
        printTab(2, 1);
        printTimer(_rTime);
      }
      
      void printTimer(uint32_t _us) {
      
        if (_us > 1000000) {
          float _s = _us / (float)1000000;
          Serial.print(_s, 4);
          Serial.print(" s");
        }
        else if (_us > 10000) {
          float _ms = _us / (float)1000;
          Serial.print(_ms, 4);
          Serial.print(" ms");
        }
        else {
          Serial.print(_us);
          Serial.print(F(" us"));
        }
      }
      

      I use AT25DF512C-SSHN-B

      posted in Troubleshooting
      Takero
      Takero
    • RE: DualOptiboot Bootloader (Solved)

      Jupp, i know this side, but i am looking dir the Hex File. Anyway i found it already.

      But my ota does Not work. Transfer Starts only if i Push Reset and after the Transfer nothing happens. I dont know if i Set up the Flash corect in my Sketch. Use pin 8 for cs. Bootloader is sensbrender Micro.

      posted in Troubleshooting
      Takero
      Takero
    • DualOptiboot Bootloader (Solved)

      Hello Again,

      i am going crazy . . .where can i find the DualOptiboot Bootloader. I found the normal Optiboot, but i want to use OTA via seperate SPI Flash.

      I found this: https://github.com/mysensors/DualOptiboot

      But is doesnt work.

      Thanks!

      posted in Troubleshooting
      Takero
      Takero
    • RE: πŸ’¬ Roller Shutter Node

      Ok, Thanks

      posted in OpenHardware.io
      Takero
      Takero
    • RE: πŸ’¬ Roller Shutter Node

      @scalz Are you sure about the Fuses? 0xE2 is normal for int. clock?! Or i am wrong?

      http://eleccelerator.com/fusecalc/fusecalc.php?chip=atmega328p&LOW=E2&HIGH=DA&EXTENDED=06&LOCKBIT=FF

      posted in OpenHardware.io
      Takero
      Takero
    • RE: πŸ’¬ Roller Shutter Node

      @scalz
      Yes 7.5. Hey it was an "easy to solve" problem πŸ˜„

      . . . maybe an eagle bug

      posted in OpenHardware.io
      Takero
      Takero
    • RE: πŸ’¬ Roller Shutter Node

      @scalz Yes, the resistor is very close πŸ™‚

      In my .sch the wire is not named πŸ˜‰ But anyway it works πŸ‘

      alt text

      posted in OpenHardware.io
      Takero
      Takero
    • RE: πŸ’¬ Roller Shutter Node

      One question: what are your fuses settings for Optiboot? Dit u use the external 8MHz Clock?
      Can you confirm:

      L: 0xEE
      H: 0xDA
      E: 0x06

      posted in OpenHardware.io
      Takero
      Takero
    • RE: πŸ’¬ Roller Shutter Node

      Yah, i know, take it easy this is an minor bug πŸ™‚
      Your misstake is in the schematic, your wire on the NRF24 CSN-PIN is unnamed.

      For feature Update, it is advisable to plug an ELKO ~400-500uF near the NRF24 Power, i have reciving problems whith "RF24_PA_HIGH" but i need hight for the distance.

      posted in OpenHardware.io
      Takero
      Takero
    • RE: πŸ’¬ Roller Shutter Node

      Hey Scalz, u have forgotten to connect the CSN - Pin in your PCB file for NRF24 πŸ˜‰ I just solder a bridge between NRF Pin 4 and R14

      posted in OpenHardware.io
      Takero
      Takero
    • RE: Update to Version 2 / !TSP:MSG:SEND Problem [Solved]

      Thanks!

      I dont know why, it works before update.
      I just increase the capacitor to 500uF and it works like a charm. πŸ˜†

      posted in Troubleshooting
      Takero
      Takero
    • RE: Update to Version 2 / !TSP:MSG:SEND Problem [Solved]

      The Sensors are works perfectly together before i update the lib . . .

      My Gateway use an NRF24I01 +PA +LNA and my Sensor an normal NRFI01+ SMD

      posted in Troubleshooting
      Takero
      Takero
    • Update to Version 2 / !TSP:MSG:SEND Problem [Solved]

      Hello There,

      i updated my Gateway, my Repeater and my Node to MySensors Version 2. At startup everythink is OK. But after some times i get no updates from my nodes.

      In the Log i see the following Message:
      Log :!TSP:MSG:SEND 0-0-20-20 s=255,c=3,t=8,pt=1,l=1,sg=0,ft=0,st=fail:0

      The Node 20 is an sleeping node, so it is (in my opinion) normal the gateway cant connect the Node.

      It is needed to connect the IRQ to the NRF24?
      What is the TSP Message?

      Thanks!

      posted in Troubleshooting
      Takero
      Takero
    • RE: πŸ’¬ Roller Shutter Node

      Hey, no Problem πŸ™‚

      I just ask for it, as you write it is in the examples folder πŸ˜‰

      Thanks for the pre Beta, i will work on it πŸ‘

      posted in OpenHardware.io
      Takero
      Takero
    • RE: πŸ’¬ Roller Shutter Node

      Where can i find the example sketch?

      posted in OpenHardware.io
      Takero
      Takero
    • SIGNING Gateway with no SIGNING Nodes?

      Hello,

      it is possible to use an SIGNING Gateway with ATSAH with no-SIGNING Nodes?

      My Network is
      1x NRF24 Gateway
      and some Sensors with no SIGNING

      I plan new Nodes, but for roller shutter. So i want for this Nodes the SIGNING feature.

      Can i use this different parts of nodes on the same Gateway?

      Thanks, Greetings

      posted in General Discussion
      Takero
      Takero
    • RE: Remote Configuration

      @derwish said:

      @Takero Microsoft has updated the ASP.NET framework. I will soon make a port on it. I hope they fixed this bug.

      reply

      Then is soon?
      Alternativ i will try an other OS for my RPi

      posted in MyNodes.NET
      Takero
      Takero
    • RE: Remote Configuration

      Any news between mono Update?

      posted in MyNodes.NET
      Takero
      Takero
    • RE: MyController - 0.0.3-Alpha2 pre-release - volunteers required to test

      @Didi i am already joined. 😊

      posted in MyController.org
      Takero
      Takero
    • RE: MyController - 0.0.3-Alpha2 pre-release - volunteers required to test

      @Didi please don't use "Stolperte" for Tripped πŸ˜„

      posted in MyController.org
      Takero
      Takero
    • RE: MyController - 0.0.3-Alpha2 pre-release - volunteers required to test

      Me too please!

      PS: can i send you a wishlist of features?

      posted in MyController.org
      Takero
      Takero
    • RE: Remote Configuration

      Yah thats realy sad . . i dont have Ethernet Gateway πŸ˜‰ I still wait for a fix

      posted in MyNodes.NET
      Takero
      Takero
    • RE: Remote Configuration

      Now i have the Problem with the SerialGateway, what you described in your Troubleshoot . . . . I will try the last Beta ob Mono . . .

      I am using a Pi2+

      Edit: It does not work . . .

      GATEWAY: Gateway is not responding.

      posted in MyNodes.NET
      Takero
      Takero
    • RE: Remote Configuration

      It works!! Thanks!

      posted in MyNodes.NET
      Takero
      Takero
    • RE: Remote Configuration

      Thanks a lot! I will try that tomorow.

      posted in MyNodes.NET
      Takero
      Takero
    • RE: Remote Configuration

      I found this information in your Link before, but it needs to run it first local too! I want to do it remote from the begining. It is hard to get local Access to my rPi. That's my Problem.

      posted in MyNodes.NET
      Takero
      Takero
    • Remote Configuration

      Hello There,

      i installed MyNodes on my Raspberry via SSH Shell. It is possible to configure the Software via Network, and not "localhost"?

      Thanks!

      posted in MyNodes.NET
      Takero
      Takero
    • RE: NRF24l01+ vs. NRF24l01+ pa + lna

      Works like a charm! Thanks a lot!

      posted in Troubleshooting
      Takero
      Takero
    • RE: NRF24l01+ vs. NRF24l01+ pa + lna

      @LastSamurai ok I will try it with an external Power source.

      posted in Troubleshooting
      Takero
      Takero
    • NRF24l01+ vs. NRF24l01+ pa + lna

      Hello,

      i have some trouble with the pa lna Module. Is something different between the normal Module and the pa lna? I use an Arduino Nano, with the "normal" it work perfect if I Connect the pa lna Module the serial connection will disconnect.

      I will use it as an Gateway.

      I try two different Nanos and nrf24l01+ lna pa

      Thanks

      posted in Troubleshooting
      Takero
      Takero
    • RE: Door Sensor / Mini Pro Clone Interrupt

      Thanks for help. . . i dont now why but it works now.

      I Think i had an Hardware issues 😞

      Thanks!

      posted in Troubleshooting
      Takero
      Takero
    • Door Sensor / Mini Pro Clone Interrupt

      Hello,

      i have some Trouble with my Door Sensor.
      The Sensor works fine, but if i use the gw.sleep function they don't wake up. I try D2 and D3. Nothing happens. . . .

      Herre is my Sketch:

      
      #include <SPI.h>
      #include <MySensor.h>
      #include <Bounce2.h>
      
      
      #define CHILD_ID 1
      #define CHILD_ID_BATT 3
      #define SENSOR_ID 30
      #define BUTTON_PIN 3
      #define INTERRUPT 1
      
      int BATTERY_SENSE_PIN = A0;  // select the input pin for the battery sense point
      
      #define SLEEP_TIME 600000
      
      MySensor gw;
      
      Bounce debouncer = Bounce(); 
      int oldValue=-1;
       
      int batterie_check = 0;
      float normaldeltabatt = 0.400;
      float batteriezwischen = 0;
      int interrupt = 1;
      
      MyMessage msg(CHILD_ID,V_TRIPPED);
      MyMessage msgVolt(CHILD_ID_BATT, V_VOLTAGE);
      
      void setup() {
        
        // use the 1.1 V internal reference
        analogReference(INTERNAL);
        gw.begin(NULL, SENSOR_ID);
        pinMode(BUTTON_PIN,INPUT);
        gw.sendSketchInfo("WoZi_Window", "1.0");
        digitalWrite(BUTTON_PIN,HIGH);
        debouncer.attach(BUTTON_PIN);
        debouncer.interval(5);
        gw.present(CHILD_ID, S_DOOR);  
        
      }
      
      void loop() {
        
        debouncer.update();
        // Get the update value
        int value = debouncer.read();
         
        if (value != oldValue) {
           // Send in the new value
           gw.send(msg.set(value==HIGH ? 1 : 0));
           oldValue = value;
        }
      
        
      //  if (batterie_check >= 30 || batterie_check < 1) { 
      //    // get the battery Voltage
      //    int sensorValue = analogRead(BATTERY_SENSE_PIN);
      //    float batteryValue = sensorValue * 0.0033140756302521;
      //    //int batteryPcnt = sensorValue / 10;
      //    batteriezwischen = batteryValue - 2;
      //    //Serial.println(batteriezwischen);
      //    float batteryPcnt = (batteriezwischen/normaldeltabatt) * 100;
      //
      //    Serial.print("Batt: ");
      //    Serial.print(batteryValue);
      //    Serial.println(" V");
      //    gw.send(msgVolt.set(batteryValue, 1));
      //    Serial.print("Battery Prozent: ");
      //    Serial.print(batteryPcnt);
      //    Serial.println(" %");
      //    gw.sendBatteryLevel(batteryPcnt);
      //    batterie_check = 1;
      //  } else {
      //    batterie_check++;  
      //  }
       
      gw.sleep(INTERRUPT, CHANGE, SLEEP_TIME);
      
      }
      
      posted in Troubleshooting
      Takero
      Takero
    • RE: MYSBootloader 1.3 pre-release & MYSController 1.0.0beta

      @rollercontainer said:

      @Takero https://github.com/mysensors/Arduino/blob/development/libraries/MySensors/MyConfig.h#L387

      Yes, i know what, but this is not there I am looking for.

      The Autor wrote:
      Attached bootloader file, compiled with these settings:

      nRF24 (Channel 76, base address 0xA8A8E1FC00, data rate 250kbs)
      115200 baud (16Mhz) or 57600 (8Mhz)

      I want a Bootloader file with Channel 105.

      posted in Development
      Takero
      Takero
    • RE: MYSBootloader 1.3 pre-release & MYSController 1.0.0beta

      Hi, i like OTA Update πŸ™‚

      How it is possible to change the Cannel from 76 to 105?

      posted in Development
      Takero
      Takero