Egg incubator IOT v3.0
-
Do you think you've seen all kinds of projects here? So ..think again. :)
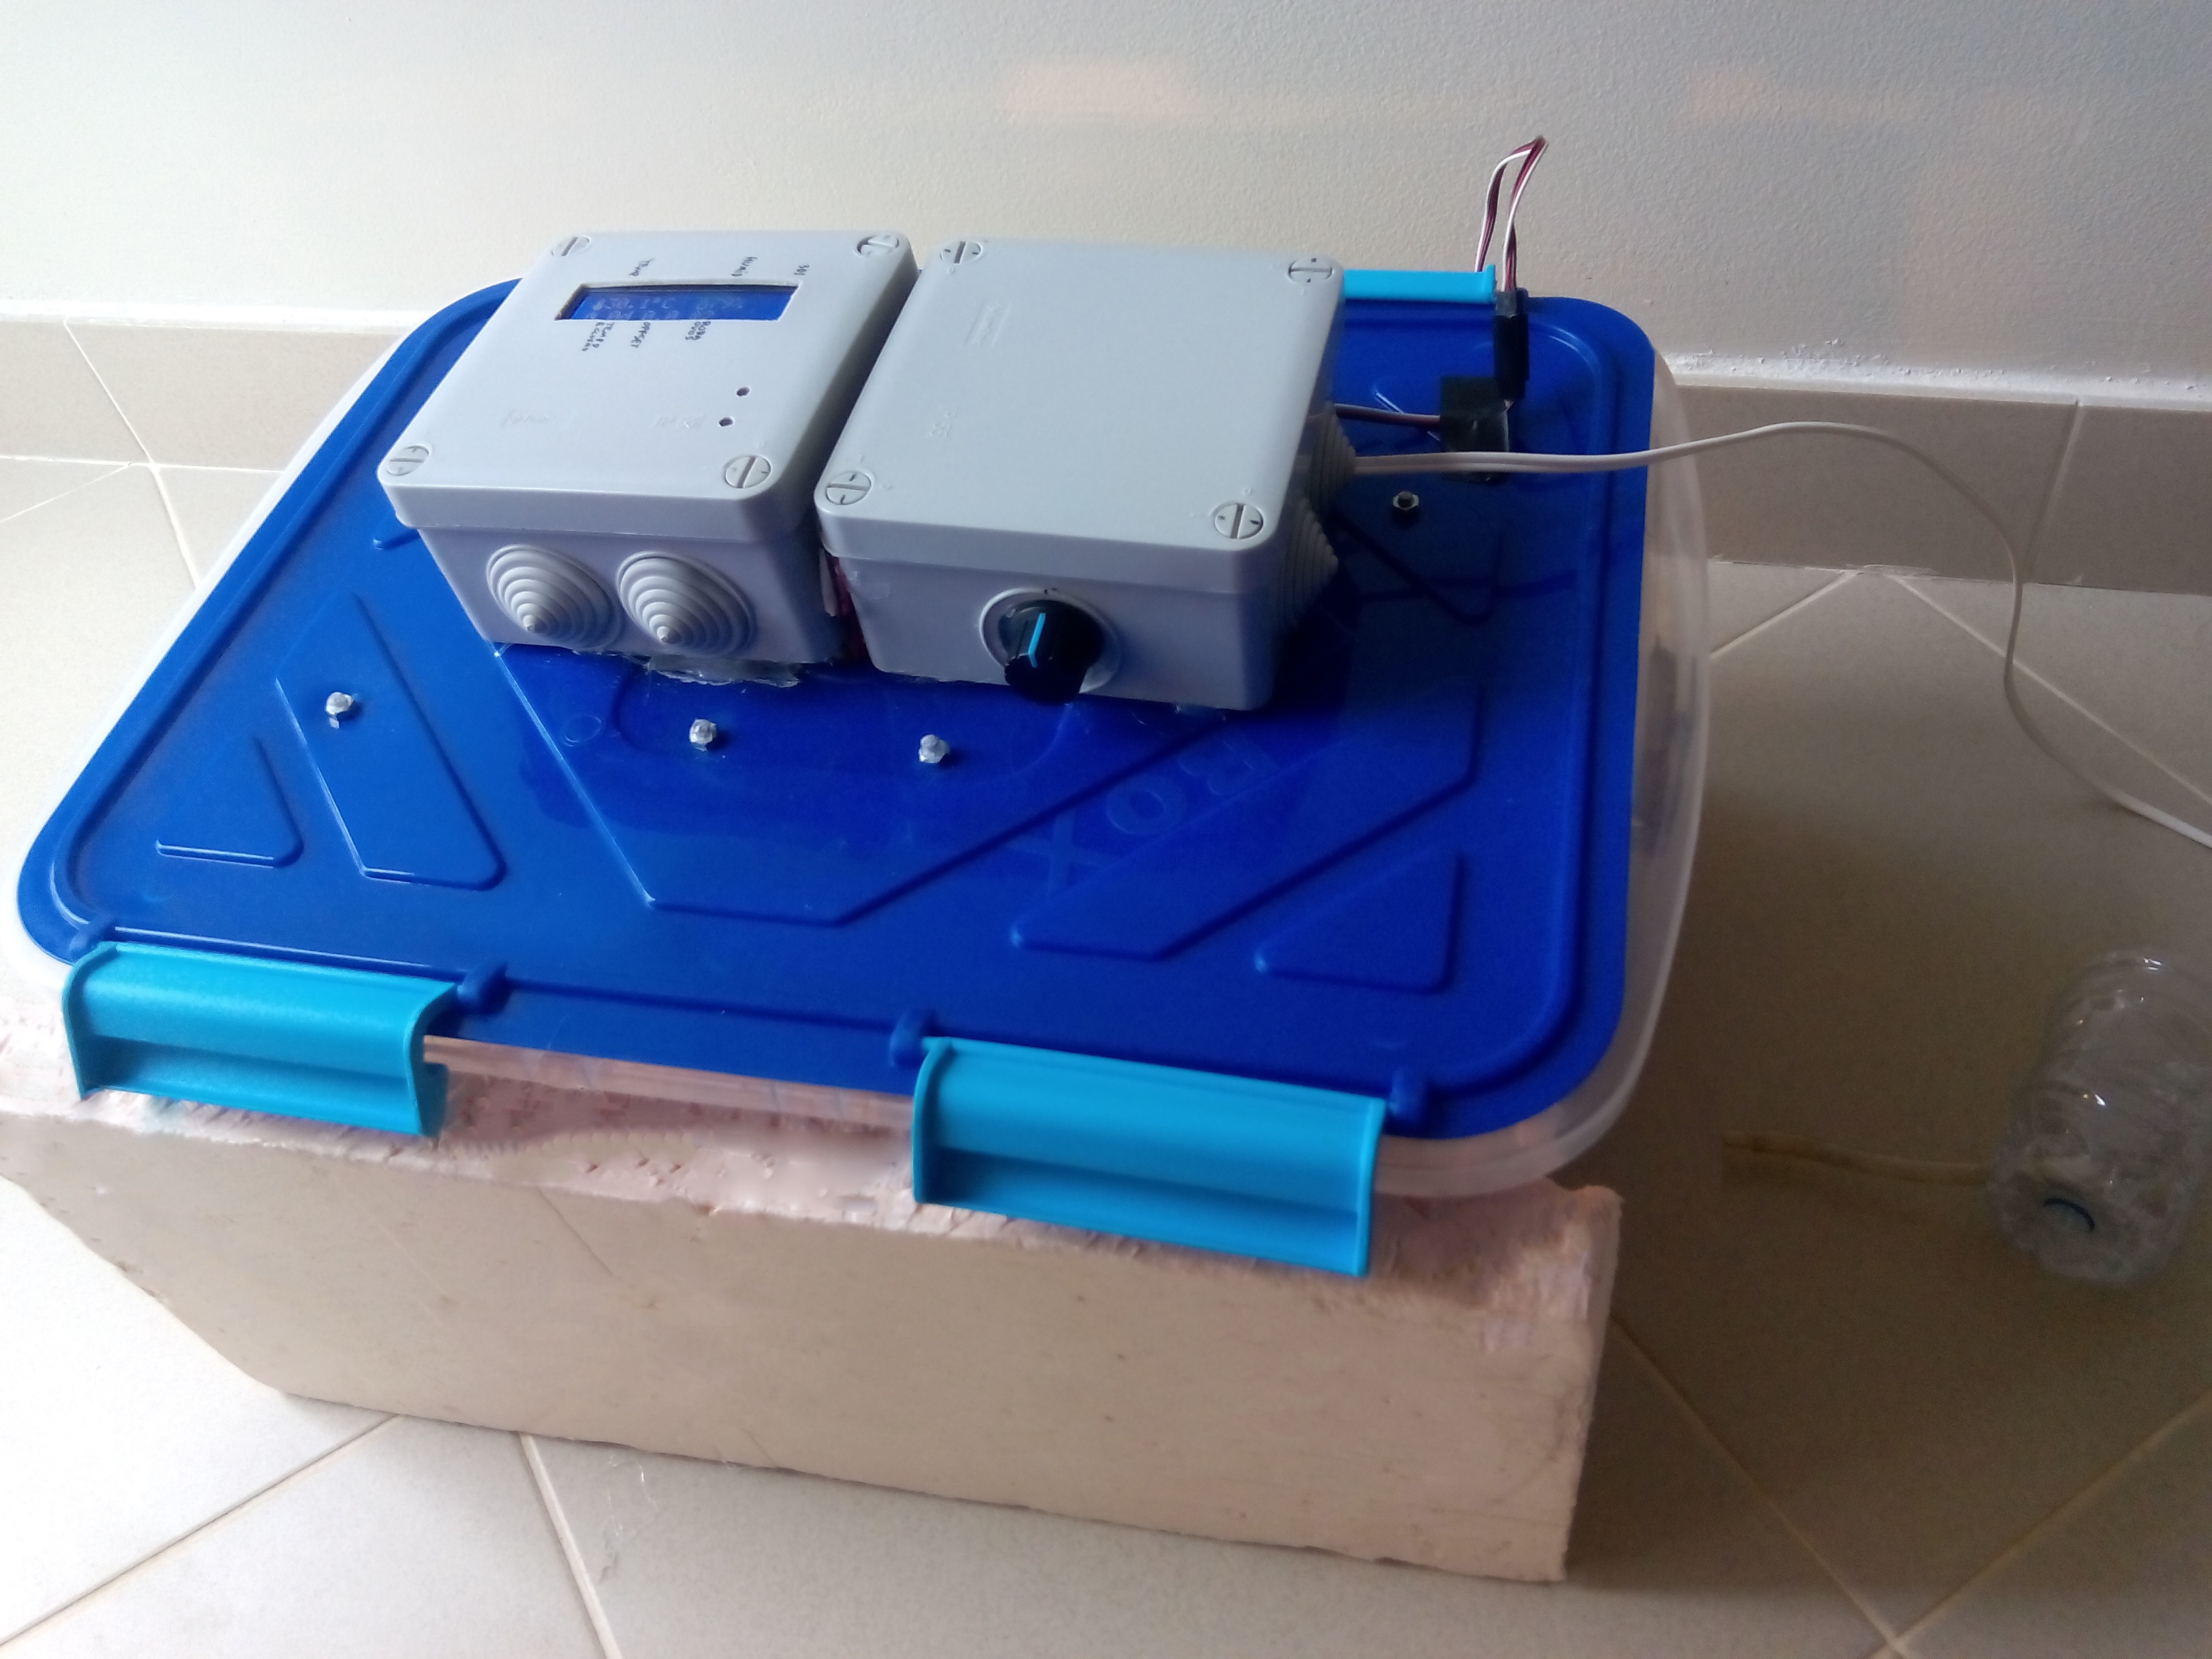
There it is my chicken eggs encubator .
Made from a 25 liters plastic storage box and some foam outside to prevent heat loss.
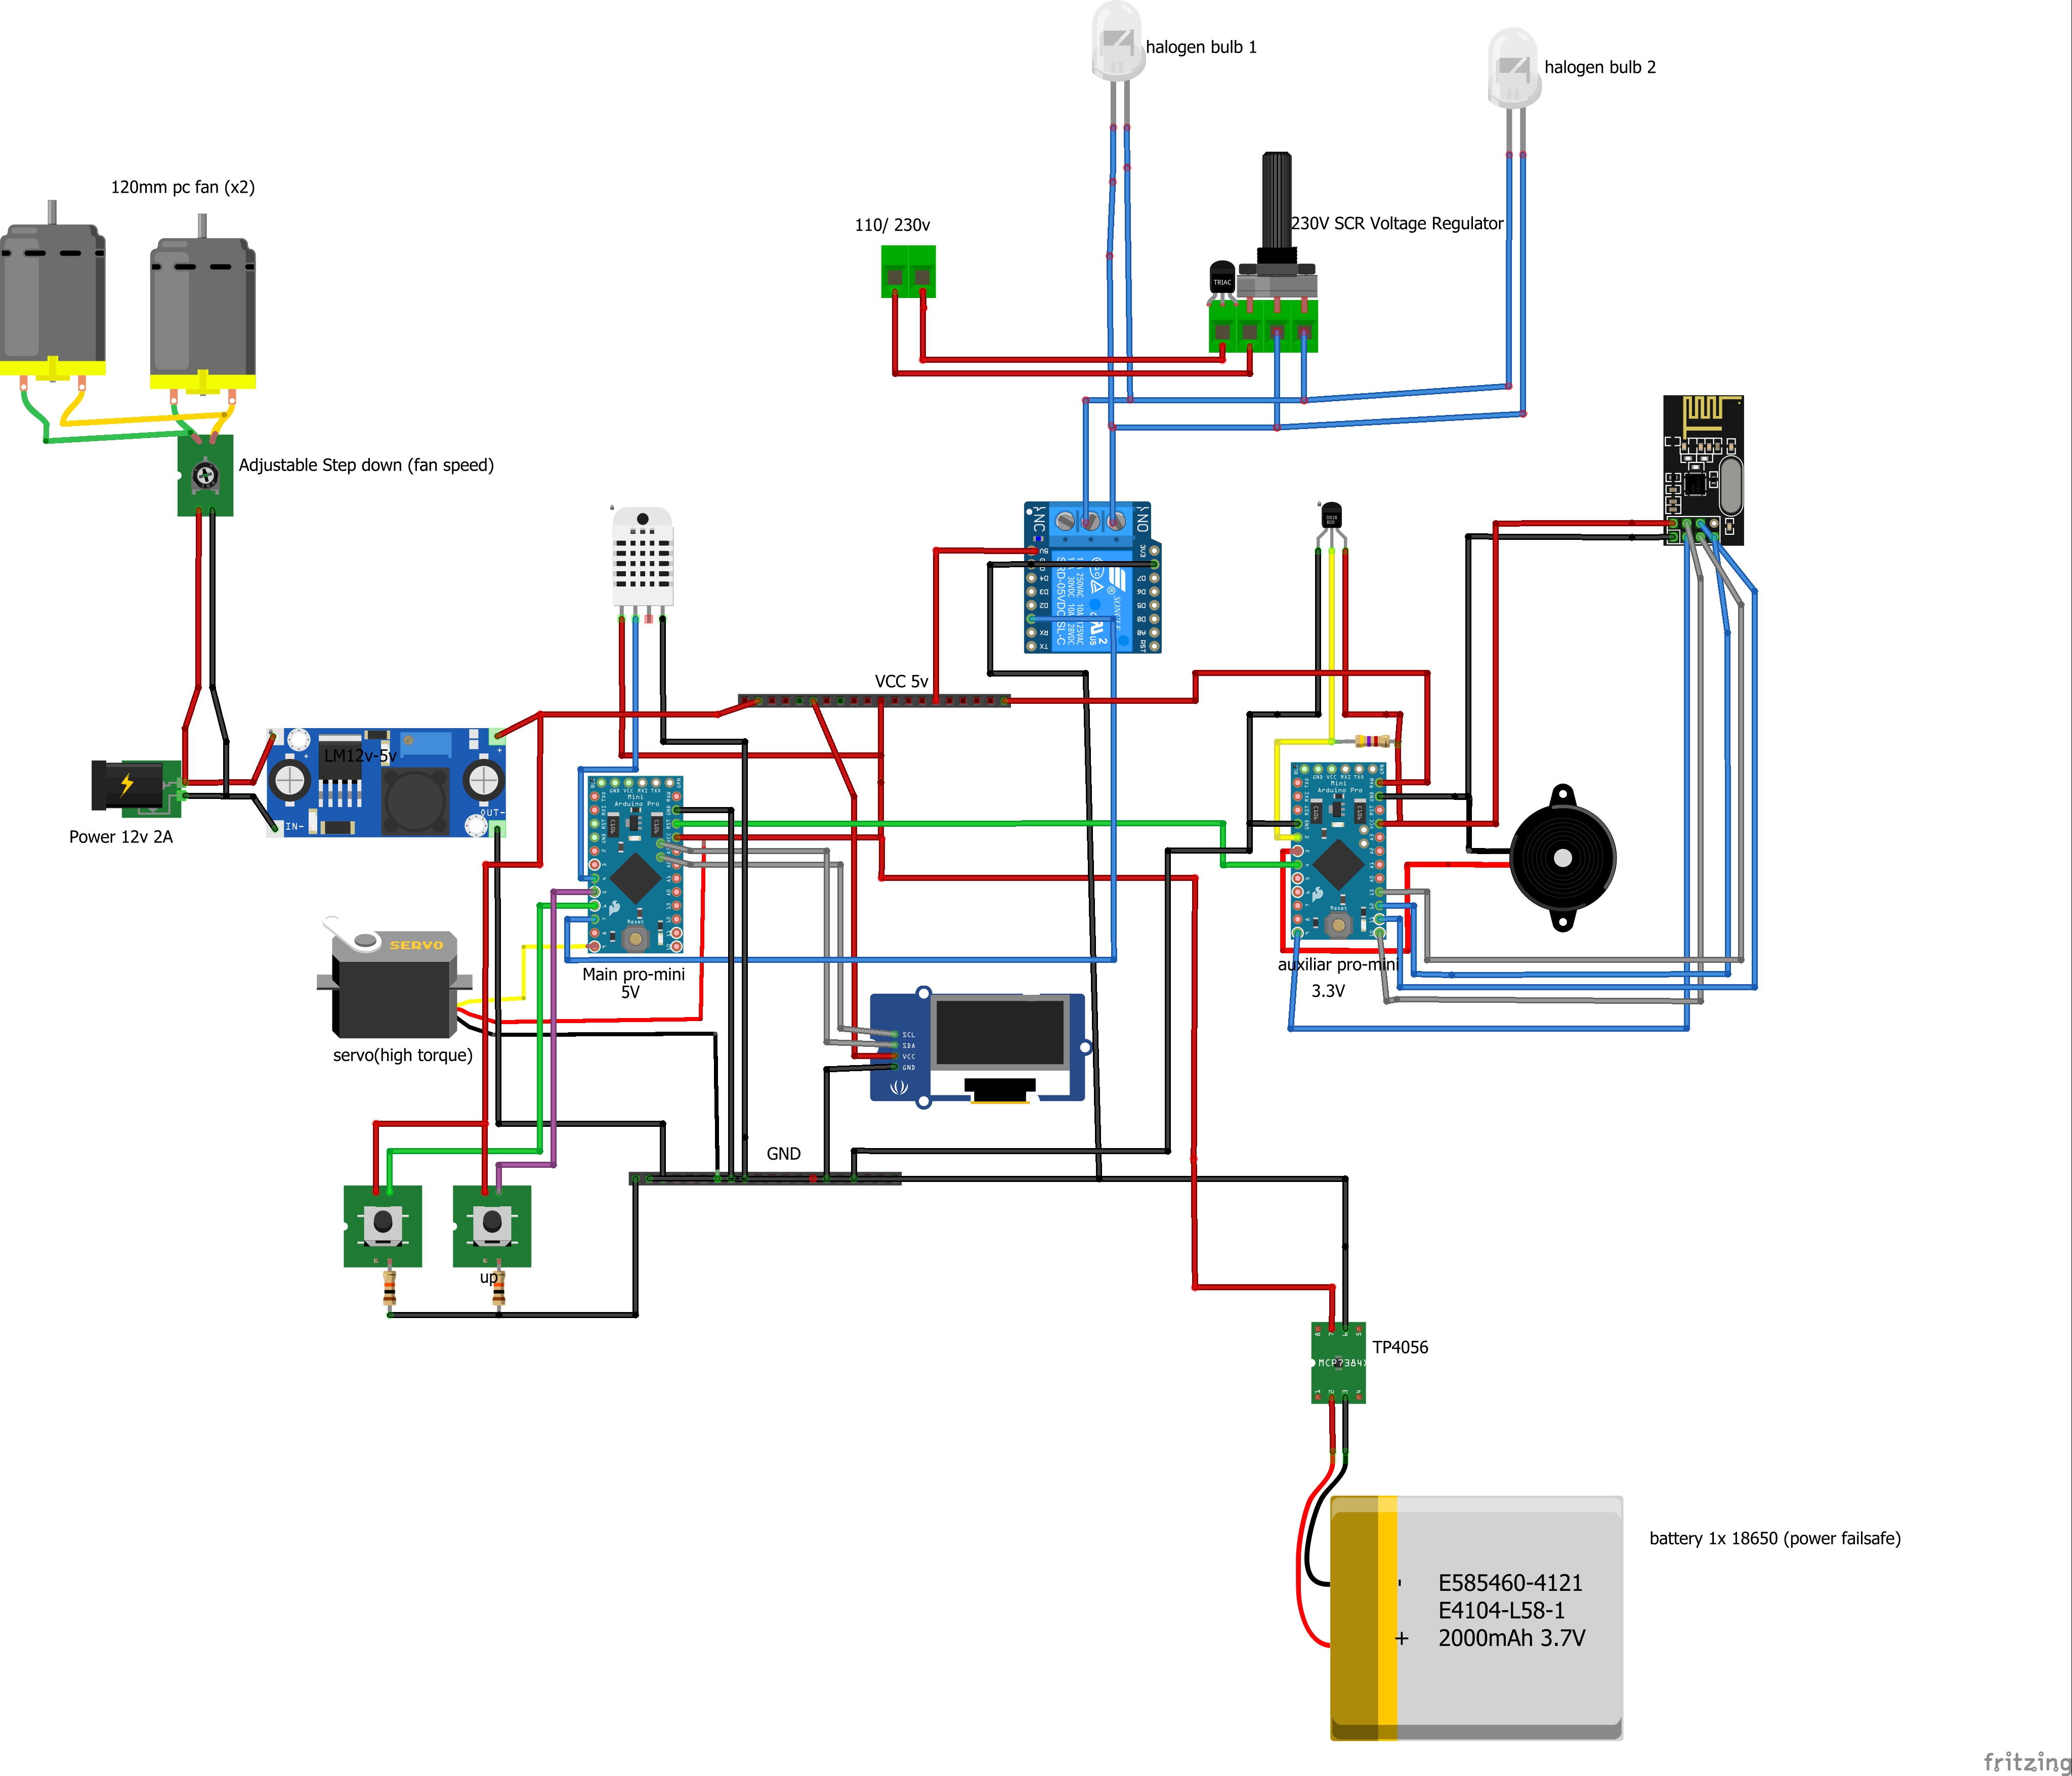
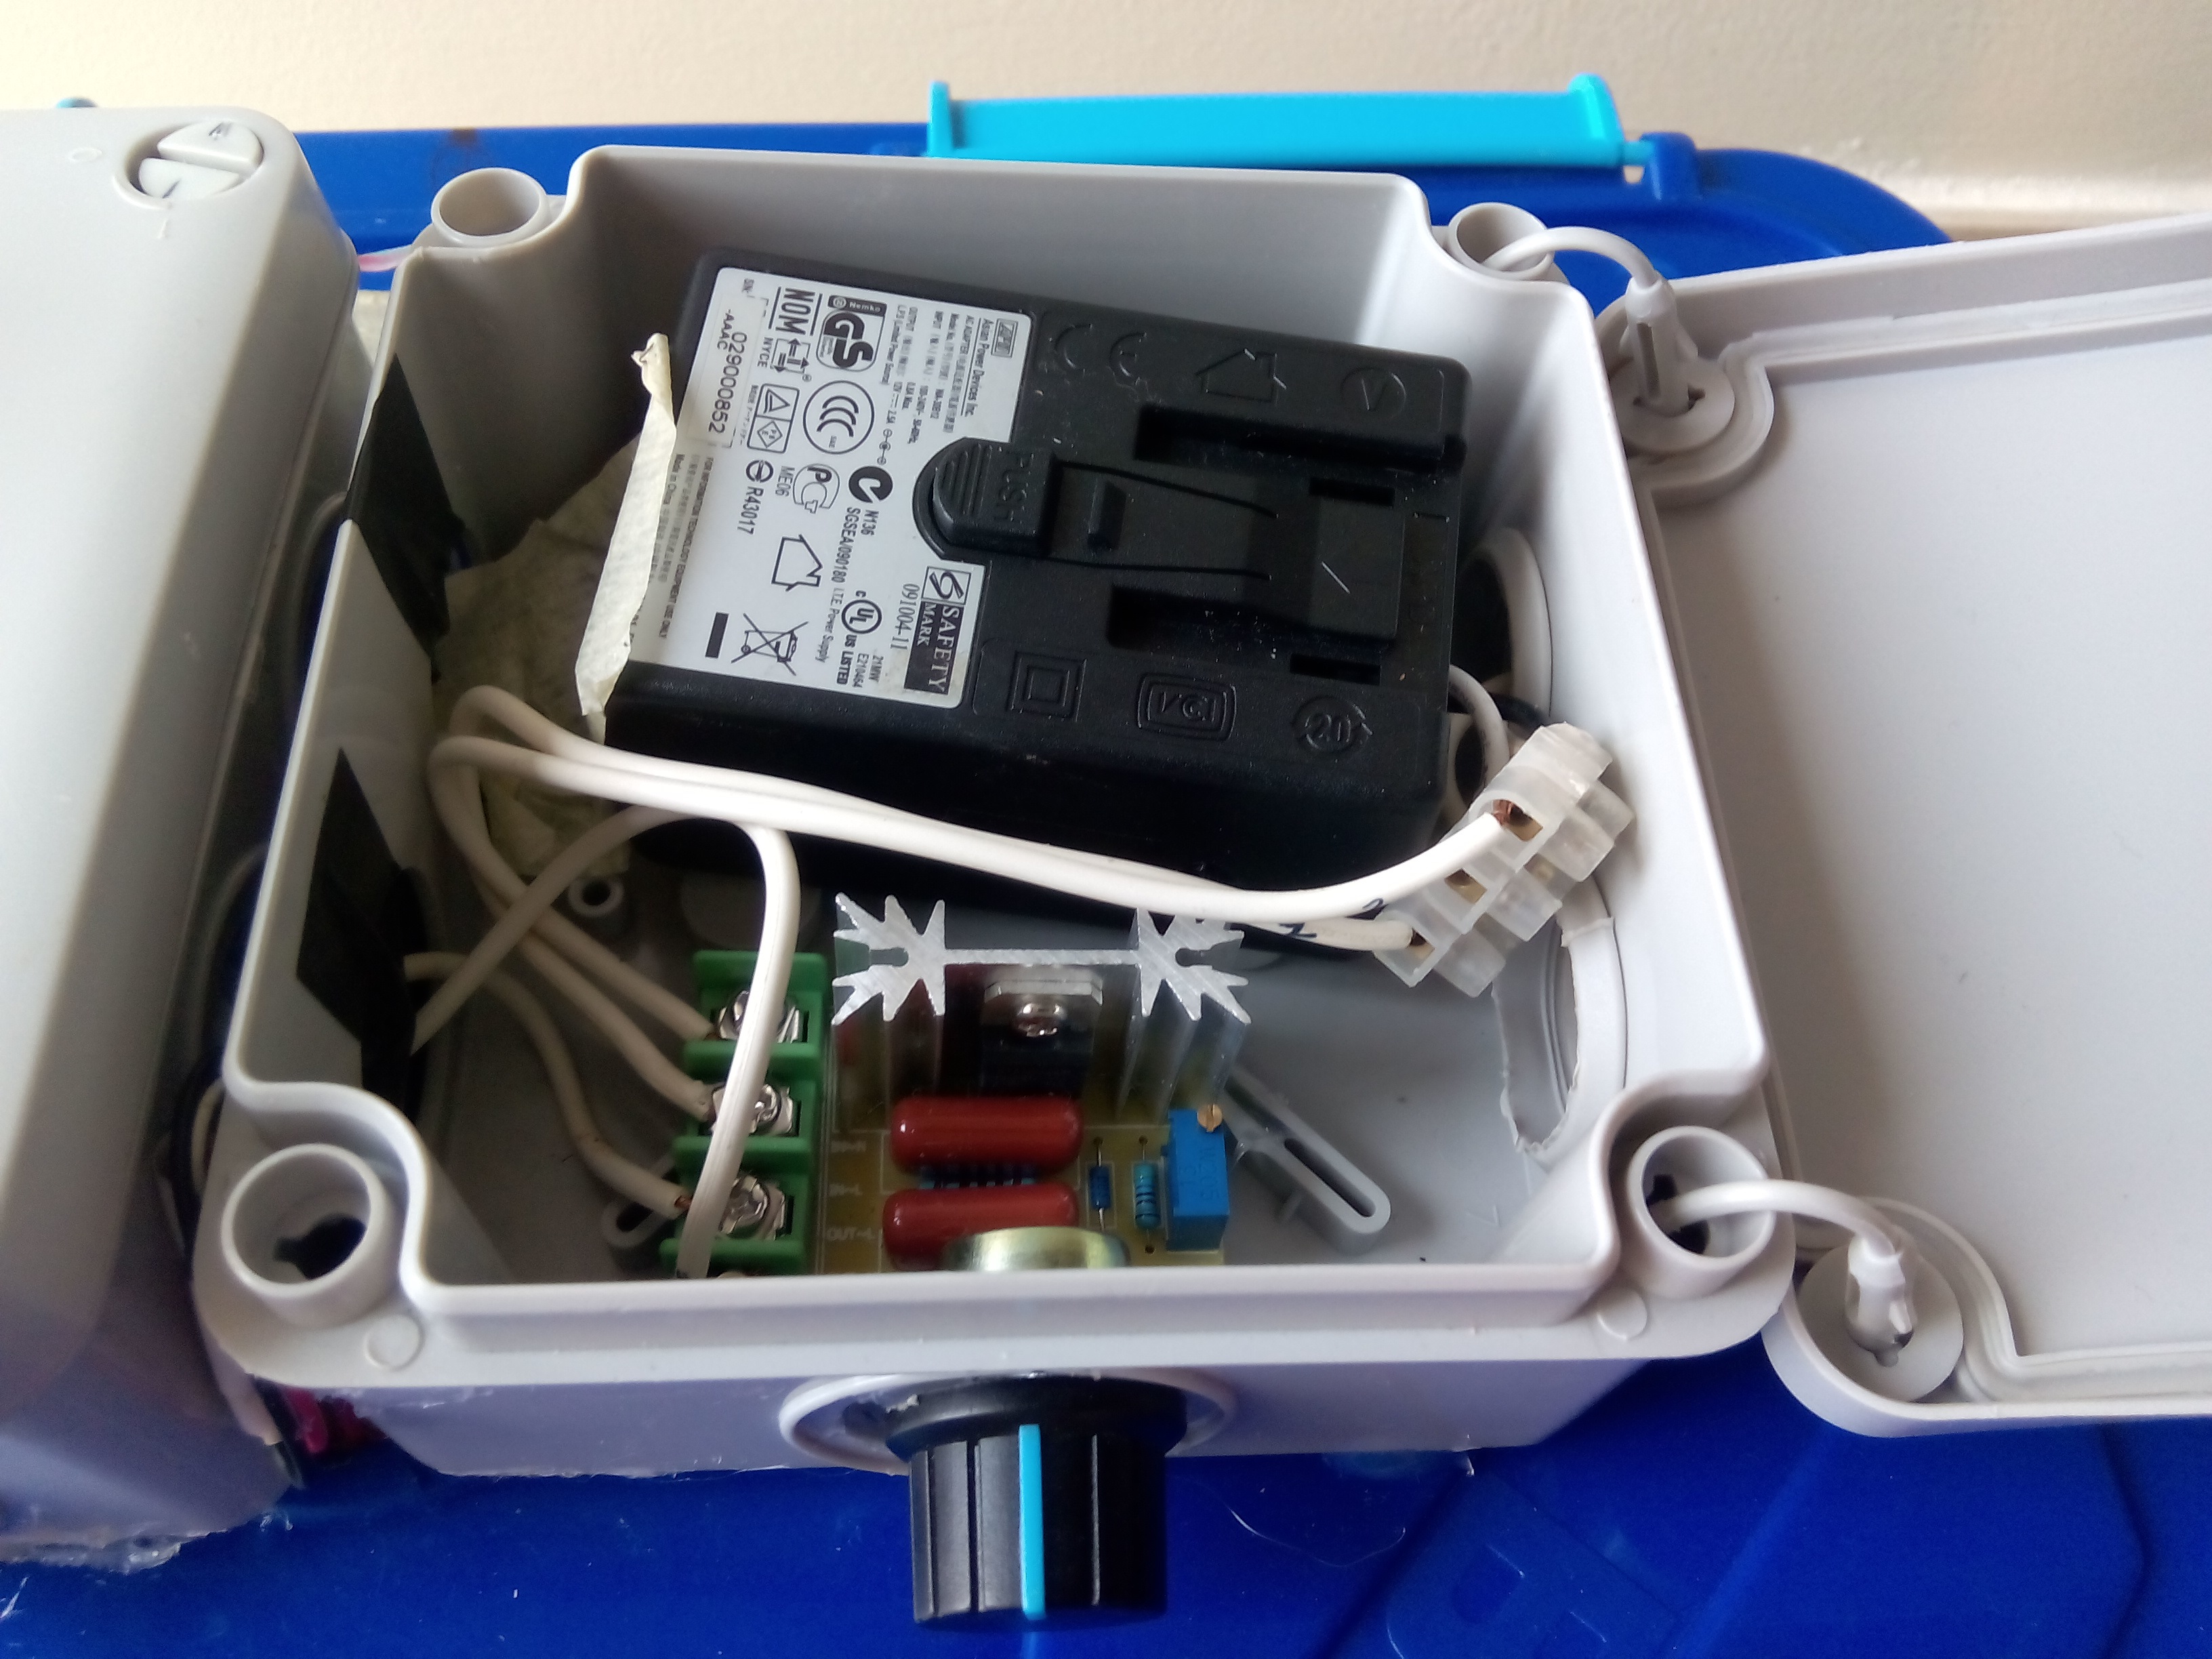
i used 2 X 18w halogen g9 bulbs and a 230v dimmer to decrease light brightness.There is a diagram above from fritzing. I uses an main arduino that controls a SSR relay for controls halogen light bulbs. this light bulbs are dimmed to half(in my case)
for hold temperature much time as possible without decrease temperature.That makes SSR stay on for some minutes before goes off again. if halogen light are to powerfull makes the SSR goes on and off many times in short period. the ideal situation is having the dimmer controlled by arduino and hold temperature without turn ligh off ,but i didn't got this dimmer yet(is there any one ready for try it? :P ).this is the 3rd version i build and all the other version hatch almost all eggs(+/-80%) even with some issues on controlling temperature.i only had 1 fan and that caused some zones that overheated (more on coners).
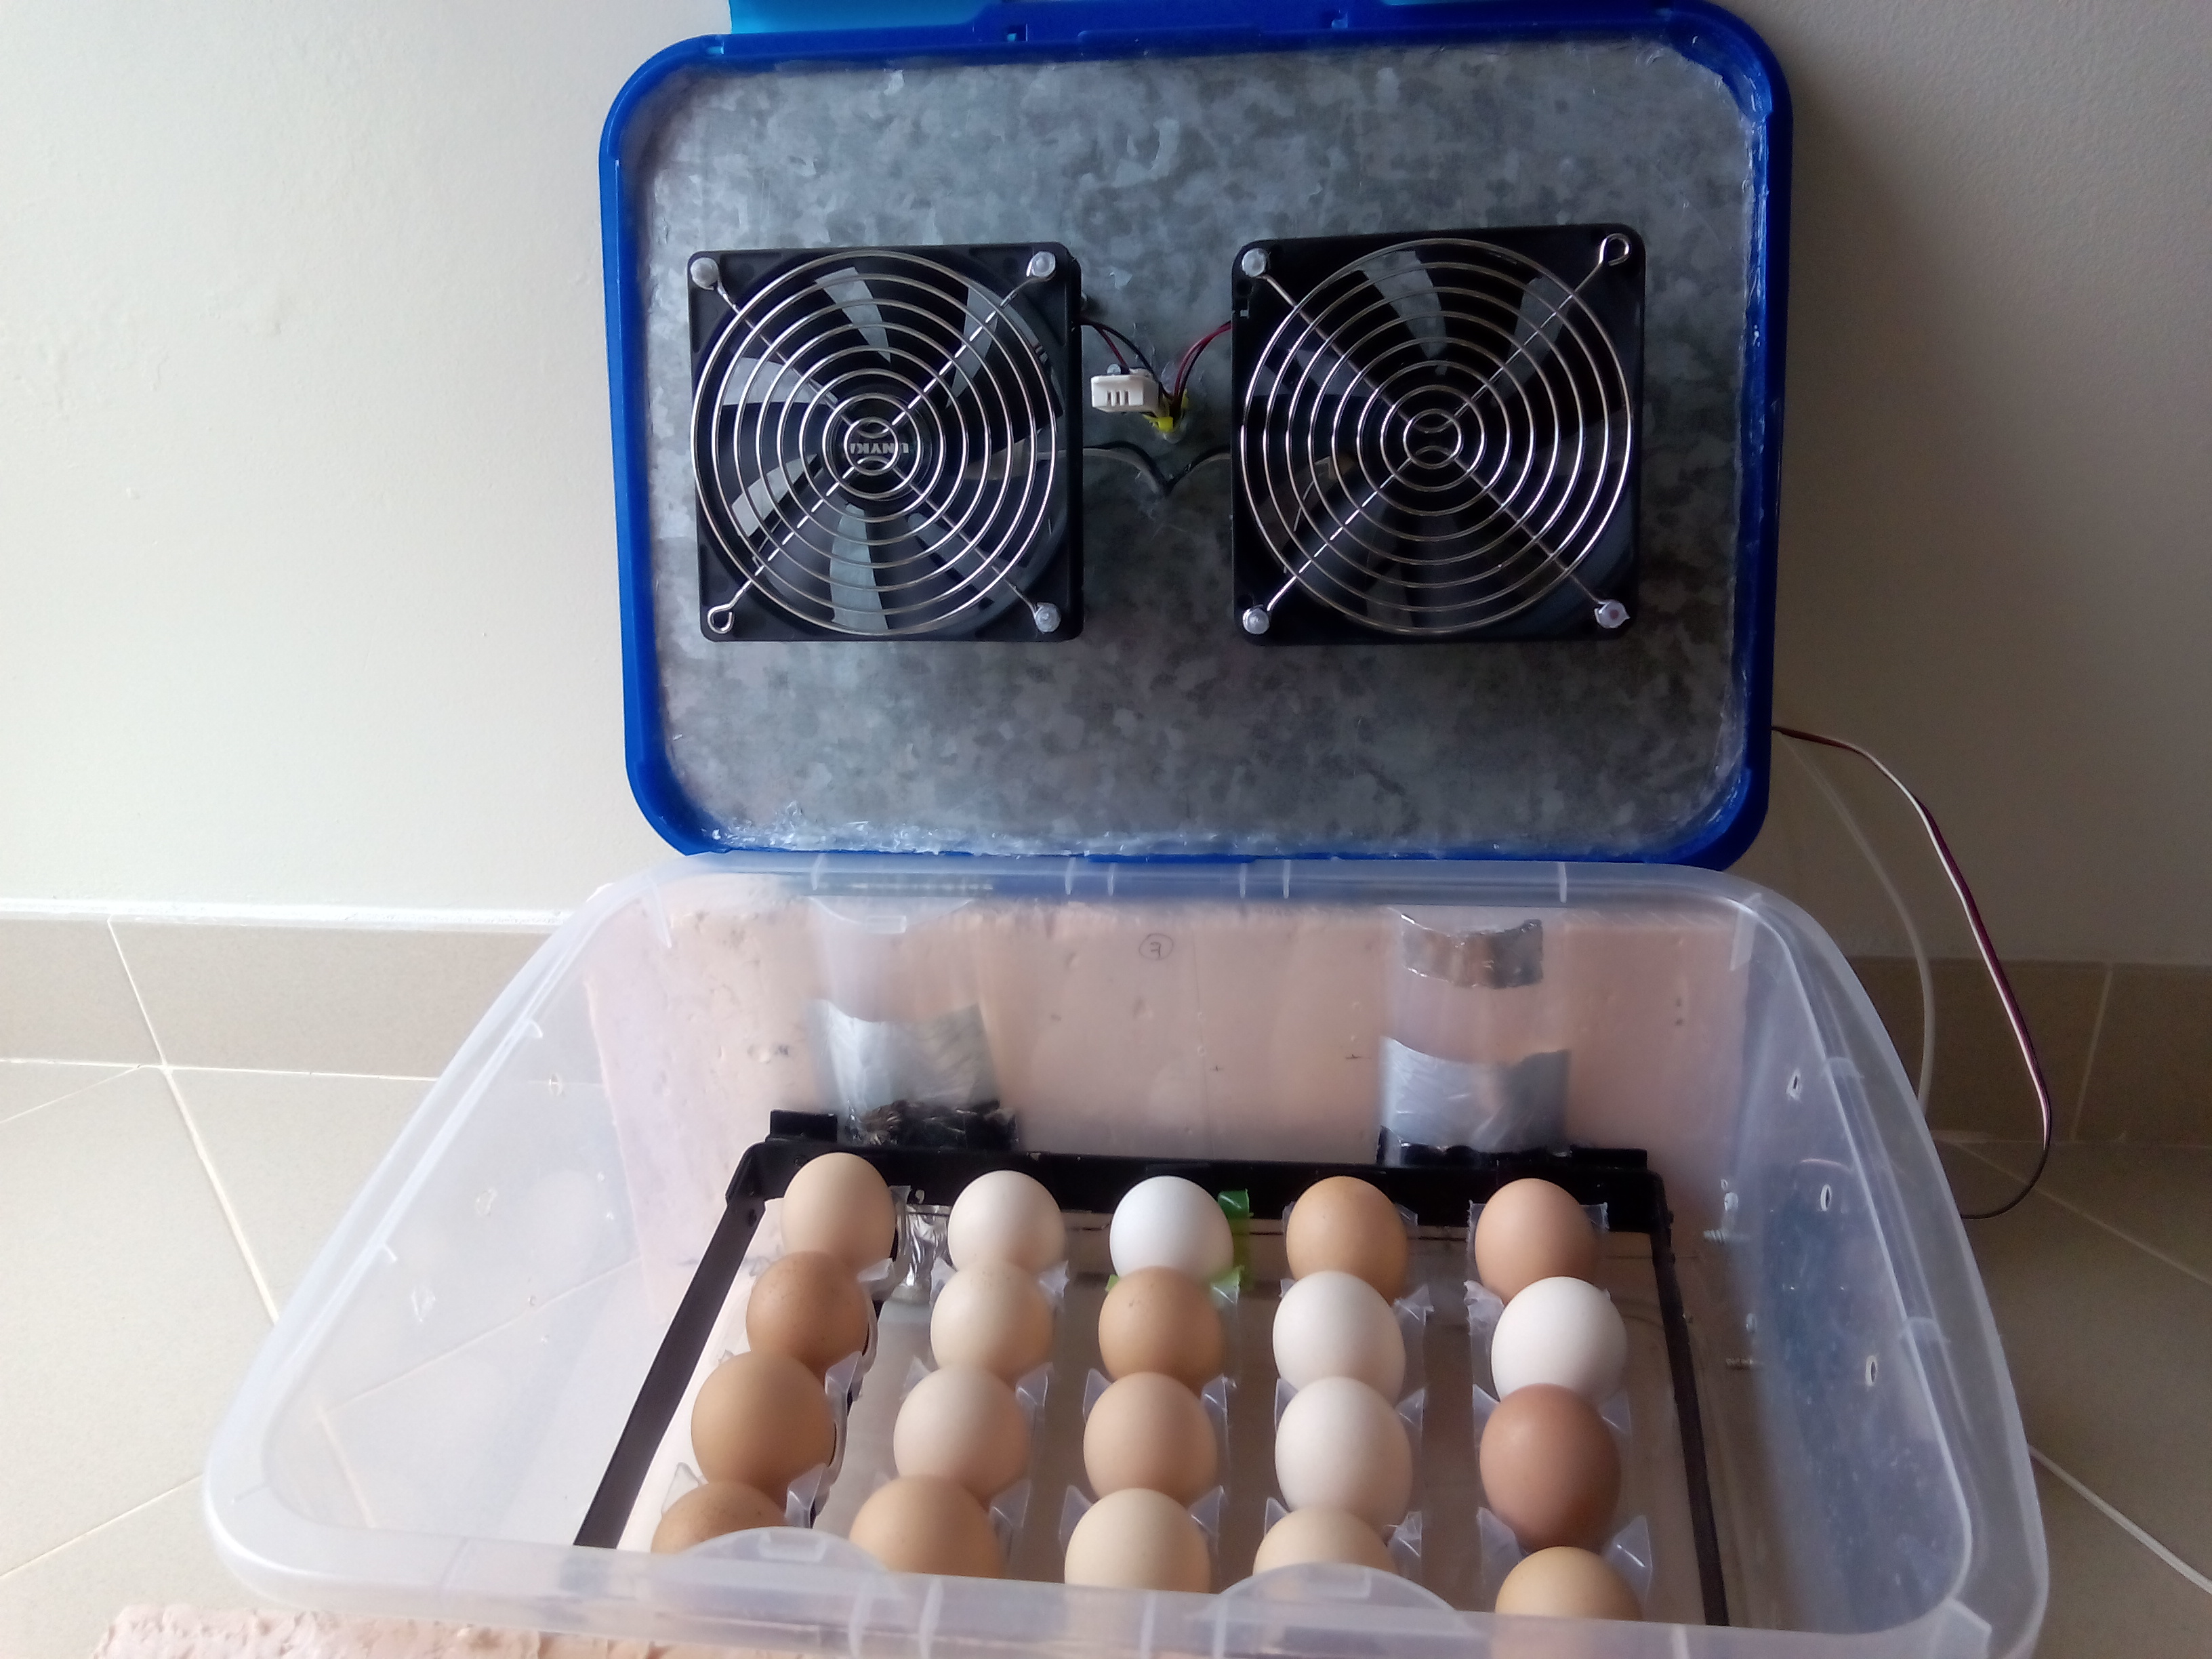
Now i have 2x120mm(0.10A) pc fans that can spread hot air the same way in all this box.Then i have a secondary arduino that it's for safe features. it controls an alarm buzzer(pc speaker) ,its connected to an temperature sensor (ds18b20) and send temperature to emoncms.com through an nrf24 wireless board
If temperatures goes over 39ºC or below 30ºC it sound an noisy alarm.Just in case main arduino or DHT22 fail.Egg roller its made os aluminium and plastic egg racks cutted and glued with hot glue(screws were better but this is enought to hold eggs).it makes 45º each side.
An High torque servo roll every 60 minutes. Note that an regular servo does not have enough torque should be an high toque version.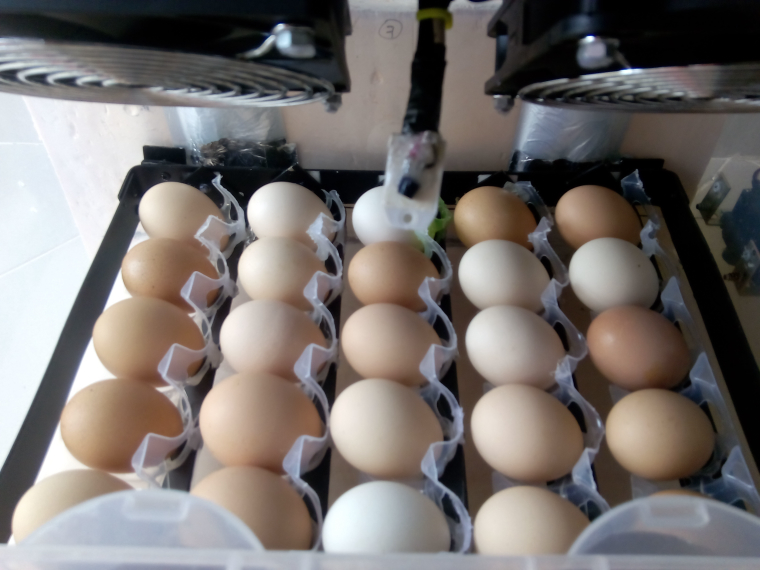
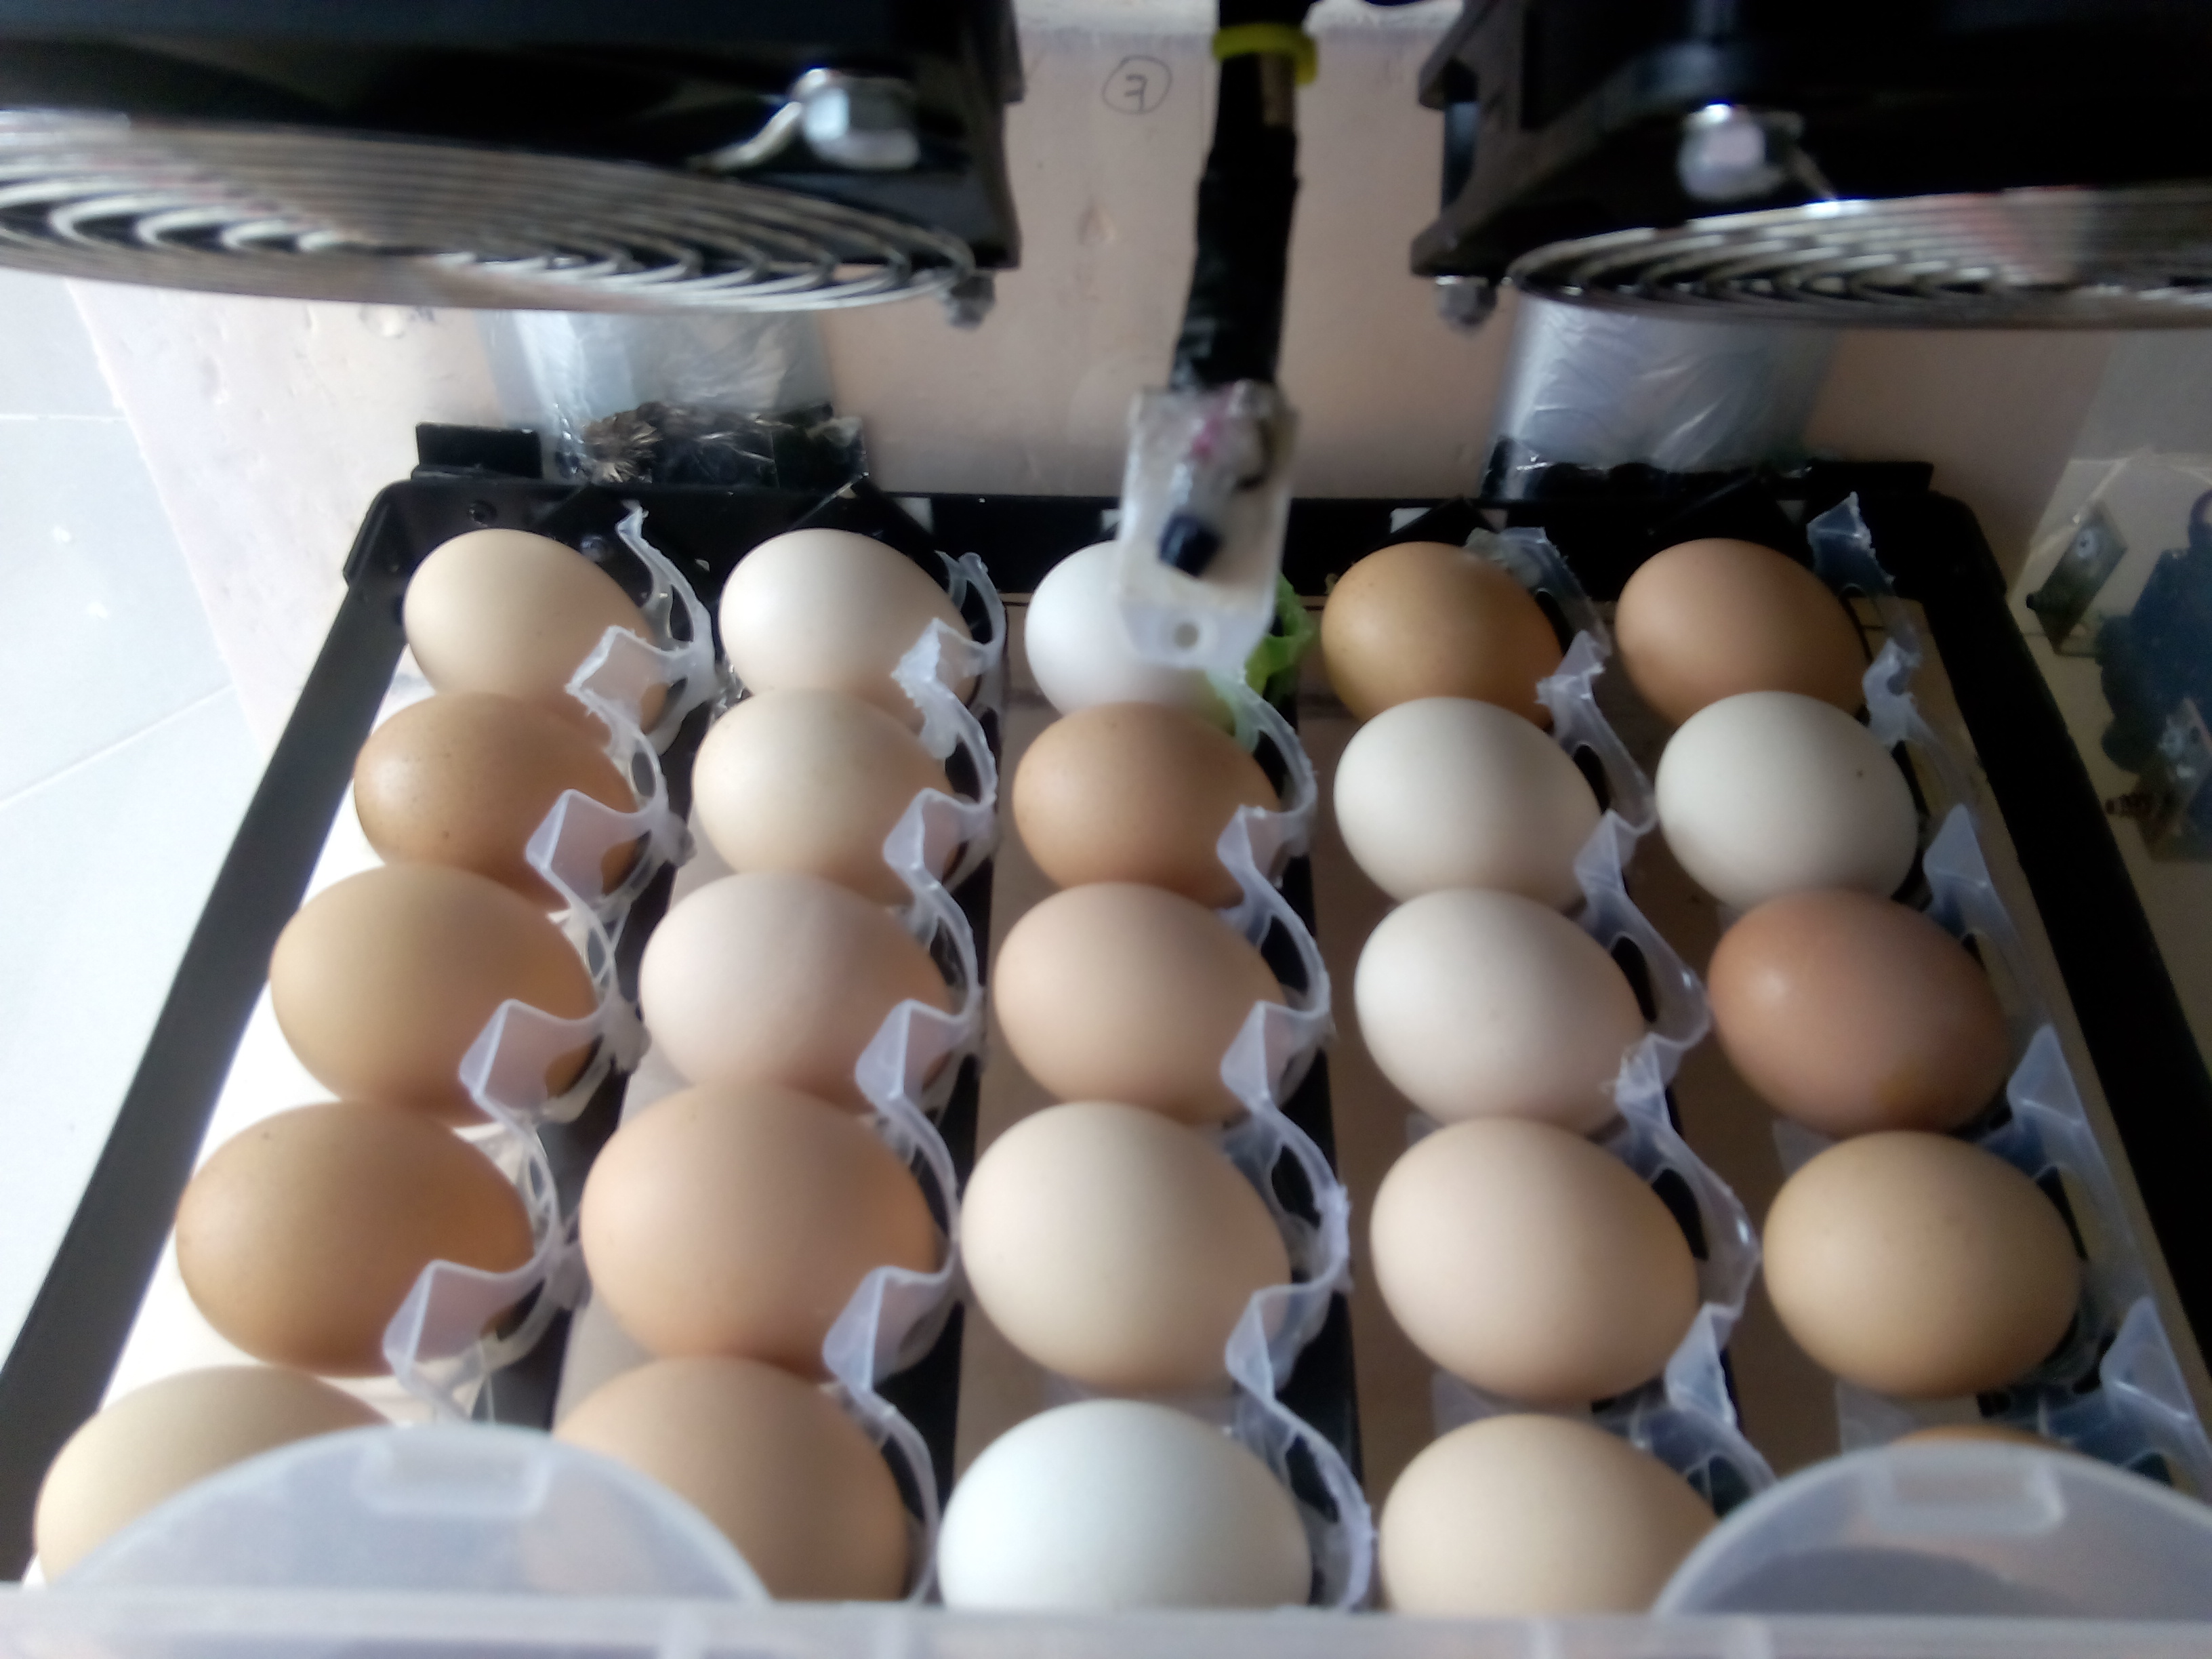
eggs ready to start hatching! note the ds18b20 sensor in the back of the DHT22 sensor.they will stay same height than egg rack.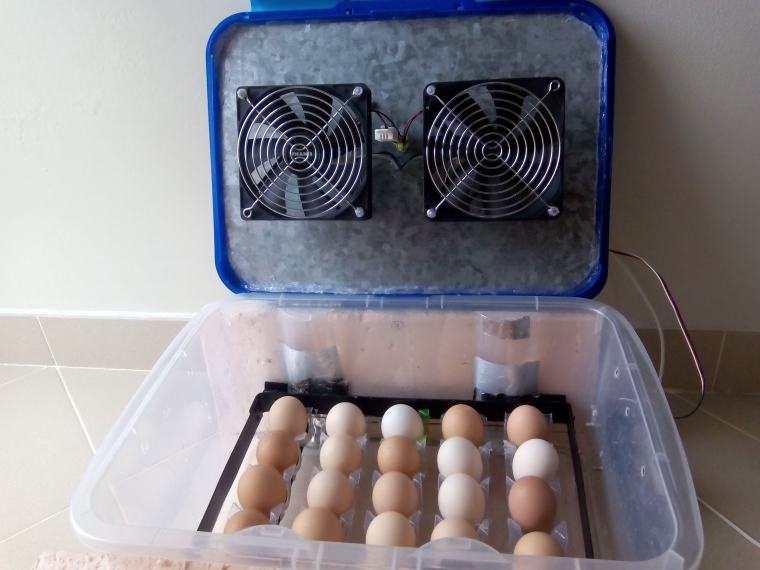
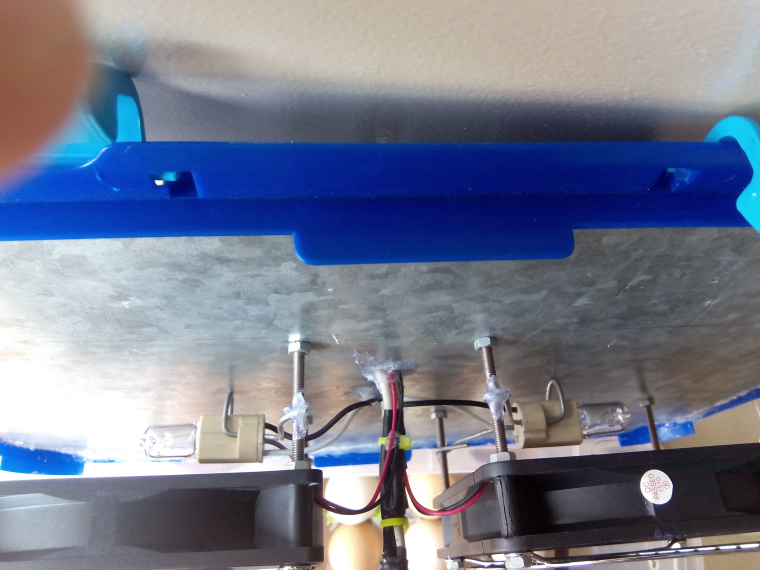
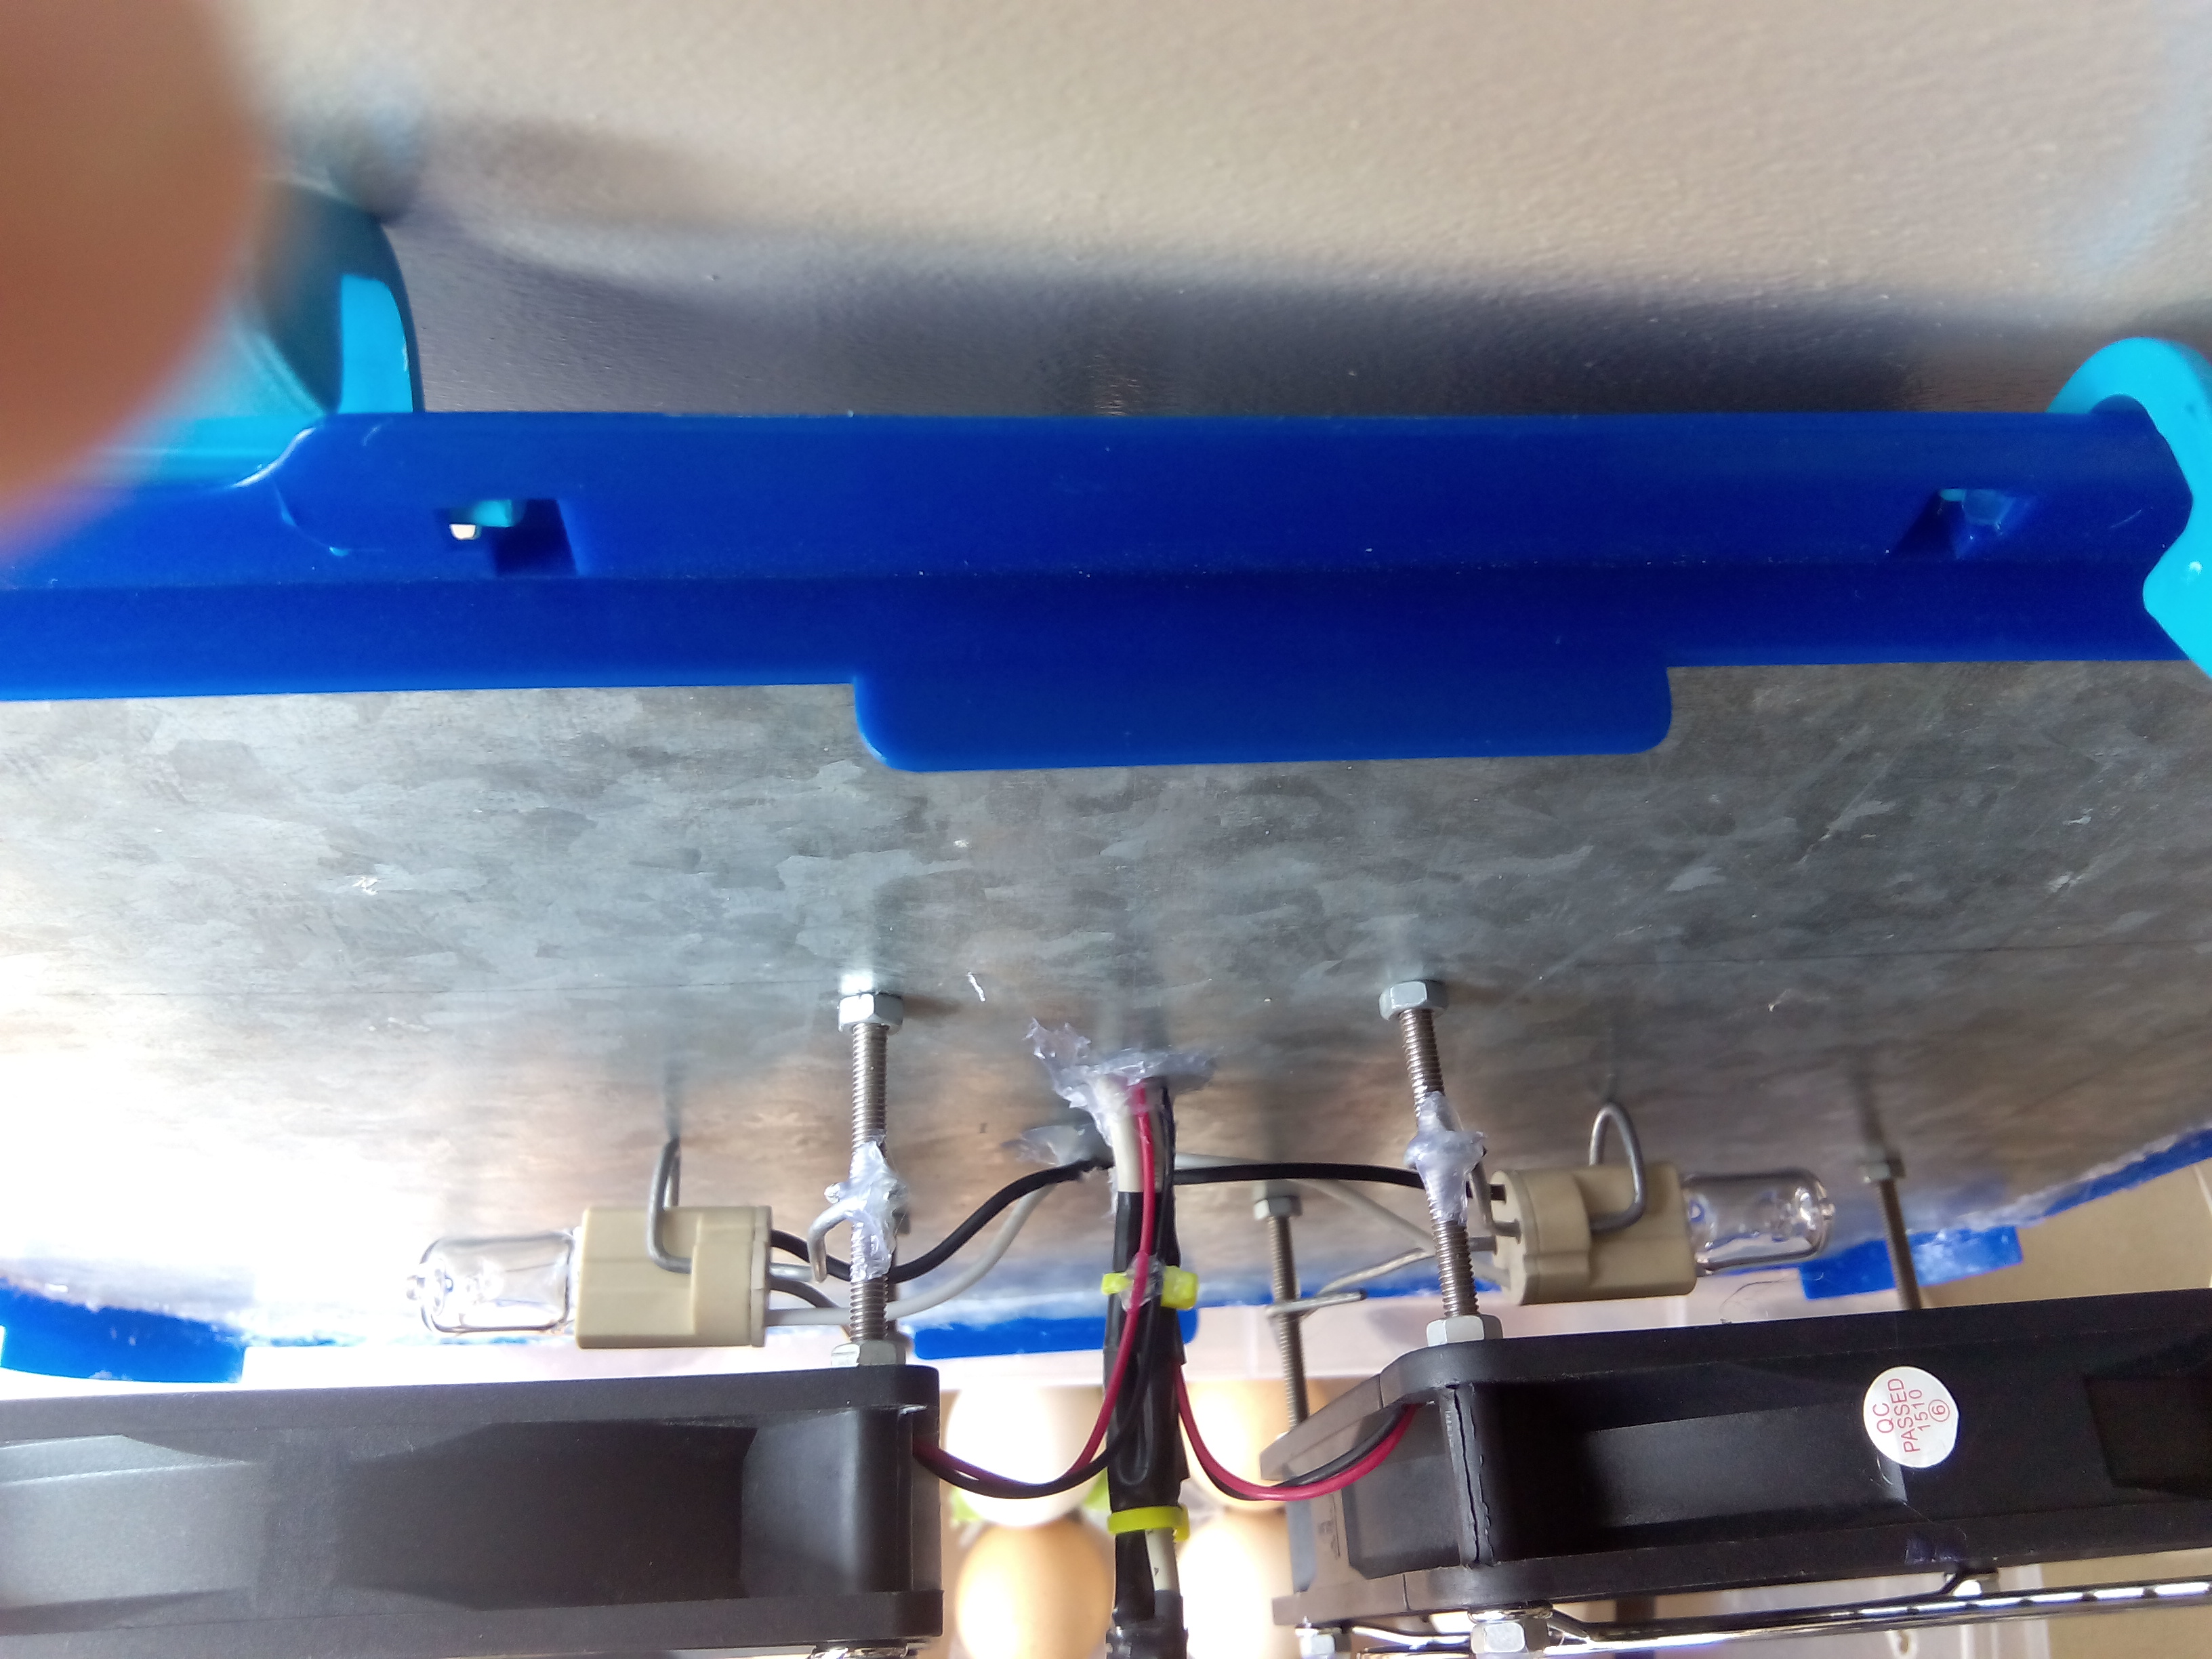
2x18w halogen lighs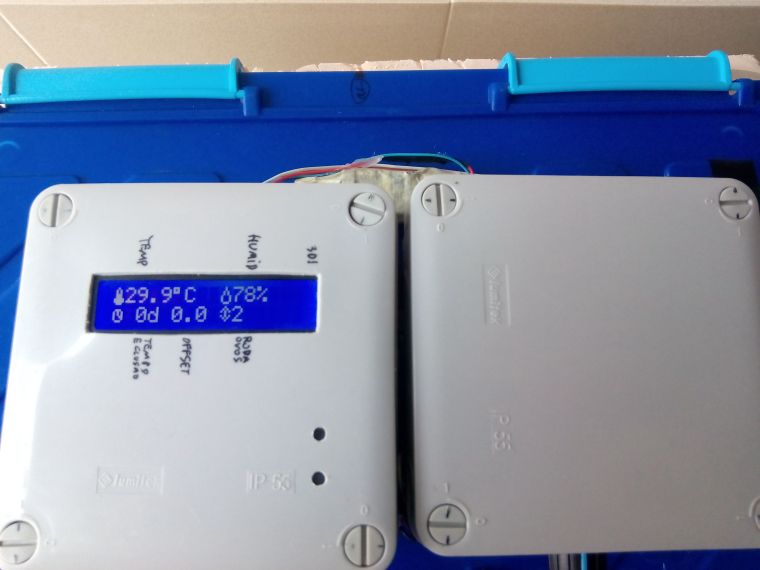
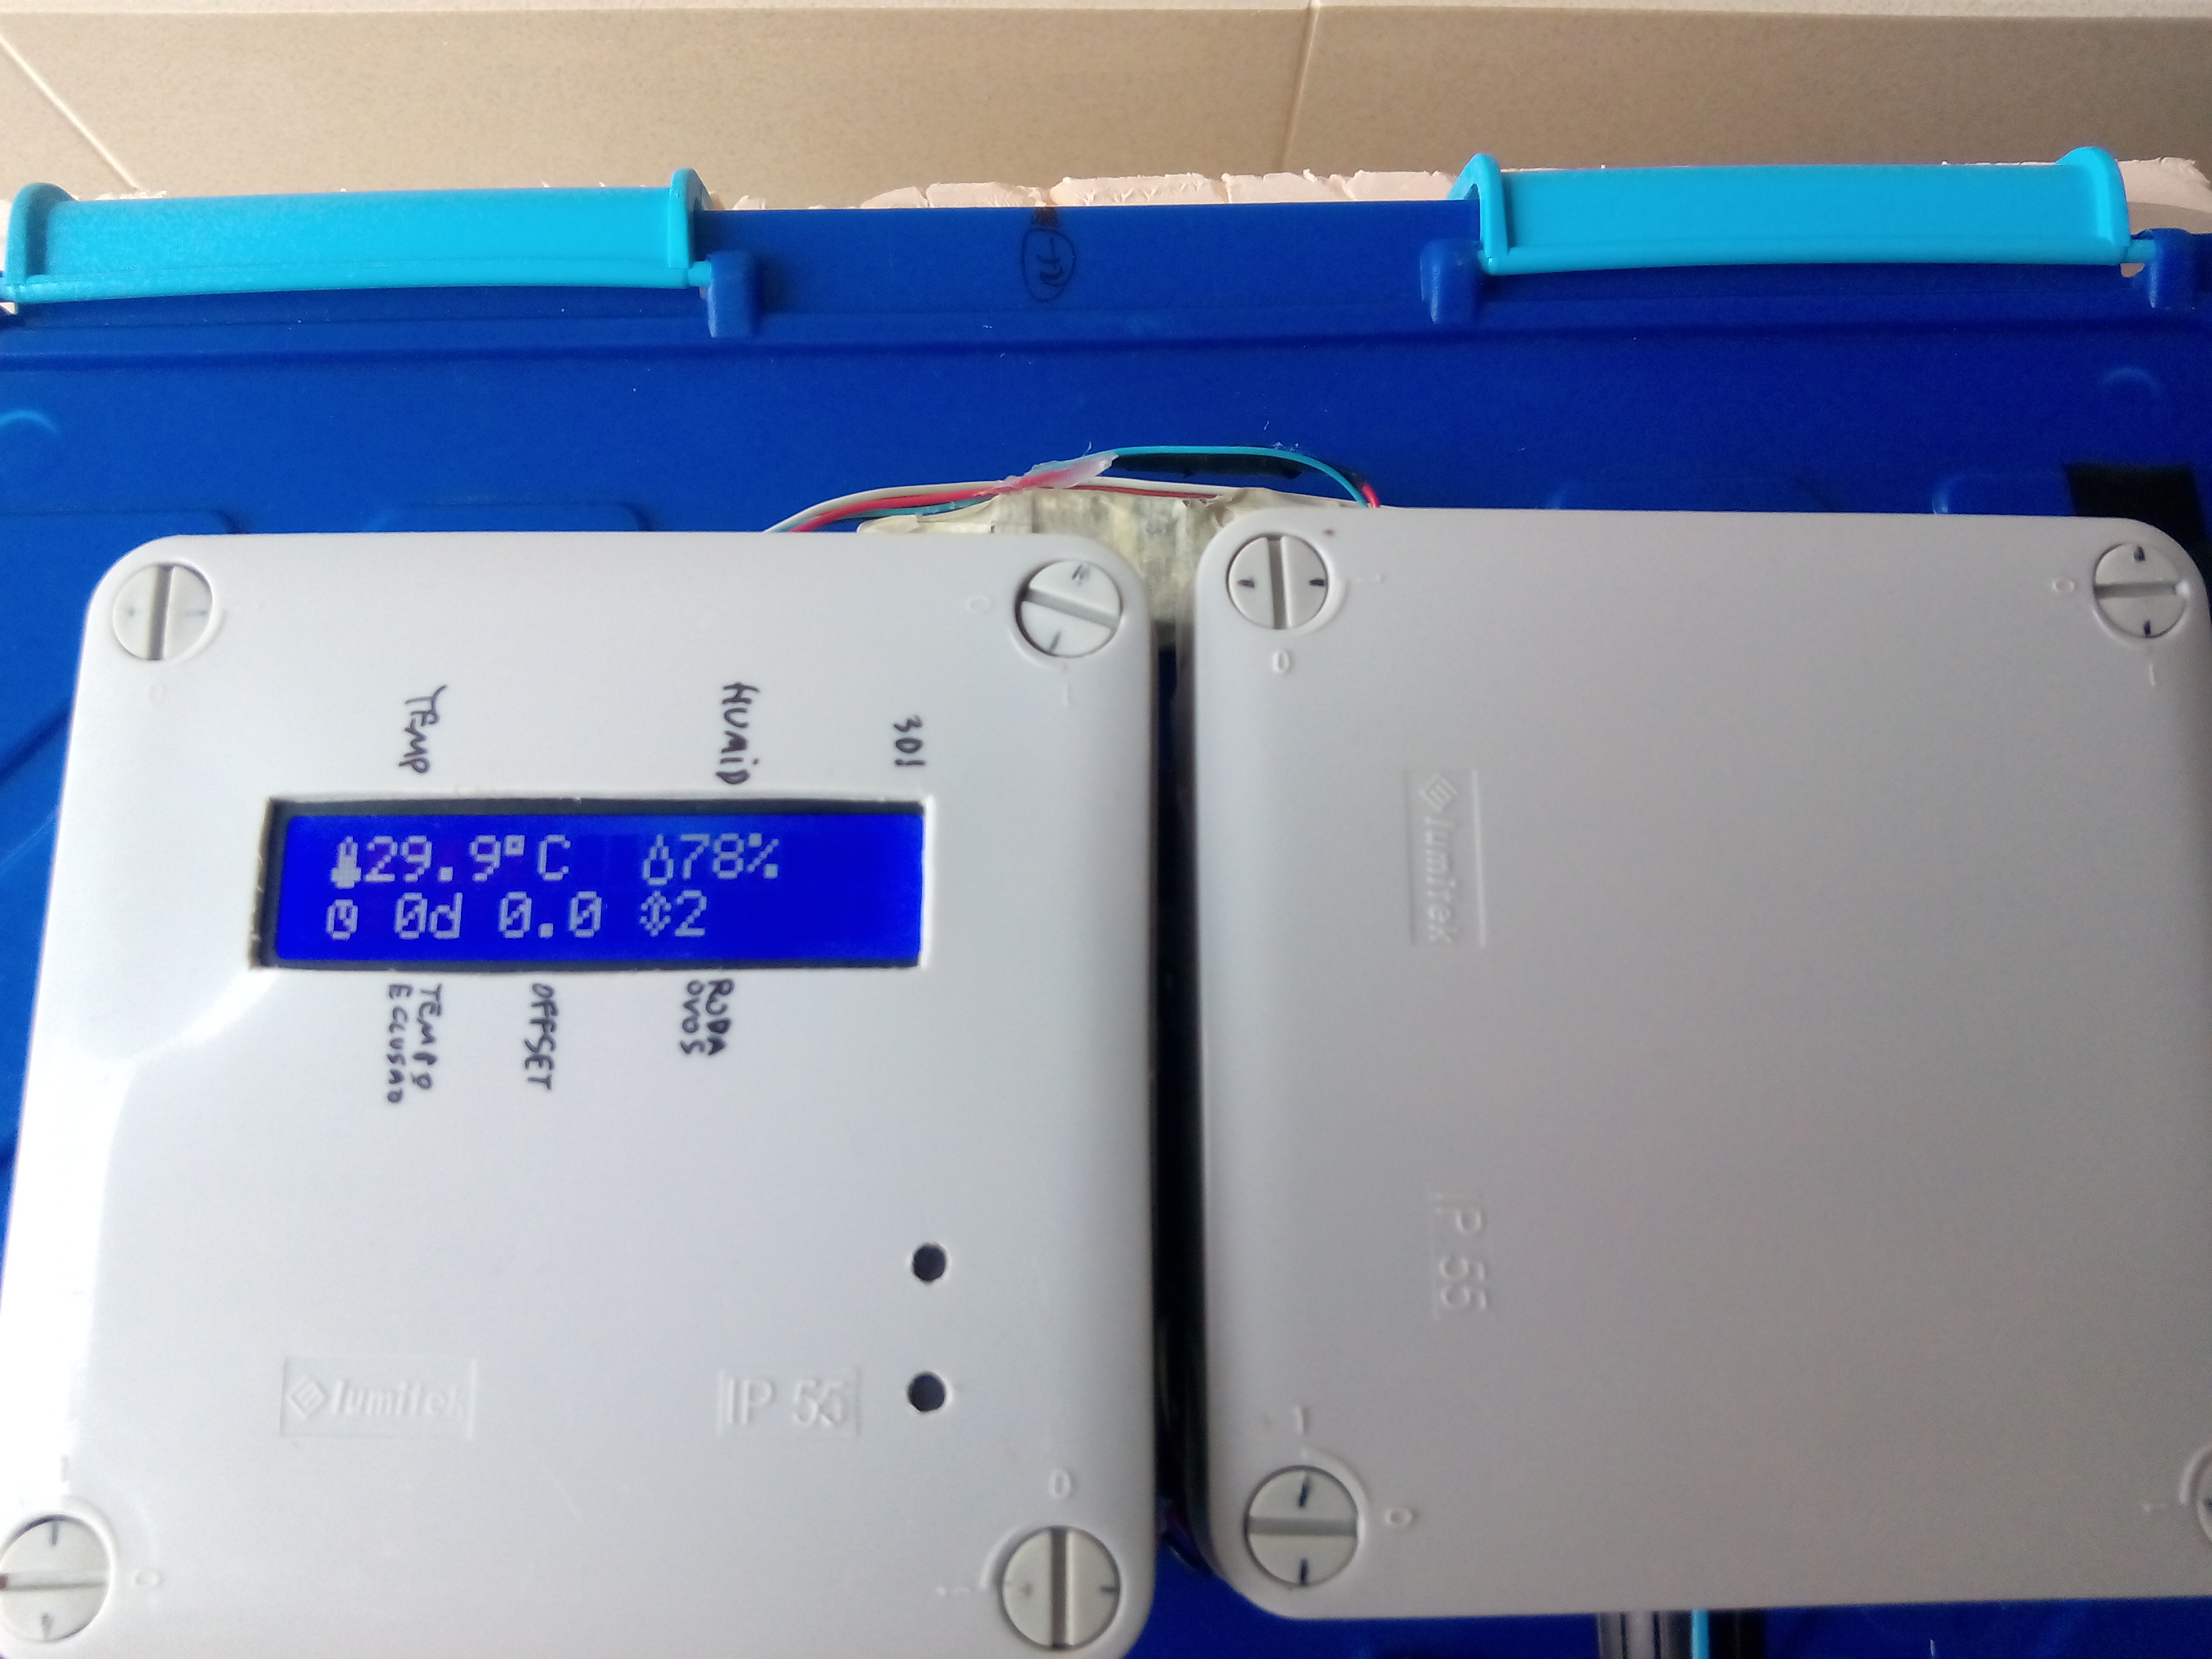
lcd screen is configured for simplicity . code have hours and days passed and remaining ,but i decide use just passed days, temperature manual offset and time for next egg roll(minutes),and of course temperature and humidity on first line.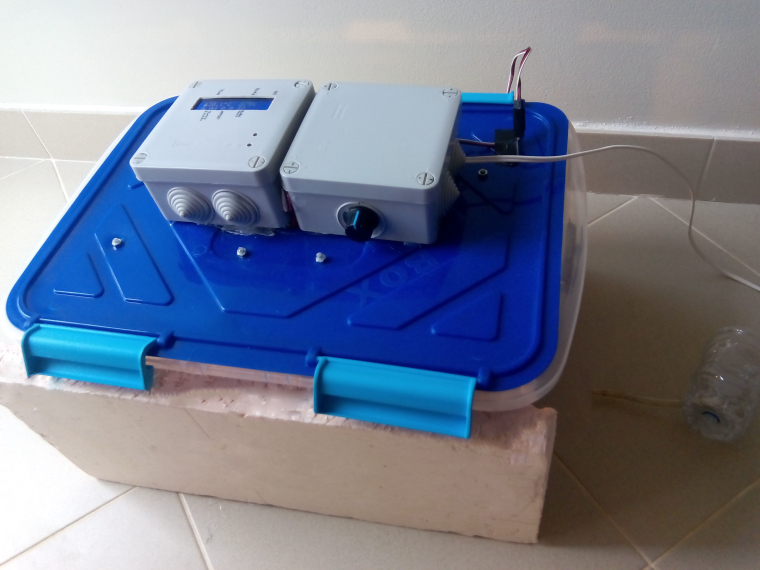
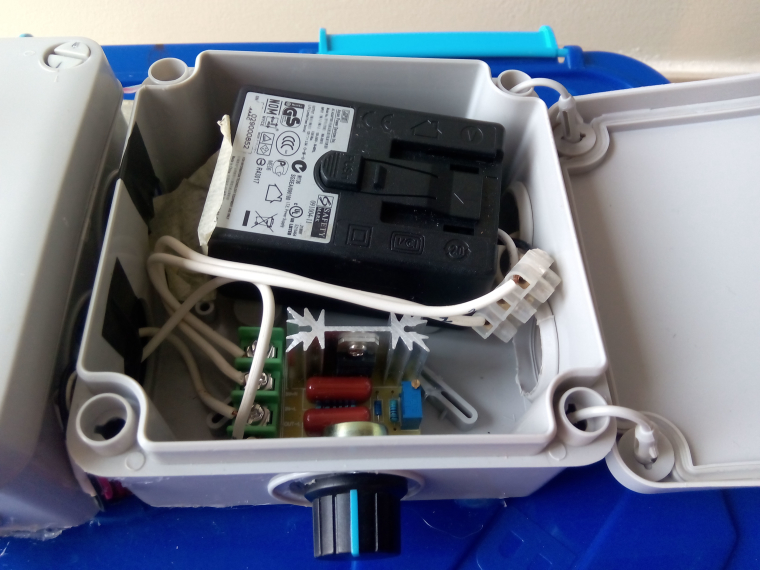
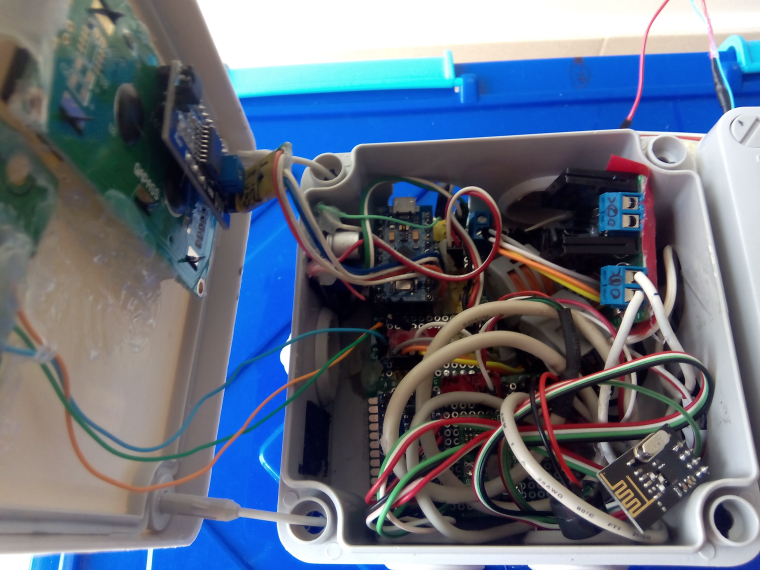
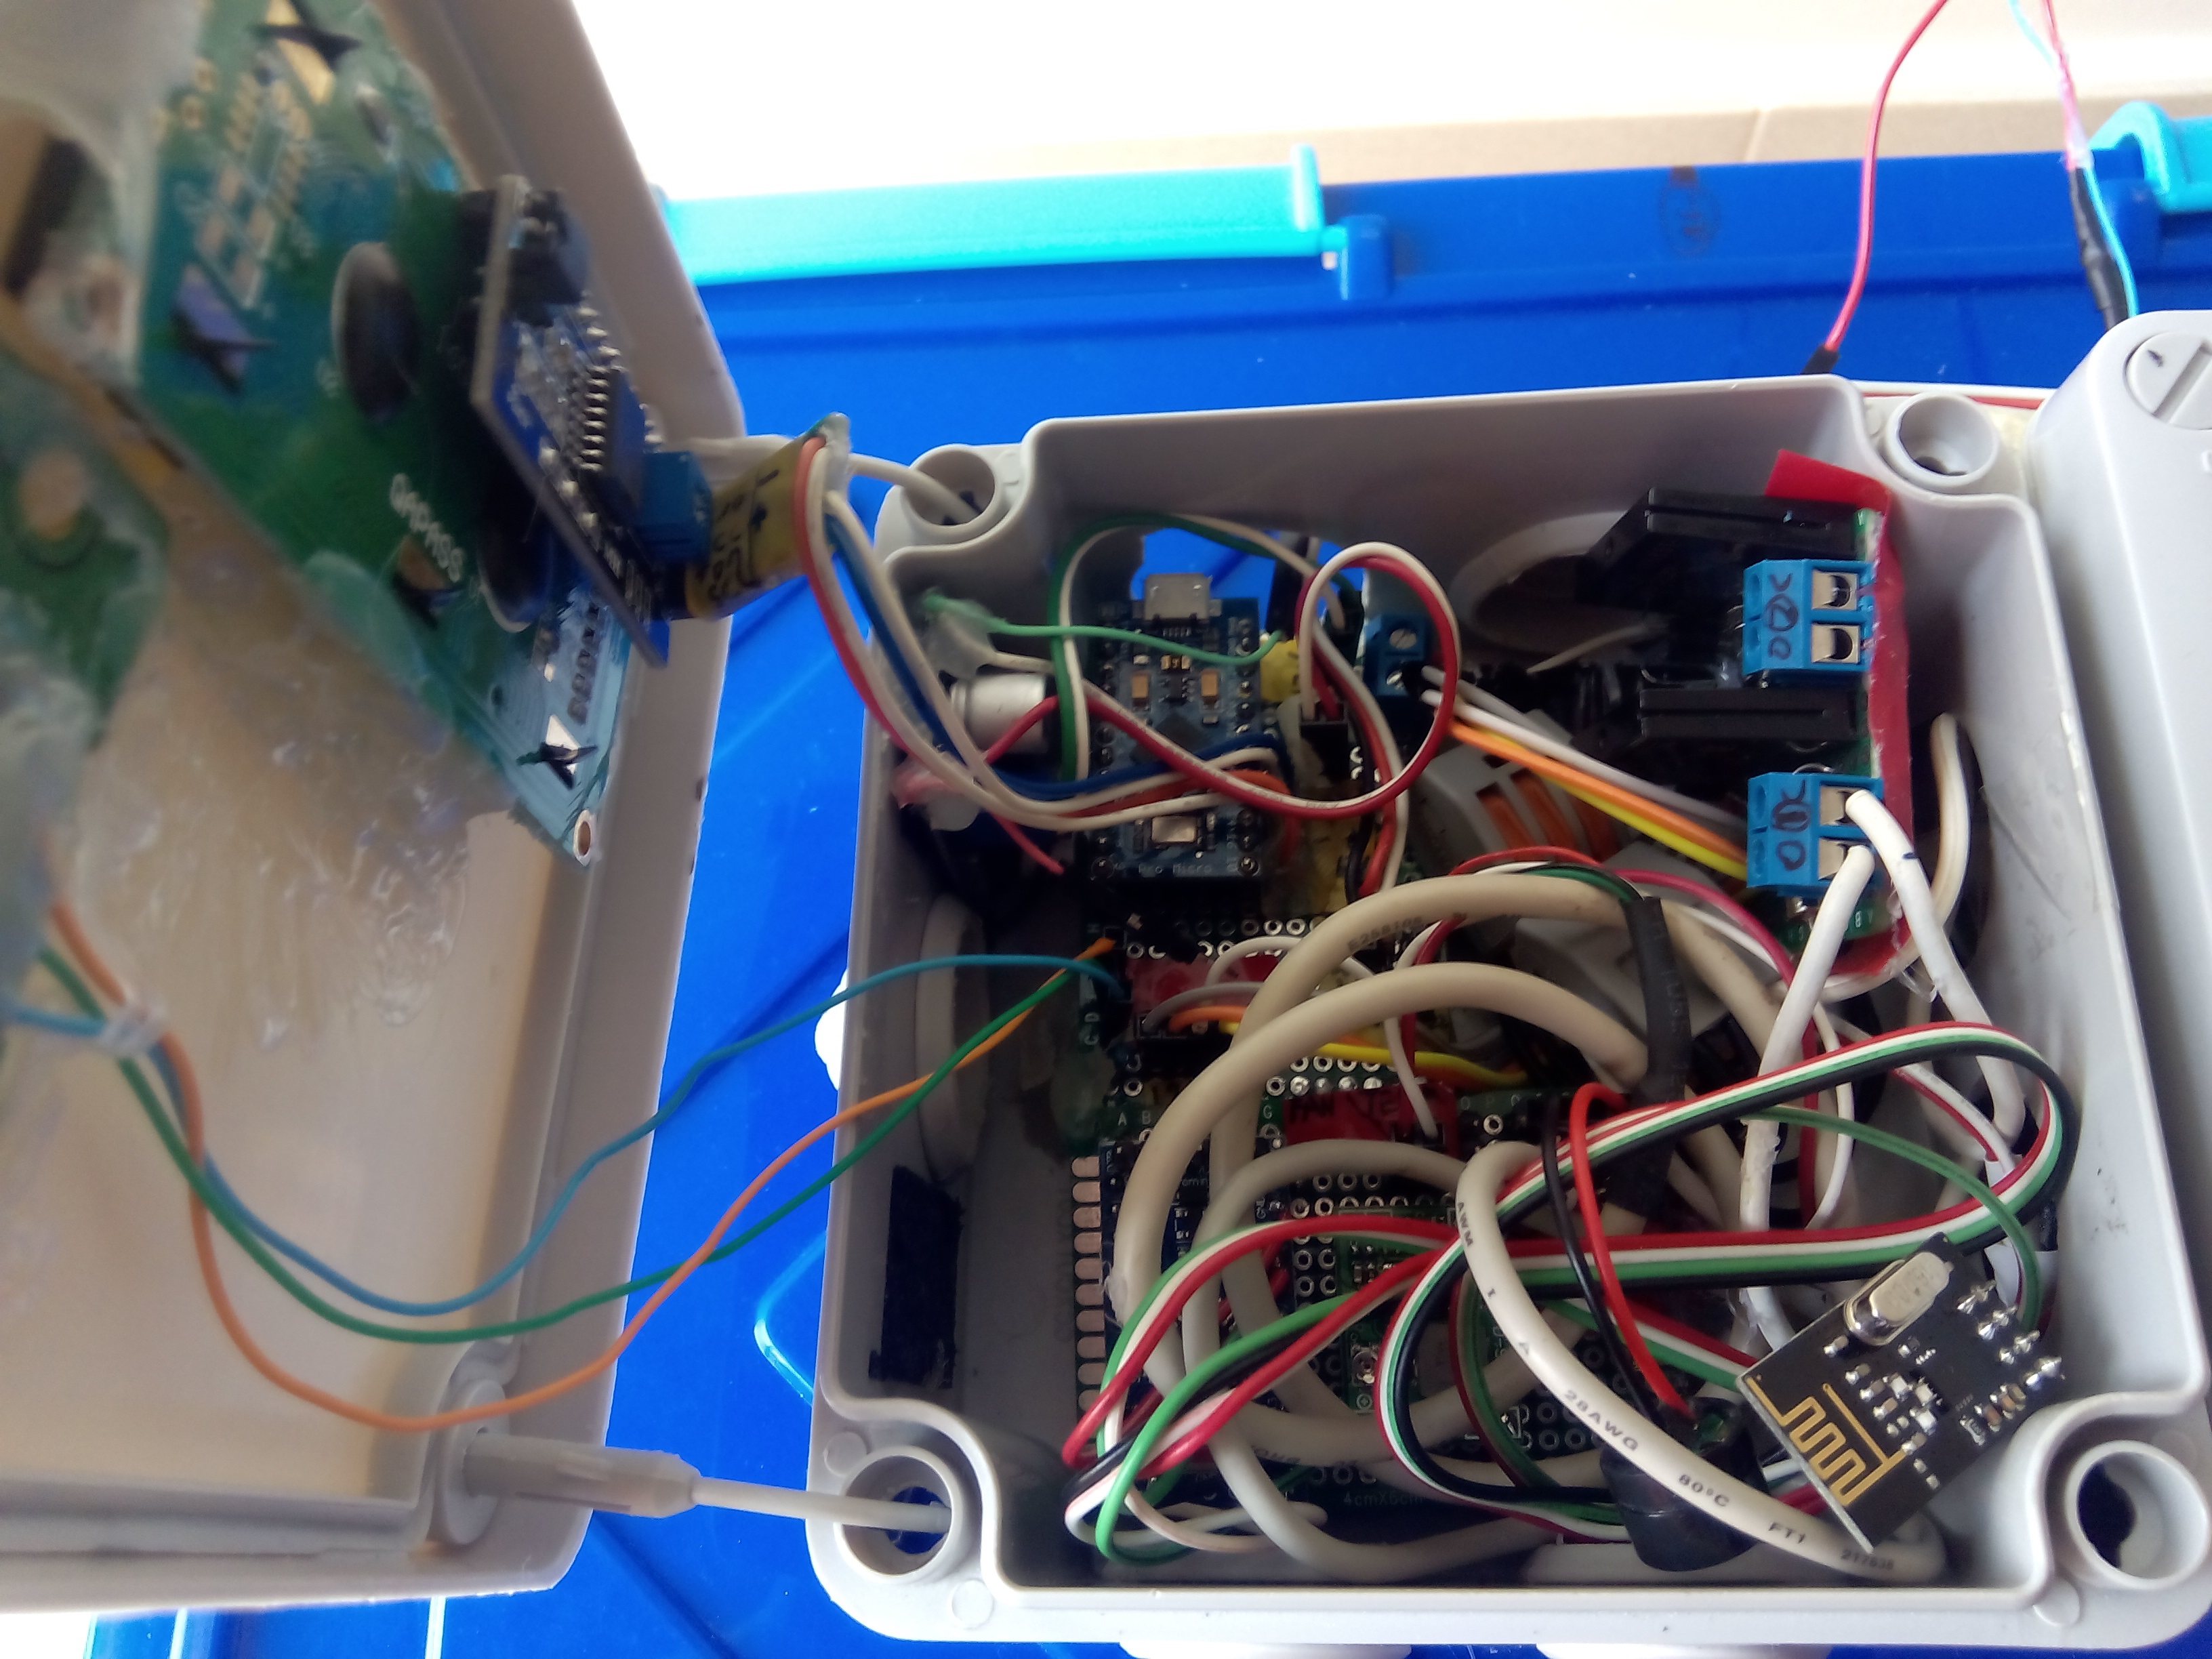
its a mess of cables ...i know. It's what happening when we always improve our project until it be a final version :P
I used usb cables from computer cases for wire sensors, it work really well .
There's 2 solid state relays on picture but we only need one.Parts:
2x 12v 120mm pc fan(0.10A -slow speed/low noise)
1x LM2596
1x High torque servo or step motor(need additional controller).
1x 5v Arduino pro mini (or equivalent )
1x DHT22
1x 5v relay Or SSR G3MB-202P Solid State
1x 2 lines I2C 1602 LCD (i2c ,not serial) or 4 lines if you what more info on screen like time left and time spent clock.
2x monetary switch
2x 10k resistors
2x 18w halogen light bulbs
2x G9 Ceramic Sockets
1x AC 220V 2000W SCR Voltage Regulator (overkill for 36W i know, but it cost 1.50€ on ebay)Optional parts
1x 3.3v pro mini (or equivalent)
1x computer speaker(buzzer)
1x DS18b20
1x NRF24L01
1x 4.7K Resistor
1x 3.7v litio battery (cellphone or 18650 cell)
1x Battery Protection Board(just for charge battery before start hatching)
note: this battery just hold main arduino in case of power failure. During normal work it never charge or discharge due 5v on line from LM2526FRITZING PROJECT:
0_1504458462680_eggencubator v2.fzz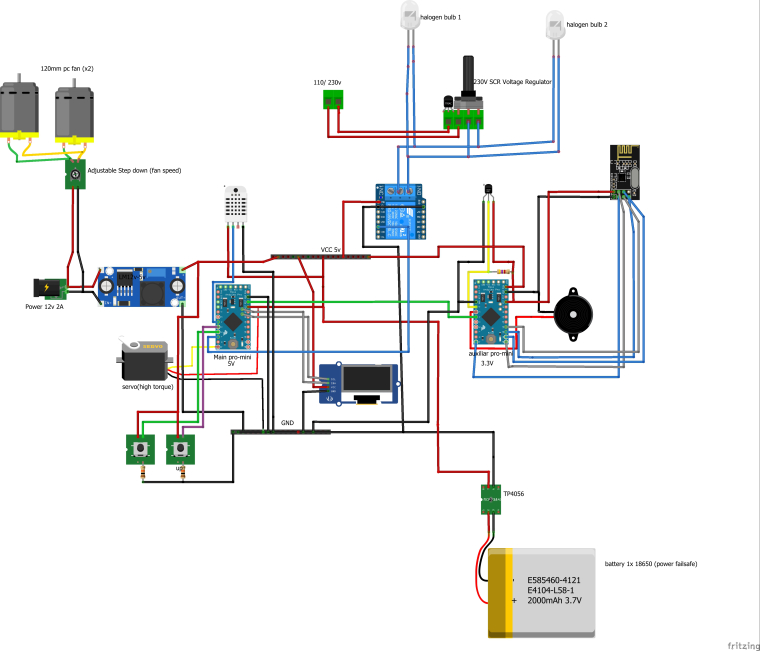
CODE:
// Servo version of
// Incubator code with lcd 16x2 ####--->>  I2C (4 wires) <<---  ###
// ---------------------------------------------
#include <Wire.h>
#include <LiquidCrystal_I2C.h>

#include "DHT.h"
#include <Servo.h>
#define DHTPIN 4                              // Define the temp sensor data pin
#define DHTTYPE DHT22                         // define the temp/hum sensor type
#define RELAY_1  7                              // define the relay 1 and 2 control pin
#define RELAY_2  8


Servo myservo;                                // create servo object to control a servo
DHT dht(DHTPIN, DHTTYPE);                     //initialize the temp sensor

LiquidCrystal_I2C lcd(0x3F,2,1,0,4,5,6,7,3, POSITIVE);    //set up what port the LCD will use

int pos = 0;                                  // variable to store the servo position
int istate = 0;

const int  buttonPin1 = 5;    // the pin that the Up pushbutton is attached to
const int  buttonPin2 = 6;    // the pin that the Down pushbutton is attached to
int buttonState1 = 0;
int buttonState2 = 0;
float val = 0; //val to increment/decrement (buttons/ threshold)

int is, im, ih, id, ida, iha, ima;                      // variables for time
float time, s1, m1, h1, d1;                   //  Set up variables to calculate time
int ic, ip, ik;
byte thermo[8] = {B00100, B01010, B01010, B01110, B01110, B11111, B11111, B01110}; //thermometer icon
byte drop[8] = {B00100, B00100, B01010, B01010, B10001, B10001, B10001, B01110}; //drop icon
byte arrow[8] = { B00100,  B01010,  B10101,  B00100, B10101,  B01010,  B00100,}; // smile icon
byte tim[8] = {B00000, B01110, B10101, B10101, B10011, B10001, B01110,}; // clock icon

int END = 0;
unsigned long previousMillis = 0;
const long interval = 3600000UL; //timer for roll eggs 1HOUR

void setup()
{
 Serial.begin(9600);

  pinMode(buttonPin1, INPUT);
  pinMode(buttonPin2, INPUT);
  dht.begin();                                //start the temp sensor
  pinMode(RELAY_1, OUTPUT);
  pinMode(RELAY_2, OUTPUT);

  lcd.begin (16,2);                          // columns, rows.  use 16,2 for a 16x2 LCD, etc.
  lcd.clear();                                // start with a blank screen
  lcd.setCursor(0, 0);                        // set cursor to column 0, row 0 (the first row)
  lcd.print("Incubatora 1.0");                 // opening line
  lcd.setCursor(0, 1);                        // set cursor to column 0, row 1
  lcd.print("A iniciar!");
  delay(2000);

  lcd.createChar(0, thermo);
  lcd.createChar(1, drop);
  lcd.createChar(2, arrow);
  lcd.createChar(3, tim);
  myservo.attach(9); // servo control is set to pin 9 (usually yellow wire is control, black goes to ground red goes to +5V)
  myservo.write(70); //put the servo at intitial position of 16 degrees
  myservo.detach();
}

//loop to read the sensor and display
void loop() {

  int buttonState1 = digitalRead(buttonPin1);
  int buttonState2 = digitalRead(buttonPin2);
  delay(10);

if (buttonState1 == HIGH)
     {
     val-=0.1;
    }
   else if (buttonState2 == HIGH)
   {
    val+=0.1;
   }


  float h = dht.readHumidity();                 // Read the humidity
  float t = dht.readTemperature();              // Read temperature in celsius
  float f = dht.readTemperature(true);          // get the temperature in Fahreheit

   //Temperature controller
    if (t >= (37.7 + val))
    {                       //  Set the temperature for the relay to come on (ideal 37.7ºC)
      digitalWrite(RELAY_1,LOW);          // TO HOT: Turns Relay OFF
    digitalWrite(RELAY_2,LOW);
    }

     if (t <= (37.5 + val))
   {                       //  Set the temperature for the relay to come on (ideal 37.7ºC)
      digitalWrite(RELAY_1,HIGH);          // TO HOT: Turns Relay ON
    digitalWrite(RELAY_2,HIGH);
    }


  // uncomment to compute heat index in Fahrenheit (the default)
  //float hif = dht.computeHeatIndex(f, h);
  // Compute heat index in Celsius (isFahreheit = false)
  //float hic = dht.computeHeatIndex(t, h, false);
  time = millis();                            //  Get time in milliseconds since tunit turn on
  s1 = time / 1000;                           //  Convert time to seconds, minutes, hours, days
  m1 = s1 / 60;
  h1 = m1 / 60;
  d1 = h1 / 24;
  id = int(d1);  //d                             //  Strip out remainder to leave Days:Hours:Minutes:Seconds
  ih = int((d1 - int(d1)) * 24); //h
  im = int((h1 - int(h1)) * 60); //m
  is = int((m1 - int(m1)) * 60);  //s


  // Calculate approximate TIME till hatch (assume 21 days to hatch)   -      not used yet
  ida = 21 - id;
  iha = 24 - ih;
  ima = 60 - im;


  if (isnan(h) || isnan(t) || isnan(f)) {
    // if sensor can't be read
    lcd.clear();
    lcd.setCursor(0, 0);
    lcd.print("Falha No Sensor");
    Serial.print("Falha No Sensor" );
     digitalWrite(RELAY_1,HIGH);          // ERRO: Turns 1 Relay OFF to not kill all the eggs
    digitalWrite(RELAY_2,LOW);
    delay(5000);
    return;
  }
  else {      //  for  LCD 16x2
    //sensor was read succesfully so print values to LCD 16x2
    lcd.clear();                                // Clear the LCD
    //Print temperature and humidity in first two lines
    lcd.setCursor(0, 0);
    // lcd.print("Temperature:");

    lcd.write(byte(0));                       // Write the Thermometer icon
     lcd.print(t , 1);
    lcd.print((char)223);
    lcd.print("C  ");

    //lcd.setCursor(0,1);
    lcd.write(byte(1));                         // Write the drop icon
    // lcd.print("Humidade:");
     lcd.print(h, 0);
     lcd.print("%");
  //   lcd.print(" ");
  //  lcd.print(ic);
    lcd.setCursor(0, 1);

    //lcd.print("  ");
    lcd.write(byte(3));
    lcd.print(" ");
    // Print timein format Time: xxd:xxh:xxm:xxs
  lcd.print(id);
    lcd.print("d ");
   /* lcd.print(ih);
    lcd.print(":");
    lcd.print(im);
    lcd.print(" ");
    lcd.print(is); lcd.print(" ");*/
    lcd.print(val,1);


  if (21 - id <= 3){
       // Print days left till hatch
       lcd.print("!");
     END = 1; //stop move eggs
   }

   // this section is to roll the eggs
unsigned long currentMillis = millis();

 int tleft = ((currentMillis - previousMillis)/ 1000) /60;
lcd.print(" ");  lcd.write(byte(2));
 lcd.print(tleft);


if (currentMillis - previousMillis >= interval)
{
  previousMillis = currentMillis;

if(istate == 0 && END == 0){
  //myservo.attach(9);
   for (pos = 80; pos <= 155; pos += 1) { // goes from 16 degrees to 80 degrees  in steps of 1 degree
     myservo.attach(9);
     myservo.write(pos);
     istate=1;
     delay(50);
   }
   myservo.detach();
 }
else if( istate == 1 && END == 0)
{
 // myservo.attach(9);
   for (pos = 155 ; pos >=80; pos -= 1) { // goes from 80 degrees to 0 degrees
    myservo.attach(9);
     myservo.write(pos);
     istate = 0;
     delay(50);                      // slow the servo down a bit to turn the eggs
   }
   myservo.detach();
 }

}

       // Pause for 2 seconds
   delay(2000);
  }
}
auxiliary/optional arduino
#define MY_DEBUG


// ---------------------------------------------
#define MY_RADIO_NRF24


#include <SPI.h>
#include <MySensors.h>
#include <OneWire.h>
#include <DallasTemperature.h>


#define MY_RF24_PA_LEVEL RF24_PA_LOW

// Data wire is plugged into pin 2 on the Arduino
#define ONE_WIRE_BUS 2
 #define CHILD_ID_EGG 12 //id
// Setup a oneWire instance to communicate with any OneWire devices
// (not just Maxim/Dallas temperature ICs)
OneWire oneWire(ONE_WIRE_BUS);

// Pass our oneWire reference to Dallas Temperature.
DallasTemperature sensors(&oneWire);
const int buzzer = 3; //buzzer to arduino pin 3
unsigned int al = 0;

bool receivedConfig = false;
bool metric = true;
MyMessage msg(CHILD_ID_EGG,V_TEMP);


unsigned long previousMillis = 0;        // will store last time sent temperature
const long interval =900000; //15min

void before()
{
  // Startup up the OneWire library
  sensors.begin();
}

void setup()
{

      sensors.begin();
       pinMode(buzzer, OUTPUT); // Set buzzer - pin 9 as an output
}


void presentation() {
  // Send the sketch version information to the gateway and Controller
  sendSketchInfo("Temperature eggs", "2.0");


  // Present all sensors to controller
       present(CHILD_ID_EGG, S_TEMP);
  }


void loop() {

  sensors.requestTemperatures(); // Send the command to get temperatures


  //Serial.print("Temperature is: ");

    float t =sensors.getTempCByIndex(0);

//Serial.print(t);
//-----------------------------timer & send-------------------------------------
 unsigned long currentMillis = millis();

  if (currentMillis - previousMillis >= interval) {

        previousMillis = currentMillis;

// Send in the new temperature every 5min send(msg.setSensor(t).set(t,1));
send(msg.set(t,1));  Serial.print(t);
  }
//---------------------------------------------------------------------------------------

//alarm buzzer-------
 if (t >=37.0) {    //(37ºc)
  al=1;                 //save 1 when 1st temperature estabilize. after that "al" will be always 1 until reset/shutdows . This makes the alarm not start when incubator still cold on warm up
   }

   //Temperature controller alarm
    if (t >= 39.0) {
      for (unsigned int i=750; i<2500; i++) {  // TO HOT: alarm!
      tone(buzzer, i ,700);
        delayMicroseconds (15);
      }
delay(2000);
    }


  if (t <= 30.0 && al == 1) {

      for (unsigned int i=750; i<2500; i++) {  // TO HOT: alarm!
      tone(buzzer, i ,700);
        delayMicroseconds (15);
      }
delay(2000);
    }


  }
NOTE: English it's not my language. i'm sorry some errors that can happens :P
-
Do you think you've seen all kinds of projects here? So ..think again. :)
There it is my chicken eggs encubator .
Made from a 25 liters plastic storage box and some foam outside to prevent heat loss.
i used 2 X 18w halogen g9 bulbs and a 230v dimmer to decrease light brightness.There is a diagram above from fritzing. I uses an main arduino that controls a SSR relay for controls halogen light bulbs. this light bulbs are dimmed to half(in my case)
for hold temperature much time as possible without decrease temperature.That makes SSR stay on for some minutes before goes off again. if halogen light are to powerfull makes the SSR goes on and off many times in short period. the ideal situation is having the dimmer controlled by arduino and hold temperature without turn ligh off ,but i didn't got this dimmer yet(is there any one ready for try it? :P ).this is the 3rd version i build and all the other version hatch almost all eggs(+/-80%) even with some issues on controlling temperature.i only had 1 fan and that caused some zones that overheated (more on coners).
Now i have 2x120mm(0.10A) pc fans that can spread hot air the same way in all this box.Then i have a secondary arduino that it's for safe features. it controls an alarm buzzer(pc speaker) ,its connected to an temperature sensor (ds18b20) and send temperature to emoncms.com through an nrf24 wireless board
If temperatures goes over 39ºC or below 30ºC it sound an noisy alarm.Just in case main arduino or DHT22 fail.Egg roller its made os aluminium and plastic egg racks cutted and glued with hot glue(screws were better but this is enought to hold eggs).it makes 45º each side.
An High torque servo roll every 60 minutes. Note that an regular servo does not have enough torque should be an high toque version.
eggs ready to start hatching! note the ds18b20 sensor in the back of the DHT22 sensor.they will stay same height than egg rack.

2x18w halogen lighs
lcd screen is configured for simplicity . code have hours and days passed and remaining ,but i decide use just passed days, temperature manual offset and time for next egg roll(minutes),and of course temperature and humidity on first line.


its a mess of cables ...i know. It's what happening when we always improve our project until it be a final version :P
I used usb cables from computer cases for wire sensors, it work really well .
There's 2 solid state relays on picture but we only need one.Parts:
2x 12v 120mm pc fan(0.10A -slow speed/low noise)
1x LM2596
1x High torque servo or step motor(need additional controller).
1x 5v Arduino pro mini (or equivalent )
1x DHT22
1x 5v relay Or SSR G3MB-202P Solid State
1x 2 lines I2C 1602 LCD (i2c ,not serial) or 4 lines if you what more info on screen like time left and time spent clock.
2x monetary switch
2x 10k resistors
2x 18w halogen light bulbs
2x G9 Ceramic Sockets
1x AC 220V 2000W SCR Voltage Regulator (overkill for 36W i know, but it cost 1.50€ on ebay)Optional parts
1x 3.3v pro mini (or equivalent)
1x computer speaker(buzzer)
1x DS18b20
1x NRF24L01
1x 4.7K Resistor
1x 3.7v litio battery (cellphone or 18650 cell)
1x Battery Protection Board(just for charge battery before start hatching)
note: this battery just hold main arduino in case of power failure. During normal work it never charge or discharge due 5v on line from LM2526FRITZING PROJECT:
0_1504458462680_eggencubator v2.fzz
CODE:
// Servo version of
// Incubator code with lcd 16x2 ####--->>  I2C (4 wires) <<---  ###
// ---------------------------------------------
#include <Wire.h>
#include <LiquidCrystal_I2C.h>

#include "DHT.h"
#include <Servo.h>
#define DHTPIN 4                              // Define the temp sensor data pin
#define DHTTYPE DHT22                         // define the temp/hum sensor type
#define RELAY_1  7                              // define the relay 1 and 2 control pin
#define RELAY_2  8


Servo myservo;                                // create servo object to control a servo
DHT dht(DHTPIN, DHTTYPE);                     //initialize the temp sensor

LiquidCrystal_I2C lcd(0x3F,2,1,0,4,5,6,7,3, POSITIVE);    //set up what port the LCD will use

int pos = 0;                                  // variable to store the servo position
int istate = 0;

const int  buttonPin1 = 5;    // the pin that the Up pushbutton is attached to
const int  buttonPin2 = 6;    // the pin that the Down pushbutton is attached to
int buttonState1 = 0;
int buttonState2 = 0;
float val = 0; //val to increment/decrement (buttons/ threshold)

int is, im, ih, id, ida, iha, ima;                      // variables for time
float time, s1, m1, h1, d1;                   //  Set up variables to calculate time
int ic, ip, ik;
byte thermo[8] = {B00100, B01010, B01010, B01110, B01110, B11111, B11111, B01110}; //thermometer icon
byte drop[8] = {B00100, B00100, B01010, B01010, B10001, B10001, B10001, B01110}; //drop icon
byte arrow[8] = { B00100,  B01010,  B10101,  B00100, B10101,  B01010,  B00100,}; // smile icon
byte tim[8] = {B00000, B01110, B10101, B10101, B10011, B10001, B01110,}; // clock icon

int END = 0;
unsigned long previousMillis = 0;
const long interval = 3600000UL; //timer for roll eggs 1HOUR

void setup()
{
 Serial.begin(9600);

  pinMode(buttonPin1, INPUT);
  pinMode(buttonPin2, INPUT);
  dht.begin();                                //start the temp sensor
  pinMode(RELAY_1, OUTPUT);
  pinMode(RELAY_2, OUTPUT);

  lcd.begin (16,2);                          // columns, rows.  use 16,2 for a 16x2 LCD, etc.
  lcd.clear();                                // start with a blank screen
  lcd.setCursor(0, 0);                        // set cursor to column 0, row 0 (the first row)
  lcd.print("Incubatora 1.0");                 // opening line
  lcd.setCursor(0, 1);                        // set cursor to column 0, row 1
  lcd.print("A iniciar!");
  delay(2000);

  lcd.createChar(0, thermo);
  lcd.createChar(1, drop);
  lcd.createChar(2, arrow);
  lcd.createChar(3, tim);
  myservo.attach(9); // servo control is set to pin 9 (usually yellow wire is control, black goes to ground red goes to +5V)
  myservo.write(70); //put the servo at intitial position of 16 degrees
  myservo.detach();
}

//loop to read the sensor and display
void loop() {

  int buttonState1 = digitalRead(buttonPin1);
  int buttonState2 = digitalRead(buttonPin2);
  delay(10);

if (buttonState1 == HIGH)
     {
     val-=0.1;
    }
   else if (buttonState2 == HIGH)
   {
    val+=0.1;
   }


  float h = dht.readHumidity();                 // Read the humidity
  float t = dht.readTemperature();              // Read temperature in celsius
  float f = dht.readTemperature(true);          // get the temperature in Fahreheit

   //Temperature controller
    if (t >= (37.7 + val))
    {                       //  Set the temperature for the relay to come on (ideal 37.7ºC)
      digitalWrite(RELAY_1,LOW);          // TO HOT: Turns Relay OFF
    digitalWrite(RELAY_2,LOW);
    }

     if (t <= (37.5 + val))
   {                       //  Set the temperature for the relay to come on (ideal 37.7ºC)
      digitalWrite(RELAY_1,HIGH);          // TO HOT: Turns Relay ON
    digitalWrite(RELAY_2,HIGH);
    }


  // uncomment to compute heat index in Fahrenheit (the default)
  //float hif = dht.computeHeatIndex(f, h);
  // Compute heat index in Celsius (isFahreheit = false)
  //float hic = dht.computeHeatIndex(t, h, false);
  time = millis();                            //  Get time in milliseconds since tunit turn on
  s1 = time / 1000;                           //  Convert time to seconds, minutes, hours, days
  m1 = s1 / 60;
  h1 = m1 / 60;
  d1 = h1 / 24;
  id = int(d1);  //d                             //  Strip out remainder to leave Days:Hours:Minutes:Seconds
  ih = int((d1 - int(d1)) * 24); //h
  im = int((h1 - int(h1)) * 60); //m
  is = int((m1 - int(m1)) * 60);  //s


  // Calculate approximate TIME till hatch (assume 21 days to hatch)   -      not used yet
  ida = 21 - id;
  iha = 24 - ih;
  ima = 60 - im;


  if (isnan(h) || isnan(t) || isnan(f)) {
    // if sensor can't be read
    lcd.clear();
    lcd.setCursor(0, 0);
    lcd.print("Falha No Sensor");
    Serial.print("Falha No Sensor" );
     digitalWrite(RELAY_1,HIGH);          // ERRO: Turns 1 Relay OFF to not kill all the eggs
    digitalWrite(RELAY_2,LOW);
    delay(5000);
    return;
  }
  else {      //  for  LCD 16x2
    //sensor was read succesfully so print values to LCD 16x2
    lcd.clear();                                // Clear the LCD
    //Print temperature and humidity in first two lines
    lcd.setCursor(0, 0);
    // lcd.print("Temperature:");

    lcd.write(byte(0));                       // Write the Thermometer icon
     lcd.print(t , 1);
    lcd.print((char)223);
    lcd.print("C  ");

    //lcd.setCursor(0,1);
    lcd.write(byte(1));                         // Write the drop icon
    // lcd.print("Humidade:");
     lcd.print(h, 0);
     lcd.print("%");
  //   lcd.print(" ");
  //  lcd.print(ic);
    lcd.setCursor(0, 1);

    //lcd.print("  ");
    lcd.write(byte(3));
    lcd.print(" ");
    // Print timein format Time: xxd:xxh:xxm:xxs
  lcd.print(id);
    lcd.print("d ");
   /* lcd.print(ih);
    lcd.print(":");
    lcd.print(im);
    lcd.print(" ");
    lcd.print(is); lcd.print(" ");*/
    lcd.print(val,1);


  if (21 - id <= 3){
       // Print days left till hatch
       lcd.print("!");
     END = 1; //stop move eggs
   }

   // this section is to roll the eggs
unsigned long currentMillis = millis();

 int tleft = ((currentMillis - previousMillis)/ 1000) /60;
lcd.print(" ");  lcd.write(byte(2));
 lcd.print(tleft);


if (currentMillis - previousMillis >= interval)
{
  previousMillis = currentMillis;

if(istate == 0 && END == 0){
  //myservo.attach(9);
   for (pos = 80; pos <= 155; pos += 1) { // goes from 16 degrees to 80 degrees  in steps of 1 degree
     myservo.attach(9);
     myservo.write(pos);
     istate=1;
     delay(50);
   }
   myservo.detach();
 }
else if( istate == 1 && END == 0)
{
 // myservo.attach(9);
   for (pos = 155 ; pos >=80; pos -= 1) { // goes from 80 degrees to 0 degrees
    myservo.attach(9);
     myservo.write(pos);
     istate = 0;
     delay(50);                      // slow the servo down a bit to turn the eggs
   }
   myservo.detach();
 }

}

       // Pause for 2 seconds
   delay(2000);
  }
}
auxiliary/optional arduino
#define MY_DEBUG


// ---------------------------------------------
#define MY_RADIO_NRF24


#include <SPI.h>
#include <MySensors.h>
#include <OneWire.h>
#include <DallasTemperature.h>


#define MY_RF24_PA_LEVEL RF24_PA_LOW

// Data wire is plugged into pin 2 on the Arduino
#define ONE_WIRE_BUS 2
 #define CHILD_ID_EGG 12 //id
// Setup a oneWire instance to communicate with any OneWire devices
// (not just Maxim/Dallas temperature ICs)
OneWire oneWire(ONE_WIRE_BUS);

// Pass our oneWire reference to Dallas Temperature.
DallasTemperature sensors(&oneWire);
const int buzzer = 3; //buzzer to arduino pin 3
unsigned int al = 0;

bool receivedConfig = false;
bool metric = true;
MyMessage msg(CHILD_ID_EGG,V_TEMP);


unsigned long previousMillis = 0;        // will store last time sent temperature
const long interval =900000; //15min

void before()
{
  // Startup up the OneWire library
  sensors.begin();
}

void setup()
{

      sensors.begin();
       pinMode(buzzer, OUTPUT); // Set buzzer - pin 9 as an output
}


void presentation() {
  // Send the sketch version information to the gateway and Controller
  sendSketchInfo("Temperature eggs", "2.0");


  // Present all sensors to controller
       present(CHILD_ID_EGG, S_TEMP);
  }


void loop() {

  sensors.requestTemperatures(); // Send the command to get temperatures


  //Serial.print("Temperature is: ");

    float t =sensors.getTempCByIndex(0);

//Serial.print(t);
//-----------------------------timer & send-------------------------------------
 unsigned long currentMillis = millis();

  if (currentMillis - previousMillis >= interval) {

        previousMillis = currentMillis;

// Send in the new temperature every 5min send(msg.setSensor(t).set(t,1));
send(msg.set(t,1));  Serial.print(t);
  }
//---------------------------------------------------------------------------------------

//alarm buzzer-------
 if (t >=37.0) {    //(37ºc)
  al=1;                 //save 1 when 1st temperature estabilize. after that "al" will be always 1 until reset/shutdows . This makes the alarm not start when incubator still cold on warm up
   }

   //Temperature controller alarm
    if (t >= 39.0) {
      for (unsigned int i=750; i<2500; i++) {  // TO HOT: alarm!
      tone(buzzer, i ,700);
        delayMicroseconds (15);
      }
delay(2000);
    }


  if (t <= 30.0 && al == 1) {

      for (unsigned int i=750; i<2500; i++) {  // TO HOT: alarm!
      tone(buzzer, i ,700);
        delayMicroseconds (15);
      }
delay(2000);
    }


  }
NOTE: English it's not my language. i'm sorry some errors that can happens :P
-
@Tmaster Nice project. Out of curiosity, what is the reason for using two pro minis? Couldn't this be done with one?
@dbemowsk ofcourse it can. ..but what happens if DHT22 gone crazy or the main arduino freeze with relay on? Secondary arduino will turn alarm on.
I forgot mention that i'm using mysensors library only on secundary arduino. for communicate with VERA lite and then send info to emoncms.com(for logs)
-
@dbemowsk ofcourse it can. ..but what happens if DHT22 gone crazy or the main arduino freeze with relay on? Secondary arduino will turn alarm on.
I forgot mention that i'm using mysensors library only on secundary arduino. for communicate with VERA lite and then send info to emoncms.com(for logs)
@Tmaster I have not built one for any of my projects yet, but what about a hardware watchdog timer like this one that uses a 555 timer. The arduino supposedly has a software watchdog timer, but what if it freezes to the point of that not even working.
The basic concept is that you have the arduino send out a pulse at a regular inteval to the 555 timer to reset. If the arduino doesn't respond in a timely manner, the watchdog will send a signal to the reset line of the arduino causing a hard reboot to bring it back to life.
As I mentioned, I have not tried this approach yet, but hope to in the near future.
-
And that is the result . 14 chicks of 25eggs ,but i could say that was 100% sucess because the other eggs were not fertilized. not even a single dead before or after hatch. Its not the arduino the most versatile machine? :)
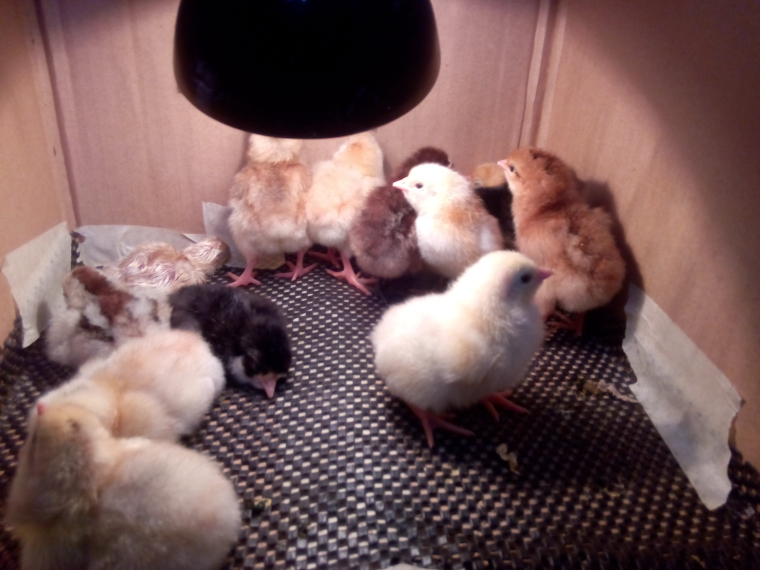
top left chic just born 10min before i take the picture:P
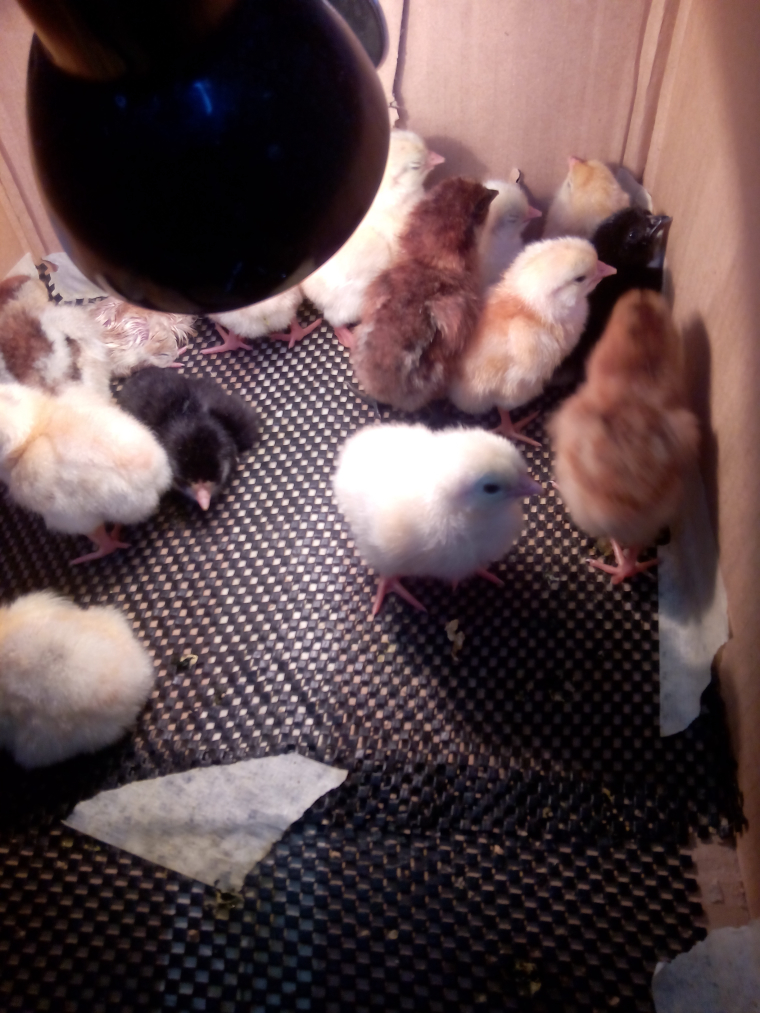
-
Hello my friends your project is very good file fritzing the format is (bin) I can not open can you send me the right format my e-mail is rahokos@yahoo.com thank you
-
Wow superb!
-
Hello my friends your project is very good file fritzing the format is (bin) I can not open can you send me the right format my e-mail is rahokos@yahoo.com thank you

