Skip to content
  • MySensors
  • OpenHardware.io
  • Categories
  • Recent
  • Tags
  • Popular
Skins
  • Light
  • Brite
  • Cerulean
  • Cosmo
  • Flatly
  • Journal
  • Litera
  • Lumen
  • Lux
  • Materia
  • Minty
  • Morph
  • Pulse
  • Sandstone
  • Simplex
  • Sketchy
  • Spacelab
  • United
  • Yeti
  • Zephyr
  • Dark
  • Cyborg
  • Darkly
  • Quartz
  • Slate
  • Solar
  • Superhero
  • Vapor

  • Default (No Skin)
  • No Skin
Collapse
Brand Logo
alowhumA

alowhum

@alowhum
Plugin Developer
About
Posts
851
Topics
88
Shares
0
Groups
1
Followers
1
Following
0

Posts

Recent Best Controversial

  • GUIDE - NRF5 / NRF51 / NRF52 for beginners
    alowhumA alowhum

    So you're curious about the NRF5 series boards huh? Let's dive in!

    // updates can be found below.

    WHAT IS THE NRF5
    It's a tiny Arm processor based board that can work like an Arduino. There are a few flavours.
    NRF51 $3
    NRF52 $3
    NRF52840 $20 (new, has built in usb support)

    Advantages:

    • Arduino with built in NRF24 for just $3.
    • The size of a postage stamp.
    • Powerful enough to use the simple encryption functionality easily.
    • Antenna socket: just plug in antenna for more range.
    • Ultra low power use.
    • You get to decide which pins do what. For example, you can decide through software which pins should be hardware serial pins. There's a small pin router built in.
    • Built in support for NFC (swiping smart cards and tags).

    Neutral:

    • Has 3.3v internal logic. Most new sensors use 3.3v for logic too.

    Negative:

    • Relatively new, so there might still be some bugs in MySensors.
    • The pins cannot handle as much current (5ma) as the Arduino's could (40ma).
    • Smaller pin spacing (1.27mm instead of 2.54mm), so harder to solder. Fewer expansion boards available.
    • Unlike the Arduino Nano, the programmer doesn't also function as a serial monitor. To get serial output you have to set some pins as the serial output, and then connect to those pins with a separate usb serial port adapter. It's a bit like the Arduino Pro Mini in that sense.
    • The EByte module has no onboard LED, which makes it difficult to know it's on, or to test things with a simple blink sketch.

    INSTALLATION
    Open the Arduino software and install these two boards in the Arduino IDE:
    https://github.com/sandeepmistry/arduino-nRF5
    https://github.com/mysensors/ArduinoBoards
    (click on the links to get installation instructions).

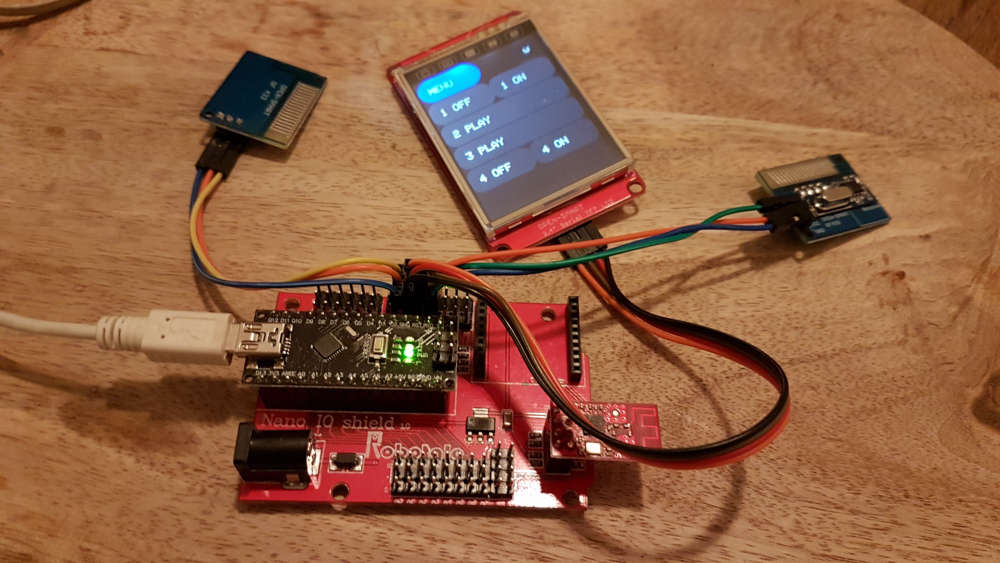
    Carefully soldered some wires to your board, and connected it a programming tool. The cheapest simplest option is to get an ST-Link v2 ($3).
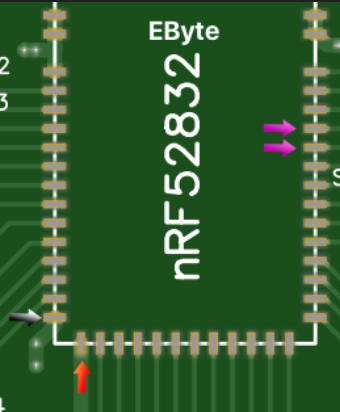
    Connect:
    gnd ->gnd (in the corner)
    3.3v -> vcc (in the same corner)
    SWDIO -> SWDIO
    SWDCLK -> SWDCLK

    alt text

    Software
    In the Arduino IDE open an example (file -> examples -> myboardNRF5 -> myboardNRF5). You will now have three files:

    • Main file <- your main code goes here.
    • MyBoardNRF5.h <- here you can set which goodies you want, on which pins.
    • MyBoardNRF5.cpp <- probably no reason to change anything here.

    In the main file make sure it has these lines:
    #define MY_RADIO_NRF5_ESB
    #include <MySensors.h>

    Upload settings
    In the Arduino IDe click on the tools dropdown and start set things up like this:

    • Board: "MyBoardNRF5 NRF52832"
    • Reset: "don't enable"
    • Bootloader/SD: "none"
    • Low frequency clock: "Crystal Oscilator" (RC Oscillator might work too).
    • Port: none
    • Programmer: ST-Link V2

    First the chip you are using must be 'wiped'. This removes the bluetooth functionality. Wipe the chip by clicking "tools -> burn bootloader". You'll get an error but that's normal.

    Next, when your sketch is complete, choose "sketch -> upload via programmer".

    POWER HUNGRY SENSORS
    If you were using an Arduino Nano before, then you might have powered your sensors directly from the Arduino's 5v pin. With these boards you can't run the power through the NRF5 board first. Make the 5V go 'around it'. Only use these boards to collect and send signals. To get a steady power supply, depending on how much you need, you could try:

    • An AMS1117 regulator. It can generate a max of 800ma at 3.3v. Here's a small version.
    • Special power supply boards such as this one.

    TROUBLESHOOTING

    • Timed out while waiting for target halted: are your pins connected ok?
    • Unable to reset target: are your pins connected ok?

    ADVANCED KNOWLEDGE

    • Some things, like turning on a pin when you press a button, can be handled by (programmed into) the 'periphery' of the chip. Not having to wake up the main chip saves some power. An example of this can be found here.

    POPULAR BOARDS

    Ebyte N73 - Manual

    • Cheap: $3
    • Is missing some parts that allows for super low power usage. Those can be added manually though.
    • Forum users have created some nice pre-made prototyping boards, like this small one or this big one.
    • Uses 91 milli amps max (while transmitting).

    Fanstel BT832X

    • Can't find the price
    • Better range than the EByte
    • Has the required 'DCDC' parts built in, allowing for super low battery usage.
    • Uses 250ma max

    Holyiot TinyBLE

    • About $5
    • Tiny! This also means it has less ports.

    UPDATE

    The easiest way to get started with NRF5 might actually be the BCC Microbit.

    Development

  • Candle - the privacy friendly smart home
    alowhumA alowhum

    At the upcoming Dutch Design Week from 19 till the 26th of October me and my team will be launching a project called "Candle". It's a privacy friendly smart home demonstrator that is built on, amongst other things, MySensors.

    Candle's goal is to accelerate the development of more privacy friendly smart devices by showing examples of what this future could look like. It proves you don't have to choose between privacy and easy of use. With good privacy design you can have both.

    We have asked artists and designers to create prototypes based on the code and electronics I developed. For example, juweler Dinie Besems created devices with a luxury appeal.

    CO2 sensor by Dinie Besems
    CO2 sensor

    Fine dust sensor by Dinie Besems
    Fine dust sensor

    More on her creations here.

    Engineer Paola Rodrigues also created two devices. This is her version of the Signal hub:

    Signal hub by Paola Rodrigues
    The signal hub can copy and/or learn to recognise 433Mhz devices

    And her version of the temperature, humidity and barometer device (using the BME280):
    Weather station by Paola Rodrigues
    Paola added extra LED's to make the sensor levels readable from far away.

    At the moment designer Jesse Howard, an expert on Open Design, is finishing work on his creations.

    NARRATIVES

    Using MySensors allowed us to really push a number of narratives that are juxtaposed to current IoT design practices:

    • Smart devices often use wifi to connect to the home network and the internet. To us, both of these things were unacceptable. If devices can access the internet themseles, who knows what they are sending. If they can connect to the home network, they form an attractive entrypoint for hackers looking to access other devices on the home network. MySensors, Zigbee/Z-wave and even Bluetooth were more acceptable to us, since since they form their own local network which can be kept separate.
    • Smart devices are often overpowered. Big arm chips, together with the wifi connection, make them an attractive target for hackers, who can use them as beach heads for further invasion of the home network. Candle uses 'minimal viable hardware', in this case the RF Nano. This decreases the attack surface.
    • The power of open source allows users to inspect the code, and thus gain/rebuild trust. In some cases the hardware reflects this call for transparency by being literally transparent. No hidden microphones here.
    • The power of open source allows users to learn more about their technology, and even modify it. It's empowering.

    EDUCATION AND DIY

    A secondary goal was to allow users to relatively easily create the devices themselves. Besides creating the MySensors add-on for the Mozilla WebThings Gatway we also created the Candle Manager add-on. This makes it easy to upload MySensors code to an Arduino. Just connect it through USB to the central controller, and follow the steps in an easy to use interface. Arduino code is then compiled and uploaded to the board, thanks to the new Arduino CLI.

    Candle Manager
    The Candle manager

    To aid in education, all Candle devices can be made without needing to solder. Dupont wires are all you need.

    INNOVATIONS

    MySensors allowed us to quickly prototype and test new privacy enhancing designs and ideas. Some examples are:

    • All Jesse's devices can be disconnected from the MySensors network with a physical hardware switch. While the devices gain functionality when networked together, all of them will also work fine as stand alone devices. For example, all sensors have their own screens to display their current values. Ideally, all smart devices should have a switch with three settings: (1) do not talk (2) data may be shared within the local (MySensors) network (3) Data may shared locally and with the internet.
    • The CO2 sensor has the option to generate 'fake data' by toggling a hardware switch. If you turn this on, it will generate more data that is similar to the last few real measurements. Why it is important to have this feature is explained in depth on the website.

    SOURCE CODE
    Most of the source code can already be found on Github, including the MySensors sketches. More of the code being will be uploaded as the launch exhibit draws closer.

    THANKS

    This project has been made possible with support from the Creative Industries Fund NL. The creation of the machine learning aspects of the project were supported by the SHERPA project, which is a Horizon 2020 research project by the European Union.

    I want to give a special thanks to @Anticimex for creating the user friendly security options. Thank you!

    LOOKING FOR MAKERS

    I am still looking for volunteers that would like to create one or more of the Candle devices and have their creation exhibited alongside the other works. We will pay for your hardware and materials costs. If you're interested, send me a message.

    If you're in the Netherlands at the end of October, please come and say hi at the exhibit.

    My Project

  • Candle won a Dutch National Privacy Award
    alowhumA alowhum

    I'm proud to say that Candle, the privacy friendly smart home project that's based on MySensors, has won a Dutch National Privacy Award.

    I just wanted to say it literally wasn't possible without all your help, patience, and of course the large amount of open source code that Candle could build upon.

    Thanks everyone!

    privacy_award_mini_exhibit.jpg

    Mozilla WebThings Gateway

  • Candle - signal Hub - A universal 433Mhz signal detector and cloner
    alowhumA alowhum

    It took three weeks to build, but here it is: a device that will easily connect almost any 433Mhz device to your smart home.

    The 433 Hub can do two things:

    • You can teach it a signal, and from then on it will be able to detect it.
    • You can teach it a signal, and from then on it will be able to replay it.

    Both of these features come in 'single signal' and 'on+off" versions. So for example:

    • You could copy the ON and OFF button from a remote for your 433Mhz sockets, and from then on switch the socket from your smart home controller.
    • You could teach it to detect window sensors that have both on and off states.
    • You could teach it to detect the alarm signal from a wireless smoke detector.

    For each signal that you teach it to recognise, a door sensor will be presented to your controller.
    For each signal that you teach it to replay, an on/off switch will be presented to your controller.

    Signals take between 8 and 28 bytes to store, depending on complexity and if they are simple or on+off signals. This means an Arduino Nano can store between 20 and 60 signals in just half of it's eeprom (512 bytes).

    HARDWARE

    • Arduino

    • 433Mhz receiver & transmitter

    • Touch screen (optional, recommended)
      or

    • OLED screen (optional)

    • Keypad (optional)

    Here's the version that uses a touch screen.
    0_1551117671838_20190218_220842_resized.jpg
    0_1551117742127_20190218_220924_resized.jpg

    Here's a version that uses a keypad.
    0_1547905513000_433hub-lowres.jpg
    With a 12 button keypad you can easily replay 10 signals. The last two buttons are used to navigate and make selections in the menu system.

    You can also trigger the learning sequences from 4 virtual buttons that the device creates on your controller (detect simple, detect on+off, replay simple, replay on+off).

    It works best if you use the touch screen. Using the menu you can delete the last recorded signal, or delete all recorded signals.

    It's designed to work with the upcoming Candle privacy friendly smart home, and the Candle Manager. More on that later this year.

    CODE
    https://github.com/createcandle/Devices/blob/master/Signal-hub/Signal-hub.ino

    My Project

  • Mozilla Webthings MySensors add-on / adapter
    alowhumA alowhum

    This is an add-on for the excellent Mozilla WebThings Gateway that will allow MySensors devices to work with it.

    .

    THE MOZILLA WEBTHINGS GATEWAY

    This smart home software, made by the people behind Firefox, focuses on being very user friendly. Here are my MySensors devices in the things overview:

    0_1556012649800_mysensors-things.png

    You can also log data with it:

    0_1556012681000_mysensors-log.png

    .

    INSTALLATION

    Just select the add-on via the gateway interface. You're done!

    .

    Q.
    My things are not showing up?

    When the add-on is installed, you will need to restart your nodes so that they present themselves. Once you've restarted all your nodes, click on the (+) button on the things page to add them to your list of things.

    .

    Q.
    Not all my children have been turned into properties?

    Because of the way that things are currently developed, a new child/property will only be added to the device if a 'set' message for it is received. That's because only then does it become clear with which V_TYPE the S_INFO type is populated.

    For example, let's say you send a presentation message for a button:

    present(RELAY_1, S_BINARY, F("Relay 1"));
    

    This child won't show up as a property until you tell the WebThings Gateway if that button should be in the on of off position. So in your setup function you should also do something like:

    send(relaymsg.set(0));
    

    .

    Q.
    Is type X or Y supported?

    The controller page on this website can give you an indication. You can also check how your preferred sensor type is supported by looking at the actual code at the bottom of this file.

    .

    Q.
    Can I make changes to the code?

    Yes you can, and help is always welcome. The code can be found here:

    https://github.com/createcandle/Webthings-mysensors-adapter

    It's based on the excellent work on pyMySensors by Theo Lind, as well as the example add-on created by Michael Stegeman, who works for Mozilla. Thanks to both!

    If you want to use the code manually, perhaps to co-develop it, here's how:

    • Enable SSH (under settings -> developer) and log into the device as normal.
    • Download the code via Github:
    cd ~/.mozilla-iot/addons/
    git clone https://github.com/createcandle/Webthings-mysensors-adapter.git
    

    Now delete the .tgz file and restart the gateway so it no longer loads the .tgz file.

    sudo systemctl restart mozilla-iot-gateway.service
    

    Now you can run the code manually to test it.

    python3 main.py
    

    You will see a lot of messages scroll by.

    The three most important files are in the pkg folder.

    Mozilla WebThings Gateway

  • Mozilla Webthings MySensors add-on / adapter
    alowhumA alowhum

    Great news: the add-on has been accepted. You can now just select the add-on through the interface of the Mozilla Webthings Gateway.

    Here is it is after installation:
    0_1556265796800_adapter-overview.png

    Once installed you will see the option to change settings:
    0_1556265827400_adapter-settings.png

    Currently these settings don't do anything yet. That will be handled in the next release. First in line will be the ethernet gateway option. In theory the MQTT option should also be possible.

    Mozilla WebThings Gateway

  • Next generation dust sensor for MySensors
    alowhumA alowhum

    Here's MySensors Arduino code for the PMS-7003. Many thanks to scapeler.com for the core of the code.

    /*
     * The MySensors Arduino library handles the wireless radio link and protocol
     * between your home built sensors/actuators and HA controller of choice.
     * The sensors forms a self healing radio network with optional repeaters. Each
     * repeater and gateway builds a routing tables in EEPROM which keeps track of the
     * network topology allowing messages to be routed to nodes.
     *
     * Created by Henrik Ekblad <henrik.ekblad@mysensors.org>
     * Copyright (C) 2013-2015 Sensnology AB
     * Full contributor list: https://github.com/mysensors/Arduino/graphs/contributors
     *
     * Documentation: http://www.mysensors.org
     * Support Forum: http://forum.mysensors.org
     *
     * This program is free software; you can redistribute it and/or
     * modify it under the terms of the GNU General Public License
     * version 2 as published by the Free Software Foundation.
     *
     *******************************
     *
     *  DESCRIPTION
     *
     *  Plantower PMS-7003 fine dust sensor
     *  
     *  This sensor uses a frickin' laser to measure lots of different fine dust levels, between 0.3 and 10 microns.
     *  
     *  It communicates with your board over serial at 9600 speed.
     *  
     *  
     *  This code makes use of kindly shared code by Scapeler:
     *  
     *  - - -
     *  Copyright 2017 Scapeler
     * 
     * Licensed under the Apache License, Version 2.0 (the "License");
     * you may not use this file except in compliance with the License.
     * You may obtain a copy of the License at
    
        http://www.apache.org/licenses/LICENSE-2.0
    
     * Unless required by applicable law or agreed to in writing, software
     * distributed under the License is distributed on an "AS IS" BASIS,
     * WITHOUT WARRANTIES OR CONDITIONS OF ANY KIND, either express or implied.
     * See the License for the specific language governing permissions and
     * limitations under the License.
     * - - -
    */
    
    //------------------------------------------------------------------------------
    
    // if you uncomment this, you can get test and debug updates about the sensor' wireless connection by using the serial monitor tool.
    #define MY_DEBUG
    
    // Enable and select radio type attached
    #define MY_RADIO_NRF24                              // A 2.4Ghz transmitter and receiver, often used with MySensors.
    #define MY_RF24_PA_LEVEL RF24_PA_MIN                // This sets a low-power mode for the radio. Useful if you use the verison with the bigger antenna, but don't want to power that from a separate power source. It can also fix problems with fake Chinese versions of the radio.
    // #define MY_RADIO_RFM69                           // 433Mhz transmitter and reveiver.
    
    // Choose if you want this sensor to also be a repeater.
    // #define MY_REPEATER_FEATURE                      // Just remove the two slashes at the beginning of this line to also enable this sensor to act as a repeater for other sensors. If this node is on battery power, you probably shouldn't enable this.
    
    // Are you using this sensor on battery power?
    // #define BATTERY_POWERED                          // Just remove the two slashes at the beginning of this line if your node is battery powered. It will then go into deep sleep as much as possible. While it's sleeping it can't work as a repeater!
    
    #include <SPI.h>
    #include <MySensors.h>
    #include <SoftwareSerial.h>
    
    #define CHILD_ID_DUST_PM10 0
    #define CHILD_ID_DUST_PM25 1
    #define CHILD_ID_DUST_PM100 2
    
    
    // Mysensors settings.
    MyMessage msgDust10(CHILD_ID_DUST_PM10, V_LEVEL);   // Sets up the message format that we'l be sending to the MySensors gateway later.
    MyMessage msgDust10b(CHILD_ID_DUST_PM10, V_UNIT_PREFIX);
    MyMessage msgDust25(CHILD_ID_DUST_PM25, V_LEVEL);   // Sets up the message format that we'l be sending to the MySensors gateway later.
    MyMessage msgDust25b(CHILD_ID_DUST_PM25, V_UNIT_PREFIX);
    MyMessage msgDust100(CHILD_ID_DUST_PM100, V_LEVEL); // Sets up the message format that we'l be sending to the MySensors gateway later.
    MyMessage msgDust100b(CHILD_ID_DUST_PM100, V_UNIT_PREFIX);


    // These defines and variables can be changed:
    int dustSlowDown = 20;                              // The dust sensor is internally checked approximately every 700 or 800 milliseconds. Once in how many loops should it send the data?
    unsigned long dustMeasurementInterval = 700;        // This is a fickle thing. Changing it can give more time-outs.
    SoftwareSerial mySerial(10, 11);                    // RX, TX . You can choose other pins if you prefer.
    
    
    // PROBABLY BEST NOT TO CHANGE THESE VARIABLES
    int inputHigh = 0;
    int inputLow = 0;
    uint16_t inputChecksum = 0;                         // variable to caclulate checksum input variables
    uint16_t concPM1_0_CF1;                             // Lots of sensor variables
    uint16_t concPM2_5_CF1;
    uint16_t concPM10_0_CF1;
    uint16_t concPM1_0_amb;
    uint16_t concPM2_5_amb;
    uint16_t concPM10_0_amb;
    uint16_t rawGt0_3um;
    uint16_t rawGt0_5um;
    uint16_t rawGt1_0um;
    uint16_t rawGt2_5um;
    uint16_t rawGt5_0um;
    uint16_t rawGt10_0um;
    uint8_t  version;
    uint8_t  errorCode;
    uint16_t checksum;
    int dustSlowDownCounter = 0;


    void presentation()
    {
      // Send the sketch version information to the gateway and Controller
      sendSketchInfo("Air Quality Sensor PMS-7003", "1.1");
    
      // Register all sensors to gateway (they will be created as child devices): 
      present(CHILD_ID_DUST_PM10, S_DUST);
      send(msgDust10b.set("um/m3"));  
      present(CHILD_ID_DUST_PM25, S_DUST);
      send(msgDust25b.set("um/m3"));
      present(CHILD_ID_DUST_PM100, S_DUST);
      send(msgDust100b.set("um/m3"));  
    }
    
    
    void setup() {
      Serial.begin(115200);
      delay(1000);
      mySerial.begin(9600);
      delay(1000);
      Serial.println("hello world, I am a sensor.");
    }
    
    
    void loop() {
    
      // The dust sensor sends its data continuously, so let's  catch that data.
      int dustSensorOutput = pms7003ReadData();
      
    }
    
    
    // MAIN FUNCTION FOR THE DUST SENSOR, Thanks to Scapeler.nl
    int pms7003ReadData() {
        
      // while (mySerial.read()!=-1) {};  //clear buffer
    
      if (mySerial.available() < 32) {
        if (mySerial.available() == 0) {
          delay(150);
          return -1;
        };
        if (mySerial.available() > 16) {
          delay(10);
          return -1;
        };
        if (mySerial.available() > 0) {
          delay(30);
          return -1;
        };
        delay(100);
        return -1;
      }
      if (mySerial.read() != 0x42) return -1;
      if (mySerial.read() != 0x4D) return -1;
    
      inputChecksum = 0x42 + 0x4D;
    
      inputHigh = mySerial.read();
      inputLow = mySerial.read();
      inputChecksum += inputHigh + inputLow;
      if (inputHigh != 0x00) return -1; 
      if (inputLow != 0x1c) return -1;    
    
      inputHigh = mySerial.read();
      inputLow = mySerial.read();
      inputChecksum += inputHigh + inputLow;
      concPM1_0_CF1 = inputLow+(inputHigh<<8);
    
      inputHigh = mySerial.read();
      inputLow = mySerial.read();
      inputChecksum += inputHigh + inputLow;
      concPM2_5_CF1 = inputLow+(inputHigh<<8);
    
      inputHigh = mySerial.read();
      inputLow = mySerial.read();
      inputChecksum += inputHigh + inputLow;
      concPM10_0_CF1 = inputLow+(inputHigh<<8);
    
      inputHigh = mySerial.read();
      inputLow = mySerial.read();
      inputChecksum += inputHigh + inputLow;
      concPM1_0_amb = inputLow+(inputHigh<<8);
    
      inputHigh = mySerial.read();
      inputLow = mySerial.read();
      inputChecksum += inputHigh + inputLow;
      concPM2_5_amb = inputLow+(inputHigh<<8);
    
      inputHigh = mySerial.read();
      inputLow = mySerial.read();
      inputChecksum += inputHigh + inputLow;
      concPM10_0_amb = inputLow+(inputHigh<<8);
    
      inputHigh = mySerial.read();
      inputLow = mySerial.read();
      inputChecksum += inputHigh + inputLow;
      rawGt0_3um = inputLow+(inputHigh<<8);
    
      inputHigh = mySerial.read();
      inputLow = mySerial.read();
      inputChecksum += inputHigh + inputLow;
      rawGt0_5um = inputLow+(inputHigh<<8);
    
      inputHigh = mySerial.read();
      inputLow = mySerial.read();
      inputChecksum += inputHigh + inputLow;
      rawGt1_0um = inputLow+(inputHigh<<8);
    
      inputHigh = mySerial.read();
      inputLow = mySerial.read();
      inputChecksum += inputHigh + inputLow;
      rawGt2_5um = inputLow+(inputHigh<<8);
    
      inputHigh = mySerial.read();
      inputLow = mySerial.read();
      inputChecksum += inputHigh + inputLow;
      rawGt5_0um = inputLow+(inputHigh<<8);
    
      inputHigh = mySerial.read();
      inputLow = mySerial.read();
      inputChecksum += inputHigh + inputLow;
      rawGt10_0um = inputLow+(inputHigh<<8);
    
      inputLow = mySerial.read();
      inputChecksum += inputLow;
      version = inputLow;
    
      inputLow = mySerial.read();
      inputChecksum += inputLow;
      errorCode = inputLow;
    
      Serial.print("PMS7003;"); 
    
      // The measurement recalculated to micrograms per cubic meter, a common standard.
      Serial.print(concPM1_0_CF1);
      Serial.print(';'); 
      Serial.print(concPM2_5_CF1);
      Serial.print(';'); 
      Serial.print(concPM10_0_CF1);
      Serial.print(';'); 
    
      // The measurement recalculated to micrograms per cubic meter, a common standard. Not quite sure what the difference is..
      Serial.print(concPM1_0_amb);
      Serial.print(';'); 
      Serial.print(concPM2_5_amb);
      Serial.print(';');     
      Serial.print(concPM10_0_amb);
      Serial.print(';');     
    
      // this is the 'raw' data that the sensor gathers internally, before it calculates the above values.
      Serial.print(rawGt0_3um); // This indicates total number or particles in 0.1 liter of air that have a diameter above 0.3um. This will be the biggest number, as it measures the most particles. But it's very imprecise: 50% accuracy..
      Serial.print(';');
      Serial.print(rawGt0_5um); // This indicates the total number or particles in 0.1 liter of air that have a diameter above 0.5um (so it will be a smaller count than the line above)
      Serial.print(';'); 
      Serial.print(rawGt1_0um); // This indicates the total number or particles in 0.1 liter of air that have a diameter above 1 micron. And so on..
      Serial.print(';'); 
      Serial.print(rawGt2_5um);
      Serial.print(';'); 
      Serial.print(rawGt5_0um); // Acording to the datashet, at this point the accuracy has reached at 98%.
      Serial.print(';'); 
      Serial.print(rawGt10_0um);
      Serial.print(';'); 
      Serial.print(version);
      Serial.print(';'); 
      Serial.print(errorCode);
      Serial.println("---");
      
      inputHigh = mySerial.read();
      inputLow = mySerial.read();
      checksum = inputLow+(inputHigh<<8);
      if (checksum != inputChecksum) {
        Serial.print(';'); 
        Serial.print(checksum); 
        Serial.print(';'); 
        Serial.print(inputChecksum); 
      }
    
      // Time to send the results to the gateway.
      dustSlowDownCounter = dustSlowDownCounter + 1;
      if(dustSlowDownCounter > dustSlowDown){
        
        /*  MEASUREMENT  */
        if(rawGt1_0um > 0){
          Serial.println(" Dust1_0 = " + String(concPM1_0_CF1));
          send(msgDust10.set(concPM1_0_CF1,1));
        }         
        if(rawGt2_5um > 0){
          Serial.println(" Dust1_0 = " + String(concPM2_5_CF1));
          send(msgDust25.set(concPM2_5_CF1,1));
        }     
        if(rawGt10_0um > 0){
          Serial.println(" Dust1_0 = " + String(concPM10_0_CF1));
          send(msgDust100.set(concPM10_0_CF1,1));
        }     
    
        /*  RAW DATA  */            
        /*
        if(rawGt0_3um > 0){
          Serial.println(" Dust03 = " + String(rawGt0_3um));
          send(msgDust03.set(rawGt0_3um,1));
        }
        if(rawGt0_5um > 0){
          Serial.println(" Dust05 = " + String(rawGt0_5um));
          send(msgDust05.set(rawGt0_5um,1));
        }
        if(rawGt1_0um > 0){
          Serial.println(" Dust10 = " + String(rawGt1_0um));
          send(msgDust10.set(rawGt1_0um,1));
        }
        if(rawGt2_5um > 0){
          Serial.println(" Dust25 = " + String(rawGt2_5um));
          send(msgDust25.set(rawGt2_5um,1));
        }
        if(rawGt5_0um > 0){
          Serial.println(" Dust50 = " + String(rawGt5_0um));
          send(msgDust50.set(rawGt5_0um,1));
        }      
        if(rawGt10_0um > 0){
          Serial.println(" Dust100 = " + String(rawGt10_0um));
          send(msgDust100.set(rawGt10_0um,1));
        }   
        */
    
        dustSlowDownCounter = 0;
      } // End of sensing message.
      
      delay(700);  // Data will come between 200 and 800 miliseconds. If you set this be be higher than 700 you will get checksum errors.
        
      return concPM2_5_CF1; // this data doesn't really go anywhere..
    }


    General Discussion

  • New non-blocking temperature sensor code
    alowhumA alowhum

    I've added your suggestions, cleaned the code to conform to standards better, and tested the new version in various configurations.

    I've created a pull request on Github for this to become the new code. And a few days ago I created a page on OpenHardware.io that could be the start of a new page about the sensor, if need be.

    Once my BME280 sensor arrives, I will create a new seperate version based on that. My suggestion is that the MySensors homepage should somehow point to two temperature sensors:

    • One for mass sensor network deployment (this one, based on the cheap Dallas).
    • One for home automation (the more expensive but awesome BME280).
    Development

  • MySensors Smart Watch
    alowhumA alowhum

    After a bit of discussion in the nRF5 thread, it might be useful to create a thread specifically focussed on the subject of re-purposing cheap nRF5 smart watches to use as MySensors nodes.

    Why would I want a MySensors smart watch?

    • If you want a power sipping node with an oled screen and a few sensors.. well you just described a smart watch.
    • From a privacy perspective, most smart watches are horribly designed. A MySensors smart watch could offer the advantages of a smart watch without all the cloud connections and bluetooth tracking risks.
    • It's cool.

    What has been done?
    Surprisingly, quite a bit. Have a look here:
    https://github.com/micooke/arduino-nRF5-smartwatches/
    https://github.com/curtpw/nRF5x-device-reverse-engineering
    https://github.com/goran-mahovlic/nRF51_ID107_libs
    https://github.com/goran-mahovlic/openwatch

    What should I look out for?

    • The holy grail would be a smart watch that can be updated via DFU over the air. That way you don't have to open it, which often destroys any waterproofing. Of course this only matters if you want to actually use it as a watch and not, say, as a small tabletop display.
    • In some of these cheap devices the heart rate and/or blood pressure devices are very poor quality, meaning you will get eratic results.
    • Currently you may need a JLink or Black Magic Probe debugger to gain control over these devices.

    Discussion
    There is a chat here

    Popular devices

    • ID107HR - It's an older NRF51, but the advantage is that the screen has been mapped, the pads are clear, and it can be opened with a small screwdriver. It's your best bet.
    • ID107HR Plus - NRF52 version. The screen doesn't seem to be mapped yet. It's glued shut, and incredibly difficult to open.

    Getting started

    • Get or make a Black Magic probe.
    • Buy an ID107HR (€15 at Gearbest)
    1. Install sandeep's git from https://github.com/sandeepmistry/arduino-nRF5. Do refer to instructions at the bottom of the git to install as a development core (supports Black Magic Probe), i.e. clone/copy repo into 'Arduino/hardware/sandeepmistry/nRF5' folder.
    2. Install ARM Cortex support by installing SAMD boards via Arduino Board Manager interface.
    3. Overwrite the variants files located in your 'Arduino/hardware/sandeepmistry/nRF5/variants/Generic' folder' using the files from https://github.com/rogerclarkmelbourne/arduino-nRF5-customised/tree/master/variants/ID107HR_smartwatch.
    4. Install Goran's git from https://github.com/goran-mahovlic/nRF51_ID107_libs and load up the example sketch of 'SmartyV2ClockOledAcc.ino'.
    5. Select the Board 'Generic nRF51' from the 'Nordic Semiconductor nRF5 Boards' menu. Select the 'Black Magic Probe (GDB)' from the programmer menu. Compile/upload.
    General Discussion

  • Where did everyone go?
    alowhumA alowhum

    I used MySensors to create a privacy friendly smart home demonstrator called Candle. Quite a few people are building it, but they may not even realise they are using MySensors.

    In this project my own attention certainly has shifted a bit. Cheap Zigbee dongles and devices aid my goal of moving Candle in a more consumer friendly direction, so that people could just buy most of the parts ready-to-go, and still keep everything local. Some devices will still be MySensors devices, simply because there aren't any privacy friendly alternatives that I know of. But a temperature and humidity sensor, those use Zigbee for me now. And I'm moving the privacy features from the arduino code into the central controller instead.

    Speculation about other factors:

    • Practical Arduino hardware education isn't happening right now because of covid. And even there, there are so many hardware options now. Microbits, ESP32, etc.
    • I've also noticed people asking about standardisation, and caring about interoperability.
    • There are many more products available now. Edge cases are being catered to, e.g. gardening.

    Things that might help for me:

    • I really wish there was a cheap, widely available Arduino akin to the RF-Nano, but with RFM69 433Mhz. MySensors has always had range issues for me on 2.4ghz.
    • The MySensors implementation doesn't make it easy for devices to describe the UI they would like. E.g. if a device is read-only or toggle-able is currently dependent on the type, instead of being a factor that can be set for each sensor type independently.

    A new website with a strong focus on new users, USP's (cheap privacy & friendly, or just fun, educational and artisanal) and up-to-date examples might help.

    This all may sound critical, but that's not the intention. I really dig MySensors. It's definitely in my toolbelt.

    General Discussion

  • Candle - the privacy friendly smart home
    alowhumA alowhum

    Today the project was featured on Hackaday :-)

    https://hackaday.com/2019/11/06/the-open-source-smart-home/

    My Project

  • New non-blocking temperature sensor code
    alowhumA alowhum

    I rewrote the temperature sensor code.

    • It no longer uses Sleep, so it can be used as a repeater.
    • It's now cleaner and documented.
    • It now has serial debugging features.

    Could someone place this code on the website?

    /**
     * The MySensors Arduino library handles the wireless radio link and protocol
     * between your home built sensors/actuators and HA controller of choice.
     * The sensors forms a self healing radio network with optional repeaters. Each
     * repeater and gateway builds a routing tables in EEPROM which keeps track of the
     * network topology allowing messages to be routed to nodes.
     *
     * Created by Henrik Ekblad <henrik.ekblad@mysensors.org>
     * Copyright (C) 2013-2015 Sensnology AB
     * Full contributor list: https://github.com/mysensors/Arduino/graphs/contributors
     *
     * Documentation: http://www.mysensors.org
     * Support Forum: http://forum.mysensors.org
     *
     * This program is free software; you can redistribute it and/or
     * modify it under the terms of the GNU General Public License
     * version 2 as published by the Free Software Foundation.
     *
     *******************************
     *
     * DESCRIPTION
     *
     * Example sketch showing how to send in DS1820B OneWire temperature readings back to the controller
     * http://www.mysensors.org/build/temp
     * 
     * The cool thing about this temperature sensor (pun intended) is thay you can attach multiple Dallas temperature sensors outputs to the same arduino pin. They will all automatically be recognised as separate sensors.
     * 
     * At the moment of writing (februari 2017) you need older versions of the Dallas and OneWire libraries. Please check the website or forum to see if this is still the case.
     * 
     * Modifications by anonymous user so that it can now simultaneously function as a MySensors repeater. 
     */
    
    
    // Enable debug prints to serial monitor
    #define MY_DEBUG 
    
    // Enable and select radio type attached
    #define MY_RADIO_NRF24
    //#define MY_RF24_PA_LEVEL RF24_PA_MIN              // This sets a low-power mode for the radio. Useful if you use the version with the bigger antenna, but don' want to power that from a separate source. It can also fix problems with fake Chinese versions of the radio.
    //#define MY_RADIO_RFM69
    
    // Choose if you want this sensor to also be a repeater.
    // #define MY_REPEATER_FEATURE                    // Just remove the two slashes at the beginning of this line to also enable this sensor to act as a repeater for other sensors.
    
    #include <SPI.h>
    #include <MySensors.h>  
    #include <DallasTemperature.h>                  
    #include <OneWire.h>                              
    
    // These variables can be changed:
    #define COMPARE_TEMP 1                            // Send temperature only if changed? 1 = Yes 0 = No
    #define ONE_WIRE_BUS 3                            // Pin where dallase sensor is connected 
    #define MAX_ATTACHED_DS18B20 16                   // Maximum amount of teperature sensors you can connect to this arduino (16).
    unsigned long MEASUREMENT_INTERVAL = 30000;       // Time to wait between reads (in milliseconds).
    
    // You shouldn't change these:
    OneWire oneWire(ONE_WIRE_BUS);                    // Setup a oneWire instance to communicate with any OneWire devices (not just Maxim/Dallas temperature ICs)
    DallasTemperature sensors(&oneWire);              // Pass the oneWire reference to Dallas Temperature. 
    float lastTemperature[MAX_ATTACHED_DS18B20];      // creates an array to hold the previous temperature measurements for each possible sensor.
    int numSensors=0;                                 // variable to contain the number of found attached sensors.
    boolean receivedConfig = false;                   // I have no idea what this does.
    boolean metric = true;                            // Probably used by the Dallas library as an indication if the temperature should be calculated in Celsius (metric) or Fahrenheit.
    boolean CURRENTLY_MEASURING = true;               // Used to indicate when the time is right for a new measurement to be made.
    boolean CURRENTLY_CALCULATING = false;            // Used to bridge the time that is needed to calculate the temperature values by the Dallas library.
    unsigned long CURRENT_MILLIS = 0;                 // The millisecond clock in the main loop.
    unsigned long PREVIOUS_MEASUREMENT_MILLIS = 0;    // Used to remember the time of the last temperature measurement.
    int16_t CONVERSION_TIME = 0;                      // Used to store the time needed to calculate the temperature from measurements.
    
    // Mysensors settings
    MyMessage msg(0,V_TEMP);
    
    void before()
    {
      sensors.begin();                                // Startup up the OneWire library
    }
    
    void setup()  
    { 
      for(int i=0;i<MAX_ATTACHED_DS18B20;i++){lastTemperature[i] = 0;} //Pre-filling array with 0's.
      sensors.setWaitForConversion(false);            // requestTemperatures() will not block current thread
      Serial.begin(115200);                           // for serial debugging.
      Serial.print("Hello world, I am a sensor. \n ");
    
    }
    
    void presentation() {
      sendSketchInfo("Temperature Sensor", "1.2");    // Send the sketch version information to the gateway and Controller
      numSensors = sensors.getDeviceCount();          // Fetch the number of attached temperature sensors  
    
      
      for (int i=0; i<numSensors && i<MAX_ATTACHED_DS18B20; i++) {   
         present(i, S_TEMP);                          // Present all sensors to controller (16 maximum).
      }
    }
    
    void loop(){     
    
      CURRENT_MILLIS = millis(); // The time since the sensor started, counted in milliseconds. This script tries to avoid using the Sleep function, so that it could at the same time be a MySensors repeater.
    
    
      // Let's measure the temperature
      if(CURRENTLY_MEASURING == true && CURRENT_MILLIS - PREVIOUS_MEASUREMENT_MILLIS >= MEASUREMENT_INTERVAL){ // If we'e not calculating, and enough time has passed, we'll start again.
        CURRENTLY_MEASURING == false; // We're measuring, so let's take it off our to-do list.
        Serial.print("Starting new measurement(s)\n");
        PREVIOUS_MEASUREMENT_MILLIS = CURRENT_MILLIS; // Mark the time of the initialiation of this measurement.
       
        // Fetch temperatures from Dallas sensors
        sensors.requestTemperatures();
        
        // query conversion time. Apparently it takes a while to calculate?
        CONVERSION_TIME = sensors.millisToWaitForConversion(sensors.getResolution());
    
        CURRENTLY_CALCULATING = true; //Next step is to re-calculate the temperature again.
      }
    
    
      // Let's calculate and send the temperature
      if(CURRENTLY_CALCULATING == true && CURRENT_MILLIS > PREVIOUS_MEASUREMENT_MILLIS + CONVERSION_TIME ){
        CURRENTLY_CALCULATING = false; // check calculating off the to-do list too.
        for (int i=0; i<numSensors && i<MAX_ATTACHED_DS18B20; i++) {    // Loop through all the attached temperatur sensors.
        
          float temperature = static_cast<float>(static_cast<int>((getControllerConfig().isMetric?sensors.getTempCByIndex(i):sensors.getTempFByIndex(i)) * 10.)) / 10.;   // Fetch and round temperature to one decimal
          
          Serial.print("Sensor #");
          Serial.print(i);
          Serial.print(" says it is ");
          Serial.print(temperature);
          Serial.print(" degrees\n");
          
          if(temperature != -127.00 && temperature != 85.00){ // avoid working with measurement errors.
            if (COMPARE_TEMP == 1 && lastTemperature[i] == temperature){
              Serial.print("Not sending it though, because it's the same temperature as before.\n");
            }
            else
            {
              Serial.print("Sending the temperature to the gateway.\n");
              send(msg.setSensor(i).set(temperature,1));
              lastTemperature[i] = temperature; // Save new temperatures to be able to compare in the next round.
            }
          }  
        }
        CURRENTLY_MEASURING = true; // Both tasks are done. Now we'll just wait for the measurement interval to be over.
        Serial.print("zzzzZZZZzzzzZZZZzzzz\n");
      }
    
    }
    
    Development

  • The examples on the website need love
    alowhumA alowhum

    Im sorry, but you are misrepresenting my position.

    • I started this post to contribute, and point out an area where I wanted to do some good: to help this project live up to its promise of 'ready to use code examples'.
    • I never said I wanted plug-and-play, that was just to offset the narrative that plug-and-play is not a valuable thing. What it's about is creating a gentle slope to get new people involved in the community. Beginners need working code to help them stay interested in the promise of the project. If the hill is too steep, people will stop climbing. Because of survivorship bias you don't see all the people who tried and quit using MySensors.
    • I have contributed to multiple open source projects, including this one, so I know exactly what you mean about the effort. It also means that when I talk about wasted time, I know what I'm talking about. If two of the sensors I try need me to jump through a lot of hoops, and not the fun kind, then that's something we need to fix. I mean, with the WaveShare device the code for the dust sensor would give twice the level of actual dust! And that code has been on the website for half a year!

    I may have misinterpreted, but it seemed to me that MySensors project understood that the onboarding of new people is vital. The friendly design of the website with the cute drawings, the light-hearted writing, that seemed like a conscious strategy. One I can totally agree with. But if that's the strategy, then the examples need some love. That's all I was trying to say.

    What doesn't help is to paint things, and me, black-and-white. Pointing out that the examples don't work does not make me someone who is demanding 'plug and play'. And I don't think it's honest to then paint broken examples as a 'feature' to aid learning. I believe I was just trying to point to a valid concern about keeping it fun for new people to get involved. I thought this community understood that value given the light-hearted design choices.

    So when I post "steer clear of this one for now" at the Dust sensor page, it's not to disrespect you, but to help new people understand that the sensor is currently not ok, while I was trying to fix it. And yes, there is frustration that I've spent $20 on an old sensor that can be bought for $3 now. A lot of people may have had the same feeling these past months. But in all that time nobody left a warning.

    Sometimes it feels like people are just solving their own problems, and when they've fixed it for themselves, they don't care enough about the people that come after them. That's not an attack on the core developers by the way, that's a statement about us all.

    Anyway, onwards.

    I've contacted environmental agencies about which cheap laser-based sensor they recommend, and I've researched them in detail. I believe it may be a good idea to create a new 'default' dust sensor sketch around the PMS7003.

    I've also updated the temperature sensor code (I've been testing it today). I'll make an account on OpenHardware and post new versions there. Hek tells me those can then be integrated into the website.

    General Discussion

  • Next generation CO2 sensor
    alowhumA alowhum

    Well, that name is getting pompous, but hey.

    Here's code for the MH-Z19 CO2 sensor. It's concidered to be the best value for money CO2 sensor currently.

    The code is non-blocking, so it can also act as a repeater.

    A pull request for the code has also been made on Github, so it can become part of the examples.

    /*
     * The MySensors Arduino library handles the wireless radio link and protocol
     * between your home built sensors/actuators and HA controller of choice.
     * The sensors forms a self healing radio network with optional repeaters. Each
     * repeater and gateway builds a routing tables in EEPROM which keeps track of the
     * network topology allowing messages to be routed to nodes.
     *
     * Created by Henrik Ekblad <henrik.ekblad@mysensors.org>
     * Copyright (C) 2013-2015 Sensnology AB
     * Full contributor list: https://github.com/mysensors/Arduino/graphs/contributors
     *
     * Documentation: http://www.mysensors.org
     * Support Forum: http://forum.mysensors.org
     *
     * This program is free software; you can redistribute it and/or
     * modify it under the terms of the GNU General Public License
     * version 2 as published by the Free Software Foundation.
     *
     *******************************
     *
     *  DESCRIPTION
     *
     *  MH-Z19 CO2 sensor
     *  
     *  This sensor uses a frickin' laser to measure lots of different fine dust levels, between 0.3 and 10 microns.
     *  
     *  It communicates with your board over serial at 9600 speed.
     *  
     *  
     *
     */
    
    
    //------------------------------------------------------------------------------
    
    // if you uncomment this, you can get test and debug updates about the sensor' wireless connection by using the serial monitor tool.
    #define MY_DEBUG
    
    // Enable and select radio type attached
    #define MY_RADIO_NRF24                            // A 2.4Ghz transmitter and receiver, often used with MySensors.
    // #define MY_RF24_PA_LEVEL RF24_PA_MIN           // This sets a low-power mode for the radio. Useful if you use the verison with the bigger antenna, but don't want to power that from a separate power source. It can also fix problems with fake Chinese versions of the radio.
    // #define MY_RADIO_RFM69                         // 433Mhz transmitter and reveiver.
    
    // Choose if you want this sensor to also be a repeater.
    // #define MY_REPEATER_FEATURE                    // Just remove the two slashes at the beginning of this line to also enable this sensor to act as a repeater for other sensors. If this node is on battery power, you probably shouldn't enable this.
    
    
    // Libraries
    #include <MySensors.h>
    #include <SoftwareSerial.h>
    
    
    // This can be changed:
    unsigned long co2MeasurementInterval = 30000;     // Time to wait between reads (in milliseconds).
    SoftwareSerial mySerial(10, 11);                  // RX, TX . You can choose other pins if you prefer.
    
    
    // Mysensors settings
    #define CHILD_ID_CO2 0                            // The Co2 sensor' ID on this node.
    MyMessage msgCo2(CHILD_ID_CO2, V_LEVEL);
    MyMessage msgCo2b(CHILD_ID_CO2, V_UNIT_PREFIX);
    
    
    void presentation()
    {
      // Send the sketch version information to the gateway and Controller
      sendSketchInfo("AIQ Sensor CO2 MH-Z19", "1.1");
    
      // Register attached sensor(s) to gateway
      present(CHILD_ID_CO2, S_AIR_QUALITY);
      send(msgCo2b.set("ppm"));
    }
    
    
    void setup() 
    {
      delay(1000);
      Serial.begin(115200);
      delay(1000);
    
      mySerial.begin(9600);
      delay(2000);
      while (mySerial.read()!=-1) {};  //clear Co2 buffer.
      Serial.println("hello world, I am a sensor.");
    }
    
    
    void loop() 
    {
    
       // You should not change these variables:
       static unsigned long previousCo2Millis = 0;       // Used to remember the time of the last temperature measurement.
    
       unsigned long currentMillis = millis(); // The time since the sensor started, counted in milliseconds. This script tries to avoid using the Sleep function, so that it could at the same time be a MySensors repeater.
    
      if (currentMillis - previousCo2Millis >= co2MeasurementInterval) { // this only gets triggered when enough time has passed.
        Serial.println("CO2 - Sending data request to sensor.");
        previousCo2Millis = currentMillis;
        
        long co2ppm = readCO2();    
        Serial.println("Co2 - PPM = " + String(co2ppm));
        send(msgCo2.set((long)ceil(co2ppm))); 
        Serial.print("Co2 - zzzzZZZZzzzzZZZZzzzz\n");
      }
    
    }
    
    
    // Main function that gets the Co2 data
    int readCO2()
    {
      while (mySerial.read()!=-1) {};  //clear serial buffer  
    
      char response[9]; // for answer
      byte cmd[9] = {0xFF, 0x01, 0x86, 0x00, 0x00, 0x00, 0x00, 0x00, 0x79};
      
      // command to ask for data
      mySerial.write(cmd, 9); //request PPM CO2 
    
      mySerial.readBytes(response, 9);
    
        Serial.print(response[0], HEX);   
        Serial.print(" - ");   
        Serial.print(response[1], HEX);   
        Serial.print(" - ");    
        Serial.print(response[2], HEX);   
        Serial.print(" - ");          
        Serial.print(response[3], HEX);   
        Serial.print(" - ");          
        Serial.print(response[4], HEX);   
        Serial.print(" - ");          
        Serial.print(response[5], HEX);   
        Serial.print(" - ");        
        Serial.print(response[6], HEX);   
        Serial.print(" - ");   
        Serial.print(response[7], HEX);   
        Serial.print(" - ");      
        Serial.print(response[8], HEX); 
        Serial.println(" - END");  
    
      if (response[0] != 0xFF)
      {
        Serial.println("Wrong starting byte from co2 sensor! (should be FF)");
        return -1;
      }
    
      if (response[1] != 0x86)
      {
        Serial.println("Wrong command from co2 sensor! (should be 86)");
        return -1;
      }
    
      int responseHigh = (int) response[2];
      int responseLow = (int) response[3];
      int ppm = (256 * responseHigh) + responseLow;
      
      return ppm;
    }
    
    
    General Discussion

  • What did you build today (Pictures) ?
    alowhumA alowhum

    I didn't build this myself, but I did create the code. It's a MySensors CO2 sensor that is part of a 'privacy friendly smart home of the future' which will be launched later this year.

    0_1566575881300_Candle-CO2-sensor-by-Dinie-Besems.jpg

    It was made by artist and jeweler Dinie Besems. All her creations feature small 'skirts' that you can lift to see the data, or cover up the screen if you have visitors and don't want them to immediately see your data.

    General Discussion

  • API first controller with OTA support, also exposes WebOfThings APIs for sensors
    alowhumA alowhum

    Good news: sounds like we can add a new controller to the list soon!

    Through the help and hard work of @Sathishkumar-Thangavel I got my first MySensors device to show up in the Mozilla Gateway yesterday.

    This is great news, as the software is really user friendly and has the force of Mozilla behind it.

    Mozilla WebThings Gateway ota api firmware firmware over the air controller webofthings

  • Candle Manager - user-friendly web-based tool to program Arduino's
    alowhumA alowhum

    For a project I'm working on I've created a small tool that could be useful to everyone in the community. I'm sharing an early version for Christmas :-)

    The tool is meant to be used with the Raspberry Pi. Through this web interface you can generate and upload code to a plugged in Arduino with the click of a few buttons.

    0_1545992240907_dashboard.png

    0_1545992251013_create_new.png

    It takes code templates (which are just normal Arduino files), and transforms them into an easy to use interface so that users can change some settings.

    0_1545991833537_code_ux_generation.png

    From the user's preferences new code is generated. This can then be uploaded with the upload wizard:

    0_1545992281342_upload_wizard2.png

    0_1545992295714_upload_wizard3.png

    The user never has to see any code if they don't want to. But if they do it has a built in code editor too.

    HOW DOES IT WORK?
    It builds on the new Arduino Command Line Interface (CLI).
    HTML5 <-> PHP <-> Arduino CLI

    What's is good for?

    • Giving workshops. People no longer have to install the Arduino IDE on their laptops, but can instead connect to Raspberry Pi wifi hotspot.
    • I'm developing it to be part of a privacy friendly smart home demonstrator that I've been working on for a while. I'm building it on top of MySensors, MySController-rs, Mozilla Gateway and the Arduino CLI.

    MORE DETAILS
    The code and more screenshots and details can be found here:
    https://github.com/createcandle/Candle-manager

    My Project

  • Lots of Repeater nodes? (new info December 2017 requested)
    alowhumA alowhum

    So, what's the answer? For those finding the thread:

    • If you are not using battery sensors, then it's fine to make all of them repeaters.
    • After 20 failures to send, nodes will try looking for other pathways. In that case having multiple repeaters is useful if a node fails.

    It might be that it takes some more space/memory on your arduino?

    Development

  • The examples on the website need love
    alowhumA alowhum

    Well this blew up :-D Sorry if I offended!

    @Awi No worries, you haven't offended me. And I was a bit harsh, sorry about that.

    @slalz I understand an open source project will not be perfect and will need you to dive into it at some level. The question is: what level.

    "We provide easy to follow build instructions, ready to use code examples".

    I also understand we all have day jobs. My whole point was that I wanted to try and help. In fact, that's what I have been doing; writing code, researching better temperature and dust sensors. If you give me a (temporary) account on the website I will gladly update the build instructions. I was already adding examples to Github through the web interface as we speak :-)

    General Discussion

  • Mozilla Webthings MySensors add-on / adapter
    alowhumA alowhum

    You can now just clone the Github repository and it should automatically become available in your add-ons list.

    What's more, I've created a request to add the adapter to the official list. If it is accepted, then in the future you will be able to just select the add-on from the list in the interface. No need to open a terminal window anymore.

    Mozilla WebThings Gateway
  • Login

  • Don't have an account? Register

  • Login or register to search.
  • First post
    Last post
0
  • MySensors
  • OpenHardware.io
  • Categories
  • Recent
  • Tags
  • Popular