Navigation

    • Register
    • Login
    • Search
    • OpenHardware.io
    • Categories
    • Recent
    • Tags
    • Popular
    1. Home
    2. emc2
    3. Best
    • Profile
    • Following
    • Followers
    • Topics
    • Posts
    • Best
    • Groups

    Best posts made by emc2

    • MyWeatherGatewayESP8266 (1.6 dev branch)

      Hi there.

      A couple of weeks ago I started to play with the 1.6 branch to hook up a sensor directly on the gateway, and decrease the clutter of cables and breadboards lying around.

      Here is the result, a ESP8266 gateway with weather station sketch allowing me to measure the atmospheric pressure, temperature and humidity (indoor). Because of the limited number of pins available I used a BME280 sensor instead of a BMP180 + dht. It may be a couple of dollar more expensive, but it's nicer to wire!

      A few drawbacks / limitations:

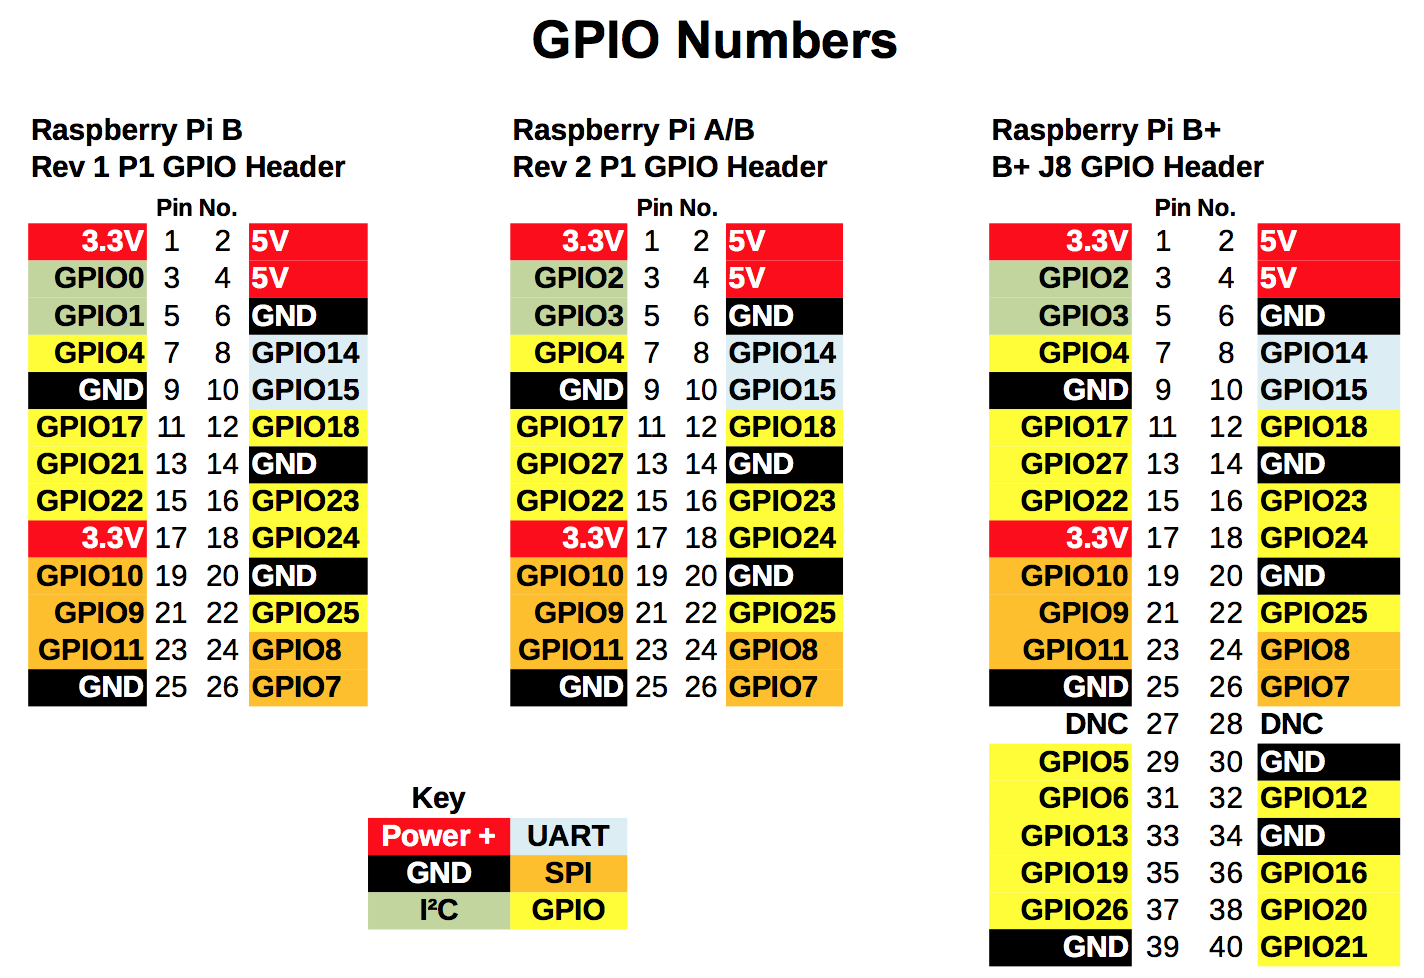
      • the CE pin is by default wired on the I2C bus. You will either need to move it, or to move the I2C bus pins. It can be easily done by commenting / uncommenting a few lines on top of the sketch.
      • BME280 is extremely sensitive. It's good right? Well not if you keep it too close of the ESP8266. Temperature will be up to 3°C higher than it really is! I still have to figure out how to resolve this issue. For now I'm back with having long wires between the BME module and the ESP 😕
      • I moved the I2C bus to GPIO 1 and 3. These are the TX and RX pins, close to the USB port. I2C and Serial communication are sort of interfering with each other if occurring in the same time. MY_DEBUG is off to prevent this. You may want to move SDA and SCL around, especially for debug purpose, but here it's close to a GND and 3.3V supply which is convenient. Maybe there is a way to do a nice PCB but I never tried before.

      Code updates, if any, will be available on https://github.com/emc2cube/MyWeatherGatewayESP8266

      /**
       * Important: I2C setup and NRF24L01 wiring
       * By default the NRF24 CE pin is wired on GPIO4. On ESP8266 default SDA and SCL pin are respectively GPIO4 and GPIO5.
       * Both CE pin and SDA (or even SCL) can be moved so depending of your setup you will have to move at least one of these.
       * Look for "#define MY_RF24_CE_PIN", "#define SDA" and "#define SCL" lines to adapt to your wiring.
       *
       * By default Adafruit BME280 library is looking for a BME280 sensor on the I2C bus at (0x77).
       * If your sensor is set with the low adress (0x76) you can uncomment the lines "#undef BME280_ADDRESS" and "#define BME280_ADDRESS (0x76)"
       * Or you can set it on high by changing the jumper/bridge setting on the PCB.
       *
       * Make sure to fill in your ssid and WiFi password below for ssid & pass.
       */
      
      // ----------------------------------------------------------------------------
      // MySensor ESP8266 Gateway configuration
      // ----------------------------------------------------------------------------
      #include <EEPROM.h>
      #include <SPI.h>
      
      // Enable debug prints to serial monitor
      //#define MY_DEBUG    // I2C devices may have a funky behaviour when serial communication is occuring and GPIO 1 and 3 are used for I2C bus (RX and TX ports).
      
      // Use a bit lower baudrate for serial prints on ESP8266 than default in MyConfig.h
      #define MY_BAUD_RATE 9600
      
      // Enables and select radio type (if attached)
      #define MY_RADIO_NRF24
      //#define MY_RADIO_RFM69
      
      // Gateway mode always enabled for ESP8266. But we add this anyway ;)
      #define MY_GATEWAY_ESP8266
      
      #define MY_ESP8266_SSID "MySSID"
      #define MY_ESP8266_PASSWORD "MyVerySecretPassword"
      
      // To use native I2C pins CE should be moved. Declare the new GPIO used here.
      // GPIO 3 is pin D9 (RX below D8)
      //#define MY_RF24_CE_PIN 3
      
      // Enable UDP communication
      //#define MY_USE_UDP
      
      // Enable MY_IP_ADDRESS here if you want a static ip address (no DHCP)
      //#define MY_IP_ADDRESS 192,168,178,87
      
      // If using static ip you need to define Gateway and Subnet address as well
      #define MY_IP_GATEWAY_ADDRESS 192,168,178,1
      #define MY_IP_SUBNET_ADDRESS 255,255,255,0
      
      // The port to keep open on node server mode 
      #define MY_PORT 5003
      
      // How many clients should be able to connect to this gateway (default 1)
      #define MY_GATEWAY_MAX_CLIENTS 2
      
      // Controller ip address. Enables client mode (default is "server" mode). 
      // Also enable this if MY_USE_UDP is used and you want sensor data sent somewhere. 
      //#define MY_CONTROLLER_IP_ADDRESS 192, 168, 178, 68
      
      // Enable inclusion mode
      #define MY_INCLUSION_MODE_FEATURE
      
      // Enable Inclusion mode button on gateway
      // #define MY_INCLUSION_BUTTON_FEATURE
      // Set inclusion mode duration (in seconds)
      #define MY_INCLUSION_MODE_DURATION 60
      // Digital pin used for inclusion mode button
      #define MY_INCLUSION_MODE_BUTTON_PIN  3
      
       
      // Flash leds on rx/tx/err
      // #define MY_LEDS_BLINKING_FEATURE
      // Set blinking period
      // #define MY_DEFAULT_LED_BLINK_PERIOD 300
      
      // Led pins used if blinking feature is enabled above
      #define MY_DEFAULT_ERR_LED_PIN 16  // Error led pin
      #define MY_DEFAULT_RX_LED_PIN  16  // Receive led pin
      #define MY_DEFAULT_TX_LED_PIN  16  // the PCB, on board LED
      
      #if defined(MY_USE_UDP)
        #include <WiFiUDP.h>
      #else
        #include <ESP8266WiFi.h>
      #endif
      
      #include <MySensor.h>
      
      // ----------------------------------------------------------------------------
      // Child sensor ids
      // ----------------------------------------------------------------------------
      #define BARO_CHILD 0
      #define TEMP_CHILD 1
      #define HUM_CHILD 2
      
      // ----------------------------------------------------------------------------
      // I2C setup: SDA and SCL pin selection
      // ----------------------------------------------------------------------------
      #include <Wire.h>
      
      // If using the standard MySensor wiring direction we can't use default I2C ports. I2C ports moved next to the second GND and 3.3v ports for convenient wiring of I2c modules.
      #define SDA 3  //default to GPIO 4 (D2) but NRF24L01+ CE is plugged on D2 by default for the ESP gateway. SDA changed to GPIO 3 (RX)
      #define SCL 1  //default to GPIO 5 (D1). SDA changed to GPIO 1 (TX)
      
      // ----------------------------------------------------------------------------
      // BME280 libraries and variables
      // Written by Limor Fried & Kevin Townsend for Adafruit Industries.
      // https://github.com/adafruit/Adafruit_BME280_Library
      #include <Adafruit_Sensor.h>
      #include <Adafruit_BME280.h>
      
      //#undef BME280_ADDRESS         // Undef BME280_ADDRESS from the BME280 library to easily override I2C address
      //#define BME280_ADDRESS (0x76) // Low = 0x76 , High = 0x77 (default on adafruit and sparkfun BME280 modules, default for library)
      
      Adafruit_BME280 bme; // Use I2C
      
      // ----------------------------------------------------------------------------
      // Weather station variables and functions
      // ----------------------------------------------------------------------------
      // Adapt this constant: set it to the altitude above sealevel at your home location.
      const float ALTITUDE = 23; // meters above sea level. Use your smartphone GPS to get an accurate value!
      
      // Set this to true if you want to send values altough the values did not change.
      // This is only recommended when not running on batteries.
      const bool SEND_ALWAYS = true;
      
      //////////////////////////////////////////////////////////
      // You should not need to edit anything after this line //
      //////////////////////////////////////////////////////////
      
      // Constant for the world wide average pressure
      const float SEALEVEL_PRESSURE = 1013.25;
      
      // Sleep time between reads (in ms). Do not change this value as the forecast algorithm needs a sample every minute.
      const unsigned long SLEEP_TIME = 60000;
      unsigned long previousMillis = 0;
      
      const char *weatherStrings[] = { "stable", "sunny", "cloudy", "unstable", "thunderstorm", "unknown" };
      enum FORECAST
      {
        STABLE = 0,       // Stable weather
        SUNNY = 1,        // Slowly rising HP stable good weather
        CLOUDY = 2,       // Slowly falling Low Pressure System, stable rainy weather
        UNSTABLE = 3,     // Quickly rising HP, not stable weather
        THUNDERSTORM = 4, // Quickly falling LP, Thunderstorm, not stable
        UNKNOWN = 5       // Unknown, more time needed
      };
      
      const char *situationStrings[] = { "very low", "low", "normal", "high", "very high" };
      enum WEATHER_SITUATION
      {
        VERY_LOW_PRESSURE = 0,   // p > -7.5hPa
        LOW_PRESSURE = 1,        // p > -2.5hPa
        NORMAL_PRESSURE = 2,     // p < +/-2.5hPa  
        HIGH_PRESSURE = 3,       // p > +2.5hPa
        VERY_HIGH_PRESSURE = 4,  // p > +7.5hPa
      };
      
      float lastPressure = -1;
      float lastTemp = -1;
      float lastHum = -1;
      int lastForecast = -1;
      int lastSituation = NORMAL_PRESSURE;
      
      const int LAST_SAMPLES_COUNT = 5;
      float lastPressureSamples[LAST_SAMPLES_COUNT];
      
      // this CONVERSION_FACTOR is used to convert from Pa to kPa in the forecast algorithm
      // get kPa/h by dividing hPa by 10 
      #define CONVERSION_FACTOR (1.0/10.0)
      
      int minuteCount = 0;
      bool firstRound = true;
      // average value is used in forecast algorithm.
      float pressureAvg;
      // average after 2 hours is used as reference value for the next iteration.
      float pressureAvg2;
      
      float dP_dt;
      boolean metric;
      MyMessage tempMsg(TEMP_CHILD, V_TEMP);
      MyMessage humMsg(HUM_CHILD, V_HUM);
      MyMessage pressureMsg(BARO_CHILD, V_PRESSURE);
      MyMessage forecastMsg(BARO_CHILD, V_FORECAST);
      MyMessage situationMsg(BARO_CHILD, V_VAR1);
      MyMessage forecastMsg2(BARO_CHILD, V_VAR2);
      
      
      void initPressureSensor() {
        Serial.print(F("NRF24L01+ CE pin on GPIO"));
        Serial.println(MY_RF24_CE_PIN);
        #if defined(SDA) && defined(SCL)
          Serial.print(F("Using custom I2C pins: SDA on GPIO"));
          Serial.print(SDA);
          Serial.print(F(" and SCL on GPIO"));
          Serial.println(SCL);
          Wire.begin(SDA,SCL);
        #else
          Serial.println(F("Using default I2C pins: SDA on GPIO4 and SCL on GPIO5"));
          Wire.begin();
        #endif
        if (!bme.begin(BME280_ADDRESS)) {
          Serial.println(F("Could not find a valid BME280 sensor, check wiring or I2C address!"));
          while (1) {
            yield();
          }
        }
      }
      
      
      int getWeatherSituation(float pressure)
      {
        int situation = NORMAL_PRESSURE;
      
        float delta = pressure - SEALEVEL_PRESSURE;
        if (delta > 7.5)
        {
          situation = VERY_HIGH_PRESSURE;
        }
        else if (delta > 2.5)
        {
          situation = HIGH_PRESSURE;
        }
        else if (delta < -7.5)
        {
          situation = VERY_LOW_PRESSURE;
        }
        else if (delta < -2.5)
        {
          situation = LOW_PRESSURE;
        }
        else
        {
          situation = NORMAL_PRESSURE;
        }
      
        return situation;
      }
      
      
      float getLastPressureSamplesAverage()
      {
        float lastPressureSamplesAverage = 0;
        for (int i = 0; i < LAST_SAMPLES_COUNT; i++)
        {
          lastPressureSamplesAverage += lastPressureSamples[i];
        }
      
        lastPressureSamplesAverage /= LAST_SAMPLES_COUNT;
      
        // Uncomment when debugging
        Serial.print(F("### 5min-Average:"));
        Serial.print(lastPressureSamplesAverage);
        Serial.println(F(" hPa"));
      
        return lastPressureSamplesAverage;
      }
      
      
      // Algorithm found here
      // http://www.freescale.com/files/sensors/doc/app_note/AN3914.pdf
      // Pressure in hPa -->  forecast done by calculating kPa/h
      int sample(float pressure)
      {
        // Calculate the average of the last n minutes.
        int index = minuteCount % LAST_SAMPLES_COUNT;
        lastPressureSamples[index] = pressure;
      
        minuteCount++;
        if (minuteCount > 185)
        {
          minuteCount = 6;
        }
      
        if (minuteCount == 5)
        {
          pressureAvg = getLastPressureSamplesAverage();
        }
        else if (minuteCount == 35)
        {
          float lastPressureAvg = getLastPressureSamplesAverage();
          float change = (lastPressureAvg - pressureAvg) * CONVERSION_FACTOR;
          if (firstRound) // first time initial 3 hour
          {
            dP_dt = change * 2; // note this is for t = 0.5hour
          }
          else
          {
            dP_dt = change / 1.5; // divide by 1.5 as this is the difference in time from 0 value.
          }
        }
        else if (minuteCount == 65)
        {
          float lastPressureAvg = getLastPressureSamplesAverage();
          float change = (lastPressureAvg - pressureAvg) * CONVERSION_FACTOR;
          if (firstRound) //first time initial 3 hour
          {
            dP_dt = change; //note this is for t = 1 hour
          }
          else
          {
            dP_dt = change / 2; //divide by 2 as this is the difference in time from 0 value
          }
        }
        else if (minuteCount == 95)
        {
          float lastPressureAvg = getLastPressureSamplesAverage();
          float change = (lastPressureAvg - pressureAvg) * CONVERSION_FACTOR;
          if (firstRound) // first time initial 3 hour
          {
            dP_dt = change / 1.5; // note this is for t = 1.5 hour
          }
          else
          {
            dP_dt = change / 2.5; // divide by 2.5 as this is the difference in time from 0 value
          }
        }
        else if (minuteCount == 125)
        {
          float lastPressureAvg = getLastPressureSamplesAverage();
          pressureAvg2 = lastPressureAvg; // store for later use.
          float change = (lastPressureAvg - pressureAvg) * CONVERSION_FACTOR;
          if (firstRound) // first time initial 3 hour
          {
            dP_dt = change / 2; // note this is for t = 2 hour
          }
          else
          {
            dP_dt = change / 3; // divide by 3 as this is the difference in time from 0 value
          }
        }
        else if (minuteCount == 155)
        {
          float lastPressureAvg = getLastPressureSamplesAverage();
          float change = (lastPressureAvg - pressureAvg) * CONVERSION_FACTOR;
          if (firstRound) // first time initial 3 hour
          {
            dP_dt = change / 2.5; // note this is for t = 2.5 hour
          }
          else
          {
            dP_dt = change / 3.5; // divide by 3.5 as this is the difference in time from 0 value
          }
        }
        else if (minuteCount == 185)
        {
          float lastPressureAvg = getLastPressureSamplesAverage();
          float change = (lastPressureAvg - pressureAvg) * CONVERSION_FACTOR;
          if (firstRound) // first time initial 3 hour
          {
            dP_dt = change / 3; // note this is for t = 3 hour
          }
          else
          {
            dP_dt = change / 4; // divide by 4 as this is the difference in time from 0 value
          }
          pressureAvg = pressureAvg2; // Equating the pressure at 0 to the pressure at 2 hour after 3 hours have past.
          firstRound = false; // flag to let you know that this is on the past 3 hour mark. Initialized to 0 outside main loop.
        }
      
        int forecast = UNKNOWN;
        if (minuteCount < 35 && firstRound) //if time is less than 35 min on the first 3 hour interval.
        {
          forecast = UNKNOWN;
        }
        else if (dP_dt < (-0.25))
        {
          forecast = THUNDERSTORM;
        }
        else if (dP_dt > 0.25)
        {
          forecast = UNSTABLE;
        }
        else if ((dP_dt > (-0.25)) && (dP_dt < (-0.05)))
        {
          forecast = CLOUDY;
        }
        else if ((dP_dt > 0.05) && (dP_dt < 0.25))
        {
          forecast = SUNNY;
        }
        else if ((dP_dt >(-0.05)) && (dP_dt < 0.05))
        {
          forecast = STABLE;
        }
        else
        {
          forecast = UNKNOWN;
        }
      
        // Uncomment when dubugging
        Serial.print(F("Forecast at minute "));
        Serial.print(minuteCount);
        Serial.print(F(" dP/dt = "));
        Serial.print(dP_dt);
        Serial.print(F("kPa/h --> ")); 
        Serial.println(weatherStrings[forecast]);
      
        return forecast;
      }
      
      
      bool updatePressureSensor()
      {
        bool changed = false;
      
        float temperature = bme.readTemperature();
        float humidity = bme.readHumidity();
        float pressure_local = bme.readPressure() / 100.0; // Read atmospheric pressure at local altitude
        float pressure = ( pressure_local / pow((1.0 - ( ALTITUDE / 44330.0 )), 5.255)); // Local pressure adjusted to sea level pressure using user altitude
        
        if (!metric) 
        {
          // Convert to fahrenheit
          temperature = temperature * 9.0 / 5.0 + 32.0;
        }
      
        int forecast = sample(pressure);
        int situation = getWeatherSituation(pressure);
      
        if (SEND_ALWAYS || (temperature != lastTemp))
        {
          changed = true;
          lastTemp = temperature;
          Serial.print(F("Temperature = "));
          Serial.print(temperature);
          Serial.println(metric ? F(" *C") : F(" *F"));
          if (!send(tempMsg.set(lastTemp, 1)))
          {
            lastTemp = -1.0;
          }
        }
      
        if (SEND_ALWAYS || (humidity != lastHum))
        {
          lastHum = humidity;
          changed = true;
          Serial.print(F("Humidity = "));
          Serial.print(humidity);
          Serial.println(F(" %"));
          if (!send(humMsg.set(lastHum, 1)))
          {
            lastHum = -1.0;
          }
        }
      
        if (SEND_ALWAYS || (pressure != lastPressure))
        {
          changed = true;
          lastPressure = pressure;
          Serial.print(F("Sea level Pressure = "));
          Serial.print(pressure);
          Serial.println(F(" hPa"));
          if (!send(pressureMsg.set(lastPressure, 1)))
          {
            lastPressure = -1.0;
          }
        }
      
        if (SEND_ALWAYS || (forecast != lastForecast))
        {
          changed = true;
          lastForecast = forecast;
          Serial.print(F("Forecast = "));
          Serial.println(weatherStrings[forecast]);
          if (send(forecastMsg.set(weatherStrings[lastForecast])))
          {
            if (!send(forecastMsg2.set(lastForecast)))
            {
            }
          }
          else
          {
            lastForecast = -1.0;
          }
        }
      
        if (SEND_ALWAYS || (situation != lastSituation))
        {
          changed = true;
          lastSituation = situation;
          Serial.print(F("Situation = "));
          Serial.println(situationStrings[situation]);
          if (!send(situationMsg.set(lastSituation)))
          {
            lastSituation = -1.0;
          }
        }
        
        return changed;
      }
      
      
      void setup() {
        // Setup locally attached sensors
        initPressureSensor();
        metric = getConfig().isMetric;
      }
      
      
      void presentation() {
        // Present locally attached sensors
        
        // Send the sketch version information to the gateway and Controller
        sendSketchInfo("Weather Station Gateway", "1.6");
      
        // Register sensors to gw (they will be created as child devices)
        present(BARO_CHILD, S_BARO);
        present(TEMP_CHILD, S_TEMP);
        present(HUM_CHILD, S_HUM);
      }
      
      
      void loop() {
        // Send locally attached sensor data here
        updatePressureSensor();
        wait(SLEEP_TIME);   // do not use sleep() or delay(), it would prevent required TCP/IP and MySensor operations!
      }
      
      posted in Development
      emc2
      emc2
    • RE: Esp8266 with wifi off

      Make sure you include this in your sketch

      #include <ESP8266WiFi.h>
      

      Then add the following lines at the beginning of your setup()

        WiFi.disconnect();
        WiFi.mode(WIFI_OFF);
        WiFi.forceSleepBegin();
        delay(1);
      

      It should totally disable ESP WiFi functions and basically you end up with an arduino nano.

      posted in General Discussion
      emc2
      emc2
    • RE: 💬 Atmospheric Pressure Sensor

      BME280 is quite nice. I got one last year that I added to my gateway and it worked flawlessly since then.

      If you remove the gateway/esp8266 top part you should be able to directly use code from https://github.com/emc2cube/MyWeatherGatewayESP8266 (which was updated from this one anyway)

      posted in Announcements
      emc2
      emc2
    • RE: rewards for sharing

      I did.

      0_1482531193060_Capture d’écran 2016-12-23 à 14.12.37.png

      Thanks!

      posted in General Discussion
      emc2
      emc2
    • RE: Ultra low temperature (-80ºC) monitoring probes

      In case someone ends up on this topic using the search function, PCB and code for using a 4-20mA sensor is available on https://forum.mysensors.org/topic/5508/mysfreezer

      posted in Hardware
      emc2
      emc2
    • RE: Ultra low temperature (-80ºC) monitoring probes

      No I do not sell these assembled.
      I think the only option on openhardware is DIY kit, but with the included Gerber files and BOM you should be able to have it assembled at a local fab house.

      For notifications, mine is actually linked to IFTTT using a script in domoticz, but basically you can use any notification functions used in your controller.

      posted in Hardware
      emc2
      emc2
    • RE: BMP280 + I2C

      Are you using a BMP280 (temp + pressure) or as you linked a BME280 (temp + hum + pressure)?

      If you have a BME280 have a look at http://forum.mysensors.org/topic/2821/myweathergatewayesp8266-1-6-dev-branch for adding the humidity readings.

      posted in My Project
      emc2
      emc2
    • RE: Forum Banner on Screen

      For a dirty quick fix you can add the following custom filter in your adblock preferences (works on µBlock)

      forum.mysensors.org###header-menu > .visible-md-block.visible-lg-block.desktop-notification-permission

      posted in General Discussion
      emc2
      emc2
    • RE: Identifying Pro Mini 5v and 3.3v, Is this correct/safe ?

      If you have good eyes most of the time you can look at the onboard power regulator if it says 5, or 50 (5V) or 33 (3.3V)

      posted in Hardware
      emc2
      emc2
    • RE: [SOLVED] ESP8266 Gateway endless loop

      I have some problem as well with the last 2.1.0 ESP8266 board files.
      You may want to try by downgrading to 2.0.0, work in my case.

      posted in Troubleshooting
      emc2
      emc2
    • RE: rewards for sharing

      I used them (and http://pcb.ng but unfortunately they don't have a way to easily share boards) and I was quite happy with the resulting PCB.

      posted in General Discussion
      emc2
      emc2
    • RE: Ultra low temperature (-80ºC) monitoring probes

      Yes I saw some, or some sensors such as http://www.mouser.com/ds/2/619/Pt100_KN1510_ceramic_wirewound_RTD_element-270979.pdf but I have no idea how to use these guys so far (but googling into it).

      I was hoping for an obscure 1Wire or I2C sensor that someone may know about, but it will probably won't be that easy 🙂

      posted in Hardware
      emc2
      emc2
    • RE: ESP8266 and RFM69 send issue

      I had the same problem when I was troubleshooting RFM69 on my Wemos GW shield.

      It seems to me that

      #define MY_RF69_IRQ_NUM MY_RF69_IRQ_PIN
      

      Is supposed to be automatically set when

      #define ARDUINO_ARCH_ESP8266
      

      is defined.

      You would assume that when you define

      #define  MY_GATEWAY_ESP8266
      

      It would automatically add

      #define ARDUINO_ARCH_ESP8266
      

      For example here in MySensors.h but it is not, meaning that

      #define MY_RF69_IRQ_NUM MY_RF69_IRQ_PIN
      

      is never declared.

      So you can simply use

      #define ARDUINO_ARCH_ESP8266
      #define MY_RF69_IRQ_PIN D1
      

      or

      #define MY_RF69_IRQ_PIN D1
      #define MY_RF69_IRQ_NUM MY_RF69_IRQ_PIN
      

      in your sketch.

      I personally think it should be automatically done in MySensors.h (and would be happy to submit a ticket on github if needed) but maybe it was done on purpose.

      posted in Troubleshooting
      emc2
      emc2
    • RE: rewards for sharing

      @NeverDie said:

      That pcb.ng sounds very interesting if they'll actually send you a fully assembled PCB in just 12 days, which is what they appear to be offering. With many parts being so incredibly tiny (e.g. BQ25504 and others) these days, I really hate the soldering part. Did you get a fully assembled board from them, and if so, how did it go? If it truly is affordable, I'm definitely interested.

      No I got a PCB only, it was for https://www.openhardware.io/view/296/MySFreezer (you can see the PCB color, it's a nice burgundy / cardinal red which actually was the perfect fit for my workplace freezers), not a lot of component on it and depending the use actually not a lot are needed in the same time, and definitively not designed to be automatically assembled for the battery configuration.

      One interesting thing on pcb.ng is the fact if you submit a solder paste layer they will actually add the paste, so you can reflow it yourself with a pan in your kitchen (dirty but works).

      Assembled price is $8 / $12 per sq. in. (single / double sided assembly) + components I guess. With tiny components and a dense layout it could totally be worth it.

      @hek Jonathan (https://blog.pcb.ng/author/jonathan-hirschman/) is quite nice and responsive, you can always shoot him an email to see if he is interested.

      posted in General Discussion
      emc2
      emc2
    • RE: MySensors + NRF24L01 + RasPi2?

      @ikkeT said:

      It's a bit shame that in many of the pinout descriptions it's not mentioned clearly which version of raspi pinout it is.

      Unless you have one the few revision 1 of the Pi B (256MB model) all Pi have the same pinout for their GPIO. Even if you have a 256MB rev1 Pi B, for MySensors wiring this is actually the same. Maybe one of your wire was simply plugged incorrectly the first time?

      GPIO Pin out

      posted in Hardware
      emc2
      emc2
    • RE: 💬 MySRaspiGW - MySensors Raspberry Pi GPIO Gateway

      @GertSanders @alexsh1
      PA+LNA Radios and PCB received and everything was assembled.
      So far everything seems to work on my old Raspberry Pi A. Pi GPIO is not fried (yet), both Rx and Tx is working without any reset or reboot so far.

      posted in OpenHardware.io
      emc2
      emc2
    • RE: rewards for sharing

      My order was placed on November 3rd and it was shipped on the 16th (9 business days, 13 "real" days).

      Don't forget they give you an average and it's probably in business days, as you ordered just before christmas it's been probably only ~2-3 business days so far.

      posted in General Discussion
      emc2
      emc2
    • RE: IR Blaster (progress)

      @blacey @scalz
      I'm thinking of starting to do an IR blaster on my own, any chance to get a glimpse of what you are cooking on your side to either wait / see what kind of function you plan?

      On my side I'm thinking of:

      • Eventually esp8266 based (probably using a WeMos mini Pro) to allow a wide range of usage even out of MySensors.
      • Micro usb powered (using the WeMos' port)
      • SMD nrf24L01, eventually RFM too if it fits on the PCB.
      • optional ATSHA.
      • IR leds on the side (roundish PCB?)
      • Optional IR receiver
      posted in Hardware
      emc2
      emc2
    • RE: MySensors Raspberry port suggestions

      @alexsh1 said:

      For whatever reason Domoticz did not see ttyMySensorsGateway so I had to create ttyUSB20

      Domoticz seems to only look for ttyUSB* interfaces. One easy trick is to run ./configure with this option so you don't have to worry with symlinking

      ./configure --my-serial-pty=/dev/ttyUSBMySensorsGateway
      

      BTW @marceloaqno , what does the option --my-serial-is-pty exactly do?
      So far I've been running the gateway in ethernet mode for a little while and it's working flawlessly, thanks a lot for this port.

      posted in Development
      emc2
      emc2
    • RE: 💬 MySRaspiGW PA+LNA - MySensors Raspberry Pi GPIO Gateway

      Been working flawlessly for almost a week now. Range untested.
      Still, be careful as it's not supposed to be. Power usage of the module should have caused some resets, or worse frying the Pi GPIO.
      Overall SMD modules tested (standard and PA+LNA) seems of better quality than non-SMD nRF24L01, almost no failed transmissions.

      posted in OpenHardware.io
      emc2
      emc2
    • RE: IR Blaster (progress)

      @scalz said:

      @emc2 hehe. i don't think this is overkill 😉 depends on what features. well let's see how it will work. mine is already designed but i won't have lot of time before beginning of the year now 😁

      Agreed, depends on the features, in my case I did not really think of any additional features, just IR stuff. PCB was designed yesterday, I will play with a protoboard to check if everything works and then will see how to improve everything before ordering.

      posted in Hardware
      emc2
      emc2
    • RE: MySensors Raspberry port suggestions

      Good to know then, thanks!

      posted in Development
      emc2
      emc2
    • RE: 💬 MySRaspiGW PA+LNA - MySensors Raspberry Pi GPIO Gateway

      @EddyG PCB received and tested, new version (v1.1) available here and on github.

      posted in OpenHardware.io
      emc2
      emc2
    • RE: BME280 temp/humidity/pressure sensor

      Was modified in 2.1.1, you need to change

      metric = getConfig().isMetric;
      

      to

      metric = getControllerConfig().isMetric;  // was getConfig().isMetric; before MySensors v2.1.1
      
      posted in Hardware
      emc2
      emc2
    • RE: MySensors Raspberry port suggestions

      @marceloaqno Thanks for the heads up.
      I'm totally happy with the ethernet version, but as it seems @hek is in the process of writing guides on https://www.mysensors.org/build/raspberry I did a few tests.

      If I understood correctly (and it seems to work), to "replace" the 1.x serial gateway with the new one running the following command should work as is (/dev/ttyUSBMySensorsGateway can be renamed to /dev/ttyMySensorsGateway to be exactly as in 1.x or /dev/ttyUSB20 to bypass the symlink step)

      ./configure --my-gateway=serial --my-serial-is-pty --my-serial-pty=/dev/ttyUSBMySensorsGateway --my-rf24-pa-level=RF24_PA_LOW
      

      --my-rf24-pa-level=RF24_PA_LOW can be omitted, especially if not using a PA+LNA module, but it seems 2.0 is really more power hungry than 1.4.

      @marceloaqno said:

      Those are cool adapters, I need to build one for me.

      If you are interested by the SMD ones, PM me your address and I will happily send you something!

      posted in Development
      emc2
      emc2
    • RE: 💬 MySWeMosGWShield - WeMos Mini MySensors Gateway Shield

      It should indeed "beep" between all the pins.

      NRF modules are also very fragile, once incorrectly plugged they are usually definitively toasted. So even if you desoldered and then resoldered them correctly it is unlikely they will work correctly.

      Yes you need the capacitor radio side, it's the only required component, everything else is optional. It don't have to be 4.7µF, anything between 4.7 and 47µF will do, as stated in the assembly instructions.

      posted in OpenHardware.io
      emc2
      emc2
    • RE: How to scan rf remote

      Install the library "rc-switch" by sul-77 in Arduino (it can be installed with the library manager)

      Upload one of the ReceiveDemo sketch to your Arduino (and wire a 433MHz receiver accordingly) and it will show you the RF codes, that you can then emulate by plugging a 433MHz Tx (see SendDemo sketch for code example)

      posted in Development
      emc2
      emc2
    • RE: 💬 MySWeMosIRShield - IR blaster shield for WeMos D1

      Arduino sketch is really basic and even if it works perfectly for me, there is probably a way to improve it greatly.

      On top of my head it would be good to

      • be able to record, save and reuse an IR code without editing the code. Plenty of EEPROM space to store data.
      • have a webpage showing the serial console to see received IR codes, or other info.
      • have a dynamic webpage automatically displaying all codes stored in such EEPROM.
      • have more than 10 codes that can be used with domoticz.

      But I do not know how to do this (even if it's possible).
      If you are interested in improving this code shoot me a private message, or answer here. I have a few extra PCBs from a previous version that I will gladly send for free to anyone willing to improve this device software.

      posted in OpenHardware.io
      emc2
      emc2
    • RE: 💬 MySWeMosIRShield - IR blaster shield for WeMos D1

      @Nca78 Not sure either to be honest, but technically I only did the calculation for a specific type of LED, the ones in the BOM.

      I do use TSAL LEDs, and used http://ledcalc.com/#calc to do the resistor calculation for 7 LEDs with numbers extracted from the datasheet, leading to the ~5ohm resistor calculation.
      I tried without any, or with a 4.7ohm resistor and I had significant better range results without resistor. Not a surprise, looking at the IR signal with a smartphone camera you can definitively see a brightness difference too, that's really a blaster 🙂

      No burned LED after 48h of testing (sending one of my IR code every 5s). I also tried, for 10min, with regular red LED (http://www.nteinc.com/specs/3000to3099/pdf/nte3019.pdf) which have lower Vf and If requirements, no problems either.

      I don't say that this is right, I truly don't have the background to do more than empirical experimentations, but it seemed good enough for me at the time. I did not had any problems since then, both with real TSAL from mouser and probably fake ones from aliexpress.

      posted in OpenHardware.io
      emc2
      emc2
    • RE: 💬 HALO : ESP32 multi transport GW/Bridge for Mysensors

      @scalz said in 💬 HALO : ESP32 multi transport GW/Bridge for Mysensors:

      So far (but not digged a lot) i've only seen PA smd modules with ipex (but would be better if i could fit sma) or chip antenna (lol). Are you thinking to an other reference, or have a favorite module??

      This work quite well with the IPX PA+LNA SMD modules

      posted in OpenHardware.io
      emc2
      emc2
    • RE: 💬 MySWeMosIRShield - IR blaster shield for WeMos D1

      Short and not perfect answer, they changed everything when they updated the library to >2.0.

      For a quick way to test your board etc, you can compile the example sketch by reverting to version 1.2.0
      0_1503463968139_irremote.png

      Ideally you may want to upgrade your sketch to be compatible with version 2.0 according to this https://github.com/markszabo/IRremoteESP8266/wiki/Upgrading-to-v2.0

      I wanted to do it, but completely forgot about it... Will try to have a look at it tonight, but hopefully you can start testing everything using the old library version.

      May also ask what minor modifications you did? Always open to suggestions to improve the board.

      posted in OpenHardware.io
      emc2
      emc2
    • RE: 💬 MySWeMosIRShield - IR blaster shield for WeMos D1

      Actually was not too bad to update.

      I pushed the updated example sketch to github and openhardware, compatible with IRremoteESP8266 v2.0 and up.
      I did a quick test here, no errors, and the vacuum cleaner already escaped to the bedroom, so good to go!

      As for the board, feel free to share any sketch here or on github.

      posted in OpenHardware.io
      emc2
      emc2