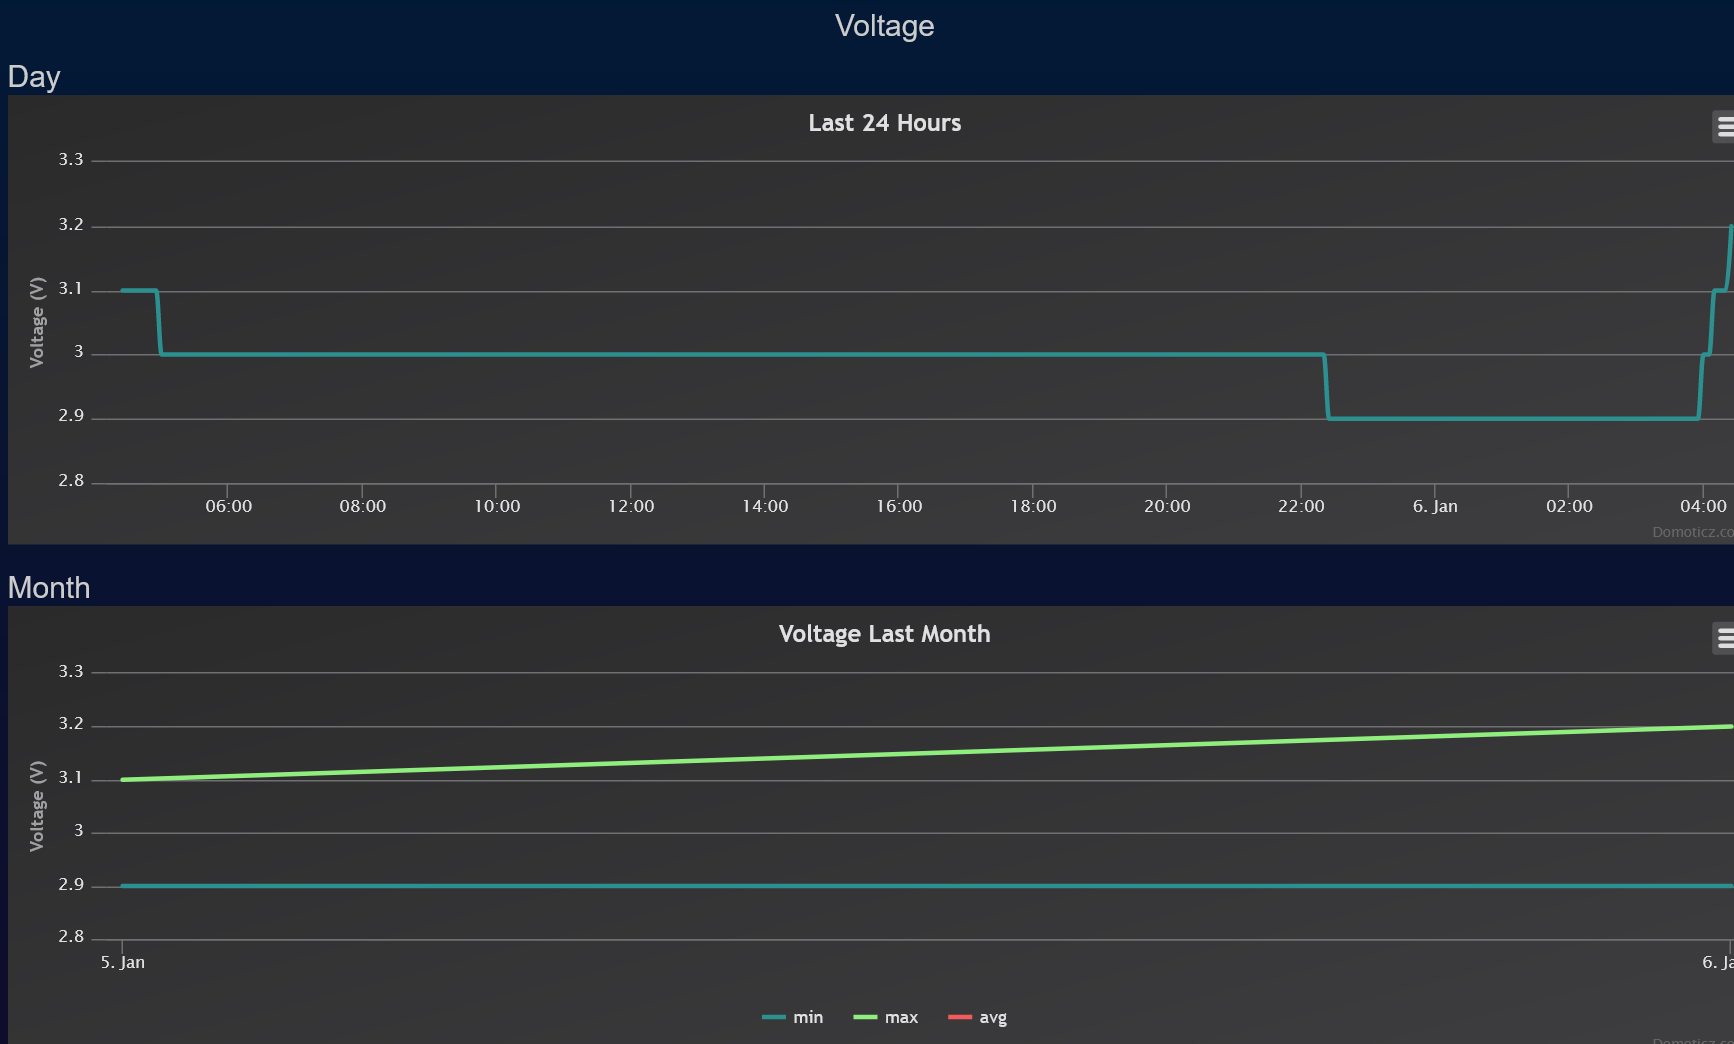
Skip to content

Hardware

Talk about fun sensor hardware, MCUs, PCBs and how to power your sensors here.
1.8k Topics 18.3k Posts
  • 0 Votes
    37 Posts
    9k Views
    gohanG
    @parachutesj that sound a reasonable approach
  • Temperature sensor sketch only sending battery info to mqtt

    sketch
    4
    0 Votes
    4 Posts
    903 Views
    rejoe2R
    You seem to send the temp messages under a different ChildID than it is presented: presentation takes "1", send uses "0". You have to allign that, e.g. by using send(msg.setSensor(i+CHILD_ID_TEMP).set(temperature,1)); But as long as there's just one DS18B20 doing that dynamically doesn't really make sense. Using the defined message structure (MyMessage msgTemp...) could make things more transparent. Also there's no sending command for voltage. So why do you expect the controller to receive also voltage?
  • Arduino MKR1000

    1
    0 Votes
    1 Posts
    526 Views
    No one has replied
  • Who needs parts to build a Sensebender Micro (or can solder for me)

    7
    0 Votes
    7 Posts
    1k Views
    marceltrapmanM
    @elcaron can you let me know how that stencil is after receiving it?
  • Hot air rework station

    15
    0 Votes
    15 Posts
    2k Views
    alexsh1A
    @dbemowsk Yes, it is hard to beat Weller, I agree. Please post your feedback.
  • Water meter: Itron Aquadis+ with pulse sensor

    46
    0 Votes
    46 Posts
    29k Views
    bisschopsrB
    @samuel-wieczorek Hi Samuel. I positioned the sensor over the 1 liter wheel. I did not used the TCRT5000 module, but made a custom built PCB. Howver the principle is the same (in fact the schematics is 100% the same as the TCRT module. If you go to https://www.openhardware.io/view/15/Itron-Aquadis-watermeter-sensor-V10 you can see pictures of the module. Some tips I can share with you: Shield the sensor and the rotating disk area from incoming light. This influences the sensor. Use a piece of plastic tube for example. In NL we have electrical wire tubes that can be used (the grey ones) Bring the sensor close to the disk. The reflection should do the rest. Setting up the TCRT is tricky as you have little room to manouver (considering reflection and the point where the schmit trigger swaps state) Be aware that when the disk stops with the edge near the sensor you get false readings. That is why I swapped to a software driven solution using SW hysteresis on the arduino. Hope this helps. If you can open it, I can share a DXF file with the sizes of the bottom plate I use. Let me know! Ralph
  • Please help! Arduino UNO + RFM69HW (TSM:INIT:TSP FAIL)

    23
    0 Votes
    23 Posts
    3k Views
    vladimirV
    @gohan Thanks for clarifying!
  • A power "platform" for Arduino Pro Mini's?

    3
    3
    4 Votes
    3 Posts
    1k Views
    NeverDieN
    I came up with some variations on the above ideas: [image: 1522716559096-power_platforms-resized.jpg] The three on the left are very close to the size of just 2x AAA batteries. One of the two on the right uses a JST-XH connector. The next iteration of the LoRa shield PCB will have that JST connector plugging in from the side so that it doesn't interfere with the FTDI connector as much. I think that for connecting to custom made PCB's, the JST connector doesn't actually make much sense, but it would make sense if plugging into a COT power pack.
  • Apparently incomplete RFM69HW modules received

    6
    2
    0 Votes
    6 Posts
    1k Views
    E
    @gohan Can't, as I said I don't know from which of multiple shipments it came. Only noticed when I used it.
  • arduino wifi gateway/nrf24 and esp-01

    4
    0 Votes
    4 Posts
    1k Views
    rustafariiR
    Whaaaaat that is awesome!!!!! i cant wait to give it a go! Thanks!
  • atmega328-au ordered instead of atmega328p-au

    2
    0 Votes
    2 Posts
    600 Views
    alexsh1A
    Lookes like the difference is no BODs settings and a bit higher consumption. However, I did not notice much difference on the breadboard. PS I'll have to order the proper ones.
  • Double channel lora Gateway (UP/DOWN)

    6
    0 Votes
    6 Posts
    2k Views
    alexsh1A
    @xander Yes, you are right - sorry about that. This is what happens when reading from the phone. :relaxed:
  • New 2.2.0 Signal report function

    14
    1 Votes
    14 Posts
    5k Views
    jumpingJ
    thanks, next time I will use the github search function :-) :+1:
  • Sound Level Sensor?

    1
    0 Votes
    1 Posts
    535 Views
    No one has replied
  • does someone use pcbs.io ?

    6
    0 Votes
    6 Posts
    1k Views
    F
    Hi, I have used Pcbs.io three times, first and second was good shipping time, both was 3 weeks from order to arrival. but now the third time I ordered 27/1 2018 and today 19/3 2018 I have still not received it. I got an email that my Pcbs were on the way at the 7/3 2018 but USPS have still not get them from Pcbs.io. So do not use Pcbs.io
  • Nrf24l01 with router antenna

    11
    0 Votes
    11 Posts
    3k Views
    zboblamontZ
    @gohan said in Nrf24l01 with router antenna: You can make a directional antenna to go farther in a specific direction with less power..... Transmission power input can indeed be reduced with any higher gain antenna, even going from a coiled 1/4 to a Dipole can reduce power input to advantage. However, directional and omni-directional arrangements need not be mutually exclusive. In the majority of cases omni-directional antennae are simple to make and quite adequate for most case uses, particularly for sub GHz. In the vast majority of arrangements, the gateway will be physically central to the nodes so has to be omni-directional. It is at the radial nodes where a directional antenna can provide benefits of larger signal or reduced power input, as it only has one direction to aim at, the Gateway. A directional antenna is in simplistic terms an omni-directional antenna with reflectors and directors, but it is the reflector which is crucial. Mounting an omni-directional with a metal reflective surface behind it will squeeze the radiation and receive lobe in the opposite direction, be it the metal siding on a shed, a biscuit tin lid, or a simple trough reflector. Easy enough to make without resorting to higher battery consumption... link text
  • NRF24L01 radio not connecting

    14
    0 Votes
    14 Posts
    2k Views
    K
    @bgunnarb Thanks, I did update the gateway also.
  • Breaduino (Atmega328p) as Mysensors Node (NRF24L01+) - will it work?

    3
    0 Votes
    3 Posts
    819 Views
    Petr NosekP
    Thanks Kimot. I did use 3,3V voltage as the radio NRF24L01+ is supposed to run on 3,3V only. I did not realise that it affect the crystal frequency. When I now tested with 5V it works perfectly! I will purchase an 8Mhz crystal instead and try it all on 3,3V with a step up booster 1,5 -3,3 to 3,3 V with AA batteries. Regarding the "broken" pro mini - I must have broken something else too, as after removing the connection in front of the sms led it unfortunately stopped responding to communicate. So I must have destroyed more than just the LED. Anyway, I am happy I was able to built my own "arduino node" with only the chip, crystal and few capacitors and resistors. It is great to see it working! Thanks for your help.
  • Low power Distance Sensor - Hardware issues

    37
    0 Votes
    37 Posts
    15k Views
    zboblamontZ
    @qqlapraline The 5v and 3v3 pro-minis can both be modified to very similar low power consumption, Google low power pro-mini for a multitude of sites over several years detailing comparatives and examples. I had reason to dig into this as explained below: With combined radio and RTC on a 3v3 pro-mini I was faced with a lack of available pins from the combination to deal with the 5v ultrasonics as well as providing voltage step-up. I tried a plethora of potential solutions before realising it was a losing battle with a single device and so many demands. Adding a low power 5v pro-mini to the node to deal with the US and communicating via I2C to the 3v3 pro-mini ended up the most efficient solution for my case. It may seem counter intuitive to waste energy on two devices and two power sources, but not so, both sleep saving energy. In my own case I was going to end up with two devices and two power supplies anyway, but just two separate radio nodes, so there was no energy penalty. The 5v pro-mini has one interrupt triggered by the 3v3's RTC for US readings, the second interrupt is to be enabled by the adjacent Gas Meter reed sensor, releasing the original dedicated node for other duties. It is not completed and deployed yet as it is still sub-zero here and the ground is rock solid where the sensor head has to run.
  • Bluetooth mesh network

    1
    0 Votes
    1 Posts
    1k Views
    No one has replied

22

Online

11.7k

Users

11.2k

Topics

113.1k

Posts